Manual - Lenco
Manual - Lenco
Manual - Lenco

Create successful ePaper yourself
Turn your PDF publications into a flip-book with our unique Google optimized e-Paper software.
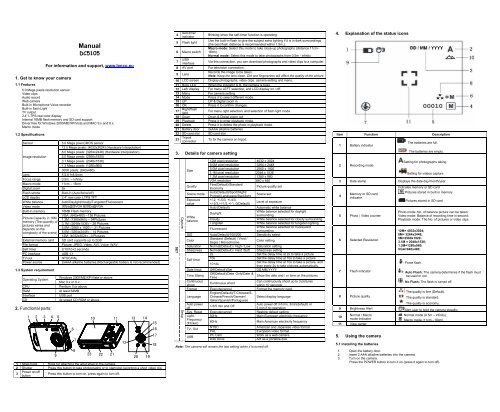
1. Get to know your camera<br />
1.1 Features<br />
<strong>Manual</strong><br />
DC5105<br />
For information and support, www.lenco.eu<br />
5.0 Mega pixels resolution sensor<br />
Video clips<br />
Audio record<br />
Web camera<br />
Built-in Microphone Voice recorder<br />
Built-in flash Light<br />
TV output<br />
2.4” LTPS real color display<br />
Internal 16MB flash memory and SD card support<br />
Driver free for Windows 2000/ME/XP/Vista and MAC 9.x and X.x<br />
Macro mode<br />
1.2 Specifications<br />
Sensor 5.0 Mega pixel CMOS sensor<br />
12.0 Mega pixels: (4032x3024) (Hardware Interpolation)<br />
8.0 Mega pixels: (3264x2448) (Hardware Interpolation)<br />
Image resolution 5.0 Mega pixels: (2560x1920)<br />
3.1 Mega pixels: (2048x1536)<br />
1.3 Mega pixels: (1280x960)<br />
300K pixels: (640x480)<br />
Lens F/2.8 f=8.5mm<br />
Focus range 0.5m. ~ Infinity<br />
Macro mode 11cm – 18cm<br />
Digital zoom 8x<br />
Flash strobe Built-in (Auto/force/off)<br />
LCD display 2.4” real color LTPS TFT<br />
White balance Auto/Daylight/cloudy/Tungsten/Fluorescent<br />
Video mode 30fps@QVGA &20fps@VGA<br />
Built-in memory 16MB Flash memory<br />
Picture Capacity in 16M<br />
memory (The quantity of<br />
pictures varies and<br />
depends on the<br />
complexity of the scene)<br />
VGA: (640x480) --138 Pictures<br />
1.3M: (1280x960) -- 54Pictures<br />
3.1M: (2048x1536) -- 28 Pictures<br />
5.0M: (2560 x 1920) -- 21 Pictures<br />
8.0M: (3264x2448) -- 14 Pictures<br />
12M: (4032x3024) --3 Pictures<br />
External memory card SD card supports up to 2GB<br />
File format Picture: JPEG, Video: AVI, Voice: WAV<br />
Self timer 2/10/10+2 seconds<br />
PC interface USB 1.1<br />
TV-out NTSC/PAL<br />
Power source 2xAAA alkaline batteries.(Rechargeable battery is not recommended)<br />
1.3 System requirement<br />
Operating System<br />
Windows 2000/ME/XP/Vista or above<br />
Mac 9.x or X.x<br />
CPU Pentium II or above<br />
RAM At least 64MB<br />
Interface USB port<br />
CD 4x speed CD ROM or above<br />
2. Functional parts:<br />
1 2 3 4<br />
9<br />
5<br />
6<br />
7<br />
8<br />
10<br />
23 22 21<br />
11<br />
12<br />
13 14<br />
20<br />
19<br />
15<br />
16<br />
17<br />
1 Strap hook Hook for attaching the wrist strap to the camera.<br />
2 Shutter Press this button to take photographs or to start/stop recording a short video clip.<br />
3<br />
Power on/off<br />
button<br />
Press this button to turn on, press again to turn off.<br />
18<br />
4 Self-timer<br />
indicator<br />
Blinking when the self-timer function is operating.<br />
5 Flash light<br />
Use the built-in flash to give the subject extra lighting if it is in dark surroundings<br />
(the best flash distance is recommended within 1.5m.).<br />
Macro mode: Select this mode to take close-up photographs (distance 11cm -<br />
6 Macro switch 18cm).<br />
Normal mode: Select this mode to take photographs from 0.5m - infinity<br />
7 USB<br />
interface<br />
Via this connection, you can download photographs and video clips to a computer.<br />
8 AV port For television connection.<br />
9 Lens<br />
Records the image to be taken.<br />
Note: Keep the lens clean. Dirt and fingerprints will affect the quality of the picture.<br />
10 LCD screen Display photographs, video clips, camera setting and menu.<br />
11 Busy LED When the indicator is lit, the camera is busy.<br />
12 Left/ display For menu LEFT selection, and LCD display on / off.<br />
13 Menu For camera setting.<br />
14 Mode Press it to select different mode.<br />
15 UP UP & Digital zoom in<br />
16 OK Press it to confirm changes.<br />
17 Right/flash<br />
light<br />
For menu right selection, and selection of flash light mode.<br />
18 Down Down & Digital zoom out<br />
19 Playback Press it to enter playback mode.<br />
20 Delete Press it to delete the photo in playback mode.<br />
21 Battery door 2xAAA alkaline batteries<br />
22 SD card slot SD card slot.<br />
23 Tripod<br />
connector<br />
To fix the camera on tripod.<br />
3. Details for camera setting<br />
SET<br />
Capture<br />
Setup<br />
Size<br />
Quality<br />
Scene mode<br />
Exposure<br />
value<br />
White<br />
balance<br />
12M pixel resolution 4032 x 3024<br />
8.0M pixel resolution 3264 x 2448<br />
5.0M pixel resolution 2560 x 1920<br />
3.1M pixel resolution 2048 x 1536<br />
1.3M pixel resolution 1280 x 960<br />
VGA resolution 640 x 480<br />
Fine(Default)/Standard/<br />
Economy<br />
Picture quality set<br />
Auto(Default)/Sport/Night/<br />
Portrait/Landscape/Backlight<br />
Scene set<br />
+/-2, +/-5/3, +/-4/3,<br />
+/-2/3,+/-1/3 +/-1, 0(Default)<br />
Level of exposure<br />
Auto (Default) Automatic white balance<br />
Daylight<br />
White balance selected for daylight<br />
surrounding<br />
Cloudy White balance selected for cloudy surrounding<br />
Tungsten White balance selected for tungsten lighting<br />
Fluorescent<br />
White balance selected for fluorescent<br />
surrounding<br />
ISO Auto(Default)/100/200 Sensitivity select<br />
Color<br />
Standard (Default) / Vivid /<br />
Sepia / Monochrome<br />
Color setting<br />
Saturation Normal(Default) / High / Low Saturation setting<br />
Sharpness Normal(Default) / Hard /Soft Sharpness setting<br />
2s Set the delay time at 2s to take a picture<br />
Self timer<br />
10s<br />
10+2s<br />
Set the delay time at 10s to take a picture<br />
Set the delay time at 10s to take a picture, and<br />
then every 2s to take pictures automatically.<br />
Date Input Off(Default)/Set DD,MM,YYYY<br />
Time Stamp<br />
Off(Default)/Date Only/Date &<br />
Show the date and / or time on the pictures<br />
Time<br />
Continuous<br />
shoot<br />
Continuous shoot<br />
Can continuously shoot up to 3 pictures<br />
within 10 seconds.<br />
Format Execute/cancel<br />
English(Default)/T-Chinese/S-<br />
Format the memory card.<br />
Language Chinese/French/German/<br />
Italian/Spanish/Portuguese<br />
Select display language<br />
Auto power<br />
off<br />
1/3/5 min and Off<br />
Auto power off in1min, 3min(default) or<br />
5 min if no operation<br />
Sys. Reset Execute/cancel Restore default setting<br />
Light- 50Hz Main European electricity frequency<br />
Frequency<br />
(Flicker)<br />
60Hz Main American electricity frequency<br />
TV- Out<br />
NTSC<br />
PAL<br />
American and Japanese video format<br />
European video format.<br />
USB<br />
PC Cam<br />
Disk Drive<br />
Work as a web camera.<br />
Act as a portable disk.<br />
Note: The camera will remain the last setting when it is turned off.<br />
4. Explanation of the status icons<br />
Item Function Description<br />
1 Battery indicator<br />
2 Recording mode<br />
The batteries are full.<br />
The batteries are empty.<br />
Setting for photographs taking<br />
Setting for videos capture<br />
3 Date stamp Displays the date day/month/year<br />
4<br />
Memory or SD card<br />
indicator<br />
5 Photo / Video counter<br />
6 Selected Resolution<br />
7 Flash indicator<br />
8 Picture quality<br />
9 Brightness Alert<br />
10<br />
Normal / Macro<br />
mode indicator<br />
11 View center<br />
5. Using the camera<br />
5.1 Installing the batteries<br />
Indicates memory or SD card<br />
:Pictures stored in built-in memory<br />
:Pictures stored in SD card<br />
Photo mode :No. of balance picture can be taken;<br />
Video mode: Balance of recording time in second;<br />
Playback mode: The No. of pictures or video clips<br />
12M= 4032x3024;<br />
8M= 3264x2448;<br />
5M=2560x1920;<br />
3.1M = 2048x1536;<br />
1.3M=1280x960;<br />
VGA=640x480;<br />
: Force flash.<br />
: Auto Flash: The camera determines if the flash must<br />
be used or not.<br />
: No Flash: The flash is turned off.<br />
The quality is fine (Default).<br />
The quality is standard.<br />
The quality is economy.<br />
Alert user to hold the camera steadily.<br />
Normal mode (0.5m – infinity)<br />
Macro mode (11cm –18cm)<br />
1. Open the battery door.<br />
2. Insert 2 AAA alkaline batteries into the camera.<br />
3. Turn on the camera.<br />
Press the POWER button to turn it on (press it again to turn off).
5.2 Inserting a memory card (not included)<br />
This camera has built-in internal memory. This memory can be extended with a SD memory card (not<br />
included).<br />
Follow the instructions given below to insert the optional SD memory card into the camera.<br />
1. Turn off the camera first.<br />
2. Insert the SD card into the camera.<br />
Note: There is only one right direction to insert the SD memory card into the slot. Do not force the card<br />
into the slot, or else it may damage both the camera and the SD memory card.<br />
Note: The SD memory card must be formatted before taking photographs. See the following sections for<br />
more information.<br />
5.3 Formatting the memory or SD card<br />
1. Press Menu button<br />
2. Select Setup setting by right key.<br />
3. Press OK to confirm and select by up or down key.<br />
4. Press OK to format the card or memory.<br />
5.4 Setting the resolution<br />
The camera can be set to different resolutions.<br />
1. Press MENU to set proper resolution.<br />
Resolution: VGA(640X480),1.3M(1280x960) 3.1M (2048X1536),<br />
5M (2560 x 1920), 8M (3264x2448), 12M (4032x3024)<br />
2. Six different resolutions will be displayed. Select the desired resolution by using the ▲ or<br />
▼buttons and then press the OK button to confirm the selection.<br />
5.5 Taking photographs<br />
1. Turn on the camera by pressing the ON/OFF button.<br />
2. Press MODE to set the camera to photo mode ( ).<br />
3. Depending on the distance to the object being photographed, use Macro switch to adjust<br />
the distance. Select the flower symbol ( ) if you wish to take a close-up photograph (11cm<br />
–18cm).<br />
If you wish to take photograph of surroundings or people (0.5m - infinity), set the Macro switch to<br />
Normal mode ( ).<br />
4. If you are not sure if there is enough lighting, turn the automatic flash ( ) on by pressing the flash<br />
button. (If the battery power is too low, the flash won’t be activated).<br />
5. Use the LCD screen to aim the object you wish to photograph.<br />
6. Press Shutter button and hold the camera steadily for 2 to 3 sec, until the LCD display turn on again.<br />
Caution: 1) Taking picture for fast-moving object is not recommended.<br />
2) Image may be distorted when taking picture in a moving vehicle.<br />
5.6 Zoom in and out<br />
The camera can zoom in up to 8 times.<br />
1. Zoom in by pressing the ▲ or▼ button, a number will appear on the display. 8.0 is the maximum<br />
zoom.<br />
2. You can zoom in by pressing the UP or DOWN button.<br />
5.7 Taking photographs using self-timer function<br />
You can use the self-timer function when you wish to take a photograph for yourself or when you wish to<br />
photograph for an object where the camera must be as still as possible, for example on the stand.<br />
1. Set the camera to photo mode.<br />
2. Press the MENU button. The quick menu will appear.<br />
3. Press ▼ to self-timer mode, press OK and ▲or ▼ to set the delay time: 2seconds / 10 seconds /<br />
10+2seconds or off.<br />
4. Press the OK button to confirm. The self-timer function is now ready for use.<br />
5. Aim at the object you wish to photograph.<br />
6. Press the SHUTTER button to take a photograph.<br />
7. The self-timer indicator LED in the front will blink.<br />
8. The photograph will be taken after the timer reaches the delay time that you pre-set, and the<br />
camera will beep once.<br />
5.8 Recording video clips<br />
1. Press the MODE button to select the video clip mode.<br />
2. Press the SHUTTER button to start recording video, press the SHUTTER button again to stop<br />
recording. The video clip will now be saved as an AVI file in the camera memory.<br />
3. Press MENU to set proper resolution, EV and WB, and press OK to confirm.<br />
5.9 Playback photographs<br />
1. Press PLAYBACK button, press or to select the video clip or photo.<br />
2. Press ▲, it will go to 2x zoom, press ▲ again to 3x zoom…… up to 8x.<br />
3. Press “OK” and then Press ▲, ▼, or to shift the image.<br />
4. Press MENU to select SLIDE SHOW, and then press OK to confirm. The pictures saved in your<br />
camera or your SD card will be displayed in sequence automatically.<br />
5.10 Playback video clips<br />
1. When video clips are displayed, press OK to play, and press DOWN key to stop.<br />
2. Press OK to pause the playback<br />
3. Press Playback key to exit.<br />
5.11 Recording voice<br />
1. Press MODE button to select the voice recording mode,<br />
2. Press SHUTTER to start voice recording and press it again to stop.<br />
5.12 Delete photographs and video clips<br />
You can choose to delete a single photograph / video clip, or delete all the photographs / video clips in the<br />
memory.<br />
5.12.1 Delete photograph<br />
Follow the instructions given below to delete photograph.<br />
1. Press PLAYBACK to enter the playback mode.<br />
2. Press the MENU button and select Delete One/Delete All, press OK to confirm.<br />
3. If you select Protect picture, your current file or images can not be deleted.<br />
4. Press MENU to exit.<br />
NOTE: Select ‘Deleting All’ and Press OK to confirm, all the pictures will be deleted.<br />
5.12.2 Shortcut to delete one picture<br />
1. Press PLAYBACK to enter Playback mode.<br />
2. Select the photo (video) you want to delete, press DELETE button.<br />
3. Press OK to confirm.<br />
6. Installing the camera driver<br />
The driver in the CD has to be installed, under following applications:<br />
For windows ME, Windows 2000, Windows XP and Windows Vista: Using as a PC cam only. (Download<br />
picture /video is driver free)<br />
6.1 Uninstalling old drivers and devices<br />
There is a chance for a conflict between the new driver and an existing driver in the computer. In that case,<br />
it is better to remove those drivers before installing the new driver.<br />
1. Enter Windows ‘Safe Mode’ (press F8 when starting Windows and then select ‘Safe Mode’ from<br />
the menu which will be displayed).<br />
2. Click on ‘Start – Settings – Control Panel’ and double-click on ‘Add/Remove Programs’ icon.<br />
3. Find all the programs for similar, old devices and remove these by clicking on the ‘Add/Remove’<br />
button. When in ‘Safe Mode’, it is possible for some programs to appear twice. In<br />
that case, remove all the programs which appear twice.<br />
4. Restart the computer.<br />
6.2 Installing the driver for Windows ME / Windows 2000 / Windows XP / Windows Vista<br />
Note: Make sure all other programs are closed during the installation process.<br />
Note: During installation for Windows XP/Vista, you may receive a message saying that the driver has not<br />
been signed. This does not cause a problem for the functionality of the program. Please click "Yes"<br />
to continue.<br />
Note: For example, ‘D: \’ is used to indicate the CD-ROM drive. This may be different for your computer.<br />
1. Insert the CD-ROM into your computer’s CD-ROM drive. The installation program will start<br />
automatically. If it does not start automatically, please do the following:<br />
a) Select 'Run' from Windows Start menu.<br />
b) Type [D:\SETUP.EXE] and click on 'OK' to start the Software Installer.<br />
2. The Software Installer will appear.<br />
3. Select the language you wish to use for the installation.<br />
4. Click on ‘Install driver‘to start the installation of the camera driver.<br />
5. Follow the on-screen instructions.<br />
6.3 Connecting the camera<br />
The camera can be connected to the computer in two different modes: Mass Storage Device, or as a PC<br />
camera for video conferencing on the Internet.<br />
6.3.1 Connecting as a mass storage device<br />
1. Turn the camera on by pressing the ON/OFF button.<br />
2. Press MENU button and press RIGHT key to select the Setup setting.<br />
3. Press ▼button to set USB connection.<br />
4. Press ▲or ▼button to choose the Disk Drive mode.<br />
5. Press OK to confirm.<br />
6. Connect the camera to the computer.<br />
7. Windows will automatically detect the camera. You can use this camera as a removable disk.<br />
6.3.2 Connecting as a PC camera<br />
When you connect the camera as a PC camera, you can use the camera as a web cam for video<br />
conferencing on the Internet by using Windows NetMeeting or Windows Messenger.<br />
(You must install the driver before connecting the Digital Camera to your computer.)<br />
1. Turn the camera on by pressing the ON/OFF button.<br />
2. Press MENU button and press RIGHT key to select the Setup setting.<br />
3. Press▼ button to chook USB connection.<br />
4. Press ▲or ▼ button to choose the PC camera mode.<br />
5. Press OK to confirm.<br />
6. Connect the camera to the computer.<br />
7. Windows will automatically detect the camera. You can use this camera as a web camera.<br />
7. Trouble shooting<br />
Problem Cause Solution<br />
Cannot turn on the camera by<br />
pressing the “power” button.<br />
Photos can not be saved when<br />
taking pictures.<br />
Cannot find removable disk after<br />
connecting the camera to the<br />
computer.<br />
Low battery power.<br />
Battery placed at wrong<br />
polarities.<br />
The memory card or built-in<br />
memory hasn’t been<br />
formatted properly.<br />
1. Connection failure.<br />
2. The mode of the camera<br />
is not set to removable<br />
disk properly<br />
Replace or install the battery correctly.<br />
Format the memory in SETUP mode of<br />
the camera. Please refer to section 5.3.<br />
1. Make sure all cable connections are<br />
secured and restart the computer if<br />
necessary.<br />
2. Set the camera to removable disk<br />
mode, refer to section 6.3.1 (system<br />
setting, USB connection).<br />
Flash does not work. Battery Power is too low. Replace with new ALKALINE battery.<br />
The batteries used up very fast. Use wrong type of battery. Replace with new ALKALINE battery.<br />
The photos are over exposure<br />
The photos are blurry<br />
Get a warning message:<br />
“Capture device was not<br />
detected” when trying to open<br />
PC cam.<br />
Cannot preview image in PC<br />
Camera mode.<br />
Warranty!!<br />
Set the flash light to force<br />
mode in bright<br />
environment.<br />
1. The camera is not held<br />
steadily<br />
2. The lens of camera is<br />
dirty<br />
1. Conflict with another<br />
camera or video device.<br />
2. The mode of the camera<br />
is not set to PC cam<br />
mode properly.<br />
“Preview” is not selected in<br />
option Menu in PC.<br />
Set the Flash light to Auto mode .<br />
1. Hold the camera steadily until it<br />
beeps when taking photo.<br />
2. Clean the lens with soft dry cloth.<br />
1. Remove any other camera driver<br />
completely from your system.<br />
Sometimes you have to re-install your<br />
system.<br />
2. Set the camera to PC cam mode,<br />
refer to section 6.3.2 (system setting,<br />
USB connection).<br />
Click “preview” in the “option” menu to<br />
select it.<br />
If you have questions regarding the warranty, the length of warranty and the working method of it, you can<br />
find the information on our site www.lenco.eu or you can directly contact the place where you<br />
purchased your product.<br />
If at any time in the future you should need to dispose of this product please note<br />
that:Waste electrical products should not be disposed of with household waste. Please<br />
recycle where facilities exist. Check with your Local Authority or retailer for recycling<br />
advice.(Waste Electrical and Electronic Equipment Directive)<br />
For information and support, www.lenco.eu