

Simple Instructions for 808 HD Car Key Micro Camera (#16)
Simple Instructions for 808 HD Car Key Micro Camera (#16)
Simple Instructions for 808 HD Car Key Micro Camera (#16)

Create successful ePaper yourself
Turn your PDF publications into a flip-book with our unique Google optimized e-Paper software.
<strong>808</strong> <strong>#16</strong> Manual R2 1 of 6<br />
<strong>Simple</strong> <strong>Instructions</strong> <strong>for</strong> <strong>808</strong> <strong>HD</strong> <strong>Car</strong> <strong>Key</strong> <strong>Micro</strong> <strong>Camera</strong> (<strong>#16</strong>)<br />
Thank you <strong>for</strong> your purchase of our <strong>808</strong> <strong>Car</strong> <strong>Key</strong> <strong>Micro</strong>-camera (<strong>#16</strong>). If this is the first time you are using a product of<br />
this kind, please follow the simple instructions. We believe you will love this little gadget once you get to know how it<br />
works and discover the amazing video quality that such a tiny camera can produce.<br />
How the <strong>#16</strong> <strong>808</strong> <strong>HD</strong> <strong>Car</strong> <strong>Key</strong> <strong>Micro</strong> <strong>Camera</strong> originated<br />
In 2010 Tom Frank created a thread, http://www.rcgroups.com/<strong>for</strong>ums/showthread.php?t=1362692, in the RC Groups<br />
which was dedicated to in<strong>for</strong>mation exchange and sample videos relating to the very popular #11 camera and RC planes.<br />
This thread was so successful and full of tips and ideas <strong>for</strong> improvements that we decided to design the <strong>#16</strong> based on<br />
what users would like to see improved.<br />
During development of the new camera, Tom was extremely helpful in suggesting improvements in the new design and<br />
did extensive testing of the prototype model.<br />
We are more than grateful <strong>for</strong> his on-going generous help and support, but would also like to thank the many users in the<br />
<strong>for</strong>um (it would be a long list) who provided comments about possible improvements and have helped others.<br />
Tom has now started a new thread dedicated to the new model, the <strong>#16</strong>. You will find a lot of helpful in<strong>for</strong>mation in the<br />
thread, and can get help / ideal from other users, web link: http://www.rcgroups.com/<strong>for</strong>ums/showthread.php?t=1556994<br />
Note: This is a self-help <strong>for</strong>um. None of the <strong>for</strong>um members have been sponsored by the manufacturer or sellers<br />
of this camera. Links in this manual are provided with permission from the authors.<br />
Specifications:<br />
1/4” CMOS WXGA <strong>HD</strong> Sensor / H.264/AVC1 DSP / Hynix 512M DDR2 / Built in Audio Codec<br />
Built in Rechargeable LIPO Battery (200mah), with Battery Charger Manage IC<br />
Video: 1280 x 720 <strong>HD</strong>, 30FPS, optional 848 x 480 30FPS; 640 x 480 30FPS<br />
Video Format: .MOV (and optional .AVI)<br />
Photo: JPG 1280*960<br />
Snap Photo: JPG 1280*720<br />
Supports up to 32GB micro SD / SDHC memory cards<br />
Supports various user settings through configuration tool.<br />
Supports in-camera <strong>for</strong>matting<br />
Supports updating firmware when it’s available<br />
USB2.0 (MSDC/PCCAM)<br />
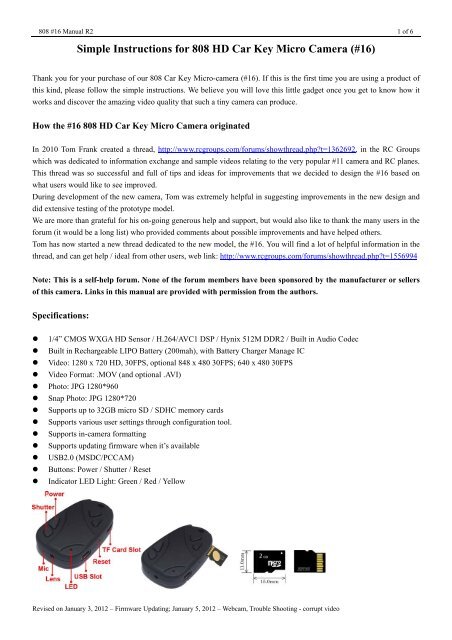
Buttons: Power / Shutter / Reset<br />
Indicator LED Light: Green / Red / Yellow<br />
Revised on January 3, 2012 – Firmware Updating; January 5, 2012 – Webcam, Trouble Shooting - corrupt video
<strong>808</strong> <strong>#16</strong> Manual R2 2 of 6<br />
Memory <strong>Car</strong>d:<br />
1. This camera has no built in memory. It needs an extra micro SD memory card (Not included in the camera) to<br />
work. The camera supports up to 32GB micro SDHC card. Class 4 or above is recommended.<br />
2. The micro SD / SDHC card, also called TF card, is 15mm x 11mm in size and has 8 pins. It is commonly used in cell<br />
phones, digital cameras, media players and USB flash disk, etc.<br />
3. Insert the TF card into the TF card slot. Please make sure the side with the 8 gold pins is inserted upwards, with the<br />
pins facing the buttons. Use your fingernail to push the card in until you hear a “click”. The card should then be<br />
securely latched.<br />
4. Removing the TF card: Push the TF card inwards about 1 mm using your fingernail. This will release the spring<br />
latch and the TF card will be ejected.<br />
Charging:<br />
1. Please charge the camera be<strong>for</strong>e using it <strong>for</strong> the first time.<br />
2. Connect the camera using the USB cable to your computer or use a generic USB charger <strong>for</strong> charging.<br />
3. Charging time is approx. 2.5 hours. The green indicator light is on when charging and off when fully charged.<br />
Video Recording:<br />
1. Make sure the TF card is correctly inserted.<br />
2. Press and hold the Power button approx. 2 secs. until the yellow indicator light turns on. The camera is now turned<br />
on and is in video recording standby mode. Yellow light on = video recording standby.<br />
3. Briefly press the “Shutter” button. The yellow indicator light flashes three times and then turns off. Video recording<br />
has started.<br />
4. Press the “Shutter” button again, and the yellow indicator light will turn on. The video recording stops and the video<br />
file is saved.<br />
5. If you briefly press the Power button during video recording, you will take a snapshot (photo).<br />
6. Press and hold the Power button <strong>for</strong> about 3 seconds. The red light flashes 3 times and the camera is turned off.<br />
Taking Pictures:<br />
1. Make sure the TF card is correctly inserted.<br />
2. Press and hold the Power button approx 2 secs. until the yellow indicator light turns on. The camera is now turned<br />
on and is in video recording standby mode. Press the Power button again, and the red light will turn on indicating<br />
that the camera is in photo standby mode. Red light on = Photo standby mode.<br />
3. Briefly press the Shutter button, the yellow indicator light flashes. One photo is taken and the file is saved. Continue<br />
to press the “Shutter” button to take and save more photos.<br />
4. Briefly press the Power button to return to video recording standby mode.<br />
How to Connect with Computer / Removable Disk Mode<br />
1. The camera is Plug and Play and will work on most computer systems. There is no need to install any drivers.<br />
2. Connect the camera, with memory card inserted, to your computer using a standard USB cable. Press and hold the<br />
power button <strong>for</strong> around 2 seconds. The camera will be recognized by the computer as a Removable Disk.<br />
3. It is recommended to move or copy the files from the camera onto the hard drive <strong>for</strong> editing, viewing etc.<br />
Note: The red LED will flash during data transfer.<br />
4. If the camera is already turned on and in standby mode, it will enter into removable disk mode when connected to<br />
the computer.<br />
5. If the camera is already turned on and is recording video, it will continue to record using USB power and at the same<br />
time will also charge the battery.<br />
Revised on January 3, 2012 – Firmware Updating; January 5, 2012 – Webcam, Trouble Shooting - corrupt video
<strong>808</strong> <strong>#16</strong> Manual R2 3 of 6<br />
PC <strong>Camera</strong> (Webcam) Mode<br />
1. The camera is Plug and Play and will work on most computer systems. There is no need to install any drivers.<br />
2. Remove the memory card from the camera.<br />
3. Turn the camera on be<strong>for</strong>e or after connecting it to the computer. Wait a few seconds, the computer system will<br />
recognize the camera as a USB PC <strong>Camera</strong>.<br />
4. You will need a webcam program, such as AMCAP, or another program that can stream video from an external<br />
device. Many video editing programs and online “messaging“ utilities also have this capability. If you see no video<br />
from the camera in your program, check the program's list of “devices” and confirm the “USB PC <strong>Camera</strong>” device is<br />
selected. If the “USB PC <strong>Camera</strong>” device does not appear in the list of devices, leave the camera in webcam mode<br />
and restart the program. The “USB PC <strong>Camera</strong>” device should now show up as a device, and you can select it to<br />
enable the video stream. Note: there is no audio when this camera using as a webcam.<br />
Recording Videos while Charging<br />
1. This camera supports recording videos while charging, which enables you to record long videos by using an external<br />
power source.<br />
2. The camera will work with any standard USB DC 5V output power source, such as USB car charger, USB wall<br />
charger, external power pack with USB output or USB computer port.<br />
3. When using the USB computer port, video recording has to be started be<strong>for</strong>e connecting the camera to the computer.<br />
When using an external charger or power pack, video recording can be started be<strong>for</strong>e or after connecting the power<br />
source to the camera. Any standard USB data cable may be used, a special cable is not needed.<br />
In-<strong>Camera</strong> Formatting<br />
This camera supports in-camera <strong>for</strong>matting. The camera will work with various micro SD / SDHC memory cards<br />
<strong>for</strong>matted as FAT32. To avoid any possible memory card compatibility issue, it’s strongly recommended to use in-camera<br />
<strong>for</strong>matting to <strong>for</strong>mat memory cards. The procedure as below,<br />
1. Connect the <strong>Camera</strong> as a Removable disk.<br />
2. Press and hold Shutter button. DO NOT RELEASE the button.<br />
3. Disconnect the camera from the computer.<br />
4. Keep holding shutter button until indicator light flashes and then turns off, indicating that <strong>for</strong>matting is completed.<br />
This will take approx 5 seconds.<br />
Updating Firmware<br />
When needed, or a new firmware version is available, you can update the firmware as follows:<br />
1. Obtain the firmware from your seller, or download the latest firmware version from Tom Frank’s <strong>#16</strong> <strong>for</strong>um:<br />
http://www.rcgroups.com/<strong>for</strong>ums/showthread.php?t=1556994<br />
2. Copy the new firmware file (FWMICDVR.bin) to the root folder of the memory card.<br />
3. Disconnect the camera from the computer. The camera will turn off.<br />
4. Briefly Press the power button, and the yellow indicator light will flash very fast.<br />
Note: DO NOT keep the power button pressed. Press the button as if you were turning the camera on.<br />
5. When the yellow light stops flashing, the process is complete. Don’t press any button during this process.<br />
6. You will need to delete the firmware file using a card reader.<br />
7. Or, you can remove the memory card from the camera, and then turn the camera on, and put the memory card back<br />
in, and then connect the camera to the computer. The computer will show the camera as a removable disk. You can<br />
now delete the firmware file from card.<br />
Revised on January 3, 2012 – Firmware Updating; January 5, 2012 – Webcam, Trouble Shooting - corrupt video
<strong>808</strong> <strong>#16</strong> Manual R2 4 of 6<br />
<strong>Camera</strong> Settings Configuration Tool<br />
This camera supports various user settings through a configuration tool. You will be able to modify the following<br />
settings:<br />
1. Set correct Date and time;<br />
2. Set movie resolutions: 720P 30fps; WVGA 848 x 480 30fps; VGA 640 x 480 30fps<br />
3. Movie cycle time (movie clip length): 5 minutes, 20 minutes, 40 minutes, 70 minutes<br />
4. Loop recording: default is off. You can turn it on when needed.<br />
Important notice: it keeps recording 5 minutes videos, and when the memory card is full, camera will delete<br />
the oldest files and record new videos. Warning: loop recording will delete the oldest video files. Please back<br />
up your important video files be<strong>for</strong>e using this option. Deleted files are not recoverable.<br />
5. Date / time stamp: default is on, you can turn it off when needed.<br />
6. Movie sound: mute, level 1, level 2, level 3<br />
7. Recording LED indicator: default is off, which is secret mode. There is no indicator light while recording video. If<br />
you turn the indicator on, the yellow light will flash every second during video recording.<br />
8. Movie data rate: 7Mbps / 10Mbps<br />
9. Auto Power off when there is no operation in standby mode: you can set 30 seconds, 1 minutes, 2 minutes, or disable<br />
auto power off.<br />
Please follow the procedure below to read the existing settings file from the camera:<br />
1. Insert a microSD card into the camera.<br />
2. Press and hold the shutter button, don't release it.<br />
3. Press the power button <strong>for</strong> about 1 second and release it.<br />
4. Release the shutter button when the light turns off. Done<br />
A new SYSCFG.txt file has been written in the root directory of the camera. It is a plain text file. Please use a plain text<br />
editor like Windows notepad to edit the file. The file contains all the settings the camera is currently using. You can<br />
manually change the settings in the [] and then save the file back to the same root directory.<br />
1. Disconnect the camera from the computer. Make sure the card is inserted and contains the SYSCFG.txt file in the root<br />
directory;<br />
2. Press and hold the shutter button, don't release it.<br />
3. Press the power button <strong>for</strong> about 1 second and release it.<br />
4. Release the shutter button when the light turns off. Done<br />
The camera will accept the changes and automatically delete the file.<br />
You may find it difficult to adjust the settings manually. We have great news: Isoprop, a member of Tom's RC <strong>for</strong>um, has<br />
developed a great Windows GUI setup program which does all the hard work <strong>for</strong> you. His amazing program also<br />
includes very detailed instructions of how to use the program and this camera. You can download the program from the<br />
<strong>#16</strong> <strong>for</strong>um:<br />
http://www.rcgroups.com/<strong>for</strong>ums/showthread.php?t=1556994<br />
or at the website:<br />
http://www.mytempfiles.info/nr16/index.html<br />
Revised on January 3, 2012 – Firmware Updating; January 5, 2012 – Webcam, Trouble Shooting - corrupt video
<strong>808</strong> <strong>#16</strong> Manual R2 5 of 6<br />
How to open the Plastic Case and remove the PCB board<br />
Note: Please don’t do this unless you have to change the battery or lens/sensor module.<br />
(1) Note the two latches inside the case.<br />
(2) Unscrew the two screws at the keychain end. (3) Gently lift the bottom casing where the screws were inserted about 6<br />
mm and then (4) very gently slide the bottom casing <strong>for</strong>ward (see picture) to avoid breaking the latches. The two halves<br />
will now be separated. (5) Unscrew the 3 screws and remove the board. Always handle the board by the edges only, and<br />
<strong>for</strong> extra protection, wrap the exposed circuit board components with tape so your fingers do not accidentally bridge<br />
circuit components during handling or cause a damaging static discharge.<br />
How to Change the Battery<br />
Note: Please don’t do this unless the battery or lens assembly needs replacement.<br />
(1) Open the case and remove the PCB board as described above. (2,3) Now follow the picture sequence outlined below.<br />
Use a wooden toothpick or similar plastic tool to "wiggle" the plug out of the socket. Do not use a metallic tool <strong>for</strong><br />
doing this or you might cause a damaging short circuit. (in the photos, a simple ball pen cap is used.) Gently pry<br />
the plug out of the socket by repeatedly wedging the toothpick in the left and the right corners between plug and socket.<br />
Do not use brute <strong>for</strong>ce or pull on the wires!<br />
Revised on January 3, 2012 – Firmware Updating; January 5, 2012 – Webcam, Trouble Shooting - corrupt video
<strong>808</strong> <strong>#16</strong> Manual R2 6 of 6<br />
How to Change the lens/sensor module<br />
Note: Please don’t do this unless the camera module is damaged or needs a replacement or<br />
upgrade.<br />
(1) Open the case and remove the PCB board and disconnect the battery as described above. (2-4) Now follow the<br />
picture sequence outlined below. The connector must first be "unlocked" by prying the black retention bar <strong>for</strong>wards in<br />
the direction of the arrow. Use a wooden toothpick or similar plastic tool inserted at one of the corners (2) (in the photos,<br />
a simple ball pen cap is used.) and gently pry the black retention bar <strong>for</strong>wards. Repeat at the other corner (3). Once<br />
"unlocked" the cable can be gently slid off the connector. Never use brute <strong>for</strong>ce or pull on the CMOS module or<br />
ribbon cable. Be<strong>for</strong>e replacing the module, ensure the connector is "unlocked", then gently work the connector back into<br />
position and “relock” the retention bar.<br />
Trouble shooting<br />
1. Yellow indicator light flashes when the camera is turned on, and then turns off.<br />
Memory card is full. No valid memory card detected. <strong>Micro</strong> SD card is not inserted, or not seated correctly. Ensure<br />
the card is locked in place. The memory card may also be defective or not <strong>for</strong>matted correctly. Please <strong>for</strong>mat the card<br />
with the SDFormatter utility or In-<strong>Camera</strong> Formatting (see above). Try another card.<br />
2. <strong>Camera</strong>s works abnormally.<br />
Use a paper clip, staple, pin, or similar object to carefully press the Reset button on the side of the camera.<br />
3. Red indicator light flashes when the camera is turned on, and then turns off.<br />
Battery is running low, please charge the camera.<br />
4. Sometimes I got corrupt video with buzzing sound, how to correct it?<br />
Don’t panic. A beta version of firmware (compiled by new generation of source codes) might be installed in the<br />
camera. The firmware got better color quality, but may not work with some memory cards well. Please <strong>for</strong>mat the<br />
memory card by in-camera <strong>for</strong>matting as above, most likely it can solve the problem. If still no luck, contact your<br />
seller <strong>for</strong> a stable firmware. Of course you can find it in Tom’s <strong>#16</strong> <strong>for</strong>um as well.<br />
Revised on January 3, 2012 – Firmware Updating; January 5, 2012 – Webcam, Trouble Shooting - corrupt video