CubeSuite+ Simulator for 78K0/Kx2 V3.00.02 Release Note - Renesas
CubeSuite+ Simulator for 78K0/Kx2 V3.00.02 Release Note - Renesas
CubeSuite+ Simulator for 78K0/Kx2 V3.00.02 Release Note - Renesas

Create successful ePaper yourself
Turn your PDF publications into a flip-book with our unique Google optimized e-Paper software.
<strong>CubeSuite+</strong> <strong>Simulator</strong> <strong>for</strong> <strong>78K0</strong>/<strong>Kx2</strong> <strong>V3.00.02</strong><br />
<strong>Release</strong> <strong>Note</strong><br />
Contents<br />
R20UT2256EJ0100<br />
Rev.1.00<br />
October 1, 2012<br />
Chapter 1. Target Devices ........................................................................................................................ 2<br />
Chapter 2. User's Manuals ........................................................................................................................ 3<br />
Chapter 3. Key Word <strong>for</strong> Uninstallation..................................................................................................... 4<br />
Chapter 4. Changes .................................................................................................................................. 5<br />
4.1 Specifications changed ..................................................................................................................... 5<br />
4.1.1 Simulation on <strong>CubeSuite+</strong> V1.03.00............................................................................................... 5<br />
Chapter 5. Cautions................................................................................................................................... 6<br />
5.1 Differences between target devices and simulator ........................................................................... 6<br />
5.1.1 Flash self programming function..................................................................................................... 6<br />
5.1.2 Reset............................................................................................................................................... 6<br />
5.1.3 Oscillation stabilization time of clock oscillation circuit ................................................................... 7<br />
5.1.4 Bit 0 (AMPH) of clock operation mode select register.................................................................... 8<br />
5.1.5 Noise reduction circuit <strong>for</strong> external-interrupt pin ............................................................................. 9<br />
5.1.6 IIC bus simulation ......................................................................................................................... 10<br />
5.1.7 SFR 0/1 constant bit ..................................................................................................................... 10<br />
5.1.8 Comparator stabilization time of A/D converter ............................................................................ 10<br />
5.1.9 Default voltage of AVREF pin.......................................................................................................... 10<br />
5.1.10 Interrupt response time............................................................................................................... 11<br />
5.1.11 Memory size switching / internal expansion RAM size switching registers................................ 11<br />
5.2 Cautions <strong>for</strong> using simulator GUI .................................................................................................... 12<br />
5.2.1 Cautions <strong>for</strong> controlling each windows ......................................................................................... 12<br />
5.2.2 Cautions <strong>for</strong> closing simulator GUI window .................................................................................. 12<br />
5.2.3 Cautions <strong>for</strong> showing help <strong>for</strong> the simulator GUI window............................................................. 12<br />
5.2.4 Cautions <strong>for</strong> disconnecting the debug tool ................................................................................... 12<br />
5.2.5 Cautions <strong>for</strong> setting the Host Machine's language and region ..................................................... 13<br />
R20UT2256EJ0100 Rev.1.00 Page 1 of 13<br />
October 1, 2012
<strong>CubeSuite+</strong> <strong>Simulator</strong> <strong>for</strong> <strong>78K0</strong>/<strong>Kx2</strong> <strong>V3.00.02</strong> <strong>Release</strong> <strong>Note</strong><br />
Chapter 1. Target Devices<br />
Below is a list of devices supported by the <strong>78K0</strong>/<strong>Kx2</strong> simulator.<br />
Nickname Device name<br />
<strong>78K0</strong>/KB2<br />
(30/36pins)<br />
<strong>78K0</strong>/KC2<br />
(38/44/48pins)<br />
<strong>78K0</strong>/KD2<br />
(52pins)<br />
<strong>78K0</strong>/KE2<br />
(64pins)<br />
<strong>78K0</strong>/KF2<br />
(80pins)<br />
μPD78F0500, μPD78F0501 , μPD78F0502, μPD78F0503, μPD78F0503D,<br />
μPD78F0500A, μPD78F0501A , μPD78F0502A, μPD78F0503A, μPD78F0503DA<br />
μPD78F0511, μPD78F0512, μPD78F0513, μPD78F0514, μPD78F0515 ,<br />
μPD78F0513D, μPD78F515D,<br />
μPD78F0511A, μPD78F0512A, μPD78F0513A, μPD78F0514A, μPD78F0515A ,<br />
μPD78F0513DA, μPD78F515DA<br />
μPD78F0521, μPD78F0522, μPD78F0523, μPD78F0524, μPD78F0525,<br />
μPD78F0526, μPD78F0527, μPD78F0527D,<br />
μPD78F0521A, μPD78F0522A, μPD78F0523A, μPD78F0524A, μPD78F0525A,<br />
μPD78F0526A, μPD78F0527A, μPD78F0527DA<br />
μPD78F0531, μPD78F0532, μPD78F0533, μPD78F0534, μPD78F0535,<br />
μPD78F0536, μPD78F0537, μPD78F0537D,<br />
μPD78F0531A, μPD78F0532A, μPD78F0533A, μPD78F0534A, μPD78F0535A,<br />
μPD78F0536A, μPD78F0537A, μPD78F0537DA<br />
μPD78F0544, μPD78F0545 , μPD78F0546, μPD78F0547, μPD78F0547D,<br />
μPD78F0544A, μPD78F0545A , μPD78F0546A, μPD78F0547A, μPD78F0547DA<br />
R20UT2256EJ0100 Rev.1.00 Page 2 of 13<br />
October 1, 2012
<strong>CubeSuite+</strong> <strong>Simulator</strong> <strong>for</strong> <strong>78K0</strong>/<strong>Kx2</strong> <strong>V3.00.02</strong> <strong>Release</strong> <strong>Note</strong><br />
Chapter 2. User's Manuals<br />
Please read the following user’s manuals together with this document.<br />
Manual Name Document Number<br />
<strong>CubeSuite+</strong> V1.01.00 <strong>78K0</strong> Debug R20UT0731EJ0100<br />
<strong>CubeSuite+</strong> V1.03.00 Message R20UT2147EJ0100<br />
R20UT2256EJ0100 Rev.1.00 Page 3 of 13<br />
October 1, 2012
<strong>CubeSuite+</strong> <strong>Simulator</strong> <strong>for</strong> <strong>78K0</strong>/<strong>Kx2</strong> <strong>V3.00.02</strong> <strong>Release</strong> <strong>Note</strong><br />
Chapter 3. Key Word <strong>for</strong> Uninstallation<br />
To uninstall this product, use the integrated uninstaller (uninstalls <strong>CubeSuite+</strong>).<br />
R20UT2256EJ0100 Rev.1.00 Page 4 of 13<br />
October 1, 2012
<strong>CubeSuite+</strong> <strong>Simulator</strong> <strong>for</strong> <strong>78K0</strong>/<strong>Kx2</strong> <strong>V3.00.02</strong> <strong>Release</strong> <strong>Note</strong><br />
This chapter describes changes from V3.00.01 to <strong>V3.00.02</strong>.<br />
4.1 Specifications changed<br />
Chapter 4. Changes<br />
4.1.1 Simulation on <strong>CubeSuite+</strong> V1.03.00<br />
Support simulation on <strong>CubeSuite+</strong> V1.03.00. There is no functional change.<br />
R20UT2256EJ0100 Rev.1.00 Page 5 of 13<br />
October 1, 2012
<strong>CubeSuite+</strong> <strong>Simulator</strong> <strong>for</strong> <strong>78K0</strong>/<strong>Kx2</strong> <strong>V3.00.02</strong> <strong>Release</strong> <strong>Note</strong><br />
Chapter 5. Cautions<br />
This section describes cautions <strong>for</strong> using the <strong>78K0</strong>/<strong>Kx2</strong> simulator. The following two types of caution are described:<br />
•Differences between target devices and simulator : Differences from behavior of target devices due to simulator<br />
specifications<br />
•Cautions <strong>for</strong> using simulator GUI : Cautions <strong>for</strong> using the simulator GUI window<br />
5.1 Differences between target devices and simulator<br />
5.1.1 Flash self programming function<br />
The simulator does not support Flash self programming function.<br />
5.1.2 Reset<br />
If a reset is generated by the Power-on-Clear circuit (POC) or low-voltage detector (LVI) circuit, the simulator<br />
will display "STANDBY" in the status bar. (The status is actually reset, not standby.)<br />
And the behavior differs as follows if a reset is generated by the RESET pin.<br />
[Target device]<br />
Goes into reset status when the RESET pin goes to low level. Reset status is released when it goes to<br />
high level.<br />
[<strong>Simulator</strong>]<br />
Does not go into reset status when the RESET pin goes to low level. When it goes to high level, the<br />
simulator momentarily goes into reset status, and then the reset status is released immediately.<br />
R20UT2256EJ0100 Rev.1.00 Page 6 of 13<br />
October 1, 2012
<strong>CubeSuite+</strong> <strong>Simulator</strong> <strong>for</strong> <strong>78K0</strong>/<strong>Kx2</strong> <strong>V3.00.02</strong> <strong>Release</strong> <strong>Note</strong><br />
5.1.3 Oscillation stabilization time of clock oscillation circuit<br />
The simulator does not simulate the clock oscillator oscillation stabilization time.<br />
The oscillation stabilization time is always 0 seconds when a reset or standby is released, regardless of the<br />
OSTS register settings. The OSTS register is set to the following values.<br />
Initial value after reset, during STOP mode, when MSTOP bit in MOC register = 1: 0x00<br />
MSTOP in MOC register = 0 after STOP mode release: Values shown in the following table<br />
The following figure illustrates this operation.<br />
OSTS setting OSTC value<br />
0x1 (2 11 /fx) 0x10<br />
0x2 (2 13 /fx) 0x18<br />
0x3 (2 14 /fx) 0x1C<br />
0x4 (2 15 /fx) 0x1E<br />
0x5 (2 16 /fx) 0x1F<br />
(Maximum value in the target device)<br />
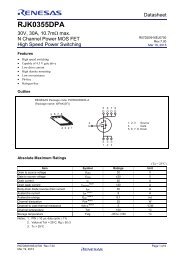
In the target device, the X1 clock oscillation starts after the states (1) to (4) have passed. In the simulator,<br />
states (1) to (4) end instantly and the X1 clock oscillation starts.<br />
X1 clock oscillation<br />
wave<strong>for</strong>m<br />
(1) STOP mode released<br />
or MSTOP bi t= 0<br />
(OSTC register is 0x00)<br />
X1 clock oscillation<br />
wave<strong>for</strong>m<br />
Target device (with OSTS set to 0x05)<br />
(2) Time until oscillation<br />
starts<br />
(OSTC register is 0x00)<br />
<strong>Simulator</strong> (with OSTS set to 0x05)<br />
STOP mode released or MSTOP bi t= 0<br />
(The OSTC register is set to 0x1F in this<br />
instant.)<br />
(3) Oscillation stabilization time<br />
(OSTC register counts up)<br />
(4) OSTC register is<br />
0x1F<br />
R20UT2256EJ0100 Rev.1.00 Page 7 of 13<br />
October 1, 2012
<strong>CubeSuite+</strong> <strong>Simulator</strong> <strong>for</strong> <strong>78K0</strong>/<strong>Kx2</strong> <strong>V3.00.02</strong> <strong>Release</strong> <strong>Note</strong><br />
There<strong>for</strong>e, pay attention to the code that waits <strong>for</strong> oscillation stabilization.<br />
There is no problem if a program is created with the condition that the execution exits the oscillation<br />
stabilization wait period when the OSTC register value becomes the maximum value, or when the OSTC<br />
register value exceeds the specified value, but if a program is created with the condition that the execution<br />
exits the oscillation stabilization wait period when the OSTC register value becomes a value other than the<br />
maximum value, the execution enters an infinite loop.<br />
The following shows examples of code that causes/does not cause problems.<br />
(This is an example of when OSTS is set to 0x05)<br />
Correct program example (1)<br />
while(OSTC != 0x1f)<br />
{<br />
NOP();/* wait */<br />
}<br />
Correct program example (2)<br />
while(OSTC
<strong>CubeSuite+</strong> <strong>Simulator</strong> <strong>for</strong> <strong>78K0</strong>/<strong>Kx2</strong> <strong>V3.00.02</strong> <strong>Release</strong> <strong>Note</strong><br />
5.1.5 Noise reduction circuit <strong>for</strong> external-interrupt pin<br />
The simulator does not simulate the noise reduction circuit. For example, if you input the active level to an<br />
external-interrupt pin with a noise reduction circuit, the interrupt will be received even if the active-level<br />
amplitude is too low.<br />
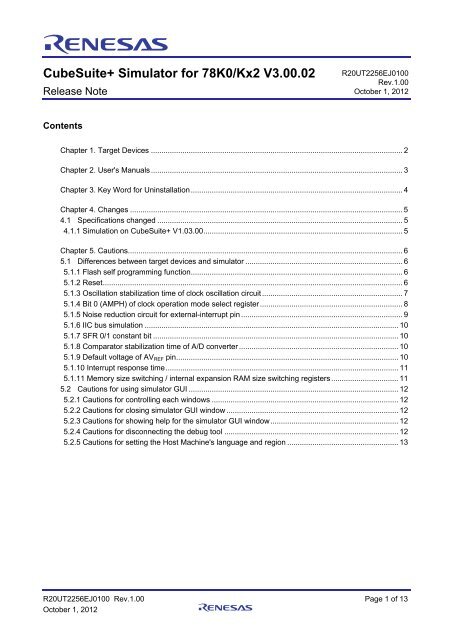
The example below considers the case when there is input to the INTP0 pin.<br />
There is a noise reduction circuit on the INTP0 pin of the target device. For this reason, in order to generate<br />
an interrupt, it is necessary to input an effective edge to the target device, and subsequently maintain the<br />
signal level. (See the user's manual of the target device <strong>for</strong> the length of time it must be maintained.)<br />
Signal input to<br />
INTP0 pin<br />
Target device behavior (falling effective edge)<br />
In the case of the simulator, however, this noise reduction circuit is not simulated. For this reason, an<br />
interrupt will be generated any time a valid edge is generated. (No need to maintain signal level).<br />
Signal input to<br />
INTP0 pin<br />
Effective<br />
edge<br />
Level must be maintained<br />
(For <strong>78K0</strong>/KF2: 1 microsec)<br />
<strong>Simulator</strong> behavior (falling effective edge)<br />
Interrupt generated immediately<br />
upon effective edge No need to maintain level<br />
Interrupt generated<br />
R20UT2256EJ0100 Rev.1.00 Page 9 of 13<br />
October 1, 2012
<strong>CubeSuite+</strong> <strong>Simulator</strong> <strong>for</strong> <strong>78K0</strong>/<strong>Kx2</strong> <strong>V3.00.02</strong> <strong>Release</strong> <strong>Note</strong><br />
5.1.6 IIC bus simulation<br />
IIC bus simulation is not supported.<br />
5.1.7 SFR 0/1 constant bit<br />
The SFR has bits that are always 0 or 1.<br />
For example, bits 3 to 7 of the processor clock control register (PCC) are always 0.<br />
PCC<br />
7 6 5 4 3 2 1 0<br />
0 0 0 0 0 PCC2 PCC1 PCC0<br />
Bits are always 0<br />
Although the values of these bits cannot be changed in the case of the target device, the values can be<br />
changed in the case o\f the simulator. <strong>Note</strong> that changing these values has no effect on behavior.<br />
5.1.8 Comparator stabilization time of A/D converter<br />
The comparator stabilization times of the A/D converter are different <strong>for</strong> the target device and simulator.<br />
[Target device]<br />
It takes 1 microsecond from the start of operation of the comparator until it stabilizes. Any A/D conversion<br />
results obtained be<strong>for</strong>e stabilization will be invalid. For this reason, it is necessary to ignore the first A/D<br />
conversion results.<br />
[<strong>Simulator</strong>]<br />
Comparator operation stabilizes immediately upon startup. For this reason, A/D conversion results<br />
obtained within 1 microsecond of the start of operation will be correct, and there is thus no need to ignore<br />
the first A/D conversion results.<br />
5.1.9 Default voltage of AVREF pin<br />
Default voltage of AVREF pin is 5.0V.<br />
<strong>Note</strong> : The meaning of "Default voltage " is the voltage when the pin have no connection.<br />
R20UT2256EJ0100 Rev.1.00 Page 10 of 13<br />
October 1, 2012
<strong>CubeSuite+</strong> <strong>Simulator</strong> <strong>for</strong> <strong>78K0</strong>/<strong>Kx2</strong> <strong>V3.00.02</strong> <strong>Release</strong> <strong>Note</strong><br />
5.1.10 Interrupt response time<br />
The interrupt response times of the target device and simulator differ.<br />
[Target device]<br />
It takes 7 to 33 clock cycles from the generation of an interrupt until actual vector interrupt processing<br />
begins.<br />
[<strong>Simulator</strong>]<br />
Vector interrupt processing begins immediately upon the interrupt.<br />
5.1.11 Memory size switching / internal expansion RAM size switching registers<br />
With the simulator, the internal ROM size, internal high-speed RAM size, and internal expansion RAM size<br />
are specified via the Property Panel.<br />
For this reason, it does not simulate the memory size switching register (IMS) and the internal expansion<br />
RAM size switching register (IXS). Although the values of these registers can be changed, doing so will not<br />
change the memory sizes. (It will be ignored.)<br />
R20UT2256EJ0100 Rev.1.00 Page 11 of 13<br />
October 1, 2012
<strong>CubeSuite+</strong> <strong>Simulator</strong> <strong>for</strong> <strong>78K0</strong>/<strong>Kx2</strong> <strong>V3.00.02</strong> <strong>Release</strong> <strong>Note</strong><br />
5.2 Cautions <strong>for</strong> using simulator GUI<br />
5.2.1 Cautions <strong>for</strong> controlling each windows<br />
The following keyboard operations are not available in the simulator windows (signal-data editor window, I/O<br />
panel window, and serial window).<br />
* Navigation via tab or arrow keys (←, ↑, →, ↓)<br />
* Deletion via the Del or Backspace keys<br />
* Copy & paste and other operations via the Ctrl + C, V, X, A, or Z keys.<br />
Per<strong>for</strong>m the above operations as follows.<br />
* Navigation: Navigate using the mouse.<br />
* Deletion: Right click and per<strong>for</strong>m the action via the context menu.<br />
* Copy & paste, etc.: Right click and per<strong>for</strong>m the action via the context menu.<br />
5.2.2 Cautions <strong>for</strong> closing simulator GUI window<br />
The simulator GUI window can only be closed by disconnecting from the debugging tool, or by closing<br />
<strong>CubeSuite+</strong> proper. (The X button cannot be clicked.)<br />
Additionally, although it appears that the X button can be pressed if Aero is enabled in Windows Vista,<br />
pressing this button will not close the GUI window.<br />
5.2.3 Cautions <strong>for</strong> showing help <strong>for</strong> the simulator GUI window<br />
Pressing the F1 key in the simulator GUI window will not display the help if none of the internal windows are<br />
visible (e.g. the I/O panel window).<br />
To display the help <strong>for</strong> the simulator GUI window, from the GUI window's menu, select [Help] > [Main<br />
Window].<br />
5.2.4 Cautions <strong>for</strong> disconnecting the debug tool<br />
<strong>CubeSuite+</strong> may exit if the debugging tool is disconnected while any of the following dialog boxes is open<br />
from the simulator GUI window. Make sure that the following dialog boxes are closed be<strong>for</strong>e disconnecting<br />
the debugging tool.<br />
•Save As •Parts Button Properties<br />
•Open •Analog Button Properties<br />
•New •Parts Key Properties<br />
•Color •Parts Level Gauge Properties<br />
•Font •Parts Led Properties<br />
•Customize •Parts Segment LED Properties<br />
•Loop •Parts Matrix Led Properties<br />
•Select Pin •Parts Buzzer Properties<br />
•Search Data •Pull up / Pull down<br />
•Format (UART) •Entry Bitmap<br />
•Format (CSI)<br />
•Message (e.g. Error)<br />
•Object Properties<br />
R20UT2256EJ0100 Rev.1.00 Page 12 of 13<br />
October 1, 2012
<strong>CubeSuite+</strong> <strong>Simulator</strong> <strong>for</strong> <strong>78K0</strong>/<strong>Kx2</strong> <strong>V3.00.02</strong> <strong>Release</strong> <strong>Note</strong><br />
5.2.5 Cautions <strong>for</strong> setting the Host Machine's language and region<br />
If a Japanese OS is installed on your Host Machine, then if the language or region is set to other than<br />
Japanese/Japan, the menus and dialog-box names of the simulator GUI window will be shown in English.<br />
Similarly, if a non-Japanese OS is installed on your Host Machine, then if the language or region is set to<br />
Japanese/Japan, the menus and dialog-box names of the simulator GUI window will be shown in Japanese.<br />
All trademarks and registered trademarks are the property of their respective owners.<br />
R20UT2256EJ0100 Rev.1.00 Page 13 of 13<br />
October 1, 2012
Notice<br />
1. Descriptions of circuits, software and other related in<strong>for</strong>mation in this document are provided only to illustrate the operation of semiconductor products and application examples. You are fully responsible <strong>for</strong><br />
the incorporation of these circuits, software, and in<strong>for</strong>mation in the design of your equipment. <strong>Renesas</strong> Electronics assumes no responsibility <strong>for</strong> any losses incurred by you or third parties arising from the<br />
use of these circuits, software, or in<strong>for</strong>mation.<br />
2. <strong>Renesas</strong> Electronics has used reasonable care in preparing the in<strong>for</strong>mation included in this document, but <strong>Renesas</strong> Electronics does not warrant that such in<strong>for</strong>mation is error free. <strong>Renesas</strong> Electronics<br />
assumes no liability whatsoever <strong>for</strong> any damages incurred by you resulting from errors in or omissions from the in<strong>for</strong>mation included herein.<br />
3. <strong>Renesas</strong> Electronics does not assume any liability <strong>for</strong> infringement of patents, copyrights, or other intellectual property rights of third parties by or arising from the use of <strong>Renesas</strong> Electronics products or<br />
technical in<strong>for</strong>mation described in this document. No license, express, implied or otherwise, is granted hereby under any patents, copyrights or other intellectual property rights of <strong>Renesas</strong> Electronics or<br />
others.<br />
4. You should not alter, modify, copy, or otherwise misappropriate any <strong>Renesas</strong> Electronics product, whether in whole or in part. <strong>Renesas</strong> Electronics assumes no responsibility <strong>for</strong> any losses incurred by you or<br />
third parties arising from such alteration, modification, copy or otherwise misappropriation of <strong>Renesas</strong> Electronics product.<br />
5. <strong>Renesas</strong> Electronics products are classified according to the following two quality grades: "Standard" and "High Quality". The recommended applications <strong>for</strong> each <strong>Renesas</strong> Electronics product depends on<br />
the product's quality grade, as indicated below.<br />
"Standard": Computers; office equipment; communications equipment; test and measurement equipment; audio and visual equipment; home electronic appliances; machine tools; personal electronic<br />
equipment; and industrial robots etc.<br />
"High Quality": Transportation equipment (automobiles, trains, ships, etc.); traffic control systems; anti-disaster systems; anti-crime systems; and safety equipment etc.<br />
<strong>Renesas</strong> Electronics products are neither intended nor authorized <strong>for</strong> use in products or systems that may pose a direct threat to human life or bodily injury (artificial life support devices or systems, surgical<br />
implantations etc.), or may cause serious property damages (nuclear reactor control systems, military equipment etc.). You must check the quality grade of each <strong>Renesas</strong> Electronics product be<strong>for</strong>e using it<br />
in a particular application. You may not use any <strong>Renesas</strong> Electronics product <strong>for</strong> any application <strong>for</strong> which it is not intended. <strong>Renesas</strong> Electronics shall not be in any way liable <strong>for</strong> any damages or losses<br />
incurred by you or third parties arising from the use of any <strong>Renesas</strong> Electronics product <strong>for</strong> which the product is not intended by <strong>Renesas</strong> Electronics.<br />
6. You should use the <strong>Renesas</strong> Electronics products described in this document within the range specified by <strong>Renesas</strong> Electronics, especially with respect to the maximum rating, operating supply voltage<br />
range, movement power voltage range, heat radiation characteristics, installation and other product characteristics. <strong>Renesas</strong> Electronics shall have no liability <strong>for</strong> malfunctions or damages arising out of the<br />
use of <strong>Renesas</strong> Electronics products beyond such specified ranges.<br />
7. Although <strong>Renesas</strong> Electronics endeavors to improve the quality and reliability of its products, semiconductor products have specific characteristics such as the occurrence of failure at a certain rate and<br />
malfunctions under certain use conditions. Further, <strong>Renesas</strong> Electronics products are not subject to radiation resistance design. Please be sure to implement safety measures to guard them against the<br />
possibility of physical injury, and injury or damage caused by fire in the event of the failure of a <strong>Renesas</strong> Electronics product, such as safety design <strong>for</strong> hardware and software including but not limited to<br />
redundancy, fire control and malfunction prevention, appropriate treatment <strong>for</strong> aging degradation or any other appropriate measures. Because the evaluation of microcomputer software alone is very difficult,<br />
please evaluate the safety of the final products or systems manufactured by you.<br />
8. Please contact a <strong>Renesas</strong> Electronics sales office <strong>for</strong> details as to environmental matters such as the environmental compatibility of each <strong>Renesas</strong> Electronics product. Please use <strong>Renesas</strong> Electronics<br />
products in compliance with all applicable laws and regulations that regulate the inclusion or use of controlled substances, including without limitation, the EU RoHS Directive. <strong>Renesas</strong> Electronics assumes<br />
no liability <strong>for</strong> damages or losses occurring as a result of your noncompliance with applicable laws and regulations.<br />
9. <strong>Renesas</strong> Electronics products and technology may not be used <strong>for</strong> or incorporated into any products or systems whose manufacture, use, or sale is prohibited under any applicable domestic or <strong>for</strong>eign laws or<br />
regulations. You should not use <strong>Renesas</strong> Electronics products or technology described in this document <strong>for</strong> any purpose relating to military applications or use by the military, including but not limited to the<br />
development of weapons of mass destruction. When exporting the <strong>Renesas</strong> Electronics products or technology described in this document, you should comply with the applicable export control laws and<br />
regulations and follow the procedures required by such laws and regulations.<br />
10. It is the responsibility of the buyer or distributor of <strong>Renesas</strong> Electronics products, who distributes, disposes of, or otherwise places the product with a third party, to notify such third party in advance of the<br />
contents and conditions set <strong>for</strong>th in this document, <strong>Renesas</strong> Electronics assumes no responsibility <strong>for</strong> any losses incurred by you or third parties as a result of unauthorized use of <strong>Renesas</strong> Electronics<br />
products.<br />
11. This document may not be reproduced or duplicated in any <strong>for</strong>m, in whole or in part, without prior written consent of <strong>Renesas</strong> Electronics.<br />
12. Please contact a <strong>Renesas</strong> Electronics sales office if you have any questions regarding the in<strong>for</strong>mation contained in this document or <strong>Renesas</strong> Electronics products, or if you have any other inquiries.<br />
(<strong>Note</strong> 1) "<strong>Renesas</strong> Electronics" as used in this document means <strong>Renesas</strong> Electronics Corporation and also includes its majority-owned subsidiaries.<br />
(<strong>Note</strong> 2) "<strong>Renesas</strong> Electronics product(s)" means any product developed or manufactured by or <strong>for</strong> <strong>Renesas</strong> Electronics.<br />
SALES OFFICES<br />
Refer to "http://www.renesas.com/" <strong>for</strong> the latest and detailed in<strong>for</strong>mation.<br />
<strong>Renesas</strong> Electronics America Inc.<br />
2880 Scott Boulevard Santa Clara, CA 95050-2554, U.S.A.<br />
Tel: +1-408-588-6000, Fax: +1-408-588-6130<br />
<strong>Renesas</strong> Electronics Canada Limited<br />
1101 Nicholson Road, Newmarket, Ontario L3Y 9C3, Canada<br />
Tel: +1-905-898-5441, Fax: +1-905-898-3220<br />
<strong>Renesas</strong> Electronics Europe Limited<br />
Dukes Meadow, Millboard Road, Bourne End, Buckinghamshire, SL8 5FH, U.K<br />
Tel: +44-1628-651-700, Fax: +44-1628-651-804<br />
<strong>Renesas</strong> Electronics Europe GmbH<br />
Arcadiastrasse 10, 40472 Düsseldorf, Germany<br />
Tel: +49-211-65030, Fax: +49-211-6503-1327<br />
<strong>Renesas</strong> Electronics (China) Co., Ltd.<br />
7th Floor, Quantum Plaza, No.27 ZhiChunLu Haidian District, Beijing 100083, P.R.China<br />
Tel: +86-10-8235-1155, Fax: +86-10-8235-7679<br />
<strong>Renesas</strong> Electronics (Shanghai) Co., Ltd.<br />
Unit 204, 205, AZIA Center, No.1233 Lujiazui Ring Rd., Pudong District, Shanghai 200120, China<br />
Tel: +86-21-5877-1818, Fax: +86-21-6887-7858 / -7898<br />
<strong>Renesas</strong> Electronics Hong Kong Limited<br />
Unit 1601-1613, 16/F., Tower 2, Grand Century Place, 193 Prince Edward Road West, Mongkok, Kowloon, Hong Kong<br />
Tel: +852-2886-9318, Fax: +852 2886-9022/9044<br />
<strong>Renesas</strong> Electronics Taiwan Co., Ltd.<br />
13F, No. 363, Fu Shing North Road, Taipei, Taiwan<br />
Tel: +886-2-8175-9600, Fax: +886 2-8175-9670<br />
<strong>Renesas</strong> Electronics Singapore Pte. Ltd.<br />
80 Bendemeer Road, Unit #06-02 Hyflux Innovation Centre Singapore 339949<br />
Tel: +65-6213-0200, Fax: +65-6213-0300<br />
<strong>Renesas</strong> Electronics Malaysia Sdn.Bhd.<br />
Unit 906, Block B, Menara Amcorp, Amcorp Trade Centre, No. 18, Jln Persiaran Barat, 46050 Petaling Jaya, Selangor Darul Ehsan, Malaysia<br />
Tel: +60-3-7955-9390, Fax: +60-3-7955-9510<br />
<strong>Renesas</strong> Electronics Korea Co., Ltd.<br />
11F., Samik Lavied' or Bldg., 720-2 Yeoksam-Dong, Kangnam-Ku, Seoul 135-080, Korea<br />
Tel: +82-2-558-3737, Fax: +82-2-558-5141<br />
http://www.renesas.com<br />
© 2012 <strong>Renesas</strong> Electronics Corporation. All rights reserved.<br />
Colophon 2.2