Anleitung Bernette 25 (PDF) - Naehzentrum.de
Anleitung Bernette 25 (PDF) - Naehzentrum.de
Anleitung Bernette 25 (PDF) - Naehzentrum.de

Create successful ePaper yourself
Turn your PDF publications into a flip-book with our unique Google optimized e-Paper software.
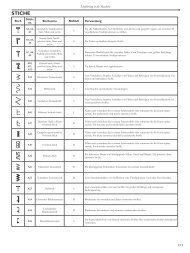
TYPE<br />
ITEM 20 <strong>25</strong><br />
Machine style<br />
Hook system<br />
Size of machine (mm) L xWxH<br />
Weight (kg)<br />
Power<br />
Revolution per minute (R.P.M)<br />
Needle<br />
Max. forward feeding<br />
Max. reverse feeding<br />
Max stitch width<br />
Electricity consuming<br />
Thread take up lever<br />
Exchange presser foot<br />
Presser foot tension<br />
adjustment settlement<br />
Needle plate<br />
Handle<br />
Spool rod<br />
Thread cutting settlement<br />
Needle settlement<br />
Bobbin Win<strong>de</strong>r<br />
Upper thread threa<strong>de</strong>r<br />
Sewing table<br />
Patterns<br />
Button hole system<br />
Dial tension settlement<br />
Presser foot lift settlement<br />
Feed dog up-down change<br />
Feed dog<br />
Slowest speed<br />
Auto stop<br />
Motor<br />
Accessory placement<br />
<br />
Free arm<br />
Drop-in Bobbin<br />
400 x 170 x 310<br />
6.4<br />
AC 110-120V/60Hz 230-240V/50Hz<br />
60 stitch patterns<br />
Straight Stitch 150-800RPM<br />
Button Hole 150-550RPM<br />
Normal Stitch 150-700RPM<br />
Bobbin Win<strong>de</strong>r 350-1700RPM<br />
Reverse Stitch 150-400RPM<br />
Lowest Speed 150RPM<br />
#10~#14 (SCHMETZ)<br />
4.0 ~ 4.5mm<br />
2.7 ~ 3.0mm<br />
7mm<br />
70W<br />
Slit type<br />
Touch controlling<br />
Dial controlling<br />
Transparent window<br />
Handle type<br />
Horizontal style<br />
Inclusive within face plate<br />
Bobbin win<strong>de</strong>r motor<br />
Self releasing with automatic stop<br />
Automatic upper thread threa<strong>de</strong>r<br />
Accessory placement<br />
One step button hole lever<br />
60 stitch patterns, 1 kinds of Alphabet<br />
Standard settlement<br />
2 steps<br />
Yes, lever controlling in the base<br />
6 gears<br />
Yes. (Both forward and backward)<br />
Self stopping while bobbin win<strong>de</strong>ring<br />
Motor overload settlement<br />
Insi<strong>de</strong> of sewing table
BEGRIFF<br />
<br />
<br />
<br />
<br />
<br />
<br />
<br />
<br />
<br />
<br />
<br />
<br />
<br />
<br />
<br />
<br />
<br />
<br />
<br />
<br />
<br />
<br />
<br />
<br />
<br />
<br />
<br />
<br />
<br />
<br />
<br />
<br />
<br />
TYP 20 <strong>25</strong><br />
<br />
<br />
<br />
400 x 170 x 310
400 x 170 x 310<br />
<br />
20 <strong>25</strong>
400 x 170 x 310<br />
<br />
20 <strong>25</strong>
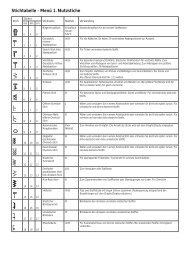
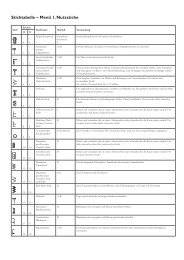
3. Details of the machine<br />
3. Bezeichnungen<br />
3. Description <strong>de</strong> la machine<br />
1<br />
2<br />
3<br />
4<br />
5<br />
6<br />
7<br />
8<br />
9<br />
10<br />
11<br />
12<br />
13<br />
<br />
<br />
<br />
<br />
<br />
<br />
<br />
<br />
<br />
<br />
<br />
<br />
<br />
<br />
<br />
<br />
<br />
<br />
<br />
<br />
<br />
<br />
<br />
<br />
<br />
<br />
<br />
<br />
<br />
<br />
<br />
<br />
<br />
<br />
14<br />
15<br />
16<br />
17<br />
18<br />
19<br />
20<br />
21<br />
22<br />
23<br />
<br />
24<br />
<strong>25</strong><br />
26<br />
27<br />
28<br />
29<br />
<br />
<br />
<br />
<br />
<br />
<br />
<br />
<br />
<br />
<br />
<br />
<br />
<br />
<br />
<br />
<br />
<br />
<br />
<br />
<br />
<br />
<br />
<br />
<br />
<br />
<br />
<br />
<br />
<br />
<br />
<br />
<br />
<br />
<br />
<br />
<br />
30<br />
31<br />
32<br />
<br />
<br />
<br />
<br />
<br />
<br />
<br />
<br />
<br />
<br />
<br />
<br />
<br />
<br />
<br />
<br />
<br />
<br />
<br />
<br />
<br />
<br />
<br />
<br />
<br />
<br />
<br />
<br />
<br />
<br />
<br />
<br />
<br />
<br />
<br />
<br />
33<br />
34
Handle
Handle
Handle
Handle
Handle
Handle
Note:<br />
Check if there is no bind or tight spots.<br />
Turn handwheel
5-3 Seitwärtsbewegung <strong>de</strong>r Na<strong>de</strong>l<br />
(Parabel) und Na<strong>de</strong>lstopp-Position<br />
<br />
<br />
<br />
<br />
<br />
<br />
<br />
<br />
<br />
<br />
<br />
<br />
<br />
<br />
<br />
<br />
<br />
<br />
<br />
<br />
<br />
<br />
<br />
min. 6mm<br />
<br />
max. 7mm
min. 6mm<br />
<br />
max. 7mm
min. 6mm<br />
<br />
max. 7mm
min. 6mm<br />
<br />
max. 7mm
min. 6mm<br />
<br />
max. 7mm
min. 6mm<br />
<br />
max. 7mm
min. 6mm<br />
<br />
max. 7mm
min. 6mm<br />
<br />
max. 7mm
min. 6mm<br />
<br />
max. 7mm
min. 6mm<br />
<br />
max. 7mm
min. 6mm<br />
<br />
max. 7mm
min. 6mm<br />
<br />
max. 7mm
min. 6mm<br />
<br />
max. 7mm
min. 6mm<br />
<br />
max. 7mm
min. 6mm<br />
<br />
max. 7mm
min. 6mm<br />
<br />
max. 7mm
min. 6mm<br />
<br />
max. 7mm
min. 6mm<br />
<br />
max. 7mm
Machine setting:<br />
Pattern selector on " " (#50).<br />
<br />
<br />
<br />
<br />
<br />
<br />
<br />
<br />
<br />
<br />
<br />
<br />
<br />
<br />
<br />
<br />
<br />
<br />
<br />
<br />
<br />
<br />
<br />
<br />
(#50)
A<br />
B
A<br />
B
A<br />
B
A<br />
B
A<br />
B
A<br />
B
1<br />
9<br />
<br />
<br />
<br />
<br />
<br />
<br />
<br />
<br />
<br />
<br />
<br />
<br />
: Set on the front cover<br />
2<br />
8<br />
<br />
<br />
<br />
<br />
<br />
<br />
<br />
<br />
<br />
<br />
<br />
<br />
<br />
7<br />
3<br />
4<br />
5<br />
6
1<br />
9<br />
<br />
<br />
<br />
<br />
<br />
<br />
<br />
<br />
<br />
<br />
<br />
<br />
: Set on the front cover<br />
2<br />
8<br />
<br />
<br />
<br />
<br />
<br />
<br />
<br />
<br />
<br />
<br />
<br />
<br />
<br />
7<br />
3<br />
4<br />
5<br />
6
1<br />
9<br />
<br />
<br />
<br />
<br />
<br />
<br />
<br />
<br />
<br />
<br />
<br />
<br />
: Set on the front cover<br />
2<br />
8<br />
<br />
<br />
<br />
<br />
<br />
<br />
<br />
<br />
<br />
<br />
<br />
<br />
<br />
7<br />
3<br />
4<br />
5<br />
6
1<br />
9<br />
<br />
<br />
<br />
<br />
<br />
<br />
<br />
<br />
<br />
<br />
<br />
<br />
: Set on the front cover<br />
2<br />
8<br />
<br />
<br />
<br />
<br />
<br />
<br />
<br />
<br />
<br />
<br />
<br />
<br />
<br />
7<br />
3<br />
4<br />
5<br />
6
1<br />
9<br />
<br />
<br />
<br />
<br />
<br />
<br />
<br />
<br />
<br />
<br />
<br />
<br />
: Set on the front cover<br />
2<br />
8<br />
<br />
<br />
<br />
<br />
<br />
<br />
<br />
<br />
<br />
<br />
<br />
<br />
<br />
7<br />
3<br />
4<br />
5<br />
6
1<br />
9<br />
<br />
<br />
<br />
<br />
<br />
<br />
<br />
<br />
<br />
<br />
<br />
<br />
: Set on the front cover<br />
2<br />
8<br />
<br />
<br />
<br />
<br />
<br />
<br />
<br />
<br />
<br />
<br />
<br />
<br />
<br />
7<br />
3<br />
4<br />
5<br />
6
Feed stepper motor no operation
Zigzag stepper motor no operation
The bobbin win<strong>de</strong>r spindle is in<br />
"off" position, but LCD shows its<br />
available.
BH no operation
Foot controller no operation
7-10 software version look-up mo<strong>de</strong><br />
Press the s titch length button (a) and switch on<br />
the machine simultaneously. (1)<br />
The screen shows the software version. (2)<br />
Press the s et/disp button (b) to quit the software<br />
version look-up mo<strong>de</strong> and back to the normal<br />
sewing status. (3)<br />
<br />
Stichlängentaste (a) und EIN-Schalter <strong>de</strong>r<br />
Maschine gleichzeitig drücken. (1)<br />
Die Softwareversion erscheint auf <strong>de</strong>m Display.<br />
(2)<br />
Bestätigungs-/Anzeigetaste (b) drücken, um<br />
wie<strong>de</strong>r zurück in <strong>de</strong>n Normalmodus zu gelangen.<br />
(3)<br />
<br />
Appuyer simultanément sur la touche <strong>de</strong> la<br />
longueur <strong>de</strong> point (a) et l'interrupteur MARCHE<br />
<strong>de</strong> la machine. (1)<br />
La version logicielle s'affiche sur l'écran. (2)<br />
Appuyer sur la touche <strong>de</strong> confirmation /<br />
d'affichage (b) pour retourner dans le mo<strong>de</strong><br />
courant. (3)
Adjustment of Foot Controller<br />
1) Potentiometer set on minimum (-).<br />
2) Press foot controller -5mm down.<br />
3) Turn the potentiometer to plus (+) direction at the time motor starts to start.<br />
4) Press foot controller down for Max. speed .if motor can not read, start the procedure again from above<br />
point one .but than press foot controller down about 4mm, follow point 3 to 4 again.
<strong>Bernette</strong> 20/<strong>25</strong>(H10D/H20D) Mar/11