
Create successful ePaper yourself
Turn your PDF publications into a flip-book with our unique Google optimized e-Paper software.
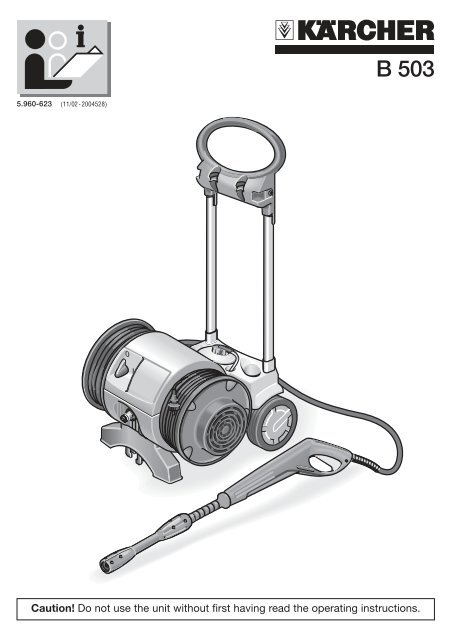
5.960-623 (11/02-2004528)<br />
B 503<br />
Caution! Do not use the unit without first having read the operating instructions.
2<br />
THANK YOU FOR PURCHASING A KARCHER<br />
PRESSURE WASHER<br />
PLEASE READ THIS LEAFLET CAREFULLY<br />
BEFORE OPERATING YOUR MACHINE.<br />
WHAT IS A PRESSURE WASHER?<br />
A Pressure Washer is essentially a powerful electric motor driving a set<br />
of pistons that force water through a small nozzle, thus creating a<br />
pressurised jet of water. This provides the cleaning power behind the<br />
Karcher Pressure Washer.<br />
A Karcher Pressure Washer can be used for an endless list of applications<br />
around the home and garden. It provides an efficient, economical and<br />
labour saving way of cleaning with excellent results.<br />
All Karcher domestic pressure washers are designed to run from a<br />
suitable cold water supply although some models will accept a water inlet<br />
temperature of between 40 °C and 60 °C.<br />
Environmental Comment - Save water with high pressure.<br />
The Karcher Pressure Washer is environmentally friendly enabling you<br />
to reduce your water consumption compared to a normal garden hose.<br />
A definite advantage with a metered water supply<br />
OR<br />
with the added benefit of suction mode, water can be drawn from an<br />
open container such as a water butt.
INDEX<br />
1. APPLICATIONS<br />
2. SAFETY INSTRUCTIONS<br />
3. GETTING STARTED<br />
3.1 Contents<br />
3.2 Water Connection<br />
3.3 Electrical Connection<br />
3.4 Suction Mode<br />
3.5 Detergent<br />
4. OPERATING YOUR PRESSURE WASHER<br />
4.1 High Pressure Operation<br />
4.2 Low Pressure Operation Without Brush<br />
4.3 Low Pressure Operation With Brush<br />
4.4 End Of Operation<br />
4.5 Storage<br />
5. IMPORTANT – CARE AND MAINTENANCE<br />
6. ACCESSORIES / SPARE PARTS<br />
7. PROBLEM CHECKLIST / TROUBLESHOOTING<br />
8. HELP-LINE<br />
9. TECHNICAL DATA<br />
10. ASSEMBLY<br />
10.1 Changing the High Pressure Hose<br />
3
1. APPLICATIONS<br />
4<br />
The main applications for this product are DOMESTIC<br />
cleaning tasks:<br />
Cars, motorbikes, caravans, boats and bicycles<br />
Patio’s, fences, garden walls, pathways, driveways and house<br />
facades – particularly useful for cleaning block driveways<br />
Removal of algae and moss from roofs, brickwork and<br />
guttering<br />
Garden tools and machinery, furniture and barbecues<br />
Hygienic cleaning of animal pens and their surroundings<br />
With the addition of Karcher accessories, the list<br />
continues .............<br />
Clearing blocked drains and pipes<br />
Removal of old paint and rust from garden furniture and gates<br />
Spraying insecticide onto trees, plants and lawns
2. SAFETY INSTRUCTIONS<br />
BEFORE STARTING UP YOUR PRESSURE WASHER PLEASE<br />
CHECK YOU HAVE THE FOLLOWING:<br />
We recommend you purchase these items from a reputable store<br />
RCD plug and socket that will interrupt electrical supply in an<br />
emergency.<br />
A typical garden hose (minimum length 7.5 metres) with suitable<br />
hose connection (Hoselock/Gardena type) to match the coupling<br />
on the machine (hose and connector not supplied).<br />
The mains voltage and supply indicated on the Rating Plate of the<br />
machine corresponds with that of the power source.<br />
The insulation of the supply cable is not damaged.<br />
Only earthed sockets should be used.<br />
If you are using an extension cable it must be completely unwound<br />
from the cable drum and be the correct diameter:<br />
10 meter length of cable should have a cross section of 1.5 mm²<br />
30 meter length of cable should have a cross section of 2.5 mm²<br />
Safety Assurance<br />
As an added precaution, your pressure washer is fitted with a safety<br />
locking device on the Spray Gun.<br />
AFTER USE, ALWAYS REMOVE THE PLUG FROM THE SOCKET<br />
BEFORE CLEANING YOUR PRESSURE WASHER<br />
5
3. GETTING STARTED<br />
3.1 Contents<br />
Upon opening the carton, if you do not<br />
have all the items as detailed please<br />
contact the Customer Helpline.<br />
1 Transport Bracket<br />
2 High Pressure Hose Reel<br />
3 High Pressure Hose<br />
4 Power Switch (On/Off)<br />
5 Detergent Tank<br />
6 Detergent Suction Tube<br />
(with Filter And Dosing Ring)<br />
7 Mains Electric Lead with Plug<br />
6<br />
Assembly<br />
see Page 19<br />
Assembly<br />
see Page 19<br />
Assembly<br />
see Page 19<br />
8 Mains Lead Storage<br />
9 Support Leg<br />
10 Hosepipe Connector<br />
11 Inlet Water Connection<br />
12 Spray Gun<br />
13 Safety Lock Device<br />
14 Spray Lance with Pressure Regulator<br />
15 Wash Brush<br />
16 Water filter
Please follow these instructions carefully<br />
for troublefree cleaning.<br />
Use the diagram on Page 6 for reference purposes.<br />
3.2 Water Connection<br />
The minimum length of supply hosepipe advised for maximum user<br />
convenience is 7.5 metres with a diameter of 12.5 mm (1/2") to allow<br />
free flow of inlet water to the machine so avoiding backpressure and<br />
any associated potential damage to your machine.<br />
Attach the water filter (No.16) to the inlet water connection (No.11)<br />
and the hosepipe connector (No.10) to the water filter (No.16).<br />
Attach your supply hosepipe with its connector to the hosepipe connector<br />
(No.10) and the other end should be connected to a suitable<br />
water supply.<br />
Dirt in the supply water could damage your Pressure Washer !<br />
To avoid this risk always use the water filter (No.16).<br />
3.3 Electrical Connection<br />
Ensure the Power Switch (No.4) is in the “OFF” position before<br />
connecting the factory fitted Plug attached to the Mains Electric Lead<br />
(No.7) into an earthed socket. (it is recommended that an RCD plug<br />
socket is used.)<br />
If using an Extension Cable make sure it is completely unwound<br />
from the cable drum and is the correct diameter.<br />
3.4 Suction Mode - an added benefit of the Karcher Pressure Washer<br />
If you are drawing water from a static water supply such as a water<br />
butt disconnect the water connection/hosepipe with coupling (No.10)<br />
from the machine and replace with a suction hose and filter (Part<br />
No. 4.440.238) that can be purchased as an accessory.<br />
Disconnect the Spray Lance from the Spray Gun.<br />
Allow the pressure washer to operate without the Spray Lance fitted<br />
until water flows from the Spray Gun without bubbles.<br />
Re-connect the Spray Lance to the Spray Gun.<br />
7
3.5 Detergent<br />
8<br />
It is recommended that only cleaning agents formulated by<br />
and manufactured for Karcher should be used. Unsuitable<br />
detergents could damage your Pressure Washer and the<br />
object being cleaned.<br />
Recommended Detergents<br />
1. Detergent tablets<br />
Karcher Clean Tabs (10 tablets per box):<br />
10 Tablets dissolved in clean water provide 5 litres of cleaning<br />
detergent.<br />
2. The following cleaning agent may be used undiluted:<br />
(But further dilution is practical but trial before application)<br />
Universal Cleaner .............................. Profi RM 555 ASF<br />
3. The following cleaning agents are available as concentrate<br />
and must be diluted with 9 parts of water (1 : 9) before use:<br />
Universal Cleaner .............................. Profi RM 555 ULTRA<br />
Automotive Cleaner ........................... Profi RM 565 ULTRA<br />
House & Garden Cleaner .................. Profi RM 570 ULTRA<br />
Boat Cleaner ..................................... Profi RM 575 ULTRA<br />
NOTE:<br />
In all instances, detergent concentration is set on the machine. It is<br />
recommended that you start cleaning at maximum dilution, increasing<br />
the concentration only if considered necessary for the cleaning task.<br />
DETAILS OF THE FULL RANGE OF DETERGENTS AND<br />
CHEMICALS ARE AVAILABLE BY CALLING THE KARCHER<br />
CUSTOMER HELPLINE ON 0906 6800632
4. OPERATING YOUR PRESSURE WASHER<br />
If you have followed all the instructions so far, you are<br />
now ready to have fun cleaning the KARCHER way!!!<br />
Turn on the supply water and press the Spray Gun lever (No.12) until<br />
the water flows freely and removes all air locks from the hoses.<br />
You may now attach the bayonet fit Spray Lance (No.14) or required<br />
accessory to the Spray Gun.<br />
All accessories are bayonet fit, simply push in and twist<br />
until they click into position !<br />
Once water is flowing through the machine, you may now switch<br />
on your Karcher Pressure Washer using the Power Switch (No.4)<br />
You can regulate the working pressure on the spray by turning the<br />
nozzle end of the Spray Lance (No.14) in a “+” or “-” direction.<br />
WHEN USING YOUR KARCHER PRESSURE WASHER ON THE<br />
HIGH PRESSURE SETTING, THE RECOMMENDED WORKING<br />
DISTANCE BETWEEN THE NOZZLE AND THE OBJECT OR<br />
SURFACE TO BE CLEANED IS 30 CM. IT CAN BE CLOSER IF<br />
REQUIRED FOR PATIOS OR MASONERY.<br />
When cleaning painted surfaces, ensure that the paint is sound and<br />
there are no signs or rusting or blistering.<br />
It is your responsibility to check the suitability of the surface to be cleaned.<br />
Karcher (UK) Ltd. cannot be held responsible for any damaged caused.<br />
9
4.1 High Pressure Operation<br />
10<br />
Switch on the pressure washer (No.4)<br />
Ensure the Spray Lance with the Pressure Regulator (No.14) is attached<br />
securely to the Spray Gun (No.12) and the nozzle is set to the required<br />
setting (+).<br />
Aim the lance towards the object to be cleaned making sure the<br />
recommended working distance is used (for reference see Page 9).<br />
Release the Safety Lock Device (No.13) on the Spray Gun and<br />
squeeze the lever.<br />
The pressurised water jet alone is capable of fulfiling most<br />
cleaning tasks around the garden or on building work but<br />
detergent and wash brush are advantageous when cleaning<br />
vehicles or other paint finishes.<br />
4.2 Low Pressure Operation without Brush<br />
Fill the Detergent Tank (No.5) with the selected detergent,<br />
ensuring it is the correct concentration (See Page 8 or read<br />
recommended dosage on label)<br />
or<br />
Dilute the detergent to the required concentration before filling the<br />
Detergent Tank. (The correct dilution is dependent on the degree of<br />
soiling of surface and is best determined by experience).<br />
Set the nozzle to the lowest working pressure setting (-).<br />
Set the Dosing Ring on the Detergent Suction Tube<br />
(No.5) to the desired dosage.<br />
Switch on the pressure washer (No.4)<br />
Aim the nozzle towards the object to be cleaned, release<br />
the Safety Locking Device on the Spray Gun<br />
and squeeze the lever to apply the detergent to the<br />
working area.<br />
To rinse the detergent away increase the nozzle setting towards “+”<br />
setting. (No detergent will be drawn in with high working pressure).<br />
Spray with the required jet spray setting until no trace of detergent<br />
can be found.
We recommend the following cleaning method:<br />
Step 1:<br />
Remove loose dirt by washing over the surface to be cleaned<br />
with the high pressure jet.<br />
Step 2:<br />
Spray on the detergent and leave for 1-4 minutes, so assisting<br />
the easy removal of fine dirt and associated greasy adhesions.<br />
Step 3:<br />
Finally, spray off the loosened dirt with the high pressure spray.<br />
4.3 Low Pressure Operation with Brush<br />
When cleaning surfaces with a grease contamination - typically car<br />
paintwork that always has a greasy traffic film covering adopt the<br />
following procedure:<br />
Washing loose dirt away with the clean water high pressure spray.<br />
Apply the detergent in low pressure mode by setting the bayonet fit<br />
spray lance (No.14) to its lowest (-) setting.<br />
Leave for 2-4 minutes for the detergent to have maximum effect.<br />
Remove the bayonet fit spray lance and fit the Wash Brush<br />
(No.15) to the Spray Gun (No.12). The Wash Brush is suitable<br />
for use with a water inlet temperature into the Pressure Washer of<br />
maximum 40 °C.<br />
With or without the pressure washer switched on, brush down the surface<br />
being cleaned, this physical agitation removes all trace of traffic film.<br />
Finally revert to the high pressure operation with the Spray Lance<br />
and complete the wash down.<br />
11
4.4 End Of Operation<br />
ALWAYS REMEMBER TO RINSE YOUR PRESSURE WASHER<br />
AFTER USING DETERGENT BY FILLING THE DETERGENT<br />
CONTAINER WITH CLEAN WATER AND RUN THE PUMP FOR<br />
APPROXIMATELY ONE MINUTE<br />
In the event of a break of 5 minutes in the operation of your<br />
Karcher Pressure Washer, always switch off the pump to<br />
avoid damage due to overheating.<br />
12<br />
Switch off the pressure washer by the Power Switch (No.4) and<br />
unplug the Mains Electric Lead (No.7) from the socket.<br />
Close the water inlet (tap) and disconnect the hosepipe.<br />
Squeeze the lever to remove all pressure from the machine.<br />
Release the lever and then secure the trigger with the Safety<br />
Locking Device to prevent accidental opening.<br />
4.5 STORAGE<br />
The Spray Gun (No.12), the Spray Lance (No.14)<br />
and the Wash Brush (not included) can be stored<br />
with the Pressure Washer.<br />
The Mains Electric Lead (No.7) can be wound up<br />
over the Mains Lead Storage (No.8).<br />
5. IMPORTANT – CARE AND MAINTENANCE<br />
To ensure prolonged life and trouble-free use of your<br />
Karcher Pressure Washer we strongly recommend<br />
that you always adopt the following procedures:<br />
Water<br />
Before use, always check the water inlet filter for dirt or debris.<br />
Visually check to see if the nozzle is blocked by dirt or grit, if so,<br />
remove the dirt from the nozzle hole with a needle and rinse with<br />
water from the front.
Failure to do this will seriously damage your machine and<br />
invalidate the warranty.<br />
Connect the water supply hose and, without the lance attached,<br />
squeeze the Spray Gun lever to run water through your pressure<br />
washer until the water flow is constant. Then plug in to the electric<br />
supply.<br />
Unless drawing water from an open water source such as a water<br />
butt, always have a minimum of 10 metres (25 feet) of uncoiled hose<br />
between the water tap and your machine. The internal diameter of<br />
the feed water hose should be 12 mm (1/2”).<br />
Water Regulations require the use of a back-flow preventer valve at<br />
the tap end of the supply hose.<br />
Only use a full flow connector to connect the hose to the machine.<br />
Electricity<br />
If using an electrical extension lead it must be rated at a minimum<br />
of 13 amps.<br />
Always fully uncoil any extension lead when used.<br />
Chemicals<br />
Use of chemicals other than those recommended by Karcher could<br />
cause significant damage which may not be covered by your warranty.<br />
After using chemicals, always run fresh water through your machine.<br />
The high pressure hose of your Karcher Pressure Washer should not<br />
be mistreated. It is designed to withstand high pressure operation so<br />
vehicles should NOT run over it, nor should it be pulled across sharp<br />
or abrasive edges. These actions may weaken the hose and cause<br />
ballooning.<br />
IMPORTANT<br />
REMEMBER FROST WILL DAMAGE YOUR KARCHER<br />
PRESSURE WASHER IF IT HAS NOT BEEN COMPLETELY<br />
EMPTIED OF WATER AFTER USE. ALWAYS STORE IN A<br />
FROST FREE AREA.<br />
13
6. ACCESSORIES<br />
A wide range of popular accessories are available from your<br />
local store selling Karcher Pressure Washers.<br />
4.763-228 Dirt Blaster/Rotary Jet<br />
A rapidly rotating pencil jet used to remove loose paint, stubborn algae and moss from hard surfaces.<br />
4.760-269 Triple Nozzle Lance<br />
An integral fan jet, pencil jet and low pressure chemical jet in one unit allows optimal nozzle selection.<br />
4.760-212 Underbody Lance<br />
Extended lance with angled end and upward firing jet for cleaning under cars, gutters etc.<br />
6.903-276 Car Wash Brush<br />
Simple bayonet fitting attaches the brush to the hand gun, used in conjunction with RM555.<br />
4.762-065 Rotary Wash Brush<br />
Ideal for car bodywork and windows as the water forces the brush to rotate enhancing cleaning power.<br />
4.760-262 Extension Lance<br />
To add length to the standard lance.<br />
2.637-729 Drain Kit (7.5 m Hose)<br />
2.637-767 Drain Kit (15 m Hose)<br />
A flexible hose with backwards firing high pressure jet to create turbulence and dislodge blockages.<br />
2.637-728 Sandblaster<br />
Used to remove paint, rust and cement from metallic and stone surfaces by using a combination of high pressure<br />
water and sand.<br />
4.760-265 Flexi Lance<br />
A lance which can be angled to any degree to clean hard to reach areas such as wheel arches etc.<br />
2.637-755 Floor Cleaning Lance<br />
An extended lance fitted with three shrouded high pressure nozzles to provide a wide area of cleaning power<br />
without any splash back.<br />
4.440-238 Suction Hose and Filter<br />
Used to provide a water supply to the unit where a mains water supply is not available by placing the kit into a water butt.<br />
6.541-040 Trolley<br />
Eliminates the need to carry the pressure washer when the unit has no built in mobility.<br />
6.964-006 Foam Nozzle<br />
A bayonet fit accessory that generates a low pressure detergent foam. This allows longer detergent contact time<br />
on the surface to be cleaned.<br />
2.637-214 Water Pump Kit<br />
9.300-051 25 Kg Grit<br />
6.291-080 RM 555 (5 litre)<br />
6.291-079 RM 555 (6 x 1 litre)<br />
14
6. Spare Parts<br />
In the event that your Karcher Pressure Washer requires replacement<br />
parts – please refer to the diagram below AND identify the particular<br />
model of your machine by reference to the data plate on the underside.<br />
Please write, email or fax Karcher (see page 17) with any parts order<br />
you wish to place. A premium rate Help-line Number is available for<br />
telephone enquires of any type.<br />
15
7. PROBLEM CHECKLIST<br />
The machine you have chosen is of the highest quality. Correctly stored<br />
away from frost it should operate without problems. If a problem does<br />
arise, please check the following chart as a solution may be at hand.<br />
PROBLEM POSSIBLE CAUSE CORRECTION<br />
Machine refuses<br />
to start<br />
Pump stops Fuse blown<br />
Strong pressure<br />
fluctuations<br />
Machine does<br />
not reach<br />
operating<br />
pressure<br />
No detergent<br />
suction<br />
16<br />
Plug not connected<br />
Defective socket<br />
Fuse blown<br />
Defective extension cable<br />
Wrong mains voltage<br />
Overheating due to poor<br />
water Supply<br />
Nozzle partly blocked<br />
Inadequate mains water<br />
Nozzle blocked/worn out<br />
Inadequate mains water<br />
Inlet hose squeezed<br />
Water filter clogged (3.1<br />
item15)<br />
Inlet hose blocked<br />
Wrong pressure<br />
Blocked filter in<br />
detergent tank<br />
Connect plug<br />
Try another socket<br />
Change the fuse<br />
Try without extension cable<br />
Check mains voltage corresponds<br />
to specifications of machine<br />
Change fuse and check size of<br />
extension cable<br />
Check inlet water flow rate - hose<br />
should fill a 10 litre bucket in one<br />
minute<br />
Clean dirt from nozzle hole with<br />
needle and rinse from the front<br />
Check inlet water flow rate<br />
Clean/replace nozzle<br />
Check inlet water flow rate<br />
Straighten out hose<br />
Clean filter<br />
Check hose for leaks or blockages<br />
Set Spray Lance at the minimum<br />
working pressure<br />
Unblock filter<br />
Clean ventilation hole in cover of<br />
Detergent Tank<br />
In the unlikely event that you need to return your machine to your supplier,<br />
please ensure that this is returned, complete with hose, gun and all<br />
accessories.<br />
Note: Inrush currents cause short-time voltage drops. Under unfavourable<br />
power supply conditions other equipment may be affected. If the system impedance<br />
of the power supply is < 0,15 Ohms, disturbances are unlikely to occur.
8. HELP - LINE<br />
Karcher (UK) Limited operate a help-line allowing customers to discuss<br />
any problems experienced with our products.<br />
The help-line operates during normal business hours, if you have difficulty<br />
getting through, please understand that there are peak periods<br />
during the day when our consultants are unable to take all calls coming<br />
in. In these circumstances we would ask that you try to contact us again<br />
later in the day.<br />
The help-line number is 0906 6800632. (This help-line is charged<br />
at 25p per minute.)<br />
It helps us if you have the model number and data plate details to<br />
hand before making your call as there are very many different models of<br />
Karcher Pressure Washers in use.<br />
Alternatively you may write or e-mail to the address below:<br />
Karcher (UK) Limited<br />
Karcher House<br />
Beaumont Road<br />
Banbury<br />
Oxon, OX16 1TB<br />
FAX: 01295 752030<br />
E-mail: retail_inquiries@karcheruk.co.uk<br />
17
9. TECHNICAL DATA<br />
18<br />
Power Connection<br />
Voltage ........................................................ 230-240 V (AC)<br />
Current .............................................................. 1~50 Hz<br />
Connected/Load .................................................. 2.0 KW<br />
Mains Fuse ........................................................... 13 AMP<br />
Water Connection<br />
Supply Temperature (Max)................................... 40 °C<br />
Supply Rate (Min) ................................................. 10 litres per minute<br />
Supply Pressure (Max) ........................(6 bar) ......0,6 MPa<br />
Supply Hose Length ............................................ 7.5 metres<br />
Diameter ......................................... 1/2 inch<br />
Suction Height from open tank<br />
at Water Temperature 20 °C .................................. 1 metre<br />
Performance Data<br />
Pump Pressure (Max) ..................... (130 bar) ....... 13 MPa (at bypass)<br />
<strong>Operating</strong> Pressure .................... (20-120 bar) ... 2-12 MPa<br />
Flow Rate ........................................ (420 l/h) .......7,0 litres per minute<br />
Detergent Intake .................................................. 0,4 litres per minute<br />
Recoil Force of Spray Gun<br />
at <strong>Operating</strong> Pressure .......................................... 22 N<br />
Optimum Working Distance on High Pressure..... 30 cm<br />
Unit vibrations (ISO 5349) ..........................................0,8 m/s²<br />
Sound pressure level L PA (EN 60704-1) ...................... 72 dB(A)<br />
Guaranteed Sound power level L WA (2000/14/EC) .... 87 dB(A)<br />
Dimensions<br />
Length ..................................................................... 438 mm<br />
Width ...................................................................... 411 mm<br />
Height ..................................................................... 936 mm<br />
Weight ...................................................................... 16 Kg<br />
Circuit Diagramm<br />
C1 Running capacitor<br />
F1 Temperature fuse<br />
M1 Motor<br />
S1 Appliance switch<br />
S2 Pressure-operated switch
10.ASSEMBLY<br />
10.1 Changing the High Pressure Hose ( No.3)<br />
19
We hereby declare that the equipment described below conforms to the relevant<br />
fundamental safety and health requirements of the appropriate EU Directives, both in its<br />
basic design and construction as well as in the version marketed by us. This declaration will<br />
cease to be valid if any modifications are made to the machine without our express<br />
approval.<br />
Product: High-pressure cleaner<br />
Model: 1.274-xxx<br />
Relevant EU Directives:<br />
EU Low-Voltage Equipment Directive 73/23/EEC amended by 93/68/EEC.<br />
EU Machinery Directive 98/37/EEC<br />
EU Directive on Electromagnetic Compatibility 89/336/EEC<br />
amended by 91/263/EEC, 92/31/EEC, 93/68/EEC.<br />
EU Directive on Noise Emission 2000/14/EC<br />
Harmonised standards applied:<br />
DIN EN 55014-1:1999 DIN EN 60335-1 DIN EN 61000-3-2:1995<br />
DIN EN 55014-2:1997 DIN EN 60335-2-79 DIN EN 61000-3-3:2001<br />
Appropriate internal measures have been taken to ensure that series-production units<br />
conform at all times to the requirements of current EU Directives and relevant standards.<br />
The signatories are empowered to represent and act on behalf of the company<br />
management.<br />
Conformity assessment procedure followed:<br />
Annex V<br />
Sound power level<br />
Measured: 85dB(A)<br />
Guaranteed: 87dB(A)<br />
EU Declaration of Conformity<br />
Alfred Kärcher GmbH & Co.<br />
Cleaning Systems<br />
Alfred-Kärcher-Str. 28–40<br />
P.O. Box 160 Dr. B. Graf H. Jenner<br />
S. Reiser<br />
5.957-621 01/02