

Installation - InSinkErator
Installation - InSinkErator
Installation - InSinkErator

Create successful ePaper yourself
Turn your PDF publications into a flip-book with our unique Google optimized e-Paper software.
2<br />
Fiber<br />
Washer<br />
10<br />
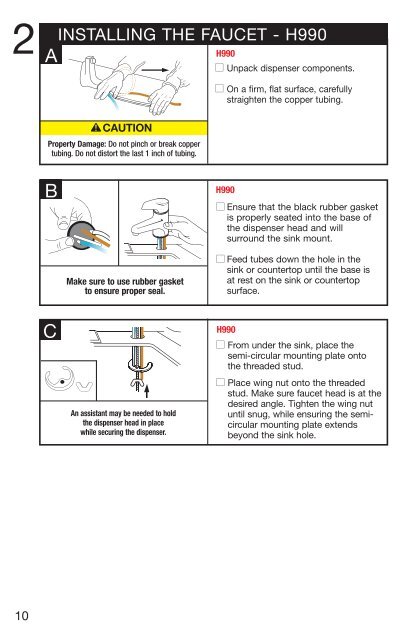
INSTALLING THE FAUCET - H990<br />
A<br />
Property Damage: Do not 1pinch or break copper 2<br />
tubing. Do not distort the last 1 inch of tubing.<br />
B<br />
C<br />
Make sure to use rubber gasket<br />
to ensure proper seal.<br />
Wing Nut<br />
1 2<br />
An assistant may be needed to hold<br />
the dispenser head in place<br />
while securing the dispenser.<br />
3<br />
H990<br />
■ Unpack dispenser components.<br />
■ On a firm, flat surface, carefully<br />
straighten the copper tubing.<br />
H990<br />
■ Ensure that the black rubber gasket<br />
is properly seated into the base of<br />
the dispenser head and will<br />
3surround<br />
the sink mount.<br />
■ Feed tubes down the hole in the<br />
sink or countertop until the base is<br />
at rest on the sink or countertop<br />
surface.<br />
H990<br />
■ From under the sink, place the<br />
semi-circular mounting plate onto<br />
the threaded stud.<br />
■ Place wing nut onto the threaded<br />
stud. Make sure faucet head is at the<br />
desired angle. Tighten the wing nut<br />
until snug, while ensuring the semicircular<br />
mounting plate extends<br />
beyond the sink hole.<br />
Fiber<br />
Plug<br />
Brass