

Installation - InSinkErator
Installation - InSinkErator
Installation - InSinkErator

You also want an ePaper? Increase the reach of your titles
YUMPU automatically turns print PDFs into web optimized ePapers that Google loves.
16<br />
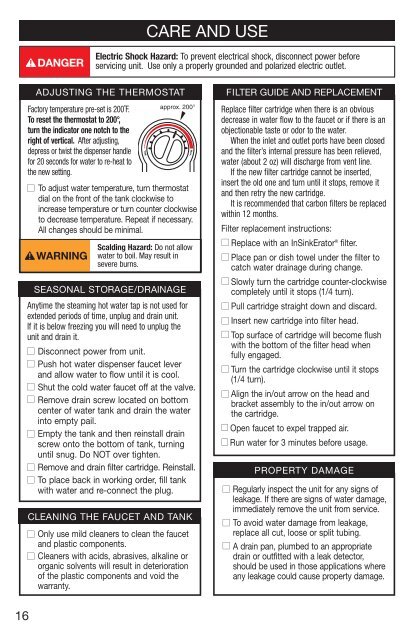
Factory temperature pre-set is 200˚F.<br />
To reset the thermostat to 200°,<br />
turn the indicator one notch to the<br />
right of vertical. After adjusting,<br />
depress or twist the dispenser handle<br />
for 20 seconds for water to re-heat to<br />
the new setting.<br />
■ To adjust water temperature, turn thermostat<br />
dial on the front of the tank clockwise to<br />
increase temperature or turn counter clockwise<br />
to decrease temperature. Repeat if necessary.<br />
All changes should be minimal.<br />
Scalding Hazard: Do not allow<br />
water to boil. May result in<br />
severe burns.<br />
CARE AND USE<br />
Electric Shock Hazard: To prevent electrical shock, disconnect power before<br />
servicing unit. Use only a properly grounded and polarized electric outlet.<br />
ADJUSTING THE THERMOSTAT<br />
approx. 200°<br />
SEASONAL STORAGE/DRAINAGE<br />
Anytime the steaming hot water tap is not used for<br />
extended periods of time, unplug and drain unit.<br />
If it is below freezing you will need to unplug the<br />
unit and drain it.<br />
■ Disconnect power from unit.<br />
■ Push hot water dispenser faucet lever<br />
and allow water to flow until it is cool.<br />
■ Shut the cold water faucet off at the valve.<br />
■ Remove drain screw located on bottom<br />
center of water tank and drain the water<br />
into empty pail.<br />
■ Empty the tank and then reinstall drain<br />
screw onto the bottom of tank, turning<br />
until snug. Do NOT over tighten.<br />
■ Remove and drain filter cartridge. Reinstall.<br />
■ To place back in working order, fill tank<br />
with water and re-connect the plug.<br />
CLEANING THE FAUCET AND TANK<br />
■ Only use mild cleaners to clean the faucet<br />
and plastic components.<br />
■ Cleaners with acids, abrasives, alkaline or<br />
organic solvents will result in deterioration<br />
of the plastic components and void the<br />
warranty.<br />
FILTER GUIDE AND REPLACEMENT<br />
Replace filter cartridge when there is an obvious<br />
decrease in water flow to the faucet or if there is an<br />
objectionable taste or odor to the water.<br />
When the inlet and outlet ports have been closed<br />
and the filter’s internal pressure has been relieved,<br />
water (about 2 oz) will discharge from vent line.<br />
If the new filter cartridge cannot be inserted,<br />
insert the old one and turn until it stops, remove it<br />
and then retry the new cartridge.<br />
It is recommended that carbon filters be replaced<br />
within 12 months.<br />
Filter replacement instructions:<br />
■ Replace with an <strong>InSinkErator</strong> ® filter.<br />
■ Place pan or dish towel under the filter to<br />
catch water drainage during change.<br />
■ Slowly turn the cartridge counter-clockwise<br />
completely until it stops (1/4 turn).<br />
■ Pull cartridge straight down and discard.<br />
■ Insert new cartridge into filter head.<br />
■ Top surface of cartridge will become flush<br />
with the bottom of the filter head when<br />
fully engaged.<br />
■ Turn the cartridge clockwise until it stops<br />
(1/4 turn).<br />
■ Align the in/out arrow on the head and<br />
bracket assembly to the in/out arrow on<br />
the cartridge.<br />
■ Open faucet to expel trapped air.<br />
■ Run water for 3 minutes before usage.<br />
PROPERTY DAMAGE<br />
■ Regularly inspect the unit for any signs of<br />
leakage. If there are signs of water damage,<br />
immediately remove the unit from service.<br />
■ To avoid water damage from leakage,<br />
replace all cut, loose or split tubing.<br />
■ A drain pan, plumbed to an appropriate<br />
drain or outfitted with a leak detector,<br />
should be used in those applications where<br />
any leakage could cause property damage.