AMI NEWSLETTER - George McEwan on ... - Glenmore Lodge
AMI NEWSLETTER - George McEwan on ... - Glenmore Lodge
AMI NEWSLETTER - George McEwan on ... - Glenmore Lodge

Create successful ePaper yourself
Turn your PDF publications into a flip-book with our unique Google optimized e-Paper software.
the placement. Then fit the hook<br />
into the slot and gently tap the hook<br />
home into the ice, that’s tap not<br />
blooter! After it’s placed clip an<br />
extender to the sling or base of the<br />
hook. This reduces any leverage <strong>on</strong><br />
the hook so you are less likely to lift<br />
it out as you move past. Finally treat<br />
this as you would the smallest of<br />
micro wires i.e. it looks like pro,<br />
feels like pro but d<strong>on</strong>’t fall off <strong>on</strong>to it<br />
and expect miracles.<br />
Drive-ins (Snargs)<br />
Drive-ins or ‘Snargs’ are drive<br />
in/hack out protecti<strong>on</strong>. For a while<br />
back before ice screws became<br />
easier to place <strong>on</strong>e handed, they<br />
were the <strong>on</strong>ly piece of ice protecti<strong>on</strong><br />
that could be placed <strong>on</strong>e handed by<br />
the leaded <strong>on</strong> steep ice. Although<br />
they have been superseded by<br />
more modern screw designs they<br />
still have niche in the ice climber’s<br />
protecti<strong>on</strong> opti<strong>on</strong>s box. They can be<br />
placed above your head which is<br />
<strong>on</strong>e advantage or into small spaces<br />
where placing an ice screw might<br />
not be possible. Do mind that your<br />
poor sec<strong>on</strong>d will need to be able to<br />
get at the thing to remove it...<br />
In terms of placement you place<br />
them at a negative angle i<br />
e. angled up and away from the<br />
directi<strong>on</strong> of load (Figure 10). To do<br />
this you will need to create a<br />
starting hole (you can either use<br />
and exiting pick placement), place<br />
the drive-in into the slot then<br />
hammer it home. Because these<br />
drive-ins do not have as<br />
pr<strong>on</strong>ounced threads as ice screws<br />
you are relying primarily <strong>on</strong> the<br />
strength of the metal tube and the<br />
integrity of the ice to provide the<br />
strength. As I menti<strong>on</strong>ed at the start<br />
of this article though, I have fallen<br />
successfully <strong>on</strong>to a well-placed<br />
DMM Snag, so it proves they work!<br />
If you are w<strong>on</strong>dering why you can’t<br />
place drive-ins at a positive angle ie.<br />
in the directi<strong>on</strong> of pull, it’s because<br />
the threads <strong>on</strong> the drive-ins are very<br />
Figure 10<br />
Snarg placed at<br />
negative angle<br />
shallow, so will offer very little<br />
resistance to being pulled out.<br />
Placing Ice Screws<br />
So as we have seen we can make<br />
the best of the available ice<br />
protecti<strong>on</strong> opti<strong>on</strong>s by using careful<br />
and appropriate placement. There<br />
are several other opti<strong>on</strong>s we can<br />
use that may extend the ability of<br />
our protecti<strong>on</strong> to hold falls. When<br />
placing ice screws make sure you<br />
clear away all the surface crud. By<br />
making use of a previous axe<br />
placement you not <strong>on</strong>ly have a<br />
starting hole, but the crap ice has<br />
been cleared in the process of<br />
making the placement. At this point<br />
you will have an idea as to how<br />
good the ice is, and can then<br />
decide at what angle to place the<br />
screw to optimise its potential<br />
holding strength. I’m not going to<br />
go into the detail of placing ice<br />
screws <strong>on</strong> the lead, but just to<br />
remind you, if you need reminding,<br />
that placing ice screws <strong>on</strong> steep ice<br />
can be strenuous even if you are<br />
using the latest shiny, sharp screws.<br />
To make this process as efficient as<br />
possible, you do need to ensure<br />
you, or your students have a system<br />
sorted for placing screws. Having<br />
screws racked up <strong>on</strong> a clipper<br />
system, being able to free a hand<br />
from your ice tools etc all make this<br />
process faster – the more efficient it<br />
is to stop and place pro, the more<br />
likely you are to do just that; the<br />
more pro you place the greater the<br />
likelihood you’ll have gear that can<br />
hold a fall.<br />
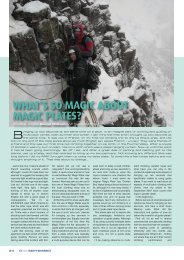
Using Load limiters or<br />
‘Screamers’<br />
When the screw has been placed<br />
you can then extend the screw by<br />
using a shock absorbing extender<br />
(called a ‘Screamer’). These load<br />
limiter extenders are designed to<br />
reduce the shock load <strong>on</strong> a screw<br />
by absorbing some of the energy of<br />
an impact force. Essentially load<br />
limiters are a length of tape with an<br />
eye at end (for clipping) which is<br />
then folded over itself and the folds<br />
held together by stitching. In the<br />
event of a high enough impact force<br />
the stitching is designed to<br />
c<strong>on</strong>secutively fail. The theory being<br />
that the stitching failing helps<br />
absorb some of the energy of the<br />
impact force. Figure 11 illustrates<br />
what happens when the load limiter<br />
is subjected to a high impact force.<br />
Different types of load limiter<br />
absorb different amounts of energy<br />
depending <strong>on</strong> how much webbing<br />
has been doubled over and<br />
stitched. For example the Charlet<br />
Moser ‘Nitro’ range has sacrificial<br />
stitching that is designed to fail at<br />
loads of 2.5kN. ‘Nitros’ are available<br />
in three lengths with the shortest<br />
having the most stitching and<br />
therefore the potential ability to<br />
absorb the most energy.<br />
Be warned though – these bits of<br />
kit are not miracle cures. Poor<br />
protecti<strong>on</strong> is still poor protecti<strong>on</strong><br />
and just because it is clipped with a<br />
load limiter will not necessarily<br />
make a huge amount of difference<br />
to its ability to hold a large impact<br />
force. Used sensibly, load limiters<br />
can decrease the impact force <strong>on</strong> an<br />
ice screw eg. the Nitro 3 produced<br />
by Charlet Moser can reduce the<br />
impact force by up to 50%.<br />
Stretchy ropes and<br />
dynamic belays<br />
You can also reduce impact forces<br />
<strong>on</strong> your ice protecti<strong>on</strong> by using<br />
ropes that are designed to allow low<br />
impact forces <strong>on</strong> anchors/runners.<br />
Many manufacturers now produce<br />
skinny double ropes that designed<br />
to do just that. Also using a belay<br />
device that allows some element of<br />
dynamic belaying would also help,<br />
but you do have to take care here<br />
with using skinny ropes and belay<br />
plates or you might just find you<br />
have a bit too much dynamism in<br />
the system. Of course, arresting<br />
falls dynamically, whether you are<br />
using rope stretch, or dynamic<br />
belaying or all of the above does<br />
come at a price – the climber ends<br />
up falling for l<strong>on</strong>ger. This does<br />
increase the risk of hitting, or<br />
landing <strong>on</strong> something <strong>on</strong> the way<br />
down and the c<strong>on</strong>sequent risk of<br />
injury. At least there is a better<br />
chance the gear might hold though!<br />
C<strong>on</strong>clusi<strong>on</strong>s<br />
So what does this all mean for us<br />
as ice climbers? As we have seen<br />
well placed ice protecti<strong>on</strong> is able to<br />
do the job we would like it to do ie.<br />
hold a big whipper, there are still<br />
two inescapable facts. The first is<br />
that protecti<strong>on</strong> is <strong>on</strong>ly as good as<br />
the ice we place it in. The sec<strong>on</strong>d,<br />
Charlet Moser ‘Nitro’<br />
even if the ice screw is ‘bomber’ just<br />
remember that half of your<br />
equipment is metal and very sharp,<br />
whilst the other half is all flimsy<br />
material covering your squishy<br />
body. So even if the ice screw holds<br />
the fall, you will be very lucky to<br />
escape injury. Comm<strong>on</strong> injuries<br />
after falls are boot top fractures<br />
caused by the climbers cramp<strong>on</strong><br />
shod boots catching <strong>on</strong> an edge<br />
during the fall snapping the ankle<br />
just above the boot. Nasty! So<br />
despite all the advances in ice<br />
climbing equipment and protecti<strong>on</strong><br />
we still share <strong>on</strong>e thing with the<br />
pi<strong>on</strong>eers of old – your key<br />
protecti<strong>on</strong> is good axe placements,<br />
a steady head, and the leader must<br />
not fall.<br />
Summary and<br />
C<strong>on</strong>clusi<strong>on</strong>s<br />
• ALL ice protecti<strong>on</strong> is <strong>on</strong>ly as good<br />
as the ice you place it in.<br />
• Before placing ice protecti<strong>on</strong>,<br />
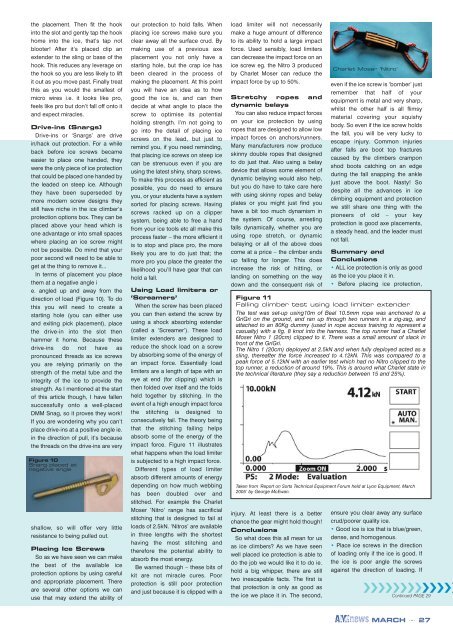
Figure 11<br />
Falling climber test using load limiter extender<br />
The test was set-up using10m of Beal 10.5mm rope was anchored to a<br />
GriGri <strong>on</strong> the ground, and ran up through two runners in a zig-zag, and<br />
attached to an 80Kg dummy (used in rope access training to represent a<br />
casualty) with a fig. 8 knot into the harness. The top runner had a Charlet<br />
Moser Nitro 1 (20cm) clipped to it. There was a small amount of slack in<br />
fr<strong>on</strong>t of the GriGri.<br />
The Nitro 1 (20cm) deployed at 2.5kN and when fully deployed acted as a<br />
sling, thereafter the force increased to 4.12kN. This was compared to a<br />
peak force of 5.12kN with an earlier test which had no Nitro clipped to the<br />
top runner, a reducti<strong>on</strong> of around 19%. This is around what Charlet state in<br />
the technical literature (they say a reducti<strong>on</strong> between 15 and 25%).<br />
Taken from ‘Report <strong>on</strong> Sorts Technical Equipment Forum held at Ly<strong>on</strong> Equipment, March<br />
2005’ by <str<strong>on</strong>g>George</str<strong>on</strong>g> <str<strong>on</strong>g>McEwan</str<strong>on</strong>g>.<br />
ensure you clear away any surface<br />
crud/poorer quality ice.<br />
• Good ice is ice that is blue/green,<br />
dense, and homogenous.<br />
• Place ice screws in the directi<strong>on</strong><br />
of loading <strong>on</strong>ly if the ice is good. If<br />
the ice is poor angle the screws<br />
against the directi<strong>on</strong> of loading. If<br />
❯❯❯❯❯❯❯❯❯❯❯❯❯<br />
C<strong>on</strong>tinued PAGE 29<br />
<str<strong>on</strong>g>AMI</str<strong>on</strong>g>news MARCH ... 27