WHAT'S SO MAGIC ABOUT MAGIC PLATES? - Glenmore Lodge
WHAT'S SO MAGIC ABOUT MAGIC PLATES? - Glenmore Lodge
WHAT'S SO MAGIC ABOUT MAGIC PLATES? - Glenmore Lodge

Create successful ePaper yourself
Turn your PDF publications into a flip-book with our unique Google optimized e-Paper software.
WHAT’S <strong>SO</strong> <strong>MAGIC</strong> <strong>ABOUT</strong><br />
<strong>MAGIC</strong> <strong>PLATES</strong>?<br />
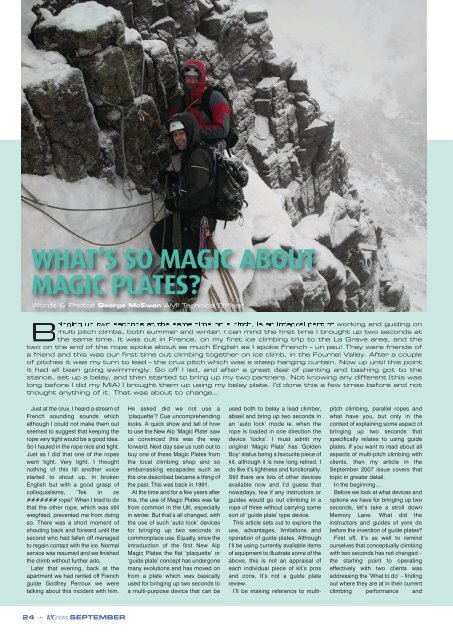
Words & Photos George McEwan AMI Technical Officer<br />
B<br />
ringing up two seconds at the same time on a pitch, is an integral part of working and guiding on<br />
multi pitch climbs, both summer and winter. I can mind the first time I brought up two seconds at<br />
the same time. It was out in France, on my first ice climbing trip to the La Grave area, and the<br />
two on the end of the rope spoke about as much English as I spoke French – un peu! They were friends of<br />
a friend and this was our first time out climbing together on ice climb, in the Fournel Valley. After a couple<br />
of pitches it was my turn to lead – the crux pitch which was a steep hanging curtain. Now up until this point<br />
it had all been going swimmingly. So off I led, and after a great deal of panting and bashing got to the<br />
stance, set up a belay, and then started to bring up my two partners. Not knowing any different (this was<br />
long before I did my MIA) I brought them up using my belay plate. I’d done this a few times before and not<br />
thought anything of it. That was about to change…<br />
Just at the crux, I heard a stream of<br />
French sounding sounds which<br />
although I could not make them out<br />
seemed to suggest that keeping the<br />
rope very tight would be a good idea.<br />
So I hauled in the rope nice and tight.<br />
Just as I did that one of the ropes<br />
went tight. Very tight. I thought<br />
nothing of this till another voice<br />
started to shout up, in broken<br />
English but with a good grasp of<br />
colloquialisms, ‘Tek in ze<br />
####### rope!’ When I tried to do<br />
that the other rope, which was still<br />
weighted, prevented me from doing<br />
so. There was a short moment of<br />
shouting back and forward until the<br />
second who had fallen off managed<br />
to regain contact with the ice. Normal<br />
service was resumed and we finished<br />
the climb without further ado.<br />
Later that evening, back at the<br />
apartment we had rented off French<br />
guide Godfrey Perroux we were<br />
talking about this incident with him.<br />
24 ... AMInews SEPTEMBER<br />
He asked did we not use a<br />
‘plaquette’? Cue uncomprehending<br />
looks. A quick show and tell of how<br />
to use the New Alp ‘Magic Plate’ saw<br />
us convinced this was the way<br />
forward. Next day saw us rush out to<br />
buy one of these Magic Plates from<br />
the local climbing shop and so<br />
embarrassing escapades such as<br />
the one described became a thing of<br />
the past. This was back in 1991.<br />
At the time and for a few years after<br />
this, the use of Magic Plates was far<br />
from common in the UK, especially<br />
in winter. But that’s all changed, with<br />
the use of such ‘auto lock’ devices<br />
for bringing up two seconds in<br />
commonplace use. Equally, since the<br />
introduction of the first New Alp<br />
Magic Plates the flat ‘plaquette’ or<br />
‘guide plate’ concept has undergone<br />
many evolutions and has moved on<br />
from a plate which was basically<br />
used for bringing up two seconds to<br />
a multi-purpose device that can be<br />
used both to belay a lead climber,<br />
abseil and bring up two seconds in<br />
an ‘auto lock’ mode ie. when the<br />
rope is loaded in one direction the<br />
device ‘locks’. I must admit my<br />
original ‘Magic Plate’ has ‘Golden<br />
Boy’ status being a favourite piece of<br />
kit, although it is now long retired, I<br />
do like it’s lightness and functionality.<br />
Still there are lots of other devices<br />
available now and I’d guess that<br />
nowadays, few if any instructors or<br />
guides would go out climbing in a<br />
rope of three without carrying some<br />
sort of ‘guide plate’ type device.<br />
This article sets out to explore the<br />
use, advantages, limitations and<br />
operation of guide plates. Although<br />
I’ll be using currently available items<br />
of equipment to illustrate some of the<br />
above, this is not an appraisal of<br />
each individual piece of kit’s pros<br />
and cons. It’s not a guide plate<br />
review.<br />
I’ll be making reference to multi-<br />
pitch climbing, parallel ropes and<br />
what have you, but only in the<br />
context of explaining some aspect of<br />
bringing up two seconds that<br />
specifically relates to using guide<br />
plates. If you want to read about all<br />
aspects of multi-pitch climbing with<br />
clients, then my article in the<br />
September 2007 issue covers that<br />
topic in greater detail.<br />
In the beginning…<br />
Before we look at what devices and<br />
options we have for bringing up two<br />
seconds, let’s take a stroll down<br />
Memory Lane. What did the<br />
instructors and guides of yore do<br />
before the invention of guide plates?<br />
First off, it’s as well to remind<br />
ourselves that conceptually climbing<br />
with two seconds has not changed –<br />
the starting point to operating<br />
effectively with two clients was<br />
addressing the ‘What to do’ – finding<br />
out where they are at in their current<br />
climbing performance and
experience – then addressing the<br />
‘How to do it’ – choice of climb<br />
appropriate to the client’s aims and<br />
abilities; what rope type and system<br />
(single Vs half; parallel Vs Series);<br />
belay method (Direct belay Vs Semidirect);<br />
how to rig the stance and so<br />
on. In addition, good and easy to<br />
understand communication between<br />
all members of the team was vital. In<br />
effect the seconds understood what<br />
was to happen, how it should<br />
happen and when it would happen.<br />
Then, as now, the key element was<br />
making judgements about all the<br />
above variables.<br />
So what did they use? Well all the<br />
methods used then could be and are<br />
still used. You could bring up two<br />
people on a body belay if that was<br />
appropriate, or you could use your<br />
belay plate, alternatively if the<br />
situation allowed and it was<br />
appropriate you would use two<br />
Italian Hitches, one for each<br />
client/student’s rope. Off course, all<br />
these methods are still in use today,<br />
all that guide plates give us is<br />
another option.<br />
A precursor of the guide plate was<br />
the Alpine Clutch. Although it worked<br />
it was not in common use, with most<br />
instructors and guides preferring to<br />
use the other three methods. The<br />
following tables outline the pros and<br />
cons of the methods listed above<br />
when used to bring up two seconds<br />
simultaneously:<br />
Indirect Belay Using<br />
Waist/Body Belay<br />
(Image 1)<br />
● Leader tied into belay using rope<br />
● Waist belay using both ropes<br />
Note: it is important to have the<br />
braking side on the same side as<br />
your attachment point to the anchor.<br />
Pros: Avoids full impact force on<br />
the belay in the event of a fall. (Use<br />
of rope, and dynamic belay<br />
increases dynamic element in<br />
system).<br />
Can be quick to arrange.<br />
Cons: Difficult to bring two<br />
clients/students up at same time if<br />
moving at different speeds. If one<br />
student weights the rope it is<br />
impossible to take in/pay out the<br />
other rope.<br />
Instructor is in the system,<br />
necessitating a potentially complicated<br />
escape if required.<br />
Semi Direct Using<br />
Belay Plate (Image 2)<br />
● Leader tied into belay using rope<br />
● Belay plate clipped into rope loop<br />
on harness<br />
Pros: Can be easier to give a<br />
tight rope in extremis, or hoist.<br />
Avoids full impact force on the<br />
belay in the event of a fall. (Use of<br />
rope, and dynamic belay increases<br />
dynamic element in system).<br />
Cons: Difficult to bring two<br />
clients/students up at same time if<br />
moving at different speeds. If one<br />
student weights the rope it is<br />
impossible to take in/pay out the<br />
other rope through the plate.<br />
Instructor is in the system<br />
necessitating a potentially complicated<br />
escape if required.<br />
Direct Belay Using<br />
Italian Hitch (Image 3)<br />
NOTE: Requires bomb proof anchors.<br />
Pros: Less strain on belayer.<br />
Leader not in the system.<br />
Fast method of bringing up<br />
second(s).<br />
Cons: Difficult to provide tight<br />
rope in extremis.<br />
Requires bomb proof anchors.<br />
I’m sure anyone reading this has<br />
used several if not all those methods<br />
outlined above. Then, as now, the<br />
body belay and the belay plate<br />
methods could be awkward to use if<br />
both seconds climbed at variable<br />
speeds. Likewise with the Italian<br />
Hitch method. Good briefings to<br />
ensure that the seconds climbed at a<br />
suitable speed, thus allowing the<br />
instructor/guide to take in the rope,<br />
and not develop long loops of slack<br />
were essential.<br />
One of the issues with using the<br />
two Italian Hitches was if one Italian<br />
Hitch was loaded it could be pulled<br />
flat against the other hitch causing<br />
them both to jam (Image 4). A<br />
method to avoid this happening used<br />
a spacer krab as shown in Image 5.<br />
As you can see none of the above<br />
methods were exactly easy to use<br />
when you had two seconds climbing<br />
at the same time. Also all these<br />
▲<br />
IMAGE 3<br />
SPON<strong>SO</strong>RED BY<br />
IMAGE 1 ▲<br />
IMAGE 2 ▲<br />
IMAGE 4 (LEFT) IMAGE 5 (RIGHT)<br />
▲<br />
AMInews SEPTEMBER ... 25
IMAGE 6 ▲<br />
The New Alp Magic Plate<br />
methods meant that the belayer had<br />
to pay attention to holding onto the<br />
braking ropes all the time, and they<br />
could be tiring to use, especially if<br />
their seconds had not heeded the<br />
brief about climbing slowly and were<br />
attempting to speed their way to the<br />
stance.<br />
New Alp Magic Plate<br />
or Plaquette (Image 6)<br />
When the New Alp ‘Magic Plate’<br />
came along it was a very useful piece<br />
of kit. It was a lightweight and simple<br />
flat piece of alloy with two slots in it,<br />
one being longer than the other (the<br />
longer one was to be used if bringing<br />
up one second as you could rotate<br />
the ‘breaking krab’ around and<br />
convert it into a lower if need be). It<br />
allowed the belayer to easily clip<br />
both ropes into the plate, and yard<br />
the rope in as the seconds climbed<br />
the pitch. Because it would lock<br />
automatically in the event of a slip the<br />
belayer could relax a bit and have a<br />
bit of a rest, maybe eat some food as<br />
they took the rope in.<br />
However, it was pretty much a<br />
device that was used primarily for<br />
bringing up two seconds (the<br />
26 ... AMInews SEPTEMBER<br />
Figure 1A<br />
Figure 1B<br />
instructions illustrated how you could<br />
use the plate to abseil and belay<br />
conventionally with but I’m not sure<br />
if anyone actually used them for that.<br />
Certainly from my own perspective I<br />
still carried a conventional belay<br />
plate to do the abseiling/belaying<br />
leader bit with). Another downside<br />
was if one of the seconds had to get<br />
a bit of slack that could be awkward<br />
to do, certainly not as easy as using<br />
a belay plate or an Italian Hitch.<br />
It was possible if you used a krab<br />
as the ‘break’ with an angular back<br />
bar rather than a rounded back bar,<br />
by ‘pumping’ the krab back and<br />
forward (Image 7) this allowed some<br />
slack to creep into the system.<br />
Incidentally it’s a method you can still<br />
use with the currently available guide<br />
plates which I’ll talk about shortly –<br />
although, as they are made of lighter<br />
materials, you have to watch you<br />
don’t damage your brand new<br />
lightweight guide plate. It is worth<br />
noting you had/have to use a square<br />
section krab to do this, as you need<br />
the krab to bite and release (Image<br />
8). Using a square section krab also<br />
had the advantage that the krab<br />
would bite the rope better if/when it<br />
was frozen.<br />
Although the above method allows<br />
some slack to be introduced it was<br />
far more difficult to lower your<br />
second(s) back down the pitch<br />
should that be necessary. One option<br />
was to attach a French Prusik to the<br />
loaded rope(s) as shown in Fig 1A,<br />
‘pump’ the ‘break’ krab back and<br />
Figure 1C<br />
forward to transfer the load onto the<br />
French Prusik, then when the load<br />
was on the prusik, put the dead side<br />
of the loaded rope(s) into an Italian<br />
Hitch (Fig1B), remove the Magic<br />
Plate and lower (Fig1C). Not very<br />
quick but it did give a very smooth<br />
and controlled lower. Again this<br />
method will still work with current<br />
guide plates although as we will see<br />
many new plates such as the<br />
Reverso 3 and the XTC Guide make<br />
this lowering process quicker to do<br />
using the plate.<br />
So although the Magic Plate<br />
addressed the need to have a simple<br />
device that allowed two seconds to<br />
be belayed up a pitch with the<br />
minimum of fuss and effort, it pretty<br />
much, all things considered, only did<br />
one job well. Subsequent<br />
developments were to see the<br />
introduction of a new generation of<br />
devices which allowed the climber to<br />
do more than one job with the device<br />
– belay a lead climber, abseil, and of<br />
course bring up two seconds. Before<br />
all you retro freaks rush out to buy a<br />
New Alp Magic Plate it would appear<br />
that they are no longer available…<br />
Today…<br />
There are several devices currently<br />
available which allow the belayer to<br />
use the same device for belaying a<br />
lead climber, abseiling and bringing<br />
up two seconds. Figure 2 (above<br />
right) shows some examples of the<br />
common types currently in use in the<br />
UK. The first three models don’t allow<br />
▲<br />
▲<br />
Attach a French Prusik<br />
to the loaded rope(s) as<br />
shown in Figure 1A<br />
Pump the ‘break’ krab<br />
back and forward to<br />
transfer the load onto<br />
the French Prusik then,<br />
when the load was on<br />
the prusik, put the dead<br />
side of the loaded<br />
rope(s) into an Italian<br />
Hitch Figure 1B<br />
Remove the Magic Plate<br />
and lower<br />
Figure 1C<br />
an easy lower from within the device,<br />
whilst the last two are designed to<br />
allow the belayer to lower their<br />
seconds from the device.<br />
Although there are more choices<br />
available, I would still suggest the<br />
original ways of bringing up two<br />
seconds – body belay, belay plate<br />
and Italian Hitches – still have a place<br />
in our tool kit of techniques. Guide<br />
plates just give us another option.<br />
Methods<br />
All of the above devices have their<br />
own unique foibles regarding their<br />
use. My top tip – and I know it goes<br />
against the grain in outdoor learning<br />
– but it might be an idea to read the<br />
instructions before using a piece of<br />
kit you are not familiar with and<br />
maybe even give it a trial run in a<br />
controlled situation before<br />
experimenting with your new toy with<br />
real people.<br />
I can vouch that the experiential<br />
method of learning how to use a new<br />
belay device does not always work<br />
effectively, nor does it inspire<br />
confidence in your mates as you<br />
puzzle how to work your new toy<br />
whilst they dangle above the very<br />
hard, and far away ground. One time<br />
we were ice climbing out in Canada<br />
as a rope of three. One of our team,<br />
the newbie of our wee group, had<br />
never used a guide plate. He was<br />
given a few minutes of instruction by<br />
one of the others in the team, and<br />
then off he went and led the crux<br />
pitch (which he did in grand style as<br />
IMAGE 7<br />
‘...using a krab as the ‘break’ with an<br />
angular back bar, rather than a rounded<br />
back bar, and ‘pumping’ the krab back and<br />
forward allowed some slack to creep into<br />
the system.’<br />
▲<br />
IMAGE 8<br />
‘...use a square<br />
section krab to<br />
do this, as you<br />
need the krab to<br />
bite and release.’
▲ FIGURE 2<br />
From left to right:– Kong Gi Gi (similar to the New Alp Magic Plate);<br />
Petzl Reverso (this is the original model now superseded by the<br />
Reverso 3); Cassin PIU’; Black Diamond ATC Guide; Petzl Reverso 3<br />
(one of the lightest guide plates currently available)<br />
it was a very steep pitch). In due<br />
course, he brought the other two of<br />
us up the pitch. I well mind it being<br />
steep and a couple of times as I was<br />
removing ice screws thinking ‘a tight<br />
rope would be good!’ When I got to<br />
the stance I was slightly shocked to<br />
see the plate simply clipped to the<br />
anchor and the rope clipped in such<br />
▲ IMAGE 9<br />
‘...another option is<br />
to clip a sling to the<br />
breaking krab...’<br />
that a way that it was just running<br />
through the krab with zero breaking<br />
or friction abilities whatsoever. So...<br />
moral of the story is read the<br />
instructions, or at least practice using<br />
your new toy before putting it to use<br />
on an actual climb.<br />
This next section will look at how<br />
these devices can be used, and<br />
illustrate some ways you can adapt<br />
what the instructions say to make<br />
some of the tasks you may wish to<br />
carry out on a stance a bit easier, as<br />
well as highlight some top tips and<br />
handy hints. I’ll not be running<br />
through how to use all of these<br />
devices on an individual basis, but<br />
will group them into broad<br />
categories, so the old style Reverso<br />
and the Gi Gi are devices that do not<br />
allow you to easily lower the<br />
seconds, whilst the brand new<br />
Reverso 3 and the ATC Guide all<br />
allow you to lower your seconds<br />
using the plate in ‘guide mode’ ie.<br />
when it is set up as a guide plate.<br />
Devices that do not<br />
easily allow lowers<br />
These are the older generation of<br />
guide plates. The Gi Gi from Kong is<br />
a development of the original Magic<br />
Plate but has a raised spine running<br />
its length. This fulcrum makes it<br />
easier, especially if using ropes of<br />
slightly different diameters, in the<br />
event of one rope being loaded to<br />
easily take in the other rope. The<br />
instructions for the Gi Gi show it<br />
being used for abseiling etc but I<br />
must admit I tended to only use mine<br />
as a guide plate. It’s very similar to<br />
the old school New Alp Magic Plate<br />
in how you use the device and how<br />
you set-up to lower.<br />
The old style Reverso is one of the<br />
first plates that allowed you to easily<br />
use it as both a guide plate and as a<br />
belay/abseil device. This type of<br />
Reverso is being replaced by the<br />
new Reverso 3 (see below).<br />
To lower one of the seconds down<br />
you can do the pump action as<br />
shown in Image 7 – remember you<br />
need to use a krab that has a square<br />
or T-section back bar to make this<br />
effective, and the rope has to be fully<br />
weighted. Ideal if all you have to do is<br />
allow a small amount of slack into the<br />
system.<br />
If you were to lower one, or both, of<br />
your seconds down the pitch, you<br />
may choose to use the method<br />
shown in Fig 1 A to C. The advantage<br />
of this method is that it allows a nice<br />
safe and controlled lower. Another<br />
option is to clip a sling to the<br />
breaking krab as shown in Image 9,<br />
clip this through the anchor as<br />
shown, then either clip it to yourself<br />
or stand in it. This releases the<br />
breaking krab and allows you to<br />
lower. HOWEVER, this method is<br />
either on or off ie. get this wrong and<br />
you can drop the second. It requires<br />
careful practice to get right. My own<br />
opinion is if I were going to lower<br />
someone back down a pitch, I would<br />
go for the method shown in Fig 1 A to<br />
C as it allows far more control.<br />
Devices that easily<br />
allow lowers<br />
The next category includes all<br />
these devices that allow you to lower<br />
using the plate in guide mode ie. self<br />
locking. They all have a similar<br />
design as you can see. All of these<br />
devices can be used as belay/abseil<br />
devices, and can be used to bring up<br />
two seconds at the same time.<br />
I’ll use the new Reverso 3 to<br />
illustrate how you can lower your<br />
seconds using the device. So you set<br />
the plate up in guide mode. Again, if<br />
you use a krab with a square or Tsection<br />
back bar, you still have the<br />
option of using that pump action to<br />
release some slack into the system if<br />
the rope(s) are weighted (I did notice<br />
though that, as the Reverso 3 is very<br />
light – 72g compared to the ATC<br />
guide’s weight of 102g – then using<br />
this method does tend to mark the<br />
back of the device as the metal is<br />
softer than the krab you are using).<br />
However, the real beauty of these<br />
devices is they allow you to lower,<br />
easily and quickly, using the plate.<br />
Image 10 shows how this is done, as<br />
per the instructions from Petzl, when<br />
one second has weighted the rope.<br />
You jam a krab into the small hole at<br />
the front of the device and pull up<br />
and back (Image 10A). This releases<br />
the locking krab and allows you to<br />
FIGURE OF EIGHT<br />
TO BACK UP<br />
LOADED ROPE<br />
UNLOADED<br />
ROPE<br />
SPON<strong>SO</strong>RED BY<br />
LOADED<br />
ROPE<br />
▲ IMAGE 10<br />
‘...the real beauty of these is<br />
they allow you to lower, easily<br />
and quickly, using the plate...’<br />
smoothly lower the second. One of<br />
the things to bear in mind with this<br />
method is that it can still be a bit<br />
binary ie. off or on. Care should be<br />
taken to ensure you have a good<br />
hold of the lowering rope because<br />
when that load comes onto the<br />
breaking rope it will do so suddenly –<br />
which is why the other second’s rope<br />
has a back-up figure of eight tied into<br />
it, although another option would be<br />
to have the other second continue to<br />
climb to get onto the belay before<br />
you start lowering the stuck second.<br />
In practice, what I have found is<br />
that this can be awkward to do and,<br />
as I said, it is a bit on or off so care<br />
has to be taken. What I have found<br />
works just as effectively is the<br />
method shown in Image 11 – this<br />
time it shows both seconds being<br />
lowered. What I would suggest is to<br />
run the braking rope through the<br />
anchor as shown in Image 11. This<br />
then allows a more controlled<br />
braking force to be exerted on the<br />
braking rope. Note: I’ve changed the<br />
way the plate faces. By setting up the<br />
plate like so, it’s easier to clip your<br />
seconds into the belay without<br />
▲ IMAGE 10A<br />
‘You jam a krab into<br />
the small hole at the<br />
front of the device and<br />
pull up and back.’<br />
AMInews SEPTEMBER ... 27
ROPE RUN<br />
THROUGH TOP<br />
KRABS<br />
STUCK<br />
SECONDS<br />
▲ IMAGE 11<br />
Note: Reverso 3 is<br />
attached other way<br />
round to facilitate easier<br />
clipping of seconds onto<br />
belay.<br />
having their ropes coming<br />
underneath the device and mitigates<br />
against any tangles.<br />
I would not just read this though –<br />
nothing beats having a play around<br />
with your guide plate before heading<br />
out onto the crag to try it out with<br />
your mates or clients.<br />
One issue of lowering your clients<br />
is what do they do when they get<br />
back down to the stance they’ve just<br />
left – assuming of course they have<br />
stripped the belay? On balance, it<br />
might be better to assist them in<br />
climbing past the section they are<br />
struggling with. One advantage with<br />
guide plates is it is very easy to set<br />
OTHER SECOND<br />
ON STANCE<br />
& CLIPPED<br />
IN<br />
PULL<br />
UP<br />
ROPEMAN<br />
OR PRUSIK<br />
ATTACHED TO<br />
LOAD ROPE<br />
STUCK<br />
SECOND<br />
▲ IMAGE 12<br />
‘...in this example the<br />
other second has made<br />
it to the stance and is<br />
clipped in.’<br />
up an unassisted hoist. Image 12<br />
shows this in action using a<br />
Ropeman, but you could just as<br />
easily use a prusik – in this example<br />
the other second has made it to the<br />
stance and is clipped in. Using an<br />
unassisted hoist allows you to give a<br />
great deal of help to a struggling<br />
second. This has the advantage that<br />
if one or both of your seconds are<br />
struggling then you can quickly and<br />
easily give them a very tight rope. It’s<br />
easy to set up and equally as easy to<br />
remove so they need never know<br />
that your superhuman strength came<br />
not from superpowers but from slick<br />
improvised rescue skills!<br />
top tips and handy hints<br />
Tip No 1<br />
When using the device in guide<br />
mode, always use a krab with a<br />
square or T-section back bar as<br />
the braking bar. This allows you<br />
to pump the krab to lower a<br />
loaded rope. In addition it<br />
provides better bite when using<br />
iced up or muddy/wet ropes.<br />
Krabs with round back bars do<br />
▲ IMAGE 13<br />
▲<br />
IMAGE 14<br />
not bite so well and it is possible,<br />
with icy ropes, that the device<br />
does not lock as the broad<br />
section of the krab’s back bar<br />
fails to bite through the icy<br />
covering on the rope, causing it<br />
to not lock but run.<br />
Tip No 2<br />
If you set your guide plate up as<br />
shown in Image13<br />
you’ll find it easier<br />
to clip your<br />
seconds’ ropes<br />
into the belay<br />
without crossing<br />
them or getting into<br />
a muddle.<br />
Tip No 3<br />
You don’t always<br />
have to clip the<br />
seconds’ ropes<br />
into the belay. If<br />
All this talk of lowering or hoisting<br />
seconds does beg the question –<br />
could you have avoided this drama<br />
in the first place? That question takes<br />
us back full circle and the first<br />
paragraph of ‘In the beginning’. The<br />
starting point to operating effectively<br />
with two clients is addressing the<br />
‘What to do’ – finding out where they<br />
are at in their current climbing<br />
performance and experience – then<br />
addressing the ‘How to do it’ –<br />
choice of climb appropriate to the<br />
clients aims and abilities; what rope<br />
type and system (single Vs half;<br />
parallel Vs Series); belay method<br />
(Direct belay Vs Semi-direct); how to<br />
rig the stance and so on.<br />
In addition, good and easy to<br />
understand communication between<br />
all members of the team is vital. In<br />
effect, the seconds understand what<br />
is to happen, how it should happen<br />
and when it will happen. So you see,<br />
although we get new toys to play<br />
with as the years roll on, some things<br />
just don’t change – it’s still, and<br />
always will be, about making the<br />
right call at the right time.<br />
you have two guide plates, you<br />
can leave your seconds clipped<br />
to the first guide plate as shown<br />
in Image 14. Then, at the next<br />
stance, you whip out the other<br />
guide plate you are carrying and<br />
bring up your team. This method<br />
has the advantage that it is very<br />
quick.<br />
However it does presuppose<br />
that you are planning on bringing<br />
both seconds up at the same<br />
time, or at least ensure you have<br />
both on belay as, once they<br />
unclip that braking krab from the<br />
plate, then both are no longer<br />
secured to the anchor.<br />
Tip No 4<br />
Strive to use high anchor points<br />
as shown in Image 15. It makes<br />
pulling in the ropes easier and<br />
makes subsequent stacking of<br />
your seconds easier.<br />
SPON<strong>SO</strong>RED BY<br />
Acknowledgments<br />
Thanks to Allen Fyffe, Ian Sherrington<br />
and the guys on the MIA Training<br />
Course at the <strong>Lodge</strong> in late July 2008.<br />
Sources<br />
www.kong.it<br />
www.bdel.com<br />
http://en.petzl.com<br />
Summary<br />
As we have seen the use of guide<br />
plates is a comparatively modern<br />
idea. They’ve come a long way from<br />
the basic flat metal plate of the New<br />
Alp Magic Plate, yet methods such<br />
as using belay plates and body<br />
belays, still have a place in any<br />
instructor/guide’s technical repertoire.<br />
Guide plates do make the whole<br />
process of bringing up two seconds<br />
more efficient, but they still rely on<br />
the instructor/guide making sound<br />
judgements about where, why and<br />
how they use these devices. Given<br />
that guide plates work best off direct<br />
belays, we do have to ensure the<br />
belay we are using is totally bomb<br />
proof. If in doubt, best to use some<br />
other method, and consider bringing<br />
up your seconds one at a time.<br />
Technical considerations aside, we<br />
still have to make appropriate<br />
judgements about the nature of the<br />
climb we are undertaking with our<br />
clients and whether it is appropriate<br />
for them.<br />
I’ve bundled a collection of top tips<br />
and handy hints for using these<br />
guide plates below.<br />
▲ IMAGE 15<br />
AMInews SEPTEMBER ... 29