
You also want an ePaper? Increase the reach of your titles
YUMPU automatically turns print PDFs into web optimized ePapers that Google loves.
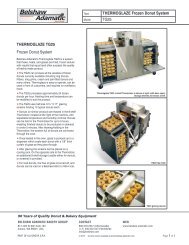
Donut Cutter<br />
<strong>Type</strong> F<br />
Operator’s <strong>Manual</strong><br />
<strong>Belshaw</strong> Bros., Inc.<br />
814 44 th Street NW, Suite 103<br />
Auburn, WA 98001 USA<br />
Phone: 206-322-5474 • Fax: 206-322-5425<br />
E-mail: service@belshaw.com • http://www.belshaw.com
If you accept the machine from the shipping<br />
company, you are, in effect, saying that the<br />
machine is in good condition, and you must pay<br />
for the machine.<br />
The Freight Company has accepted responsibility<br />
for the safe delivery of our machines.<br />
For your protection, inspect the machine to see<br />
that no parts are bent, scratched, or otherwise<br />
damaged.<br />
If any damage has occurred in shipping, file a<br />
freight claim with the shipping company<br />
immediately.<br />
EQUIPMENT RECORD<br />
Please provide the information below when you correspond with us about your machine.<br />
Purchased by _____________________________________________________________________<br />
Installed by ______________________________________________________________________<br />
Date of Installation ________________________________________________________________<br />
Model number ___________________________________________________________________<br />
Serial number<br />
010208<br />
MN-1532EN<br />
<strong>Belshaw</strong> Bros., Inc.<br />
814 44 th Street NW, Suite 103<br />
Auburn, WA 98001 USA<br />
Phone: 206-322-5474 • Fax: 206-322-5425<br />
E-mail: service@belshaw.com • http://www.belshaw.com
Contents<br />
1 Operation 1<br />
2 Cleaning 2<br />
3 Maintenance 3<br />
Daily 3<br />
Weekly 3<br />
Every Six Months 4<br />
Storing the Cutter 4<br />
4 Donut-Making Helps 5<br />
Tips on Making Quality Cake Donuts 5<br />
Calculating Correct Water Temperature 6<br />
Ratios of Plunger Sizes to Donut Weights 6<br />
Temperature Conversion 6<br />
<strong>Belshaw</strong> Bros., Inc. • www.belshaw.com • Phone 206-322-5474 • Fax 206-322-5425<br />
Donut Cutter <strong>Type</strong> F OM MN-1532EN iii
Preface<br />
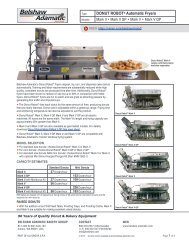
The <strong>Type</strong> F Donut Cutter is designed to cut cake<br />
donut products and deposit them in a variety of<br />
fryers. It is designed to be mounted on a wall, or<br />
on a column, attached to the fryer.<br />
In the European Community, the machine is<br />
available with the following electrical<br />
configurations:<br />
• 220 volts, 1 phase, 50 hertz<br />
• 380 volts, 3 phase, 50 hertz<br />
• 240 volts, 1 phase, 50 hertz<br />
• 415 volts, 3 phase, 50 hertz<br />
The <strong>Type</strong> F Donut Cutter produces only 75.5<br />
dB(A) of equivalent A-weighted sound pressure<br />
at workstations. The C600G-E system (C600G-<br />
E, FM600-E, <strong>Type</strong> F Donut Cutter, FT600-E,<br />
DC600-E, and CA600-E) produces 71.5 dB(A).<br />
This has been determined while running the<br />
cutter with no batter in the hopper, using a Bruel<br />
& Kjaer sound level meter, type 2236.<br />
During production, the operator must move the<br />
Cutter, holding the guide handle, to deposit<br />
donuts in the desired locations in the fryer. The<br />
operator must work safely at all times and read<br />
this manual, following its instructions and<br />
warnings.<br />
A thorough understanding of how to install,<br />
maintain, and safely operate the <strong>Type</strong> F Donut<br />
Cutter will prevent production delays and<br />
injuries. Heed the following warnings and all<br />
other warnings that appear in this manual:<br />
• Make sure the machine is mounted securely.<br />
Doing so will prevent the machine from<br />
tipping over or falling, which could cause<br />
serious injury.<br />
• When the machine is column-mounted on a<br />
fryer, make sure the fryer is securely fastened<br />
to the floor. If the fryer is not fastened to the<br />
floor, the weight of the cutter could cause the<br />
fryer to tip over, resulting in serious burns,<br />
other injury, or death.<br />
• To avoid being seriously injured, never put<br />
your hand in the hopper while the machine is<br />
connected to the power source.<br />
• To avoid being seriously injured, never put<br />
your hand between the trip arms while the<br />
machine is connected to the power source.<br />
• To avoid electrocution, or other injury,<br />
unplug the machine before attempting any<br />
adjustment, repair, disassembly, or cleaning.<br />
• To avoid damaging the machine, never use<br />
force to assemble, disassemble, operate,<br />
clean, or maintain it.<br />
• Be careful never to get shortening, water, or<br />
other materials on the floor. If anything does<br />
get spilled on the floor, clean the area<br />
immediately. Materials on the floor can<br />
cause people to slip or fall, resulting in<br />
serious injury, or loss of life.<br />
• To prevent unintentional startup and possible<br />
fire, unplug the machine if there is a local<br />
power outage. When the power is restored, it<br />
is safe to plug the machine in again.<br />
• To avoid electrocution, make sure that all<br />
electrical cords are not frayed, or cracked,<br />
and they do not pass through any water, or<br />
shortening.<br />
• Make sure that all electrical cords are routed<br />
so that no one will trip over them.<br />
<strong>Belshaw</strong> Bros., Inc. • www.belshaw.com • Phone 206-322-5474 • Fax 206-322-5425<br />
iv MN-1531EN Donut Cutter <strong>Type</strong> F OM
1 Operation<br />
Read each step completely prior to doing what it<br />
tells you to do.<br />
1. Select the desired donut weight as follows:<br />
a. Loosen the dial lock nut on the side of<br />
the cutter head.<br />
b. Turn the pointer to the desired number<br />
on the dial. (The higher the number, the<br />
larger the donuts will be.)<br />
c. Tighten the dial lock nut.<br />
WARNING<br />
To avoid serious injury, never adjust the<br />
product size while the motor is on.<br />
2. Put dough into the hopper.<br />
3. Move the power switch on the motor to the<br />
ON position.<br />
4. Expel any air that is trapped in the cylinder<br />
as follows:<br />
a. Hold a bowl under the cutter.<br />
b. Squeeze the clutch lever toward the<br />
handle, and allow two or three donuts to<br />
drop into the bowl.<br />
c. Release the clutch lever.<br />
d. Put the donuts back in the hopper.<br />
5. Swing the cutter over the fryer kettle and<br />
squeeze the clutch lever to deposit donuts in<br />
the fryer. You should move the cutter about<br />
4”/10 cm after every cut.<br />
If the thermal overload circuit breaker cuts<br />
off the power to the motor during operation,<br />
push the red reset button.<br />
WARNING<br />
To avoid serious injury, never put your<br />
hand in the hopper, under the hopper, or<br />
between the trip arms while the machine is<br />
connected to the power source.<br />
6. To use the last of the dough in the hopper,<br />
use a rubber or plastic spatula to push the<br />
dough to the bottom of the hopper. Do not<br />
use a metal utensil; it could scratch the<br />
hopper.<br />
7. When you are done cutting donuts, release<br />
the clutch lever and swing the cutter away<br />
from the fryer kettle.<br />
<strong>Belshaw</strong> Bros., Inc. • www.belshaw.com • Phone 206-322-5474 • Fax 206-322-5425<br />
Donut Cutter <strong>Type</strong> F OM MN-1532EN 1
2 Cleaning<br />
Clean the <strong>Type</strong> F Donut Cutter after every use.<br />
Follow these steps:<br />
1. Turn the motor off and disconnect the<br />
machine from the power source.<br />
WARNING<br />
To avoid electrocution or other injury,<br />
unplug the machine before cleaning.<br />
2. Put one of your hands underneath the<br />
cylinder.<br />
CAUTION<br />
If you do not keep your hand under the<br />
cylinder when you loosen the plunger, the<br />
plunger will fall on through and be<br />
damaged.<br />
3. Loosen the wing nut that holds the crown<br />
bearing in place.<br />
4. Remove the trip arm guard.<br />
5. Loosen the wing nut that holds the hinge<br />
clamp in place.<br />
6. Open the hinge clamp and remove the<br />
hopper, and the plunger, by pulling them<br />
forward.<br />
7. If desired, remove the cylinder from the<br />
hopper. If you cannot remove it at first, run<br />
hot water on the hopper and cold water on<br />
the cylinder, and try again.<br />
8. Wash the cutter, hopper, and cylinder<br />
separately, using warm water, a mild<br />
detergent, and a non-abrasive scrubber.<br />
9. Rinse these parts in clear water.<br />
10. Dry the parts.<br />
11. If desired, wipe the rest of the machine using<br />
a damp cloth.<br />
WARNING<br />
To avoid electric shock, serious burns, and<br />
equipment damage, never allow water to<br />
enter the cutter head or the motor.<br />
<strong>Belshaw</strong> Bros., Inc. • www.belshaw.com • Phone 206-322-5474 • Fax 206-322-5425<br />
2 MN-1532EN Donut Cutter <strong>Type</strong> F OM
3 Maintenance<br />
WARNING<br />
To avoid electrocution or other injury,<br />
unplug the machine before performing<br />
maintenance.<br />
WARNING<br />
If grease gets on the floor, clean the area<br />
immediately. Grease on the floor can cause<br />
someone to slip, fall, be seriously injured,<br />
or even die.<br />
Daily<br />
Taking Care of the Plunger and<br />
Cylinder<br />
The plunger and cylinder are precision<br />
equipment. Always handle them carefully and<br />
avoid dropping them. If you do, they will<br />
perform well for years.<br />
Every day, after you clean and dry the plunger<br />
and the cylinder, coat them with a thin film of<br />
cooking oil. Doing so will keep them from<br />
rusting.<br />
Lubricating the Center Rod<br />
Before starting and after every two hours of<br />
operation, apply several drops of edible-grade<br />
mineral oil to the center rod, directly above the<br />
trip arm guard. This will allow the center rod to<br />
move smoothly through the crown bearing.<br />
Weekly<br />
WARNING<br />
DO NOT allow grease/lubrication to get<br />
into the donut hopper, or to come in<br />
contact with the donut mixture.<br />
Lubricating the Shaft<br />
Once a week, put one drop of food grade 30weight<br />
oil through the lubricating hole that is in<br />
the cam case, right next to the dial. (This hole is<br />
tapered; do not confuse it with the access hole in<br />
the dial, which is larger and not tapered.)<br />
Lubricating the Cams and Trip<br />
Arm Pivot Pins<br />
Once a week, apply several drops of food grade<br />
30-weight oil through each of the two holes in<br />
the top of the cam case. (The rear hole is for<br />
lubricating the trip arm pivot pins. The other<br />
hole is for lubricating the cams.)<br />
Draining the Cam Case<br />
Once a week, drain the oil out of the cam case as<br />
follows:<br />
1. Remove the trip arm guard, hopper, and<br />
plunger.<br />
2. Lift the frame assembly off of the pivot arm<br />
pin.<br />
3. Hold the frame assembly so the trip arms<br />
point downward and allow any accumulated<br />
oil to run out of the cam case.<br />
<strong>Belshaw</strong> Bros., Inc. • www.belshaw.com • Phone 206-322-5474 • Fax 206-322-5425<br />
Donut Cutter <strong>Type</strong> F OM MN-1532EN 3
4. Wipe the excess oil from the trip arms and<br />
the cam case.<br />
5. Put the frame assembly back on the pivot<br />
arm pin.<br />
6. Re-install the plunger, hopper, and trip arm<br />
guard.<br />
Lubricating the Cam Shaft<br />
Once a week, lubricate the camshaft as follows:<br />
1. Disconnect the machine from the power<br />
source.<br />
2. Loosen the wing nut that holds the crown<br />
bearing in place.<br />
3. Turn the dial so the trip arms spread apart.<br />
4. Use a narrow paintbrush to apply ediblegrade<br />
grease to the camshaft through the<br />
opening between the trip arms.<br />
5. Hand-tighten the wing nut that holds the<br />
crown bearing in place.<br />
Lubricating the Gears and the<br />
Clutch<br />
The oil in the gearbox should come up all the<br />
way to the fill hole, which is located on the lower<br />
part of the gearbox. Once a week, check the<br />
level of the oil and, if necessary, add oil, as<br />
follows:<br />
1. Make sure the F machine is mounted in the<br />
upright operating position.<br />
2. Remove the plug from the fill hole.<br />
3. Check the oil level.<br />
4. If necessary, pump 90-weight oil into the<br />
gearbox until it begins to overflow.<br />
5. Allow the excess oil to drain out of the hole.<br />
6. Replace the plug.<br />
7. Wipe the oil off of the gearbox exterior.<br />
Every Six Months<br />
Every six months replace the oil in the gearbox<br />
as follows:<br />
1. Remove the trip arm guard, hopper, and<br />
plunger.<br />
2. Lift the frame assembly off of the pivot arm<br />
pin.<br />
3. Remove the plug from the fill hole.<br />
4. Allow the oil to drain from the gearbox into<br />
a suitable container.<br />
5. Recycle or dispose of the used oil properly.<br />
6. Pump 90-weight oil into the gearbox until it<br />
begins to overflow.<br />
7. Allow the excess oil to drain out of the hole.<br />
8. Replace the plug.<br />
9. Wipe the oil off of the gearbox exterior.<br />
10. Put the frame assembly back on the pivot<br />
arm pin.<br />
11. Install the plunger, hopper, and trip arm<br />
guard.<br />
Storing the Cutter<br />
If the cutter is to be stored for any length of time,<br />
please use the following procedure:<br />
Store the cutter upright. If it cannot be stored<br />
upright, drain the oil from the gear box. (The<br />
gearbox is not “watertight,” and should not be<br />
sprayed with water for cleaning purposes).<br />
<strong>Belshaw</strong> Bros., Inc. • 1750 22 nd Ave. S. • Seattle, WA 98144 • Phone 206-322-5474 • Fax 206-322-5425<br />
4 MN-1531EN Donut Cutter <strong>Type</strong> F OM
4 Donut-Making Helps<br />
Tips on Making Quality<br />
Cake Donuts<br />
• Use the correct batter temperature.<br />
In general, the correct batter temperature is<br />
75°-80°F/24°-27°C. Check the mix<br />
manufacturer’s instructions, as the<br />
recommended temperature range may vary.<br />
If the batter is too warm, the donuts will lack<br />
volume and may “ring out” or be misshapen.<br />
If the batter is too cold, the donuts will stay<br />
under the shortening too long, fry too<br />
slowly, and crack open or ball up. They may<br />
also absorb excess shortening and lose<br />
volume.<br />
• Use the correct floor time.<br />
A floor time of 10 minutes between mixing<br />
and cutting allows the baking powder to<br />
react with the water. This helps the donuts<br />
attain the proper volume the proper level of<br />
shortening penetration.<br />
If the floor time exceeds 30 minutes, the mix<br />
will gas off, the donuts will lose volume and<br />
shape and will absorb too much shortening.<br />
• Use the correct frying temperature.<br />
The correct shortening temperature for<br />
frying is 370°-380°F/188°-193°C.<br />
If the shortening is too hot, the donuts will<br />
fry too quickly on the outside and will lose<br />
volume. The donuts may also become dense<br />
inside.<br />
If the shortening is too cold, the donuts will<br />
spread too rapidly, will form large rings, will<br />
tend to crack open, will be too light in<br />
appearance, and will absorb too much<br />
shortening.<br />
• Maintain the proper shortening level. We<br />
recommend a distance of 1 1/4” between the<br />
cutter and the shortening.<br />
If the shortening is too deep, the donuts may<br />
not turn over when they reach the turner,<br />
causing them to cook unevenly.<br />
If the shortening is too shallow (too far<br />
below the cutter), the donuts may not drop<br />
flat, may turn over while submerging and<br />
surfacing, and may become irregular,<br />
cracked, or rough-crusted.<br />
• Ensure that the donuts absorb the right<br />
amount of shortening.<br />
Donuts should absorb 1-1/2 to 3 oz/42 to 85<br />
g of shortening per dozen, depending on<br />
their weight. You can achieve proper<br />
absorption by following tips 1-3.<br />
• If the donuts do not absorb enough<br />
shortening, they will not keep well.<br />
If they absorb too much shortening, they will<br />
lose volume and may become misshapen. If<br />
this happens, follow tips 1-3, mix the batter<br />
a little longer than usual, turn the donuts as<br />
soon as they become golden brown, and turn<br />
the donuts only once.<br />
<strong>Belshaw</strong> Bros., Inc. • www.belshaw.com • Phone 206-322-5474 • Fax 206-322-5425<br />
Donut Cutter <strong>Type</strong> F OM MN-1532EN 5
Calculating Correct Water<br />
Temperature<br />
The following is an example of how to calculate<br />
the correct water temperature to use. You must<br />
use your own room temperature, dry mix<br />
temperature, desired batter temperature, and, if<br />
you are making yeast-raised donuts, estimated<br />
temperature increase during mixing.<br />
Cake Donuts Yeast-Raised Donuts<br />
°F °C °F °C<br />
Room temperature 72 22.2 72 22.2<br />
Dry mix temperature +70 +21.1 +70 +21.1<br />
Total A 142 43.3 142 43.3<br />
Desired batter temperature 75 23.9 80 26.7<br />
x3 x3 x3 x3<br />
Total B 225 71.7 240 80.1<br />
Total B 225 71.7 240 80.1<br />
-Total A -142 -43.3 -142 -43.3<br />
Desired water temp. for cake donuts 83°F 28.4°C 98 36.8<br />
↓ ↓<br />
Figure from above 98 36.8<br />
Temperature increase during mixing (average: 30°F/17°C) -30 -17<br />
Desired water temperature for yeast-raised donuts 68°F 19.8°C<br />
Ratios of Plunger Sizes to<br />
Donut Weights<br />
The weights given are for donuts without icings<br />
or other toppings. They are provided for<br />
reference only, as weights vary according to the<br />
density of the batter.<br />
Plunger Size Donut Weight per<br />
Dozen<br />
1” 5-8 oz/142-227 g<br />
1 5/8” 14-17 oz/397-482 g<br />
1 3/4” 16-20 oz/454-567 g<br />
1 7/8” 19-24 oz/539-680 g<br />
2" 22-27 oz/624-765 g<br />
Temperature Conversion<br />
To convert temperatures from Fahrenheit to<br />
Celsius, subtract 32 from °F and divide the<br />
result by 1.8. For example, 212°F-32/1.8 =<br />
100°C. To convert temperatures from Celsius to<br />
Fahrenheit, multiply °C by 1.8 and add 32 to the<br />
result. For example, (100°C x 1.8) + 32 =<br />
212°F.<br />
°F °C °F °C<br />
55 12.8 340 171.1<br />
60 15.6 345 173.9<br />
65 18.3 350 176.7<br />
70 21.2 355 179.4<br />
75 23.9 360 182.2<br />
80 26.7 365 185.0<br />
325 162.8 370 187.8<br />
330 165.6 375 190.6<br />
335 168.3 380 193.3<br />
<strong>Belshaw</strong> Bros., Inc. • 1750 22 nd Ave. S. • Seattle, WA 98144 • Phone 206-322-5474 • Fax 206-322-5425<br />
6 MN-1531EN Donut Cutter <strong>Type</strong> F OM
Donut Cutter<br />
<strong>Type</strong> F<br />
Technical Supplement<br />
<strong>Belshaw</strong> Bros., Inc.<br />
814 44 th Street NW, Suite 103<br />
Auburn, WA 98001 USA<br />
Phone: 206-322-5474 • Fax: 206-322-5425<br />
E-mail: service@belshaw.com • http://www.belshaw.com
If you accept the machine from the shipping<br />
company, you are, in effect, saying that the<br />
machine is in good condition, and you must pay<br />
for the machine.<br />
The Freight Company has accepted responsibility<br />
for the safe delivery of our machines.<br />
For your protection, inspect the machine to see<br />
that no parts are bent, scratched, or otherwise<br />
damaged.<br />
If any damage has occurred in shipping, file a<br />
freight claim with the shipping company<br />
immediately.<br />
EQUIPMENT RECORD<br />
Please provide the information below when you correspond with us about your machine.<br />
Purchased by _____________________________________________________________________<br />
Installed by ______________________________________________________________________<br />
Date of Installation ________________________________________________________________<br />
Model number ___________________________________________________________________<br />
Serial number<br />
042010<br />
MN-1533EN<br />
<strong>Belshaw</strong> Bros., Inc.<br />
814 44 th Street NW, Suite 103<br />
Auburn, WA 98001 USA<br />
Phone: 206-322-5474 • Fax: 206-322-5425<br />
E-mail: service@belshaw.com • http://www.belshaw.com
Contents<br />
1 Installation 1<br />
Unpacking and initial cleaning 1<br />
Preparing to Mount the Cutter on the Wall 1<br />
Installing the Wall Plate 1<br />
Installing the Swing Arm 2<br />
Preparing to Mount the Cutter on the Column 2<br />
Installing the Cutter 5<br />
Filling the Gear Box 5<br />
Installing the Motor 5<br />
Installing the Motor Coupling Covers 6<br />
Installing the Plunger and Hopper 6<br />
2 Troubleshooting 7<br />
Adjusting the Spacing of the Trip Arms 12<br />
Adapter Kits 13<br />
3 Plunger Info 14<br />
French Plunger Drawing (7B-1001) 15<br />
French Plunger Cleaning Instructions 16<br />
Care Maintenance & Cleaning Instructions for Plungers, Cylinders & Hoppers 17<br />
Service Bulletin #254F (#0291 Extension Arm Limiting Bracket Installation Instructions) 18<br />
4 Parts Info 19<br />
5 Appendix 23<br />
Parts List Drawing Insert Page Insert<br />
<strong>Belshaw</strong> Bros., Inc. • www.belshaw.com • Phone 206-322-5474 • Fax 206-322-5425<br />
Donut Cutter <strong>Type</strong> F TS MN-1533EN iii
Preface<br />
The <strong>Type</strong> F Donut Cutter is designed to cut cake<br />
donut products and deposit them in a variety of<br />
fryers. It is designed to be mounted on a wall, or<br />
on a column, attached to the fryer.<br />
In the European Community, the machine is<br />
available with the following electrical<br />
configurations:<br />
• 220 volts, 1 phase, 50 hertz<br />
• 380 volts, 3 phase, 50 hertz<br />
• 240 volts, 1 phase, 50 hertz<br />
• 415 volts, 3 phase, 50 hertz<br />
The <strong>Type</strong> F Donut Cutter produces only 75.5<br />
dB(A) of equivalent A-weighted sound pressure<br />
at workstations. The C600G-E system (C600G-<br />
E, FM600-E, <strong>Type</strong> F Donut Cutter, FT600-E,<br />
DC600-E, and CA600-E) produces 71.5 dB(A).<br />
This has been determined while running the<br />
cutter with no batter in the hopper, using a Bruel<br />
& Kjaer sound level meter, type 2236.<br />
During production, the operator must move the<br />
Cutter, holding the guide handle, to deposit<br />
donuts in the desired locations in the fryer. The<br />
operator must work safely at all times and read<br />
this manual, following its instructions and<br />
warnings.<br />
A thorough understanding of how to install,<br />
maintain, and safely operate the <strong>Type</strong> F Donut<br />
Cutter will prevent production delays and<br />
injuries. Heed the following warnings and all<br />
other warnings that appear in this manual:<br />
• Make sure the machine is mounted securely.<br />
Doing so will prevent the machine from<br />
tipping over or falling, which could cause<br />
serious injury.<br />
• When the machine is column-mounted on a<br />
fryer, make sure the fryer is securely fastened<br />
to the floor. If the fryer is not fastened to the<br />
floor, the weight of the cutter could cause the<br />
fryer to tip over, resulting in serious burns,<br />
other injury, or death.<br />
• To avoid being seriously injured, never put<br />
your hand in the hopper while the machine is<br />
connected to the power source.<br />
• To avoid being seriously injured, never put<br />
your hand between the trip arms while the<br />
machine is connected to the power source.<br />
• To avoid electrocution, or other injury,<br />
unplug the machine before attempting any<br />
adjustment, repair, disassembly, or cleaning.<br />
• To avoid damaging the machine, never use<br />
force to assemble, disassemble, operate,<br />
clean, or maintain it.<br />
• Be careful never to get shortening, water, or<br />
other materials on the floor. If anything does<br />
get spilled on the floor, clean the area<br />
immediately. Materials on the floor can<br />
cause people to slip or fall, resulting in<br />
serious injury, or loss of life.<br />
• To prevent unintentional startup and possible<br />
fire, unplug the machine if there is a local<br />
power outage. When the power is restored, it<br />
is safe to plug the machine in again.<br />
• To avoid electrocution, make sure that all<br />
electrical cords are not frayed, or cracked,<br />
and they do not pass through any water, or<br />
shortening.<br />
• Make sure that all electrical cords are routed<br />
so that no one will trip over them.<br />
<strong>Belshaw</strong> Bros., Inc. • www.belshaw.com • Phone 206-322-5474 • Fax 206-322-5425<br />
iv MN-1533EN Donut Cutter <strong>Type</strong> F TS
1 Installation<br />
Unpacking and Initial<br />
Cleaning<br />
To unpack the <strong>Type</strong> F Donut Cutter, transport it<br />
to the workstation, and clean it:<br />
1. Remove all the parts of the machine from the<br />
shipping containers.<br />
2. Carefully carry the parts to the workstation.<br />
Observe proper lifting techniques.<br />
3. Remove all packing materials from the<br />
machine.<br />
4. Wipe the hopper, plunger, and other parts of<br />
the machine with a damp cloth.<br />
WARNING<br />
To avoid electrocution and equipment<br />
damage, do not allow any water to enter the<br />
motor.<br />
5. Dry all the parts.<br />
Preparing to Mount the<br />
Cutter on the Wall<br />
1. Have a qualified technician provide a solid<br />
support on the wall, as explained below. We<br />
cannot guarantee that the <strong>Type</strong> F Donut<br />
Cutter will comply with CE standards unless<br />
you have this work done by a qualified<br />
technician.<br />
a. Cut a good-quality board (at least 2”/<br />
5 cm thick by 4”/10 cm wide) so that it<br />
extends from the floor to the ceiling of<br />
the bakery.<br />
b. Attach the board to a wall stud using #4<br />
wood screws, at least 4”/10 cm long.<br />
Space the screws every 12”/30.5 cm<br />
along the entire length of the board.<br />
2. Drill holes for mounting the fryer, as<br />
follows:<br />
a. Position the fryer 6-8”/15-20 cm from<br />
the wall, slightly to one side of the<br />
board. Level the fryer.<br />
b. Lay a straight edge across the top of the<br />
fryer kettle so that it touches the board.<br />
c. With a pencil, mark the board where the<br />
bottom of the straight edge touches it.<br />
This mark indicates the height of the top<br />
of the kettle.<br />
d. With a pencil, mark the board 15”/38 cm<br />
above the kettle height, in the center of<br />
the board.<br />
3. Using an appropriate tool, make a 1/4”/0.635<br />
cm diameter hole at this point.<br />
Installing the Wall Plate<br />
1. Attach the wall plate to the wall support by<br />
screwing a 5/16” x 1-1/2” lag screw<br />
(provided) through the top hole of the wall<br />
plate.<br />
2. Use a level to make sure the wall plate is<br />
hanging vertically.<br />
3. On the mounting board, mark the locations<br />
of the five other holes in the wall plate.<br />
4. Using an appropriate tool, make holes at<br />
these five locations.<br />
5. Screw the five remaining lag screws through<br />
the five remaining holes in the wall plate.<br />
<strong>Belshaw</strong> Bros., Inc. • www.belshaw.com • Phone 206-322-5474 • Fax 206-322-5425<br />
Donut Cutter <strong>Type</strong> F TS MN-1532EN 1
Installing the Swing Arm<br />
1. Connect the straight-arm section to the wall<br />
plate as follows:<br />
a. One end of the straight arm is wider than<br />
the other. Slide the bushing through one<br />
leg of the wide end of the straight arm.<br />
b. Slide the set collar onto the bushing,<br />
with the pin side down.<br />
c. Slide the bushing into the other leg of the<br />
straight arm.<br />
d. Put the straight-arm and bushing<br />
between the hinge brackets on the wall<br />
plate. The bushing must line up with<br />
the holes in the hinge brackets.<br />
e. Slide the wall arm pin through the hinge<br />
brackets and bushing. See Figure 1-1.<br />
Wall arm<br />
pin<br />
Arm<br />
pin<br />
Pivot arm<br />
Pivot arm pin<br />
Wall plate<br />
Set<br />
collar<br />
Bushing<br />
Straight arm<br />
Figure 1-1 Installing the Swing Arm on the<br />
Wall Plate<br />
2. Connect the pivot arm section to the straight<br />
arm as follows:<br />
a. Put the pivot arm between the legs of the<br />
straight arm. The holes in the pivot arm<br />
and straight-arm must line up.<br />
b. Slide the arm pin through the holes in the<br />
straight-arm and pivot arm. (See Figure<br />
1-1.)<br />
Skip the next section and proceed to “Installing<br />
the Cutter.”<br />
Preparing to Mount the<br />
Cutter on the Column<br />
Before you can column-mount the <strong>Type</strong> F Donut<br />
Cutter to a fryer, you must secure the fryer to the<br />
floor, install the column, and install the swing<br />
arm.<br />
Securing the Fryer<br />
If you plan to column-mount the cutter to a non-<br />
<strong>Belshaw</strong> fryer, fasten the fryer securely to the<br />
floor. We cannot guarantee that the <strong>Type</strong> F<br />
Donut Cutter will comply with CE standards if<br />
you use a non-<strong>Belshaw</strong> fryer.<br />
If you plan to column-mount the cutter to a<br />
<strong>Belshaw</strong> Century fryer, you do not need to fasten<br />
the fryer to the floor.<br />
If you plan to column-mount the cutter to a<br />
<strong>Belshaw</strong> open-kettle fryer, secure the fryer to the<br />
floor as follows:<br />
1. Remove the hairpin clips (2 per leg) that<br />
hold the casters to the frame of the fryer,<br />
then remove the casters. The flanged feet of<br />
the fryer will now be resting on the floor.<br />
2. Each of the flanged feet has two holes in it,<br />
mark the locations of these holes on the<br />
floor.<br />
3. Have a qualified technician use an<br />
appropriate tool to create holes in the floor<br />
to accommodate 1/4” bolts. We cannot<br />
guarantee that the <strong>Type</strong> F Donut Cutter will<br />
<strong>Belshaw</strong> Bros., Inc. • www.belshaw.com • Phone 206-322-5474 • Fax 206-322-5425<br />
2 MN-1533EN Donut Cutter <strong>Type</strong> F TS
comply with CE standards, unless you have<br />
this work done by a qualified technician.<br />
4. Thread a 1/4-20 bolt through each of the<br />
holes in the fryer’s feet and into the floor.<br />
WARNING<br />
When the machine is column-mounted on a<br />
fryer, make sure the fryer is securely<br />
fastened to the floor. If the fryer is not<br />
fastened to the floor, the weight of the<br />
cutter could cause the fryer to tip over,<br />
resulting in serious burns, other injury, or<br />
death.<br />
Installing the Column<br />
To install the column, follow the instructions<br />
appropriate for your fryer. The four sets of<br />
instructions below explain how to install the<br />
column on the following fryers:<br />
• Pre-1990 <strong>Belshaw</strong> Open-Kettle Electric<br />
Fryers;<br />
• Other <strong>Belshaw</strong> Open-Kettle Fryers (this<br />
includes all <strong>Belshaw</strong> Open-Kettle Gas<br />
Fryers, and <strong>Belshaw</strong> Electric Fryers<br />
manufactured since 1990);<br />
• <strong>Belshaw</strong> Century fryers; and<br />
• Non-<strong>Belshaw</strong> Fryers<br />
Pre-1990 <strong>Belshaw</strong> Open-Kettle Electric<br />
Fryers<br />
To install the column on a <strong>Belshaw</strong> electric fryer<br />
made before 1990, follow these steps:<br />
1. Slide the column mounting brackets onto the<br />
column.<br />
2. Remove the six nuts and washers from the<br />
mounting blocks on the back of the fryer<br />
cabinet.<br />
3. (On older <strong>Belshaw</strong> fryers with narrow kettle<br />
flanges, there are no mounting blocks. The<br />
mounting holes are pre-punched in the sheet<br />
metal cabinet.)<br />
4. Slide the mounting brackets onto the bolts.<br />
5. Replace the washers and nuts you removed<br />
in step 3, and tighten the nuts.<br />
6. With the column resting on the floor, secure<br />
the column by tightening the two 5/16-18 x<br />
1” square head set screws (provided) in the<br />
mounting brackets.<br />
Other <strong>Belshaw</strong> Open-Kettle Fryers<br />
Read this section if you want to column-mount<br />
the <strong>Type</strong> F Donut Cutter on a <strong>Belshaw</strong> openkettle<br />
gas fryer or on a <strong>Belshaw</strong> open-kettle<br />
electric fryer manufactured since 1990. To<br />
install the column, follow these steps:<br />
1. Slide the column mounting brackets onto the<br />
column.<br />
2. There is a mounting plate on the side of the<br />
fryer cabinet; the plate has two sets of three<br />
holes in it. Align the holes in the mounting<br />
brackets with these holes. Fasten the<br />
mounting brackets to the plate using the six<br />
lock washers and 5/16-18 x 1” hex-head<br />
screws provided.<br />
3. With the column resting on the floor, secure<br />
the column by tightening the two 5/16-18 x<br />
1” square head set screws (provided) in the<br />
mounting brackets.<br />
<strong>Belshaw</strong> Century Fryers<br />
To install the column on a <strong>Belshaw</strong> Century<br />
Fryer, follow these steps:<br />
1. Have a qualified technician use an<br />
appropriate tool to create holes in the fryer’s<br />
frame assembly for installing the column<br />
mounting brackets.<br />
2. We cannot guarantee that the <strong>Type</strong> F Donut<br />
Cutter or the Century Fryer will comply with<br />
CE standards unless you have this work<br />
done by a qualified technician.<br />
3. Slide the column mounting brackets onto the<br />
column.<br />
<strong>Belshaw</strong> Bros., Inc. • www.belshaw.com • Phone 206-322-5474 • Fax 206-322-5425<br />
Donut Cutter <strong>Type</strong> F TS MN-1532EN 3
4. Align the holes in the column mounting<br />
brackets, with the holes in the fryer frame<br />
assembly.<br />
5. Secure the mounting brackets to the frame<br />
using the 5/16-18 x 1” hex-head screws<br />
provided.<br />
6. With the column resting on the floor, secure<br />
the column by tightening the two 5/16-18 x<br />
1” square head set screws (provided) in the<br />
mounting brackets.<br />
Non-<strong>Belshaw</strong> Fryers<br />
If you have a non-<strong>Belshaw</strong> Fryer, check in the<br />
Technical Supplement to see whether <strong>Belshaw</strong><br />
makes an adapter kit for it. If we do, order the<br />
adapter kit and install the column according to<br />
the instructions that come with the kit.<br />
To install the column on a non-<strong>Belshaw</strong> fryer for<br />
which we do not make an adapter kit, follow<br />
these steps:<br />
1. Slide the column mounting brackets onto the<br />
column.<br />
2. Chose a location to mount the column. You<br />
should mount the column on the side of the<br />
fryer the operator will stand on, on the rear<br />
corner. You may mount the column either<br />
on the side, or on the back of the fryer,<br />
provided that the cutter will be able to move<br />
freely.<br />
3. Have a qualified technician use an<br />
appropriate tool to create holes in the fryer<br />
cabinet for installing the column mounting<br />
brackets. We cannot guarantee that the <strong>Type</strong><br />
F Donut Cutter will comply with CE<br />
standards, unless you have this work done<br />
by a qualified technician.<br />
4. Secure the mounting brackets to the fryer<br />
using 5/16-18 machine screws, 5/16 flat<br />
washers, 5/16 lock washers, and 5/16-18 hex<br />
nuts.<br />
5. With the column resting on the floor, secure<br />
the column by tightening the two 5/16-18 X<br />
1” square head set screws (provided) in the<br />
mounting brackets.<br />
Installing the Swing Arm<br />
1. Slide the set collar onto the column.<br />
2. Slide the straight-arm section onto the<br />
column.<br />
3. Put the pivot arm section between the legs of<br />
the straight arm.<br />
4. Put the extension arm-limiting bracket<br />
between the legs of the pivot arm. The holes<br />
in the extension arm limiting bracket, pivot<br />
arm, and straight-arm must line up. (You do<br />
not need to use the extension arm-limiting<br />
bracket if you are mounting the machine to a<br />
<strong>Belshaw</strong> Century fryer.)<br />
WARNING<br />
You must use the extension arm limiting<br />
bracket when column-mounting the <strong>Type</strong> F<br />
Donut Cutter to a <strong>Belshaw</strong> 618, 618L, 624,<br />
718LG, or 724G fryer, or to any fryer that<br />
is 24”/61 cm square or smaller. If you do<br />
not, the fryer might tip over when the<br />
cutter is swung away from the fryer,<br />
resulting in serious burns, other injury, or<br />
even death.<br />
5. Slide the arm pin through the holes in the<br />
straight-arm, pivot arm, and extension armlimiting<br />
bracket.<br />
<strong>Belshaw</strong> Bros., Inc. • www.belshaw.com • Phone 206-322-5474 • Fax 206-322-5425<br />
4 MN-1533EN Donut Cutter <strong>Type</strong> F TS
Arm pin<br />
Extension<br />
arm limiting<br />
bracket<br />
Pivot arm<br />
Pivot arm pin<br />
Column set<br />
collar<br />
Straight<br />
arm<br />
Figure 1-2. Installing the Swing Arm on the<br />
Column.<br />
6. Slide the straight arm up the column far<br />
enough for the cutter to clear the fryer when<br />
it is mounted. (The exact height does not<br />
matter at this point.) To hold the straight<br />
arm in place, slide the set collar up the<br />
column and tighten the setscrew.<br />
Installing the Cutter<br />
1. Mount the cutter by sliding the frame<br />
assembly onto the pivot arm pin.<br />
2. Adjust the height of the cutter as follows:<br />
a. Loosen the setscrew in the set collar.<br />
b. Slide the straight arm up the bushing, or<br />
column as far as needed, for the hopper<br />
cylinder to be the proper distance above<br />
the shortening in the fryer. (See Figure<br />
1-3.)<br />
c. Slide the set collar up the bushing, or<br />
column, so it is right under the straight<br />
arm. Secure it by tightening the<br />
setscrew.<br />
Figure 1-3 - Setting the Cutter Height<br />
Plunger <strong>Type</strong> and<br />
Size<br />
Cake plungers,<br />
7/8”-1”<br />
Cake plungers,<br />
1-1/8”-2-1/4”<br />
French cruller<br />
plungers, all sizes<br />
Distance between<br />
Cylinder and<br />
Shortening<br />
1”/2.5 cm<br />
1-1/4”-1-3/8”/<br />
3.2 cm-3.5 cm<br />
1-1/2”/3.8 cm<br />
Filling the Gear Box<br />
Before you use the <strong>Type</strong> F Donut Cutter, you<br />
must fill the gearbox with oil. Follow these<br />
steps:<br />
1. Make sure the F machine is mounted in the<br />
upright operating position.<br />
2. Remove the plug from the fill hole. The fill<br />
hole is in the lower part of the gearbox.<br />
3. Pump 90-weight oil into the gearbox until it<br />
begins to overflow.<br />
4. Allow the excess oil to drain out of the hole.<br />
5. Replace the plug.<br />
6. Wipe the oil off of the gearbox exterior.<br />
Installing the Motor<br />
1. Place motor (with spacers) onto motor<br />
mounting plate, on top of gearbox.<br />
2. Hand tighten ¼-20 hex nuts.<br />
3. Check that there is a slight clearance<br />
between the “worm shaft & coupling<br />
assembly” (motor set collar), and the motor<br />
mounting plate. Insert the blade of a<br />
flathead screwdriver under the set collar.<br />
Rotate shaft, so flat of shaft, is under set<br />
screw. Tighten setscrew, being careful not<br />
to overtighten.<br />
<strong>Belshaw</strong> Bros., Inc. • www.belshaw.com • Phone 206-322-5474 • Fax 206-322-5425<br />
Donut Cutter <strong>Type</strong> F TS MN-1532EN 5
4. Turn motor on.<br />
5. With motor running, finish tightening the<br />
hex nuts underneath the motor spacers.<br />
Tighten in an alternating sequence (not one<br />
after another in a circle).<br />
6. This allows the motor to properly center the<br />
drive shaft.<br />
WARNING<br />
Failure to install the motor in the above<br />
manner can cause the shaft to wear<br />
improperly and break.<br />
Installing the Motor<br />
Coupling Covers<br />
Install the motor coupling covers (2) around<br />
motor spacers, using the two sheet metal screws<br />
provided.<br />
Installing the Plunger and<br />
Hopper<br />
To install the plunger and the hopper on the<br />
cutter, follow these steps:<br />
1. Open the hinge clamp at the bottom of the<br />
frame, if it is not open already. To open it,<br />
loosen the wing nut and swing the hinge<br />
clamp bolt out of the slot.<br />
2. Put the plunger in the hopper. Put one of<br />
your hands underneath the hopper cylinder<br />
so the plunger does not fall out.<br />
3. Slide the plunger’s locating pins into the<br />
slots on the ends of the trip arms.<br />
4. Slide the cylinder into the opening at the<br />
bottom of the frame.<br />
5. Swing the hinge clamp around the cylinder,<br />
swing the hinge clamp bolt into the slot, and<br />
hand-tighten the wing nut that holds the<br />
hinge clamp shut.<br />
6. Install the trip arm guard assembly. The<br />
crown bearing, which is mounted inside the<br />
trip arm guard, must pass over the plunger<br />
center rod and into the cylindrical opening in<br />
the frame. The safety key, which is also<br />
mounted inside the trip arm guard, must<br />
connect with the safety interlock switch.<br />
7. Hand-tighten the wing nut that holds the<br />
crown bearing in place. The wing nut can be<br />
reached through the opening in the side of<br />
the trip arm guard.<br />
<strong>Belshaw</strong> Bros., Inc. • www.belshaw.com • Phone 206-322-5474 • Fax 206-322-5425<br />
6 MN-1533EN Donut Cutter <strong>Type</strong> F TS
2 Troubleshooting<br />
If you have a problem with your <strong>Type</strong> F<br />
Donut Cutter that you cannot solve, call your<br />
dealer or another qualified technician.<br />
If your dealer cannot help you, please call<br />
<strong>Belshaw</strong>. To do so, first dial the appropriate<br />
international access code, then (206) 322-5474<br />
(United States). When you call, please specify<br />
the following:<br />
• The model name of the machine.<br />
• The serial number of the machine.<br />
• The voltage, phase, and cycle of the machine.<br />
CAUTION<br />
If you perform repairs yourself or have<br />
them performed by anyone other than a<br />
service technician authorized by <strong>Belshaw</strong><br />
Bros., you do so at your own risk.<br />
Following is a troubleshooting question and<br />
answer to help you identify and solve some basic<br />
problems.<br />
Heed all warnings listed below. These warnings<br />
when followed will help ensure your safety.<br />
WARNING<br />
Disconnect the machine from the power<br />
source before disassembling, repairing, or<br />
wiring.<br />
WARNING<br />
To avoid serious injury, before doing any<br />
service to the cutter, turn off the cutter,<br />
disconnect it from the power source, and<br />
swing it away from over the fryer.<br />
<strong>Belshaw</strong> Bros., Inc. • www.belshaw.com • Phone 206-322-5474 • Fax 206-322-5425<br />
Donut Cutter <strong>Type</strong> F TS MN-1532EN 7
THE MOTOR WILL NOT START.<br />
Possible Causes What To Do<br />
The machine is not connected to a proper power<br />
source.<br />
Connect the machine to a proper power source, as<br />
specified on the data plate.<br />
The circuit breaker has been tripped. Press the red reset button.<br />
THE MOTOR SHUTS OFF WHEN THE CLUTCH IS ENGAGED.<br />
Possible Cause What To Do<br />
The plunger is jammed at the base of the hopper<br />
cylinder.<br />
Clear away the cause of the obstruction. Plug in<br />
and turn on the machine. Press the red reset<br />
button.<br />
THE DONUTS DO NOT DROP STRAIGHT OR SEPARATE FROM THE<br />
CYLINDER EVENLY.<br />
Possible Causes What To Do<br />
The machine frame is out of alignment. Send the machine to the factory for service.<br />
The cylinder is dirty. Clean the cylinder as explained in Section 3,<br />
“Cleaning.”<br />
THE MACHINE MAKES CLICKING OR BANGING NOISES.<br />
Possible Cause What To Do<br />
The machine frame is out of alignment. Send the machine to the factory for service.<br />
THE DONUTS VARY IN SIZE.<br />
Possible Causes What To Do<br />
The hopper and the cylinder are not joined tightly<br />
enough.<br />
The plunger pistons are worn or undersized. Replace the plunger.<br />
Tap down lightly on the top of the hopper.<br />
<strong>Belshaw</strong> Bros., Inc. • www.belshaw.com • Phone 206-322-5474 • Fax 206-322-5425<br />
8 MN-1533EN Donut Cutter <strong>Type</strong> F TS
THE OUTER AND INNER DIAMETERS OF THE DONUTS ARE TOO LARGE.<br />
Possible Cause What To Do<br />
The donuts are falling too far, causing them to turn<br />
after they drop.<br />
UNWANTED DOUGH IS DEPOSITED ON THE PRODUCT.<br />
Possible Causes What To Do<br />
The plunger is worn. Replace the plunger.<br />
The cylinder is worn. Replace the cylinder.<br />
The cylinder lip is damaged. Replace the cylinder.<br />
THE MACHINE JAMS.<br />
Possible Causes What To Do<br />
Adjust the height of the machine so there is less<br />
distance between the bottom of the machine and<br />
the frying screen. Do this by moving the set collar<br />
on the mounting column or bushing.<br />
The machine frame is out of alignment. Send the machine to the factory for service.<br />
There is an obstruction in the cylinder. Clear the cause of the obstruction.<br />
The plunger is bent. Replace the plunger.<br />
WHEN USING THE BALL PLUNGER, THE BALLS STICK TOGETHER.<br />
Possible Cause What To Do<br />
The cutter is too far above the shortening. Adjust the height of the machine so the end of the<br />
plunger touches the shortening when the balls are<br />
extruded. Do this by moving the set collar on the<br />
mounting column or bushing.<br />
WHEN USING THE BALL PLUNGER, THE BALLS VARY IN SIZE.<br />
Possible Cause What To Do.<br />
One of the holes in the plunger piston is clogged<br />
with batter.<br />
Remove the plunger and clean it.<br />
<strong>Belshaw</strong> Bros., Inc. • www.belshaw.com • Phone 206-322-5474 • Fax 206-322-5425<br />
Donut Cutter <strong>Type</strong> F TS MN-1532EN 9
WHEN USING THE STICK PLUNGER, THE STICKS BEND AND ARE<br />
POORLY SHAPED.<br />
Possible Causes What To Do<br />
The sticks are too large. Turn the short crank on the dial to decrease the<br />
size of the sticks.<br />
The cutter is too far above the shortening. Lower the cutter. Do this by moving the set collar<br />
on the mounting column or bushing.<br />
WHEN USING THE KRINKLE PLUNGER, THE PRODUCT IS SHAPED<br />
IRREGULARLY.<br />
Possible Cause What To Do<br />
The former flutes are plugged with batter. Disassemble and clean the plunger.<br />
THE LOWER PISTON AND THE FORMER OF THE KRINKLE PLUNGER<br />
CANNOT BE REMOVED FOR CLEANING.<br />
Possible Cause What To Do<br />
The lower piston and the former are stuck to the<br />
center rod, probably due to corrosion.<br />
Soak the plunger in oil for 24 hours. Tap the<br />
lower piston and the former lightly with a rubber<br />
hammer to loosen them.<br />
<strong>Belshaw</strong> Bros., Inc. • www.belshaw.com • Phone 206-322-5474 • Fax 206-322-5425<br />
10 MN-1533EN Donut Cutter <strong>Type</strong> F TS
Adjustments<br />
Adjusting the Verticality<br />
If the donuts do not drop straight or separate<br />
from the cutter evenly, the cutter may not be<br />
level.<br />
To make minor adjustments in the verticality of<br />
the machine, you do not need to re-mount the<br />
wall plate or the column; you can simply adjust<br />
the pivot hinge by changing the setting of the<br />
pivot hinge-adjusting pin.<br />
Pivot arm pivot hinge adjusting pin<br />
To adjust the verticality of the machine (see<br />
Figure 2-1):<br />
1. Turn off and unplug the machine.<br />
WARNING<br />
To avoid being seriously injured or<br />
electrocuted, turn off and unplug the<br />
machine before making adjustments.<br />
2. Thread the pivot hinge adjusting pin in or<br />
out:<br />
• Thread the pin out to move the vertical<br />
axis of the cutter counterclockwise<br />
• Thread the pin in to move the vertical<br />
axis of the cutter clockwise<br />
Pivot<br />
hinge<br />
Figure 2.1. Adjusting the Verticality of the Machine<br />
Pivot<br />
arm pin<br />
<strong>Belshaw</strong> Bros., Inc. • www.belshaw.com • Phone 206-322-5474 • Fax 206-322-5425<br />
Donut Cutter <strong>Type</strong> F TS MN-1532EN 11
Adjusting the Spacing of<br />
the Trip Arms<br />
If the machine becomes jammed, the trip arms<br />
may go out of adjustment. Therefore, you should<br />
check the spacing of the trip arms after any<br />
jamming has occurred. Also, you should check<br />
the spacing of the trips arms if doing so is<br />
suggested in “Troubleshooting.”<br />
To check and adjust the spacing of the trip arms,<br />
follow the procedure below, referring to Figure<br />
2-2. All dimensions given are ± 0.020”/0.051<br />
cm.<br />
1. Turn off and unplug the machine.<br />
WARNING<br />
To avoid being seriously injured or<br />
electrocuted, turn off and unplug the<br />
machine before making adjustments.<br />
2. Set the donut size to #3, the maximum setting<br />
on the dial.<br />
3. Turn the dial by hand until the lower trip arm<br />
is in its lowest position.<br />
4. Check dimension A. If necessary, bend the<br />
lower trip arm until this dimension is<br />
11.063”/28.100 cm.<br />
5. Turn the dial until the upper trip arm is in its<br />
lowest position.<br />
6. Check dimension B. If necessary, bend the<br />
upper trip arm until this dimension is<br />
12.53”/31.83 cm.<br />
7. Turn the dial until the pointer on the short<br />
rank points straight down.<br />
8. Check dimension C. If this dimension is not<br />
2.65”/6.73 cm, some of the parts in your<br />
machine may be worn and need to be<br />
replaced.<br />
9. Turn the dial until the pointer on the short<br />
crank points straight up.<br />
10. Check dimension D. If this dimension is not<br />
0.94”/2.39 cm, some of the parts in your<br />
machine may be worn and need to be<br />
replaced.<br />
Trip<br />
arms C D<br />
Frame<br />
A B<br />
Figure 2-2. Adjusting the Spacing of the Trip<br />
Arms.<br />
<strong>Belshaw</strong> Bros., Inc. • www.belshaw.com • Phone 206-322-5474 • Fax 206-322-5425<br />
12 MN-1533EN Donut Cutter <strong>Type</strong> F TS
Adapter Kits<br />
If you want to column-mount the <strong>Type</strong> F Donut<br />
Cutter to a non-<strong>Belshaw</strong> fryer, use the table<br />
below to determine whether <strong>Belshaw</strong> can provide<br />
you with a special adapter kit.<br />
The adapter kits, which are available at<br />
additional cost, contain complete installation<br />
instructions and blueprints. Order kits by<br />
number.<br />
MAKE MODEL KIT NUMBER<br />
Anetsberger TFS 20x20, BFG 18x26, TFS 24x24,<br />
WFG 18x26, TFS 24x34<br />
Avalon 20x20, 24x24, 24x34 AV-1000<br />
Eagle C-2, C-3 FR-1000<br />
Frymaster 24-D P-1000<br />
Keating 18x18 P-1000<br />
Moffat D-450 MO-1000<br />
Pitco 20, 24, 26x34 P-1000<br />
Wells KS-12 W-1000<br />
KS-18 W-1001<br />
KS-24 W-1003<br />
(Adapter kit not required.)<br />
<strong>Belshaw</strong> Bros., Inc. • www.belshaw.com • Phone 206-322-5474 • Fax 206-322-5425<br />
Donut Cutter <strong>Type</strong> F TS MN-1532EN 13
3 Plunger Info<br />
This section contains the following information:<br />
French Plunger Drawing (7B-1001)<br />
French Plunger Cleaning Instructions<br />
Care & Maintenance and Cleaning Instructions for Plungers & Hoppers<br />
Service Bulletin #254F<br />
<strong>Belshaw</strong> Bros., Inc. • www.belshaw.com • Phone 206-322-5474 • Fax 206-322-5425<br />
14 MN-1533EN Donut Cutter <strong>Type</strong> F TS
Models B, F and MD-2 Cutters<br />
#7B-1001 French Plunger<br />
Sizes: 1-1/8”, 1-1/4”, 1-3/8”, 1-1/2”, 1-5/8”,<br />
1-3/4”, 1-7/8”, 2”, 2-1/8”, 2-1/4”<br />
7B-1001 FRENCH PLUNGER PARTS LIST.<br />
BILL OF MATERIAL<br />
ITEM DESCRIPTION<br />
1 Lower Piston (Specify Size):<br />
2 Former Assembly (Specify Size)<br />
3 Side Rod Assy (Specify Size):<br />
4 Gib (2 required, specify size):<br />
5 Gib Screw (2 required)<br />
6 Center Rod Replacement Kit<br />
(Includes items 7, 8, 9, & 7B-11<br />
Center Rod)<br />
7 Short Retainer (2 Required)<br />
8 Flanged Retainer<br />
9 Groove Pin<br />
For repairs involving the side rod assemblies,<br />
your French plunger should be returned to the<br />
factory.<br />
<strong>Belshaw</strong> Bros., Inc. • www.belshaw.com • Phone 206-322-5474 • Fax 206-322-5425<br />
Donut Cutter <strong>Type</strong> F TS MN-1532EN 15
<strong>Belshaw</strong> Bros., Inc. • www.belshaw.com • Phone 206-322-5474 • Fax 206-322-5425<br />
16 MN-1533EN Donut Cutter <strong>Type</strong> F TS
CARE, MAINTENANCE, and CLEANING INSTRUCTION<br />
for PLUNGERS, CYLINDERS, and HOPPERS<br />
The plungers and hoppers of your donut machine are precision instruments built from alloy steels and<br />
aluminum. They should be handled with care to insure continued satisfactory performance.<br />
When cleaning aluminum, selection of the right type cleaner is your most important consideration. Any<br />
household dish washing detergent which is safe for aluminum does a good job of cleaning and does not<br />
attack aluminum. Strong Alkali cleaners, such as lye, soda ash, and tri-sodium phosphate, will discolor or<br />
even corrode aluminum even in weak solutions.<br />
DO NOT Handle roughly or drop on hard surfaces.<br />
DO NOT Mix with other utensils in the sink when washing.<br />
DO NOT Allow to rust. Always wash parts thoroughly. Dry completely and then lubricate with mineral oil<br />
or<br />
liquid shortening before storing or reinstalling in unit.<br />
DO NOT Force the machine if it becomes jammed. Disassemble and remove any obstruction to prevent<br />
damage to the plunger.<br />
Washing Plungers, Cylinders, and Hoppers by Hand:<br />
1. Remove “O” Rings, if so equipped.<br />
2. Use plenty of warm water.<br />
3. Add cleaner approved for aluminum in concentrations recommended by manufacturer.<br />
4. Presoak to loosen stubborn or dried-on deposits.<br />
5. Use a non-scratching plastic scour cloth to remove soil and restore luster.<br />
6. Rinse in clear hot water (170-190 °F)<br />
7. Wipe completely dry.<br />
8. Dip plungers in mineral oil or liquid shortening to prevent rust and sticking.<br />
SPECIAL INSTRUCTIONS FOR THE CARE OF FRENCH PLUNGERS:<br />
The French plunger must be handled with great care. Before each use, put one drop of mineral oil on each of the<br />
gibs that slide in the grooves near the top of the plunger. After each use, unscrew the lower piston and remove the<br />
product former. Thoroughly wash and dry and then oil the parts with mineral oil or liquid shortening to prevent<br />
sticking. Reassemble the plunger. Be certain that the bottom piston is threaded into place completely.<br />
<strong>Belshaw</strong> Bros., Inc. • www.belshaw.com • Phone 206-322-5474 • Fax 206-322-5425<br />
Donut Cutter <strong>Type</strong> F TS MN-1532EN 17
<strong>Belshaw</strong> Bros., Inc. • www.belshaw.com • Phone 206-322-5474 • Fax 206-322-5425<br />
18 MN-1533EN Donut Cutter <strong>Type</strong> F TS
4 Parts Info<br />
Drawings and Parts Lists in this section are for<br />
reference only. See the Parts List Drawing Insert<br />
for part numbers.<br />
<strong>Belshaw</strong> Bros., Inc. • www.belshaw.com • Phone 206-322-5474 • Fax 206-322-5425<br />
Donut Cutter <strong>Type</strong> F TS MN-1532EN 19
TYPE F DONUT CUTTER MAIN ASSEMBLY.<br />
BILL OF MATERIAL<br />
ITEM QTY. DESCRIPTION ITEM QTY. DESCRIPTION<br />
1 1 Label–“Stop Motor to Adjust” 24 1 Gasket<br />
2 1 Dial Lock Nut 25 1 Gear Box Assy (Incl. 25A-25G)<br />
3 1 Short Crank 25A 1 Gear Box<br />
4 1 Dial 25B 1 Gear Box Cover<br />
5 1 Dial Clamp Bolt 25C 1 Gasket<br />
6 1 Dial Spacer Washer 25D 1 Thrust Bearing Kit<br />
7 1 Frame Assembly (Includes Items 7A-7E) 25E 1 Thrust Plate Gasket<br />
7A 1 Frame Half–Left 25F 1 Thrust Plate<br />
7B 1 Frame Half–Right 25G 1 1/8 Brass Pipe Plug<br />
7C 1 Hinge Clamp Bolt 26 1 Bearing<br />
7D 1 Hinge Clamp 27 1 Felt Washer<br />
7E 1 Hinge Pin 28 1 Backing Washer<br />
8 1 Cylinder Assembly 29 1<br />
or<br />
Worm Gear Assembly–Double Thread<br />
9 1 Hopper 1 Worm Gear Assembly–Single Thread<br />
10 1 Plunger Assembly 31 1 Brake Band Assembly (Includes Items<br />
31A-31E)<br />
11 2 Trip Arm 31A 1 Brake Band–Upper<br />
12 2 Cam Roller 31B 1 Brake Band–Lower<br />
13 1 Sleeve Cam, Standard – case hardened steel 31C 1 Retaining Clip<br />
Sleeve Cam, Optional – cast iron 31D 1 Spring<br />
14 2 5/32 x 5/8 #505 Woodruff Key 31E 1 Clutch Block<br />
15 1 1/8 x 3/4 #406 Woodruff Key 32 1 Clutch Block Cap<br />
16 1 Shaft Cam, Standard – case hardened steel 33 1 Dodge Pin<br />
Shaft Cam, Optional – cast iron 34 1 Clutch Pin Spring<br />
17 2 Trip Arm Pivot Pin 35 1 Clutch Pawl Safety Plate<br />
18 1 Guide Handle 36 1 Holding Spring<br />
19 1 Crown Bearing 37 1 Clutch Stop Pawl Assembly<br />
20 2 Motor Coupling Cover 38 1 Clutch Lever Cam Key<br />
22 1 Worm Gear/Drive Shaft Assy (Single Thread) (Incl. 39A 1 Motor Assembly (Includes Items<br />
22A-22C)<br />
39A and 39e)<br />
1 Worm Gear/Drive Shaft Assy (Double Thread) (Incl.<br />
22A-22C)<br />
39B 1 Motor ID Label<br />
22A 1 Shaft and Coupling Assembly 39C 4 Motor Spacer<br />
22B 1 Motor Mount Flange Assembly 39D 1 Replacement Switch<br />
22C 1 Worm Gear–Single Thread 39E 1 Power Cord<br />
1 Worm Gear–Double Thread 40 1 Nameplate<br />
23 1 Clutch Lever Assy 41 1 Clutch Pawl Spring<br />
<strong>Belshaw</strong> Bros., Inc. • www.belshaw.com • Phone 206-322-5474 • Fax 206-322-5425<br />
20 MN-1533EN Donut Cutter <strong>Type</strong> F TS
BILL OF MATERIAL<br />
TYPE F DONUT CUTTER MAIN ASSEMBLY (continued).<br />
ITEM QTY.. DESCRIPTION ITEM QTY. . DESCRIPTION<br />
42 1 Column Mounting Kit (Incl. 42A-42G) Note: Your <strong>Type</strong> F Donut Cutter comes with one of three<br />
standard mounting kits—A, B, or C, not shown.<br />
42A 1 Fryer Mount Column A 1 Column Mounting Kit for Open-Kettle Fryers<br />
(Incl. A1-A3, B, V, W, and JJ)<br />
42B 1 Column Mounting Bracket (Open Kettle Fryers<br />
only)<br />
A1 1 Fryer Mount Column<br />
Column Mounting Bracket (Century Fryers<br />
only)<br />
A2 1 Column Mounting Bracket<br />
42C 1 Set Collar A3 1 Set Collar<br />
42D 1 Straight Arm Section B 1 Column Mounting Kit for Century Fryers (Incl.<br />
B1-B3, B, V, W, and JJ)<br />
42E 1 Arm Pin Assembly B1 1 Fryer Mount Column<br />
42F 1 Pivot Arm Section Assembly B2 1 Column Mounting Bracket<br />
42G 1 Extension Arm Limiting Bracket B3 1 Set Collar<br />
43 1 Wall Mounting Kit (Incl. 43A-43G) C 1 Wall Mounting Kit (Incl. C1-C4, A, and W)<br />
43A 1 Wall Mount Plate C1 1 Wall Mount Plate<br />
43B 1 Wall Arm Pin Assembly C2 1 Wall Arm Pin Assembly<br />
43C 1 Wall Mount Bushing C3 1 Wall Mount Bushing<br />
43D 1 Straight Arm Section C4 1 Set Collar<br />
43E 1 Arm Pin Assembly<br />
43F 1 Pivot Arm Section Assembly<br />
43G 1 Extension Arm Limiting Bracket<br />
Power Trans Lube 90 wt. SAE Food Stock (not<br />
shown)<br />
FASTENERS FASTENERS<br />
ITEM QTY. DESCRIPTION ITEM QTY. DESCRIPTION<br />
A 6 5/16 x 1-1/2 Hex-Head Lag Screw T 3 5/16-18 x 1/2 Socket-Head Set Screw<br />
B 6 5/16-18 x 1 Hex-Head Machine Screw U 2 5/16-18 x 5/16 Socket-Head Set Screw<br />
C 1 1/4-20 x 1-3/4 Carriage Bolt V 2 5/16-18 x 7/8 Square-Head Set Screw<br />
D 1 1/4-20 x 4-1/2 Hex-Head Cap Screw W 1 5/16-18 x 1/2 Square-Head Set Screw<br />
E 4 1/4-20 x 1/2 Hex-Head Machine Screw X 1 5/16-18 Hex Jam Nut<br />
F 2 1/4-20 x 1-1/2 Slotted Truss-Head Screw Y 5 1/4-20 Hex Nut<br />
G 2 1/4-20 x 1-1/4 Slotted Truss-Head Screw Z 1 10-24 Hex Nut<br />
H 1 1/4-20 x 1 Slotted Truss-Head Screw AA 1 1/4-20 Wing Nut<br />
J 4 1/4-20 x 7/8 Socket-Head Cap Screw BB 1 5/16-18 Wing Nut<br />
K 1 10-24 x 1-1/2 Slotted Flat-Head Machine Screw CC 2 0 x 1/8 Drive Screw<br />
L 2 10-24 x 5/8 Slotted Round-Head Machine Screw DD 1 5/32 x 1-1/2 Spring Pin<br />
M 8 10-24 x 3/8 Slotted Round-Head Machine Screw EE 1 5/32 x 1-1/4 Spring Pin<br />
N 2 6-32 x 1/4 Slotted Pan-Head Machine Screw FF 1 1/8 x 1-1/2 Cotter Pin<br />
P 1 10-24 x 1 Socket-Head Machine Screw GG 1 5/16 Flat Washer<br />
R 2 10-16 x 1/2 Tek Screw HH 4 1/4 SAE Flat Washer<br />
S 1 5/16-18 x 3/4 Socket-Head Set Screw<br />
<strong>Belshaw</strong> Bros., Inc. • www.belshaw.com • Phone 206-322-5474 • Fax 206-322-5425<br />
Donut Cutter <strong>Type</strong> F TS MN-1532EN 21
<strong>Belshaw</strong> Bros., Inc. • www.belshaw.com • Phone 206-322-5474 • Fax 206-322-5425<br />
22 MN-1533EN Donut Cutter <strong>Type</strong> F TS
5 Appendix<br />
See Parts List Drawing Insert Page<br />
<strong>Belshaw</strong> Bros., Inc. • www.belshaw.com • Phone 206-322-5474 • Fax 206-322-5425<br />
Donut Cutter <strong>Type</strong> F TS MN-1532EN 23