ResinLite and DuraStone - MX Group
ResinLite and DuraStone - MX Group
ResinLite and DuraStone - MX Group

Create successful ePaper yourself
Turn your PDF publications into a flip-book with our unique Google optimized e-Paper software.
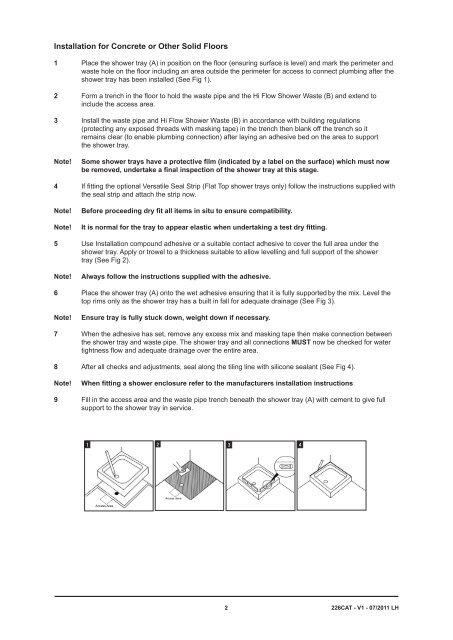
Installation for Concrete or Other Solid Floors<br />
1 Place the shower tray (A) in position on the floor (ensuring surface is level) <strong>and</strong> mark the perimeter <strong>and</strong><br />
waste hole on the floor including an area outside the perimeter for access to connect plumbing after the<br />
shower tray has been installed (See Fig 1).<br />
2 Form a trench in the floor to hold the waste pipe <strong>and</strong> the Hi Flow Shower Waste (B) <strong>and</strong> extend to<br />
include the access area.<br />
3 Install the waste pipe <strong>and</strong> Hi Flow Shower Waste (B) in accordance with building regulations<br />
(protecting any exposed threads with masking tape) in the trench then blank off the trench so it<br />
remains clear (to enable plumbing connection) after laying an adhesive bed on the area to support<br />
the shower tray.<br />
Note! Some shower trays have a protective film (indicated by a label on the surface) which must now<br />
be removed, undertake a final inspection of the shower tray at this stage.<br />
4 If fitting the optional Versatile Seal Strip (Flat Top shower trays only) follow the instructions supplied with<br />
the seal strip <strong>and</strong> attach the strip now.<br />
Note! Before proceeding dry fit all items in situ to ensure compatibility.<br />
Note! It is normal for the tray to appear elastic when undertaking a test dry fitting.<br />
5 Use Installation compound adhesive or a suitable contact adhesive to cover the full area under the<br />
shower tray. Apply or trowel to a thickness suitable to allow levelling <strong>and</strong> full support of the shower<br />
tray (See Fig 2).<br />
Note! Always follow the instructions supplied with the adhesive.<br />
6 Place the shower tray (A) onto the wet adhesive ensuring that it is fully supported by the mix. Level the<br />
top rims only as the shower tray has a built in fall for adequate drainage (See Fig 3).<br />
Note! Ensure tray is fully stuck down, weight down if necessary.<br />
7 When the adhesive has set, remove any excess mix <strong>and</strong> masking tape then make connection between<br />
the shower tray <strong>and</strong> waste pipe. The shower tray <strong>and</strong> all connections MUST now be checked for water<br />
tightness flow <strong>and</strong> adequate drainage over the entire area.<br />
8 After all checks <strong>and</strong> adjustments, seal along the tiling line with silicone sealant (See Fig 4).<br />
Note! When fitting a shower enclosure refer to the manufacturers installation instructions<br />
9 Fill in the access area <strong>and</strong> the waste pipe trench beneath the shower tray (A) with cement to give full<br />
support to the shower tray in service.<br />
1<br />
2 3<br />
4<br />
2<br />
226CAT - V1 - 07/2011 LH