Available (PDF) - Ford Racing Performance Parts
Available (PDF) - Ford Racing Performance Parts
Available (PDF) - Ford Racing Performance Parts
Create successful ePaper yourself
Turn your PDF publications into a flip-book with our unique Google optimized e-Paper software.
M-9424-463V<br />
Intake Manifold<br />
INSTALLATION INSTRUCTIONS<br />
NO PART OF THIS DOCUMENT MAY BE REPRODUCED WITHOUT PRIOR AGREEMENT AND WRITTEN PERMISSION OF<br />
FORD RACING PERFORMANCE PARTS.<br />
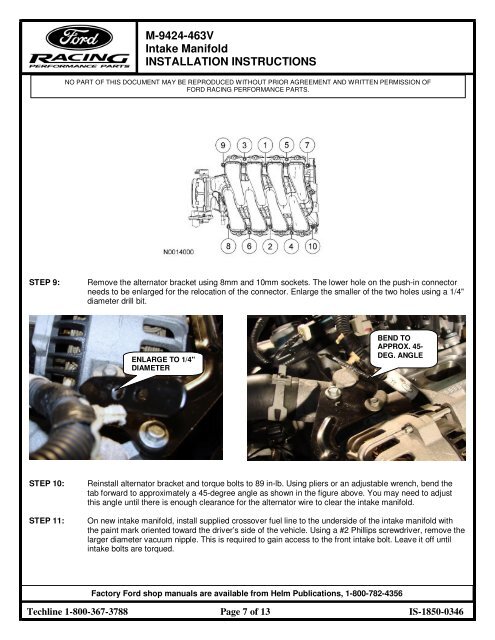
STEP 9: Remove the alternator bracket using 8mm and 10mm sockets. The lower hole on the push-in connector<br />
needs to be enlarged for the relocation of the connector. Enlarge the smaller of the two holes using a 1/4"<br />
diameter drill bit.<br />
ENLARGE TO 1/4"<br />
DIAMETER<br />
BEND TO<br />
APPROX. 45-<br />
DEG. ANGLE<br />
STEP 10: Reinstall alternator bracket and torque bolts to 89 in-lb. Using pliers or an adjustable wrench, bend the<br />
tab forward to approximately a 45-degree angle as shown in the figure above. You may need to adjust<br />
this angle until there is enough clearance for the alternator wire to clear the intake manifold.<br />
STEP 11: On new intake manifold, install supplied crossover fuel line to the underside of the intake manifold with<br />
the paint mark oriented toward the driver’s side of the vehicle. Using a #2 Phillips screwdriver, remove the<br />
larger diameter vacuum nipple. This is required to gain access to the front intake bolt. Leave it off until<br />
intake bolts are torqued.<br />
Factory <strong>Ford</strong> shop manuals are available from Helm Publications, 1-800-782-4356<br />
Techline 1-800-367-3788 Page 7 of 13 IS-1850-0346


