ProCal II INSTRUCTION SHEET Techline (800 ... - Ford Racing Parts
ProCal II INSTRUCTION SHEET Techline (800 ... - Ford Racing Parts
ProCal II INSTRUCTION SHEET Techline (800 ... - Ford Racing Parts
- No tags were found...
You also want an ePaper? Increase the reach of your titles
YUMPU automatically turns print PDFs into web optimized ePapers that Google loves.
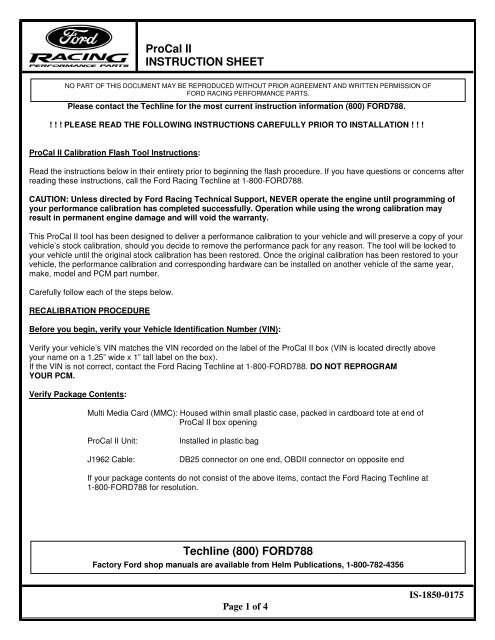
<strong>ProCal</strong> <strong>II</strong><strong>INSTRUCTION</strong> <strong>SHEET</strong>NO PART OF THIS DOCUMENT MAY BE REPRODUCED WITHOUT PRIOR AGREEMENT AND WRITTEN PERMISSION OFFORD RACING PERFORMANCE PARTS.Please contact the <strong>Techline</strong> for the most current instruction information (<strong>800</strong>) FORD788.! ! ! PLEASE READ THE FOLLOWING <strong>INSTRUCTION</strong>S CAREFULLY PRIOR TO INSTALLATION ! ! !<strong>ProCal</strong> <strong>II</strong> Calibration Flash Tool Instructions:Read the instructions below in their entirety prior to beginning the flash procedure. If you have questions or concerns afterreading these instructions, call the <strong>Ford</strong> <strong>Racing</strong> <strong>Techline</strong> at 1-<strong>800</strong>-FORD788.CAUTION: Unless directed by <strong>Ford</strong> <strong>Racing</strong> Technical Support, NEVER operate the engine until programming ofyour performance calibration has completed successfully. Operation while using the wrong calibration mayresult in permanent engine damage and will void the warranty.This <strong>ProCal</strong> <strong>II</strong> tool has been designed to deliver a performance calibration to your vehicle and will preserve a copy of yourvehicle’s stock calibration, should you decide to remove the performance pack for any reason. The tool will be locked toyour vehicle until the original stock calibration has been restored. Once the original calibration has been restored to yourvehicle, the performance calibration and corresponding hardware can be installed on another vehicle of the same year,make, model and PCM part number.Carefully follow each of the steps below.RECALIBRATION PROCEDUREBefore you begin, verify your Vehicle Identification Number (VIN):Verify your vehicle’s VIN matches the VIN recorded on the label of the <strong>ProCal</strong> <strong>II</strong> box (VIN is located directly aboveyour name on a 1.25” wide x 1” tall label on the box).If the VIN is not correct, contact the <strong>Ford</strong> <strong>Racing</strong> <strong>Techline</strong> at 1-<strong>800</strong>-FORD788. DO NOT REPROGRAMYOUR PCM.Verify Package Contents:Multi Media Card (MMC): Housed within small plastic case, packed in cardboard tote at end of<strong>ProCal</strong> <strong>II</strong> box opening<strong>ProCal</strong> <strong>II</strong> Unit:J1962 Cable:Installed in plastic bagDB25 connector on one end, OBD<strong>II</strong> connector on opposite endIf your package contents do not consist of the above items, contact the <strong>Ford</strong> <strong>Racing</strong> <strong>Techline</strong> at1-<strong>800</strong>-FORD788 for resolution.<strong>Techline</strong> (<strong>800</strong>) FORD788Factory <strong>Ford</strong> shop manuals are available from Helm Publications, 1-<strong>800</strong>-782-4356Page 1 of 4IS-1850-0175
<strong>ProCal</strong> <strong>II</strong><strong>INSTRUCTION</strong> <strong>SHEET</strong>NO PART OF THIS DOCUMENT MAY BE REPRODUCED WITHOUT PRIOR AGREEMENT AND WRITTEN PERMISSION OFFORD RACING PERFORMANCE PARTS.Prepare <strong>ProCal</strong> <strong>II</strong>:STEP 1:Remove the <strong>ProCal</strong> <strong>II</strong> from its plastic bag. Peel back the rubber boot from the lower portion of the<strong>ProCal</strong> <strong>II</strong> to expose the MMC socket.Remove the MMC from its plastic case. Insert the MMC into the socket of the <strong>ProCal</strong> <strong>II</strong>. Return therubber boot to its original position to cover the MMC.STEP 2:Remove the J1962 cable from its plastic packaging. Insert the DB25 connector of the cable into the top ofthe <strong>ProCal</strong> <strong>II</strong>. Finger-tighten the retaining screws of the DB25 so that it is firmly fastened to the <strong>ProCal</strong> <strong>II</strong>.Prepare Vehicle:STEP 3:Make sure your vehicle’s battery is fully charged (at least 12.0 volts) and all accessories (radio, interiorfan, headlights, etc.) are off. If you are unsure if your vehicle’s battery is fully charged, connect a batterycharger prior to beginning the programming process.CAUTION: If your <strong>ProCal</strong> <strong>II</strong> aborts programming due to low voltage, you may be required to havean authorized <strong>Ford</strong> Dealer reprogram your PCM to its original stock calibration in order to regainPCM functionality.STEP 4:STEP 5:Locate the onboard diagnostic link connector (DLC) beneath the driver side dashboard. The exactlocation of the DLC will vary with vehicle model and year but will always be on the driver’s side.Connect your <strong>ProCal</strong> <strong>II</strong> tool to the vehicle diagnostic connector.Note: For first time power-up of your <strong>ProCal</strong> <strong>II</strong>, you may receive a message indicating BootLoaderfirmware is updating. The RED error light will be on while the firmware is updating. This is normal for firsttime power-up.STEP 6:STEP 6A:Turn the ignition key of your vehicle to the ON position.If the vehicle you are working on is a <strong>Ford</strong> GT or Lightning truck, you must make a change inside the<strong>ProCal</strong> <strong>II</strong> tool.1. Scroll down to “DIAGNOSTICS” and press ENTER.2. Highlight “SELECT PROTOCOLS” and press ENTER.3. Scroll to “SCP - 24 BIT” and press ENTER.You are now ready to reprogram your <strong>Ford</strong> GT or Lightning truck with the <strong>Ford</strong> <strong>Racing</strong> calibration.<strong>Techline</strong> (<strong>800</strong>) FORD788Factory <strong>Ford</strong> shop manuals are available from Helm Publications, 1-<strong>800</strong>-782-4356Page 2 of 4IS-1850-0175
<strong>ProCal</strong> <strong>II</strong><strong>INSTRUCTION</strong> <strong>SHEET</strong>NO PART OF THIS DOCUMENT MAY BE REPRODUCED WITHOUT PRIOR AGREEMENT AND WRITTEN PERMISSION OFFORD RACING PERFORMANCE PARTS.STEP 20:STEP 21:STEP 22:Use Up/Down arrow keys to obtain desired axle ratio and press ENTER when complete.Use Down arrow key to highlight “OCTANE ADJUST” and press ENTER to select.Use Up/Down arrow keys to toggle between Y or N and press ENTER to complete.Note: Always set this parameter to N. If you experience audible knock after programming your PCM withthis setting, reprogram your PCM and change this parameter to Y.STEP 23:Use Down arrow key to highlight “SAVE CHANGES” and press ENTER to select and initiateprogramming.<strong>ProCal</strong> <strong>II</strong> will initiate programming and display % complete for each reprogramming step. “UPDATECOMPLETE” will be displayed for successful programming.STEP 24:Press ENTER once “UPDATE COMPLETE” is displayed.<strong>ProCal</strong> <strong>II</strong> will display “The performance calibration install is done!”STEP 25:Press ENTER to return to the main menu.Changing Tire Size, Axle Ratio or Octane Adjust:STEP 26:Repeat STEPS 3 – 24 above. Enter changes to Tire Size, Axle Ratio or Octane Adjust as required.Returning to Original Stock Calibration:STEP 27:Repeat STEPS 3 – 24 above. At STEP 14, select “RESTORE ORIGINAL” instead of“PERFORMANCE CAL.”<strong>Techline</strong> (<strong>800</strong>) FORD788Factory <strong>Ford</strong> shop manuals are available from Helm Publications, 1-<strong>800</strong>-782-4356Page 4 of 4IS-1850-0175


