
You also want an ePaper? Increase the reach of your titles
YUMPU automatically turns print PDFs into web optimized ePapers that Google loves.
<strong>Unholy</strong> <strong>Heels</strong><br />
The principle of those ‘<strong>Unholy</strong> <strong>Heels</strong>’ is fairly simple: Knit together the last<br />
‘live’ stitch with the first ‘reserved’ stitch, and make a new stitch by<br />
picking up and twisting the running thread between these stitches.<br />
This can be done in hand knitting, and on knitting machines, too. I have<br />
not yet tried this on a Japanese machine, but it should work more or less<br />
the same: instead of working the pushers to ‘reserve’ stitches, those<br />
stitches are being put on Hold. I tried it a few times, and it does work<br />
beautifully at the Passap Duomatic 80.<br />
Therefore, my description will be with the Passap DM80:<br />
Knit your sock (as written in the Passap Duomatic Manual) until you come<br />
to the Section C, Heel<br />
Row counter to 000<br />
Lock GX/BX<br />
On front bed pushers in Working Position (WP) equaling number of stitches<br />
Lock at right<br />
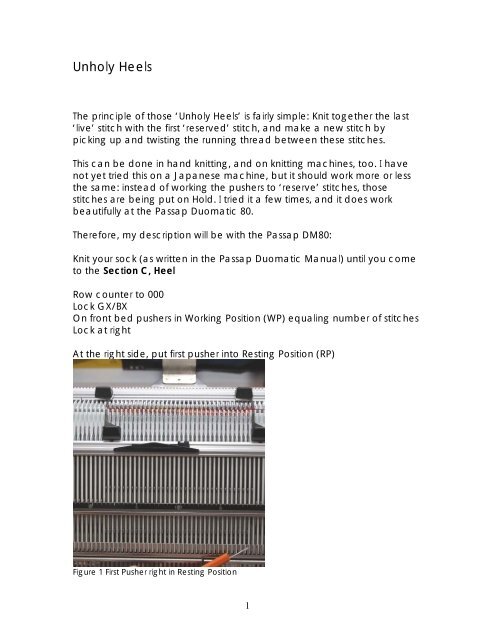
At the right side, put first pusher into Resting Position (RP)<br />
Figure 1 First Pusher right in Resting Position<br />
1
Knit 1 row<br />
Lock left<br />
At the left side, put first pusher into RP<br />
Knit 1 row<br />
Continue knitting and put 1 pusher into RP at the side where the lock is,<br />
until there are about one third of the stitches on the left side in ‘reserve’ (=<br />
pushers in RP), one third of stitches in the center ‘live’ (pushers in WP), and<br />
one third of stitches to the right in ‘reserve’ (= pushers in RP), or whatever<br />
division of stitches you found the best for your socks.<br />
Figure 2: One third left in 'Reserve', the center third, and the third right in 'Reserve'<br />
The lock should be at the left side, and you have just put the last left<br />
pusher into RP to get to the number of stitches you intended.<br />
Now you put the first right side pusher next to the ‘live’ center stitches and<br />
put that pusher into WP.<br />
2
Figure 3: put first right-of -center pusher back into WP<br />
Take the stitch that is on this needle and put it on the needle to the left so<br />
that there are two stitches on this needle (the last live stitch and the stitch<br />
where you just put the pusher into WP again).<br />
Figure 4: Take stitch and put it on needle to the left (center)<br />
3
Figure 5: empty needle<br />
Then pick up the running thread between the needle with the two stitches<br />
and the needle to the right of the empty needle, twist it, and put it on the<br />
empty needle (Figures 6 to 12).<br />
:<br />
Figure 6: Pick up running thread<br />
4
Note: you know that you have the correct thread if the loop tightens on<br />
the next needle (in this case, the needle to the right).<br />
Figure 7: Insert tool into picked-up running thread<br />
Figure 8: start to twist running thread<br />
5
Figure 9: twist running thread to form a loop<br />
Figure 10: put twisted loop over empty needle as a new stitch<br />
6
Figure 11: use orange tool to get the loop over needle<br />
Figure 12: Done! Loop is twisted and over (formerly) empty needle<br />
7
Knit 1 row<br />
Lock is now on the right side.<br />
Put the first pusher on the left side next to the center stitches back into WP.<br />
Take the stitch from this needle and put it on the needle to the right<br />
(towards the center).<br />
Pick up the running thread between the double-stitch center needle and<br />
the stitch to the left of the empty needle, twist the thread, and put this<br />
stitch on the empty needle (Figures 13 – 17).<br />
Figure 13: K2tog on the left side of center<br />
8
Figure 14: From left to right: 2 nd Reserved stitch, empty needle, K2tog from last live stitch and first<br />
reserved stitch<br />
Figure 15: Picking up the running thread and inserting tool to twist a loop<br />
9
Figure 16: Twisting the running thread<br />
Figure 17: (from left to right) 'Reserved' Stitch, twisted loop, 2 stitches on needle<br />
10
Knit 1 row<br />
Lock is now on the left side.<br />
Continue to put the next pusher into WP opposite the side where the lock<br />
is, transferring this stitch to the next needle towards the center, pick up the<br />
running thread and put the twisted loop on the empty needle.<br />
When you come to the next-to-last stitch on the right side, remember that<br />
you ‘skipped’ the first needle when you started the heel (figure 18).<br />
Therefore, you have to ‘fish’ a little bit to find this running thread that will<br />
tighten the loop on the back bed.<br />
Figure 18: skipped first stitch from first row<br />
For the last stitch on the right side you have to take a thread from the row<br />
below and make sure that this thread is reliably twisted – it still will give a<br />
little hole, but it’s a little hole.<br />
With the lock on the right side, prepare the last stitch on the left side,<br />
Change the lock to CX/CX, and set the row counter back to 000, and knit<br />
the first row of the D section (Passap Manual) – the foot.<br />
11
Additional notes:<br />
It does not seem to matter if you twist clockwise or anti-clockwise. What<br />
matters is that there is a twisted loop on the needle – otherwise there will<br />
be a hole.<br />
The last stitches on the left side are less of a problem, but the running<br />
threads are easier to find on either side if you put the orange tool<br />
between both beds and stretch the fabric somewhat to the outside to see<br />
the threads clearly. (see Figure 19)<br />
Figure 19: Stretching the threads on the right side to find a suitable running thread for the last<br />
twisted loop<br />
I have found that the orange tool is the best one for picking up the<br />
threads and putting them on the needles. Two orange tools would be<br />
12
perfect, but any other single-stitch transfer tool works. I had more<br />
problems with the two-eyed bodkin, for whatever reasons.<br />
Be careful with the weights. If too much weight is put on the heel, it is *very<br />
difficuIt* to fiddle the twisted loop on the empty needle. I had more<br />
success without weights (apart from the two clamps that I always have on<br />
the socks), or one heel gripper and a clamp rather than with a heel<br />
gripper and the ‘normal’ weight.<br />
If anyone has ideas, tricks or suggestions to make this easier, faster, or<br />
better, please do contact me.<br />
Thanks!<br />
Makoshark<br />
Copyright 2011<br />
Dedicated to A.Charlene D. – my teacher, mentor, and steadfast supporter in all my Passap-endeavours ☺<br />
Thank you, Hilary, for the catchy name.<br />
13
<strong>Unholy</strong> <strong>Heels</strong><br />
(Version without pictures for use at the knitting machine)<br />
The principle of those ‘<strong>Unholy</strong> <strong>Heels</strong>’ is fairly simple: Knit together the last<br />
‘live’ stitch with the first ‘reserved’ stitch, and make a new stitch by<br />
picking up and twisting the running thread between these stitches.<br />
This can be done in hand knitting, and on knitting machines, too. I have<br />
not yet tried this on a Japanese machine, but it should work more or less<br />
the same: instead of working the pushers to ‘reserve’ stitches, those<br />
stitches are being put on Hold. I tried it a few times, and it does work<br />
beautifully at the Passap Duomatic 80.<br />
Therefore, my description will be with the Passap DM80:<br />
Knit your sock (as written in the Passap Duomatic Manual) until you come<br />
to the Section C, Heel<br />
Row counter to 000<br />
Lock GX/BX<br />
On front bed pushers in Working Position (WP) equaling number of stitches<br />
Lock at right<br />
At the right side, put first pusher into Resting Position (RP)<br />
Knit 1 row<br />
Lock left<br />
At the left side, put first pusher into RP<br />
Knit 1 row<br />
Continue knitting and put 1 pusher into RP at the side where the lock is,<br />
until there are about one third of the stitches on the left side in ‘reserve’ (=<br />
pushers in RP), one third of stitches in the center ‘live’ (pushers in WP), and<br />
one third of stitches to the right in ‘reserve’ (= pushers in RP).<br />
The lock should be at the left side, and you have just put the last left<br />
pusher into RP to get to the number of stitches you intended.<br />
Now you put the first right side pusher next to the ‘live’ center stitches and<br />
put that pusher into WP.<br />
Take the stitch that is on this needle and put it on the needle to the left so<br />
that there are two stitches on this needle.<br />
14
Then pick up the running thread between the needle with the two stitches<br />
and the needle to the right of the empty needle, twist it, and put it on the<br />
empty needle.<br />
Note: you know that you have the correct thread if the loop tightens on<br />
the next needle (in this case, the needle to the right).<br />
Knit 1 row<br />
Lock is now on the right side.<br />
Put the first pusher on the left side next to the center stitches back into WP.<br />
Take the stitch from this needle and put it on the needle to the right<br />
(towards the center).<br />
Pick up the running thread between the double-stitch center needle and<br />
the stitch to the left of the empty needle, twist the thread, and put this<br />
stitch on the empty needle.<br />
Knit 1 row<br />
Lock is now on the left side.<br />
Continue to put the next pusher into WP opposite the side where the lock<br />
is, transferring this stitch to the next needle towards the center, pick up the<br />
running thread and put the twisted loop on the empty needle.<br />
When you come to the next-to-last stitch on the right side, remember that<br />
you ‘skipped’ the first needle when you started the heel (figure 18).<br />
Therefore, you have to ‘fish’ a little bit to find this running thread that will<br />
tighten the loop on the back bed.<br />
For the last stitch on the right side you have to take a thread from the row<br />
below and make sure that this thread is reliably twisted – it still will give a<br />
little hole, but it’s a little hole.<br />
With the lock on the right side, prepare the last stitch on the left side,<br />
Change the lock to CX/CX , and set the row counter back to 000, and<br />
proceed with Section D (Passap Manual) with knitting the foot.<br />
Makoshark<br />
Copyright 2011<br />
Dedicated to A.Charlene D. – my teacher, mentor, and steadfast supporter in all my Passap-endeavours ☺<br />
Thank you, Hilary, for the catchy name!<br />
15