Create successful ePaper yourself
Turn your PDF publications into a flip-book with our unique Google optimized e-Paper software.
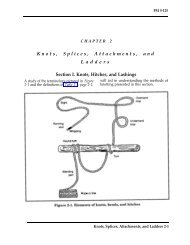
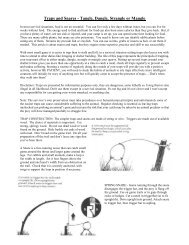
<strong>Knots</strong> & <strong>Knotting</strong><br />
Technical Terms in <strong>Knotting</strong>:<br />
Standing End – The long end of the rope too<br />
long to use or already attached to something.<br />
Running End or Working End – The end or<br />
the rope you are going to tie your knot with.<br />
Both ends could be your Running Ends.<br />
Some Common <strong>Knots</strong> and their Uses:<br />
1. Thumb Knot: End of rope, hanking and lots more.<br />
2. Marline Spike / Lever Hitch: Spar to rope for pulling.<br />
3. Fisherman’s Knot: Tying two wet / slippery ropes.<br />
4. Slip Knot: Temporary hold.<br />
5. Lariat Knot: Well balanced loop / Honda for a Lariat.<br />
6. Guy-Line Hitch: Improvise guy lines on tents.<br />
7. Figure-of-eight Knot: Same as (1) – but stronger.<br />
8. Packer’s Knot: For parcels, easy tighten.<br />
9. Reef Knot: Joining rope / cord of the same thickness.<br />
10. Single Slip Reef: Temporary tie, easy to undo.<br />
11. Double Slip Reef: Tie shoes / temporary tie.<br />
12. Surgeon’s Knot: Variation of (9) – holds while tying.<br />
13. Sheet Bend: Joining odd thickness ropes.<br />
14. Sheet Bend: Same as (13) but on a loop.<br />
15. Double Sheet Bend: Very unequal / wet ropes.<br />
16. Swab Hitch / Slippery Sheet Bend: For quick release.<br />
17. Carrick Bend: ‘Bending’ large thick ropes together.<br />
18. Binder Turn: If knot to go through machine / pulley.<br />
19. Clove Hitch: Temporary tie / starting lashings.<br />
20. Rolling Hitch: Sideways pull under strain.<br />
21. Magnus Hitch: Tie off, using rope friction to hold.<br />
22. Highwayman’s Hitch: To secure, but loosen easily.<br />
Useful tips:<br />
Always practise tying knots using proper rope or<br />
cord and not string. Get to know what the<br />
finished knot looks like, then you will know<br />
what you’re aiming at. You should become so<br />
practised at tying knots (which is the only way to<br />
get to know them – by practice), that you should<br />
be able to tie any knot in any position, eyes<br />
closed, behind your back, in the dark, etc. Speed<br />
will also come with constant practice.<br />
23. Larks Head: Various uses like (4), easy to undo.<br />
24. Half Hitch: Temporary tie, easy to undo.<br />
25. Round Turn & Two Half Hitches: Rope under strain.<br />
26. Round Turn & Two Half Hitches: If Rope too long.<br />
27. Timber Hitch: Starting Diagonal Lashing / securing.<br />
28. Bowline: Loop at rope end / rescue loop.<br />
29. Bowline-on-a-Bight: Double loop rope end / rescue.<br />
30. Water Bowline: Prevents knot ‘jamming’ when wet.<br />
31. Running Bowline: Useful running noose / loop.<br />
32. Hangman’s Noose / Jack Ketche’s Collar: Run loop.<br />
33. Hangman’s Noose: Used as a non-running loop.<br />
34. Sheepshank: Temporary method to shorten a rope.<br />
35. Sheepshank: Two methods of locking the knot.<br />
36. Fireman’s Chair Knot: Two loops rope end / rescue.<br />
37. Fireman’s Chair Knot: Method of locking.<br />
38. Double Overhand Knot: Quick loop at rope end.<br />
39. Man Harness Knot: Loop in middle of a rope.<br />
40. Middleman’s Knot: Loop in middle of a rope.<br />
41. Rover Noose: Loop in middle or end of a rope.<br />
42. Fisherman’s Surgeon Knot: To join fish line / nylon.<br />
43. Blood Knot: To join fish line / nylon filament.<br />
44. Taut-line Hitch: Temporary guy line / slip tie off
Types & Care of Rope<br />
Ropes and Cords are very expensive, but with<br />
proper care will last for numerous years. Ropes<br />
should be treated properly, stored in a dry place<br />
and never left out unless in use. Wet ropes<br />
should be dried before storing and all ropes<br />
inspected regularly for defects and rectified<br />
immediately. Rope ends should never be allowed<br />
to unravel.<br />
Coiling and Laying of Rope:<br />
Coiling ropes properly prevents ‘springy’ tangle<br />
before storage. A rope laid up right handed, must<br />
be coiled right handed i.e. clockwise and viceversa.<br />
The same applies when laying (twisting)<br />
frayed strands back into position.<br />
Rope Terms:<br />
Hawser-laid Rope –<br />
3 Strands laid up right<br />
handed as shown in<br />
fig.1<br />
Shroud-laid Rope – 4 Strands laid right<br />
handed with a cord heart as in fig.2<br />
Cable-laid Rope – 3 Right hand Hawser-laid<br />
Ropes laid left handed together as in fig.3
THE SIX BASIC SCOUT KNOTS AND HITCHES<br />
THE REEF KNOT A flat and easily untied knot.<br />
How to tie it: Say to yourself, "Right over left and<br />
under. Left over right and under." Then take a<br />
piece of rope or thick string and practise.<br />
SHEEPSHANK<br />
Not really a knot. Tied in the bight of a rope for shortening a rope or<br />
taking up the slack or to pass the strain over a weakened or frayed<br />
part of the rope.<br />
As the bowline is a<br />
knot that makes a<br />
loop that does not<br />
slip, it is used for<br />
rescues and lifelines<br />
BOWLINE<br />
This is the king of knots. The most useful and one of the simplest<br />
ways of putting a fixed loop into a rope. The basic purpose is to<br />
put a nonslip knot into a rope, and thus form an eye or loop or<br />
bight. It is easy to tie and untie and it never slips or jams. The<br />
bowline has a large number of variations but the one shown is<br />
the basic jack-of-all-trades<br />
CLOVE HITCH<br />
The clove hitch is easy to tie in a number of different ways<br />
and is also easy to untie. It is possibly the nearest there is<br />
to a general utility hitch. Care must be taken not to use it<br />
when a rolling hitch would serve better. It is used to start<br />
and end lashings.<br />
ROUND TURN-AND-TWO HALF HITCHES<br />
This is a very secure hitch in almost all<br />
circumstances. It is a good haulage hitch, or for<br />
securing guy lines. Also useful for tying up a boat or<br />
an animal to a pole as it can stand a lot of strain.<br />
Make sure you can tie the Clove Hitch and Round<br />
Turn-and-Two Half Hitches quickly and securely as<br />
you will need these to start and finish lashings, which<br />
form a large part of Scout Pioneering Projects.<br />
SHEETBEND<br />
This knot, like most bends, is used for<br />
tying two ropes together. Note that to be<br />
correct the two ends should be on the<br />
same side of the knot. If the two ropes<br />
differ in thickness a double sheetbend<br />
should be used. All this is to take an<br />
extra turn around the thicker rope<br />
before finishing
WHIPPING<br />
The ends of a freshly-cut rope will rapidly<br />
fray and unlay if nothing is done to<br />
prevent it. Before using a rope, whip the<br />
two ends to keep them from unravelling.<br />
There are various methods of whipping a<br />
rope, and here we will describe three<br />
methods.<br />
Simple or American Whipping<br />
To whip a knotting rope, use a thin twine<br />
about 30 cm long. Make one end into a<br />
loop and place it at the end of the rope.<br />
End A should be fairly short. Wind the<br />
longer end of the twine around the rope<br />
and the loop, spiralling away and drawing<br />
each turn tight. When the whipping is as<br />
wide as the diameter of the rope, thread the<br />
twine through the end of the loop. Pull end<br />
A hard until the loop has disappeared<br />
under the whipping. Trim off the two ends.<br />
Then whip the other end of the ropes. For<br />
a more permanent type of whipping see the<br />
Sailmaker’s whipping below.<br />
West Country Whipping<br />
This is the easiest form of whipping. Tie a<br />
Thumb Knot a few centimeters from the<br />
end of the rope using thin, strong twine.<br />
Then tie another Thumb Knot at the back<br />
of the rope, and continue tying Thumb<br />
<strong>Knots</strong> on each side of the rope to within<br />
about a centimeter from the end. Finish off<br />
with a Reef Knot, and trim with a sharp<br />
knife.<br />
Sailmaker’s Whipping<br />
1. Open the lay of the rope and place a<br />
loop of twine around one strand. Relay<br />
the rope.<br />
2. Hold the loop down with one hand,<br />
leaving the short end free. With the<br />
long end of the twine make tight turns<br />
around the rope, close together,<br />
towards the end of the rope.<br />
3. Raise the loop and slip it over the end<br />
of the strand it is around. Pull the<br />
short end to tighten. Join the ends of<br />
the twine with a Reef Knot.<br />
4. Trim the end of the sharp knife and<br />
rub with wax.
SPLICING<br />
Splices are used to join any two parts of<br />
rope together permanently. A good splice<br />
has up to 95 per cent of the rope’s<br />
strength, while a knot’s efficiency varies<br />
from only 45 to 60 per cent of the rope’s<br />
strength.<br />
Before beginning to splice, you need a<br />
couple of tools - a sharp knife and a<br />
marlinspike. The marlinspike is the tool<br />
included in some pen-knives that most<br />
Scouts think is used for taking stones out<br />
of horses’ hooves I The marlinspike is<br />
used to help you in opening the lay of the<br />
rope at the point where the strand is to be<br />
introduced. If you haven’t a marlinspike<br />
handy, a 15cm nail will do the job.<br />
The most important step in splicing is the<br />
start. Marry the strands correctly and the<br />
remaining steps follow easily.<br />
To properly prepare a rope for splicing,<br />
unlay the end adequately and whip each<br />
strand with a temporary whipping.<br />
Four tucks will hold any splice providing<br />
that they are full strands (i.e. not tapered<br />
off). Tapering off is done after the fourth<br />
tuck and is performed by reducing each of<br />
the strands by one-third with a knife; tuck<br />
again with the thinner strands and then<br />
reduce the strands by another third; and<br />
finally by tucking and trimming off close.<br />
Back Splice<br />
This is also sometimes called the end<br />
splice’, it is used as a permanent fastening<br />
at the end of a rope to prevent unravelling.<br />
However, as it causes a bulge at the end of<br />
the rope, which might prevent it from<br />
passing through a block, for most purposes<br />
it is better to whip the end of a rope.<br />
Unlay the end of the rope about 12 to 15<br />
centimeters.<br />
Hold the rope upright, where the unlaid<br />
strands begin, and make sure that the three<br />
strands hang down over your hand with an<br />
equal distance between each of them.<br />
Make a Crown Knot to start the splice.<br />
This is done as follows:<br />
Take one strand (1) and lay it over its<br />
neighbour (2), working anti-clockwise.<br />
Bring down strand 2 over strand 1 and 3.<br />
Take the end of strand 3 over strand, 2 and<br />
down through the loop made by strand 1.<br />
Tighten each strand in turn by pulling<br />
downwards. If you have tied the Crown<br />
Knot correctly, the strands will hang down
the rope with an equal distance between<br />
them. You are now ready to make the first<br />
‘tuck’. From above the Crown Knot<br />
should look like this:<br />
With the marlinspike or nail, lift one of the<br />
strands of the rope immediately below the<br />
Crown Knot and pass the end of one of the<br />
strands underneath it. Pull tight.<br />
Working anti-clockwise, take the end of<br />
the next strand and pass it underneath the<br />
next laid strand of the rope. Then take the<br />
third end and pass it under the third laid<br />
strand of the rope. Pull tight. You have<br />
now completed the first ‘tuck’ and if you<br />
have done it correctly the strands will hang<br />
down with an equal distance between<br />
them. After every completed tuck this<br />
should be the case. On completion of the<br />
first tuck your Back Splice will look like<br />
this:<br />
Now complete the second tuck by passing<br />
each of the three ends under a strand in<br />
turn as described. above. At the end of<br />
your completed tuck the strands should<br />
hang down with an equal distance between<br />
them.<br />
Four sets of tucks will be enough, after<br />
which the ends should be trimmed of f. If<br />
you wish to taper your splice, after the<br />
fourth tuck unravel each of the ends in turn<br />
and cut one-third of the yarns (see page 2)<br />
off. Tuck again with the thinner strands;<br />
reduce the strands by another third and<br />
then finish of f the splice with another<br />
tuck. Trim off the ends.<br />
Your untapered, untrimmed, completed<br />
Back Splice should look like this:<br />
Eye Splice<br />
The Eye Splice is the strongest type of<br />
rope loop (an ‘eye’). Unlay the rope for a<br />
sufficient distance from the end,<br />
depending upon the size of eye required<br />
and the size of the rope. Normally, about<br />
12 times the diameter of the rope is about<br />
right.<br />
If you are a beginner in the art of splicing,<br />
it is a good idea to put on a temporary<br />
whipping around the rope at the point<br />
where the strands begin to unlay. This<br />
whipping should be cut off after the splice<br />
is formed.<br />
1. With the eye towards you and the<br />
standing part of the rope away<br />
from you, open out the three<br />
strands.
2. Take the middle strand 2 and pass<br />
it over strand ‘c’, under strand ‘b’,<br />
and out between strands ‘a’ and<br />
‘b’.<br />
3. Take strand 1 over strand ‘b’ and<br />
tuck it under strand ‘a’. Pull it<br />
through.<br />
4. Tuck strand 3 under strand ‘c’ and<br />
pull it through.<br />
Tug on each strand in turn. If your start<br />
has been done correctly the three strands<br />
should have an equal distance between<br />
them.<br />
Continue forming the splice by making<br />
four tucks in the same way as you did for<br />
the Back Splice described above. At the<br />
end of the fourth tuck, trim off the end of<br />
the strands, or taper the splice.<br />
Short Splice<br />
The Short Splice joins two ropes of equal<br />
size or two ends of the same rope. It is the<br />
strongest of splices, but because it<br />
increases the diameter of the rope it cannot<br />
run through a block of the correct size for<br />
the rope. Its bulk can be reduced by<br />
tapering the strands toward the end of the<br />
splice, but this weakens it somewhat.<br />
Unlay both ends of the rope for a distance<br />
about equal to 12 times the diameter of the<br />
rope.<br />
A Place the two ends of the rope together<br />
alternating the strands.
B Temporarily tie down the strands to<br />
prevent the rope unlaying further.<br />
C Tuck strand 1 over an opposing strand<br />
and under the next strand.<br />
D Bring strand 2 over strand 5 and under<br />
the next one.<br />
E Bring strand 3 over strand 6 and under<br />
the next one. You have now completed<br />
the first tuck.<br />
F Remove the temporary tie and repeat<br />
the operation described above on the<br />
other rope end. Continue tucking the<br />
strands in sequence until you have<br />
done four tucks on each rope. Trim the<br />
ends.<br />
To taper the splice, finish several complete<br />
tucks on each rope, then remove the<br />
whippings from the strands. With a sharp<br />
knife or razor cut about one third of the<br />
yarns from each strand. Retwist the yarns,<br />
whip as before, and make another full<br />
tuck. Again, untwist and slice about one<br />
third of the remaining yarn of each strand<br />
for the remaining tuck.<br />
For synthetic rope, follow the same<br />
method as mentioned above, but allow one<br />
additional tuck (with or without tapering).<br />
Docker’s Splice<br />
The Docker’s Splice is sometimes called<br />
the Marline Eye Splice or the Tucked Eye<br />
Splice. It is the easiest of all to form. It is a<br />
quick method of making a temporary eye a<br />
rope at any point and is often used on<br />
ridge tents to hold the dolly of the main<br />
guylines.<br />
In most splices the lay of the rope is<br />
opened and the tucks are made with the<br />
rope strands. In the Docker’s Splice the<br />
whole rope is used.<br />
Open the lay at the chosen point in the<br />
rope and tuck the whole of the running end<br />
through the raised strand to make an eye of<br />
the required size (A).<br />
Now open the lay of the standing part of<br />
the rope immediately below the first tuck<br />
and pull the running end through until both<br />
tucks lock together (B).<br />
As in all splices, remember to work<br />
against (or across) the lay. After the<br />
second tuck make sure that the running<br />
end is of reasonable length so that there is<br />
no danger of it pulling out.
LASHING<br />
Figure-of-Eight Lashing<br />
You’ve seen a tripod? Well, the tripod is<br />
made by lashing three spars together with<br />
a figure-of-eight lashing. This lashing is<br />
also used for making a gyn, which is a<br />
tripod used with block and tackle for<br />
lifting heavy weights.<br />
The figure-of-eight is for lashing three<br />
spars together at the top when the bottom<br />
ends are to be opened out to make a tripod.<br />
Lay the spars alongside one another, tie a<br />
Clove Hitch around one of the outside<br />
spars, and twist the running end around the<br />
standing part of the rope. Now go over and<br />
under the three spars with the rope<br />
alternatively (A) like a figure-of-eight for<br />
seven or eight times (B). Frap between<br />
each spar, and finish off with a Clove<br />
Hitch (C) on the opposite outside spar to<br />
the one on which you started.<br />
Unlike most other lashings, with the<br />
figure-of-eight lashing the wrapping turns<br />
and the two frapping turns should not be<br />
tight as the lashing tightens when the legs<br />
of the tripod are opened out.<br />
The Filipino Diagonal Lashing<br />
The Filipino diagonal lashing serves the<br />
same purpose as the ordinary diagonal<br />
lashing. It is particularly useful when<br />
lashing thin spars or bamboo spars toget-<br />
her when they spring apart or need to be<br />
pulled together to close a gap.<br />
Double the lashing rope, pass the bight<br />
around the two spars, and then thread the<br />
two ends of the rope through the bight and,<br />
as with a Timber Hitch, draw the two spars<br />
together. Then continue as with the normal<br />
diagonal lashing with two wrapping turns<br />
around both spars and then two wrapping<br />
turns through the opposite angle.<br />
To frap, take the two ends of the double<br />
rope between the spars in opposite<br />
directions. Pull tight.<br />
Finish off the lashing by joining the two<br />
running ends together with a Reef Knot.
The Japanese Square Lashing Mk I<br />
The Japanese Square Lashing Mark I and<br />
the Japanese Square lashing Mark II are<br />
two easy-to-tie lashings which are<br />
particularly useful when lashing thin spars<br />
or bamboo spars.<br />
Double the rope. Start by passing the bight<br />
formed in the middle of the lashing rope<br />
around the underneath spar and then with<br />
the two running ends of the double rope<br />
side by side without crossing, take two<br />
complete wraps around both spars in the<br />
same way as in normal square lashing.<br />
Make frapping turns by passing the two<br />
running ends between the spars in opposite<br />
directions. Pull the f rapping turns tight<br />
and finish the lashing by joining the two<br />
running ends with a Reef Knot.<br />
Japanese Square Lashing MK II<br />
As with the normal square lashing and the<br />
Japanese Square lashing Mark I, the Mark<br />
II lashing is used when it is not necessary<br />
to spring the spars together before lashing<br />
them.<br />
It is probably the simplest of all the<br />
lashings to tie and the fastest.<br />
Double the lashing rope and place the<br />
bight around the back of the upright spar<br />
above the crosspiece. Take the two<br />
running ends over the horizontal spar and<br />
cross them at the back of the upright spar<br />
(A). Bring them forward and over the<br />
horizontal spar and cross them at the back<br />
of the upright spar. Continue in this<br />
fashion until you have made four<br />
wrappings.<br />
Make two frappings by crossing the rope<br />
ends and making the turns around the<br />
lashing between the spars. Pull the<br />
frappings tight. Finish with a Reef Knot.
PRO-PLAN CHART NO. 2.
PRO-PLAN CHART NO. 3.
PRO-PLAN CHART NO. 4.
PRO-PLAN CHART NO. 5.
PRO-PLAN CHART NO. 8.
PRO-PLAN CHART NO. 10.
PRO-PLAN CHART NO. 11.
PRO-PLAN CHART NO. 12.
PRO-PLAN CHART NO. 13.
PRO-PLAN CHART NO. 14.
PRO-PLAN CHART NO. 20.
PRO-PLAN CHART NO. 29.
PRO-PLAN CHART NO. 39.
PRO-PLAN CHART NO. 42.
PRO-PLAN CHART NO. 43.
PRO-PLAN CHART NO. 64.
PRO-PLAN CHART NO. 65.<br />
The Newmarket Ballista<br />
For this one you will need six Scout staffs, seven sisal lashings, and a ‘shotholder’<br />
consisting of an empty tin with three extra-strong elastic bands (cut<br />
from car inner tubes) attached to the base. This should be prepared before the<br />
Patrol meeting.<br />
Note that the locking bar is moveable and is square-lashed to the crossbar of<br />
the sheer legs, but merely rests in the crutch of the back legs. The angle of fire<br />
can be adjusted simply by moving the locking bar in the crutch. The Ballista is<br />
locked in the firing position when the ‘gunner’ sits astride the back legs.<br />
For “shot” use tennis balls, or tight<br />
balls of newspaper sealed with tape.
PRO-PLAN CHART NO. 66.<br />
The Brandon Transportable<br />
SWINGING DERRICK<br />
The DERRICK POST is lashed to the face of a pair of sheer legs which are supported by a<br />
second pair braced backwards to form an extended back leg with back transoms lashed<br />
from the legs of the forward sheers to the apex of the back leg to form a rigid structure.<br />
Note that any pioneering structure built of triangles will be rigid if the lashings are sound.<br />
The JIB UNIT is a third pair of sheer legs that should fit snugly around the derrick post.<br />
Note that the back leg should be at least twice as long as the jib. The theory of the<br />
structure (which you are invited to prove or disprove by trial and error) is that a<br />
considerable load on the jib can be balanced by manual pressure alone on the end of the<br />
back leg.
PRO-PLAN CHART NO. 67.<br />
GUIDED MISSILE<br />
Try this great experiment!<br />
Whether or not this crazy device will work is for you to discover. Certainly there will be<br />
plenty of interesting technical problems to solve.<br />
The firepower is obtained from a strong rubber band cut from a car inner tube and<br />
secured catapult-fashion between two convenient branches. The ‘carriage’ (which is<br />
catapulted by this arrangement) is a Scout staff suspended from three small iron blocks<br />
with three small tins lashed on the underside. The first and second tins have their<br />
bottoms cut out to make tubes; the third is open at one end only.<br />
The ‘missile’ is a Scout staff with a sharp spike at one end. This lies in the three tins. The<br />
carriage is catapulted down a steep, very taut line. (Wire would give a much better result,<br />
if you can get it). A short distance above the target, another rubber band is bound on to<br />
the line to make a stopper. The carriage is checked abruptly as it reaches the stopper, and<br />
the missile shoots onwards o embed itself in the target.<br />
That’s the theory of the thing – now see if you can make it work!
PRO-PLAN CHART NO. 68.<br />
The Scout Transporter<br />
GEAR REQUIRED<br />
Ropes:<br />
Two 10m, 20mm diameter guylines<br />
Four 5m lashing ropes<br />
Three 3m lashing ropes<br />
Spars:<br />
Three poles 4m to 5m in length<br />
One 2m spar<br />
One 1m spar
PRO-PLAN CHART NO. 69.<br />
The Basher<br />
Invented by a Senior Scout from Dereham, Norfolk in England.<br />
Note that the maul is loosely secured in the crutch of the two<br />
back legs. The haft should slide fairly snugly between the two<br />
guide bars at the front of the structure. The operating lines<br />
run through small iron blocks at the top and bottom of the<br />
frame.
PRO-PLAN CHART NO. 70.<br />
GEAR REQUIRED<br />
THE MONKEY BRIDGE<br />
Ropes: Lashings:<br />
One 7cm hawser more than span between legs Ten 3m<br />
Two 5cm hawsers more than span between legs Blocks:<br />
(or one 5cm hawser double length) One double<br />
One 5cm 10m for tackle One single<br />
Spars: Oddments:<br />
Four 5m Sacking<br />
Four 2m Sisal for mooring<br />
Pickets: Maul<br />
Six Light poles or cords for stays<br />
Spade
PRO-PLAN CHART NO. 71.<br />
THE BUSH BRIDGE<br />
GEAR REQUIRED<br />
Ropes:<br />
One 5cm diameter hawser at least<br />
twice the width of the span<br />
Spars:<br />
15 to 20 light poles or 20 forked sticks<br />
10 or so short 1m poles<br />
Oddments<br />
1 rope ladder more than the width of the span<br />
Sacking<br />
Maul<br />
15-20 tent pegs unless forked sticks are used<br />
Cord or sisal for lashing tent pegs to poles<br />
Lashings<br />
30 light lashings (3 for each support)
PRO-PLAN CHART NO. 72.<br />
GEAR REQUIRED<br />
Ropes: Lashings:<br />
Two 2.5cm, 16m Nine 5m<br />
Spars: Fourteen 3m<br />
Two 6m Thirty light lines<br />
Two 3m Pickets:<br />
Four 2m, light Four<br />
Four 1.5m, light Oddments:<br />
Sixteen 2m staves Rope ladder<br />
Four 1m staves<br />
STILT TOWER
PRO-PLAN CHART NO. 73.
The Hourglass Tower<br />
Poles: 100 mm x 5.4 m 3<br />
100 mm x 4.8 m 3<br />
100 mm x 3.6 m 3<br />
75 mm x 2.4 m 3<br />
75 mm x 1.8 m 3<br />
Staves: 32 mm x 0.9 m 25 (ladder rungs)<br />
32 mm x 1.8 m 6 (platform)<br />
32 mm x 1.5 m 6 (platform)<br />
32 mm x 0.9 m 6 (platform)<br />
Rope: 12 mm x 6 m 40 (lashings)<br />
12 mm x 10 m 2 (tripod lashings)<br />
12 mm x 15 m 2 (ladder)<br />
7 mm x 10 m 2 (platform floor)<br />
Sundries: Frapping Mallets<br />
Serving Mallets<br />
Mallet<br />
Pickets<br />
Tape Measure Sisal<br />
Scissors<br />
Chalk
The Abington Spring Bridge<br />
Poles: 100 mm x 3.6 m 4 (sheer legs)<br />
100 mm x 1.8 m 2 (sheer legs base)<br />
Staves: 32 mm x 0.9 m 1 (sheer legs steps)<br />
32 mm x 0.6 m 1<br />
32 mm x 1.5 m 1<br />
Rope: 12 mm x 6 m 6 (main lashings on sheer legs)<br />
12 mm x 15 m 4 (guylines)<br />
10 mm x 5 m 6 (steps to sheer legs)<br />
10 mm x 6 m 6 (holdfasts)<br />
16 mm x 20 m 2 (handrails)<br />
26 mm x 25 m 1 (hawser)<br />
7 mm x 3 m 25 (stringers)<br />
Sundries: 3-2 Block and Tackle (25 mm)<br />
Strop<br />
Log (1.5 m x 300 mm)<br />
Hessian<br />
Spare tent pegs 10<br />
Frapping Mallets<br />
Serving Mallets<br />
Mallet<br />
Pickets 22<br />
Tape Measure<br />
Sisal<br />
Whipping Twine<br />
Chalk<br />
Pick and Spade