Hazelnut Processing Bulletin - Home @ Midwest Hazelnut ...
Hazelnut Processing Bulletin - Home @ Midwest Hazelnut ...
Hazelnut Processing Bulletin - Home @ Midwest Hazelnut ...

You also want an ePaper? Increase the reach of your titles
YUMPU automatically turns print PDFs into web optimized ePapers that Google loves.
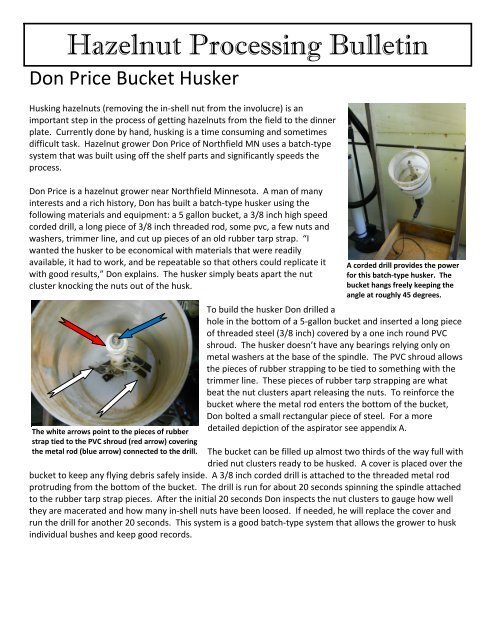
<strong>Hazelnut</strong> <strong>Processing</strong> <strong>Bulletin</strong><br />
Don Price Bucket Husker<br />
Husking hazelnuts (removing the in‐shell nut from the involucre) is an<br />
important step in the process of getting hazelnuts from the field to the dinner<br />
plate. Currently done by hand, husking is a time consuming and sometimes<br />
difficult task. <strong>Hazelnut</strong> grower Don Price of Northfield MN uses a batch‐type<br />
system that was built using off the shelf parts and significantly speeds the<br />
process.<br />
Don Price is a hazelnut grower near Northfield Minnesota. A man of many<br />
interests and a rich history, Don has built a batch‐type husker using the<br />
following materials and equipment: a 5 gallon bucket, a 3/8 inch high speed<br />
corded drill, a long piece of 3/8 inch threaded rod, some pvc, a few nuts and<br />
washers, trimmer line, and cut up pieces of an old rubber tarp strap. “I<br />
wanted the husker to be economical with materials that were readily<br />
available, it had to work, and be repeatable so that others could replicate it<br />
with good results,” Don explains. The husker simply beats apart the nut<br />
cluster knocking the nuts out of the husk.<br />
The white arrows point to the pieces of rubber<br />
strap tied to the PVC shroud (red arrow) covering<br />
the metal rod (blue arrow) connected to the drill.<br />
A corded drill provides the power<br />
for this batch‐type husker. The<br />
bucket hangs freely keeping the<br />
angle at roughly 45 degrees.<br />
To build the husker Don drilled a<br />
hole in the bottom of a 5‐gallon bucket and inserted a long piece<br />
of threaded steel (3/8 inch) covered by a one inch round PVC<br />
shroud. The husker doesn’t have any bearings relying only on<br />
metal washers at the base of the spindle. The PVC shroud allows<br />
the pieces of rubber strapping to be tied to something with the<br />
trimmer line. These pieces of rubber tarp strapping are what<br />
beat the nut clusters apart releasing the nuts. To reinforce the<br />
bucket where the metal rod enters the bottom of the bucket,<br />
Don bolted a small rectangular piece of steel. For a more<br />
detailed depiction of the aspirator see appendix A.<br />
The bucket can be filled up almost two thirds of the way full with<br />
dried nut clusters ready to be husked. A cover is placed over the<br />
bucket to keep any flying debris safely inside. A 3/8 inch corded drill is attached to the threaded metal rod<br />
protruding from the bottom of the bucket. The drill is run for about 20 seconds spinning the spindle attached<br />
to the rubber tarp strap pieces. After the initial 20 seconds Don inspects the nut clusters to gauge how well<br />
they are macerated and how many in‐shell nuts have been loosed. If needed, he will replace the cover and<br />
run the drill for another 20 seconds. This system is a good batch‐type system that allows the grower to husk<br />
individual bushes and keep good records.
Dried nut clusters are shown above left ready to be husked. Don runs the drill for about 20 seconds and then checks to see<br />
how well the nut clusters have been broken up and if the in‐shell nuts have released. If some nuts are still attached to the husk<br />
he continues with the drill for another 20 seconds. The above picture on the right shows the broken apart nut clusters & the<br />
loose in‐shell nuts. This mixture is then “sucked up” into the aspirator for separation.<br />
This Delta Dust collector is the kind<br />
found in many wood shops across the<br />
U.S. The ¾ horse motor provides about<br />
450 cubic ft per minute of air flow.<br />
Separating the husk pieces and dust from the in‐shell nuts also needs to be<br />
done. To accomplish this task Don uses a home built aspirator, with a Delta<br />
dust collector providing the suction. The dust collector can move about<br />
450 cubic ft of air per minute so certainly has the power to provide enough<br />
suction for the air column. He already owned the dust collector so it wasn’t<br />
something that he had to purchase. Other growers could use a shop<br />
vacuum or something comparable. An aspirator uses a column of air from<br />
a blower or vacuum to “suck” up the lighter husk pieces while the heavier<br />
in‐shell nuts fall to the bottom of the column.<br />
The aspirator is built almost entirely of PVC piping of various dimensions. A<br />
3 inch diameter piece approximately two feet long is attached to the inlet<br />
of the dust collector. Attached to this is a flexible piece of 3 inch ducting<br />
that attaches to the top of the air column. The air column itself is<br />
approximately 7 ft tall. The upper portion is 3 inch PVC with a Y connector.<br />
Below the Y connector is a larger piece of 4 inch PVC that attaches to the<br />
blast gate at the base of the column. For a more detailed depiction of the<br />
aspirator see appendix B.<br />
The mixture of in‐shell nuts and husk pieces is sucked up and enters the air column at the Y connector where<br />
the heavier in‐shell nuts are dropped to the bottom of the column. The machine is switched off and the blast<br />
gate is opened to reveal the clean in‐shell nuts. A quick inspection of the husk pieces in the dust collector bin<br />
revealed very few nuts still in the husk. Those nuts still attached to the husk and in the dust collector bin are<br />
usually blanks anyway, explaining why they are light enough to be sucked up.
This before and after series of pictures show how well the aspirator works. The picture above and left shows the in‐shell<br />
nuts/husk mix directly out of the husker. The picture above right shows the in‐shell nuts after being “cleaned up” in the<br />
aspirator. The amount of force used to beat apart the nut clusters and release the in‐shell nuts is an important variable. Too<br />
little and the in‐shell nuts will not release, too much and the nuts will be cracked; the blue arrow above points out a cracked<br />
shell. In this test we found 5 kernels meaning at least 5 nuts had been cracked.<br />
Don is constantly making improvements to the system as he processes his nuts. One variation that can be<br />
incorporated into the air column aspirator is a mechanism to adjust the amount of air entering the column. By<br />
letting more or less air enter, the separation can be fine tuned to a wider set of variables. This is significant<br />
because of the variability of the nut clusters themselves. Some nut clusters will hold the nuts firmly in the<br />
husk. Many times this is indicative of an in‐shell nut that is blank, however it may also be a cluster that is not<br />
quite ripe or simply that way for whatever reason. Anecdotal evidence from growers suggests that some<br />
bushes simply hold the nuts firmly in the husk. While further research and selection may help to reduce these<br />
outlier nut clusters it is important to note the limitations for some<br />
bushes.<br />
Compared to hand husking with a pair of leather gloves this system<br />
represents a huge advancement in processing nuts. Husking by hand, a<br />
pound of in‐shell nuts could take as little as 5 minutes to as long as 20<br />
minutes or longer depending on the ripeness and how loose the nuts<br />
are in the husk. The bucket husker and aspirator can accomplish this<br />
task in as little as one to two minutes. When extrapolated to dozens or<br />
hundreds of pounds the time and labor savings are huge.<br />
Don figures he has roughly $60 invested in his system (not counting the<br />
dust collector, 3/8 inch drill, and small or scrounged parts) and several<br />
hours of his time assembling the pieces.<br />
Don is happy to visit and share with others how he built the processing<br />
equipment and provide tips and pointers to those wishing to build their<br />
own.<br />
<strong>Hazelnut</strong> Grower Don Price<br />
shows clean in‐shell nuts out of<br />
the aspirator. This system<br />
significantly reduces his time<br />
and labor.
Appendix A. Don Price Bucket Husker<br />
C<br />
A<br />
E<br />
D<br />
B<br />
F<br />
C<br />
Arrow A – This nut and<br />
washer is attached to a long<br />
piece of 3/8 inch threaded<br />
steel that eventually attaches<br />
to a corded drill and turns the<br />
PVC spindle.<br />
Arrow B – One inch diameter<br />
PVC is capped and encloses<br />
the 3/8 inch threaded steel<br />
rod. The PVC spindle<br />
provides a something solid to<br />
tie the rubber straps to.<br />
Arrows C – Pieces of rubber<br />
strap are connected to trimmer<br />
line and “tied” to the PVC<br />
spindle. As the drill turns the<br />
steel rod it also turns the<br />
spindle at a high rate of speed.<br />
The rubber strap pieces tear<br />
apart the nut cluster and<br />
knock the in-shell nuts loose<br />
from the husk.<br />
Arrow D – A flat piece of<br />
steel is bolted to the bottom of<br />
the bucket to provide<br />
reinforcing at the hole where<br />
the steel rod enters the bucket.<br />
Arrow E – The bucket husker<br />
uses no bearing. A couple of<br />
washers on the bottom of the<br />
bucket and the flat piece of<br />
steel inside the bucket are all<br />
that is needed.<br />
Arrow F – The angle of the<br />
bucket is important. A slight<br />
45 degree angle keeps the nut<br />
clusters in contact with the<br />
spindle as it turns.
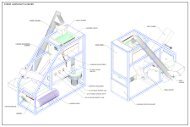
Appendix B. Don Price Air Column Aspirator<br />
A<br />
B<br />
D<br />
C<br />
F<br />
E<br />
Arrow A – 3 inch diameter PVC<br />
with a 4 inch coupling that<br />
attaches to the 4 inch inlet of the<br />
dust collector.<br />
Arrow B – Flexible 3 inch<br />
diameter ducting attached to the<br />
top of the air column.<br />
Arrow C – 3 inch diameter PVC<br />
is used for the upper portion of<br />
the air column. It is connected to<br />
a Y fitting.<br />
Arrow D – This Y fitting<br />
connects the upper portion of the<br />
air column to the lower portion<br />
and is the entry point for the<br />
husk/nut mixture that gets sucked<br />
up via the flexible hose. The top<br />
and bottom are both 3 inch and<br />
the Y portion is 2 inches in<br />
diameter.<br />
Arrow E – This 2 inch piece of<br />
flexible hose sucks up the<br />
husk/nut mixture out of the five<br />
gallon bucket husker. The size is<br />
important since smaller diameter<br />
hose may plug up.<br />
Arrow F – 4 inch diameter PVC<br />
is used for the lower portion of<br />
the air column and is attached at<br />
the bottom to the blast gate. This<br />
is where the in-shell nuts collect.