RP Centre AutoCAD Laser Cutting Tutorial
RP Centre AutoCAD Laser Cutting Tutorial
RP Centre AutoCAD Laser Cutting Tutorial

You also want an ePaper? Increase the reach of your titles
YUMPU automatically turns print PDFs into web optimized ePapers that Google loves.
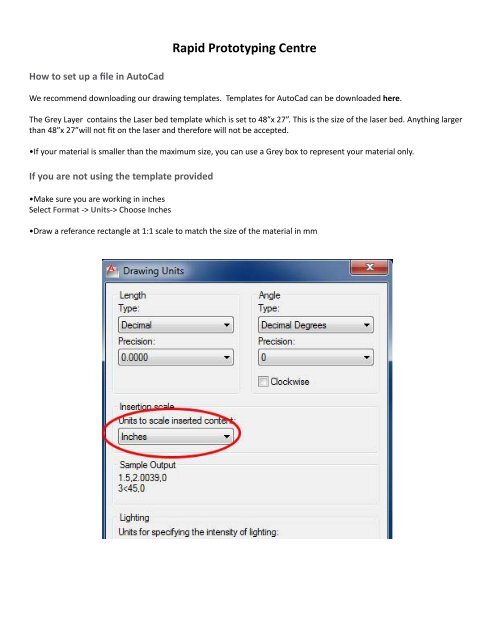
How to set up a file in AutoCad<br />
Rapid Prototyping <strong>Centre</strong><br />
We recommend downloading our drawing templates. Templates for AutoCad can be downloaded here.<br />
The Grey Layer contains the <strong>Laser</strong> bed template which is set to 48”x 27”. This is the size of the laser bed. Anything larger<br />
than 48”x 27”will not fit on the laser and therefore will not be accepted.<br />
•If your material is smaller than the maximum size, you can use a Grey box to represent your material only.<br />
If you are not using the template provided<br />
•Make sure you are working in inches<br />
Select Format -> Units-> Choose Inches<br />
•Draw a referance rectangle at 1:1 scale to match the size of the material in mm
<strong>Laser</strong> <strong>Cutting</strong>/Engraving Lines<br />
For everything you would like to have laser cut you’ll need to put all these lines onto a seperate layer and set to the following<br />
specifications:<br />
Make a new layer in the layer menu<br />
Re-name the layer “Cut”<br />
Set the stroke colour to Red (RGB: 255,0,0)<br />
Set the line weight to 0.01 pt<br />
Vector engraving / scoring lines<br />
For everything you would like to have vector engraved / scored you’ll need to put all lines onto a seperate layer and set<br />
to the following specifications:<br />
Make a new layer in the layer menu<br />
Re-name the layer “Engrave”<br />
Set the stroke colour to Black (RGB 0,0,0)<br />
Set the line weight to 0.01 pt<br />
Raster Lines and Fills<br />
It is rare to have rastering done with AutoCad, but it is not impossible.<br />
Set all all portions you want to have rastered to:<br />
Solid hatch fill<br />
Black: RGB: 0,0,0<br />
example of laser rastering, engraving and cutting<br />
Converting text for vector engraving / scoring<br />
All text will need to be setup to be vector engraved / scored. To do this, you’ll need to make sure the font you use is not<br />
bold or solid hatch filled font:<br />
Use a single line font e.g an .txt font where possible<br />
If using a bold solid hatch filled font such as Arial and you are using a PC you can use the Express tools command to retain<br />
the font style in outlines. To do this:<br />
Select the text you would like to explode.<br />
Select Express tools > Text explode.<br />
The command is not perfect and you might need to delete any stray lines within the outlines:<br />
Activate the regular explode command to break polylines into line segments<br />
Delete exploded lines as required<br />
Maintaining continuous vector geometry - Joining lines<br />
Try and draw in polylines if you can to maintain continuous vector geometry. If drawings are drafted with lines from<br />
more than one path, make sure that they are joined.<br />
Joining lines – (note this will only function for single lines that are co-linear)<br />
In the command box type J for Join<br />
Select source object or multiple objects to join at once then press enter<br />
Objects to join and press enter<br />
Lines will now join to form complete lines<br />
Minimum Cut Widths<br />
Nesting:<br />
If compiling a file with lots of components on one sheet of material, make sure there is a gap of at least 5/64” or 2mm<br />
between the components.<br />
Small details / cut widths:<br />
We recommend that minimum cut widths be no smaller than 1/16” We can go smaller but things can get quite fragile<br />
and we cannot guarantee it will work.<br />
Materials<br />
The laser cutter can cut/engrave an abundance of materials including: Acrylic, Abs, Acetal, Styrene, Polypropylene, Zotefoam,<br />
Solid Wood, Veneered MDF, Plywood, Paper & Card stock, Fabric and Rubber.<br />
We do not cut materials that are thicker 1/4” with some exception.<br />
Saving your file<br />
Select File > Save As<br />
File Format <strong>AutoCAD</strong> 2000/LT 2000 DXF (dxf)*<br />
IMPORTANT<br />
This allows us to open the file in illustrator and make any neccesary edits to your laser file. Please note there is a minimum<br />
24 hour lead time.