The Native American Flute - Music Trader Index Page
The Native American Flute - Music Trader Index Page
The Native American Flute - Music Trader Index Page

Create successful ePaper yourself
Turn your PDF publications into a flip-book with our unique Google optimized e-Paper software.
Making of <strong>Native</strong> <strong>American</strong> Style <strong>Flute</strong>s Ethnic & Ancient Instruments<br />
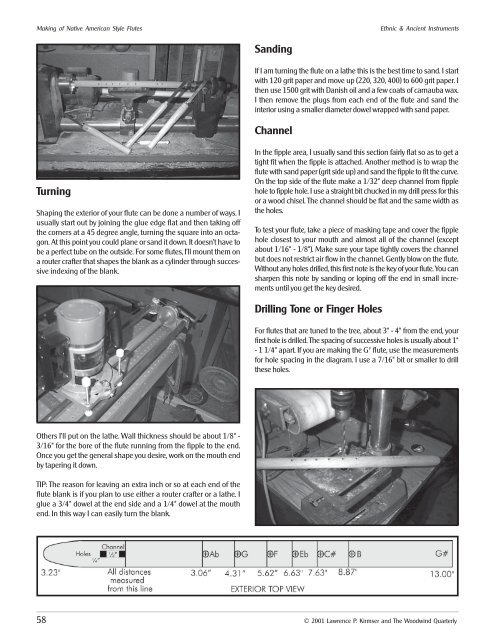
Turning<br />
Shaping the exterior of your flute can be done a number of ways. I<br />
usually start out by joining the glue edge flat and then taking off<br />
the corners at a 45 degree angle, turning the square into an octagon.<br />
At this point you could plane or sand it down. It doesn’t have to<br />
be a perfect tube on the outside. For some flutes, I’ll mount them on<br />
a router crafter that shapes the blank as a cylinder through successive<br />
indexing of the blank.<br />
Others I’ll put on the lathe. Wall thickness should be about 1/8" -<br />
3/16" for the bore of the flute running from the fipple to the end.<br />
Once you get the general shape you desire, work on the mouth end<br />
by tapering it down.<br />
TIP: <strong>The</strong> reason for leaving an extra inch or so at each end of the<br />
flute blank is if you plan to use either a router crafter or a lathe. I<br />
glue a 3/4" dowel at the end side and a 1/4" dowel at the mouth<br />
end. In this way I can easily turn the blank.<br />
Sanding<br />
If I am turning the flute on a lathe this is the best time to sand. I start<br />
with 120 grit paper and move up (220, 320, 400) to 600 grit paper. I<br />
then use 1500 grit with Danish oil and a few coats of carnauba wax.<br />
I then remove the plugs from each end of the flute and sand the<br />
interior using a smaller diameter dowel wrapped with sand paper.<br />
Channel<br />
In the fipple area, I usually sand this section fairly flat so as to get a<br />
tight fit when the fipple is attached. Another method is to wrap the<br />
flute with sand paper (grit side up) and sand the fipple to fit the curve.<br />
On the top side of the flute make a 1/32" deep channel from fipple<br />
hole to fipple hole. I use a straight bit chucked in my drill press for this<br />
or a wood chisel. <strong>The</strong> channel should be flat and the same width as<br />
the holes.<br />
To test your flute, take a piece of masking tape and cover the fipple<br />
hole closest to your mouth and almost all of the channel (except<br />
about 1/16" - 1/8"). Make sure your tape tightly covers the channel<br />
but does not restrict air flow in the channel. Gently blow on the flute.<br />
Without any holes drilled, this first note is the key of your flute. You can<br />
sharpen this note by sanding or loping off the end in small increments<br />
until you get the key desired.<br />
Drilling Tone or Finger Holes<br />
For flutes that are tuned to the tree, about 3" - 4" from the end, your<br />
first hole is drilled. <strong>The</strong> spacing of successive holes is usually about 1"<br />
- 1 1/4" apart. If you are making the G # flute, use the measurements<br />
for hole spacing in the diagram. I use a 7/16" bit or smaller to drill<br />
these holes.<br />
58 © 2001 Lawrence P. Kirmser and <strong>The</strong> Woodwind Quarterly