The Native American Flute - Music Trader Index Page
The Native American Flute - Music Trader Index Page
The Native American Flute - Music Trader Index Page

You also want an ePaper? Increase the reach of your titles
YUMPU automatically turns print PDFs into web optimized ePapers that Google loves.
ETHNIC INSTRUMENTS<br />
THE MAKING OF NATIVE AMERICAN STYLE FLUTES<br />
“Every tree has a soul,<br />
every soul... a song.”<br />
I have been a woodworker for over twenty years and I must say<br />
there has not been a venture more pleasurable than the<br />
reawakening of a tree’s song. I was inspired to pursue this art after<br />
hearing the tree’s song from a medicine woman. <strong>The</strong> <strong>Native</strong> <strong>American</strong><br />
style flute has a melody like no other. And each flute has its<br />
own song that is an intertwining of the tree, the craftsman, and the<br />
player. <strong>The</strong> making and playing of these flutes has been such a gift<br />
to me that I would like to take this opportunity to share with those<br />
who would like to embark on a similar adventure.<br />
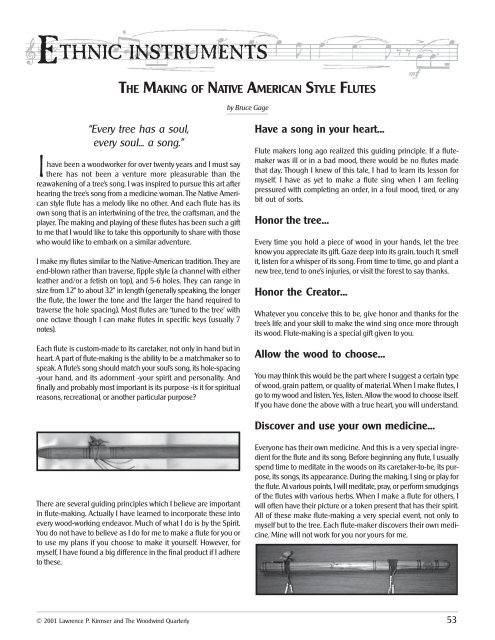
I make my flutes similar to the <strong>Native</strong>-<strong>American</strong> tradition. <strong>The</strong>y are<br />
end-blown rather than traverse, fipple style (a channel with either<br />
leather and/or a fetish on top), and 5-6 holes. <strong>The</strong>y can range in<br />
size from 12" to about 32" in length (generally speaking, the longer<br />
the flute, the lower the tone and the larger the hand required to<br />
traverse the hole spacing). Most flutes are ‘tuned to the tree’ with<br />
one octave though I can make flutes in specific keys (usually 7<br />
notes).<br />
Each flute is custom-made to its caretaker, not only in hand but in<br />
heart. A part of flute-making is the ability to be a matchmaker so to<br />
speak. A flute’s song should match your soul’s song, its hole-spacing<br />
-your hand, and its adornment -your spirit and personality. And<br />
finally and probably most important is its purpose -is it for spiritual<br />
reasons, recreational, or another particular purpose?<br />
<strong>The</strong>re are several guiding principles which I believe are important<br />
in flute-making. Actually I have learned to incorporate these into<br />
every wood-working endeavor. Much of what I do is by the Spirit.<br />
You do not have to believe as I do for me to make a flute for you or<br />
to use my plans if you choose to make it yourself. However, for<br />
myself, I have found a big difference in the final product if I adhere<br />
to these.<br />
by Bruce Gage<br />
Have a song in your heart...<br />
<strong>Flute</strong> makers long ago realized this guiding principle. If a flutemaker<br />
was ill or in a bad mood, there would be no flutes made<br />
that day. Though I knew of this tale, I had to learn its lesson for<br />
myself. I have as yet to make a flute sing when I am feeling<br />
pressured with completing an order, in a foul mood, tired, or any<br />
bit out of sorts.<br />
Honor the tree...<br />
Every time you hold a piece of wood in your hands, let the tree<br />
know you appreciate its gift. Gaze deep into its grain, touch it, smell<br />
it, listen for a whisper of its song. From time to time, go and plant a<br />
new tree, tend to one’s injuries, or visit the forest to say thanks.<br />
Honor the Creator...<br />
Whatever you conceive this to be, give honor and thanks for the<br />
tree’s life and your skill to make the wind sing once more through<br />
its wood. <strong>Flute</strong>-making is a special gift given to you.<br />
Allow the wood to choose...<br />
You may think this would be the part where I suggest a certain type<br />
of wood, grain pattern, or quality of material. When I make flutes, I<br />
go to my wood and listen. Yes, listen. Allow the wood to choose itself.<br />
If you have done the above with a true heart, you will understand.<br />
Discover and use your own medicine...<br />
Everyone has their own medicine. And this is a very special ingredient<br />
for the flute and its song. Before beginning any flute, I usually<br />
spend time to meditate in the woods on its caretaker-to-be, its purpose,<br />
its songs, its appearance. During the making, I sing or play for<br />
the flute. At various points, I will meditate, pray, or perform smudgings<br />
of the flutes with various herbs. When I make a flute for others, I<br />
will often have their picture or a token present that has their spirit.<br />
All of these make flute-making a very special event, not only to<br />
myself but to the tree. Each flute-maker discovers their own medicine.<br />
Mine will not work for you nor yours for me.<br />
© 2001 Lawrence P. Kirmser and <strong>The</strong> Woodwind Quarterly 53
Making of <strong>Native</strong> <strong>American</strong> Style <strong>Flute</strong>s Ethnic & Ancient Instruments<br />
Visioning your <strong>Flute</strong><br />
Visioning your flute requires that you give up what you think your<br />
flute ought to be and discover what awaits you. <strong>Flute</strong>s can come in<br />
all colors, sizes, and shapes and each will have their own song. But<br />
is it your song? Many times this stage takes longer than the actual<br />
making of the flute!<br />
<strong>The</strong>re are many things that go into finding your flute. First, it must fit<br />
you in hand. Without such consideration, you will not give the flute<br />
the full honor of playing its song. A large flute and a small hand will<br />
make a beautiful ornament but not a companion. <strong>The</strong>re are a number<br />
of ways in finding the appropriate measurements. First take a<br />
piece of paper and draw a straight line on it. Next place your left<br />
hand on the line with your ring finger, middle, and index fingers<br />
parallel with each other (as if you were covering the holes of a<br />
flute). Now slowly spread them out keeping them on the line. Now<br />
mark the center for each finger. Do the same for the right hand.<br />
Now measure the distance between the ring finger and the index<br />
for each hand. <strong>The</strong>se two distances are for your hole placement.<br />
Next measure from your elbow to the tip of your middle finger. And<br />
then, as if holding a flute with your right hand (the lower hand),<br />
measure the distance from your mouth to your ring finger. Keep<br />
your elbow bent and don’t over-extend. This can give you an idea of<br />
the maximum length of the farthest tone hole from your mouth.<br />
Remember, all of these measurements should feel comfortable.<br />
Now that we have fit your hand, it is time to fit your heart. In order<br />
to find this, you must be willing to spend some time on reflecting on<br />
what you are and what your flute is to be. Everyone goes about this<br />
differently. Some think in terms of the elements (earth, wind, fire,<br />
water)... others the seasons (planting, growing, harvest, and rest)...<br />
others, special animal totems, guides, or teachers, some the stars.<br />
Some will recall a special place they have found, or a time that had<br />
great meaning in their life.<br />
Next, think in terms of your flute. How did you come upon wanting<br />
to be a caretaker of such? What do you wish of its songs? Take all of<br />
this to dream-time, prayer, meditation or wherever you go to find<br />
your answers. Have the flute come to you. See it, touch it, hear its<br />
song. During this time, try to remember all that is around you... the<br />
sights... the sounds.... the smells.... Write it down, draw pictures... try to<br />
capture the essence of what you have learned. Do not try to rush or<br />
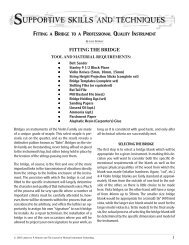
Figure 1. Parts of the flute<br />
force this to happen (I have as yet to find one who has not had such<br />
an experience). This becomes our initial blueprint. I try with all my<br />
heart to blend all of these.<br />
Knowing your <strong>Flute</strong><br />
When I first started making flutes, I had no idea that there were<br />
so many kinds. Most <strong>Native</strong> <strong>American</strong> style flutes are endblown,<br />
five to six holes, and use a fipple style channel and<br />
block. European and Oriental flutes tend to be traverse (holding<br />
a flute sideways and blowing over an embouchure hole). It is<br />
also different from many of the South <strong>American</strong> designs such<br />
as the Andean quena which is basically an open bore with a<br />
notch at the mouth piece that is blown over. Peruvian flutes<br />
tend to have a notch in the body similar to recorders. You will<br />
also see on many other types of flutes 8 hole finger patterns,<br />
holes of different sizes and a thumb hole. Typically this is not<br />
seen on <strong>Native</strong> <strong>American</strong> styles.<br />
<strong>The</strong> flute can be divided into four sections: the mouth, the fipple,<br />
the body, and the end. Figure 1 shows the different parts of the<br />
flute in both diagram and photo form.<br />
Mouth<br />
<strong>The</strong> mouth section is usually tapered though I have made some<br />
flutes that are the same bore size as the end. On the tapered<br />
flutes, the bore is usually smaller (about 1/4" to 3/8" in diameter)<br />
and often enters a small air compression chamber at the<br />
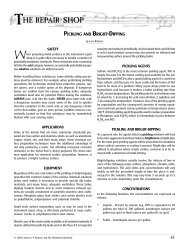
fipple section (see Figure 2 for interior diagram).<br />
54 © 2001 Lawrence P. Kirmser and <strong>The</strong> Woodwind Quarterly
Ethnic & Ancient Instruments Making of <strong>Native</strong> <strong>American</strong> Style <strong>Flute</strong>s<br />
Fipple<br />
<strong>The</strong> fipple section of the flute is probably the most important section<br />
of the flute. In all flutes, the air must be split before it enters the<br />
sound chamber in order for a tone to occur. In other style flutes, this<br />
occurs at the mouthpiece where air is blown over an embouchure.<br />
Also, some may use a v-notch similar to recorders to split the air.<br />
Fipple style flutes do the same as the notched ones just that the<br />
angle is on the interior of the chamber. <strong>The</strong> fipple section contains<br />
a narrow shallow channel (about 1/4" in width and 1/32" in depth)<br />
with squared holes at each end on the top of the flute. Resting over<br />
this channel is the actual fipple which forces the air rising from the<br />
mouth-end squared hole to ride along the channel until it reaches<br />
the squared hole entering the body of the flute. <strong>The</strong> hole is angled<br />
(about 37 to 45 degrees) at the body end to a very fine edge. Ideally,<br />
this edge should be parallel to half of the height of the channel in<br />
order to split the air evenly. As air is forced through the channel,<br />
some of the air enters the flute’s body while the rest escapes over<br />
the top of the hole. This splitting of the air produces a sound wave.<br />
Fipple mechanisms vary from flute-maker to flute-maker. Some have<br />
a channel in the fetish, some use a gasket or nest, and some have<br />
the channel in the body of the flute. I have heard where early flutes<br />
were only 4 holes as the other hand was used to cover the channel.<br />
Later, a piece of leather was used to serve the same purpose freeing<br />
up the other hand and allowing more holes. <strong>The</strong> majority of my<br />
flutes have the channel in the body. I then use either leather and/<br />
or a fetish to cover this channel.<br />
As you can see by the diagram, the leather and/or fetish is tightly<br />
secured over the channel by means of tonging of leather strapping.<br />
Sound quality and volume are influenced by moisture, temperature,<br />
and air pressure thus the fipple must be adjustable. For the<br />
most part, the fetish rests about 1/16" to 1/8" in from the end of the<br />
Figure 2. Interior view of flute.<br />
channel. <strong>The</strong> tonging allows the user to adjust the fipple back and<br />
forth for best sound quality. An airier sound suggests that the fipple<br />
be moved forward while a note jumping an octave would suggest<br />
the fipple be moved back a bit.<br />
Body<br />
<strong>The</strong> flute body has 5-6 finger or tone holes. You will notice in the<br />
first diagram, they are labeled L1 to R3. This corresponds to the left<br />
and right hand fingers (1 = index, 2 = middle, & 3 = ring fingers).<br />
You will notice on my flutes that these finger holes are carved with<br />
an indentation so that your fingers can easily find their way. <strong>The</strong>se<br />
indentations are tapered toward the back to improve the tone of<br />
each note.<br />
© 2001 Lawrence P. Kirmser and <strong>The</strong> Woodwind Quarterly 55<br />
End<br />
Toward the end of the flute, you may see on some several sounding<br />
holes. This is actually where the last and lowest note is produced (all<br />
fingers covered). By having sound holes the end of the flute can be<br />
solid with or without a fetish or it may be used to extend the length<br />
of the flute for personal preferences.
Making of <strong>Native</strong> <strong>American</strong> Style <strong>Flute</strong>s Ethnic & Ancient Instruments<br />
Making Your <strong>Flute</strong><br />
It has been said that one of the first flutes was from a branch that<br />
insects were the craftsmen and the wind called through it to one<br />
who plucked it from the tree. What a special gift! I have as yet to<br />
find such myself, so I must search within for other gifts to bring<br />
about my own. In order to make a flute, I believe the way of the<br />
heart is more important than any other. <strong>The</strong>re are many ways of the<br />
hand. You could follow any one method to the exact specification<br />
and the tree would still not sing if there is not something special in<br />
your heart.<br />
Wood Selection<br />
Having been a woodworker for years, it never ceases to amaze me<br />
the distinct personality of woods, not only in species but between<br />
trees themselves and even from different parts of the same tree.<br />
<strong>Flute</strong> making seems to exemplify the mysteries of these distinctions.<br />
Each flute is born with an individualism that is an expression of the<br />
tree and myself as well as the one I make it for. <strong>The</strong> woods I have<br />
used so far include the softwoods of pine, fir, white cedar, red cedar,<br />
and redwood; and the hardwoods of maple, oak, cherry, mahogany,<br />
and walnut. I am willing to try other woods as well as long as they<br />
are not endangered species or it is ‘found’ wood. A favorite tree of<br />
the caretaker that has passed on often makes a very special flute.<br />
<strong>The</strong> method and tools I use are certainly not the ways of the old. I<br />
use what I have just as those before me. Some of you may not have<br />
certain pieces of equipment. I understand full well. It took me years<br />
to build my shop. I will try and recommend alternatives where I can.<br />
But you will also find your own answers. Keep in mind, that someone<br />
created a flute long before you with much less on hand than<br />
what you are working with now. But the element you do share is<br />
your desire to once again make the tree sing.<br />
Dimensioning Lumber<br />
As much of my wood is rough sawn, I first begin by dimensioning<br />
the lumber through planing, joining, and sawing. Planing provides<br />
a smooth flat surface while joining does the same for the edge of<br />
the board. Giving exact dimensions is tough as I make several<br />
different sizes of flutes and use various methods of construction.<br />
Give yourself at least an extra inch on both ends and start with a<br />
thickness at least 1/4" more than what you need for each half. If<br />
you are planing to start out with a single piece and rip it in half,<br />
remember to take into account your saw kerf.<br />
<strong>The</strong> large flutes have a 1" bore so I usually start out with boards at<br />
least 2" wide and at least 30" in length. <strong>The</strong> medium size flutes<br />
have a 7/8" bore using boards 1 3/4” wide and at least 24" in<br />
length. Finally the smaller flutes have a 3/4" bore using boards<br />
1 1/2" and at least 20" in length. Depending on whether you are<br />
making the flute out of two pieces or splitting one piece, make sure<br />
the thickness is at least 1/4"+ half the diameter for each half.<br />
After you have finished dimensioning your lumber, you should<br />
have two pieces that are equal in length, width and thickness.<br />
When you sandwich the pieces together, they should appear<br />
almost seamless even without glue. If you find that your pieces<br />
are warped, cupped, or bowed it is best that you start over at this<br />
point as a tight glue joint is necessary when joining the two<br />
halves together.<br />
Making the Bore<br />
<strong>The</strong> next step is making the bore of the flute. Because I use the<br />
split-half method of making the flute, the objective is to make a<br />
half-circle bore in each piece so when fitted together they form<br />
a perfect round bore.<br />
I use a shaper and a half-round veining bit to produce the half<br />
sections of the bore on the inside of each half. Remember, only<br />
raise the bit to half of the diameter. If you are making a 1" bore,<br />
56 © 2001 Lawrence P. Kirmser and <strong>The</strong> Woodwind Quarterly
Ethnic & Ancient Instruments Making of <strong>Native</strong> <strong>American</strong> Style <strong>Flute</strong>s<br />
make sure your depth of cut is set at exactly 1/2". I leave anywhere<br />
from 3" - 8" unbored for the fipple and mouthpiece area. When the<br />
two pieces are placed together, you should have a perfect round<br />
bore.<br />
Air Chamber/Channel<br />
About 1/2" - 3/4" from where your bore stops at the fipple end,<br />
make another bore of the same diameter 1" - 2" in length. This is<br />
an optional air compression chamber. <strong>The</strong>n channel a 1/4" channel<br />
from this chamber to the mouth end of the flute. On some<br />
flutes, I skip the chamber and just channel up to about 1/2" - 3/4"<br />
of the bore as seen in the picture.<br />
Fipple Holes<br />
This is probably the most important step of your flute. Mark the<br />
center of where your bore stops and the air chamber/channel.<br />
Working on the inside of the top half of your flute, drill two<br />
holes at their edge (1/4" +/- 1/16" in diameter). Next, file these<br />
holes square. Now file their opposite sides to about 45 degrees.<br />
Later you will be carving a shallow channel between these<br />
holes on the top side of the flute.<br />
Glue-up<br />
Now that you have much of the interior done, it is time to glue up<br />
the halves. Make sure that the two halves fit seamlessly. Use a<br />
water-resistant or water-proof wood glue. Lightly coat both halves<br />
and then clamp together for at least 24hrs. Use enough clamps to<br />
make a good seal. Be careful not to over-tighten your clamps as<br />
your flute will easily crack under high pressure. Make sure that the<br />
bore is properly aligned by feeling the interior.<br />
TIP: You may also want to take a dowel with a damp piece of cloth<br />
attached at its end and swab the interior of the bore before it dries.<br />
© 2001 Lawrence P. Kirmser and <strong>The</strong> Woodwind Quarterly 57
Making of <strong>Native</strong> <strong>American</strong> Style <strong>Flute</strong>s Ethnic & Ancient Instruments<br />
Turning<br />
Shaping the exterior of your flute can be done a number of ways. I<br />
usually start out by joining the glue edge flat and then taking off<br />
the corners at a 45 degree angle, turning the square into an octagon.<br />
At this point you could plane or sand it down. It doesn’t have to<br />
be a perfect tube on the outside. For some flutes, I’ll mount them on<br />
a router crafter that shapes the blank as a cylinder through successive<br />
indexing of the blank.<br />
Others I’ll put on the lathe. Wall thickness should be about 1/8" -<br />
3/16" for the bore of the flute running from the fipple to the end.<br />
Once you get the general shape you desire, work on the mouth end<br />
by tapering it down.<br />
TIP: <strong>The</strong> reason for leaving an extra inch or so at each end of the<br />
flute blank is if you plan to use either a router crafter or a lathe. I<br />
glue a 3/4" dowel at the end side and a 1/4" dowel at the mouth<br />
end. In this way I can easily turn the blank.<br />
Sanding<br />
If I am turning the flute on a lathe this is the best time to sand. I start<br />
with 120 grit paper and move up (220, 320, 400) to 600 grit paper. I<br />
then use 1500 grit with Danish oil and a few coats of carnauba wax.<br />
I then remove the plugs from each end of the flute and sand the<br />
interior using a smaller diameter dowel wrapped with sand paper.<br />
Channel<br />
In the fipple area, I usually sand this section fairly flat so as to get a<br />
tight fit when the fipple is attached. Another method is to wrap the<br />
flute with sand paper (grit side up) and sand the fipple to fit the curve.<br />
On the top side of the flute make a 1/32" deep channel from fipple<br />
hole to fipple hole. I use a straight bit chucked in my drill press for this<br />
or a wood chisel. <strong>The</strong> channel should be flat and the same width as<br />
the holes.<br />
To test your flute, take a piece of masking tape and cover the fipple<br />
hole closest to your mouth and almost all of the channel (except<br />
about 1/16" - 1/8"). Make sure your tape tightly covers the channel<br />
but does not restrict air flow in the channel. Gently blow on the flute.<br />
Without any holes drilled, this first note is the key of your flute. You can<br />
sharpen this note by sanding or loping off the end in small increments<br />
until you get the key desired.<br />
Drilling Tone or Finger Holes<br />
For flutes that are tuned to the tree, about 3" - 4" from the end, your<br />
first hole is drilled. <strong>The</strong> spacing of successive holes is usually about 1"<br />
- 1 1/4" apart. If you are making the G # flute, use the measurements<br />
for hole spacing in the diagram. I use a 7/16" bit or smaller to drill<br />
these holes.<br />
58 © 2001 Lawrence P. Kirmser and <strong>The</strong> Woodwind Quarterly
Ethnic & Ancient Instruments Making of <strong>Native</strong> <strong>American</strong> Style <strong>Flute</strong>s<br />
TIP: Place a dowel inside the flute before drill to reduce tear out or<br />
chipping on the inside of the flute. If you are absolutely sure of your<br />
measurements, you can also drill tone holes from the inside before<br />
joining the halves.<br />
I work from the end up (R3, R2, R1, L3, L2, L1). Each tone hole is<br />
carefully drilled and lightly sanded. <strong>The</strong>n I use a tuner to test the<br />
note produced. If a hole produces a note too flat, drilling a bit more<br />
toward the mouth end will sharpen the note. However, if the note is<br />
too sharp there is nothing you can do to flatten the note unfortunately.<br />
I usually finish up each hole by using a 3/8" bit over the top<br />
and lightly make an indentation over the hole. <strong>The</strong>n I will smooth<br />
out that indentation by sanding them toward the end side of the<br />
flute.<br />
Fipple/Fetish<br />
<strong>The</strong> fipple is usually a thin piece of wood that fits tightly over the<br />
channel. You can also use a piece of leather to achieve this purpose.<br />
<strong>The</strong> design below is an example of a notched fipple; however,<br />
the notching is not as important as having a tight fit. <strong>The</strong> fipple is<br />
attached to the flute by means of leather tonging. In this way, it<br />
remains adjustable. <strong>The</strong> fipple covers the mouth end fipple hole<br />
completely and the channel up to about 1/16 to 1/8 inch from the<br />
end side fipple hole.<br />
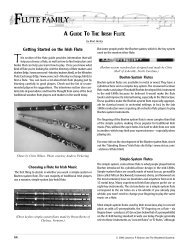
Adornments<br />
A fetish can be glued on top of the fipple as decoration. Most of my<br />
fetishes are animals that represent spiritual totems. I first design out<br />
the side view of the totem on a 3/4" piece of wood. Next I will<br />
bandsaw this shape. Using a dremel tool and carving knives, I give<br />
it its final three-dimensional shape. Once glued on top of the fipple,<br />
I secure it over the channel using 1/8" leather tonging. <strong>The</strong> leather<br />
is usually wrapped at least a couple of times over the fipple block<br />
and then I use a clove hitch knot on the underneath side of the<br />
flute (where the beginning and the end of the leather are slid<br />
under the banding before it). In this way, when you pull both ends,<br />
the strapping tightens and locks in place.<br />
Here are just a few examples of some of the fetishes on my own<br />
flutes:<br />
Carvings can be on the body of the flute by several means. I typically<br />
use a dremel tool or a wood-burner with a very fine tip. <strong>The</strong><br />
only precaution is to remember<br />
that the walls of the flute<br />
are rather thin.<br />
On flutes with thicker walls, I<br />
have used inlay banding. I<br />
usually route a channel down<br />
the length of the flute and<br />
© 2001 Lawrence P. Kirmser and <strong>The</strong> Woodwind Quarterly 59
Making of <strong>Native</strong> <strong>American</strong> Style <strong>Flute</strong>s Ethnic & Ancient Instruments<br />
glue in the banding of choice. I then sand it down flush with the<br />
body of the flute.<br />
Featherwork<br />
and beading<br />
typically<br />
hang from<br />
the tonging<br />
at the fipple<br />
end and at<br />
the base of<br />
the flute. I<br />
usually<br />
leave about<br />
6" of tonging<br />
that I<br />
will hang stone or glass pony beads, shells, feathers, horse hair,<br />
etc. I also try and work closely with the caretaker in selecting<br />
adornments that reflect their clan, totems, signs, or preference.<br />
Final Finishing<br />
After all the work is done, I disassemble<br />
the flute and dip it several<br />
times in linseed oil. I then allow it to<br />
dry, end side down on a dowel. After<br />
the flute is thoroughly dried, I will add<br />
a few coats of carnauba wax. <strong>The</strong> flute<br />
is then reassembled and ready to play!<br />
Playing your <strong>Flute</strong><br />
Just as there are technical aspects of flute-making and the more<br />
spiritual ones, I have found this to be true of playing as well. Let’s<br />
first begin with the technical and some pointers.<br />
First of all, before you begin playing, make sure your fipple is tight<br />
on your flute. You can tighten it by pulling gently on the bandings<br />
in opposite directions away from the flute. <strong>The</strong> fipple should be in<br />
such a position that you see the entire fipple sounding hole (the<br />
one farthest from the mouthpiece) and about 1/16" to an 1/8" of<br />
the channel.<br />
<strong>Flute</strong>s seem to play their best when you are sitting or standing with<br />
your back erect. Hold the flute at a slight angle away from your<br />
body. Hold the flute gently in a relaxed position.<br />
As your flute was built to your hand, your fingers should fit comfortably<br />
in the spacing. Your left hand should be on top, with your<br />
index finger on the tone hole closest to the fipple end of the flute.<br />
Depending on how many tone holes your flute has, your fingers will<br />
go down successively. On five and six hole flutes, your pinkies are<br />
never used.<br />
Make sure that when you play a note, that the pad of your fingertip<br />
completely covers the tone hole. <strong>The</strong> only exception is when you<br />
half a note (which will be discussed later). You do not need to tightly<br />
clamp down on the hole but it does need to be completely covered.<br />
With all tone holes covered, lightly blow on the flute. Adjust your air<br />
flow so that you get a nice pure tone. This note is the key your flute<br />
is in. Too hard of a breath, and you will notice that the note jumps<br />
an octave or squeaks.<br />
60 © 2001 Lawrence P. Kirmser and <strong>The</strong> Woodwind Quarterly
Ethnic & Ancient Instruments Making of <strong>Native</strong> <strong>American</strong> Style <strong>Flute</strong>s<br />
If the note sounds too airy, first make sure that the fipple is tight<br />
then try and adjust the fipple slightly forward (1/64 increments,<br />
it doesn’t take much!). If not enough volume, move it slightly<br />
back.<br />
So the first note is with all holes covered. <strong>The</strong> next note, raise your<br />
finger from the hole farthest from you. This should be one note up<br />
from the one you just played. Repeat by raising each successive<br />
finger. You may find that the higher notes you will have to increase<br />
your breath just a bit. For most flutes, these seven notes (for 6<br />
holed flutes) form the scale of the flute.<br />
Notes in between these 7 notes can be achieved in one of two<br />
ways. <strong>The</strong> first way, is to raise the second to last finger while keeping<br />
the last finger down as you go up. In other words, the first such note,<br />
your fingers would be<br />
down on L1, L2, L3,<br />
R1, & R3 while raising<br />
your finger on R2.<br />
<strong>The</strong> next such note<br />
would be: fingers<br />
down on L1, L2, L3,<br />
& R2 while raising<br />
your fingers on R1<br />
& R3... and so forth.<br />
Another way to<br />
achieve these notes<br />
is called half-stepping.<br />
This takes a little practice<br />
but instead of<br />
raising a middle finger,<br />
the last finger on<br />
a hole is opened just<br />
halfway with the<br />
lower section being<br />
open.<br />
One note here... I have<br />
played several flutes<br />
where I rarely raise L3. Thus the highest two notes are with L3 still<br />
closed. Try this with your flute and see.<br />
Finally, the last set of notes can sometimes be achieved on flutes.<br />
<strong>The</strong>se are called over-blow notes and most of the time can only be<br />
done on the lowest notes of your flute. Start with all fingers down,<br />
blow the note as it is supposed to be played. Now gradually apply<br />
more breath until it produces a higher note. When done correctly,<br />
this note is exactly one octave higher than the original.<br />
All other keying, will produce one of the above notes so as you see<br />
there is very little for you to remember!<br />
You will also find that you can achieve different sounds by changing<br />
your air flow. Such effects as tonguing will give you a staccato<br />
effect. If you can flutter your diaphragm while blowing, you can<br />
achieve a nice vibrato. A sharp blow at the end of a song also has<br />
a nice sound to it. Finally fluttering a key by rapidly raising and<br />
closing gives a two-tone vibrato and slowly doing this gives a waawaa<br />
effect.<br />
Some people enjoy playing by sheet music. <strong>The</strong> only thing one<br />
must remember is that flutes will vary as to what finger combinations<br />
play what notes. Once you are knowledgeable of your own<br />
flute, sheet music can be played fairly easily. This is also true for<br />
others who play by ear.<br />
As a child, I had learned both ways. But it was not until the flute,<br />
that I realized there is also a third way.... that is, playing by the heart<br />
or spirit. To tell you the truth, this is the only way I play the flute. For<br />
one, I have forgotten how to read music! And playing by ear rarely<br />
happens as much of what I play are songs I have never heard<br />
before.<br />
Such playing occurs when I am giving honour or thanks to something<br />
such as a beautiful sunrise, a hawk circling above, a laughing<br />
child playing in a meadow. It also happens when I pray with the<br />
flute, when I am seeking an answer to some problem, or when I am<br />
just meditating to renew myself.<br />
For me, all of a sudden, I feel as if I am no longer playing. I am<br />
aware that I am supplying the wind but that’s about it. Often images<br />
will come to mind and I can only describe it as playing the soundtrack<br />
for a movie. If I try and analyze it too closely, I easily loose it! But<br />
usually afterward I have played in such ways, I come away with a<br />
very special feeling, or answers, or lots of energy. <strong>The</strong> way I see it, if<br />
it works use it! I have had others describe similar experiences as<br />
well. As with most things of this nature, you must discover your own<br />
path to find it. I can only assure you that if your heart is in earnest<br />
of such and you are diligent, you too can find this joy.<br />
Caretaking<br />
As your flute is made out of wood, its care should be like any other<br />
wood product. Wood breathes just as we do. It expands with heat,<br />
contracts with cold, and absorbs moisture. It doesn’t like to go from<br />
one extreme to another. And certainly it likes to be handled with<br />
care. If you follow these simple rules, your flute will probably last<br />
beyond even you!<br />
© 2001 Lawrence P. Kirmser and <strong>The</strong> Woodwind Quarterly 61
Making of <strong>Native</strong> <strong>American</strong> Style <strong>Flute</strong>s Ethnic & Ancient Instruments<br />
Avoid high humidity, moisture, water and excessive heat. Wood<br />
absorbs water. This will cause the wood to expand leading to splitting<br />
or cracking of the glue joints. Excessive heat will do the same.<br />
Using a water-resistant glue and treating the flute with many coats<br />
of tung oil and carnauba wax in the finishing stage reduces this<br />
possibility. However, long exposure to water or heat will break down<br />
such measures. Moving from very warm places to very cold places<br />
or vice versa is also a shock to the wood.<br />
Store your flute in a dry cool place. <strong>The</strong> back of a car with the<br />
windows rolled up on a hot summer’s day or leaving your flute<br />
in the rain are not the best ideas! Many make flute racks to<br />
display their flute. My recommendation is to find one or make it<br />
so that the flute is at a slight angle with the mouth-piece lower<br />
(this moves the moisture away from most of the flute).<br />
<strong>The</strong> tubular shape of a flute makes it quite durable in falls. I’ve<br />
dropped mine a few times without incidence. However, it is not<br />
recommended that you do this as a practice. If it should happen,<br />
check your flute immediately for damage (scratches, dents, chips,<br />
cracks, etc.).<br />
Use a protective case when traveling and store the flute in a safe<br />
area. Soft cases can be made out of an old blanket, felt, cottonbacked<br />
naugahyde, leather, deerskin, etc. Hard cases can be made<br />
out of PVC pipe and even cardboard mailing tubes and then covered<br />
with fabric.<br />
Dry out your flute after playing. After playing your flute for awhile,<br />
you will notice that moisture collects in the mouthpiece, the fipple<br />
channel, and even the barrel of the flute. After playing, I usually<br />
give a hard blow to the fipple holes forcing the moisture toward<br />
both ends of the flute. I then take a dowel that has had a cotton<br />
cloth securely taped or stapled to the end and swab out the barrel.<br />
Be careful not to lose the swab in the barrel! And never use anything<br />
which you have to force up the chambers! A light swabbing<br />
will do. Clean and oil your flute occasionally. Most owners are reluctant<br />
to remove the bandings of the fipple. However, look at the way<br />
it was tied, slightly loosen each end and slide it back toward the<br />
mouth piece until you see both fipple holes. With a soft cloth, clean<br />
the channel. Never sand! <strong>The</strong>n take a cloth that is damp (not soaked)<br />
with tung or Danish oil (available at most discount or hardware<br />
stores near the paint). Lightly rub the exterior and swab the interior.<br />
Take your dry cloth and then repeat. <strong>The</strong>n let your flute dry for a day<br />
at an angle (mouthpiece down). Do not use waxes (they tend to<br />
build up), furniture polish (they contain alcohol which will dry<br />
your wood), or oils such as canola or sunflower (they do not<br />
dry).<br />
Finally, the last step in flute care is to play the flute! <strong>Flute</strong>s do<br />
have a spirit! And I have found that the more I play them, the<br />
better they sound!<br />
If you have any questions feel free to write: bgage@pop.uky.edu<br />
SHOP TIPS<br />
Handy plexiglass plier caddy<br />
Know your barbarians<br />
Viking Mongol<br />
Goth Visigoth<br />
Drummer<br />
62 © 2001 Lawrence P. Kirmser and <strong>The</strong> Woodwind Quarterly<br />
Turk