Clipsal Lifesaver® Smoke Alarm
Clipsal Lifesaver® Smoke Alarm
Clipsal Lifesaver® Smoke Alarm

Create successful ePaper yourself
Turn your PDF publications into a flip-book with our unique Google optimized e-Paper software.
<strong>Clipsal</strong> <strong>Lifesaver®</strong> <strong>Smoke</strong> <strong>Alarm</strong><br />
240V a.c. Photelectric <strong>Smoke</strong> <strong>Alarm</strong> with battery backup<br />
Suitable for single use or interconnection of up to 40 alarms.<br />
Tested and passed to AS3786 - 1993.<br />
I IMPORTANT: Please leave this manual with the owner. I<br />
110-647C<br />
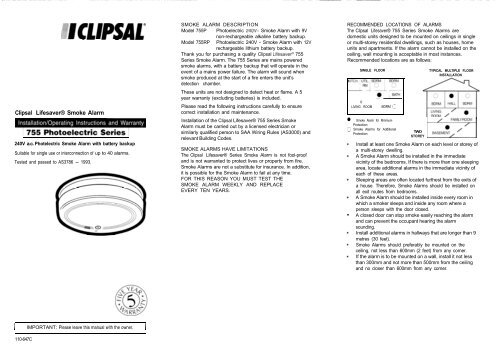
SMOKE ALARM DESCRIPTION RECOMMENDED LOCATIONS OF ALARMS<br />
Model 755P Photoelectric 24OV- <strong>Smoke</strong> <strong>Alarm</strong> with 9V The <strong>Clipsal</strong> <strong>Lifesaver®</strong> 755 Series <strong>Smoke</strong> <strong>Alarm</strong>s are<br />
non-rechargeable alkaline battery backup. domestic units designed to be mounted on ceilings in single<br />
Model 755RP Photoelectric 240V - <strong>Smoke</strong> <strong>Alarm</strong> with 12V or multi-storey residential dwellings, such as houses, home<br />
rechargeable lithium battery backup. units and apartments. If the alarm cannot be installed on the<br />
Thank you for purchasing a quality <strong>Clipsal</strong> Lifesavep 755 ceiling, wall mounting is acceptable in most instances.<br />
Series <strong>Smoke</strong> <strong>Alarm</strong>. The 755 Series are mains powered Recommended locations are as follows:<br />
smoke alarms, with a battery backup that will operate in the<br />
event of a mains power failure. The alarm will sound when<br />
smoke produced at the start of a fire enters the unit’s<br />
detection chamber.<br />
These units are not designed to detect heat or flame. A 5<br />
year warranty (excluding batteries) is included.<br />
Please read the following instructions carefully to ensure<br />
correct installation and maintenance.<br />
Installation of the <strong>Clipsal</strong> <strong>Lifesaver®</strong> 755 Series <strong>Smoke</strong><br />
<strong>Alarm</strong> must be carried out by a licensed electrician or<br />
similarly qualified person to SAA Wiring Rules (AS3000) and<br />
relevant Building Codes.<br />
SMOKE ALARMS HAVE LIMITATIONS<br />
The <strong>Clipsal</strong> <strong>Lifesaver®</strong> Series <strong>Smoke</strong> <strong>Alarm</strong> is not fool-proof<br />
and is not warranted to protect lives or property from fire.<br />
<strong>Smoke</strong> <strong>Alarm</strong>s are not a substitute for insurance. In addition,<br />
it is possible for the <strong>Smoke</strong> <strong>Alarm</strong> to fail at any time.<br />
FOR THIS REASON YOU MUST TEST THE<br />
SMOKE ALARM WEEKLY AND REPLACE<br />
EVERY TEN YEARS.<br />
SINGLE FLOOR<br />
0 -~<br />
LIVING ROOM BDRM 0<br />
<strong>Smoke</strong> <strong>Alarm</strong> for Minimum<br />
Protection<br />
0 <strong>Smoke</strong> <strong>Alarm</strong>s for Additional<br />
Protection<br />
<br />
TYPICAL MULTIPLE FLOOR<br />
INSTALLATION<br />
TWO pfJq<br />
STOREY<br />
Install at least one <strong>Smoke</strong> <strong>Alarm</strong> on each level or storey of<br />
a multi-storey dwelling.<br />
A <strong>Smoke</strong> <strong>Alarm</strong> should be installed in the immediate<br />
vicinity of the bedrooms. If there is more than one sleeping<br />
area, locate additional alarms in the immediate vicinity of<br />
each of these areas.<br />
Sleeping areas are often located furthest from the exits of<br />
a house. Therefore, <strong>Smoke</strong> <strong>Alarm</strong>s should be installed on<br />
all exit routes from bedrooms.<br />
A <strong>Smoke</strong> <strong>Alarm</strong> should be installed inside every room in<br />
which a smoker sleeps and inside any room where a<br />
person sleeps with the door closed.<br />
A closed door can stop smoke easily reaching the alarm<br />
and can prevent the occupant hearing the alarm<br />
sounding.<br />
Install additional alarms in hallways that are longer than 9<br />
metres (30 feet).<br />
<strong>Smoke</strong> <strong>Alarm</strong>s should preferably be mounted on the<br />
ceiling, not less than 600mm (2 feet) from any corner.<br />
If the alarm is to be mounted on a wall, install it not less<br />
than 300mm and not more than 500mm from the ceiling<br />
and no closer than 600mm from any corner.
Side wall<br />
LOCATIONS TO AVOID<br />
Installing a <strong>Smoke</strong> <strong>Alarm</strong> in an unsuitable location creates<br />
two main problems.<br />
Obstructions can prevent the alarm from giving early<br />
warning in the event of a fire.<br />
Its location may lead to nuisance (false) alarms.<br />
To avoid these situations, <strong>Clipsal</strong> <strong>Lifesaver®</strong> 755 Series<br />
<strong>Smoke</strong> <strong>Alarm</strong>s should not be installed in any of the<br />
following locations:<br />
The garage. Combustible products are present in the air<br />
when you start and run your vehicle’s engine.<br />
In front of forced air movement from air-conditioners,<br />
heaters, fans, etc.<br />
In dead air spaces where early smoke may not enter. e.g.<br />
upper sections of sloping or ‘A’ frame ceilings or exposed<br />
ceiling beams, where air does not circulate.<br />
In dusty areas. Dust may cause a <strong>Smoke</strong> <strong>Alarm</strong> to false<br />
alarm or even fail to alarm.<br />
In spray painting areas.<br />
In areas where temperatures may fall below 5°C or rise<br />
above 45°C.<br />
In areas where relative humidity may fall below 10% or<br />
rise above 93%.<br />
In or near very humid areas such as bathrooms. Moisture<br />
can cause false alarms.<br />
Near hot water heaters, space heaters or fireplaces.<br />
In any area that attracts insects. Some lights attract<br />
insects, particularly fluorescent and mercury vapour<br />
lamps.<br />
When installing a <strong>Smoke</strong> <strong>Alarm</strong> on the ceiling, do not<br />
install it near any protrusions that may prevent smoke<br />
spreading quickly to the alarm.<br />
LOCATING A SMOKE ALARM IN A CARAVAN OR MOBILE<br />
HOME<br />
Many mobile homes may not be well insulated, enabling<br />
extreme heat or cold to be transferred from outside the<br />
home through the walls and roof. This may create a<br />
thermal barrier which can prevent smoke from reaching<br />
a <strong>Smoke</strong> <strong>Alarm</strong> mounted on the ceiling. If this situation<br />
+<br />
exists, install the <strong>Smoke</strong> <strong>Alarm</strong> on an inside partition<br />
between 300mm and 500mm from the ceiling.<br />
If you are not sure about insulation in a mobile home,<br />
or if you notice the walls and ceilings are either hot or<br />
cold, install the alarm on an inside wall. For minimum<br />
protection, install one alarm close to the bedrooms.<br />
For additional protection, refer to the single floor plan on<br />
page 3.<br />
In mobile homes and caravans it is particularly important<br />
to install <strong>Smoke</strong> <strong>Alarm</strong>s as far away as possible<br />
from cooking areas to reduce the potential for nuisance<br />
alarms.<br />
Other areas to avoid are listed under the heading -<br />
“Locations to Avoid”.<br />
BUILT-IN HUSH CONTROL - Warning<br />
Before using the alarm’s Hush feature, fully identify the<br />
source of the smoke and make certain that the area is<br />
safe. Nuisance sources such as kitchen cooking areas<br />
can cause nuisance or false alarms. Built into <strong>Clipsal</strong><br />
<strong>Lifesaver®</strong> 755 Series <strong>Smoke</strong> <strong>Alarm</strong>s is a special Hush<br />
feature that lets you silence false alarms from nuisance<br />
sources.<br />
Features<br />
The Hush control will temporarily silence the alarm for<br />
approximately 15 minutes.<br />
After 15 minutes the unit will automatically revert to the<br />
fully alert mode.<br />
Very dense smoke will override the Hush control and<br />
sound the alarm.<br />
The Hush feature can be used repeatedly to silence the<br />
alarm until the air is cleared.<br />
This feature is to be used only when a known condition<br />
(e.g. smoke from cooking) activates the alarm.<br />
To operate, push the HUSH/TEST button. The alarm<br />
will silence immediately and the red light blinks<br />
approximately every 10 seconds for the next 15<br />
minutes.<br />
It will then automatically revert to the fully alert<br />
condition. If smoke particles are still present, the alarm<br />
will sound again.<br />
If interconnected alarms are installed, the unit that<br />
detects the smoke and sounds the alarm cannot be<br />
inadvertently silenced by the HUSH/TEST button of<br />
other units. In this case all of the alarms will continue to<br />
sound for as long as smoke is detected or until the<br />
HUSH/TEST button of the triggering alarm is pressed.<br />
The <strong>Smoke</strong> <strong>Alarm</strong> produces an audible sound of 85<br />
decibel alarm at 3 metres.<br />
5<br />
INSTALLATION<br />
The <strong>Clipsal</strong> <strong>Lifesaver®</strong> 755 Series <strong>Smoke</strong> <strong>Alarm</strong>s are 240V<br />
a.c. unit with 9V d.c. battery backup. Unless a 9V d.c. battery<br />
is installed, disconnection of this unit from its mounting plate<br />
or loss of mains power will render this device inoperative.<br />
This <strong>Smoke</strong> <strong>Alarm</strong> must be connected to a continuous 240V<br />
a.c. 50Hz supply which cannot be inadvertently switched off.<br />
Interconnected alarms must be wired on the same final subcircuit.<br />
WIRING INSTRUCTIONS<br />
240V a.c. installation must be carried out by a licensed<br />
electrician or similarly qualified person in accordance<br />
with the SAA Wiring Rules (AS3000). Do not connect<br />
mains to the I terminal. Permanent damage may result.<br />
0 Do not conduct an insulation resistance test to any<br />
circuit with the <strong>Smoke</strong> <strong>Alarm</strong>s connected.<br />
0 It is important that the alarm is wired correctly and<br />
fitted with a 9V d.c. battery backup to ensure correct<br />
operation.<br />
To<br />
Fuse or<br />
circuit<br />
breaker<br />
f-<br />
Terminals<br />
755P<br />
755RP<br />
Turn to remove the mounting plate as indicated by arrows.<br />
Fix mounting plate in position.<br />
Fit off the terminal block.<br />
Connect 9V battery (included with Model 755P ).<br />
Connect circuit wiring to terminal block as set out in<br />
diagram and close the cover over the terminal block.<br />
Fit the <strong>Smoke</strong> <strong>Alarm</strong> to the mounting plate, rotate until it<br />
snaps into place.<br />
Turn on power and check the green light on alarm cover. It<br />
should be lit when mains connected.<br />
Test alarm by pushing on HUSH/TEST button in indicated<br />
location, the alarm will sound by holding down the HUSH/<br />
TEST button for 5 seconds.
MULTIPLE ALARM WIRING<br />
Use 1.5mm’ minimum solid or stranded wire with a rating<br />
of 240V. When interconnecting, the maximum wire length<br />
between any two <strong>Smoke</strong> <strong>Alarm</strong>s is 450m for 1.5mm2 (20<br />
OHMS loop resistance).<br />
This <strong>Smoke</strong> <strong>Alarm</strong> may be interconnected with as many<br />
as 39 <strong>Clipsal</strong> Lifesaver or 755 Series <strong>Smoke</strong> <strong>Alarm</strong>s. Do<br />
not connect to any other type or model <strong>Smoke</strong> <strong>Alarm</strong>.<br />
Connect <strong>Smoke</strong> <strong>Alarm</strong>s to a same phase.<br />
m ,<br />
FUSE OR<br />
Blue Neutral<br />
CIRCUIT<br />
BREAKER<br />
0 0 0 0 0 0 0 0 0<br />
A I N A 1 N A 1 N<br />
Connecting the switch wire terminal in any other way to that<br />
shown in this instruction may result in damage to the alarm,<br />
failure to operate or an electrical shock hazard. It will also<br />
void the warranty.<br />
FITTING TAMPER PIN<br />
A tamper resistant feature on the <strong>Smoke</strong> <strong>Alarm</strong> may<br />
be used to prevent unauthorised removal of the <strong>Smoke</strong><br />
<strong>Alarm</strong> from the mounting plate.<br />
From the back of the <strong>Smoke</strong> <strong>Alarm</strong> remove the mounting<br />
plate. Twist out and remove one of the pins moulded into<br />
the plate. (Both pins are exactly the same).<br />
0 Position <strong>Smoke</strong> <strong>Alarm</strong> to mounting plate and turn<br />
clockwise to lock into place. To engage tamper resist<br />
feature, insert pin into notch on edge of <strong>Smoke</strong> <strong>Alarm</strong>.<br />
@ert h e r pin here<br />
BATTERY INSTALLATION AND REPLACEMENT<br />
The <strong>Clipsal</strong> <strong>Lifesaver®</strong> 755P <strong>Smoke</strong> <strong>Alarm</strong> uses one 9V<br />
d.c. battery which automatically provides backup power for<br />
the alarm in the event of the mains power failing. A fresh<br />
battery will operate the alarm for approximately one to three<br />
months with a.c. power off. This <strong>Smoke</strong> <strong>Alarm</strong> has a low/<br />
missing battery indicator which will ‘beep’ at intervals of<br />
approximately 60 seconds. It is vital for your safety that the<br />
battery is renewed when this occurs. An inactive alarm will not<br />
save lives. Replace the battery with a new one at least every<br />
year (Model 755P only). The <strong>Smoke</strong> <strong>Alarm</strong> cannot be fitted<br />
to the mounting plate if the Battery is missing.<br />
1. To replace the battery, rotate the <strong>Smoke</strong> <strong>Alarm</strong> in the<br />
direction shown by the arrow on the unit’s cover.<br />
2. Disconnect the mains wiring by pulling the connector<br />
away from the <strong>Smoke</strong> <strong>Alarm</strong>.<br />
3. Remove the battery from compartment.<br />
4. Connect a new battery and place it into the battery<br />
compartment.<br />
5. Replace the mains connector, and fix <strong>Smoke</strong> <strong>Alarm</strong> in<br />
place by rotating it onto mounting plate.<br />
Use only the following batteries as replacements: Model 755P<br />
Eveready 522, 216, 1222 or Duracell MN 1604.<br />
WARNING: In Australia, smoke alarm installation and battery<br />
replacement must onlv be performed by a licensed electrician.<br />
Using inferior batteries or the incorrect type may cause the<br />
alarm to malfunction. When replacing the battery and refitting<br />
the alarm to the mounting plate make sure that it is fully<br />
connected and flush with the mounting plate.<br />
NOTE: Rechargeable lithium batteries are permanently<br />
mounted and sealed in the tamper - proof housing. These<br />
cells are designed to last the useful life of the <strong>Smoke</strong> <strong>Alarm</strong> of<br />
10 years.<br />
OPERATION AND TESTING<br />
The <strong>Clipsal</strong> <strong>Lifesaver®</strong> 755 Series <strong>Smoke</strong> <strong>Alarm</strong>s are<br />
operational once all of the connections are correctly made,<br />
the 9V battery installed and mains power restored.<br />
Test the alarm by pushing the HUSH/TEST button for 5<br />
seconds. The alarm should sound simultaneously.<br />
This test should be done at least once a week to ensure<br />
that the alarm is operating correctly.<br />
If interconnected alarms are installed, pushing the HUSH/<br />
TEST button on one unit should cause all interconnected<br />
units to sound.<br />
If the alarm does not sound, check the wiring, 9V battery,<br />
fuses or circuit breaker and make sure that the alarm is<br />
connected to a 240V a.c. supply which cannot be<br />
inadvertently turned off.<br />
The green light indicates that the unit is operating with a.c.<br />
power. If this light is off, the a.c. power is off and the backup<br />
battery will operate the unit.<br />
You will not be safeguarded if the a.c. power goes off and<br />
the unit is not fitted with a fresh battery.<br />
The red light should flash once approximately every 60<br />
seconds to indicate the unit is functioning and alert. It will<br />
flash rapidly when the unit goes into alarm. The flashing<br />
light and pulsating loud alarm will continue until the air is<br />
cleared. For interconnected alarms, only the unit which<br />
senses smoke (or is being tested) will flash rapidly. All other<br />
units will sound their alarms but not flash rapidly.<br />
Do not apply excessive force to HUSH/TEST button. Doing<br />
so may damage the unit and void the warranty.<br />
Never use an open flame of any type to test your alarm.<br />
a<br />
You may damage the alarm or set fire to your home.<br />
Operating the HUSH/TEST button will check for<br />
correct functioning.<br />
MAINTENANCE AND CLEANING<br />
If a zinc oxide or alkaline battery is used, the battery<br />
should be renewed at least once a year.<br />
The <strong>Clipsal</strong> <strong>Lifesaver®</strong> 755 Series <strong>Smoke</strong> <strong>Alarm</strong>s are<br />
virtually maintenance free. However, vacuuming the unit<br />
at least once every six months will remove dust.<br />
Wipe the enclosure clean with a water moistened cloth.<br />
Do not immerse this unit or use household cleaners.<br />
Do not apply paint or spray with any liquid.<br />
All <strong>Clipsal</strong> <strong>Smoke</strong> <strong>Alarm</strong>s are manufactured and tested to<br />
rigorous quality standards and have a minimum life<br />
expectancy of 10 years. However, for your safety we<br />
recommend replacing your smoke alarm with a new<br />
<strong>Clipsal</strong> unit after 10 years. This will ensure that you are<br />
always protected by a <strong>Smoke</strong> <strong>Alarm</strong> thats operating within<br />
the limits of its life expectancy.<br />
REPAIRS AND SERVICE<br />
This <strong>Smoke</strong> <strong>Alarm</strong> has no user serviceable parts. Dangerous<br />
voltages are contained within, so do not attempt to repair this<br />
unit yourself. Instead, this <strong>Smoke</strong> <strong>Alarm</strong> should be returned to<br />
the supplier for service. Never send this unit through the post.<br />
(Return unit to supplier or department of health for<br />
disposal.)<br />
LIMITATIONS OF SMOKE ALARMS<br />
When installed and maintained correctly, <strong>Smoke</strong><br />
<strong>Alarm</strong>s are an excellent and inexpensive way of<br />
providing your family with an early warning of possible<br />
fires.<br />
It must be remembered, however, that <strong>Smoke</strong> <strong>Alarm</strong>s do have<br />
their limitations and that this product should not be a<br />
substitute for basic safety precautions and fire prevention.<br />
<strong>Smoke</strong> <strong>Alarm</strong>s cannot provide an alarm if smoke<br />
does not reach the unit. It may not sense a fire that<br />
is on the other side of a closed door, or fires that<br />
start in chimneys, walls, ceilings, roofs, or on another<br />
storey.<br />
<strong>Alarm</strong>s located outside bedrooms, on the other side of a<br />
closed door may not wake a sound sleeper.<br />
<strong>Smoke</strong> <strong>Alarm</strong>s must be tested regularly to ensure that<br />
batteries and alarm circuits are in good condition. A<br />
<strong>Smoke</strong> <strong>Alarm</strong> with a flat or missing battery offers no<br />
protection in the event of a mains power failure.<br />
<strong>Smoke</strong> <strong>Alarm</strong>s do have a limited life and should be<br />
replaced after 10 years service.<br />
People with impaired hearing are advised to use special<br />
purpose <strong>Smoke</strong> <strong>Alarm</strong>s that use flashing lights or<br />
vibrating devices to indicate alarm conditions.<br />
9
DEVELOPING AN ESCAPE PLAN<br />
A mains powered <strong>Smoke</strong> <strong>Alarm</strong> with battery backup, correctly<br />
installed and maintained is the most effective way of giving<br />
your family early warning of a fire. Other precautions are to<br />
reduce the risks of a fire starting in your home and to develop<br />
a fire escape plan with all family members.<br />
Here are some suggestions for developing your escape plan:<br />
1. Make a floor plan which clearly indicates all doors and<br />
windows in your home and at least two escape routes<br />
from each room. Multi-storey dwellings require special<br />
attention. For instance, upper storey windows may need a<br />
chain ladder or other fire stairway as a means of exit.<br />
2. Determine a place outside your home (e.g. the letter box<br />
or front fence) where all family members can assemble if<br />
a fire occurs.<br />
3. Discuss your escape plan with all members of your family.<br />
Show everyone, particularly young children, what to do in<br />
case of a fire.<br />
4. Make sure all family members are familiar with the sound<br />
of the <strong>Smoke</strong> <strong>Alarm</strong>.<br />
5. At least every six months, sound the alarm and practice<br />
your family’s fire drill.<br />
Remember:<br />
In the event of a fire, you may not be able to reach your<br />
children. Therefore, it is important for all family members,<br />
including small children, to know exactly what to do.<br />
WHAT TO DO IF THE ALARM SOUNDS<br />
1.<br />
2.<br />
3.<br />
4.<br />
5.<br />
6.<br />
7.<br />
8.<br />
Leave immediately, following your family’s escape plan.<br />
As you leave, don’t open any inside doors without first<br />
feeling its surface.<br />
If the door is hot, or if you see smoke coming through<br />
the cracks, do not open the door. Use an alternative<br />
exit.<br />
If the inside of the door is cool, place your shoulder<br />
against it, open it slightly and be ready to slam it shut if<br />
heat and smoke rush in.<br />
If the air is smoky, stay as close to the floor as possible.<br />
Breathe shallowly through a cloth, which if possible<br />
should be wet.<br />
Once outside, go to your pre-selected assembly area and<br />
make sure everyone else is there.<br />
Call the Fire Service from a neighbour’s home - never<br />
from your own.<br />
Do not return to your home until fire officials give you<br />
permission to do so.<br />
For further information on fire safety, contact your local<br />
Fire Service.<br />
TROUBLESHOOTING<br />
To be carried out by a licensed electrician or similiarly<br />
qualified person.<br />
A DANGER: Always turn off power at main fuse box<br />
or circuit breaker before taking trouble<br />
shooting action.<br />
A WARNING: DO NOT disconnect battery or a.c. power<br />
to quieten an unwanted alarm. This will<br />
remove your protection. Fan the air or<br />
open a window to remove smoke or dust.<br />
PROBLEM SOLUTION<br />
<strong>Smoke</strong> <strong>Alarm</strong> does<br />
not sound when<br />
tested.<br />
NOTE: Push Hush/<br />
TEST button for at<br />
least five (5)<br />
seconds while testing!<br />
<strong>Smoke</strong> <strong>Alarm</strong> beeps<br />
about once a minute.<br />
(Model 755 only)<br />
Model 755RP<br />
<strong>Smoke</strong> <strong>Alarm</strong> sounds<br />
unwanted alarms<br />
when residents are<br />
cooking, taking<br />
showers, etc<br />
Interconnected <strong>Smoke</strong><br />
<strong>Alarm</strong>s do not sound<br />
when system is<br />
tested.<br />
1. Check that a.c. power is<br />
turned on and the green<br />
light is on.<br />
2. Turn off power. Remove<br />
<strong>Smoke</strong> <strong>Alarm</strong> from<br />
mounting plate and:<br />
a. check that connector<br />
plug is securely<br />
attached.<br />
b. check that battery is<br />
properly attached to<br />
connector. (Model 755P<br />
only)<br />
3. Vacuum <strong>Smoke</strong> <strong>Alarm</strong>.<br />
1. Turn off power and<br />
replace battery in the<br />
“Battery Installation<br />
and Replacement”<br />
section.<br />
2. Vacuum <strong>Smoke</strong> <strong>Alarm</strong>.<br />
3. Verify that the unit has been<br />
under mains operation for a<br />
minimum of 2 full days. If the<br />
beeping persists after the<br />
required charging period,<br />
return the unit for service.<br />
1. Get an electrician to<br />
move <strong>Smoke</strong> <strong>Alarm</strong> to a<br />
new location.<br />
See “Recommended<br />
locations of alarms”.<br />
2. Vacuum <strong>Smoke</strong> <strong>Alarm</strong>.<br />
1. Press and hold TEST/<br />
HUSH button for at least<br />
three seconds after the<br />
first unit sounds.<br />
2. Have an electrician<br />
check the connections if<br />
interconnected alarms<br />
still do not sound.<br />
The benefits conferred by this warranty are in addition to all other<br />
rights and remedies in respect of the product which the consumer<br />
has under the Trade Practices Act and similar State and Territory<br />
Laws.<br />
The original purchaser of this <strong>Clipsal</strong> Lifesavep 755 Series <strong>Smoke</strong><br />
<strong>Alarm</strong> is provided with the following warranty and subject to the<br />
following conditions. Gerard Industries Pty Ltd warrant this product<br />
for a period of 5 years from the date of purchase for all parts<br />
defective in workmanship or materials. All defective parts will be<br />
replaced free of charge. The following exclusions do not preclude<br />
the purchaser from those statutory rights consumers have under<br />
the Trade Practices Act and similar State and Territory Laws.<br />
WARRANTY CONDITIONS<br />
1.<br />
2.<br />
3.<br />
4.<br />
5.<br />
6.<br />
This warranty is only valid for products installed according to<br />
the manufacturer’s instructions.<br />
This product must not be modified or changed in any way.<br />
All wiring must be carried out by a licensed electrician or<br />
similarly qualified person and must be connected to the voltage<br />
requirements as specified in the ratings label.<br />
The manufacturer does not accept liability for any direct or<br />
consequential damage, loss or other expense arising from<br />
misuse or incorrect installation and operation of this product.<br />
Warranty will only be given on products with proof of purchase<br />
date e.g. original invoice.<br />
This warranty does not extend to cover batteries or any faults<br />
caused by batteries when incorrectly installed, leaking or<br />
otherwise installed in non accordance with manufacturer’s<br />
directions.<br />
Note: It is illegal to send radioactive material through Australia Post.<br />
Send by courier.<br />
Check for similar conditions with any forwarding agency before<br />
sending this product.<br />
As a record of purchase, please complete the following details and file<br />
this information with your purchase invoice.<br />
<strong>Clipsal</strong> Lifesaver- <strong>Smoke</strong> <strong>Alarm</strong><br />
MODEL 755P n 755RP (<br />
Serial <strong>Alarm</strong><br />
Purchased From<br />
Date of Purchase<br />
Product of Gerard Industries Pty Ltd Registered offices in all States:<br />
ACN 007873529 New South Wales (02) 9794 9200<br />
Head Office Victoria (03) 9207 3200<br />
12 Park Terrace, Bowden, Queensland (07) 3244 7477<br />
South Australia 5007 South Australia (08) 8269 0555<br />
Telephone (08) 8269 0511 Western Australia (08 9442 4444<br />
Facsimile (08) 8340 1724 Northern Territory (08) 8947 0278<br />
Tasmania (003) 31 6951<br />
IO 11 F1517