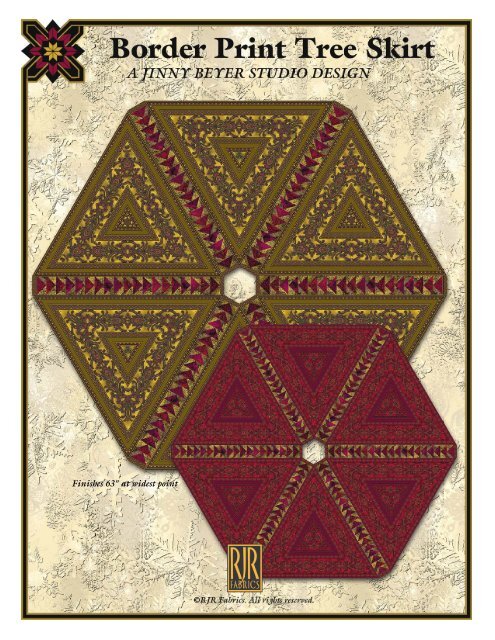
Border Print Tree Skirt Pattern - Download - Jinny Beyer Studio
Border Print Tree Skirt Pattern - Download - Jinny Beyer Studio
Border Print Tree Skirt Pattern - Download - Jinny Beyer Studio

Create successful ePaper yourself
Turn your PDF publications into a flip-book with our unique Google optimized e-Paper software.
Finishes 63" at widest point
<strong>Jinny</strong> <strong>Beyer</strong>’s <strong>Border</strong> <strong>Print</strong> Christmas <strong>Tree</strong> <strong>Skirt</strong> puts her elegant border print fabric to work for you. That one<br />
fabric gives you large, ornate triangles, which are divided by strips of shaded, classic flying geese units.<br />
Be sure to read the entire pattern before beginning. All<br />
seam allowances are ¼-inch. <strong>Pattern</strong> assumes basic<br />
quiltmaking knowledge. Press seams to one side.<br />
Step 1: Make Large <strong>Border</strong> <strong>Print</strong> Triangle<br />
Units<br />
Follow the instructions on page 4 to make a full-sized<br />
Template 1 pattern.<br />
Place a large sheet of template plastic over the Template<br />
1 pattern and using a permanent marker, transfer<br />
the cutting, sewing and center lines, arrow and dot<br />
from the pattern to the template.<br />
A large border print triangle is made from three Template<br />
1 triangles. Follow the Template 1 Layout Diagram<br />
and Cutting Instructions on page 3 to mark and<br />
cut the Template 1 triangles.<br />
Once all the Template 1 triangles have been cut, sort<br />
them into two different piles of A and B triangles.<br />
When you piece the large triangle units, be sure you<br />
are using three identical pieces.<br />
To make a unit, select three identical triangles. Place<br />
two triangles together, right sides facing, matching the<br />
fabric designs. Pin along one of the short sides and<br />
then sew, stopping at the dot marked on your fabric.<br />
Pin the third triangle to your newly sewn unit along a<br />
short side, matching the fabric design, and sew, stopping<br />
at the dot. Repeat<br />
for the last seam and<br />
press the unit. Repeat<br />
to make six triangle<br />
units.<br />
Diagram 1<br />
1<br />
Step 2: Make Flying Geese Strips<br />
The flying geese units can be constructed with traditional<br />
piecing methods or using the foundation masters<br />
provided on pages 4 and 5. After selecting your desired<br />
method, follow the fabric cutting directions on page 7<br />
for Fabrics 1-5.<br />
Traditional Piecing: Referring to Diagrams 2 & 3<br />
below, sew a Fabric 5 triangle to each short side of the<br />
Fabrics 1-4 triangles. Make a total of 30 units using<br />
Fabrics 1-3 and 24 units using Fabric 4.<br />
*<br />
Fabric 5<br />
Diagram 2<br />
Red<br />
Fabric<br />
Fabric 5<br />
Red<br />
Fabric<br />
Diagram 3<br />
Fabric 5<br />
Sew the units together as in Diagram 5 on page 2,<br />
making a total of six flying geese strips.<br />
Foundation Piecing: To foundation piece, make six copies<br />
each of Foundations 1-4.<br />
Foundation piece the strips, using the fabrics and piecing<br />
orders indicated on the foundations. Sew the foundations<br />
together as shown in Diagram 5 to make six<br />
complete strips of flying geese units.<br />
Attach <strong>Border</strong> <strong>Print</strong> Rectangles.<br />
Using Template 4 on page 6, cut twelve identical pieces<br />
of border print, placing the template on the wide fabric<br />
stripe as shown below and aligning the mirror line in<br />
the center of the design motif. Sew one rectangle to the<br />
top and bottom of each flying geese strip.<br />
Diagram 4. Template 4 patches can be cut from both edges of the<br />
wide border print stripe. Be sure to align the mirror line on the template<br />
on a mirror-image motif. The * indicates the portion of the<br />
stripe that will be visible once the quilt is complete.
3<br />
2<br />
1<br />
4<br />
3<br />
2<br />
1<br />
4<br />
3<br />
2<br />
1<br />
4<br />
3<br />
2<br />
1<br />
4<br />
3<br />
2<br />
1<br />
Foundation<br />
4<br />
Foundation 2 Foundation 3<br />
Foundation 1<br />
Diagram 5. Sew the flying geese units or foundations together in the<br />
order shown above. If you foundation pieced, do not remove the paper<br />
foundations until the tree skirt has been assembled in Step 3.<br />
2<br />
Step 3: Assemble the <strong>Tree</strong> <strong>Skirt</strong><br />
Following the color image on the pattern cover and the<br />
diagram below, sew the tree skirt together, alternating<br />
border print triangles and flying geese strips. Leave the<br />
final seam open.<br />
If you foundation-pieced the flying geese strips, remove<br />
the foundations at this time. Take extra care removing<br />
the foundation behind the strip on the open seam to<br />
avoid stretching the edges.<br />
B<br />
A<br />
A<br />
Diagram 6. When assembling the tree skirt, alternate the A and B triangle<br />
units and leave one seam open (as indicated by the heavy line).<br />
Step 4: Finish the <strong>Tree</strong> <strong>Skirt</strong><br />
Layer the tree skirt as follows: backing (wrong side up),<br />
batting, pieced tree skirt (right side up). Baste the layers<br />
together. Quilt as desired, but not crossing over the<br />
unsewn edge.<br />
When quilting is completed, trim backing and batting<br />
even with the edges of tree skirt. Cut through the backing<br />
and batting along the open seam and cut out the<br />
backing and batting in the center opening.<br />
Make bias binding strips using Fabric 7 and bind using<br />
your favorite binding method or by following the<br />
instruction for Binding a Quilt the <strong>Jinny</strong> <strong>Beyer</strong> Way at<br />
www.jinnybeyer.com/promos/binding.<br />
B<br />
B<br />
A
A<br />
A<br />
A<br />
A<br />
Template 1 Cutting Instructions<br />
Each large border print triangle is made from three<br />
identical triangles cut using Template 1. The yardage<br />
provided is sufficient to provide two sets (A and B) of<br />
nine matching triangles. This means that three of the<br />
finished triangle units will have one design, and three<br />
will have a slightly different design.<br />
Triangle A<br />
Triangle B<br />
Each triangle “captures” a portion of a narrow stripe at the top and<br />
bottom, and the full width of the wide stripe through the center. However,<br />
because the mirror line on the template is placed on the mirror<br />
line of two different design motifs, two different completed triangle<br />
units will result.<br />
The Template 1 Layout Diagram above shows you how<br />
to position the template to maximize the use of the fabric.<br />
As you mark and cut, here are several things to keep<br />
in mind:<br />
• Align the dotted sewing line on the long side of the<br />
template just under the narrow printed edge of the<br />
narrow border stripe as in the diagrams above.<br />
B<br />
B<br />
B<br />
B<br />
A<br />
A<br />
A<br />
A<br />
3<br />
B B<br />
B<br />
B<br />
B<br />
Template 1 Layout Diagram<br />
A<br />
• To achieve the mirrored effect, you must center the<br />
template in the middle of a mirrored motif and ensure<br />
that the template is positioned over exactly the same<br />
design repeat for each of the matching triangles. To do<br />
this, place the template over the fabric in the desired<br />
position and mark a portion of the design motif onto<br />
the template. When you’re ready to mark and cut the<br />
next piece, be sure to match the motif on the template<br />
with the motif on the fabric.<br />
(To use the same plastic template for both the A and B<br />
triangles, simply use different colors to mark the two<br />
different motifs on the template.)<br />
Once your pieces are cut, transfer the dot marked at the<br />
top of the template to the wrong side of your pieces.
To make a full-sized Template 1, enlarge the Template 1 pattern piece 200%,<br />
then make a second copy of the enlarged pattern. Flip the copy printed side<br />
down and trace over the dashed and solid lines. Match the two pieces along the<br />
mirror line and tape together.<br />
Match the two pieces on the center line and tape together to<br />
make a full-sized pattern.<br />
Template Size Check<br />
This box should measure<br />
2 inches square before the<br />
page is enlarged.<br />
If the box does not measure 2",<br />
your templates/foundations will<br />
not be the correct size.<br />
If you are printing at home, be<br />
sure your printer is set to print at<br />
100% with “no scaling”.<br />
Template 2<br />
Do Not Enlarge<br />
4<br />
Template 1 (Left Side)<br />
Enlarge 200%<br />
Template 3<br />
Do Not Enlarge<br />
Mirror Line
17 16 18<br />
Fabric 2<br />
14 13 15<br />
Fabric 1<br />
11 10 12<br />
Fabric 4<br />
8 7<br />
9<br />
Fabric 3<br />
5 4<br />
6<br />
Fabric 2<br />
2 1<br />
3<br />
Fabric 1<br />
Foundation 1<br />
5<br />
17<br />
16<br />
Fabric 4<br />
14 13 15<br />
Fabric 3<br />
11 10 12<br />
Fabric 2<br />
8 7<br />
9<br />
Fabric 1<br />
5 4<br />
6<br />
Fabric 4<br />
2 1<br />
3<br />
Fabric 3<br />
Foundation 2<br />
18
17<br />
16<br />
Fabric 2<br />
Fabric 1<br />
Fabric 4<br />
8 7<br />
9<br />
Fabric 3<br />
5 4<br />
6<br />
Fabric 2<br />
2 1<br />
3<br />
Fabric 1<br />
Foundation 3<br />
18<br />
14 13 15<br />
11 10 12<br />
6<br />
2 1<br />
3<br />
Template 4<br />
Fabric 3<br />
Foundation 4<br />
Mirror Line
1161-04<br />
1165-04<br />
1164-01<br />
1162-01<br />
1165-01<br />
1163-01<br />
1166-04<br />
Fabric & Cutting Guide<br />
The flying geese units can be made using traditional sewing or foundation-piecing techniques. Cutting directions for<br />
both techniques are provided below; choose one only. (Note that the Fabric 5 patches are cut slightly oversized for foundation<br />
piecing.)<br />
1161-01<br />
1165-01<br />
4 yards required for backing (not included in kits)<br />
Fabric 1 ¼ yard<br />
Traditional/Foundation: Cut 15 squares measuring 2 7/ 8"<br />
then cut them once on the diagonal or cut 30 patches<br />
using Template 2.<br />
Fabric 2 ¼ yard<br />
Traditional/Foundation: Cut 15 squares measuring 2 7/ 8"<br />
then cut them once on the diagonal or cut 30 patches<br />
using Template 2.<br />
Fabric 3 ¼ yard<br />
Traditional/Foundation: Cut 15 squares measuring 2 7/ 8"<br />
then cut them once on the diagonal or cut 30 patches<br />
using Template 2.<br />
Fabric 4<br />
1/ 8 yard<br />
Traditional/Foundation: Cut 12 squares measuring 2 7/ 8"<br />
then cut them once on the diagonal or cut 24 patches<br />
using Template 2.<br />
Fabric 5 ¾ yard<br />
Traditional: Cut 114 squares measuring 2¼" then cut<br />
them once on the diagonal or cut 228 patches using Template 3.<br />
Foundation: Cut 114 squares measuring 2¾" then cut<br />
once on the diagonal.<br />
Fabric 6 4½ yards<br />
See pattern.<br />
Fabric 7<br />
Reserve for binding.<br />
7<br />
7/ 8 yard<br />
©2009, 2012 <strong>Jinny</strong> <strong>Beyer</strong><br />
<strong>Pattern</strong> written by Elaine Kelly