Sassy Sweet Mini Skirt ZUCKA - Farbenmix
Sassy Sweet Mini Skirt ZUCKA - Farbenmix
Sassy Sweet Mini Skirt ZUCKA - Farbenmix

Create successful ePaper yourself
Turn your PDF publications into a flip-book with our unique Google optimized e-Paper software.
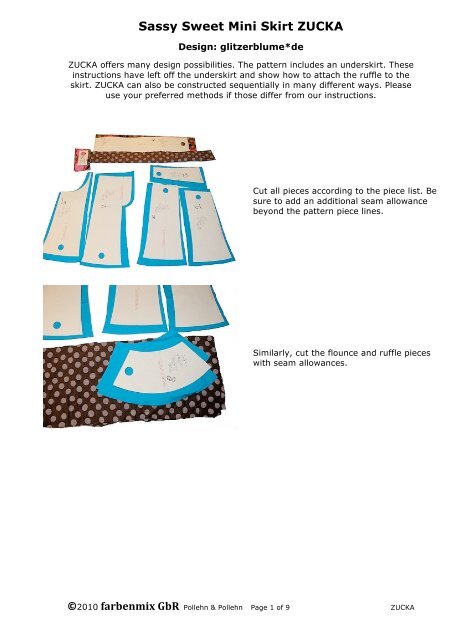
<strong>Sassy</strong> <strong>Sweet</strong> <strong>Mini</strong> <strong>Skirt</strong> <strong>ZUCKA</strong><br />
Design: glitzerblume*de<br />
<strong>ZUCKA</strong> offers many design possibilities. The pattern includes an underskirt. These<br />
instructions have left off the underskirt and show how to attach the ruffle to the<br />
skirt. <strong>ZUCKA</strong> can also be constructed sequentially in many different ways. Please<br />
use your preferred methods if those differ from our instructions.<br />
Cut all pieces according to the piece list. Be<br />
sure to add an additional seam allowance<br />
beyond the pattern piece lines.<br />
Similarly, cut the flounce and ruffle pieces<br />
with seam allowances.<br />
©2010 farbenmix GbR Pollehn & Pollehn Page 1 of 9 <strong>ZUCKA</strong>
Cut the pockets and pocket flaps with an<br />
additional seam allowance. Cut the pocket<br />
flap linings. Cut the lining pieces for the<br />
patch pockets (optional). You may choose<br />
to leave thes patch pockets off the skirt.<br />
Auf die rückwärtigen und die kleine Tasche<br />
vorne kann auf Wunsch auch verzichtet<br />
werden.<br />
Please note: The pockets photographed to<br />
the left are not the same shape as the<br />
pockets on the pattern sheet. The pattern<br />
sheet has two different patch pockets and<br />
pocket flaps. Experiement with the pocket<br />
shapes and sizes as you like.<br />
Stitch the skirt front side pieces to the skirt<br />
front middle pieces, fabric right sides<br />
together. Stitch the skirt back side pieces<br />
to the skirt back middle pieces. Press the<br />
seam allowances toward the center and<br />
topstitch from the garment right side.<br />
Stitch the saddle panel pieces (pieces 3 or<br />
20) to the two skirt back halves, right sides<br />
together. Press the seam allowances<br />
upward and topstitch from the right side.<br />
©2010 farbenmix GbR Pollehn & Pollehn Page 2 of 9 <strong>ZUCKA</strong>
Stitch the two skirt back halves together.<br />
Press the seam allowance to one side and<br />
topstitch.<br />
Stitch the front pocket bags (piece7) at the<br />
front pocket edge of the skirt front side<br />
pieces (piece 2 or 22), fabric right sides<br />
together. Trim the seam allowance for a<br />
smooth turn. Turn and enclose the seam.<br />
Press and edgestitch the pocket edge from<br />
the right side.<br />
Stitch the front pocket facing pieces (piece<br />
6) to the front pocket bag (piece 7) right<br />
sides together along the curved edge and<br />
the inside side. Pin or baste stitch the front<br />
pockets at the waist edge and skirt front<br />
sides to hold the layers of material in place.<br />
As desired, secure the pocket to the skirt<br />
with a decorative stitch. Trace the pocket<br />
line with disappearing textile marker or<br />
tailor’s chalk. Stitch over the line with a<br />
stitch of your choice.<br />
©2010 farbenmix GbR Pollehn & Pollehn Page 3 of 9 <strong>ZUCKA</strong>
Unlined Pocket:<br />
Fold the front edge over once toward the<br />
fabric right side. Stitch along the short<br />
vertical ends. Notch the corners and turn<br />
the top of the pocket. Press the pocket top<br />
edge and press the seam allowances on the<br />
sides and bottom toward the pocket wrong<br />
side.<br />
Lined pockets and lined pocket flaps:<br />
Stitch the pocket flap lining to the pocket<br />
flap outer (piece 14) right sides together.<br />
Leave a small opening for turning. Trim the<br />
seam allowance and notch the corners for a<br />
smooth turn. Turn the flaps right side out<br />
and press. Press the seam allowances at<br />
the small opening toward the inside of the<br />
flap. Edgestitch around the flap edge and<br />
close the small opening. Edgestitch around<br />
the entire pocket flap.<br />
Repeat the above for the pocket pieces.<br />
However, edgestitch only along the top of<br />
the pocket.<br />
Pin the pockets to the skirt back at the<br />
marks and stitch. Secure the stress points<br />
of the pocket corners with bar tacks.<br />
Pin the pocket flaps above the pockets<br />
approxmiately 1-2 cm (3/8-5/8 in.) and<br />
stitch. Reinforce the stress points of the<br />
flap corners with bar tacks.<br />
©2010 farbenmix GbR Pollehn & Pollehn Page 4 of 9 <strong>ZUCKA</strong>
Stitch the two skirt front halves together<br />
right sides together. Stitch around the faux<br />
fly extensions. From the right side press<br />
the seam allowance toward the left<br />
(wearer’s right).<br />
Für einen Rock nur mit Gummizug die<br />
Mittelnaht komplett schließen. Nahtzugabe<br />
auf eine Seite klappen und von rechts<br />
knappkantig absteppen.<br />
Tuck in the fly extensions to form a little<br />
vertical pocket. With a textile marker or<br />
tailor’s chalk, mark a line to mimic the<br />
stitching line of a zipper fly. Topstitch the<br />
middle seam from the right side. When you<br />
reach the marking for the faux fly, stitch up<br />
the marked line. To further reinforce the<br />
illusion of a zipper fly, stitch a small bar<br />
tack at the base of the faux fly.<br />
Repeat the above steps for attaching the<br />
rear pockets for the side pockets.<br />
Experiment with the pocket placement and<br />
find a look you like.<br />
Pin the skirt front and back right sides<br />
together and stitch the side seams. Press<br />
the seam allowances toward the front and<br />
topstitch.<br />
©2010 farbenmix GbR Pollehn & Pollehn Page 5 of 9 <strong>ZUCKA</strong>
Stitch the flounces pieces right sides<br />
together to form a ring. Press the seam<br />
allowances in the same directions of<br />
corresponding skirt seams and topstitch<br />
from the right side.<br />
Align the flounce seams with the skirt<br />
seams and pin. Stitch, press the seam<br />
allowance upward and topstitch.<br />
Hem the bottom flounce edge.<br />
The overskirt is now complete. You may<br />
leave off the underskirt and skip ahead to<br />
adding the waistband. You may also chose<br />
to add a ruffle underneath without adding<br />
the underskirt. These instructions will show<br />
you will method.<br />
©2010 farbenmix GbR Pollehn & Pollehn Page 6 of 9 <strong>ZUCKA</strong>
Stitch the short ends of the underskirt<br />
ruffle pieces right sides together to form a<br />
ring. Press the seam allowances open.<br />
Hem the bottom edge of the ruffle.<br />
Mark a line for attaching the ruffle on the<br />
skirt approximately 1 - 3 cm (3/8 – 1 ¼<br />
in.) (depending on the size and your<br />
preference) above the flounce seamline on<br />
both the skirt wrong and right sides. Please<br />
use a seam gauge and check to make sure<br />
that the two lines are right on top of one<br />
another on the fabric right and wrong sides.<br />
Along the top edge of the ruffle ring,<br />
stitch two lines of basting stitches. Pin the<br />
ruffle piece in four or eight places<br />
equidistant around marked line on the<br />
skirt wrong side. Gently pull both<br />
gathering threads to gather and fit the<br />
ruffle material to the underskirt hem. Pin<br />
the ruffle in place as you go.<br />
©2010 farbenmix GbR Pollehn & Pollehn Page 7 of 9 <strong>ZUCKA</strong>
Once the ruffle is gathered to fit and pinned<br />
to the skirt, stitch the ruffle to the skirt<br />
from the skirt right side. It is recommended<br />
to use a wide decorative stitch to be sure to<br />
catch the ruffle in your stitching line. It is<br />
recommended to use a wide decorative<br />
stitch to be sure to catch the ruffle in your<br />
stitching line. Clean up the seam by<br />
removing the basting stitches.<br />
Fold the lengthwise belt loop edges toward<br />
the center and overlap them (piece 10).<br />
Stitch the belt loops, perhaps with a twin<br />
needle or with a decorative stitch to secure<br />
the folds.<br />
Pin the waistband right fabric side to the<br />
inside of the inside of the skirt along the<br />
waist edge. Stitch the waistband to the<br />
skirt through both skirt layers along the<br />
waist edge seam allowance. Fold the<br />
waistband upward and press the seam. At<br />
this time, press the opposite waistband<br />
edge toward the fabric wrong side (it is<br />
easiest to press eight along the stitching<br />
of the overcast stitches of the finished<br />
edge).<br />
Fold the waistband over toward the<br />
garment right side and pin the folded<br />
bottom edge to the skirt. Press the top<br />
waistband fold. Stitch the waistband to<br />
the skirt from the garment right side. This<br />
stitching line will be somewhat below the<br />
first waistband stitching line. Edgestitch<br />
the top edge of the waistband.<br />
Attach the belt loops with bar tacks.<br />
Alternately, you may pin one end of the<br />
belt loops under the front waistband edge<br />
before stitching and catch the bottoms of<br />
the belt loops in this stitching line. Secure<br />
©2010 farbenmix GbR Pollehn & Pollehn Page 8 of 9 <strong>ZUCKA</strong>
<br />
the beltloops with bar tacks at the top<br />
edge of the waistband.<br />
With the aid of a safety pin or bodkin,<br />
insert elastic into the waistband casing.<br />
Cinch the elastic to the desired fit. Stitch<br />
the ends of the elastic together securely.<br />
Tuck the elastic into the casing opening.<br />
Close the opening with a few hand<br />
stitches.<br />
Make the sash: Fold the sash in half<br />
lengthwise, fabric right sides together.<br />
Stitch along all four edges. Leave a small<br />
opening for turning. Notch the corners.<br />
Turn the sash right side out. Press the<br />
sash. Edgestitch all the way around the<br />
sash and close thereby the opening.<br />
Insert the sash into the belt loops and<br />
loosely tie into a square knot.<br />
<strong>ZUCKA</strong> is complete!<br />
©2010 farbenmix GbR Pollehn & Pollehn Page 9 of 9 <strong>ZUCKA</strong>