Roomline skirting Fitting instructions
Roomline skirting Fitting instructions
Roomline skirting Fitting instructions

Create successful ePaper yourself
Turn your PDF publications into a flip-book with our unique Google optimized e-Paper software.
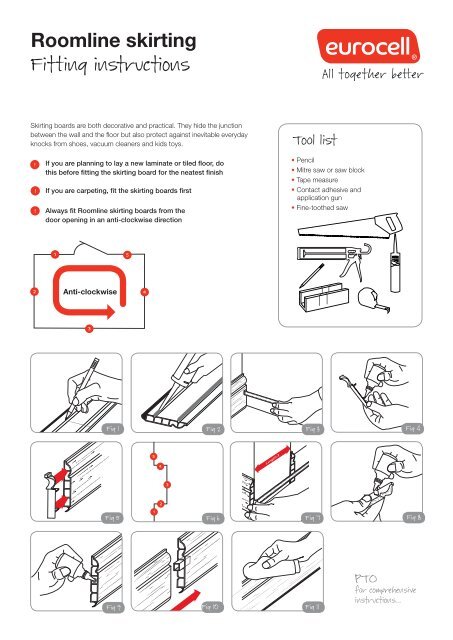
<strong>Roomline</strong> <strong>skirting</strong><br />
<strong>Fitting</strong> <strong>instructions</strong><br />
Skirting boards are both decorative and practical. They hide the junction<br />
between the wall and the floor but also protect against inevitable everyday<br />
knocks from shoes, vacuum cleaners and kids toys.<br />
If you are planning to lay a new laminate or tiled floor, do<br />
this before fitting the <strong>skirting</strong> board for the neatest finish<br />
If you are carpeting, fit the <strong>skirting</strong> boards first<br />
Always fit <strong>Roomline</strong> <strong>skirting</strong> boards from the<br />
door opening in an anti-clockwise direction<br />
Anti-clockwise<br />
Tool list<br />
Fig 9 Fig 10<br />
Fig 11<br />
• Pencil<br />
• Mitre saw or saw block<br />
• Tape measure<br />
• Contact adhesive and<br />
application gun<br />
• Fine-toothed saw<br />
Fig 1 Fig 2 Fig 3 Fig 4<br />
Fig 5 Fig 6<br />
Fig 7 Fig 8<br />
PTO<br />
for comprehensive<br />
<strong>instructions</strong>...
1. <strong>Fitting</strong> 2. External corners<br />
1.1<br />
Measure length 1 from the external edge<br />
of the architrave to the inside corner of the<br />
room. Transfer this measurement onto a<br />
length of <strong>skirting</strong> board and mark accurately<br />
with a pencil. Cut the <strong>skirting</strong> board to length<br />
using square cuts with the aid of a fine<br />
toothed saw and saw block. Position the<br />
<strong>skirting</strong> board to check length. See Fig 1<br />
1.2<br />
Lay the <strong>skirting</strong> board on its face and apply<br />
a bead of SilverSil Never Nails or another<br />
contact building adhesive down each<br />
adhesive channel. Place the <strong>skirting</strong> board<br />
in position pushing firmly back to the wall.<br />
See Fig 2<br />
1.3<br />
Measure length 2 from the flat face of the<br />
<strong>skirting</strong> board to the inside corner of the<br />
room. Cut to length using square cuts. See<br />
Fig 3<br />
1.4<br />
Apply contact adhesive to the scribed<br />
internal corner moulding (available from your<br />
local Eurocell Building Plastics branch as<br />
part of the corner trim kit) and push onto<br />
the left hand end of the cut <strong>skirting</strong> board.<br />
Position the <strong>skirting</strong> board to check for<br />
length and trim if necessary. Once satisfied<br />
repeat stage 2. See Fig 4<br />
1.5<br />
Repeat this process until the<br />
room is complete.<br />
2.1<br />
Measure from the flat face of <strong>skirting</strong> board<br />
1 to the external corner of the wall. Cut<br />
the <strong>skirting</strong> board using square cuts. Fit a<br />
scribed internal corner moulding to the left<br />
hand end and check for fit. If satisfied fix in<br />
position with adhesive. See Fig 5<br />
2.2<br />
Measure length 4 from the inside corner of<br />
the room to the external corner of the room.<br />
Cut to length using square cuts. If satisfied<br />
with fit fix to wall using adhesive.<br />
2.3<br />
Measure length 3 from the inside faces of<br />
fitted lengths 2 & 4 and square cut to length.<br />
See Fig 7<br />
2.4<br />
Apply adhesive to the external corner<br />
mouldings and push fit onto each end of<br />
length 3. Apply adhesive to the back face<br />
of the <strong>skirting</strong> board and the remaining tabs<br />
of the corner mouldings and fix into position<br />
making sure that the tabs locate into their<br />
correct position within the previously fitted<br />
lengths 2 & 4. Wipe off any surplus adhesive.<br />
See Fig 8<br />
For more information about <strong>Roomline</strong> products, call<br />
Eurocell today on 0800 988 3047 or visit eurocellroomline.co.uk<br />
3. Inline joints<br />
3.1<br />
Cut the required lengths of <strong>skirting</strong> board to<br />
be jointed with accurate square cuts. Apply<br />
adhesive into the correct cavity of one cut<br />
length. See Fig 9<br />
3.2<br />
Push fit the in-line joint moulding so that half<br />
the moulding is inside the <strong>skirting</strong> and half<br />
protrudes. See Fig 10<br />
3.3<br />
Apply adhesive into the other length to be<br />
jointed and push fit onto the moulding until<br />
a tight fit is achieved. Wipe off any excess<br />
adhesive. Once jointed the length can be<br />
4. Maintenance<br />
<strong>Roomline</strong> products are designed for<br />
minimal maintenance. All they require is<br />
the occasional wipe over with household<br />
polish or a damp cloth. Stubborn marks can<br />
be removed using a non abrasive cream<br />
cleaner, such as SilverSil Cream Cleaner. The<br />
use of chemical based cleaners or abrasive<br />
materials is NOT recommended. See Fig 11