

DARTMOOR BLADE / RUSH / SIMPLE chainguide assembly manual
DARTMOOR BLADE / RUSH / SIMPLE chainguide assembly manual
DARTMOOR BLADE / RUSH / SIMPLE chainguide assembly manual

You also want an ePaper? Increase the reach of your titles
YUMPU automatically turns print PDFs into web optimized ePapers that Google loves.
Required tools:<br />
– 3mm, 4mm and 5mm Allen keys<br />
<strong>DARTMOOR</strong> <strong>BLADE</strong> / <strong>RUSH</strong> / <strong>SIMPLE</strong><br />
<strong>chainguide</strong> <strong>assembly</strong> <strong>manual</strong><br />
To correctly <strong>assembly</strong> the <strong>chainguide</strong>, first you have to properly set the chain line.<br />
Chainguide was designed to assist your drivetrain, but performance will be hindered<br />
if for example, the bottom bracket is too long or too short, the crankset spindle is<br />
bent, etc. All Dartmoor <strong>chainguide</strong>s use the ISCG (International Standard Chain Guide<br />
mount) bolt pattern. Depending on version it may be either the ISCG 03 (OLD) or ISCG<br />
05. All the modern gravity aimed frames are fitted with one of this standard mounts.<br />
In case your frame is not equipped with such a mount, each guide is designed to use<br />
a flanged fixed cup type bottom bracket when using the supplied ISCG adapter plate.<br />
All the <strong>chainguide</strong>s are built of aluminum spider and plastic sliders and pulleys (the Simple<br />
<strong>chainguide</strong> has only the pulley).<br />
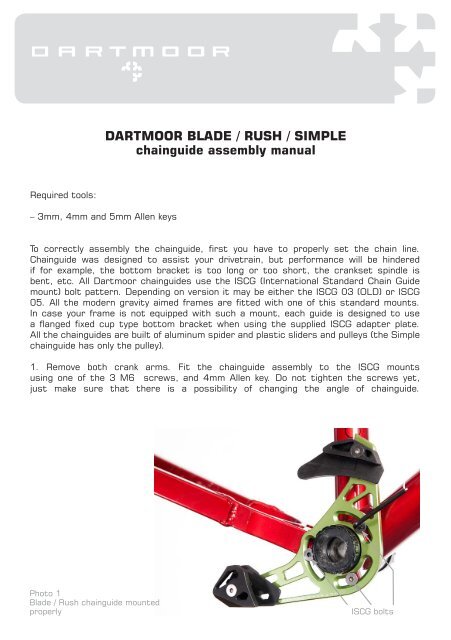
1. Remove both crank arms. Fit the <strong>chainguide</strong> <strong>assembly</strong> to the ISCG mounts<br />
using one of the 3 M6 screws, and 4mm Allen key. Do not tighten the screws yet,<br />
just make sure that there is a possibility of changing the angle of <strong>chainguide</strong>.<br />
Photo 1<br />
Blade / Rush <strong>chainguide</strong> mounted<br />
properly<br />
ISCG bolts
2. Re-install your crankarm / chainring <strong>assembly</strong> on to the bottom bracket spindle. In case<br />
of Blade / Rush <strong>chainguide</strong> loosen the upper cage mounting bolts, using 4mm Allen key, to<br />
allow the chainring to fit easily.<br />
3. Fit the chain onto chainring. In case of Rush <strong>chainguide</strong> you have to open the upper<br />
guide cage (photo 3). Use 3mm Allen key.<br />
Photo 2<br />
Simple <strong>chainguide</strong><br />
mounted properly<br />
Photo 4<br />
Blade<br />
Photo 3<br />
4. To make sure that your <strong>chainguide</strong> will work properly it is crucial to properly set its<br />
angle. The ISCG mount allows for a lot of angle adjustment. In case of <strong>chainguide</strong>s with<br />
upper guide cage (Blade/Rush) the angle of the <strong>chainguide</strong> should be set so the hole in the<br />
cage is parallel to the chain line (see photos 4, 5).<br />
Photo 5<br />
Rush
Simple <strong>chainguide</strong> can be set<br />
differently, depending on its<br />
purpose. In case of two chainrings<br />
in front it can be set precisely only<br />
to reduce the possibility of chain<br />
falling off the rockring (photo 6).<br />
Photo 6<br />
In case of singlespeed setting on the frame with vertical dropouts, the angle of <strong>chainguide</strong><br />
should be set to reduce chain slack to minimum (photo 7).<br />
Photo 7<br />
5. After setting the correct angle,<br />
you can screw the <strong>chainguide</strong> to the<br />
frame (photo 8).<br />
Photo 8
6. After setting the aluminum spider of the <strong>chainguide</strong>, you have to screw the bolts of<br />
the upper cage. Remember not to over-tighten those. Maximum torque is 6 Nm. Cage<br />
should be as close to the chainring as possible, but preferably without chain contact. This<br />
allows for friction free action.<br />
7. Now the <strong>chainguide</strong> is mounted properly. Unfortunately there are different cranksets<br />
and different bottom brackes so there can be a situation in which you will find the<br />
<strong>chainguide</strong> to be not perfectly mounted. To find out if everything is ok, check the chainline<br />
by looking at the <strong>chainguide</strong> upper cage (photo 9 and 10).<br />
8. In this case (photo 11) the chainring is too far from the frame, so to set the <strong>chainguide</strong><br />
properly you have to use provided spacers. The spacers should fit between the frame<br />
ISCG mount and the <strong>chainguide</strong> itself (photo 12).<br />
In this case (photo 13) the chainring is too close to the frame. The solution is adding extra<br />
spacer on the right side of bottom bracket or changing the bottom bracket to a longer<br />
one.<br />
too much<br />
space<br />
Photo 11<br />
correct<br />
chain line<br />
Photo 9 Photo 10<br />
too little<br />
space<br />
spacer<br />
Photo 12 Photo 13