From Bare Root....To Bloom! By: Jill Barnard, jabarnard@cox.net ...
From Bare Root....To Bloom! By: Jill Barnard, jabarnard@cox.net ...
From Bare Root....To Bloom! By: Jill Barnard, jabarnard@cox.net ...

Create successful ePaper yourself
Turn your PDF publications into a flip-book with our unique Google optimized e-Paper software.
<strong>From</strong> <strong>Bare</strong> <strong>Root</strong>....<strong>To</strong> <strong>Bloom</strong>!<br />
<strong>By</strong>: <strong>Jill</strong> <strong>Barnard</strong>, <strong>jabarnard@cox</strong>.<strong>net</strong>, Consulting Rosarian<br />
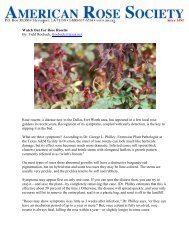
It seems that many people are uneasy about planting bare root roses. The good news is that roses<br />
want to grow badly enough to overcome most deficiencies in technique. If you plant them 'green<br />
side up' and water until the worms wiggle, you're almost guaranteed success. A little insight into<br />
sensible methodology, however, will ensure a more vigorous and healthy bush.<br />
There are various ways to buy bare root roses: through mail order sources, and either bagged or<br />
boxed from your nursery or garden center. When ordering by mail, request No. 1 grade plants.<br />
When buying locally you have the same choice - plants are marked No. 1, 1 1/2, or 2 and priced<br />
accordingly. Spend the extra bucks on the No. 1 and save on the anguish. <strong>From</strong> the #1 grades<br />
select one with a large bud union, three or more thumb-sized canes 12-15" long, and preferably<br />
with one or more new main canes starting to emerge from the bud union.<br />
When you have your bare root rose home, take the plant out of whatever packing material it<br />
might be in. I recommend removing the box from a boxed rose, as well. Submerge the entire<br />
plant in a bucket of water to which a few tablespoons of a transplant solution such as Vitamin B-<br />
1 have been added. It should soak at least 12 hours to rehydrate the root system after several days<br />
or even weeks of exposure to less than perfect moisture conditions. If you are delayed in<br />
planting, it can soak for 3-4 days, but change the water daily to discourage bacterial growth.<br />
Meanwhile, dig the almighty hole....<br />
THE ALMIGHTY HOLE - 2' x 2' WIDE x 2' DEEP The size of the hole seems like 'overkill',<br />
but it will pay off in spades in future performance. The hole in which you plant is the most<br />
important aspect of growing good roses from bare roots.<br />
Depth is for drainage. Other than anchor roots which aren't the main nutrient suppliers, most<br />
roses grow only about 12 inches deep. However, they require lots of water and won't tolerate wet<br />
feet from lack of drainage. If you are confident you have loose, draining soil to a depth of 2 feet<br />
then you may dig to only 18 inches. If you aren't confident, fill the hole with water. If it takes<br />
more than an hour to drain, dig deeper to 24" and add a 4-5" layer of gravel.<br />
Don't compromise on the width. You need to add organic amendments to lighten and enrich the<br />
entire growing area. A healthy bush, properly cared for, will develop feeder roots everywhere in<br />
a two foot radius and frequently beyond if the soil is light and friable.<br />
SOIL COMPOSITION All soil contains minerals and soil organisms which are necessary to<br />
break down organic amendments and fertilizers, making them available to the plant roots. What<br />
some soil is lacking is 'organic' material. You must supply the necessary amendments such as<br />
compost, mulch or peat to make the final mixture 1/2 garden soil and 1/2 organic material. Wellaged<br />
manure may be added as a portion of the organic materials. Rabbit and chicken manures are<br />
higher in nitrogen than cow and steer manures. Whichever you choose, 'well-aged' is the key.<br />
The heat generated by fresh manure in the decomposition process can burn tender roots.
When you have thoroughly mixed the amendments into the garden soil, refill the hole half way<br />
with the mixture. Then fill the hole with water and let it drain to settle the soil.<br />
ORGANICS AND AMENDMENTS Sprinkle 1/2 C. superphosphate or bone meal around the<br />
bottom of the hole and mix lightly with loose soil. Phosphorus moves very slowly in soil and<br />
should be available at the bottom of the hole. <strong>To</strong> the remaining soil mix, add another 1/2 C.<br />
superphosphate or bone meal, 1 C. cottonseed meal and 1/2 C blood meal. This mixture will fill<br />
the top 10-12" of the hole, the area where the feeder roots will develop.<br />
With the amended soil, make a cone-shaped mound tall enough to reach the top of the hole. The<br />
cone shape will support the natural downward and outward growth pattern of the roots allowing<br />
the plant to anchor itself well enough to support tall top growth.<br />
TRIM THE ROSE PLANT Now comes the painful part of planting bare roots - trimming the<br />
roots and cutting back the canes. Trimming the roots is easy, lets start there. Cut off any broken<br />
roots just above the break, as the damaged tissue is a perfect harbor for disease. Then trim 1/2<br />
inch off of each root end to stimulate new root development.<br />
Now a look at the plant will tell you why you need to reduce the cane length to about 6-8"<br />
maximum. If the plant is to prosper, the roots must be able to gather enough water and nutrients<br />
to support the top growth. If the canes are twice the size of the roots, the roots can't produce<br />
adequately, and the top growth will be spindly. Coming out of cold storage equates to coming<br />
out of dormancy, and each bud eye will vigorously try to produce foliage and blooms. Therefore,<br />
you want to reduce the number of bud eyes, and give the roots a chance to develop along with<br />
the top.<br />
Make your cuts 1/4" above a bud eye growing away from the center of the bush, at a 45-degree<br />
angle sloping away from the bud eye. If there any new shoots that have already started to grow<br />
along the portion of cane that remains, cut them off. They will be replaced. Each bud has 2 or 3<br />
'eyes' as a natural defense against damage or frost. (Amazing, these creatures - they just want to<br />
grow.)<br />
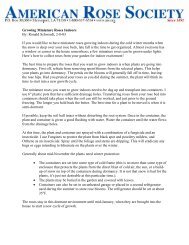
READY TO PLANT - FINALLY! As in most aspects of gardening, preparation of the planting<br />
site utilizes more than half of the effort expended, but it will produce twice the results.<br />
Place the newly-trimmed plant over the cone of soil, gently speading the roots out over it.<br />
Position it so that the bud union is at the proper height, by pushing the plant down slowly on the<br />
cone, taking care not to break the roots.<br />
Much discussion occurs among rose-growers as to the proper height to plant. Where winter<br />
temperatures are extreme (below 20 degrees F.) the bud union should be slightly below soil level<br />
to protect from freezing. In hot climates, protection from heat and sunburn dictates placing the<br />
bud union just at soil level. Moderate climates allow the bud union to be 1-2" above the soil<br />
surface.
Holding the plant in position, filter loose soil down around the roots. Begin filling in the rest of<br />
the hole, pressing the soil down firmly enough to avoid air pockets but not enough to compact<br />
the soil and damage the roots. When the hole is half filled, water with half of the soaking<br />
solution and let drain. Then fill the hole to soil level and form a water well around the plant of<br />
slightly larger diameter than the root system. Fill the water well with the remainder of the<br />
soaking solution.<br />
MOUND light soil or mulch over the new plant to at least half its height and water it well, but<br />
don't water it away. This step is essential in keeping the young tissue moist and protecting it<br />
from dry, cold winds. For the next month, water the plant every three days. The planting soil<br />
should be kept on the wet side of moist, and the mounding soil moist, not soggy. Remember,<br />
those tiny roots can't reach out for water yet - it must be supplied directly to them. Stifle the urge<br />
to fertilize with rose food until after the first bloom. If you are overly maternal, you may add<br />
Superthrive to the water or even fish emulsion mixed at 1/3 strength, since these are organic<br />
products that won't burn the new roots.<br />
When the top bud eyes have produced 2-inch shoots with leaflets its time to unmound. With a<br />
slow trickle of water or using ONE finger, not your big clumsy hand, carefully remove the<br />
mound from around the canes. Leave it slightly above the bud union for a while - weather and<br />
watering will do the rest. Some plants come out of dormancy slower than others, so have<br />
patience in watching for leaflets to appear. If the canes are still green and firm and not greyish<br />
and wrinkled, the plant is okay. Keep watering and wait. A little die-back is normal; if it<br />
progresses beyond an inch or so you may need to cut to the next bud eye, and water and wait<br />
some more.<br />
While you wait for foliage and blooms to color your garden, place a 2-3" layer of mulch over the<br />
entire bed, covering the bud union, too. This protective layer will keep the surface feeder roots<br />
cool and moist, conserve moisture in hot weather, and keep weeds from gaining a foothold.<br />
Garden aesthetics are greatly enhanced, as well.<br />
Your bare root should bloom in 10-12 weeks, given the TLC above. Some rose books<br />
recommend snapping off rose buds to direct the youthful plant's energy to more root and foliage<br />
development. WHEN TURKEYS FLY! I certainly haven't the fortitude nor do I practice the<br />
self-denial that would be a requisite to eliminating the one thing that caused me to buy the plant<br />
in the first place!<br />
<strong>By</strong> the time the new plant blooms, its roots should be developed enough for chemical rose foods.<br />
It will benefit more from liquids than granulars, because it is readily available to the roots.<br />
Feeding twice as often with 1/2 strength liquids will supply instant food on a steady basis.<br />
On a first-year bush, blooms should be removed by cutting SHORT stems, leaving as much<br />
foliage as possible. "Cut for the bush" is the rule of thumb - wait 'til next year to cut long stems.<br />
The plant needs every leaf it has to manufacture food. And water, water, water. Roses like at<br />
least 2" per week - more in hot weather. Think of water as fertilizer . . . Without it, the plant can<br />
absorb nothing from the soil.
The fertilizer you apply can't break down into a soluble form, and even the invisible soil<br />
organisms will be subdued in their all-important tasks.<br />
. . . And since you took the time to prepare the 'Almighty Hole', you needn't worry about wet<br />
feet!