rs200 owner's manual - Rs Sailing
rs200 owner's manual - Rs Sailing
rs200 owner's manual - Rs Sailing

Create successful ePaper yourself
Turn your PDF publications into a flip-book with our unique Google optimized e-Paper software.
RS200<br />
OWNER’S MANUAL<br />
LDC Racing Sailboats, Trafalgar Close, Chandlers Ford, Eastleigh<br />
SO53 4BW, GBR<br />
Tel. +44 (0)23 8027 4500 Fax. +44 (0)23 8027 4800<br />
www.ldcracingsailboats.co.uk
Introduction<br />
Congratulations on the purchase of your new RS200.<br />
The RS200 was designed by Phil Morrison and launched in the UK at the<br />
beginning of 1996.<br />
Designer Phil Morrison<br />
Length 4.00m 13'0"<br />
Beam 1.83m 6'0"<br />
Sail Area (main & jib) 11.52sq.m. 124sq.ft.<br />
Sail Area (asymmetric) 8.29sq.m. 89sq.ft.<br />
Weight 78Kg 172lbs<br />
Important Note<br />
The RS200 is an exciting boat to sail and offers fantastic performance. It is a<br />
light weight racing dinghy and should be treated with care. In order to get<br />
the most enjoyment from your boat and maintain it in top condition,<br />
please read this <strong>manual</strong> carefully.<br />
Whilst your RS boat has been carefully prepared, it is important that new<br />
owners should check that shackles, knots, mast step bolts etc. are tight. This<br />
is especially important when the boat is new, as travelling can loosen<br />
seemingly tight fittings and knots. It is also important to regularly check such<br />
items prior to sailing. Make sure that you have a basic tool kit with you the first<br />
time you rig the boat in case there are tuning / settings changes that you wish<br />
to make.<br />
Index<br />
1. Rigging and <strong>Sailing</strong> by Phil Morrison page 2<br />
2. Care and Maintenance by Richard Woof page 20<br />
3. Sail Care Guide by Hyde Sails page 23<br />
4. Racing and Tuning page 24<br />
5. RS Class Association page 27<br />
6. Class Rules page 28<br />
7. Class Association membership form page 35<br />
For further information, spares, accessories, and service, please contact:<br />
LDC Racing Sailboats<br />
Trafalgar Close<br />
Chandlers Ford<br />
Eastleigh<br />
Hants SO53 4BW<br />
Tel: 02380 274500 Fax: 02380 274800<br />
E-mail: <strong>Rs</strong>@ldcracingsailboats.co.uk<br />
www.ldcracingsailboats.co.uk<br />
2
Rigging and <strong>Sailing</strong><br />
By Phil Morrison (designer)<br />
Your RS 200 will have been examined and checked both at the factory and by<br />
your dealer. The following is a step by step guide to rigging the boat for the<br />
first time and some general advice on sailing your new RS 200.<br />
Preliminary checks<br />
As delivered the mast may be wrapped for transport please remove the<br />
wrapping carefully and perform some preliminary checks as follows:-<br />
(1) Check that the shroud ‘T’ terminals are correctly seated in their sockets<br />
on the mast and that they are securely attached to the end of the spreaders.<br />
(2) Ensure that the spreaders are angled slightly above horizontal with no<br />
slack in the shroud above the spreader. It is a good idea to secure the<br />
spreader ends with PVC (electrical insulating) tape to prevent them moving up<br />
or down the shroud<br />
(3) Wrap tape around any sharp edges on the spreaders or brackets to<br />
protect the spinnaker.<br />
(4) Attach a short length of shock cord between the shrouds approximately<br />
300mm down from the top and passing around the jib halyard and forestay<br />
this will help prevent the spinnaker being trapped in the angle formed between<br />
the jib halyard and the mast under certain situations.<br />
(5) Check the spreader settings, spreaders should have been pre-set at<br />
the factory or by your dealer but the recommended initial settings are as<br />
follows:-<br />
Length of spreader measured from the wall of the mast to the shroud 390mm<br />
Distance from a line between the shrouds and the back of the mast 140mm<br />
(6) The main and jib halyards should be sorted out and dressed neatly<br />
down the mast<br />
(7) Check that the spinnaker halyard passes through the Tweeker ring<br />
which is tied to a line which emerges from the front of the mast just above the<br />
forestay<br />
(8) Dress the spinnaker halyard down the mast in the manner described<br />
below<br />
Warning:-<br />
The spreader settings recommended are safe general purpose<br />
settings. Most people should not find it necessary to deviate substantialy from<br />
these positions. We have deliberately left the spreaders adjustable in the<br />
RS200 to enhance its potential as a racing boat and broaden the range of<br />
competitive sailors. Extreme settings, especially a reduction in the distance<br />
from the shrouds to the back of the mast, may lead to mast failure in strong<br />
winds.<br />
3
Stepping the mast<br />
Before stepping the mast<br />
(1) Check the surroundings for electrical power lines! On no account<br />
attempt to step the mast near electrical power lines or if there are any lines<br />
between you and the sailing water!<br />
(2) Check, all sheaves and pulleys rotate freely<br />
(3) Check the shrouds, forestay and halyards for damage or chafe, the<br />
spreaders for alignment and that the spinnaker halyard and Tweeker line<br />
move easily.<br />
(4) Fit any racing flag or wind direction indicator to the mast head.<br />
It will help if the boat and launching trolley are off the road trailer base when<br />
stepping and unstepping the mast as this keeps the boat as low as possible.<br />
Stepping the mast<br />
(1) Check the shrouds and forestay are free and ready to attach and that<br />
the mast step in the boat is clear of ropes and obstructions, the kicking strap<br />
rig tension and cunningham controls should all be aft of the step<br />
(2) Rotate the mast to the upright position whilst standing beside the boat<br />
adjacent to the mast step.<br />
(3) Try to ensure that the tenon at the base of the mast remains free of<br />
sand, grit or stones.<br />
(4) Lift the mast into position. If you are uncertain or there are strong winds<br />
it will be helpful if one crew member stands in the boat just behind the mast<br />
step. Be careful to keep forward of the launching trolley wheels when in the<br />
boat.<br />
(5) Ensure that the tenon is fully located, both in the step and between the<br />
two bolts. It should be a snug fit, any rotational play reduces the<br />
efficiency of the spreaders to control mast bend.<br />
(6) One crew member remains holding the mast.<br />
(7) The other crew member can then attach the shrouds.<br />
For a first setting locate the shrouds 5 holes down on the longer range of<br />
adjusters.<br />
(8) Secure the forestay to the large eye bolt at the bow using at least 3<br />
turns of the lanyard and finally finishing off with 3 or 4 half hitches.<br />
(9) Do not over tension the forestay, a light tension sufficient to prevent the<br />
mast moving around excessively is sufficient.<br />
It is desirable that the forestay has some considerable slack in it once the jib<br />
is hoisted and tensioned. The windward performance of you RS 200 may be<br />
adversely affected if the forestay becomes tight whilst sailing!<br />
(10) Once the mast is stepped and secured tape all the rigging pins on the<br />
shrouds for extra security.<br />
(11) The clip on the Tweeker line, which exits from starboard side of the<br />
mast just above the gooseneck, should now be connected to a similar metal<br />
clip to be found near the inboard end of the spinnaker Sprit.<br />
The RS 200 mast is fairly light, most people will have little difficulty simply<br />
lifting the mast into place in the mast step as described. If you are short<br />
4
handed, however, it is possible to step the mast with the shrouds already<br />
attached.<br />
Warning:-<br />
The forestay on the RS 200 is intended solely to support the mast<br />
when ashore without sails hoisted. Do not attempt to sail the boat without a<br />
fully hoisted and tensioned jib. Should the jib fall down or lose tension for any<br />
reason return to shore as quickly as possible sheeting the mainsail only<br />
lightly.<br />
Normally, before lowering the mast:-<br />
(1) Un-reave the spinnaker halyard tail right back to the exit slot in the<br />
mast.<br />
(2) Make a large bowline in the fall of the halyard.<br />
(3) Pass the whole of the tail of the halyard through the loop of the<br />
bowline.<br />
(4) Keep hold of the bitter end of the halyard tail<br />
(5) Pull on the halyard where it exits from the mast slot, hoisting the<br />
bowline up the mast taking a loop of the tail with it.<br />
(6) When the halyard has got to the end of its travel the end can now be<br />
secured at the exit slot with a couple of half hitches.<br />
(7) Any remainder can be wrapped around the mast or used to secure the<br />
shrouds etc.<br />
This method of securing the spinnaker halyard when de-rigging has the<br />
advantages of keeping everything tidy when lowering or stepping the mast.<br />
More importantly it does not require a lot of winding or coiling which helps to<br />
keep the halyard twist and kink free when sailing.<br />
The Sprit is fully rigged and set at the factory but you should see the sections<br />
below, on operating and rigging the Sprit for details of operation.<br />
Reaving the spinnaker halyard<br />
If you have dressed the spinnaker halyard on the mast as recommended<br />
above:-<br />
(1) Untie the hitches and pull the halyard down.<br />
(2) Keep the bowline on the end of the halyard and hook it over a handle<br />
of the launching trolley. This is a precaution to ensure the halyard is not<br />
inadvertently pulled up the mast, or worse still, pulled through the top sheave.<br />
(3) Feed the tail of the halyard directly from the exit slot forward through<br />
the outer (unsprung) pulley at the aft end of the sprit tube.<br />
(4) Pass it around the single block attached to the pole launch line,<br />
situated toward the front of the tube.<br />
(5) Pass it back through the fairlead and cleat at the inboard end of the<br />
sprit tube.<br />
(6) Lead the halyard tail, which is now the downhaul line, via the block<br />
fitted close to the port forward end of the centreboard slot and directly back to<br />
the turning block at the aft end of the spinnaker sock.<br />
5
(7) When you attach the spinnaker (see:- Rigging the spinnaker), this line<br />
must be fed through the spinnaker sock to the chute mouth and tied to the<br />
downhaul patch on the spinnaker. A sail batten or stiff wire will help with this<br />
on the first occasion.<br />
(8) Remember to pull the end of the spinnaker sheet or some other rope<br />
back through the sock when you subsequently de-rig in order to facilitate this<br />
action in future.<br />
Hoisting the Jib<br />
When using a brand new jib for the first time carefully unroll it in a clean area<br />
and hold it out by the three corners:-<br />
(1) Ensure that the eye in the luff wire at the head is correctly aligned with<br />
the attaching tape.<br />
(2) Now whilst applying firm tension to the luff wire make a small lashing at<br />
the tack between the eyelet in the sail and the eye in the luff wire ensuring<br />
these are correctly aligned. (You cannot do this with the jib rolled as this twists<br />
the wire relative to the sail.)<br />
(3) Leave the lashing quite slack at this stage you can adjust the tension<br />
once the sail is hoisted and the luff wire correctly tensioned.<br />
(4) Attach the jib sheets, knotting the sheet rope at its centre through the<br />
clew cringle.<br />
(5) At the boat, shackle the tack to the same eye bolt as the forestay<br />
ensuring the eye in the luff wire and the sail lashing are correctly aligned fore<br />
and aft without any twists.<br />
(6) Shackle the jib halyard to the head of the jib, ensuring the jib or halyard<br />
are not twisted.<br />
(7) Tape these two areas generously to prevent snagging the spinnaker.<br />
(8) Hoist the sail by pulling on the jib halyard tail, which exits from a slot<br />
just beneath the gooseneck<br />
(9) Hook the loop of wire which emerges onto the jib halyard tensioning<br />
purchase. It may help to obtain sufficient slack at this point if one crew<br />
member pulls firmly forward on the forestay.<br />
(10) Ensure that the tensioning purchase is not twisted or fouling other<br />
systems (it should be the one closest to the mast).<br />
(11) Pull on some rig tension, a generous heave should be sufficient.<br />
(12) Stow the halyard tail in the halyard bag provided.<br />
(13) Check that the forestay now has plenty of slack in it and that the jib is<br />
not twisting at the head. If it is, it may be necessary to lower the sail and turn<br />
the wire (undoing the temporary lashing) at the tack until the sail lies fairly well<br />
fore and aft.<br />
(14) Adjust the lashing at the tack so that the tension is just sufficient to<br />
remove the wrinkles in the sail cloth (it may be necessary to redo these<br />
adjustments after one or two sails as the jib and luff wire settle down).<br />
(15) Finally pass the jib sheets through the jib fairleads andfinish off with a<br />
figure of eight knot in the usual manner.<br />
(16) If conditions permit cleat the jib to save it flapping and remember never<br />
leave any sails especially the jib and spinnaker flapping unnecessarily as this<br />
considerably shortens the life of the sail.<br />
6
Rigging the spinnaker<br />
If conditions allow, it is simplest to rig the spinnaker with it partly hoisted and<br />
whilst the jib is up.<br />
(1) Identify the three corners of the sail, the tack is close to the sailmakers<br />
mark and should be attached to the tack line which is permanently fixed to the<br />
end of the Sprit, tie this on with a bowline.<br />
(2) Next attach the halyard to the head of the spinnaker (the corner with<br />
the narrowest angle), first checking that it is clear of the jib halyard and<br />
forestay.<br />
(3) Partially hoist the spinnaker and with the slack thus gained in the<br />
halyard/downhaul pull it out of the chute mouth and attach it to the downhaul<br />
patch on the spinnaker. Remember this line should go directly from the chute<br />
mouth to the spinnaker if the spinnaker is lying on the port side or around in<br />
front of the jib luff if the spinnaker is to starboard, it should not pass inside the<br />
jib luff in order to reach the spinnaker.<br />
(4) The spinnaker sheets should be fed under the kicking strap and boom<br />
but over the jib sheets and spinnaker halyard, passing directly across the boat<br />
between the ratchet blocks attached at each shroud anchorage. Take care to<br />
ensure that they are threaded the correct way through these ratchet blocks<br />
(the arrows indicate the direction of sheeting in, i.e. they should point into the<br />
boat). You can check this by holding the sheet on either side of the block and<br />
applying some load to engage the ratchet whilst moving the sheet back and<br />
forth.<br />
(5) Take the ends of the spinnaker sheets and bring them together at the<br />
jib luff ensuring that they pass outside everything to do with the jib and<br />
forestay and inside everything to do with the spinnaker.<br />
(6) Take both sheets to the spinnaker clew (the corner with the greatest<br />
angle.....the only one left!) ensuring one sheet passes around the jib luff and<br />
tie them securely making sure they are inside the downhaul. Keep these<br />
knots neat and tape the ends to avoid snagging the downhaul and jib luff<br />
when dropping the spinnaker. A tip is to tie one slightly large bowline to the<br />
clew spinnaker. A tip is to tie one slightly large bowline to the clew cringle and<br />
tie the second sheet to the loop of that bowline to prevent a large bunch right<br />
at the clew.<br />
(7) Finally if conditions permit try the sail on either gybe to ensure<br />
everything is rigged correctly and lower the sail pulling gently on the downhaul<br />
and carefully feeding the sail into the chute making sure it does not snag on<br />
the launching trolley handles etc.<br />
(8) Tape everything which may snag a wayward spinnaker.<br />
(9) Whether it was possible to check that the spinnaker was rigged<br />
properly whilst ashore or not; it is good racing practice to make a habit of<br />
hoisting the spinnaker and trying a gybe or two prior to the start of the race<br />
anyway.<br />
Hoisting the mainsail<br />
(1) With a brand new sail carefully unroll the sail in the boat or on a clean<br />
smooth surface and ensure the battens are fully inserted into their protectors<br />
7
at the luff and securely tied into the sail. It is preferable, initially at least, to tie<br />
the battens in too tightly rather than too loosely. This helps to prevent the<br />
formation of wrinkles emanating from the battens in use. Other than this the<br />
sail is ready to hoist.<br />
(2) Ensure that the boat is as near as possible head to wind. This is<br />
especially important with fully battened sails as point loads at the end of the<br />
batten tend to accelerate the wear on the luff tape if care is not taken when<br />
hoisting and lowering the sail. The use of candle wax or silicon spray in the<br />
luff groove from time to time is highly recommended, this will certainly ease<br />
hoisting and prolong the life of your sail.<br />
(3) Do not attach the boom.<br />
(4) Tie a permanent overhand knot in the end of the halyard for security.<br />
(5) After checking that the halyard is clear attach it to the head of the<br />
mainsail by tying another overhand knot through the eye in the headboard. A<br />
bowline is not recommended as it wastes distance at the mast head, it is also<br />
a weak knot especially when tied in Kevlar.<br />
(6) The exit for the main halyard is positioned on the port side of the mast,<br />
when hoisting try to avoid letting the halyard run through the Clamcleat. Hoist<br />
the sail taking care to feed the sail carefully into the metal feeder on the luff<br />
grove. You will notice that this becomes a little harder just after each batten as<br />
the tension in the sail cloth tries to force the bend into the batten. You will help<br />
this situation by holding the luff rope just below the feeder and pulling it<br />
forward of the sail track, this will force bend into the batten and take the load<br />
off the sail where it enters the feeder.<br />
(7) Do not force the sail into the feeder, if it catches ease the sail down a<br />
little and then start again using the technique described above.<br />
(8) When fully hoisted slip the halyard into the Clamcleat and stow the<br />
halyard tail in the stowage bag beneath.<br />
(9) Secure the tack around the mast using the webbing and buckle<br />
provided.<br />
(10) Ensure that the cunningham eye purchase is untwisted and connect<br />
this by passing the knotted end of the single line through the higher cringle in<br />
the sail and locating the knot into the short length of sail track available above<br />
the jib exit slot immediately under the gooseneck.<br />
(11) Pull fairly hard on the cunningham control and release, now pull hard<br />
on the main halyard once again and re-cleat, this helps remove stretch in the<br />
halyard.<br />
Rigging the boom and mainsheet<br />
(1) Check and adjust if necessary the position of the sliding eye<br />
attachments for the central mainsheet block and kicking strap, ensuring that<br />
the latter is very firmly screwed home. These may be adjusted to suit your<br />
personal preferences however the following positions are recommended as a<br />
guide:- mainsheet at 1030 mm and kicker at 380mm, measured from the<br />
inboard end of the boom to the centre of the eye.<br />
(2) After sailing your RS 200 in a variety of conditions, and you are<br />
satisfied these positions are correct, a small hole drilled in the underside of<br />
the boom track where the slider screw locates will ensure these fittings do not<br />
slip under load.<br />
8
(3) Attach the kicking strap purchase to the eye on the boom ensuring it<br />
runs freely and is clear of twists.<br />
(4) Reave the mainsheet. Tie a figure of eight knot in one end of the<br />
mainsheet then pass the other end through the fairlead on top of the<br />
swivelling mainsheet cleat, through the ratchet block in the opposite direction<br />
to the indicating arrow and up to the central block on the boom. From here<br />
feed the mainsheet through he slot in the underside of the boom until it<br />
emerges at the outboard end, thence through the block at the end of the<br />
boom. Finally pass it through the loop in the centre of the aft bridle and tie a<br />
simple overhand knot to prevent it pulling back through.<br />
(5) You may wish to tie a further fig.8 knot in the helmsman’s end of the<br />
mainsheet, positioned so that the boom will not hit the shroud with the<br />
mainsheet released. this saves wear and tear on the boom and mainsail and<br />
could prevent a broken boom or mast in the event of a capsize in strong<br />
winds.<br />
(6) If not already supplied by your dealer you are recommended to fit a<br />
gybing rope as follows:- tie one end of a piece of rope approx. 900mm long to<br />
the centre boom eye and make a bowline in the other so that the loop<br />
encircles but does not restrict the fall of the mainsheet. This rope enables the<br />
helmsman to pull the boom over positively in a gybe rather than pulling on the<br />
mainsheet.<br />
(7) Normally the mainsheet and kicking strap may be left permanently<br />
attached to the boom for ease of use.<br />
Fitting the rudder<br />
(1) Fit the tiller extension to the end of the tiller, the flexible joint on the<br />
extension locates in the fitting provided on the tiller and is locked in place by<br />
rotating the cover plate.<br />
(2) The tiller extension, as supplied, is certainly long enough for most<br />
tastes. If you find the extension on the long side it is perfectly acceptable to<br />
trim it to length by cutting off the outboard end.<br />
(3) Ensure the extension is properly located then wrap tape around the<br />
cover plate and tiller as a precaution against accidental release.<br />
(4) Ensure the down haul line is released and fully raise the rudder blade<br />
in the stock.<br />
(5) Adjust the wing nut pressure so that the friction will safely hold the<br />
blade up.<br />
(6) Pass the tiller and extension under the mainsheet bridle and slide the<br />
rudder assembly onto the transom fittings.<br />
(7) Check that the rudder retaining clip engages correctly over the lower<br />
gudgeon.<br />
(8) Immediately prior to launching ensure the tiller extension is clear of the<br />
mainsheet<br />
9
Attaching the boom<br />
As the boom can be readily attached whilst the mainsail is hoisted, you will<br />
find most owners do not attach the boom until they are just ready to launch<br />
and soon release the clew on coming ashore. You will find this makes the sail<br />
a lot more manageable and removes the potential danger from an<br />
uncontrolled boom.<br />
When ready to launch you should attach the boom to the mast and sail as<br />
follows:-<br />
(1) Release the outhaul line near the inboard end of the boom so there is<br />
about 500mm of line available at the outboard end.<br />
(2) Slip the inboard end of the boom onto the gooseneck.<br />
(3) From the aft end of the boat maintaining slight forward pressure so that<br />
the boom does not fall off the gooseneck, lift the outboard end of the boom to<br />
the clew of the mainsail.<br />
(4) Engage the clew slider into the slot on the top of the boom and pull aft.<br />
(5) Thread the outhaul line through the clew cringle and locate the knotted<br />
end in the ‘V’ notch at the end of the boom.<br />
(6) Tension the outhaul to the desired setting. A setting allowing about<br />
50mm draught in the foot of the sail will make a good starting point.<br />
Adjusting the centreplate friction<br />
The friction pad which holds the centreboard in position is pre-set at the<br />
factory after a few sails it may be necessary to adjust this setting:-<br />
(1) Whilst the boat is on the launching trolley and trailer base raise the bow<br />
of the boat as far as it will go.<br />
(2) Armed with a good “Posidrive” screwdriver and a short piece of wood<br />
or plastic approx. 25 x 5 mm in section get under the boat near the forward<br />
end of the centreboard slot gasket.<br />
(3) Insert the piece of wood through the slot in the gasket and rotate it to<br />
spread the gasket.<br />
(4) The two screws locating and compressing the centreplate friction pad<br />
should be readily visible<br />
(5) Adjust the friction pad as desired screwing in to increase centreplate<br />
friction.<br />
10
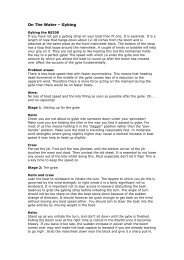
<strong>Sailing</strong> the RS 200<br />
Your initial perception of the RS 200 will depend to a large extent on your<br />
previous dinghy experience. If you are used to small light weight dinghies then<br />
the 200 will hold few surprises. However, if you are relatively inexperienced<br />
and used to the more intrinsically stable kinds of dinghies found in sailing<br />
schools you may find her lively feel a little disconcerting at first. This is<br />
primarily a function of her lower weight and narrower waterline relative to her<br />
overall beam. If you feel this to be the case, simply avoid sailing in strong<br />
winds for the first few sails. You will rapidly become acclimatised to these<br />
characteristics and should quickly begin to appreciate the advantages of<br />
sailing a light responsive racing dinghy. You will notice that although the boat<br />
feels lively and responsive she still remains controllable at all times, provided<br />
you provide the correct input of course! You may find it helpful to remember<br />
that helm and crew will need to move about more than in larger heavier boats.<br />
Similarly, that correct steering plays as much a role in keeping the boat<br />
upright as playing the sheets, especially off wind with the spinnaker up. It is<br />
just these characteristics that make the RS 200 the ideal boat to hone those<br />
sailing skills and provide the long term excitement and satisfaction of<br />
competing in a challenging racing dinghy.<br />
Prior to leaving the shore make a quick check of the cockpit to ensure that all<br />
ropes, sheets, tiller and extension are clear and free running. If it is light wind<br />
or you are likely to spend some time at low speed insert the bung in the self<br />
bailer hole at the back end of the centreplate case.<br />
Remember to lower a little centreplate as soon as possible and fully lower the<br />
rudder by pulling on the downhaul line as soon as you have enough depth of<br />
water. Avoid applying a large load to the tiller when the rudder blade is not<br />
fully down as this can put considerable loads on the stock and fittings. Try to<br />
sail the boat away from the beach using the sails and heel of the boat to guide<br />
her. Once safely in deep water and clear of other boats tighten the wing nut<br />
on the rudder stock if necessary, this helps to eliminate extraneous movement<br />
and maintain a positive feel especially in strong winds. Don’t forget to slacken<br />
the wing nut before coming ashore!<br />
You will find that with the rudder blade fully down the helm should be both<br />
light and responsive. If at any time the helm becomes heavy, suspect that the<br />
rudder has lifted and check that it is fully down. Should you prefer a little more<br />
feel to the helm in particular in light weather, then you can of course<br />
deliberately let the rudder come back a small amount. The movement<br />
required is very small indeed and probably best achieved by attaching small<br />
packing pieces to the inside of the rudder stock just below the lower fitting,<br />
where the rudder blade touches when fully down.<br />
Sheet in and enjoy your sail. Give yourself and the crew time to get used to<br />
the feel of the boat initially, allow plenty of time for manoeuvres. Check the<br />
main sheet and jib sheet cleats are the right height for ease of operation, the<br />
toe straps are adjusted for best sitting out position, you are comfortable with<br />
the tiller extension length. Try a few gentle tacks, you will probably be<br />
11
surprised how fast she can tack and you may need a little time to get used to<br />
pushing the tiller extension in front of you, Laser style, as you start the tack.<br />
Don’t try to take it round the back, it won’t go! Try some gybes, in any wind<br />
you will find the gybeing line described above most useful for pulling the boom<br />
over and that just the right amount of rudder correction is required coming out<br />
of the gybe.<br />
Setting the fore and aft sails<br />
The following are helpful generalisations to guide the relatively inexperienced.<br />
Further advise and information is available in subsequent sections to help you<br />
get the best racing performance from your RS200.<br />
The jib<br />
Once hoisted and a firm but not ridiculous tension is applied to the rig the only<br />
adjustment necessary is to position the jib fairleads. By and large if the rake<br />
has been set up as suggested in ‘stepping the mast’ then a middle position<br />
should not be far out. The jib has a fairly narrow sheeting angle and<br />
consequently the crew should be careful not to over sheet the jib.<br />
In most conditions the jib should be set as closely as possible yet allowing the<br />
leach to take a slight curve in sympathy with the shape of the mainsail. There<br />
is no hard and fast rule, only practice and experience will find the correct<br />
setting for all conditions. Observation of the telltales will go a long way to<br />
helping find the correct setting. When the jib is correctly set these should all<br />
respond pretty well in unison, if you have difficulty in achieving this then try<br />
moving the fairleads a little fore and aft as follows:-<br />
If the top leeward telltale tends to collapse before the others then ease the<br />
sheet a little (by little read 1cm or so), if this causes the foot of the jib to get<br />
significantly fuller then move the fairleads aft. If the top windward tell tale<br />
tends to lift well before the others then sheet a little harder or if this has little or<br />
no effect then move the fairleads forward. In very light and in strong winds the<br />
fairleads should be moved a hole or so aft of the optimum to encourage the<br />
leach to open. The RS 200 is fundamentally a pointing boat; so even in<br />
moderate winds the top windward telltale should lift a fraction before the<br />
others and the boat generally sailed to windward such that all windward tell<br />
tales are lifting a little.<br />
The mainsail<br />
To windward in all but the most extreme conditions the mainsail should be<br />
sheeted close to the centreline. To this end the length of the mainsheet bridle<br />
should be adjusted in order to optimise this across the wind range. Adjust the<br />
clew outhaul so that it just takes the slack out of the foot of the sail. Only ease<br />
it when off the wind or when looking for that extra bit of power in say moderate<br />
winds and a choppy sea, and then only a little. You may pull it tight once<br />
overpowered especially on flat water.<br />
In most conditions sheet the mainsail solely with the mainsheet, the kicking<br />
strap should remain slack and only come into play when the mainsheet is<br />
12
eased or in strong winds. Up until the wind strength when you are effectively<br />
overpowered all of the time use no cunningham tension at all, basically sail on<br />
the mainsheet constantly adjusting the tension to keep the upper part of the<br />
mainsail correctly sheeted. Use the upper leach telltale to help you determine<br />
this. Beware of under sheeting the mainsail, from experience many people,<br />
even experienced hands, who are new to fully battened mainsails tend to<br />
under sheet the sail with a consequent loss in pointing ability. The<br />
combination of large upper roach and modified aerodynamics mean that<br />
considerably more tension and less twist is required for the optimum<br />
performance. Obviously it is still possible to overdo it, but be prepared for the<br />
best performance to be when the upper leach telltale spends more of its time<br />
collapsed than flying.<br />
As you start to become overpowered, especially in gusty conditions, parry the<br />
gust by luffing slightly and easing the mainsheet for a moment. If the gusts are<br />
particularly viscous or prolonged you may set the kicker so that it is very<br />
lightly tensioned when the sail is sheeted fully in and comes under load as the<br />
main is eased. This further helps to bend the mast and improves the<br />
responsiveness to the gusts.<br />
As the wind increases further to the point where you are almost continuously<br />
having to ease power start to pull some tension on the cunningham control,<br />
bearing in mind that you should always aim to be slightly overpowered rather<br />
than under powered. “Rig for the lulls and not for the gusts”.<br />
You will find that the cunningham is much more effective in de-powering the<br />
fully battened sail than it is in a conventional soft sail. Use just sufficient<br />
kicking strap tension to maintain the pointing required. Ultimately you may end<br />
up with full cunningham and considerable kicking strap tension, by now it will<br />
be very windy indeed! Don’t forget to ease some kicker before you bear away<br />
or you will put unfair loads on the lower mast. If things deteriorate to survival<br />
conditions you will probably find extra super cunningham tension and virtually<br />
no kicking strap tension to be the easiest set up to control.<br />
Off wind<br />
Ease the cunningham away completely. Adjust the kicking strap to the best<br />
setting. Due to the unsupported deck stepped mast, this will have to be a<br />
compromise between reducing twist and over bending the lower mast.<br />
If overpowered on a tight reach with the spinnaker set remember to ease the<br />
kicker to allow the upper sail to twist open and spill wind. If trying to survive or<br />
just lay the mark on such a leg don’t forget the cunningham can be used to<br />
further flatten and de-power the main.<br />
Use of the outhaul will normally be restricted to maximising power on two sail<br />
reaches.<br />
Setting the spinnaker and operating the Sprit<br />
To hoist the spinnaker in reaching mode - ensure the check line knot is clear<br />
of the “V” notch alongside the halyard cleat and pull on the spinnaker halyard<br />
until the sprit is fully extended and the halyard is hoisted to hounds height (the<br />
tweeker line should be<br />
13
taught). Ensure the downhaul line is free to follow the spinnaker out of the<br />
chute ( you are not standing on it). Unless something becomes fouled the sprit<br />
should have precedence over the halyard as it has a 2:1 purchase advantage.<br />
Sheet in using the appropriate sheet. Check again that the halyard/downhaul<br />
is not caught and distorting the spinnaker<br />
Now treat the spinnaker virtually like a large jib.<br />
As with a jib or a conventional spinnaker for that matter pay attention never to<br />
over sheet the sail. The spinnaker sheets should be played constantly in an<br />
attempt to keep the luff of the sail just on the edge of collapse. With practice<br />
at the onset of a gust especially on a tight reach the luff of the sail can be<br />
partially rolled to help keep the boat on a level keel and travelling at her<br />
maximum speed.<br />
It is a characteristic of the asymmetric spinnaker that it will develop<br />
considerable lee helm at times particularly if the main has to be eased to any<br />
extent. For this reason it should never be necessary to raise the centreboard<br />
when reaching and is perfectly acceptable to sail the boat with a slight heel to<br />
leeward to obtain a neutral helm. The hull shape has been designed with this<br />
consideration in mind.<br />
Gybing<br />
Gybing an asymmetric spinnaker is simplicity itself but as with most<br />
manoeuvres there are a few simple tricks which can help with the efficiency of<br />
the process.<br />
They are not going to like hearing this but the helmsman holds the key to a<br />
perfect gybe! The speed with which you enter the gybe and the amount by<br />
which you allow the boat to round up after the boom has crossed over affect<br />
the success of the gybe fundamentally. Don’t bear away too quickly. Try to<br />
bear away smoothly allowing the crew sufficient time to adjust the sheets and<br />
maintaining speed. In preparing for the gybe the crew should have released<br />
the old jib sheet and set the new one loosely on the windward side then taken<br />
as much slack out of the new spinnaker sheet as possible. The crew should<br />
resist the urge to let go of or ease the old sheet too far. In fact it will help if the<br />
crew gives the old sheet a final tug in at the last moment before the boom<br />
goes over and subsequently sheets in smartly on the new sheet. Coming out<br />
of the gybe if the conditions allow the helmsman should permit the boat to<br />
round up sufficiently to fill the spinnaker as quickly as possible before bearing<br />
away smoothly to the new course. Timing is the essence and practice makes<br />
perfect.<br />
To hoist in running mode - locate the check line knot in the “V” notch and<br />
pull on the spinnaker halyard until the spinnaker has reached the top ( in this<br />
case the sheave box above the hounds). Pull on the windward sheet and set<br />
as if goose winging a jib. Setting the spinnaker goose winged on the run is not<br />
easy, it requires accurate course control and co-ordination but can have<br />
marked performance advantages particularly in restricted and tidal waters. It<br />
certainly adds another fascinating dimension to down wind tactics. The finer<br />
points of goose-winged running are still to be discovered.<br />
14
To change from reaching to running mode - ease the sheet to unload the<br />
spinnaker, then release a good armful (1 metre - 3ft.) of halyard and retract<br />
the sprit by pulling on the check line. Locate the knot on the “V” notch and<br />
finally take up any slack in the halyard. With practise it may be possible to<br />
release the correct amount of halyard initially so that final adjustment is not<br />
necessary however too much is better than too little at first.<br />
To change from running to reaching mode - probably best accomplished<br />
before hardening up onto the reaching course - as before ease the sheet to<br />
unload the spinnaker, then release a good armful of halyard (this allows the<br />
Tweeker line take up to pull the halyard down to the hounds) release the<br />
Check line from the “V” notch and pull on the spinnaker halyard again until the<br />
sprit is extended and sail hoisted to the hounds.<br />
Lowering the spinnaker in either mode - release the halyard and allow to<br />
run free then haul quickly and firmly until the spinnaker is fully recovered into<br />
the chute and the pole retracted. It helps avoid bunching and the downhaul<br />
becoming entangled in the sheet knots if the sheet is not released too early in<br />
this process; give it to the helmsman or try standing or sitting on it until the<br />
spinnaker is entered into the chute mouth.<br />
Rigging the Sprit<br />
Internal lines should be rigged as shown on the attached diagram.<br />
To set the correct lengths proceed as follows:-<br />
(1) Tack line - fixed length sufficient to tie to spinnaker<br />
(2) Launch line - should emerge through the slot in the outertube, pass<br />
anti-clockwise around the adjacent cheek block and tie off to a single<br />
block. The length should be such that this block is fully forward when<br />
the pole is retracted (check there is sufficient movement to fully extend<br />
the pole).<br />
(3) Tweeker line - comes out of the inboard end of the pole and passes<br />
around the inner (sprung) block and is connected by the clips to the<br />
end of the Tweeker line which emerges from the mast just above the<br />
gooseneck. To ensure the correct lengths the pole should be fully<br />
extended and locked out. The Tweeker line coming from the pole<br />
should then be pulled as far as it will go and the clip tied off close to the<br />
sprung block. The Tweeker line and clip from the mast should now be<br />
tied off tightly so that the spinnaker halyard is held firmly into the mast<br />
at the hounds. Check that with the pole retracted the spinnaker halyard<br />
can go fully up the mast (the clips have sufficient travel between the<br />
sprung block and the mast exit slot) and that with the pole extended<br />
there is no significant slack in the Tweeker line.<br />
(4) Tweeker line take up elastic - this should be tensioned so that the<br />
Tweeker line still has as much tension as possible when the sprit is<br />
retracted yet the elastic is never over-stretched when the Tweeker line<br />
15
is tensioned. Check this by pulling on the Tweeker line and ensuring<br />
the internal plastic ring can travel right to the inboard end of the sprit.<br />
(5) Check line - simply exits from the inboard end of the sprit and outer<br />
tube, although it is also used to attach the end of the take up elastic it<br />
is not meant to move so ensure it is knotted both ways. a further knot<br />
should be placed in the Check line so that it can be engaged in the “V”<br />
notch in the base plate to prevent the sprit from going out. The line<br />
should be left long enough that the end does not disappear into the<br />
sprit outer tube when the sprit is extended.<br />
16
Care and Maintenance<br />
By Richard Woof – the builder<br />
There are four key areas of care:<br />
1. Keep your dinghy well drained and ventilated<br />
2. Wash with fresh water (internally and externally) on a regular basis<br />
3. Have damage repaired promptly.<br />
4. Tie your dinghy correctly to the trailer for towing<br />
1. Keep your dinghy well drained and ventilated<br />
All composite structures, no matter what they are made from absorb moisture<br />
which increases weight and under additional circumstances causes cosmetic<br />
blistering and raised fibre pattern. Obviously in dealing with a marine<br />
environment, equipment gets wet which in itself is not a problem. The<br />
problem starts when moisture is trapped for any length of time - e.g. a dinghy<br />
is left with a PVC cover on for several weeks, the cover fills with water and<br />
pulls the cover tight over the foredeck and sidedecks, the moisture trapped<br />
between the cover and the deck alters in salinity and creates the start of an<br />
osmotic cell.<br />
To help avoid this situation<br />
a) Ensure the boat is kept at an angle that allows water to run off the cover<br />
and internal water to drain out of tanks and self bailer.<br />
b) If using a PVC cover, make sure it is removed and the boat well ventilated<br />
at least once a week. Better still, get a breathable cover - polycotton, acrylic<br />
or cotton duck.<br />
c) When using an undercover, make sure the cover has an opening by the<br />
self bailer to prevent water draining from the cockpit and filling the<br />
undercover. Do not leave the undercover on for long periods.<br />
d) Trailer cradles should be covered with a free draining material, in order to<br />
prevent an osmotic cell. All recent RS trailers are supplied with a ribbed<br />
rubber cradle liner. If your trailer cradles do not have this, a rubber kit is<br />
available through your RS dealer.<br />
2. Wash with fresh water<br />
Fresh water evaporates far quicker than salt water, so if your dinghy has been<br />
sailed in salt water, don't stop at the sails, fittings and external surfaces, wash<br />
the tanks out as well. This is not as daft as it sounds - all RS tanks are vented<br />
and sooner or later water will enter, particularly after prolonged capsizes.<br />
When this happens, drain the tanks and lightly spray a fresh water hose pipe<br />
into the tank to lift off the salt water and then the tank will have a much better<br />
chance of drying out.<br />
17
3. Damage<br />
Hull damage falls into three categories:<br />
a) SERIOUS e.g. large hole, split, crack or worse. Don't be too distressed!<br />
Get the remains back to your RS dealer, most problems can be repaired by<br />
the builder.<br />
b) MEDIUM e.g. small hole or split, gel crazing. If this occurs during an event,<br />
sailing can often be continued, as long as leaking can be prevented by drying<br />
off the area and applying a strong adhesive tape. Sail repair tape, duck tape<br />
or "denso" tape works well with the ends of the tape cut to a radius to prevent<br />
the corners peeling back. CAUTION - if the damage has occurred on or close<br />
to a heavily loaded point, then a close inspection should be made to ensure<br />
joints or laminate are fit for the prevailing conditions. If in doubt, ask an RS<br />
dealer. With this type of damage, get it fixed as soon as possible at your local<br />
RS dealer.<br />
c) SMALL e.g. chip, scratching. This type of damage is obviously not life<br />
threatening but needs to be attended to, firstly to keep the boat looking good<br />
and secondly to prevent water ingress into the laminate.<br />
This type of damage can be rectified by you the owner, if you wish. Buy the<br />
correct colour gel coat repair kit from your RS dealer and either wait for a dry<br />
warm day outside or preferably put your boat in a dry warm place under<br />
cover. Start by carefully drying the area to be repaired.<br />
N E A T N E S S A N D C A R E<br />
I S T H E S E C R E T O F A<br />
G O O D R E P A I R !<br />
If the damage is a single scratch or score mark, make sure it is clean by<br />
gently re-scratching with the tip of a sharp craft knife. If the damage is more<br />
general, etch up with a medium grade abrasive - say 80 grit (no wet or dry<br />
paper because it will leave a grey discoloration). Blow off the dust, don't wipe;<br />
this may leave fluff or contamination which will spoil the quality of the repair.<br />
If your hand is not steady, mask around the prepared area with masking tape<br />
(always remove the tape while the gel coat is liquid)<br />
The gel coat you get from the dealer has a wax additive in it so, when it cures,<br />
a tack free surface is produced. This tack free surface makes final shaping<br />
and finishing of the repair easier but also means that if you have to recoat the<br />
repair, the surface should be abraded or solvent wiped to remove the paraffin<br />
wax which helps create the tack free surface.<br />
Stir the tin of gel coat, then decant a small quantity into a suitable container<br />
and add 2% catalyst. As a guide use 2 drops of catalyst (match head size) per<br />
full tin lid measure from an RS gel coat tin. Mix thoroughly and carefully apply<br />
to the repair area with a suitable instrument e.g. artist's brush, cocktail stick,<br />
match stick etc.<br />
18
The speed of cure depends on temperature - on a warm day, the repair will be<br />
workable in 1-2 hours, if cooler, it may have to be left overnight. The shaping<br />
and finishing is done firstly with a file or fine abrasive 180 - 240 grit and then<br />
rubbing down with wet or dry abrasive 400 grade, then 600 grade, then 800<br />
and finally 1200 grade. Finally polish with a proprietary polishing compound.<br />
4.Tying down your dinghy correctly<br />
Tying your RS dinghy correctly to the trailer is obviously important, but<br />
damage can be caused by tying down too tightly or too loosely. The boats are<br />
well located on their trailers and it is therefore only necessary to apply<br />
sufficient tension to hold the boat in contact with the cradles or keel and<br />
gunwale support. Tying the boat too loosely will allow it to move around on its<br />
supports, running the risk of scuffing the hull, but too tightly and there is a risk<br />
of structural damage. Do use ratchet straps unless they are used very gently.<br />
19
Sail Care Guide<br />
By Hyde Sails<br />
Good racing sails today are expensive items, yet it is surprising how many<br />
people are prepared to neglect or mistreat them. The rules for correct sail<br />
care are easy and simple to implement.<br />
1. The jib and mainsail should be stored dry, out of direct sunlight when not in<br />
use (Ultra-Violet light damages sailcloth), and rolled:<br />
* Ensure there are no folds in the cloth as you roll the sail.<br />
* If you do have a fold or crease, unroll the sail and let the crease drop out.<br />
DO NOT PULL IT OUT!! This action can tear sailcloth.<br />
2. Asymmetric spinnakers should be stored dry and loose if possible, do not<br />
leave them in the chute with the corners hanging out! Do not dry spinnakers<br />
by allowing them to flap in the wind.<br />
3. When using brand new sails for the first time, try to ensure that the<br />
conditions are not too extreme because the high loads on new sailcloth can<br />
diminish the racing life of the sail. This particularly applies to the Hard Dacron<br />
jib which may get a lot of those 'Little white score marks'. Do not allow sails to<br />
flap unnecessarily. Where possible, take sails down between races and as<br />
soon as possible after sailing.<br />
4. If your sail is stained in any way, try to remove it using normal detergent<br />
and warm water. Do not attempt to launder the sail yourself.<br />
6. Repairs should be temporarily fixed using sticky number cloth or sail repair<br />
tape and then returned to a sailmaker for a professional repair.<br />
7. Check the batten tension regularly, slack battens can work their way out of<br />
the luff retaining caps and damage the sailcloth. The battens should be<br />
tensioned enough in the pockets so that when the boat is sailing there are no<br />
wrinkles in the batten pockets. Watch out for wear and tear, especially<br />
around the batten pockets and bolt rope.<br />
8. Make sure that all shackles, pins and sharp objects that the spinnaker<br />
might travel over are well taped (preferably using PVC tape). Untaped<br />
shackles or frayed wires are the most common cause of major tears in<br />
spinnakers.<br />
20
Racing and Race Tuning<br />
Setting up the RS200 - Rig checklist<br />
Light Winds<br />
Rig Tension Eased slightly.<br />
Cunningham Slack.<br />
Outhaul Tight, foot of sail just touching the boom.<br />
Kicker Slack when sheeted in, but with just enough tension to allow you to<br />
flick the battens when tacking.<br />
Light - Medium Winds<br />
Rig Tension Full tension, very tight.<br />
Cunningham Slack.<br />
Outhaul Eased in choppy water, foot of sail about one<br />
hand width from the boom. Tight in flat water.<br />
Kicker In choppy water, just enough tension to stop the<br />
boom skying when sheet is eased. Slightly more tension in flat water.<br />
Medium - Strong Winds<br />
Rig Tension Full tension, very tight.<br />
Cunningham Pull on lots when overpowered, but ease it off in the lulls.<br />
Outhaul Tight but not bar tight if it is choppy.<br />
Kicker Moderately tight so as to bend the mast a bit and control the amount of<br />
twist. More tension in flat water than in a chop.<br />
Strong Winds<br />
Rig Tension Full tension, very tight. Possibly rake mast back by tightening the<br />
shrouds.<br />
Cunningham Very tight except in the lulls.<br />
Outhaul Very tight.<br />
Kicker Very tight, but not so tight that the mainsail is<br />
prevented from twisting and opening at the head.<br />
Your RS200 has been set up at the factory to the following rig dimensions which<br />
were taken from the winning boat at the 1996 National Championships:<br />
Forestay Rig Tension - measured using ISP tension guage 25<br />
Shroud rig tension - measured using ISP tension guage<br />
Below 6 knots of wind (sub-hiking) 150-200lbs<br />
7 knots of wind and above 350lbs<br />
Mast Rake - measured to top corner of gudgeon mount 21'9" (6625mm). For<br />
winds above force 5 drop the shrouds by one hole on the shroud plates 21'7"<br />
(6575mm)<br />
Spreader length - measured from the centreline of the shroud to the mast on the<br />
centreline of the spreader 375mm<br />
Spreader deflection - measured as the shortest distance between the back face of<br />
the mast and a stright line between the shrouds. 125mm<br />
21
Racing the RS200<br />
Upwind<br />
Under 6knots: In this sub hiking wind it pays to control the mainsail leech using th<br />
mainsheet only. In this breeze, the jib generally has to be played, often with the sheet<br />
slightly eased to maintain speed through the water.<br />
The outhaul should be falling off the boom, creating approximately a 2" gap between<br />
the boom and the foot of the sail at it's mid point.<br />
It is important to get the crew weight as far forward as possible, with the crew being<br />
located in the vicinity of the jib cleats and the helm in front of the main sheet.<br />
6-15 knots: Once hiking, increase the rig tension as out-lined above, the jib can then<br />
be sheeted fairly hard to generate pointing. Try and maintain mainsail leech tension<br />
with the mainsheet for as long as possible, but as soon as the boom has to be eased,<br />
the leech tension will have to be held by the vang. Once vang is required, it pays to<br />
"pull it on hard!". This is due to there only being an 8:1 vang allowed by the class<br />
rules and the significant tension required to close in the large roached mainsail.<br />
The outhaul should remain eased untl overpowered, when it should be pulled on until<br />
the foot of the sail touches the boom.<br />
Once the mainsheet is permanently eased (over 12 knots), the cunninghamshould be<br />
used to remove the horizontal creases that would have appeared on the luff edge of<br />
the mainsail.<br />
Over 15 knots: The rig should now be raked back, with large amounts of vang,<br />
cunningham and outhaul tension. The boat can now be "feathered" easily, constantly<br />
playing hthe mainsheet over the leeward aft quarter of the boat.<br />
When you are overpowered, it does not pay to reduce rig tension in an attempt to<br />
increase rake and depower.<br />
Downwind Sail Settings<br />
Under 6 knots: Unlike most assymetric boats, it seems the helm must sit to leeward<br />
and the crew to windward, both as far forward as possible. The outhaul can be<br />
eased 6" away from the boom and when trying to run deep, the centreboard can be<br />
raised halfway.<br />
6-15 knots: The helm should stay to leeward until the boat is almost planing / surfing<br />
when the crew should move onto the thwart and the helm onto the windward side to<br />
increase control. The outhaul and the cunningham should remain eased. The RS200<br />
is particularly responsive to being steered and pumped through waves to induce the<br />
surf / plane. The centreboard should be lowered to increase stability.<br />
When reaching, always try to maintain vang tension to keep the boat in balance.<br />
Over 15 knots: The helm must be to windward with the centreboard fully down. It<br />
can pay to have the crew on the windward side as well, even if trying to run deep.<br />
Gybing in these conditions often requires a gybing strop on the boom.<br />
When reaching it pays to sit well aft in the boat. If overpowered, ease the spinnaker<br />
sheet allowing the kite to permanently curl (this takes alot of concentration by the<br />
crew) and pull on the outhaul and the cunningham, only easing the vang as a very<br />
last resort as this makes the boat unstable.<br />
22
RS CLASS ASSOCIATION<br />
www.rs-association.com<br />
The RS Class Association is highly active and you really should join.<br />
The RS Racing Circuits are the envy of the dinghy world, with great competition and<br />
a fantastic and friendly social life. The RS Association also organises Training<br />
Events throughout the year. Social highlights such as the RS Ball are not to be<br />
missed!<br />
The Class Association produces regular, informative Newsletters, and a Yearbook.<br />
There is also an extremely comprehensive RS Association web site, part of which is<br />
only accessible to RS members.<br />
In addition, the Association maintains the Class Rules, which are the “fabric” of any<br />
one design class. Without these the Class would disintegrate and values would<br />
tumble.<br />
The Association relies on the support of the owners of the boats to financially survive.<br />
Membership costs only £33.00 per year (£15 for Youth membership) and without it,<br />
you won’t even know what you are missing!<br />
You should have received a membership application form with your new boat, but if<br />
not, please contact the RS Class Membership Secretary Jill Line on 01275 872466,<br />
jill@the-j-team.fsnet.co.uk, or see under ‘Documents’ on the website.<br />
Members receive a voucher towards the cost of boat insurance with Noble Marine<br />
Insurance.<br />
Any other queries about the Association should be directed to the RS Association<br />
Administrator, Heather Chipperfield, on 01590 610273, heatherc@rsassociation.com.<br />
Insurance<br />
The class Association has organised an insurance scheme with M A Noble Insurance<br />
Brokers. They are highly efficient to deal with and always fair when it comes to<br />
making a claim.<br />
Contact Noble Insurance on:<br />
Tel. 01636 707606<br />
Fax. 01636 707632<br />
23
LDC Racing Sailboats<br />
Trafalgar Close, Chandlers’ Ford<br />
Eastleigh, Hants SO53 4BW<br />
England<br />
HIN<br />
EC DECLARATION OF CONFORMITY TO<br />
DIRECTIVE 94/25/CE<br />
G B L D C 2 1<br />
I declare that the craft described as:<br />
RS200<br />
Bearing the Hull Identification Number:<br />
Conforms to EU Recreational Craft directive 94/25/EC<br />
Annex 1 – sections 3.2 & 3.3 and Annex 6 – Module Aa<br />
EU Notified body: No. 0808 (Irish <strong>Sailing</strong> Assoc.)<br />
Trade Marque: RS Racing<br />
Type: RS200<br />
Design Category: C<br />
Maximum Crew: 3<br />
Maximum load: 225kg<br />
Iso Standards: ISO 12217<br />
24
Overall Length 4.00m<br />
Builder Name: LDC Racing Sailboats, England<br />
Date: ____________________________<br />
Signed: Name: ______________________<br />
Signature: ___________________<br />
25