Telephone ringer amplifier with flasher and door bell ... - Phone Master
Telephone ringer amplifier with flasher and door bell ... - Phone Master
Telephone ringer amplifier with flasher and door bell ... - Phone Master

You also want an ePaper? Increase the reach of your titles
YUMPU automatically turns print PDFs into web optimized ePapers that Google loves.
CL2L<br />
<strong>Telephone</strong> <strong>ringer</strong> <strong>amplifier</strong> <strong>with</strong> <strong>flasher</strong> <strong>and</strong><br />
<strong>door</strong> <strong>bell</strong><br />
Indicateur d’appel téléphonique avec flash<br />
et sonnette<br />
Telefonklingelverstärker mit<br />
Blitz und Türklingel<br />
English Page 2<br />
Français Page 15<br />
Deutsch Page 28
CAUTION: The switch for Ringer ALARM<br />
selection must never be set during ringing/<br />
flashing mode but always when CL2 is silent<br />
mode ( No incoming call ringing).<br />
ATTENTION: Le commutateur de configuration<br />
du mode Alarme ne doit jamais être changé<br />
lorsque le CL2 envoie sa sonnerie ( ou flash<br />
lumineux ) mais uniquement durant le mode<br />
repos.<br />
WARNUNG: Bitte die Taste für die Auswahl<br />
des Klingeltons niemals während des Läutens<br />
bzw. Blitz-Signals betätigen, sondern nur im<br />
Ruhe-Modus ( kein eingehender Anruf ).<br />
1
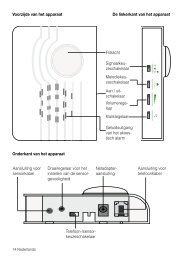
1. DESCRIPTION<br />
DESCRIPTION<br />
The CL2 will alert you to both <strong>door</strong><strong>bell</strong> <strong>and</strong> telephone. It<br />
has adjustable volume <strong>and</strong> different tone settings for<br />
<strong>door</strong><strong>bell</strong> <strong>and</strong> telephone.<br />
Door<strong>bell</strong> Tone<br />
control<br />
Strobe <strong>flasher</strong><br />
BELL PUSH<br />
4 <strong>ringer</strong><br />
settings<br />
Paring/Test<br />
Door <strong>bell</strong><br />
LED<br />
Wall mounting<br />
holes<br />
Bell push<br />
button<br />
<strong>Telephone</strong> line<br />
cord socket (*)<br />
Shaker socket (*)<br />
Modular jack for<br />
Mains power lead socket (*)<br />
telephone line cord (*)<br />
(*) Classified TNV-3 according to EN60950 st<strong>and</strong>ard.<br />
2<br />
Volume<br />
control<br />
FRONT VIEW<br />
<strong>Phone</strong> <strong>ringer</strong><br />
<strong>amplifier</strong> tone<br />
control<br />
Loud sound<br />
alarm<br />
REAR VIEW
INSTALLATION<br />
2. INSTALLATION<br />
230V AC/DC<br />
d t<br />
Double plug<br />
Wall socket<br />
<strong>Telephone</strong><br />
Option :<br />
Special cable to link<br />
two CL2s<br />
3<br />
Screw wall mount<br />
Door Bell<br />
Button<br />
Door Bell<br />
Option : Shaker<br />
(ref.: SHAKCL_BLK only)<br />
1 - Connect the CL2 line cord in CL2 “Line IN”.<br />
2 - Connect your <strong>Telephone</strong> in the double plug of the line<br />
cord.<br />
3 - Connect the double plug in the <strong>Telephone</strong> wall socket.<br />
4 - If necessary connect the required shaker<br />
(SHAKCL_BLK only) to the shaker plug input.<br />
5 - Connect the mains adaptor line cord in CL2 12V DC<br />
input.<br />
6 - Connect the mains adaptor in the 230V wall socket.<br />
(*)
INSTALLATION<br />
(*) Classified "hazardous voltage" according to EN60950<br />
st<strong>and</strong>ard.<br />
Electrical connection: The apparatus is designed to<br />
operate from a 230V 50Hz supply only. (Classified as<br />
'hazardous voltage" according to EN60950 st<strong>and</strong>ard).<br />
The apparatus does not incorporate an integral power<br />
on/off switch. To disconnect the power, either switch off<br />
supply at the mains power socket or unplug the AC<br />
adaptor. When installing the apparatus, ensure that the<br />
mains power socket is readily accessible.<br />
<strong>Telephone</strong> connection: Voltages present on the<br />
telecommunication network are classified TNV-3<br />
(Telecommunication Network Voltage) according to the<br />
EN60950 st<strong>and</strong>ard.<br />
4
BELL PUSH WALL MOUNTING<br />
3.1. BELL PUSH – WALL MOUNTING<br />
The wire free <strong>bell</strong> push is mounted by the front <strong>door</strong>. It<br />
has a range of 20-60 metres depending on the structure<br />
of the building (see note).<br />
Test the system before mounting<br />
on the wall – plug in the CL2 <strong>and</strong><br />
press the <strong>bell</strong> push button to<br />
check that the CL2 rings.<br />
To mount the <strong>bell</strong> push, open<br />
the access cover in the middle of<br />
the <strong>bell</strong> push <strong>with</strong> a needle or<br />
small screwdriver.<br />
Decide where to position the <strong>bell</strong><br />
push <strong>and</strong> use the wall mount<br />
template, shown below, to mark<br />
the holes on the wall or <strong>door</strong><br />
surround <strong>and</strong> drill holes if<br />
necessary.<br />
Align <strong>with</strong> prepared marks or screwholes, insert <strong>and</strong><br />
tighten screws <strong>and</strong> replace access cover.<br />
Bell push is now ready for use.<br />
Note: Do not place the <strong>bell</strong> push onto a metallic base or<br />
near electric equipment (such as TV, Radio, computer,<br />
washing machine...). The CL2 will work <strong>with</strong>in a range of<br />
60m in an environment where there are no obstacles<br />
<strong>and</strong> 20m in an environment which contains a wall or<br />
metallic structure.<br />
5
WALL MOUNTING BELL PUSH<br />
WALL MOUNTING TEMPLATES<br />
To wall mount the <strong>bell</strong> push or the CL2, use these<br />
templates to mark the screw hole centres. We<br />
recommend the use of a spirit level to ensure the holes<br />
are level.<br />
6<br />
Bell push template<br />
CL2 template
BELL PUSH CHANGE THE BATTERY<br />
3.2. CHANGE THE BATTERY<br />
The <strong>door</strong> <strong>bell</strong> is supplied <strong>with</strong> a 23A 12V battery. The<br />
CL2 is supplied ready to use, it is not necessary to open<br />
the <strong>bell</strong> push when you first install the CL2.<br />
To replace the battery, open the access cover <strong>and</strong><br />
unscrew the <strong>door</strong> <strong>bell</strong> from the wall, unscrew the three<br />
screws located on the base <strong>and</strong> open the box to get<br />
access to the battery compartment. Replace the battery,<br />
replace back <strong>and</strong> remount.<br />
Back of Bell Push Inside Bell Push<br />
Unscrew to<br />
open<br />
Battery<br />
Switches for<br />
LED colour<br />
Note: Do not use a rechargeable battery. Do not put the<br />
used battery into the household rubbish, pay attention to<br />
battery regulations regarding battery disposal.<br />
7
CL2 SETTINGS<br />
4.1. CL2 SETTINGS<br />
ALARM MODE SETTING<br />
For incoming calls – choose<br />
which alarm mode you want by<br />
moving the alarm mode switch<br />
to one of the following positions:<br />
No alarm selected<br />
Door<strong>bell</strong>/<strong>ringer</strong><br />
<strong>amplifier</strong> <strong>and</strong> strobe<br />
<strong>flasher</strong><br />
Door<strong>bell</strong>, strobe<br />
<strong>flasher</strong> <strong>and</strong> shaker<br />
(if connected)<br />
Door<strong>bell</strong>/<strong>ringer</strong> <strong>amplifier</strong> <strong>and</strong> shaker<br />
(if connected)<br />
VOLUME CONTROL<br />
For <strong>door</strong><strong>bell</strong> <strong>and</strong> <strong>ringer</strong> <strong>amplifier</strong>:<br />
Use the slider control to adjust<br />
the volume of the sound alarm<br />
of the CL2.<br />
8<br />
Flasher:<br />
Bell push – 3-4 flashes<br />
<strong>Telephone</strong> – flashes as<br />
long as phone rings
SETTINGS CL2<br />
RING TONE CONTROL<br />
The three position switch allows<br />
you to set the tone of the CL2<br />
<strong>ringer</strong> when the telephone rings.<br />
DOOR BELL TONE CONTROL<br />
This three position switch allows<br />
you to set a different tone when<br />
the <strong>door</strong> <strong>bell</strong> rings.<br />
OPTIONAL ACCESSORIES:<br />
Extra <strong>bell</strong> push – to cover a second <strong>door</strong>, such as a<br />
kitchen <strong>door</strong>.<br />
Shaker – the Geemarc shaker unit (CLA2) can be<br />
tucked under your pillow or at the side of your chair to<br />
vibrate when the <strong>door</strong><strong>bell</strong> or telephone rings. Particularly<br />
useful for hearing aid wearers, when they are not<br />
wearing their hearing aids at night.<br />
Wrist watch alarm – can be worn by someone in the<br />
house who is bedbound <strong>and</strong> may need to call for help.<br />
To purchase these items, contact your dealer. In case of<br />
difficulty, visit the Geemarc website on:<br />
www.geemarc.com<br />
9
PAIRING SETTINGS<br />
4.2. The Pairing Procedure<br />
( Note : Factory default setting : paired. )<br />
1. Press <strong>and</strong> hold the (Pairing/Test) button for 2<br />
seconds to enter pairing mode, at the same time, the<br />
unit makes a beep sound.<br />
2. The 1st LED lights, to pair the BELL PUSH, press <strong>and</strong><br />
hold the (Pairing/Test) button <strong>and</strong> then Bell<br />
push button at the same time, the 1st LED flashes,<br />
after paired, the 1st LED lights <strong>and</strong> stop flashing,<br />
beeps to confirm.<br />
3. If user wants to pair the 2nd or 3rd BELL PUSH, when<br />
the 1st LED lights, press the (Pairing/Test)<br />
button <strong>with</strong>in 2 seconds, the 1st LED goes off <strong>and</strong><br />
then the 2nd LED lights. User is able to pair the 2nd<br />
BELL PUSH, repeat the same procedure for the 3rd.<br />
4. Repeat the above, all 3 LEDS flashing together for the<br />
4th BELL PUSH pairing, the BELL TONE is not<br />
adjustable for the 4th BELL PUSH.<br />
5. If paired more BELL PUSH on same LED, only the<br />
last one kept.<br />
10
SETTINGS PAIRING<br />
4.3. Un- Register The Pairing<br />
1. Press <strong>and</strong> hold the Pairing/Test button for 5 seconds<br />
to enter un-register mode, 3 LED light together.<br />
2. If user wants to un-register the 1st BELL PUSH,<br />
press the Pairing/Test button <strong>with</strong>in 2 seconds, the 1st<br />
LED will be flashing (the other 2 LED light), means<br />
user is now un-registering the 1st BELL PUSH, press<br />
the Pairing/Test button until the 1st LED goes off,<br />
beeps to confirm. The 1st remote is now un-registered.<br />
3. If user wants to keep the 1st BELL PUSH but unregister<br />
the 2nd or 3rd BELL PUSH, when the 1st LED<br />
flashes, press the Pairing/Test button <strong>with</strong>in 2 seconds,<br />
the 2nd LED flashes (other 2 LED light), to select<br />
which BELL PUSH to be un-registered.<br />
Note :<br />
1. To check whether the unit works normally, you can<br />
press the (pairing/Test) button, the unit would<br />
sound alarm <strong>and</strong> flash.<br />
2. Don’t unregister a BELLPUSH unless it is really<br />
necessary.<br />
11
5. TROUBLESHOOTING<br />
TROUBLESHOOTING<br />
If the CL2 system doesn't work correctly, please carry<br />
out the following checks before calling the helpline:<br />
● If the phone rings but the CL2 does not ring:<br />
Check the connection between the phone socket <strong>and</strong> the<br />
CL2.<br />
● If the <strong>door</strong> <strong>bell</strong> does not ring:<br />
1. Check that the CL2 is plugged into the mains <strong>and</strong><br />
switched on.<br />
2. Unscrew the <strong>bell</strong> push <strong>and</strong> check the battery is<br />
correctly fitted.<br />
3. Try fitting a new battery.<br />
4. Check that the Bell push paired <strong>with</strong> CL2, please refer<br />
to page 10/Setting for how to pair the Bellpush <strong>with</strong><br />
CL2.<br />
12
GUARANTEE<br />
6. GUARANTEE<br />
From the moment your Geemarc product is purchased,<br />
Geemarc guarantee it for the period of one year. During this<br />
time, all repairs or replacements (at our discretion) are free of<br />
charge. Should you experience a problem then contact our<br />
helpline or visit our website at www.geemarc.com.<br />
The guarantee does not cover accidents, negligence or<br />
breakages to any parts.<br />
The product must not be tampered <strong>with</strong> or taken apart by<br />
anyone who is not an authorised Geemarc representative.<br />
The Geemarc guarantee in no way limits your legal rights.<br />
IMPORTANT: YOUR RECEIPT IS PART OF YOUR<br />
GUARANTEE AND MUST BE RETAINED AND<br />
PRODUCED IN THE EVENT OF AWARRANTY CLAIM.<br />
The guarantee applies to the<br />
United Kingdom only.<br />
Declaration: Geemarc Telecom SA hereby declares that<br />
this product is in compliance <strong>with</strong> the essential<br />
requirements <strong>and</strong> other relevant provisions of the Radio<br />
<strong>and</strong> Telecommunications Terminal Equipment Directive<br />
1999/5/ EEC <strong>and</strong> in particular article 3 section 1a, 1b<br />
<strong>and</strong> section 2.<br />
The declaration of conformity may be consulted at<br />
www.geemarc.com<br />
13
RECYCLING DIRECTIVES<br />
7. RECYCLING DIRECTIVES<br />
Recycling directives: The WEEE (Waste Electrical <strong>and</strong><br />
Electronic Equipment) Directive has been put in place so<br />
that products at the end of life are recycled in the best<br />
way.<br />
When this product is out of order, please do not put it in<br />
your domestic waste bin. Please use one of the following<br />
disposal options:<br />
– Remove the batteries <strong>and</strong> deposit them in an<br />
appropriate WEEE skip. Deposit the product in an<br />
appropriate WEEE skip.<br />
– Or h<strong>and</strong> the old product to the retailer. If you purchase<br />
a new one, they should accept it.<br />
Thus if you respect these instructions you ensure human<br />
health <strong>and</strong>environmental protection.<br />
For product support <strong>and</strong> help visit our website at<br />
www.geemarc.com<br />
<strong>Telephone</strong>: +44 (0)1707 384438<br />
or Fax +44 (0)1707 832529<br />
14