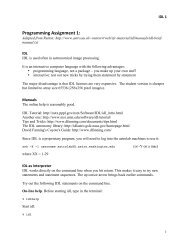
IRAF Exercise II - Quick-look Photometry with Imexamine
IRAF Exercise II - Quick-look Photometry with Imexamine
IRAF Exercise II - Quick-look Photometry with Imexamine

Create successful ePaper yourself
Turn your PDF publications into a flip-book with our unique Google optimized e-Paper software.
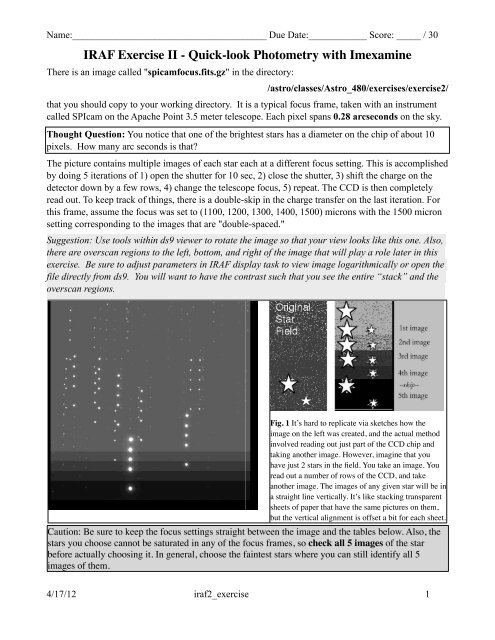
Name:________________________________________ Due Date:____________ Score: _____ / 30<br />
<strong>IRAF</strong> <strong>Exercise</strong> <strong>II</strong> - <strong>Quick</strong>-<strong>look</strong> <strong>Photometry</strong> <strong>with</strong> <strong>Imexamine</strong><br />
There is an image called "spicamfocus.fits.gz" in the directory:<br />
/astro/classes/Astro_480/exercises/exercise2/<br />
that you should copy to your working directory. It is a typical focus frame, taken <strong>with</strong> an instrument<br />
called SPIcam on the Apache Point 3.5 meter telescope. Each pixel spans 0.28 arcseconds on the sky.<br />
Thought Question: You notice that one of the brightest stars has a diameter on the chip of about 10<br />
pixels. How many arc seconds is that?<br />
The picture contains multiple images of each star each at a different focus setting. This is accomplished<br />
by doing 5 iterations of 1) open the shutter for 10 sec, 2) close the shutter, 3) shift the charge on the<br />
detector down by a few rows, 4) change the telescope focus, 5) repeat. The CCD is then completely<br />
read out. To keep track of things, there is a double-skip in the charge transfer on the last iteration. For<br />
this frame, assume the focus was set to (1100, 1200, 1300, 1400, 1500) microns <strong>with</strong> the 1500 micron<br />
setting corresponding to the images that are "double-spaced."<br />
Suggestion: Use tools <strong>with</strong>in ds9 viewer to rotate the image so that your view <strong>look</strong>s like this one. Also,<br />
there are overscan regions to the left, bottom, and right of the image that will play a role later in this<br />
exercise. Be sure to adjust parameters in <strong>IRAF</strong> display task to view image logarithmically or open the<br />
file directly from ds9. You will want to have the contrast such that you see the entire “stack” and the<br />
overscan regions.<br />
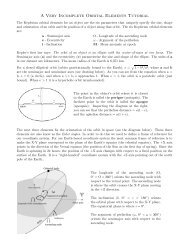
Fig. 1 It’s hard to replicate via sketches how the<br />
image on the left was created, and the actual method<br />
involved reading out just part of the CCD chip and<br />
taking another image. However, imagine that you<br />
have just 2 stars in the field. You take an image. You<br />
read out a number of rows of the CCD, and take<br />
another image. The images of any given star will be in<br />
a straight line vertically. It’s like stacking transparent<br />
sheets of paper that have the same pictures on them,<br />
but the vertical alignment is offset a bit for each sheet.<br />
Caution: Be sure to keep the focus settings straight between the image and the tables below. Also, the<br />
stars you choose cannot be saturated in any of the focus frames, so check all 5 images of the star<br />
before actually choosing it. In general, choose the faintest stars where you can still identify all 5<br />
images of them.<br />
4/17/12 iraf2_exercise 1
1. By how many rows is the image single-space shifted between focus settings? ______<br />
2. When the telescope has its best focus, the stellar images should be axisymmetric (ellipticity<br />
= 0), smallest (min FWHM), and have the maximum peak intensity. Check out the 5 images of the<br />
faint star whose 3rd image is at about (693, 470). Notice that the 3rd image seems better than the rest.<br />
This is a clue that the best focus setting will likely be around 1300 microns. We will now confirm this<br />
quantitatively. Edit the "rimexam" parameter file so that the object radius=4, background<br />
buffer width=2 and background width=1. Now choose two well-behaved (unsaturated and<br />
isolated) stars and fill in the tables below.<br />
Star 1: Double-skip centroid: x = ________ y = ________ (pixels)<br />
Focus Setting Peak Flux Ellipticity<br />
1100<br />
1200<br />
1300<br />
1400<br />
1500<br />
Focus Setting<br />
1100<br />
1200<br />
1300<br />
1400<br />
1500<br />
FWHM<br />
(pixels)<br />
Star 2: Double-skip centroid: x = ________ y = ________ (pixels)<br />
Peak<br />
Flux<br />
Ellipticity<br />
FWHM<br />
(pixels)<br />
FWHM (arcsec)<br />
FWHM (arcsec)<br />
3. What would you choose as the best focus setting for the telescope? On what basis? Which<br />
FWHM value did you use?<br />
2<br />
In your answering of the next question, we need to make sure that you<br />
understand completely how the spicamfocus image was made.<br />
•What information do the overscan regions contain? _________________<br />
•How many “layers of sky” are in the brightest part of the image? ______<br />
•In which part of the image will you get values of the real sky? ________<br />
•Since that part will also contain read noise, how will you get just the<br />
values of the sky in ADUs? ____________________________________<br />
4. Using just the ds9 pixel readout (accessed from the Analysis<br />
menu at the top), what would you estimate as the background sky value for<br />
this image, in A/D units? ______________
5. Investigate how the rimexam parameters affect the results you obtain for aperture<br />
photometry. The settings of the object radius, buffer width, and background width will affect the<br />
determination of the sky values and object flux. Edit the rimexam parameter file and set rplot=15<br />
(NOTE: this is not the aperture radius), buffer=1, width=1. For the values of object radius given, fill in<br />
the table below (see next page). As you fill in the table, notice how the sky value in the radial plot<br />
varies. Use the isolated star at (523,497) that is in focus. [Don’t forget to set up a log file to save your<br />
work. Also, make sure that the iterations parameter in rimexam is set to 1!]<br />
(radius = 1.) Object radius #change this value as you work through this step<br />
For Object at x = ___523___ y = ___497___<br />
Object radius Magnitude Flux Sky Peak FWHM<br />
1<br />
2<br />
3<br />
4<br />
8<br />
12<br />
16<br />
6. From your data in the table above, explain how the sky, peak and FWHM values depend on<br />
the object radius. There were probably unexpected results or trends. If so, list one and come up <strong>with</strong><br />
your guess as to why it occurred.<br />
7. <br />
a) Graph the FWHM and magnitude (smallest numbers at the top of the axis for both) versus<br />
aperture radius values in the graph shown on the last page (use different colors or symbols and each<br />
axis will have different values and units).<br />
b) Do they tend to asymptotic values as the object radius gets larger? Explain.<br />
8. If the "right" answer is obtained <strong>with</strong> a very large object radius, what disadvantages might<br />
dissuade you from using an object radius of, say, 25 pixels?<br />
3
9. How does the task imexamine determine the astronomical flux from a star? We are not<br />
<strong>look</strong>ing for the steps you took (such as, epar’ing, typing ‘r,’ making a log file, etc.), but the actual<br />
process going on <strong>with</strong>in the programs. What is <strong>IRAF</strong> doing to get the peaks, FWHM, sky values, and<br />
magnitudes? This means digging into phelp imexamine.<br />
10. Learning objectives are given at the top of the tutorial page for this exercise. In narrative<br />
form, using good writing style, meet the first 5 objectives. For the proficiency goal: What do you think<br />
you will easily remember as we go on to the next <strong>IRAF</strong> exercises, and why?<br />
4
Name ____________________________________<br />
5
We have intentionally put only this sentence on this page.<br />
6