COMSOL Multiphysics®
COMSOL Multiphysics®
COMSOL Multiphysics®

Create successful ePaper yourself
Turn your PDF publications into a flip-book with our unique Google optimized e-Paper software.
<strong>COMSOL</strong><br />
Multiphysics ®<br />
V ERSION 3.5a<br />
MODEL LIBRARY
How to contact <strong>COMSOL</strong>:<br />
Benelux<br />
<strong>COMSOL</strong> BV<br />
Röntgenlaan 19<br />
2719 DX Zoetermeer<br />
The Netherlands<br />
Phone: +31 (0) 79 363 4230<br />
Fax: +31 (0) 79 361 4212<br />
info@comsol.nl<br />
www.comsol.nl<br />
Denmark<br />
<strong>COMSOL</strong> A/S<br />
Diplomvej 376<br />
2800 Kgs. Lyngby<br />
Phone: +45 88 70 82 00<br />
Fax: +45 88 70 80 90<br />
info@comsol.dk<br />
www.comsol.dk<br />
Finland<br />
<strong>COMSOL</strong> OY<br />
Arabianranta 6<br />
FIN-00560 Helsinki<br />
Phone: +358 9 2510 400<br />
Fax: +358 9 2510 4010<br />
info@comsol.fi<br />
www.comsol.fi<br />
France<br />
<strong>COMSOL</strong> France<br />
WTC, 5 pl. Robert Schuman<br />
F-38000 Grenoble<br />
Phone: +33 (0)4 76 46 49 01<br />
Fax: +33 (0)4 76 46 07 42<br />
info@comsol.fr<br />
www.comsol.fr<br />
Germany<br />
<strong>COMSOL</strong> Multiphysics GmbH<br />
Berliner Str. 4<br />
D-37073 Göttingen<br />
Phone: +49-551-99721-0<br />
Fax: +49-551-99721-29<br />
info@comsol.de<br />
www.comsol.de<br />
Italy<br />
<strong>COMSOL</strong> S.r.l.<br />
Via Vittorio Emanuele II, 22<br />
25122 Brescia<br />
Phone: +39-030-3793800<br />
Fax: +39-030-3793899<br />
info.it@comsol.com<br />
www.it.comsol.com<br />
Norway<br />
<strong>COMSOL</strong> AS<br />
Søndre gate 7<br />
NO-7485 Trondheim<br />
Phone: +47 73 84 24 00<br />
Fax: +47 73 84 24 01<br />
info@comsol.no<br />
www.comsol.no<br />
Sweden<br />
<strong>COMSOL</strong> AB<br />
Tegnérgatan 23<br />
SE-111 40 Stockholm<br />
Phone: +46 8 412 95 00<br />
Fax: +46 8 412 95 10<br />
info@comsol.se<br />
www.comsol.se<br />
Switzerland<br />
FEMLAB GmbH<br />
Technoparkstrasse 1<br />
CH-8005 Zürich<br />
Phone: +41 (0)44 445 2140<br />
Fax: +41 (0)44 445 2141<br />
info@femlab.ch<br />
www.femlab.ch<br />
<strong>COMSOL</strong> Multiphysics Model Library<br />
© COPYRIGHT 1998–2008 by <strong>COMSOL</strong> AB. All rights reserved<br />
Patent pending<br />
United Kingdom<br />
<strong>COMSOL</strong> Ltd.<br />
UH Innovation Centre<br />
College Lane<br />
Hatfield<br />
Hertfordshire AL10 9AB<br />
Phone:+44-(0)-1707 636020<br />
Fax: +44-(0)-1707 284746<br />
info.uk@comsol.com<br />
www.uk.comsol.com<br />
United States<br />
<strong>COMSOL</strong>, Inc.<br />
1 New England Executive Park<br />
Suite 350<br />
Burlington, MA 01803<br />
Phone: +1-781-273-3322<br />
Fax: +1-781-273-6603<br />
<strong>COMSOL</strong>, Inc.<br />
10850 Wilshire Boulevard<br />
Suite 800<br />
Los Angeles, CA 90024<br />
Phone: +1-310-441-4800<br />
Fax: +1-310-441-0868<br />
<strong>COMSOL</strong>, Inc.<br />
744 Cowper Street<br />
Palo Alto, CA 94301<br />
Phone: +1-650-324-9935<br />
Fax: +1-650-324-9936<br />
info@comsol.com<br />
www.comsol.com<br />
For a complete list of international<br />
representatives, visit<br />
www.comsol.com/contact<br />
Company home page<br />
www.comsol.com<br />
<strong>COMSOL</strong> user forums<br />
www.comsol.com/support/forums<br />
The software described in this document is furnished under a license agreement. The software may be used<br />
or copied only under the terms of the license agreement. No part of this manual may be photocopied or<br />
reproduced in any form without prior written consent from <strong>COMSOL</strong> AB.<br />
<strong>COMSOL</strong>, <strong>COMSOL</strong> Multiphysics, <strong>COMSOL</strong> Reaction Engineering Lab, and FEMLAB are registered<br />
trademarks of <strong>COMSOL</strong> AB.<br />
Other product or brand names are trademarks or registered trademarks of their respective holders.<br />
Version: November 2008 <strong>COMSOL</strong> 3.5a<br />
Part number: CM020004
CONTENTS<br />
Chapter 1: Introduction<br />
Typographical Conventions . . . . . . . . . . . . . . . . . . . 3<br />
Model Library Guide 5<br />
Chapter 2: Acoustics Models<br />
Acoustics of a Muffler 12<br />
Introduction . . . . . . . . . . . . . . . . . . . . . . . . 12<br />
Model Definition . . . . . . . . . . . . . . . . . . . . . . . 12<br />
Results and Discussion. . . . . . . . . . . . . . . . . . . . . 13<br />
Modeling in <strong>COMSOL</strong> Multiphysics . . . . . . . . . . . . . . . . 14<br />
Modeling Using the Graphical User Interface . . . . . . . . . . . . 15<br />
Eigenmodes of a Room 21<br />
Model Definition . . . . . . . . . . . . . . . . . . . . . . . 21<br />
Results and Discussion. . . . . . . . . . . . . . . . . . . . . 23<br />
Modeling Using the Graphical User Interface . . . . . . . . . . . . 24<br />
Chapter 3: Chemical Engineering Models<br />
Transport and Adsorption 32<br />
Model Definition . . . . . . . . . . . . . . . . . . . . . . . 33<br />
Modeling in <strong>COMSOL</strong> Multiphysics . . . . . . . . . . . . . . . . 35<br />
Results. . . . . . . . . . . . . . . . . . . . . . . . . . . 36<br />
Modeling Using the Graphical User Interface . . . . . . . . . . . . 38<br />
Tubular Reactor 44<br />
Introduction . . . . . . . . . . . . . . . . . . . . . . . . 44<br />
Model Definition . . . . . . . . . . . . . . . . . . . . . . . 44<br />
Results. . . . . . . . . . . . . . . . . . . . . . . . . . . 47<br />
CONTENTS | i
ii | CONTENTS<br />
Modeling Using the Graphical User Interface . . . . . . . . . . . . 49<br />
Chapter 4: Electromagnetics Models<br />
Electrostatic Potential Between Cylinders 57<br />
Model Definition . . . . . . . . . . . . . . . . . . . . . . . 57<br />
Results. . . . . . . . . . . . . . . . . . . . . . . . . . . 57<br />
Modeling Using the Graphical User Interface . . . . . . . . . . . . 58<br />
Pacemaker Electrode 68<br />
Introduction . . . . . . . . . . . . . . . . . . . . . . . . 68<br />
Model Definition . . . . . . . . . . . . . . . . . . . . . . . 69<br />
Results and Discussion. . . . . . . . . . . . . . . . . . . . . 70<br />
Modeling Using the Graphical User Interface . . . . . . . . . . . . 71<br />
Skin Effect in a Circular Wire 76<br />
Introduction . . . . . . . . . . . . . . . . . . . . . . . . 76<br />
Model Definition . . . . . . . . . . . . . . . . . . . . . . . 76<br />
Results. . . . . . . . . . . . . . . . . . . . . . . . . . . 77<br />
Modeling Using the Graphical User Interface . . . . . . . . . . . . 78<br />
Modeling a Wire with an Aluminum Core . . . . . . . . . . . . . 81<br />
Quadrupole Lens 83<br />
Introduction . . . . . . . . . . . . . . . . . . . . . . . . 83<br />
Model Definition . . . . . . . . . . . . . . . . . . . . . . . 83<br />
Results and Discussion. . . . . . . . . . . . . . . . . . . . . 86<br />
Modeling Using the Graphical User Interface . . . . . . . . . . . . 88<br />
Spherical Capacitor 93<br />
Introduction . . . . . . . . . . . . . . . . . . . . . . . . 93<br />
Model Definition . . . . . . . . . . . . . . . . . . . . . . . 94<br />
Modeling Using the Graphical User Interface . . . . . . . . . . . . 95
Chapter 5: Equation-Based Models<br />
The Black-Scholes Equation 100<br />
Introduction . . . . . . . . . . . . . . . . . . . . . . . 100<br />
Model Definition . . . . . . . . . . . . . . . . . . . . . . 101<br />
Modeling in <strong>COMSOL</strong> Multiphysics . . . . . . . . . . . . . . . 101<br />
Modeling Using the Graphical User Interface . . . . . . . . . . . 102<br />
Optimizing a Flywheel Profile 104<br />
Introduction . . . . . . . . . . . . . . . . . . . . . . . 104<br />
Model Definition . . . . . . . . . . . . . . . . . . . . . . 105<br />
Results and Discussion. . . . . . . . . . . . . . . . . . . . 108<br />
Reference . . . . . . . . . . . . . . . . . . . . . . . . 109<br />
Modeling Using the Graphical User Interface . . . . . . . . . . . 109<br />
Electrical Signals in a Heart 118<br />
Introduction . . . . . . . . . . . . . . . . . . . . . . . 118<br />
Model Definition . . . . . . . . . . . . . . . . . . . . . . 120<br />
Modeling in <strong>COMSOL</strong> Multiphysics . . . . . . . . . . . . . . . 121<br />
Results. . . . . . . . . . . . . . . . . . . . . . . . . . 122<br />
Modeling Using the Graphical User Interface . . . . . . . . . . . 123<br />
References . . . . . . . . . . . . . . . . . . . . . . . . 128<br />
An Integro-Partial Differential Equation 129<br />
Introduction . . . . . . . . . . . . . . . . . . . . . . . 129<br />
Modeling in <strong>COMSOL</strong> Multiphysics . . . . . . . . . . . . . . . 130<br />
Results. . . . . . . . . . . . . . . . . . . . . . . . . . 131<br />
Comparison with the Full 3D Radiation Model . . . . . . . . . . 132<br />
Reference . . . . . . . . . . . . . . . . . . . . . . . . 133<br />
Modeling Using the Graphical User Interface . . . . . . . . . . . 134<br />
The KdV Equation and Solitons 138<br />
Introduction . . . . . . . . . . . . . . . . . . . . . . . 138<br />
Model Definition . . . . . . . . . . . . . . . . . . . . . . 139<br />
Results. . . . . . . . . . . . . . . . . . . . . . . . . . 140<br />
References . . . . . . . . . . . . . . . . . . . . . . . . 140<br />
Modeling Using the Graphical User Interface . . . . . . . . . . . 141<br />
CONTENTS | iii
iv | CONTENTS<br />
Shallow Water Equations 145<br />
Introduction . . . . . . . . . . . . . . . . . . . . . . . 145<br />
Artificial Stabilization . . . . . . . . . . . . . . . . . . . . 146<br />
Model Definition . . . . . . . . . . . . . . . . . . . . . . 146<br />
Results and Discussion. . . . . . . . . . . . . . . . . . . . 149<br />
Modeling in <strong>COMSOL</strong> Multiphysics . . . . . . . . . . . . . . . 150<br />
Reference . . . . . . . . . . . . . . . . . . . . . . . . 150<br />
Modeling Using the Graphical User Interface . . . . . . . . . . . 150<br />
Shell Diffusion 153<br />
Introduction . . . . . . . . . . . . . . . . . . . . . . . 153<br />
Model Definition . . . . . . . . . . . . . . . . . . . . . . 153<br />
Results. . . . . . . . . . . . . . . . . . . . . . . . . . 154<br />
Modeling in <strong>COMSOL</strong> Multiphysics . . . . . . . . . . . . . . . 156<br />
Modeling Using the Graphical User Interface . . . . . . . . . . . 156<br />
Spherically Symmetric Transport 159<br />
Introduction . . . . . . . . . . . . . . . . . . . . . . . 159<br />
Model Definition . . . . . . . . . . . . . . . . . . . . . . 159<br />
Results. . . . . . . . . . . . . . . . . . . . . . . . . . 162<br />
Modeling in <strong>COMSOL</strong> Multiphysics . . . . . . . . . . . . . . . 164<br />
Modeling Using the Graphical User Interface . . . . . . . . . . . 165<br />
The Telegraph Equation 169<br />
Introduction . . . . . . . . . . . . . . . . . . . . . . . 169<br />
Model Definition . . . . . . . . . . . . . . . . . . . . . . 169<br />
Results. . . . . . . . . . . . . . . . . . . . . . . . . . 170<br />
Modeling in <strong>COMSOL</strong> Multiphysics . . . . . . . . . . . . . . . 172<br />
Modeling Using the Graphical User Interface . . . . . . . . . . . 173<br />
A Transport Problem 176<br />
Introduction . . . . . . . . . . . . . . . . . . . . . . . 176<br />
Model Definition . . . . . . . . . . . . . . . . . . . . . . 176<br />
Streamline Diffusion. . . . . . . . . . . . . . . . . . . . . 177<br />
Upwinding Using Discontinuous Basis Functions . . . . . . . . . . 177<br />
Results. . . . . . . . . . . . . . . . . . . . . . . . . . 178<br />
Modeling in <strong>COMSOL</strong> Multiphysics . . . . . . . . . . . . . . . 179<br />
Modeling Using the Graphical User Interface . . . . . . . . . . . 179
The Two-Term Boltzmann Equation 183<br />
Introduction . . . . . . . . . . . . . . . . . . . . . . . 183<br />
Model Definition . . . . . . . . . . . . . . . . . . . . . . 185<br />
Results and Discussion. . . . . . . . . . . . . . . . . . . . 187<br />
Modeling in <strong>COMSOL</strong> Multiphysics . . . . . . . . . . . . . . . 190<br />
References . . . . . . . . . . . . . . . . . . . . . . . . 191<br />
Modeling Using the Graphical User Interface . . . . . . . . . . . 191<br />
Chapter 6: Fluid Dynamics Models<br />
Backstep with Argyris Element 204<br />
Introduction . . . . . . . . . . . . . . . . . . . . . . . 204<br />
Model Definition . . . . . . . . . . . . . . . . . . . . . . 204<br />
Argyris Element Properties . . . . . . . . . . . . . . . . . . 204<br />
Results. . . . . . . . . . . . . . . . . . . . . . . . . . 205<br />
Using the Graphical User Interface . . . . . . . . . . . . . . . 205<br />
Flow Past a Cylinder 211<br />
Introduction . . . . . . . . . . . . . . . . . . . . . . . 211<br />
Model Definition . . . . . . . . . . . . . . . . . . . . . . 211<br />
Results. . . . . . . . . . . . . . . . . . . . . . . . . . 213<br />
Reference . . . . . . . . . . . . . . . . . . . . . . . . 213<br />
Modeling Using the Graphical User Interface . . . . . . . . . . . 214<br />
Time-Dependent Simulation . . . . . . . . . . . . . . . . . 217<br />
Terminal Falling Velocity of a Sand Grain 220<br />
Introduction . . . . . . . . . . . . . . . . . . . . . . . 220<br />
Model Definition . . . . . . . . . . . . . . . . . . . . . . 220<br />
Results. . . . . . . . . . . . . . . . . . . . . . . . . . 222<br />
Reference . . . . . . . . . . . . . . . . . . . . . . . . 225<br />
Modeling Using the Graphical User Interface . . . . . . . . . . . 225<br />
Fluid Valve 230<br />
Introduction . . . . . . . . . . . . . . . . . . . . . . . 230<br />
Model Definition . . . . . . . . . . . . . . . . . . . . . . 230<br />
Results. . . . . . . . . . . . . . . . . . . . . . . . . . 232<br />
CONTENTS | v
vi | CONTENTS<br />
Modeling in <strong>COMSOL</strong> Multiphysics . . . . . . . . . . . . . . . 234<br />
Modeling Using the Graphical User Interface . . . . . . . . . . . 234<br />
Micromixer 240<br />
Introduction . . . . . . . . . . . . . . . . . . . . . . . 240<br />
Model Definition . . . . . . . . . . . . . . . . . . . . . . 241<br />
Results. . . . . . . . . . . . . . . . . . . . . . . . . . 242<br />
Modeling Using the Graphical User Interface . . . . . . . . . . . 243<br />
Shock Tube 252<br />
Introduction . . . . . . . . . . . . . . . . . . . . . . . 252<br />
Model Definition . . . . . . . . . . . . . . . . . . . . . . 252<br />
Modeling in <strong>COMSOL</strong> Multiphysics . . . . . . . . . . . . . . . 253<br />
Results. . . . . . . . . . . . . . . . . . . . . . . . . . 254<br />
Modeling Using the Graphical User Interface . . . . . . . . . . . 255<br />
Sloshing Tank 259<br />
Introduction . . . . . . . . . . . . . . . . . . . . . . . 259<br />
Model Definition . . . . . . . . . . . . . . . . . . . . . . 260<br />
Results. . . . . . . . . . . . . . . . . . . . . . . . . . 262<br />
Modeling Using the Graphical User Interface . . . . . . . . . . . 264<br />
Chapter 7: Geophysics Models<br />
Groundwater Flow and Solute Transport 270<br />
Introduction . . . . . . . . . . . . . . . . . . . . . . . 270<br />
Model Definition . . . . . . . . . . . . . . . . . . . . . . 270<br />
Results and Discussion. . . . . . . . . . . . . . . . . . . . 274<br />
References . . . . . . . . . . . . . . . . . . . . . . . . 277<br />
Modeling Using the Graphical User Interface . . . . . . . . . . . 277<br />
A Rock Fracture Flow Model 283<br />
Introduction . . . . . . . . . . . . . . . . . . . . . . . 283<br />
Model Definition . . . . . . . . . . . . . . . . . . . . . . 283<br />
Modeling in <strong>COMSOL</strong> Multiphysics . . . . . . . . . . . . . . . 284<br />
Results. . . . . . . . . . . . . . . . . . . . . . . . . . 285
Modeling Using the Graphical User Interface . . . . . . . . . . . 286<br />
Chapter 8: Heat Transfer Models<br />
Heating with a Moving Laser 292<br />
Introduction . . . . . . . . . . . . . . . . . . . . . . . 292<br />
Model Definitions . . . . . . . . . . . . . . . . . . . . . 293<br />
Results and Discussion. . . . . . . . . . . . . . . . . . . . 296<br />
Modeling Using the Graphical User Interface . . . . . . . . . . . 298<br />
Heat-sink Experiments Using the Component Library 303<br />
Introduction . . . . . . . . . . . . . . . . . . . . . . . 303<br />
Model Definition . . . . . . . . . . . . . . . . . . . . . . 303<br />
Results. . . . . . . . . . . . . . . . . . . . . . . . . . 306<br />
Modeling Using the Graphical User Interface . . . . . . . . . . . 308<br />
Chapter 9: Multidisciplinary Models<br />
Magnetic Brake 316<br />
Introduction . . . . . . . . . . . . . . . . . . . . . . . 316<br />
Model Definition . . . . . . . . . . . . . . . . . . . . . . 316<br />
Modeling in <strong>COMSOL</strong> Multiphysics . . . . . . . . . . . . . . . 318<br />
Results. . . . . . . . . . . . . . . . . . . . . . . . . . 318<br />
Modeling Using the Graphical User Interface—Fixed ω . . . . . 319<br />
Modeling Using the Programming Language—Fixed ω . . . . . 322<br />
Exporting to Simulink—Time-Dependent ω . . . . . . . . 324<br />
Modeling Using the Graphical User Interface —Time-Dependent ω . 327<br />
Process Control Using a PID Controller 331<br />
Introduction . . . . . . . . . . . . . . . . . . . . . . . 331<br />
Model Definition . . . . . . . . . . . . . . . . . . . . . . 331<br />
Results. . . . . . . . . . . . . . . . . . . . . . . . . . 334<br />
Modeling Using the Graphical User Interface . . . . . . . . . . . 336<br />
CONTENTS | vii
viii | C ONTENTS<br />
Controlling Temperature 342<br />
Introduction . . . . . . . . . . . . . . . . . . . . . . . 342<br />
Model Definition . . . . . . . . . . . . . . . . . . . . . . 342<br />
Modeling in <strong>COMSOL</strong> Multiphysics . . . . . . . . . . . . . . . 343<br />
Results. . . . . . . . . . . . . . . . . . . . . . . . . . 344<br />
Using the Graphical User Interface—No Controller . . . . . . . . 345<br />
Exporting to Simulink—Temperature Control . . . . . . . . . . . 349<br />
Chapter 10: Multiphysics Models<br />
Free Convection 356<br />
Introduction . . . . . . . . . . . . . . . . . . . . . . . 356<br />
Model Definition . . . . . . . . . . . . . . . . . . . . . . 356<br />
Modeling in <strong>COMSOL</strong> Multiphysics . . . . . . . . . . . . . . . 358<br />
Results. . . . . . . . . . . . . . . . . . . . . . . . . . 359<br />
Modeling Using the Graphical User Interface . . . . . . . . . . . 360<br />
Time-Dependent Simulation . . . . . . . . . . . . . . . . . 372<br />
Modeling Using the Graphical User Interface . . . . . . . . . . . 373<br />
Magnetic Drug Targeting in Cancer Therapy 376<br />
Introduction . . . . . . . . . . . . . . . . . . . . . . . 376<br />
Model Definition . . . . . . . . . . . . . . . . . . . . . . 376<br />
Model Data . . . . . . . . . . . . . . . . . . . . . . . . 380<br />
Results. . . . . . . . . . . . . . . . . . . . . . . . . . 380<br />
Modeling in <strong>COMSOL</strong> Multiphysics . . . . . . . . . . . . . . . 383<br />
References . . . . . . . . . . . . . . . . . . . . . . . . 384<br />
Modeling Using the Graphical User Interface . . . . . . . . . . . 384<br />
Marangoni Convection 391<br />
Introduction . . . . . . . . . . . . . . . . . . . . . . . 391<br />
Model Definition . . . . . . . . . . . . . . . . . . . . . . 391<br />
Modeling in <strong>COMSOL</strong> Multiphysics . . . . . . . . . . . . . . . 393<br />
Results. . . . . . . . . . . . . . . . . . . . . . . . . . 394<br />
Reference . . . . . . . . . . . . . . . . . . . . . . . . 396<br />
Modeling Using the Graphical User Interface . . . . . . . . . . . 396
Simulation of a Microrobot 403<br />
Introduction . . . . . . . . . . . . . . . . . . . . . . . 403<br />
Model Definition . . . . . . . . . . . . . . . . . . . . . . 403<br />
Results and Discussion. . . . . . . . . . . . . . . . . . . . 406<br />
Modeling in <strong>COMSOL</strong> Multiphysics . . . . . . . . . . . . . . . 407<br />
Reference . . . . . . . . . . . . . . . . . . . . . . . . 407<br />
Modeling Using the Graphical User Interface . . . . . . . . . . . 407<br />
Vibrations in Milk Containers 414<br />
Introduction . . . . . . . . . . . . . . . . . . . . . . . 414<br />
Model Definition . . . . . . . . . . . . . . . . . . . . . . 414<br />
Modeling in <strong>COMSOL</strong> Multiphysics . . . . . . . . . . . . . . . 415<br />
Results. . . . . . . . . . . . . . . . . . . . . . . . . . 416<br />
Modeling Using the Graphical User Interface . . . . . . . . . . . 417<br />
Peristaltic Pump 423<br />
Introduction . . . . . . . . . . . . . . . . . . . . . . . 423<br />
Model Definition . . . . . . . . . . . . . . . . . . . . . . 423<br />
Results. . . . . . . . . . . . . . . . . . . . . . . . . . 426<br />
Modeling in <strong>COMSOL</strong> Multiphysics . . . . . . . . . . . . . . . 429<br />
Modeling Using the Graphical User Interface . . . . . . . . . . . 430<br />
Chapter 11: Quantum Mechanics Models<br />
Conical Quantum Dots 438<br />
Introduction . . . . . . . . . . . . . . . . . . . . . . . 438<br />
Model Definition . . . . . . . . . . . . . . . . . . . . . . 438<br />
Results. . . . . . . . . . . . . . . . . . . . . . . . . . 441<br />
Modeling in <strong>COMSOL</strong> Multiphysics . . . . . . . . . . . . . . . 441<br />
Reference . . . . . . . . . . . . . . . . . . . . . . . . 441<br />
Modeling Using the Graphical User Interface . . . . . . . . . . . 442<br />
The Schrödinger Equation for the Hydrogen Atom 445<br />
Introduction . . . . . . . . . . . . . . . . . . . . . . . 445<br />
Model Definition . . . . . . . . . . . . . . . . . . . . . . 445<br />
Results. . . . . . . . . . . . . . . . . . . . . . . . . . 446<br />
CONTENTS | ix
x | C ONTENTS<br />
Modeling in <strong>COMSOL</strong> Multiphysics . . . . . . . . . . . . . . . 448<br />
Modeling Using the Graphical User Interface . . . . . . . . . . . 451<br />
Chapter 12: Semiconductor Device Models<br />
Distributed SPICE Model of an Integrated Bipolar Transistor 456<br />
Introduction . . . . . . . . . . . . . . . . . . . . . . . 456<br />
Model Definition . . . . . . . . . . . . . . . . . . . . . . 457<br />
Results and Discussion. . . . . . . . . . . . . . . . . . . . 458<br />
Modeling in <strong>COMSOL</strong> Multiphysics . . . . . . . . . . . . . . . 460<br />
Reference . . . . . . . . . . . . . . . . . . . . . . . . 460<br />
Modeling Using the Graphical User Interface . . . . . . . . . . . 461<br />
DC Characteristics of a MOS Transistor (MOSFET) 473<br />
Introduction . . . . . . . . . . . . . . . . . . . . . . . 473<br />
Model Definition . . . . . . . . . . . . . . . . . . . . . . 474<br />
Results and Discussion. . . . . . . . . . . . . . . . . . . . 478<br />
Modeling Using the Graphical User Interface . . . . . . . . . . . 480<br />
Semiconductor Diode 492<br />
Introduction . . . . . . . . . . . . . . . . . . . . . . . 492<br />
Model Definition . . . . . . . . . . . . . . . . . . . . . . 494<br />
Results. . . . . . . . . . . . . . . . . . . . . . . . . . 498<br />
References . . . . . . . . . . . . . . . . . . . . . . . . 501<br />
Modeling Using the Graphical User Interface . . . . . . . . . . . 501<br />
SPICE Parameter Extraction for a Semiconductor Diode 507<br />
Introduction . . . . . . . . . . . . . . . . . . . . . . . 507<br />
Model Definition . . . . . . . . . . . . . . . . . . . . . . 507<br />
Results and Discussion. . . . . . . . . . . . . . . . . . . . 512<br />
Modeling Using the Graphical User Interface . . . . . . . . . . . 513
Chapter 13: Structural Mechanics Models<br />
Eigenvalue Analysis of a Crankshaft 522<br />
Model Definition . . . . . . . . . . . . . . . . . . . . . . 522<br />
Results. . . . . . . . . . . . . . . . . . . . . . . . . . 522<br />
Modeling Using the Graphical User Interface . . . . . . . . . . . 525<br />
Deformation of a Feeder Clamp 529<br />
Introduction . . . . . . . . . . . . . . . . . . . . . . . 529<br />
Model Definition . . . . . . . . . . . . . . . . . . . . . . 529<br />
Results and Discussion. . . . . . . . . . . . . . . . . . . . 531<br />
Modeling Using the Graphical User Interface . . . . . . . . . . . 533<br />
Topology Optimization of a Loaded Knee Structure 548<br />
Introduction . . . . . . . . . . . . . . . . . . . . . . . 548<br />
Model Definition . . . . . . . . . . . . . . . . . . . . . . 548<br />
Results and Discussion. . . . . . . . . . . . . . . . . . . . 550<br />
Reference . . . . . . . . . . . . . . . . . . . . . . . . 551<br />
Modeling in <strong>COMSOL</strong> Multiphysics . . . . . . . . . . . . . . . 551<br />
Modeling Using the Graphical User Interface . . . . . . . . . . . 552<br />
Stiffness Analysis of a Communication Mast’s Diagonal Mounting 559<br />
Introduction . . . . . . . . . . . . . . . . . . . . . . . 559<br />
Model Definition . . . . . . . . . . . . . . . . . . . . . . 560<br />
Results. . . . . . . . . . . . . . . . . . . . . . . . . . 563<br />
Modeling Using the Graphical User Interface . . . . . . . . . . . 564<br />
Stresses in a Pulley 571<br />
Introduction . . . . . . . . . . . . . . . . . . . . . . . 571<br />
Model Definition . . . . . . . . . . . . . . . . . . . . . . 571<br />
Results and Discussion. . . . . . . . . . . . . . . . . . . . 573<br />
Modeling in <strong>COMSOL</strong> Multiphysics . . . . . . . . . . . . . . . 576<br />
Modeling Using the Graphical User Interface . . . . . . . . . . . 577<br />
A Note About Adaptive Mesh Refinement . . . . . . . . . . . . 586<br />
CONTENTS | xi
xii | C ONTENTS<br />
Chapter 14: Wave Propagation Models<br />
Diffraction Patterns 590<br />
Introduction . . . . . . . . . . . . . . . . . . . . . . . 590<br />
Model Definition . . . . . . . . . . . . . . . . . . . . . . 590<br />
Results. . . . . . . . . . . . . . . . . . . . . . . . . . 591<br />
Modeling Using the Graphical User Interface . . . . . . . . . . . 592<br />
Chapter 15: Benchmark Models<br />
Isospectral Drums 598<br />
Introduction . . . . . . . . . . . . . . . . . . . . . . . 598<br />
Model Definition . . . . . . . . . . . . . . . . . . . . . . 598<br />
Results. . . . . . . . . . . . . . . . . . . . . . . . . . 599<br />
Modeling in <strong>COMSOL</strong> Multiphysics . . . . . . . . . . . . . . . 600<br />
References . . . . . . . . . . . . . . . . . . . . . . . . 600<br />
Modeling Using the Graphical User Interface . . . . . . . . . . . 600<br />
Modeling Using the Programming Language . . . . . . . . . . . . 603<br />
INDEX 607
1<br />
Introduction<br />
We have designed <strong>COMSOL</strong> Multiphysics to be an extremely flexible package<br />
applicable to virtually any area of research, science, and engineering. A consequence<br />
of this flexibility is that it becomes necessary to set up <strong>COMSOL</strong> Multiphysics for<br />
a specific modeling task. To relieve you of this work in many disciplines and<br />
application areas, we have created a series of time-saving preconfigured models and<br />
collected them in this Model Library. It ships as a standard component of<br />
<strong>COMSOL</strong> Multiphysics 3.5a, and it is just one of several collections available to<br />
<strong>COMSOL</strong> Multiphysics users. Similar libraries with models devoted to specific<br />
disciplines are also available in the range of add-on modules:<br />
AC/DC Module<br />
Acoustics Module<br />
Chemical Engineering Module<br />
Earth Science Module<br />
Heat Transfer Module<br />
MEMS Module<br />
RF Module<br />
Structural Mechanics Module.<br />
1
2 | CHAPTER 1: INTRODUCTION<br />
These ready-to-run models cover many classic problems and equations from science<br />
and engineering, and they have two goals in mind:<br />
To show the versatility of <strong>COMSOL</strong> Multiphysics and the wide range of applications<br />
it covers<br />
To form an educational basis for you to learn about <strong>COMSOL</strong> Multiphysics and<br />
gain an understanding of the underlying physics<br />
Each model entry consists of two elements: the documentation and a corresponding<br />
ready-to-run <strong>COMSOL</strong> Multiphysics Model MPH-file you load directly from the<br />
Model Navigator window in <strong>COMSOL</strong> Multiphysics. These model files are copied to<br />
your hard disk with the default installation.<br />
The documentation for each model entry in this library includes a technical<br />
background, the model definition, and results. Each entry also contains a section that<br />
shows, step by step, how to implement the model in <strong>COMSOL</strong> Multiphysics.<br />
Following the model description, a series of instructions guide you in the process of<br />
building, solving, and postprocessing the model in <strong>COMSOL</strong> Multiphysics.<br />
Note: In some cases, the settings appear in a table rather than giving a step-by-step<br />
procedure for each data entry.<br />
Those users new to <strong>COMSOL</strong> Multiphysics might want start reading the <strong>COMSOL</strong><br />
Multiphysics Quick Start and Quick Reference, which contains a detailed<br />
step-by-step instruction for a basic multiphysics model. During modeling, some<br />
general questions might arise about <strong>COMSOL</strong> Multiphysics, its various features, and<br />
how to use them. For the answers we suggest that you first refer to the <strong>COMSOL</strong><br />
Multiphysics User’s Guide and the <strong>COMSOL</strong> Multiphysics Modeling Guide.<br />
The Model Library entries follow the basic structure of <strong>COMSOL</strong> Multiphysics and<br />
the modeling process you follow in using this package. Most of the chapters<br />
correspond to application modes in <strong>COMSOL</strong> Multiphysics. For a description of<br />
these application modes, including typical example models included in the Model<br />
Library, see the <strong>COMSOL</strong> Multiphysics Modeling Guide.<br />
When describing equation-based models, which use partial differential equations<br />
(PDEs) directly, the text provides information about the model and the physical or<br />
mathematical background. In benchmark models you can compare a solution to<br />
analytical or established results. Parametric studies vary physical or geometrical
parameters in a series of solutions for optimization or evaluation of design criteria. To<br />
quickly locate models in each of the above categories, refer to the “Model Library<br />
Guide” on page 5.<br />
One outstanding feature of <strong>COMSOL</strong> Multiphysics is the ability to include several<br />
interacting physics in one system using its multiphysics modeling features. To help you<br />
better appreciate this power, the Model Library includes a number of corresponding<br />
examples in the chapter “Multiphysics Models” on page 355. Additional information<br />
about multiphysics modeling is available in the <strong>COMSOL</strong> Multiphysics User's Guide<br />
and the <strong>COMSOL</strong> Multiphysics Modeling Guide.<br />
The chapter “Multidisciplinary Models” on page 315 contains models that include<br />
control loops or other system simulation components. The models in this chapter show<br />
you how to combine <strong>COMSOL</strong> with MATLAB and Simulink for system simulations<br />
that include finite element models.<br />
Typographical Conventions<br />
All <strong>COMSOL</strong> manuals use a set of consistent typographical conventions that should<br />
make it easy for you to follow the discussion, realize what you can expect to see on the<br />
screen, and know which data you must enter into various data-entry fields. In<br />
particular, you should be aware of these conventions:<br />
A boldface font of the shown size and style indicates that the given word(s) appear<br />
exactly that way on the <strong>COMSOL</strong> graphical user interface (for toolbar buttons in<br />
the corresponding tooltip). For instance, we often refer to the Model Navigator,<br />
which is the window that appears when you start a new modeling session in<br />
<strong>COMSOL</strong>; the corresponding window on the screen has the title Model Navigator.<br />
As another example, the instructions might say to click the Multiphysics button, and<br />
the boldface font indicates that you can expect to see a button with that exact label<br />
on the <strong>COMSOL</strong> user interface.<br />
The names of other items on the graphical user interface that do not have direct<br />
labels contain a leading uppercase letter. For instance, we often refer to the Draw<br />
toolbar; this vertical bar containing many icons appears on the left side of the user<br />
interface during geometry modeling. However, nowhere on the screen will you see<br />
the term “Draw” referring to this toolbar (if it were on the screen, we would print<br />
it in this manual as the Draw menu).<br />
The symbol > indicates a menu item or an item in a folder in the Model Navigator.<br />
For example, Physics>Equation System>Subdomain Settings is equivalent to: On the<br />
Physics menu, point to Equation System and then click Subdomain Settings.<br />
| 3
4 | CHAPTER 1: INTRODUCTION<br />
<strong>COMSOL</strong> Multiphysics>Heat Transfer>Conduction means: Open the <strong>COMSOL</strong><br />
Multiphysics folder, open the Heat Transfer folder, and select Conduction.<br />
A Code (monospace) font indicates keyboard entries in the user interface. You might<br />
see an instruction such as “Type 1.25 in the Current density edit field.” The<br />
monospace font also indicates code.<br />
An italic font indicates the introduction of important terminology. Expect to find<br />
an explanation in the same paragraph or in the Glossary. The names of books in the<br />
<strong>COMSOL</strong> documentation set also appear using an italic font.
Model Library Guide<br />
The table below summarizes key information about the entries in this Model Library.<br />
The first three columns contain the model name, page number, and solution times.<br />
The solution time is the elapsed time measured on a machine running Windows Vista<br />
with a 2.6 GHz AMD Athlon X2 Dual Core 500 CPU and 2 GB of RAM. For models<br />
with a sequential solution strategy, the Solution Time column shows the combined<br />
solution time for all solution steps.<br />
The subsequent three columns indicate whether the model geometry includes 1D, 2D,<br />
3D, or multiple geometries (extended multiphysics).<br />
The next several columns indicate the analysis types that the model covers, such as<br />
stationary, time-dependent, eigenvalue, sensitivity, or optimization.<br />
The Multiphysics column shows which models include multiphysics couplings.<br />
The final column indicates models that use parametric studies to evaluate and optimize<br />
their results by varying the value of one or more parameters.<br />
TABLE 1-1: <strong>COMSOL</strong> MULTIPHYSICS MODEL LIBRARY MODELS<br />
MODEL PAGE<br />
ACOUSTICS MODELS 11<br />
SOLUTION TIME<br />
automotive muffler 12 9 min √ √ √<br />
eigenmodes of room 21 12 s √ √<br />
reactive muffler 35 *<br />
2 s √ √<br />
BENCHMARK MODELS 597<br />
isospectral drum 1 598 1 s √ √<br />
isospectral drum 2 598 1 s √ √<br />
point source 279 *<br />
1 s √ √<br />
CHEMICAL ENGINEERING MODELS 31<br />
1D<br />
2D<br />
3D<br />
STATIONARY<br />
TIME-DEPENDENT<br />
EIGENVALUE<br />
SENSITIVITY//OPTIMIZATION<br />
MULTIPHYSICS<br />
PARAMETRIC STUDY<br />
MODEL LIBRARY GUIDE | 5
6 | CHAPTER 1: INTRODUCTION<br />
TABLE 1-1: <strong>COMSOL</strong> MULTIPHYSICS MODEL LIBRARY MODELS<br />
MODEL PAGE<br />
adsorption 32 7 s √ √ √<br />
tubular reactor 44 22 s √ √ √<br />
DIFFUSION MODELS<br />
effective diffusivity 58 *<br />
thin layer diffusion 434 *<br />
ELECTROMAGNETICS MODELS 55<br />
electric sensor 121 *<br />
electrochemical polishing 468 *<br />
45 s √ √<br />
1 s √ √<br />
2 s √ √<br />
2 s √ √<br />
pacemaker electrode 68 4 s √ √<br />
permanent magnet 126 *<br />
2 s √ √<br />
potential between cylinders 57 1 s √ √<br />
quadrupole 83 1 s √ √<br />
skin effect 76 1 s √ √<br />
spherical capacitor 93 1 s √ √<br />
thin film resistance 422 *<br />
3 s √ √<br />
EQUATION-BASED MODELS 99<br />
black-scholes put 100 1 s √ √<br />
flywheel profile ¤<br />
104 16 s √ √ √<br />
heart electrical clg 118 6 min √ √ √<br />
heart electrical fhn 118 20 min √ √ √<br />
integro partial 129 3 s √ √<br />
kdv equation 138 4 s √ √<br />
shallow water 145 10 s √ √<br />
shell diffusion 153 1 s √ √<br />
spherical symmetry ore 159 1 s √ √<br />
telegraph equation 169 1 s √ √<br />
SOLUTION TIME<br />
1D<br />
2D<br />
3D<br />
STATIONARY<br />
TIME-DEPENDENT<br />
EIGENVALUE<br />
SENSITIVITY//OPTIMIZATION<br />
MULTIPHYSICS<br />
PARAMETRIC STUDY
TABLE 1-1: <strong>COMSOL</strong> MULTIPHYSICS MODEL LIBRARY MODELS<br />
MODEL PAGE<br />
transport problem 176 1 s √ √<br />
two term boltzmann 183 2 min √ √ √<br />
FLUID DYNAMICS MODELS 203<br />
backstep 154 *<br />
10 s √ √ √<br />
backstep argyris 204 18 s √ √<br />
backstep quad 154 *<br />
47 s √ √ √<br />
cylinder flow 211 25 min √ √<br />
falling sand 220 20 min √ √<br />
fluid valve 230 13 min √ √<br />
micromixer 240 4 min √ √<br />
reversed flow ¤<br />
326 *<br />
25 min √ √ √<br />
shock tube 252 3 s √ √<br />
sloshing tank 259 49 s √ √<br />
GEOPHYSICS MODELS 269<br />
groundwater flow 270 17 s √ √ √<br />
rock fracture 283 3 s √ √<br />
HEAT TRANSFER MODELS 291<br />
heat convection 2D 192 *<br />
heat radiation 1D 188 *<br />
heat transient axi 196 *<br />
1 s √ √<br />
1 s √ √<br />
1 s √ √<br />
laser heating 292 49 s √ √ √<br />
dev merge lpd19 303 16 s √ √ √<br />
MULTIDISCIPLINARY MODELS 315<br />
magnet brake 316 4 s √ √ √<br />
magnet brake simulink 316 1 s √ √<br />
PID control 331 2 min √ √ √<br />
SOLUTION TIME<br />
1D<br />
2D<br />
3D<br />
STATIONARY<br />
TIME-DEPENDENT<br />
EIGENVALUE<br />
SENSITIVITY//OPTIMIZATION<br />
MULTIPHYSICS<br />
PARAMETRIC STUDY<br />
MODEL LIBRARY GUIDE | 7
8 | CHAPTER 1: INTRODUCTION<br />
TABLE 1-1: <strong>COMSOL</strong> MULTIPHYSICS MODEL LIBRARY MODELS<br />
MODEL PAGE<br />
thermal controller simulink 342 1 s √ √ √<br />
MULTIPHYSICS MODELS 355<br />
electronic conductor 36 **<br />
2 min √ √ √ √<br />
free convection 356 41 s √ √ √ √<br />
magnetic drug targeting 376 55 s √ √ √<br />
marangoni 391 27 s √ √ √<br />
microrobot 403 2 min √ √ √<br />
milk container 414 1 s √ √ √ √<br />
peristaltic pump 423 47 s √ √ √<br />
resistive heating 387 *<br />
8 s √ √ √ √<br />
QUANTUM MECHANICS MODELS 437<br />
conical quantum dot 438 1 s √ √<br />
hydrogen atom 445 3 s √ √<br />
SEMICONDUCTOR DEVICE MODELS 455<br />
bipolar transistor 456 2 min √ √ √ √<br />
mos transistor 473 3 min √ √ √ √<br />
semiconductor diode 492 2 min √ √ √ √<br />
spice parameter extraction ¤<br />
507 2 min √ √ √ √<br />
STRUCTURAL MECHANICS MODELS 521<br />
crankshaft 521 54 s √ √<br />
edge load 2d 235 *<br />
1 s √ √<br />
feeder clamp 529 6 s √ √<br />
gravity load 2d 240 *<br />
1 s √ √<br />
loaded knee ¤<br />
548 21 min √ √ √<br />
mast diagonal mounting 559 29 s √ √<br />
mast diagonal mounting sensitivity 299 *<br />
2 min √ √ √<br />
SOLUTION TIME<br />
1D<br />
2D<br />
3D<br />
STATIONARY<br />
TIME-DEPENDENT<br />
EIGENVALUE<br />
SENSITIVITY//OPTIMIZATION<br />
MULTIPHYSICS<br />
PARAMETRIC STUDY
TABLE 1-1: <strong>COMSOL</strong> MULTIPHYSICS MODEL LIBRARY MODELS<br />
MODEL PAGE<br />
pulley 571 8 s √ √ √<br />
WAVE PROPAGATION MODELS 589<br />
diffraction patterns 590 1 s √ √ √<br />
¤ Requires the Optimization Lab.<br />
* In the <strong>COMSOL</strong> Multiphysics Modeling Guide.<br />
** In the <strong>COMSOL</strong> Multiphysics Quick Start and Quick Reference.<br />
SOLUTION TIME<br />
1D<br />
2D<br />
3D<br />
STATIONARY<br />
TIME-DEPENDENT<br />
EIGENVALUE<br />
SENSITIVITY//OPTIMIZATION<br />
MULTIPHYSICS<br />
PARAMETRIC STUDY<br />
MODEL LIBRARY GUIDE | 9
10 | CHAPTER 1: INTRODUCTION
2<br />
Acoustics Models<br />
This chapter contains acoustics models solving for the pressure field using<br />
time-harmonic and eigenvalue formulation in the Acoustics application mode.<br />
11
Acoustics of a Muffler<br />
Introduction<br />
12 | CHAPTER 2: ACOUSTICS MODELS<br />
This model describes the pressure wave propagation in a muffler for an explosion<br />
engine. The approach is general for analysis of damping of propagation of harmonic<br />
pressure waves.<br />
The purpose of the model is to show how to treat 3D acoustics in a fairly complex<br />
geometry, consisting of several separate sections and pipes divided by thin perfectly<br />
rigid walls. The analysis gives the transmission loss in the frequency range 100 Hz–<br />
1000 Hz.<br />
Model Definition<br />
The model geometry consists of three separate resonator chambers divided by thin<br />
walls. The inlet and the outlet correspond to the connection in the direction of the<br />
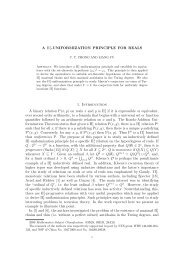
engine and of free air, respectively.<br />
Figure 2-1: The geometry of a muffler. The exhaust fumes enter through the left pipe, pass<br />
the three resonator chambers, and exit through the right pipe.<br />
DOMAIN EQUATIONS<br />
The problem is solved in the frequency domain using the time-harmonic Acoustics<br />
application mode. The model equation is a slightly modified Helmholtz’s equation for<br />
the acoustic pressure, p:
where ρ is the density, c s is the speed of sound, and ω is the angular frequency. The<br />
density needs to be included in the equation in cases where variations in density in<br />
different materials exist. The model assumes that in the low-frequency range, reactive<br />
damping prevails. Resistive damping is therefore not included.<br />
BOUNDARY CONDITIONS<br />
The boundary conditions are of three different types. At all the solid boundaries, which<br />
include the outer walls of the muffler, the dividing walls between the resonator<br />
chambers, and the walls of the pipes, sound hard (wall) boundary conditions are used:<br />
At the inlet boundary is a combination of incoming and outgoing plane waves:<br />
(2-1)<br />
In this equation p 0 denotes the applied outer pressure and i the imaginary unit. At the<br />
outlet boundary, an outgoing plane wave is set:<br />
Results and Discussion<br />
∇p<br />
∇ ⎛– ------ ⎞ ω<br />
⎝ ρ ⎠<br />
2 p<br />
⋅ – --------- = 0<br />
2<br />
ρ<br />
The following equation defines the damping of the acoustic energy, d w:<br />
Here, w o and w i denote the acoustic energy at the outlet and inlet, respectively. The<br />
acoustic energy is calculated using the following equations:<br />
c s<br />
⎛ ∇<br />
-----p<br />
– ⎞ ⋅ n = 0<br />
⎝ ρ ⎠<br />
⎛ ∇<br />
-----p<br />
– ⎞ ⋅ n =<br />
⎝ ρ ⎠<br />
--------p<br />
iω<br />
ρ cs ⎛ ∇<br />
-----p<br />
⎝<br />
– ⎞<br />
ρ ⎠<br />
⋅ n =<br />
d w<br />
w o<br />
–<br />
2<br />
----------p<br />
iω<br />
ρ c 0<br />
s<br />
--------p<br />
iω<br />
ρ cs w o<br />
= 10 log⎛------<br />
⎞<br />
⎝ ⎠<br />
=<br />
∫<br />
∂Ω<br />
2<br />
pc w i<br />
------------ dA<br />
2 ρ cs ACOUSTICS OF A MUFFLER | 13
14 | CHAPTER 2: ACOUSTICS MODELS<br />
w i<br />
=<br />
Figure 2-2 shows the result of a parametric frequency study. This plot reveals that the<br />
damping is better at higher frequencies, with the exception of several deep dips<br />
throughout the frequency range. The dips correspond to the resonance frequencies for<br />
different parts of the muffler system.<br />
Figure 2-2: The damping (dB) in the muffler as a function of the frequency (Hz).<br />
∫<br />
∂Ω<br />
Modeling in <strong>COMSOL</strong> Multiphysics<br />
The dividing walls between the resonator chambers and the walls of the pipes<br />
constitute interior boundaries. Because no waves propagate through these boundaries,<br />
the pressure between the inside and the outside of the pipe walls, as well as that<br />
between the chambers, must be decoupled. To accomplish this, use three dependent<br />
variables for the pressure (and three Acoustics application modes) in the model: one<br />
for the pipes, p p , one for the first and the third resonator chambers, p c1 , and one for<br />
the second resonator chamber, p c2 . You implement this by deactivating the variables<br />
in the parts of the model where they do not exist. It is then possible to specify the<br />
dividing walls and the walls of the pipes as exterior boundaries for each pressure<br />
2<br />
p0 ------------ dA<br />
2 ρ cs
variable. The pressure variables couple to each other where the pipes open up into the<br />
resonator chambers and at the openings between the chambers. You only have to<br />
specify this coupling in one direction; the implementation distributes the reaction<br />
forces evenly. To view the results for the entire pressure field simultaneously, you define<br />
a variable p for the common pressure.<br />
Model Library path: <strong>COMSOL</strong>_Multiphysics/Acoustics/automotive_muffler<br />
Modeling Using the Graphical User Interface<br />
MODEL NAVIGATOR<br />
1 In the Model Navigator, click the Multiphysics button.<br />
2 Add three Acoustics application modes. To do so, select 3D in the Space dimension<br />
list and then select Acoustics>Acoustics>Time-harmonic analysis in the list of<br />
application modes (in the <strong>COMSOL</strong> Multiphysics folder if the license contains<br />
additional modules).<br />
3 Before adding each application mode, name it and its dependent variable according<br />
to the following table:<br />
APPLICATION MODE NAME DEPENDENT VARIABLE<br />
pipe p_p<br />
chamber1 p_c1<br />
chamber2 p_c2<br />
Type the names of the application mode and the dependent variable in the<br />
Application mode name and Dependent variables edit fields, respectively.<br />
4 Click Add to add each of the application modes to the model.<br />
5 When you have added the three application modes, click OK to exit the<br />
Model Navigator and continue modeling.<br />
OPTIONS AND SETTINGS<br />
1 Open the Constants dialog box from the Options menu, and enter the variable name<br />
p0 and the expression 1. Click OK.<br />
2 From the Physics menu, choose Scalar Variables to open the<br />
Application Scalar Variables dialog box. Set the frequency to freq for all the three<br />
ACOUSTICS OF A MUFFLER | 15
16 | CHAPTER 2: ACOUSTICS MODELS<br />
application modes. It is sufficient to type freq in the Expression edit field for the<br />
variable freq_pipe only and press Enter. The synchronization of equivalent<br />
variables then sets the two other frequency variables to freq. When done, click OK.<br />
GEOMETRY MODELING<br />
1 Create a cylinder with radius 0.03, height 0.75, axis base point (−0.1, 0, 0), and axis<br />
direction vector (1, 0, 0).<br />
2 Create another cylinder with radius 0.03, height 0.65, axis base point<br />
(0.25, −0.09, 0), and axis direction vector (1, 0, 0).<br />
3 Go to the Work-Plane Settings dialog box in the Draw menu. On the Quick page,<br />
specify a y-z plane at x = 0. Click OK.<br />
4 In this new work plane, specify an ellipse with semiaxes 0.15 and 0.07 centered at<br />
(0, 0).<br />
5 In the Extrude dialog box in the Draw menu, select the ellipse and extrude it by a<br />
distance of 0.8.<br />
6 In the Work-Plane Settings dialog box, set the x coordinate for the y-z plane to 0.25.<br />
When done, click OK.<br />
7 Specify a circle with radius 0.03 centered at (0.09, 0).<br />
8 Go to the Embed dialog box in the Draw menu. Select both the circle and the ellipse,<br />
and embed them.<br />
9 Go to the Work-Plane Settings dialog box again, and set the x coordinate for the y-z<br />
plane to 0.65. Click OK.<br />
10 Embed the circle and the ellipse from this plane.<br />
11 Finally, click the Zoom Extents button on the Main toolbar to view the complete<br />
muffler geometry.
The geometry should now look like that in Figure 2-3.<br />
Figure 2-3: The muffler geometry.<br />
PHYSICS SETTINGS<br />
Subdomain Settings<br />
In this model, use the default values for the subdomain settings. However, every<br />
subdomain should have only one active application mode. Open the Subdomain<br />
Settings dialog box from each application mode, select the Active in this mode check<br />
box in the following subdomains, and clear it in all other subdomains.<br />
APPLICATION MODE ACTIVE IN SUBDOMAINS<br />
pipe 1, 3, 5, 6, 8, 9<br />
chamber1 2, 7<br />
chamber2 4<br />
Boundary Conditions<br />
1 In the pipe application mode, select Radiation condition from the Boundary condition<br />
list and then select Plane wave from the Wave type list on Boundaries 1 and 50; the<br />
pressure source p_p0 should be p0 on Boundary 1 and 0 on Boundary 50. Use the<br />
default sound-hard boundary condition on all other boundaries.<br />
ACOUSTICS OF A MUFFLER | 17
18 | CHAPTER 2: ACOUSTICS MODELS<br />
2 In the chamber1 application mode, use the Pressure boundary condition on<br />
Boundaries 19, 31, 40, and 43. Set the pressure source p_c1 0 to p_p on<br />
Boundaries 19 and 40 and p_c2 on Boundaries 31 and 43. Use the default<br />
sound-hard boundary condition on all other active boundaries.<br />
3 In the chamber2 application mode, use the default sound-hard boundary condition<br />
on all boundaries.<br />
Coupling Variables<br />
1 On the Options menu, point to Integration Coupling Variables and then click<br />
Boundary Variables.<br />
2 In the Boundary Integration Variables dialog box, select Boundary 1 and create a<br />
boundary integration variable with Name Iin, Expression p0^2/(2*1.25*343),<br />
Integration order 4, and Global destination.<br />
3 Select Boundary 50. On a new line, create a boundary integration variable with<br />
Name Iout, Expression p_p^2/(2*1.25*343), Integration order 4, and Global<br />
destination.<br />
4 Click OK to close the Boundary Integration Variables dialog box.<br />
Expression Variables<br />
1 Open the Scalar Expressions dialog box from the Options menu. Create a scalar<br />
expression with Name dw and Expression 10*log10(Iin/Iout). This represents the<br />
damping in dB. When done, click OK.<br />
2 Open the Boundary Expressions dialog box. Create a boundary expression with Name<br />
p and Expression depending on the boundary according to the following table; when<br />
done, click OK.<br />
EXPRESSION BOUNDARIES<br />
p_p 2–5, 10, 11, 13, 14, 20–23, 25, 26, 28, 29, 36–39, 46–49<br />
p_c1 6, 7, 12, 16, 33, 41, 44<br />
p_c2 17, 27, 32<br />
3 Open the Subdomain Expressions dialog box. Create a subdomain expression with<br />
Name p and Expression according to the following table; when done, click OK.<br />
EXPRESSION SUBDOMAINS<br />
p_p 1, 3, 5, 6, 8, 9<br />
p_c1 2, 7<br />
p_c2 4
MESH GENERATION<br />
Click the Initialize Mesh button on the Main toolbar to generate the mesh.<br />
COMPUTING THE SOLUTION<br />
1 Click the Solver Parameters button on the Main toolbar.<br />
2 In the Solver Parameters dialog box, select Parametric from the Solver list.<br />
3 Type freq in the Parameter names edit field and range(100,10,1000) in the<br />
Parameter values edit field. This will compute the solution for 91 equally spaced<br />
frequencies from 100 Hz to 1000 Hz. Note that this process takes around<br />
25 minutes; if you want to run a faster analysis, try the same frequency range but<br />
with a step of 100 Hz instead (to do so, type range(100,100,1000)).<br />
4 Click OK.<br />
5 Click the Solve button on the Main toolbar to compute the solution.<br />
POSTPROCESSING AND VISUALIZATION<br />
1 To see what goes on inside the muffler, hide the boundaries that obstruct the view.<br />
To do so, choose Options>Suppress>Suppress Boundaries and suppress Boundaries 1,<br />
8, 9, 15, 18, 19, 24, 30, 31, 34, 35, 40, 42, 43, 45, and 50 by selecting them from<br />
the Boundary selection list in the Suppress Boundaries dialog box. Click OK.<br />
2 Click the Plot Parameters button on the Main toolbar.<br />
3 Visualize the pressure in the muffler with a boundary plot of the absolute value of<br />
the pressure and an isosurface plot of the pressure. To do so, click the General tab,<br />
clear the Slice check box and select the Boundary and Isosurface check boxes in the<br />
Plot type area.<br />
4 Click the Boundary tab and type abs(p) in the Expression edit field.<br />
5 Click the Isosurface tab. Type p in the Expression edit field on the Isosurface Data<br />
page. The suitable number of isosurface levels for the isosurface plot varies with the<br />
frequency. At frequencies with low damping many of the isosurfaces tend to<br />
congregate inside the pipe. For a frequency of 490 Hz (select this solution from the<br />
General page of the Plot Parameters dialog box), ten isolevels gives a nice plot.<br />
6 Click OK.<br />
7 Click the Headlight button on the Camera toolbar to make the visualization more<br />
viewer friendly. The plot should look like the one in Figure 2-4.<br />
ACOUSTICS OF A MUFFLER | 19
20 | CHAPTER 2: ACOUSTICS MODELS<br />
8 Click the Go to XY View toolbar button to see a projection of the plot on the<br />
xy-plane. You may need to click it twice, in case the muffler appears upside<br />
down.The pressure in the second chamber displays a resonance pattern.<br />
Figure 2-4: The solution at 490 Hz. The real value of the pressure is plotted as isosurfaces,<br />
and the absolute value of the pressure is displayed as a boundary plot on the inner walls of<br />
the muffler.<br />
9 To see the damping as a function of the frequency, open the<br />
Cross-Section Plot Parameters dialog box.<br />
10 On the General page, select all solutions in the Solutions to use area.<br />
11 Click the Point plot button.<br />
12 Click the Point tab and type dw in the Expression edit field to make a point plot of<br />
the damping in some arbitrary point located inside the geometry. The origin (the<br />
default point) will do.<br />
13 Click OK to close the Plot Parameters dialog box and generate the plot.<br />
The plot should look like in Figure 2-2. Notice the deep dip in the damping around<br />
490 Hz caused by the resonance in the second chamber. If you plot the pressure in the<br />
muffler at other dips, resonances in the other chambers appear.
Eigenmodes of a Room<br />
Resonance can at times be a problem in everyday life. The low bass notes from the<br />
music system or home theater in the living room can shake the windows and make the<br />
floor vibrate. This happens only for certain frequencies—the eigenfrequencies of the<br />
room.<br />
It is only in the low-frequency range that the eigenfrequencies are well separated. In<br />
the mid- and high-frequency ranges, the eigenfrequencies are packed so closely, with<br />
less than a halftone between them, that the individual resonances are insignificant for<br />
music and other natural sounds. Nevertheless, the music experience is affected by the<br />
acoustics of the room.<br />
When designing a concert hall, it is extremely important to take the resonances into<br />
account. For a clear and neutral sound, the eigenfrequencies should be evenly spaced.<br />
For the home theater or music system owner, who cannot change the shape of the<br />
living room, another question is more relevant: Where should the speakers be located<br />
for the best sound?<br />
Model Definition<br />
For example, take a room with the dimensions 5 by 4 by 2.6 meters equipped with a<br />
TV set, two speakers, and a couch. To illustrate the effects on the music, compute all<br />
eigenfrequencies below 100 Hz together with the corresponding eigenmodes. The<br />
eigenmode shows the sound intensity pattern for its associated eigenfrequency. From<br />
the characteristics of the eigenmodes, you can draw some conclusions as to where the<br />
speakers should be placed.<br />
DOMAIN EQUATIONS<br />
Sound propagating in free air is described by the wave equation:<br />
– ∆p<br />
1<br />
c 2<br />
∂ p<br />
+ ---- =<br />
0<br />
∂<br />
where p is the pressure, and c is the speed of sound. If the air is brought into motion<br />
by a harmonically oscillating source, for example, a loudspeaker, only one frequency f<br />
exists in the room. For that reason it makes sense to look for a time-harmonic solution<br />
on the form<br />
2<br />
t 2<br />
EIGENMODES OF A ROOM | 21
22 | CHAPTER 2: ACOUSTICS MODELS<br />
The wave equation then simplifies to the Helmholtz equation for p, the amplitude of<br />
the acoustic disturbances:<br />
BOUNDARY CONDITIONS<br />
This model assumes that all boundaries—walls, floor, ceiling, and furniture —are<br />
perfectly rigid (sound hard boundaries).<br />
ANALYTIC COMPARISON<br />
It is possible to solve the simpler case of an empty room analytically. Each<br />
eigenfrequency corresponds to an integer triple (i, l, m):<br />
The eigenmodes can be divided into three distinct classes:<br />
Eigenfrequencies with only one index different from zero give rise to axial modes,<br />
that is, plane standing waves between two opposite walls.<br />
If one index is zero, the mode is tangential.<br />
If all indices are different from zero, the mode is oblique.<br />
Theoretical eigenvalues for a room without furniture are found in the following table.<br />
MODE INDEX ω 2 /10 5<br />
fi, l, m<br />
p ˆ<br />
∆<br />
p p ˆ e iωt<br />
=<br />
ω 2<br />
------ p ˆ<br />
+ = 0<br />
MODE INDEX ω 2 /10 5<br />
0,0,0 0 0,1,1 2.444<br />
1,0,0 0.465 2,1,0 2.584<br />
0,1,0 0.726 0,2,0 2.902<br />
1,1,0 1.191 1,1,1 2.908<br />
0,0,1 1.718 1,2,0 3.367<br />
2,0,0 1.858 2,0,1 3.575<br />
1,0,1 2.182 3,0,0 4.180<br />
=<br />
--<br />
c<br />
2<br />
c 2<br />
⎛----- i ⎞<br />
⎝ ⎠<br />
2 ⎛----- l ⎞<br />
⎝ ⎠<br />
2 ⎛----- m ⎞<br />
⎝ ⎠<br />
2<br />
+ +<br />
L x<br />
L y<br />
L z
Results and Discussion<br />
The relevant quantity when it comes to placing the loudspeakers is the amplitude of<br />
the standing pressure wave. A sound source excites an eigenmode the most if it is<br />
placed in one of the pressure antinodes for the mode. Conversely, with the source in a<br />
pressure node, the eigenmode remains silent.<br />
All modes have local maxima in the corners of an empty room so speakers in the<br />
corners excite all eigenfrequencies. This simulation predicts eigenmodes that strongly<br />
resemble those of the corresponding empty room. The higher the frequency, the more<br />
the placing of the furniture matters. For instance, some of the high-frequency<br />
eigenmodes are located behind the couch.<br />
In the strictest sense, the results of this simulation only apply to a room with perfectly<br />
rigid walls and nonabsorbing furniture. The prediction that speakers placed in the<br />
corners of the room excite many eigenmodes and give a fuller and more neutral sound,<br />
however, holds for real-life rooms.<br />
Figure 2-5: The sound pressure distribution for ω = 569 rad/s. The (negative of) the real<br />
part of the pressure is visualized as an isosurface plot, and the absolute value of the pressure<br />
as a boundary plot.<br />
EIGENMODES OF A ROOM | 23
24 | CHAPTER 2: ACOUSTICS MODELS<br />
Model Library path: <strong>COMSOL</strong>_Multiphysics/Acoustics/eigenmodes_of_room<br />
Modeling Using the Graphical User Interface<br />
MODEL NAVIGATOR<br />
1 Click Multiphysics.<br />
2 Select 3D in the Space dimension list.<br />
3 In the list of application modes, select Acoustics (in the <strong>COMSOL</strong> Multiphysics folder if<br />
your license includes additional modules), and in the Acoustics folder, select<br />
Eigenfrequency analysis.<br />
4 Click Add.<br />
5 Add geometries according to the following table by clicking the Add Geometry<br />
button.<br />
NAME SPACE DIMENSION INDEPENDENT VARIABLES<br />
Floor 2D x y z<br />
Table 2D x y z<br />
TV 2D x y z<br />
6 Click OK to close the Model Navigator.<br />
GEOMETRY MODELING<br />
1 Click the Geom1 tab.<br />
2 Click the Block button to create a block with the following dimensions that you<br />
enter in the Length area; when done, click OK.<br />
PARAMETER VALUE<br />
X 5<br />
Y 4<br />
Z 2.6<br />
3 Click to clear the Highlight Face button on the Draw toolbar for a wireframe view.<br />
Now create the cross section of the geometry on the floor of the room. The floor is by<br />
default an xy-plane at z = 0.
1 Go to the Floor work plane and click the Zoom Extents button on the Main toolbar.<br />
2 From the Options menu, open the Axes/Grid Settings dialog box.<br />
3 Click the Grid tab, clear the Auto check box, and change the grid according to the<br />
following table; when done, click OK.<br />
GRID<br />
x spacing 0.2<br />
Extra x 1.7 2.1 4.5 4.7<br />
y spacing 0.2<br />
Extra y 1.7 2.3<br />
4 Draw a rectangle with top left corner at (0.4, 3) and bottom right corner at (1.2, 1).<br />
5 Draw eight squares with side 0.1 and upper left corners at (1.6, 1.7), (1.6, 2.4),<br />
(2.1, 1.7), (2.1, 2.4), (4.4, 1.7), (4.4, 2.4), (4.7, 1.7), and (4.7, 2.4).<br />
6 From the Draw menu, choose Extrude.<br />
7 In the Extrude dialog box, select all objects and set the Distance parameter to 0.4.<br />
8 Click OK.<br />
Figure 2-6: The geometry of the Floor work plane.<br />
Now proceed to create the cross section of the geometry at the level of the table.<br />
EIGENMODES OF A ROOM | 25
1 Go to the Table work plane.<br />
26 | CHAPTER 2: ACOUSTICS MODELS<br />
2 Go to the Work-Plane Settings dialog box and change the z coordinate to 0.4. When<br />
done, click OK.<br />
3 Click the Zoom Extents button on the Main toolbar.<br />
4 In the Axes/Grid Settings dialog box, click the Grid tab and clear the Auto check box.<br />
Then change the grid spacing according to the following table; when done, click OK.<br />
GRID<br />
x spacing 0.2<br />
y spacing 0.2<br />
5 Draw a rectangle with top left corner at (1.6, 2.6) and bottom right corner at<br />
(2.2, 1.4).<br />
6 Make sure the rectangle is selected and choose Extrude from the Draw menu. Set the<br />
distance to 0.1 and click OK.<br />
7 Return to the Table work plane.<br />
8 Draw a rectangle with top left corner at (0.4, 3) and bottom right corner at (1.2, 1),<br />
that is, following the blue projected contour.<br />
9 Draw another rectangle with top left corner at (0.6, 2.8) and bottom right corner<br />
at (1.2, 1.2).<br />
10 Select the two last rectangles and click the Difference button.
11 With the new composite object still selected, open the Extrude dialog box. Set<br />
Distance to 0.4 and Displacement x to -0.1 and click OK.<br />
Figure 2-7: The geometry of the Table work plane.<br />
Finally, create the geometry in the cross section of the TV.<br />
1 Go the TV work plane.<br />
2 Go to the Work-Plane Settings dialog box. Select the y-z plane and set the<br />
x coordinate to 4.4.<br />
3 Click OK.<br />
4 Click the Projection of All 3D Geometries button and after that the Zoom Extents<br />
button.<br />
5 Use Axes/Grid Settings to change the grid as in the following table; when done, click<br />
OK.<br />
GRID<br />
x spacing 0.2<br />
y spacing 0.2<br />
6 Draw the TV set as a rectangle with top left corner at (1.6, 1.0) and bottom right<br />
corner at (2.4, 0.4).<br />
EIGENMODES OF A ROOM | 27
28 | CHAPTER 2: ACOUSTICS MODELS<br />
7 Draw the left speaker as a rectangle with top left corner at (0.8, 1.0) and bottom<br />
right corner at (1.2, 0.0).<br />
8 Draw the right speaker with the same size, but with top left corner at (2.8, 1.0).<br />
9 Select all objects and open the Extrude dialog box. Set distance to 0.4, then click OK.<br />
10 In the 3D geometry, select all objects and click the Difference button.<br />
Now the room is completed and should look like in Figure 2-8.<br />
Figure 2-8: The 3D geometry.<br />
PHYSICS SETTINGS<br />
Boundary Conditions<br />
Use the Sound hard boundary (wall) boundary condition for all boundaries.<br />
Subdomain Settings<br />
Use the default subdomain settings.<br />
MESH GENERATION<br />
Click the Initialize Mesh button to initialize the mesh.
COMPUTING THE SOLUTION<br />
1 Make sure that Eigenfrequency is selected from the Solver list in the Solver Parameters<br />
dialog box.<br />
2 To get 6 eigenfrequencies around 90 Hz enter 6 in the Desired number of<br />
eigenfrequencies edit field, this is default, and 90 in the Search for eigenfrequencies<br />
around edit field.<br />
3 Click OK to close the Solver Parameters dialog box.<br />
4 Click the Solve button to compute the solution.<br />
POSTPROCESSING AND VISUALIZATION<br />
The default plot style is a slice plot showing the sound pressure in five equally spaced<br />
slices. Try looking at some of the eigenmodes. The first eigenvalue in the list is very<br />
small. Its true value is zero, corresponding to the solution without any sound. The next<br />
few are axial and tangential modes. To get a better view of the more complicated<br />
eigenmodes, you can do a combined surface and boundary plot (see Figure 2-5).<br />
1 In the Suppress Boundaries dialog box in the Options menu, suppress Boundaries 1,<br />
2, and 4.<br />
2 On the General page of the Plot Parameters dialog box, clear the Slice check box and<br />
select the Isosurface, Boundary, and Geometry edges check boxes in the Plot type area.<br />
In the Eigenfrequency list, select the eigenvalue of about 90.6.<br />
3 Click the Boundary tab and type abs(p) in the Expression edit field.<br />
4 Click the Isosurface tab and type -p in the Expression edit field.<br />
5 Click the Scene Light and Perspective Projection buttons in the Camera toolbar.<br />
6 Click OK.<br />
This particular mode is concentrated behind the couch. Try moving around the room<br />
and looking at other eigenmodes. It is possible that you can identify some of them with<br />
the exact solutions for the case of an empty room.<br />
EIGENMODES OF A ROOM | 29
30 | CHAPTER 2: ACOUSTICS MODELS
Chemical Engineering Models<br />
This section contains a model of a tubular reactor and a model of surface diffusion<br />
and surface reactions coupled to transport of species to the reacting surface—a<br />
comprehensive set of chemical engineering models covering mass balances, energy<br />
balances, and momentum balances is available in the Model Library that comes<br />
with the Chemical Engineering Module.<br />
3<br />
31
Transport and Adsorption<br />
This model demonstrates one of the unique features of <strong>COMSOL</strong> Multiphysics: the<br />
possibility to model phenomena defined in different numbers of dimensions in a fully<br />
coupled manner.<br />
Whereas in most cases you define the reaction rate expression as a function of the<br />
concentrations of the reactants and products, in adsorption reactions it is also necessary<br />
to model the surface concentrations of the active sites or surface complex. This implies<br />
that the mass balance in the bulk of the reactor must be coupled to the mass balance<br />
for species present only at the surface of the device. This device could be a catalyst, a<br />
biochip, a semiconductor component, or any process with surface-specific species.<br />
In this particular case, the model involves a small parallel-plate reactor with an active<br />
surface. It is a simple example of surface diffusion and surface reactions coupled to the<br />
transport of species between the reacting surface and the surrounding volume.<br />
Processes of this kind are found, for instance, in heterogeneous reactors and biacore<br />
chips.<br />
32 | CHAPTER 3: CHEMICAL ENGINEERING MODELS
Model Definition<br />
The geometry of the domain appears in Figure 3-1.<br />
Figure 3-1: The modeled domain is a parallel plate reactor with an active surface where<br />
you want to model the concentration of surface species.<br />
The first approximation you can make is to reduce the 3D geometry to a 2D<br />
approximation, which is reasonable if the variations in concentration are small along<br />
the depth of the domain.<br />
DOMAIN EQUATIONS<br />
The reaction at the active surface is given as<br />
where<br />
3D<br />
Modeled cross sectional plane<br />
Active surface<br />
c is the bulk concentration (mol/m 3 )<br />
k ads<br />
θ is the surface concentration of active sites (mol/m 2 )<br />
c s is the surface concentration of adsorbed species (mol/m 2 )<br />
2D<br />
c + θ ⇔ cs k des<br />
Gas outlet<br />
Gas inlet<br />
Active surface<br />
TRANSPORT AND ADSORPTION | 33
k ads is the rate constant for the forward reaction (m 3 /(mol·s))<br />
k des is the rate constant for the backward reaction (1/s)<br />
Note: The surface concentration is in moles per unit surface.<br />
The material balance for the surface, including surface diffusion and the reaction rate<br />
expression for the formation of the adsorbed species, c s , is:<br />
where D s represents surface diffusivity. However, the concentration of active sites is<br />
equal to the difference between the total concentration of active sites and the number<br />
of sites occupied by the adsorbed species. This gives the following equation for the<br />
reaction rate:<br />
34 | CHAPTER 3: CHEMICAL ENGINEERING MODELS<br />
∂cs<br />
------- + ∇ ⋅ ( – D<br />
∂t<br />
s∇c s)<br />
= kadscθ– kdescs ∂cs<br />
------- + ∇ ⋅ ( – D<br />
∂t<br />
s∇cs ) = kadsc( θ0 – cs) – kdescs (3-1)<br />
In the above equation, θ 0 represents the total number of active sites available on the<br />
surface of the catalyst. Equation 3-1 also defines the units of the rate constants: k ads<br />
and k des. The initial condition is that the concentration of adsorbed species is zero at<br />
the beginning of the process:<br />
The equation for the surface-reaction expression includes the concentration of the<br />
bulk species, c, at the position of the catalyst surface. Thus you must solve the equation<br />
for the surface reaction in combination with the mass balance in the bulk. The coupling<br />
between the mass balance in the bulk and the surface is obtained as a boundary<br />
condition in the bulk’s mass balance. This condition sets the flux of c at the boundary<br />
equal to the rate of the surface reaction and is presented below. The transport in the<br />
bulk of the reactor is described by a convection-diffusion equation:<br />
The initial condition sets the concentration in the bulk at t = 0:<br />
c s<br />
= 0<br />
----<br />
∂c<br />
+ ∇ ⋅ ( – D∇c+ cu)<br />
= 0<br />
∂t<br />
c =<br />
c0 (3-2)
In the above equation, D denotes the diffusivity of the reacting species, c is its<br />
concentration, and u is the velocity. In this case, the velocity in the x direction equals<br />
0 while the velocity in the y direction comes from the analytical expression for fully<br />
developed laminar flow between two parallel plates:<br />
Here, δ is the distance between the plates, and v max is the maximum local velocity. We<br />
assume that the origin for x is at the left edge of the model depicted in Figure 3-1.<br />
BOUNDARY CONDITIONS<br />
The boundary conditions for the material balance for the surface species are insulating<br />
conditions according to:<br />
For the bulk, the boundary condition at the active surface couples the rate of the<br />
reaction at the surface with the flux of the reacting species and the concentration of<br />
the adsorbed species and bulk species:<br />
The other boundary conditions for the bulk problem are:<br />
Inlet: c = c 0<br />
Outlet:<br />
Insulation:<br />
( x – 0.5δ)<br />
u 0 vmax 1 ⎛------------------------ ⎞<br />
⎝ 0.5δ ⎠<br />
2<br />
= ( , –<br />
)<br />
n ⋅ ( – Ds∇cs ) = 0<br />
n ⋅ ( – D∇c+ cu)<br />
= – kadsc(<br />
θ0 – cs) + kdescs n ⋅ ( – D∇c+ cu)<br />
= n ⋅ cu<br />
n ⋅ ( – D∇c+ cu)<br />
=<br />
0<br />
Modeling in <strong>COMSOL</strong> Multiphysics<br />
(3-3)<br />
This model deals with a phenomenon occurring in a 2D domain (convection-<br />
diffusion) coupled to another phenomenon occurring only at the 1D boundary of the<br />
2D domain (diffusion-reaction). The <strong>COMSOL</strong> Multiphysics implementation is<br />
straightforward in every step except for the definition of the 1D problem, which<br />
requires some mathematical background. You need to use weak-form application<br />
modes for modeling PDEs on boundaries, edges, or points. To add the 1D boundary<br />
equation in the 2D model, use the Weak Form, Boundary application mode. This<br />
enables you to formulate the problem with the weak form instead of with the PDE<br />
form. An examination of the spatial diffusion on the boundary shows that only the flux<br />
tangential to the surface is defined. Therefore, in the weak-form specification you must<br />
TRANSPORT AND ADSORPTION | 35
make use of the special tangential derivative variable. For more information about<br />
how to specify equations on the weak form, refer to the chapter “Deriving the Weak<br />
Form” on page 360 in the <strong>COMSOL</strong> Multiphysics Modeling Guide.<br />
You define the two equations using the multiphysics feature of <strong>COMSOL</strong><br />
Multiphysics. Select the two application modes, corresponding to the 2D and 1D<br />
material balances, in the Model Navigator.<br />
Results<br />
Figure 3-2: The concentration of the reacting species, c, after 2 seconds of operation in the<br />
2D cross section (top) and along the active surface (bottom).<br />
36 | CHAPTER 3: CHEMICAL ENGINEERING MODELS
The upper plot in Figure 3-2 shows the concentration, c, of the reacting species in the<br />
2D subdomain after 2 seconds of operation. The reaction is very fast and almost<br />
reaches steady state in that time frame. The lower plot, displaying the concentration<br />
along a vertical cross section of the active surface, shows that the concentration<br />
distribution exhibits edge effects at both ends of the catalyst. The higher concentration<br />
near y = 0 is easy to explain because this is the position closest to the inlet, and this end<br />
is therefore continuously supplied with fresh reactant. The increase in concentration at<br />
the end closer to the outlet is due to radial diffusion; the edge of the surface can receive<br />
diffusion in all directions within a 90° angle without having to “compete” for the<br />
reactant supply with other parts of the catalysts. This effect also appears at the edge<br />
close to the inlet.<br />
The concentration of adsorbed species, c s , shows a similar spatial distribution.<br />
However, while the concentration of the reactant decreases with time, the<br />
concentration of adsorbed species increases. You can also see that the slight spatial<br />
diffusion evens out the concentration gradients somewhat (see Figure 3-3).<br />
Increasing time<br />
Figure 3-3: The concentration of adsorbed species increases with time. The edge effect<br />
appears at both edges due to the increased supply of reactants. This figure displays the<br />
concentration after 0.05, 0.5, 1.0, 1.5, and 2.0 s.<br />
TRANSPORT AND ADSORPTION | 37
The concentration of reacting species decreases while the surface concentration of the<br />
adsorbed species increases with time. This implies that the surface reaction rate<br />
decreases with time. You can see this effect in Figure 3-4, which also shows that after<br />
0.5 s the reaction rate almost reaches steady-state. The upper curve shows the reaction<br />
rate after 0.05 s, while the lower curve represents the curves for 0.5, 1.0, 1.5, and 2.0 s,<br />
which are all on top of each other.<br />
Figure 3-4: Surface reaction rate at the active surface. The largest reaction rate is<br />
obtained initially and is at the edges of the active surface. The reaction process almost<br />
reaches steady state at 0.5 s.<br />
Model Library path: <strong>COMSOL</strong>_Multiphysics/Chemical_Engineering/<br />
adsorption<br />
Modeling Using the Graphical User Interface<br />
The following pages describe how to solve this problem using the graphical user<br />
interface.<br />
38 | CHAPTER 3: CHEMICAL ENGINEERING MODELS<br />
Increasing time
MODEL NAVIGATOR<br />
1 Start <strong>COMSOL</strong> Multiphysics.<br />
2 In the Model Navigator, click the Multiphysics button and select 2D in the Space<br />
dimension list.<br />
3 Highlight the application mode <strong>COMSOL</strong> Multiphysics>Convection and<br />
Diffusion>Convection and Diffusion>Transient analysis. Click the Add button.<br />
4 Select the application mode <strong>COMSOL</strong> Multiphysics>PDE Modes>Weak Form, Boundary.<br />
Type cs in the Dependent variables edit field. Click the Add button.<br />
5 Click OK.<br />
OPTIONS AND SETTINGS<br />
1 From the Options menu, choose Constants.<br />
2 Define the following constants in the Constants dialog box:<br />
NAME EXPRESSION DESCRIPTION<br />
c0 1000[mol/m^3] Initial concentration<br />
kads 1e-6[m^3/(mol*s)] Forward rate constant<br />
kdes 1e-9[1/s] Backward rate constant<br />
theta0 1000[mol/m^2] Active site concentration<br />
Ds 1e-11[m^2/s] Surface diffusivity<br />
D 1e-9[m^2/s] Gas diffusivity<br />
TRANSPORT AND ADSORPTION | 39
NAME EXPRESSION DESCRIPTION<br />
v_max 1[mm/s] Maximum velocity<br />
delta 0.1[mm] Channel width<br />
3 Click OK.<br />
4 Open the Axes/Grid Settings dialog box from the Options menu. Specify the following<br />
settings and click OK.<br />
POSITION X-Y LIMITS<br />
x min -15e-5<br />
x max 25e-5<br />
y min -15e-5<br />
y max 25e-5<br />
GEOMETRY MODELING<br />
1 Hold down the shift key and click the Rectangle/Square button on the Draw toolbar.<br />
Enter the values listed below in the corresponding edit fields and click OK.<br />
EDIT FIELD VALUE<br />
Width 1e-4<br />
Height 3e-4<br />
x 0<br />
y -1e-4<br />
2 Click the Zoom Extents button on the Main toolbar.<br />
3 Click the Point button and click on the coordinate (1e-4, 0) in the drawing area.<br />
Click the Point button again and click on (1e-4, 1e-4).<br />
PHYSICS SETTINGS<br />
Expression Variables<br />
1 On the Options menu, point to Expressions and then click Boundary Expressions.<br />
2 Select Boundary 5 in the Boundary selection list and enter the following expression.<br />
NAME EXPRESSION<br />
react_surf kads*c*(theta0-cs)-kdes*cs<br />
3 Click OK.<br />
4 On the Options menu, select Expressions and then click Subdomain Expressions.<br />
40 | CHAPTER 3: CHEMICAL ENGINEERING MODELS
5 Select Subdomain 1 in the Subdomain selection list and enter the following<br />
expression.<br />
NAME EXPRESSION<br />
v_lam v_max*(1-((x-0.5*delta)/(0.5*delta))^2)<br />
6 Click OK.<br />
Boundary Conditions<br />
1 From the Multiphysics menu, select 1 Convection and Diffusion (cd).<br />
2 From the Physics menu, choose Boundary Settings.<br />
3 Enter boundary conditions according to the following table:<br />
SETTINGS BOUNDARIES 1, 4, 6 BOUNDARY 2 BOUNDARY 3 BOUNDARY 5<br />
Type Insulation/<br />
Symmetry<br />
c0 N0 4 Click OK.<br />
Subdomain Settings<br />
1 From the Physics menu, choose Subdomain Settings.<br />
2 Select Subdomain 1 in the Subdomain Settings dialog box.<br />
3 Specify the settings as in the following table:<br />
QUANTITY VALUE/EXPRESSION<br />
δts 1<br />
D (isotropic) D<br />
R 0<br />
u 0<br />
v v_lam<br />
4 Click the Init tab and type c0 in the Concentration, c edit field (c(t 0 )).<br />
5 Click OK.<br />
Concentration Convective flux Flux<br />
c0<br />
-react_surf<br />
Boundary Conditions<br />
Perform this step to specify the transport equation stated in Equation 3-1. Do so in<br />
the Boundary Settings dialog box because the catalytic surface is a boundary of the 2D<br />
geometry.<br />
TRANSPORT AND ADSORPTION | 41
1 In the Multiphysics menu, select 2 Weak Form, Boundary (wb).<br />
2 From the Physics menu, choose Boundary Settings.<br />
3 Select the Select by group check box, then click in the Boundary selection list to select<br />
all boundaries (Boundaries 1–6). Clear the Active in this domain check box.<br />
4 Clear the Select by group check box, then select Boundary 5. Check the Active in this<br />
domain check box to enable the weak form application mode only on this boundary.<br />
5 Click the Init tab and then type 0 in the cs(t0 ) edit field.<br />
6 Click the Weak tab. Make the following specifications:<br />
TERM VALUE/EXPRESSION<br />
weak Ds*(-test(csTx)*csTx-test(csTy)*csTy)+<br />
test(cs)*(react_surf-cst)<br />
dweak 0<br />
constr 0<br />
7 Click OK.<br />
By adding T to all the weak variables you get the tangential components discussed in<br />
the section “Modeling in <strong>COMSOL</strong> Multiphysics” on page 35. The lowercase t<br />
indicates the derivative with respect to time.<br />
Point Settings<br />
To enforce the boundary condition in Equation on the surface equation you must<br />
open the Point Settings dialog box from the Physics menu and select Points 4 and 5. In<br />
this case the default settings are correct, that is, the weak, dweak, and constr edit fields<br />
should all contain 0, so just leave them as is.<br />
MESH GENERATION<br />
1 From the Mesh menu, choose Free Mesh Parameters.<br />
2 In the Free Mesh Parameters dialog box, click the Boundary tab and select<br />
Boundary 5 from the list.<br />
3 Type 1.5e-6 in the Maximum element size edit field.<br />
4 Click Remesh, then click OK.<br />
COMPUTING THE SOLUTION<br />
1 Click the Solver Parameters button on the Main toolbar.<br />
2 Select Time dependent in the Solver list.<br />
3 In the Time stepping area, type range(0,0.05,2) in the Times edit field.<br />
42 | CHAPTER 3: CHEMICAL ENGINEERING MODELS
4 Click OK.<br />
5 Click the Solve button on the Main toolbar.<br />
POSTPROCESSING AND VISUALIZATION<br />
To generate the right plot in Figure 3-2:<br />
1 From the Postprocessing menu, choose Domain Plot Parameters.<br />
2 Go to the General tab and click the Line/Extrusion plot button. Select 2 in the<br />
Solutions to use list. Customize the plot with text labels by clicking the Title/Axis<br />
button.<br />
3 Click the Line/Extrusion tab and then select Convection and Diffusion (cd)><br />
Concentration, c from the Predefined quantities list.<br />
4 From the Boundary selection list select Boundary 5.<br />
5 Under x-axis data, click the upper option button. Select y from the adjacent list.<br />
6 Click OK.<br />
To generate Figure 3-3, repeat the previous operations but with these changes:<br />
1 On the General page, go to the Solutions to use list and hold down the Ctrl key to<br />
select the times 0.05, 0.5, 1.0, 1.5, and 2.0.<br />
2 Click the Line/Extrusion tab and then select Weak Form, Boundary (wb)>cs from the<br />
Predefined quantities list.<br />
To generate Figure 3-4, repeat the previous operations but with this change:<br />
On the Line/Extrusion tab, type react_surf in the Expression edit field.<br />
TRANSPORT AND ADSORPTION | 43
Tubular Reactor<br />
Introduction<br />
This example studies an elementary, exothermic, 2nd-order reversible reaction<br />
44 | CHAPTER 3: CHEMICAL ENGINEERING MODELS<br />
(3-4)<br />
in a tubular reactor (liquid phase, laminar flow regime). The reactor is equipped with<br />
a cooling jacket to limit the temperature increase due to the exothermic nature of the<br />
reaction and avoid an explosion. The model is described by the material balances for<br />
the species involved and the energy balances for the reactor and the cooling jacket.<br />
Additional background to this model is available in Section 8.9 of the Fourth Edition<br />
of Elements of Chemical Reaction Engineering by H.S. Fogler.<br />
Model Definition<br />
A+ B⇔2C<br />
Figure 3-5 illustrates the reactor geometry. By assuming that the variations in the<br />
angular direction around the centerline are negligible, you can use a 2D axisymmetric<br />
model.<br />
Figure 3-5: Geometry for the 2-dimensional rotationally symmetric models.<br />
The model geometry consists of an inlet boundary, an outlet boundary, a reactor wall<br />
facing the cooling jacket, and the symmetry axis r =0. The reactor’s radius is R = 8 cm<br />
its length L = 1 m.
Assuming the diffusivities for the three species to be identical, you can model the<br />
reactor using three differential equations:<br />
A material-balance partial differential equation (PDE) for one of the species. As<br />
noted in the next section, separate material-balance equations are not necessary for<br />
the other two species if the diffusivities are identical.<br />
An energy-balance PDE for the reactor core.<br />
An energy-balance ordinary differential equation (ODE) for the cooling jacket.<br />
Under the assumptions that the coolant flow is turbulent and that turbulent mixing<br />
eliminates any temperature differences in the radial direction, only axial temperature<br />
variations are present in the cooling jacket. For this reason, the cooling jacket is not<br />
included in the model geometry.<br />
The material and energy balances in the reactor are automatically set up in <strong>COMSOL</strong><br />
Multiphysics by selecting the proper application modes. The ordinary differential<br />
equation that describes the energy balance in the cooling jacket is manually defined as<br />
a boundary equation.<br />
The material balance and energy balances for the reactor are described by the equations<br />
∇ ⋅ ( – D∇cA+ ucA) = rA ∇ ⋅ ( – k∇T+ uρC pT) = ∆HRxrA (3-5)<br />
In the material-balance equation for c A (mol/m 3 ), the concentration of species A, D<br />
(m 2 /s) denotes the diffusion coefficient, u (m/s) the flow velocity, and r A (mol/<br />
(m 3 ·s)) the reaction rate. In the energy-balance equation for the reactor temperature,<br />
T (K), the additional parameters are the thermal conductivity, k (W/(m·K)), the fluid<br />
density, ρ (kg/m 3 ), the specific heat capacity, C p (J/(kg·K)), and the reaction enthalpy<br />
∆H Rx (J/mol).<br />
The boundary conditions for Equations 3-5 are as follows (see Figure 3-5 for the<br />
appropriate references):<br />
cA( r, 0)<br />
= cA0 Tr0 ( , ) = T0 ∂cA ( Rz , )<br />
∂r<br />
∂T<br />
( Rz , )<br />
∂r<br />
Here c A0 and T 0 denote the initial concentration and temperature, respectively.<br />
For the flow velocity, assume a laminar profile:<br />
∂cA = ( 0, z)<br />
= 0<br />
∂r<br />
=<br />
∂T<br />
( 0, z)<br />
= 0<br />
∂r<br />
∂cA ( r, L)<br />
= 0<br />
∂z<br />
∂T<br />
( rL , ) =<br />
0<br />
∂z<br />
(3-6)<br />
TUBULAR REACTOR | 45
46 | CHAPTER 3: CHEMICAL ENGINEERING MODELS<br />
(3-7)<br />
Here u max = 2u 0 , where the average velocity, u 0 (m/s), is calculated as the ratio<br />
between the total volume flow rate, v 0 (m 3 /s), and the reactor’s cross-sectional area,<br />
πR 2 .<br />
In this model, assume that the species A, B, and C have the same diffusivity. This<br />
implies that you only need to solve one material balance, because you can find the<br />
other species’ concentrations through stoichiometry. Specifically, assuming the initial<br />
concentration for species C to be zero, the concentrations are given by<br />
where x A is the conversion of species A.<br />
r<br />
u umax 1 ⎛--- ⎞<br />
⎝R⎠ 2<br />
= ⎛<br />
⎝<br />
– ⎞<br />
⎠<br />
cA = ( 1 – xA)cA0 cB = cB0 – xAcA0 cC = 2xAc A0<br />
In the <strong>COMSOL</strong> Multiphysics Chemical Engineering Module, you could have<br />
modeled all three species using their true multicomponent diffusivities. These<br />
assumptions give the reaction-rate expression<br />
r A<br />
E<br />
A ⎛---------- ⎞<br />
⎛ ⎞<br />
= – exp cAc ---------<br />
⎝RgT⎠ ⎜ B – ⎟<br />
⎝ ⎠<br />
(3-8)<br />
(3-9)<br />
where A (m 3 /(mol·s)) refers to the rate constant, E (J/mol) is the activation energy,<br />
R g =8.314 J/(mol·K) denotes the ideal gas constant, T (K) is the temperature, and the<br />
equilibrium constant is<br />
The energy-balance ODE for the coolant reads<br />
(3-10)<br />
(3-11)<br />
where T c is the coolant temperature (K), U k (W/(m 2 ·K)) is the total heat-transfer<br />
coefficient between the reactor and the cooling jacket, rate, C pc (J/(kg·K)) is the<br />
coolant’s specific heat capacity, and m c (kg/s) represents its mass flow. You can neglect<br />
the heat conduction in the cooling jacket and thus assume that heat transport takes<br />
place only through convection.<br />
As a boundary condition, set the temperature of the incoming cooling fluid:<br />
2<br />
cC K eq<br />
Keq Keq0 ∆HRxR ---------------<br />
1<br />
g 303 K<br />
1<br />
= exp⎛<br />
⎛ – --- ⎞⎞<br />
⎝ ⎝ T⎠⎠<br />
∂Tc --------<br />
∂z<br />
2π RUk( T– Tc) =<br />
----------------------------------------<br />
Cpc mc
Table 3-1 summarizes the relevant input data.<br />
TABLE 3-1: MODEL INPUT DATA<br />
PROPERTY VALUE<br />
D 10 -9 m 2 /s<br />
k 0.559 W/(m·K)<br />
ρ 1000 kg/m 3<br />
Cp 4180 J/(kg·K)<br />
∆HRx -83,680 J/mol<br />
T0 320 K<br />
cA0 500 mol/m 3<br />
cB0 500 mol/m 3<br />
v0 5·10 -4 m 3 /s<br />
A 1.65·10 11 m 3 /(mol·s)<br />
E 95,238 J/mol<br />
Keq0 10 3<br />
Uk 1300 W/(m 2 ·K)<br />
C pc<br />
m c<br />
T c0<br />
Results<br />
4180 J/(kg·K)<br />
0.01 kg/s<br />
298 K<br />
Tc( 0)<br />
=<br />
Tc0 . (3-12)<br />
From the plots in Figure 3-6 you can see how the conversion and temperature vary<br />
inside the reactor. Due to a larger residence time, you find the highest conversion close<br />
to the wall (right side). Also, the cooling effect of the wall is evident from the<br />
temperature plot. Nevertheless, the temperature maximum is located close to the wall<br />
because the temperature depends strongly on the relation between the convected heat<br />
and the heat produced in the reaction. Due to the laminar-flow velocity profile, the<br />
TUBULAR REACTOR | 47
fluid close to the reactor wall but not in contact with the cooling jacket is heated<br />
during a longer time by the exothermic reactions.<br />
Figure 3-6: Conversion (left) and temperature (right) in the reactor.<br />
Figure 3-7 shows how the coolant temperature increases along the length of the<br />
reactor. The temperature increases rapidly close to the inlet, but as the reaction rate<br />
decreases due to the depletion of reactants so does the rate of temperature increase.<br />
Figure 3-7: Coolant temperature along the length of the reactor.<br />
Model Library path:<br />
<strong>COMSOL</strong>_Multiphysics/Chemical_Engineering/tubular_reactor<br />
48 | CHAPTER 3: CHEMICAL ENGINEERING MODELS
Modeling Using the Graphical User Interface<br />
MODEL NAVIGATOR<br />
1 In the Model Navigator, select Axial symmetry (2D) from the Space dimension list.<br />
2 Click the Multiphysics button in the lower-right corner.<br />
3 Open the <strong>COMSOL</strong> Multiphysics folder and select the Convection and Diffusion<br />
application mode from the Convection and Diffusion folder.<br />
4 In the Dependent variables edit field, type cA. Click Add.<br />
5 Add the Convection and Conduction application mode from the Heat Transfer folder.<br />
6 From the Space dimension list, select 2D.<br />
7 Open the <strong>COMSOL</strong> Multiphysics>PDE Modes folder and select Weak Form, Boundary.<br />
8 Change the name of the dependent variable to Tc, then click Add.<br />
9 Click OK.<br />
OPTIONS AND SETTINGS<br />
1 Go to the Options menu and choose Constants.<br />
2 Make the following entries in the Constants dialog box and then click OK.<br />
NAME EXPRESSION DESCRIPTION<br />
D 1e-9[m^2/s] Diffusivity<br />
k 0.559[W/(m*K)] Thermal conductivity, reactor<br />
rho 1000[kg/m^3] Fluid density, reactor<br />
Cp 4180[J/(kg*K)] Specific heat capacity, reactor<br />
dHRx -83680[J/mol] Reaction enthalpy<br />
T0 320[K] Initial temperature, reactor<br />
cA0 500[mol/m^3] Initial concentration, species A<br />
cB0 500[mol/m^3] Initial concentration, species B<br />
R 8[cm] Reactor radius<br />
v0 0.0005[m^3/s] Total flow rate, reactor<br />
u0 v0/(pi*R^2) Mean axial flow velocity<br />
E 95238[J/mol] Activation energy<br />
A 1.65e11[m^3/(mol*s)] Rate constant frequency factor<br />
Rg 8.314[J/(mol*K)] Ideal gas constant<br />
Keq0 1000 Equilibrium constant at 303 K<br />
Uk 1300[W/(m^2*K)] Heat transfer coefficient<br />
TUBULAR REACTOR | 49
NAME EXPRESSION DESCRIPTION<br />
Tc0 298[K] Coolant temperature, inlet<br />
Cpc 4180[J/(kg*K)] Specific heat capacity, coolant<br />
mc 0.01[kg/s] Total mass-flow rate, coolant<br />
3 Go to the Options menu and choose Expressions>Scalar Expressions.<br />
4 Make the following entries in the Scalar Expressions dialog box; when done, click OK.<br />
NAME EXPRESSION DESCRIPTION<br />
uz 2*u0*(1-(r/R)^2) Axial flow velocity<br />
xA (cA0-cA)/cA0 Conversion, species A<br />
cB cB0-cA0*xA Concentration, species B<br />
cC 2*cA0*xA Concentration, species C<br />
rA -A*exp(-E/(Rg*T))<br />
*(cA*cB-cC^2/Keq)<br />
Keq Keq0*exp(dHRx/Rg<br />
*(1/303[K]-1/T))<br />
GEOMETRY MODELING<br />
1 Go to the Draw menu and select Specify Objects>Rectangle.<br />
2 Type 0.08 in the Width edit field and 1 in the Height edit field. Click OK.<br />
3 Click Zoom Extents to center the geometry.<br />
PHYSICS SETTINGS<br />
Subdomain Settings—Convection and Diffusion<br />
1 From the Multiphysics menu, select Convection and Diffusion (cd).<br />
2 From the Physics menu, select Subdomain Settings.<br />
3 In the Subdomain Settings dialog box, select Subdomain 1 and type D in the<br />
Diffusion coefficient edit field.<br />
4 In the Reaction rate edit field, type rA.<br />
5 In the z-velocity edit field, type uz.<br />
6 Still in the Subdomain Settings dialog box, click the Init tab.<br />
7 In the edit field for cA(t 0 ), enter the initial value cA0.<br />
8 Click OK.<br />
50 | CHAPTER 3: CHEMICAL ENGINEERING MODELS<br />
Reaction rate<br />
Equilibrium constant<br />
Q (-rA)*(-dHRx) Heat production
Boundary Conditions—Convection and Diffusion<br />
1 From the Physics menu, choose Boundary Settings.<br />
2 In the Boundary Conditions dialog box enter the following boundary conditions.<br />
SETTINGS BOUNDARIES 1, 4 BOUNDARY 2 BOUNDARY 3<br />
Type Insulation/Symmetry Concentration Convective flux<br />
cA0 - cA0 -<br />
3 Click OK.<br />
Subdomain Settings—Convection and Conduction<br />
1 From the Multiphysics menu, choose Convection and Conduction (cc).<br />
2 From the Physics menu, choose Subdomain Settings and select Subdomain 1.<br />
3 In the Thermal conductivity edit field, type k.<br />
4 In the Density edit field, type rho.<br />
5 In the Heat capacity at constant pressure edit field, type Cp.<br />
6 In the Heat source edit field, type Q.<br />
7 In the z component (right) edit field for the Velocity field, type uz.<br />
8 Still in the Subdomain Settings dialog box, click the Init tab.<br />
9 In the edit field for T(t 0 ), enter the initial value T0.<br />
10 Click OK.<br />
Boundary Conditions—Convection and Conduction<br />
1 From the Physics menu, choose Boundary Settings.<br />
2 In the Boundary Conditions dialog box enter the following boundary conditions.<br />
SETTINGS BOUNDARY 1 BOUNDARY 2 BOUNDARY 3 BOUNDARY 4<br />
Type Axial symmetry Temperature Convective flux Heat flux<br />
q0 - T0 - -Uk*(T-Tc)<br />
Because Tc is the dependent variable of a PDE application mode, it does not have<br />
an associated unit. Therefore, if the Highlight unexpected units check box is selected<br />
in your modeling session, the Unit label for the q 0 edit field appears in red. Provided<br />
you specify the boundary condition for Tc using the chosen base unit system<br />
(specified under Physics>Model Settings; the default choice is SI), you can safely<br />
ignore this warning.<br />
3 Click OK.<br />
TUBULAR REACTOR | 51
Boundary Conditions—Weak Form, Boundary<br />
1 From the Multiphysics menu, choose Weak Form, Boundary (wb).<br />
2 From the Physics menu, choose Boundary Settings.<br />
3 Select Boundaries 1–3 in the Boundary selection list and clear the Active in this<br />
domain check box.<br />
4 Select Boundary 4 and click the Weak tab.<br />
5 In the weak edit field, type Tc_test*(TcTz-2*pi*R*Uk*(T-Tc)/(Cpc*mc)).<br />
6 Click OK.<br />
7 From the Physics menu, choose Point Settings.<br />
8 Select Point 3 from the Point selection list.<br />
9 Set the inlet temperature of the cooling water by typing Tc-Tc0 in the constr edit<br />
field.<br />
10 Click OK.<br />
MESH GENERATION<br />
1 From the Mesh menu, choose Mapped Mesh Parameters.<br />
2 Click the Boundary tab.<br />
3 Select Boundaries 1 and 4 from the Boundary selection list by left-clicking and<br />
holding down the Ctrl-key.<br />
4 Select the Constrained edge element distribution check box, then set the Number of<br />
edge elements to 100. In the Distribution area, set the Element ratio to 15 and select<br />
Exponential as the Distribution method.<br />
5 Select Boundaries 2 and 3 from the Boundary selection list.<br />
6 Select the Constrained edge element distribution check box, then set the Number of<br />
edge elements to 60. In the Distribution area, set the Element ratio to 40, select<br />
Exponential as the Distribution method, and select the Reverse direction check box.<br />
7 Click Remesh. When the mesher has finished, click OK.<br />
The generated mesh is dense both close to the cooling wall to resolve the large<br />
gradients in temperature and close to the reactor inlet to resolve the large gradients in<br />
composition.<br />
COMPUTING THE SOLUTION<br />
1 Click the Solver Parameters button on the Main toolbar.<br />
2 Make sure the Stationary solver is selected.<br />
52 | CHAPTER 3: CHEMICAL ENGINEERING MODELS
3 Click OK.<br />
4 Click the Solve button on the Main toolbar to start the simulation.<br />
POSTPROCESSING AND VISUALIZATION<br />
The default plot displays the concentration profile.<br />
To see the resulting conversion or temperature profiles, follow these steps:<br />
1 Click the Plot Parameters button on the Main toolbar.<br />
2 To see the conversion or temperature profile, go to the Surface page and type xA (for<br />
the conversion) or T (for the temperature) in the Expression edit field.<br />
3 Click OK to close the Plot Parameters dialog box.<br />
4 Use the Zoom Window tool on the Main toolbar to get a closer look at the results<br />
(see Figure 3-6).<br />
To plot the coolant temperature throughout the length of the reactor (see Figure 3-7),<br />
follow these steps:<br />
1 From the Postprocessing menu, choose Domain Plot Parameters.<br />
2 Click the Line/Extrusion tab and select Boundary 4 from the Boundary selection list.<br />
3 From the Predefined quantities list, select Weak Form, Boundary (wb)>Tc.<br />
4 From the x-axis data list, select z.<br />
5 Click OK.<br />
To investigate the average outlet conversion, concentration, and temperature follow<br />
the steps below:<br />
1 From the Postprocessing menu, choose Boundary Integration.<br />
2 Select Boundary 3 in the Boundary selection list.<br />
3 Select the Compute surface integral (for axisymmetric modes) check box.<br />
4 Type 1 in the Expression edit field to get the cross-sectional area of the reactor.<br />
5 Click Apply. The value of the integral (roughly 0.0201 m 2 ) appears in the message<br />
log at the bottom of the user interface.<br />
6 Type xA in the Expression edit field, then click OK. To get the average outlet<br />
conversion, divide the result with the reactor’s cross-sectional area.<br />
7 Follow the same procedure using the expressions cA and T to find the average outlet<br />
concentration and temperature, respectively.<br />
TUBULAR REACTOR | 53
54 | CHAPTER 3: CHEMICAL ENGINEERING MODELS
4<br />
Electromagnetics Models<br />
This chapter contains a few electromagnetics models—more comprehensive sets<br />
are available in the model libraries that comes with the AC/DC Module and<br />
RF Module. For introductory electromagnetics models and information about the<br />
application modes for electromagnetics, see “Electromagnetics” on page 77 in the<br />
<strong>COMSOL</strong> Multiphysics Modeling Guide.<br />
Several physical quantities are fundamental to electromagnetics. They are:<br />
Electric field intensity, E<br />
Electric flux density or electric displacement, D<br />
Magnetic flux density, B<br />
Magnetic field intensity, H<br />
Current density, J<br />
Electric charge density, ρ<br />
The governing partial differential equations for all macroscopic electromagnetic<br />
problems are well known—they are the four Maxwell’s equations. Of these<br />
relationships, the first three are Faraday’s law, Ampère’s circuital law, and Gauss’<br />
Law. The fourth equation states that isolated magnetic charges (monopoles) do not<br />
exist in nature.<br />
55
In electromagnetics, constitutive relations specify material-dependent interactions<br />
between fundamental physical quantities such as E and D. The definition of boundary<br />
conditions, taken together with Maxwell’s equations and the constitutive relations,<br />
make it possible to describe any macroscopic electromagnetic problem. For an<br />
introduction to the theory of electromagnetics, see the section “Fundamentals of<br />
Electromagnetics” on page 79 in the <strong>COMSOL</strong> Multiphysics Modeling Guide.<br />
56 | CHAPTER 4: ELECTROMAGNETICS MODELS
Electrostatic Potential Between<br />
Cylinders<br />
This example model demonstrates each step in building and solving a 3D electrostatics<br />
model. The analysis shows the electric potential between two cylinders in a vacuum.<br />
Model Definition<br />
The first step is to define the overall model and draw its geometry. This model consists<br />
of two cylinders with opposite electrostatic potentials. The potential difference<br />
between them induces an electric field in the vacuum. The electrostatic scalar potential<br />
V is related to an electric field as E = – ∇V . Gauss’ law, ∇⋅ ( εE)<br />
= ρ,<br />
gives<br />
– ∇⋅( ε∇V)<br />
=<br />
ρ .<br />
This equation includes a material property and a source term:<br />
ε is the permittivity.<br />
ρ is the space charge density.<br />
To simulate the vacuum chamber, create a box in which there is no atmosphere or gas<br />
of any kind. In addition, assume that the potential is zero on the bottom boundary and<br />
that there is no electric field normal to the other exterior boundaries.<br />
Results<br />
The plot in Figure 4-1 on page 58 combines a surface plot of the potential with a<br />
streamline plot of the electric field. The surface plot shows the electric potential on the<br />
cylinder and box faces. As expected, the electric field lines run from cylinder to cylinder<br />
and from the cylinders to the grounded bottom plate. The electric field does not<br />
penetrate the top and side walls.<br />
ELECTROSTATIC POTENTIAL BETWEEN CYLINDERS | 57
Figure 4-1: The electric potential (surface) and the electric field (streamlines).<br />
Modeling Using the Graphical User Interface<br />
Start <strong>COMSOL</strong> Multiphysics using the procedure for the operating system on your<br />
computer. On Windows double-click the <strong>COMSOL</strong> Multiphysics icon to start <strong>COMSOL</strong><br />
Multiphysics and open the Model Navigator.<br />
Model Library path: <strong>COMSOL</strong>_Multiphysics/Electromagnetics/<br />
potential_between_cylinders<br />
MODEL NAVIGATOR<br />
For this model use the Electrostatics application mode.<br />
1 In the Model Navigator click on the New tab.<br />
2 Select 3D in the Space dimension list.<br />
58 | CHAPTER 4: ELECTROMAGNETICS MODELS
3 In the list of application modes, open the <strong>COMSOL</strong> Multiphysics folder and then the<br />
Electromagnetics folder. Select Electrostatics from the list of electromagnetics<br />
application modes.<br />
4 Accept the default element type (quadratic Lagrange elements), which is suitable for<br />
most cases.<br />
5 Click OK.<br />
The Electrostatics application mode provides predefined equations and boundary<br />
conditions that make it easy to create this model, but you must still attend to a few<br />
details.<br />
OPTIONS AND SETTINGS<br />
In this model the permittivity of free space, ε0 , defines the permittivity in the domain.<br />
It is not necessary to enter this variable because it is a predefined application scalar<br />
variable in the Electrostatics application mode. If you prefer to use another value rather<br />
than the standard SI unit value, choose Scalar Variables from the Physics menu. Doing<br />
so, however, changes the underlying formulation for electrostatics, so we recommend<br />
that you use the predefined value.<br />
GEOMETRY MODELING<br />
Next define the model geometry. For this example, create a box measuring<br />
2-by-2-by-2 meters, and then place two cylinders inside that box. When you exit the<br />
ELECTROSTATIC POTENTIAL BETWEEN CYLINDERS | 59
Model Navigator to begin setting up a model, <strong>COMSOL</strong> Multiphysics enters Draw<br />
mode with access to the drawing tools.<br />
To define the model geometry, begin with the box:<br />
1 Open the Block dialog box by clicking on the appropriate symbol on the Draw<br />
toolbar.<br />
2 In that dialog box, go to the Base area and click the Center button to use centered<br />
base coordinates.<br />
3 In the Length area, type 2 in the X, Y, and Z edit fields as the length for all three<br />
dimensions.<br />
4 Click OK to create the block.<br />
5 To ensure that the full geometry is visible, click the Zoom Extents button on the<br />
Main toolbar.<br />
Now move on to the two cylinders. To create these 3D objects on a 2D screen, work<br />
in a 2D work plane. The method to follow in creating the cylinders is simple: draw two<br />
circles in 2D and then extrude them in the z direction to form 3D objects.<br />
1 Go to the Draw menu and choose Work-Plane Settings to define a new work plane.<br />
2 Click the Quick tab and make sure that the x-y button is selected (the default).<br />
3 Type -0.2 in the z edit field.<br />
4 Click OK to enter the 2D work plane.<br />
Now draw the cylinder cross sections in the work plane:<br />
1 Click on the Zoom In button several times until the grid spacing equals 0.2 in both<br />
the x and y directions.<br />
2 Go to the Options menu and choose Axes/Grid Settings.<br />
3 In the Axes/Grid Settings dialog box, click the Grid tab.<br />
60 | CHAPTER 4: ELECTROMAGNETICS MODELS
4 Clear the Auto check box and type 0.1 in the y spacing edit field.<br />
5 Click OK. You can now create circles with a radius of 0.1.<br />
6 Click on the Ellipse/Circle (Centered) button in the Draw toolbar.<br />
7 Place the crosshairs at the coordinates (−0.4, 0). Then click on the right mouse<br />
button and drag up or down until you create a circle with radius of 0.1.<br />
8 Repeat the process to draw a second circle of the same size centered at (0.4, 0).<br />
Create the cylinders:<br />
1 Press Ctrl+A to select both circles.<br />
2 Go to the Draw menu and choose Extrude.<br />
3 In the Extrude dialog box define the height of the cylinders by typing 0.4 in the<br />
Distance edit field. The resulting cylinders extend from –0.2 to 0.2 in the z direction.<br />
4 Click OK to close the dialog box.<br />
<strong>COMSOL</strong> Multiphysics now returns to the 3D environment where the cylinders are<br />
present. The cylinders have become extruded geometry objects with the names EXT1<br />
and EXT2.<br />
To complete the geometry, subtract the two cylinders from within the box using a<br />
Boolean operation:<br />
1 Click the Create Composite Object button in the Draw toolbar.<br />
2 Type the Boolean expression BLK1-EXT1-EXT2 in the Set formula edit field.<br />
3 Click OK.<br />
The resulting geometry is a new composite object with the default label CO1.<br />
ELECTROSTATIC POTENTIAL BETWEEN CYLINDERS | 61
PHYSICS MODELING<br />
The next task is to define the physics through material properties on the domain and<br />
conditions on the boundaries.<br />
Subdomain Settings<br />
First, specify the material properties in the modeling domain.<br />
Open the Subdomain Settings dialog box from the Physics menu. <strong>COMSOL</strong><br />
Multiphysics then switches to Subdomain mode where you can specify material<br />
properties for each subdomain.<br />
In this example, ε equals the permittivity of free space ε 0 = 8.854·10 12 F/m, a value<br />
predefined in <strong>COMSOL</strong> Multiphysics. The relative permittivity ε r then equals 1.<br />
SETTINGS SUBDOMAIN 1<br />
ε r<br />
The space charge density option specifies the distribution of a space charge in a<br />
subdomain. Here there is none, so the value of ρ equals zero.<br />
Now set the value for the permittivity in the model:<br />
1 This model consists of only one subdomain. Make certain that Subdomain 1 is<br />
selected in the Subdomain selection list.<br />
2 Go to Constitutive relation and make certain that the default D = ε 0ε rE is selected.<br />
3 Click OK.<br />
62 | CHAPTER 4: ELECTROMAGNETICS MODELS<br />
1<br />
ρ 0
For time-dependent and nonlinear analyses you might find it necessary to set initial<br />
conditions. That step is not necessary for this linear electrostatics problem.<br />
Boundary Conditions<br />
To set boundary conditions, go to the Physics menu and choose Boundary Settings to<br />
open up the corresponding dialog box. Here you select boundaries and specify the<br />
boundary conditions.<br />
When you select a specific boundary, the program allows you to choose from a list of<br />
available boundary conditions.<br />
To speed up the modeling process even with a relatively simple 3D model, you can<br />
select several faces with one mouse click. To learn more about the various selection<br />
methods see “Object Selection Methods in 3D” on page 127 in the <strong>COMSOL</strong><br />
Multiphysics User’s Guide.<br />
The following table summarizes the boundaries in this model and their values:<br />
SETTINGS BOUNDARIES 6–11 BOUNDARIES 12–17 BOUNDARIES 1, 2, 4, 5, 18 BOUNDARY 3<br />
Type Electric potential Electric potential Zero charge/Symmetry Ground<br />
V 0 1 -1<br />
Boundaries 6–11 define the left cylinder where the electric potential is 1 V.<br />
The second cylinder consists of Boundaries 12–17 and has an electric potential of<br />
−1 V.<br />
The third set of boundaries defines the box, except the bottom boundary.<br />
The last set (Boundary 3) is the grounded bottom plate.<br />
ELECTROSTATIC POTENTIAL BETWEEN CYLINDERS | 63
To enter these boundary values into the model, follow these steps:<br />
1 To enable object selection with the mouse you must first deselect the orbit/pan/<br />
zoom function. To do so, click the Orbit/Pan/Zoom button.<br />
2 Draw a rubber-band box around one of the cylinders.<br />
3 When its faces are highlighted, select Electric potential from the Boundary condition<br />
list.<br />
4 Type 1 in the V 0 edit field.<br />
5 Repeat the procedure for the second cylinder, but this time type –1 in the V 0 edit<br />
field.<br />
6 Select the Select by group check box.<br />
7 Select Boundary 1. The group selection then also selects all other exterior<br />
boundaries.<br />
8 Select Zero charge/Symmetry from the Boundary condition list.<br />
9 To select the bottom face, first click to clear the Select by group check box and then<br />
select Boundary 3.<br />
10 Select Ground from the Boundary condition list.<br />
11 Click OK.<br />
MESH GENERATION<br />
Generating the mesh is usually quite simple: just click one of the mesh buttons on the<br />
Main toolbar. In cases with special requirements you can also use commands in the<br />
Mesh menu. In this case, use a predefined setting for creating a coarse mesh, which<br />
makes the solution process faster than the default mesh-size settings.<br />
1 From the Mesh menu, choose Free Mesh Parameters.<br />
2 In the Free Mesh Parameters dialog box, select Coarser from the Predefined mesh sizes<br />
list.<br />
3 Click OK.<br />
4 Click the Initialize Mesh button on the Main toolbar.<br />
COMPUTING THE SOLUTION<br />
At this point you can either accept the default settings for the solver <strong>COMSOL</strong><br />
Multiphysics should use, or you can interactively select the solver and its operating<br />
parameters. In most cases, though, you only need to click on the Solve button in the<br />
Main toolbar.<br />
64 | CHAPTER 4: ELECTROMAGNETICS MODELS
To reduce the time and memory requirements for the solution process, it is wise to<br />
make a few changes to the solver parameters. The default settings for 3D electrostatics<br />
models specify an iterative solver. These solvers generally use less memory than direct<br />
solvers and are often faster.<br />
Iterative solvers work with a set of preconditioners, and the algebraic multigrid<br />
(AMG) preconditioner works best for scalar elliptic PDEs such as Laplace’s equation<br />
and Poisson’s equations. It is the default preconditioner for the 3D Electrostatics<br />
application mode.<br />
1 From the Solve menu, open the Solver Parameters dialog box.<br />
2 Click the General tab.<br />
3 Choose a linear system solver. Select GMRES from the Linear system solver list.<br />
4 Choose a preconditioner. Select Algebraic multigrid from the Preconditioner list.<br />
5 Click OK.<br />
6 Start the solution process by clicking the Solve button on the Main toolbar. The<br />
results might take a few seconds to compute depending on the problem’s<br />
complexity.<br />
ELECTROSTATIC POTENTIAL BETWEEN CYLINDERS | 65
POSTPROCESSING AND VISUALIZATION<br />
After solving the problem, <strong>COMSOL</strong> Multiphysics shifts to its postprocessing mode<br />
and shows a slice plot of the electric potential V. This plot, however, might not offer<br />
much immediately useful information, but <strong>COMSOL</strong> Multiphysics provides a variety<br />
of color plots and animations that help you more quickly spot trends and regions of<br />
interest. To better examine the solution for an electrostatic problem, for instance, you<br />
might want to view a surface or contour plot, and as the variable of interest you can<br />
select the electrostatic potential, the electric field, the electric displacement field, or the<br />
polarization field. Further, for arrow or streamline plots it is possible to select the x, y,<br />
or z components of most of those parameters.<br />
To combine a surface plot with a flow plot, follow these steps:<br />
1 Choose Plot Parameters from the Postprocessing menu.<br />
2 On the General page, clear the Slice check box to deactivate the slice plot.<br />
3 Select the Boundary and Streamline check boxes to activate these features.<br />
4 Click the Streamline tab.<br />
5 Type 30 in the Number of start points edit field on the Start Points tab.<br />
6 Click OK.<br />
The surface plot obstructs the view, making it impossible to see inside the box. To<br />
remove the rendering of the front faces, use the ability of <strong>COMSOL</strong> Multiphysics to<br />
suppress boundaries.<br />
1 In the Options menu, point to Suppress and then click Suppress Boundaries.<br />
2 While holding down the Ctrl key, select Boundaries 1, 2, and 4 in the Boundary<br />
selection list.<br />
3 Click OK to close the dialog box and render all boundaries except 1, 2, and 4.<br />
4 To add lighting to the model, click the Scene Light and Headlight buttons on the<br />
Camera toolbar.<br />
5 Click the Postprocessing Mode button on the Main toolbar.<br />
66 | CHAPTER 4: ELECTROMAGNETICS MODELS
ELECTROSTATIC POTENTIAL BETWEEN CYLINDERS | 67
Pacemaker Electrode<br />
This model illustrates the use of <strong>COMSOL</strong> Multiphysics for modeling of ionic current<br />
distribution problems in electrolytes, in this case in human tissue. The problem is<br />
exemplified on a pacemaker electrode, but it can be applied in electrochemical cells like<br />
fuel cells, batteries, corrosion protection, or any other process where ionic conduction<br />
takes place in the absence of concentration gradients.<br />
Introduction<br />
The modeled device is a pacemaker electrode that is placed inside the heart and helps<br />
the patient’s heart to keep a normal rhythm. The device is referred to as an electrode,<br />
but it actually consists of two electrodes: a cathode and an anode.<br />
Figure 4-2 shows a schematic drawing of two pair of electrodes placed inside the heart.<br />
The electrodes are supplied with current from the pulse generator unit, which is also<br />
implanted in the patient.<br />
Figure 4-2: Schematic drawing of the heart with two pairs of pacemaker electrodes.<br />
This model deals with the current and potential distribution around one pair of<br />
electrodes.<br />
68 | CHAPTER 4: ELECTROMAGNETICS MODELS
Model Definition<br />
The model domain consists of the blood and tissue surrounding the electrode pair. The<br />
actual electrodes and the electrode support are boundaries to the modeled domain.<br />
Figure 4-3 shows the electrode in a darker shade, while the surrounding modeling<br />
domain is shown in a lighter shade.<br />
Annular counter electrode<br />
Insulated surfaces of<br />
the device<br />
Figure 4-3: Modeling domain and boundaries.<br />
Spherical working electrode<br />
Outer boundaries<br />
of the domain<br />
The working electrode consists of a a hemisphere placed on the tip of the supporting<br />
cylindrical structure. The counter electrode is placed in the “waist” of this structure.<br />
All other surfaces of the supporting structure are insulated. The outer boundaries are<br />
placed far enough from the electrode to give a small impact on the current and<br />
potential distribution.<br />
In <strong>COMSOL</strong> Multiphysics, use the 3D Conductive Media DC application mode for<br />
the analysis of the electrode. This application mode is useful for modeling conductive<br />
materials where a current flows due to an applied electric field.<br />
DOMAIN EQUATIONS<br />
The current in the domain is controlled by the continuity equation, which follows<br />
from the Maxwell’s equations:<br />
– ∇ ⋅ ( σ∇V) =<br />
0<br />
where σ is the conductivity of the human heart. This equation uses the following<br />
relations between the electric potential and the fields.<br />
PACEMAKER ELECTRODE | 69
BOUNDARY CONDITIONS<br />
Ground potential boundary conditions are applied on the thinner waist of the<br />
electrode. The tip of the electrode has a fixed potential of 1 V. All other boundaries are<br />
electrically insulated.<br />
Results and Discussion<br />
This simulation gives you the potential distribution on the surface of the electrode and<br />
the streamlines of the current distribution inside the human heart. This plot appears in<br />
Figure 4-4.<br />
Figure 4-4: The plot shows the electrostatic potential distributed on the surface of the<br />
electrode. The total current density is shown as streamlines.<br />
As expected, the current density is highest at the small hemisphere, which is the one<br />
that causes the excitation of the heart. The current density is fairly uniform on the<br />
70 | CHAPTER 4: ELECTROMAGNETICS MODELS<br />
E = – ∇V<br />
J = σE<br />
n⋅J =<br />
0
working electrode. The counter electrode is larger and there are also larger variations<br />
in current density on its surface. Mainly, the current is lower with the distance from<br />
the working electrode. The model shows that the anchoring arms of the device have<br />
little influence on the current density distribution.<br />
Model Library path: <strong>COMSOL</strong>_Multiphysics/Electromagnetics/<br />
pacemaker_electrode<br />
Modeling Using the Graphical User Interface<br />
1 In the Model Navigator, select 3D from the Space dimension list.<br />
2 In the <strong>COMSOL</strong> Multiphysics>Electromagnetics folder, select Conductive Media DC.<br />
Make sure Lagrange - Quadratic is selected in the Element list.<br />
3 Click OK.<br />
GEOMETRY MODELING<br />
1 Select Work-Plane Settings from the Draw menu.<br />
2 Click the y-z button and then click OK.<br />
3 From the Draw menu, select Specify Objects>Rectangle. In the Rectangle dialog box,<br />
enter 2.1e-3 in the Width edit field, 5.5e-3 in the Height edit field, and enter the<br />
corner coordinates (0, 14.5e-3) in the edit fields x and y. Make sure that Corner is<br />
selected in the Base list. Click OK.<br />
4 Select Fillet/Chamfer from the Draw menu. Expand R1 and select point number 2.<br />
Enter 5e-4 in the Radius edit field. Click OK.<br />
5 Create a rectangle with width 1.6e-3, height 2e-3, and corner position at<br />
(0, 12.5e-3).<br />
6 Create a rectangle with width 2.1e-3, height 12.5e-3, and corner position at<br />
(0, 0).<br />
7 Select Fillet/Chamfer from the Draw menu. Expand R2 and select point number 2 and<br />
3. Enter 5e-4 in the Radius edit field. Click OK.<br />
8 From the Draw menu, select Specify Objects>Circle. Enter 1e-3 in the Radius edit<br />
field. Click OK.<br />
9 Create a rectangle with width 2e-3, height 2e-3, and corner position at<br />
(−2e-3, −1e-3).<br />
PACEMAKER ELECTRODE | 71
10 Select Create Composite Object from the Draw menu. In the dialog box, type the<br />
formula C1-R2 in the Set formula edit field. Click OK.<br />
11 Select all objects by pressing Ctrl+A. Click on the Union toolbar button located to<br />
the left side.<br />
12 Click the Delete Interior Boundaries toolbar button on the same toolbar.<br />
13 Click the Zoom Extents button on the Main toolbar. You should have a window<br />
similar to the figure below.<br />
14 Select Revolve from the Draw menu. Click OK.<br />
15 Click the Zoom Extents button to see the revolved geometry.<br />
These steps created the electrode, but the electrode also has some hooks that hold it<br />
in place.<br />
1 Go back to the work plane by clicking on the Geom2 tab.<br />
2 Create a rectangle with width 5e-4, height 5.2e-3, and corner position at<br />
(0, 3.5e-3).<br />
3 Select Fillet/Chamfer from the Draw menu. Expand R1 and select point number 3.<br />
Click the Chamfer radio button, and enter 2e-4 in the Distance edit field. Click OK.<br />
4 Select Revolve from the Draw menu. Click OK.<br />
72 | CHAPTER 4: ELECTROMAGNETICS MODELS
5 Click the Rotate toolbar button and enter 60 in the edit field for the rotation angle.<br />
Define the point and axis for the rotation by specifying the coordinate<br />
(0, 0, 2.5e-3) in the Point on rotation axis frame, and the direction (1, 0, 0) in the<br />
Rotation axis direction vector frame. Click OK.<br />
6 Press Ctrl+C to copy the object. Press Ctrl+V to paste it directly. In the Paste dialog<br />
box, leave all displacement fields set to zero. Click OK.<br />
7 Click the Rotate toolbar button and set the rotation angle to 90. Click OK.<br />
8 Press Ctrl+V again and click OK (zero displacements).<br />
9 Click the Rotate toolbar button and set the rotation angle to 180. Click OK.<br />
10 Press Ctrl+V and click OK (zero displacements).<br />
11 Click on the Rotate toolbar button and set the rotation angle to 270. Click OK.<br />
12 Press Ctrl+A to select all objects. Click on the Union toolbar button and then click<br />
on the Delete Interior Boundaries toolbar button.<br />
13 Click the Zoom Extents and the Headlight toolbar buttons to see geometry in the<br />
following figure.<br />
Finally, you need to define the volume surrounding the electrode. The simulation only<br />
takes place in this volume, where the boundaries of the electrode influence the result.<br />
PACEMAKER ELECTRODE | 73
1 Click the Cylinder toolbar button. In the Cylinder dialog box, enter 10e-3 in the<br />
Radius edit field, 40e-3 in the Height edit field, and the coordinate (0, 0, -20e-3) in<br />
the edit fields of the Axis base point frame. Click OK.<br />
2 Choose Create Composite Object from the Draw menu. In the dialog box, type the<br />
formula CYL1-CO2 in the Set formula edit field. Click OK.<br />
3 Click the Zoom Extents button on the Main toolbar.<br />
PHYSICS SETTINGS<br />
Boundary Conditions<br />
The thin waist of the electrode is grounded, and a positive potential is applied to the<br />
lower half sphere. All other boundaries are kept electrically insulated.<br />
1 Open the Boundary Settings dialog box from the Physics menu.<br />
2 Define the boundary condition according to the following table. Click OK.<br />
SETTINGS BOUNDARIES<br />
29, 30, 58, AND 63<br />
Subdomain Settings<br />
The electrode is inserted into the human heart, so you must define the conductivity<br />
for the heart tissue.<br />
1 From the Physics menu, open the Subdomain Settings dialog box.<br />
2 Select Subdomain 1, then click in the σ edit field. In the pop-up window that opens,<br />
type 5000 in the active upper-left edit field to set the isotropic electric conductivity.<br />
3 Click OK.<br />
MESH GENERATION<br />
Use the default mesh settings. Click the Initialize Mesh button on the Main toolbar to<br />
generate the mesh.<br />
COMPUTING THE SOLUTION<br />
Use the default solver parameters—the stationary solver using the conjugate gradients<br />
iterative solver—and algebraic multigrid as the preconditioner.<br />
Click on the Solve button on the Main toolbar.<br />
74 | CHAPTER 4: ELECTROMAGNETICS MODELS<br />
BOUNDARIES 31, 32, 59,<br />
AND 60<br />
ALL OTHER<br />
BOUNDARIES<br />
Boundary condition Ground Electric potential Electric insulation<br />
V0 1
POSTPROCESSING AND VISUALIZATION<br />
The potential distribution on the electrode boundary is used together with a<br />
streamline plot of the total current density to visualize the result of the simulation.<br />
1 Start by suppressing some boundaries not to be used for visualization. On the<br />
Options menu, point to Suppress, and then choose Suppress Boundaries.<br />
2 In the Suppress Boundaries dialog box, select Boundaries 1, 2, 3, 4, 45, and 74. Click<br />
OK.<br />
3 Choose Plot Parameters from the Postprocessing menu. In the Plot Parameters dialog<br />
box under the General tab, clear the Slice check box and select the Boundary and<br />
Streamline check boxes.<br />
4 Click the Boundary tab and make sure that Electric potential is selected as boundary<br />
data.<br />
5 Click the Streamline tab and then select Total current density from the Predefined<br />
quantities list. Click the Line Color tab, and then click the Use expression radio button.<br />
Use the default expression—the electric potential.<br />
6 Select Tube from the Line type list. Click the Tube Radius button. In the Tube Radius<br />
Parameters dialog box, select the Radius data check box, and choose Total current<br />
density, norm from the Predefined quantities list. Click OK twice. You should now see<br />
something similar to the figure below after proper rotation and zoom operations.<br />
PACEMAKER ELECTRODE | 75
Skin Effect in a Circular Wire<br />
Introduction<br />
This model demonstrates the skin effect, that is, the phenomenon that electrons tend<br />
to move along the surface when an AC current flows through a conductor. Changes<br />
in the current’s amplitude and direction induce a magnetic field that pushes the<br />
electrons toward the wire’s exterior. The effect increases with frequency and conductor<br />
size.<br />
Engineers working at microwave frequencies take advantage of these effects by<br />
designing hollow waveguides because at these frequencies, the core of a conductor<br />
does not carry current anyway.<br />
In solid conductors, the skin effect can have important implications even at powerline<br />
frequencies. For instance, utilities can replace expensive, heavy copper wire with<br />
aluminum cables clad with a copper skin without appreciably increasing power losses.<br />
As proof of this claim, this model first computes the current distribution at 50 Hertz<br />
in an unusually large copper cable (20 cm diameter). It then goes on to compute the<br />
current distribution and compare resistive losses in a like-sized copper-clad cable that<br />
consists of 90% aluminum.<br />
Model Definition<br />
Copper specifies a conductivity σ of 5.99·10 7 S/m and permeability µ of 4π·10 −7 H/<br />
m. For aluminum the values are 3.77·10 7 S/m and 4π ·10 −7 H/m, respectively. The<br />
materials’ dielectric properties have no influence on the fields at low frequencies as in<br />
this case. You can therefore set ε = ε 0 = 8.854·10 −12 F/m.<br />
Using the AC Power Electromagnetics application mode, the equation that <strong>COMSOL</strong><br />
Multiphysics solves is a complex-valued Helmholtz equation for the amplitude of the<br />
magnetic potential:<br />
76 | CHAPTER 4: ELECTROMAGNETICS MODELS<br />
– ∇<br />
1<br />
⋅ ⎛--∇A⎞ ⎝µ z k<br />
⎠<br />
2 + Az = 0<br />
k jωσ ω 2 =<br />
– ε
Here ω is the angular frequency, in this case 2π·50 rad/s. For good conductors, such<br />
as copper and aluminum, σ >> ωε. So, for engineering purposes the approximation<br />
k = jωσ is close enough.<br />
The boundary conditions require some careful consideration. From a mathematical<br />
point of view, it is necessary to specify either the magnetic potential A z (corresponding<br />
to a Dirichlet type condition) or the normal derivative of the same field (a Neumann<br />
condition) on the outer surface. These quantities, however, have little or no<br />
significance in applied engineering. In <strong>COMSOL</strong> Multiphysics the Neumann type<br />
condition on the A z field is implemented by specifying a surface current equal to the<br />
negative of the tangential magnetic field at the boundary. The current might not be<br />
physically real. On exterior boundaries you can interpret it as the surface current<br />
necessary to make the magnetic field H vanish outside the domain.<br />
Even better from the pure engineering point of view is to specify the total current<br />
throughput, which is rather straightforward in this case. Making the magnetic field<br />
disappear everywhere outside the circular domain requires that the total current<br />
through the domain equals zero. One way of achieving this is by adding a “virtual”<br />
surface current of opposite sign to the “real” current inside the conductor. Because the<br />
problem is rotationally symmetric, you can write the necessary virtual surface current<br />
density<br />
where I tot is the total real current throughput, and R is the radius of the wire.<br />
Results<br />
J s<br />
Figure 4-5 shows the real part of the total current density through a cross section of<br />
the wire. Because of the time lag between the surface and the interior, the solution of<br />
the AC power electromagnetics equation is complex valued. You can plot various<br />
properties of the complex solution by typing expressions such as imag(Jz_qa) or<br />
abs(Jz_qa) in an Expression edit field in the Plot Parameters dialog box.<br />
I tot<br />
=<br />
– -----------<br />
2πR<br />
SKIN EFFECT IN A CIRCULAR WIRE | 77
Figure 4-5: Total current density through a wire carrying an AC current.<br />
Model Library path: <strong>COMSOL</strong>_Multiphysics/Electromagnetics/skin_effect<br />
Modeling Using the Graphical User Interface<br />
MODEL NAVIGATOR<br />
1 Select 2D from the Space dimension list.<br />
2 In the list of application modes, open the <strong>COMSOL</strong> Multiphysics folder and then the<br />
Electromagnetics folder. Select AC Power Electromagnetics from the list of<br />
electromagnetics application modes.<br />
3 Click OK.<br />
OPTIONS AND SETTINGS<br />
1 From the Options menu, choose Axes/Grid Settings.<br />
78 | CHAPTER 4: ELECTROMAGNETICS MODELS
2 Set axis and grid settings according to the following table. On the Grid page, clear<br />
the Auto check box to enter the grid spacings manually.<br />
AXIS GRID<br />
x min -0.15 x spacing 0.1<br />
x max 0.15 Extra x<br />
y min -0.1 y spacing 0.1<br />
y max 0.1 Extra y<br />
3 Click OK.<br />
4 From the Options menu, choose Constants.<br />
5 Enter the following constants (the descriptions are optional):<br />
NAME EXPRESSION DESCRIPTION<br />
sigma_Cu 5.99e7[S/m] Electrical conductivity, copper<br />
sigma_Al 3.77e7[S/m] Electrical conductivity, aluminum<br />
I_tot 100[A] Total current<br />
6 Click OK.<br />
GEOMETRY MODELING<br />
The cross section of the conductor is represented by a circle with radius 0.1. The<br />
aluminum core is drawn as a circle with radius 0.0949.<br />
1 Draw a circle centered at (0, 0) with a radius of 0.1.<br />
2 Draw one more circle centered at (0, 0) with a radius of 0.1.<br />
3 Double-click the last circle and enter a new radius of 0.0949.<br />
PHYSICS SETTINGS<br />
Boundary Conditions<br />
1 From the Physics menu, choose Boundary Settings.<br />
2 Enter boundary coefficients according to the following table. When done, click OK.<br />
BOUNDARY ALL<br />
Type Surface current<br />
Jsz -I_tot/(2*pi*0.1[m])<br />
Subdomain Settings<br />
1 From the Physics menu, choose Subdomain Settings.<br />
SKIN EFFECT IN A CIRCULAR WIRE | 79
2 Click the Electric Parameters tab.<br />
3 Enter the subdomain settings (material property) according to the following table.<br />
When done, click OK.<br />
SETTING SUBDOMAINS 1, 2<br />
σ sigma_Cu<br />
MESH GENERATION<br />
The small gap between the concentric circles gives you a fine mesh close to the<br />
boundaries, where the solution is expected to vary fastest. If you decrease the element<br />
growth rate, the mesh becomes smoother.<br />
1 In the Free Mesh Parameters dialog box, click the Custom mesh size button and type<br />
1.1 in the Element growth rate edit field. Click OK.<br />
2 Initialize the mesh.<br />
COMPUTING THE SOLUTION<br />
Click the Solve button on the Main toolbar.<br />
80 | CHAPTER 4: ELECTROMAGNETICS MODELS
POSTPROCESSING AND VISUALIZATION<br />
Due to the skin effect, the current density at the surface is much higher than that<br />
within the interior of the conductor. Plotting the current density J z clearly shows this<br />
effect.<br />
1 Open the Plot Parameters dialog box.<br />
2 Click the Surface tab.<br />
3 On the Surface Data tab, select Total current density, z component from the Predefined<br />
quantities list.<br />
4 Click OK.<br />
The resistance per meter is defined as R = P/I 2 , where P is the power loss per meter of<br />
wire, and I is the current through the power line. You can compute both the power<br />
and the current with integrations over the cross section:<br />
where Q = σ|E| 2 . The value of the second integral is known a priori, because the total<br />
current is part of the boundary conditions.<br />
1 From the Postprocessing menu, open the Subdomain Integration dialog box. Select<br />
both subdomains and choose the Total current density, z component from the<br />
Predefined quantities list. Click Apply and note that the total current is very close to<br />
100 A, as expected.<br />
2 Change the integration expression to Resistive heating, time average and click OK.<br />
3 You can now compute the resistance per meter from R = P/I 2 .<br />
Modeling a Wire with an Aluminum Core<br />
Next, replace almost all copper with aluminum, leaving only a thin copper shell, and<br />
compare the results.<br />
SUBDOMAIN SETTINGS<br />
Change the conductivity in Subdomain 2 to sigma_Al.<br />
COMPUTING THE SOLUTION<br />
Solve the problem.<br />
∫<br />
P = QdA ∫<br />
I =<br />
JzdA SKIN EFFECT IN A CIRCULAR WIRE | 81
POSTPROCESSING<br />
Now calculate the resistance per meter in the modified design.<br />
1 From the Postprocessing menu, open the Subdomain Integration dialog box.<br />
2 Select both subdomains and select Resistive heating, time average from the Predefined<br />
quantities list.<br />
3 Click OK.<br />
4 Calculate the resistance per meter as before.<br />
For a given current the combined copper/aluminum wire suffers approximately 10%<br />
more resistance compared to pure copper. On the other hand it weighs only one third<br />
and is considerably less expensive.<br />
82 | CHAPTER 4: ELECTROMAGNETICS MODELS
Quadrupole Lens<br />
Introduction<br />
Just like optical lenses focus light, electric and magnetic lenses can focus beams of<br />
charged particles. Systems of magnetic quadrupole lenses find a common use in<br />
focusing both ion and particle beams in accelerators at nuclear and particle physics<br />
centers such as CERN, SLAC, and ISIS. This <strong>COMSOL</strong> Multiphysics model shows<br />
the path of B 5+ ions going through three consecutive magnetic quadrupole lenses. The<br />
model is set up in a cross section of the geometry. You can find a full 3D version in the<br />
AC/DC Module Model Library.<br />
Model Definition<br />
The quadrupole consists of an assembly of four permanent magnets, as seen in<br />
Figure 4-6 below, where the magnets work together to give a good approximation of<br />
a quadrupole field. To strengthen the field and keep it contained within the system,<br />
the magnets are set in an iron cylinder.<br />
Figure 4-6: Cross-sectional view of one of the magnetic quadrupoles used in the lens.<br />
QUADRUPOLE LENS | 83
The ions are sent through a system of three consecutive quadrupole assemblies. The<br />
middle one is twice as long as the other ones, and is rotated by 90 degrees around the<br />
central axis. This means the polarity of its magnets is reversed. Figure 4-7 gives a full<br />
view of the magnetic quadrupole lens.<br />
Figure 4-7: Cutout of the quadrupole lens. The second quadrupole (Q2) has its polarities<br />
reversed compared to Q1 and Q2. After traveling through the lens, the ions are left to drift<br />
1 m.<br />
An accelerator feeds the system with ions traveling with the velocity 0.01c along the<br />
the central axis. To study the focusing effect of the quadrupoles, track a number of ions<br />
starting out from a distance of 3 cm from the central axis, evenly distributed along the<br />
circumference of a circle in the transverse plane. They are all assumed to have a zero<br />
initial transverse velocity. Each quadrupole focuses the ion beam along one of the<br />
transverse axes and defocuses it along the other one. The net effect after traveling<br />
through the system of the three quadrupoles and the drift length is focusing in all<br />
directions. As the ions exit the system, they are all contained within a 1 cm radius in<br />
the transverse plane.<br />
The model is set up in a 2D cross section of any of the two identical quadrupoles Q1<br />
and Q3. Neglecting fringe fields, the transverse magnetic field at a given point in a<br />
transverse plane in Q2 will automatically have the same magnitude as the<br />
corresponding in Q1 and Q3, but point in the opposite direction. It is therefore<br />
sufficient to model the fields in one of the quadrupoles.<br />
DOMAIN EQUATIONS<br />
The magnetic field is described using the Magnetostatics equation, solving for the z<br />
component of the magnetic potential A (Wb/m):<br />
84 | CHAPTER 4: ELECTROMAGNETICS MODELS
– 1<br />
∇ Az<br />
∇ × ( µ 0 ( × – M)<br />
) – σv× ( ∇ × Az) = σ∆V⁄ L + Jz Here µ 0 = 4π·10 −7 H/m denotes the permeability of vacuum, M is the magnetization<br />
(A/m), σ the conductivity (S/m), and v the velocity of the medium (m/s). In this<br />
model, the medium is not moving. The right-hand side of the equation holds an<br />
imposed current, specified in terms of either ∆V (V) and L (m), or an external current<br />
density J z e (A/m 2 ). No currents are imposed in this model. The iron subdomain uses<br />
a slightly different formulation of the same equation:<br />
⎛ 1<br />
∇ × -----------∇ × A ⎞<br />
⎝ z – σ v × ( ∇ × Az)<br />
= σ∆V⁄ L+<br />
J<br />
⎠<br />
z<br />
µ 0 µ r<br />
where µ r = 4000 is the relative permeability. The magnetic potential is everywhere<br />
defined so that B =<br />
∇ × A .<br />
BOUNDARY CONDITIONS<br />
The magnetic field is approximately parallel to the exterior boundary of the iron<br />
cylinder. To enforce this, use the magnetic insulation boundary condition, stating<br />
that Az = 0.<br />
e<br />
,<br />
e<br />
QUADRUPOLE LENS | 85
Results and Discussion<br />
The magnetic field density and flowlines in a cross section of Q1 or Q3 appear in<br />
Figure 4-8 below.<br />
Figure 4-8: The magnetic field density and flowlines in the center of one of the quadrupole<br />
magnets.<br />
Each ion passing through the assembly experiences a Maxwell force equal to<br />
F = q v × B, where v (m/s) is the ion’s velocity. Next, assume that the z component of<br />
the velocity is constant and much larger than the x and y (transverse) components.<br />
Thus consider only the force contributions from the z component of the velocity. To<br />
find the transverse position as a function of time, you need to solve Newton’s second<br />
law for each ion, q v × B = m a, where m is the ion mass (kg), and a denotes its<br />
acceleration (m/s 2 ). If the computed magnetic flux density in Q1 equals B', and the<br />
length of quadrupole i is L i (m), the flux density that the ion experiences is given by<br />
86 | CHAPTER 4: ELECTROMAGNETICS MODELS
B<br />
⎧<br />
⎪<br />
⎪<br />
⎪<br />
⎪<br />
⎪<br />
⎪<br />
=<br />
⎨<br />
⎪<br />
⎪<br />
⎪<br />
⎪<br />
⎪<br />
⎪<br />
⎩<br />
B' if t L1 < ------<br />
where t (s) is the time of flight. This dependency of the magnetic flux density on the<br />
time of flight is fed to the particle-tracing algorithm as a logical expression. Figure 4-9<br />
below shows how the ions travel in the transverse plane.<br />
Figure 4-9: As the ions enter Q1, they start out evenly distributed around the larger circle,<br />
3 cm from the z-axis. Q1 focuses along the x-axis and defocuses along the y-axis. The force<br />
on each ion is approximately proportional to its distance from the z-axis, so as the ions enter<br />
Q2, those that are far out on the x-axis rapidly turn around and move toward the center.<br />
Q3 stabilizes the motion and gets all ions on the right track. Finally the ions are left to drift<br />
toward a waist situated a little bit more than 1 m beyond Q3.<br />
v z<br />
– B'<br />
if L1 ------ t L1 L + 2<br />
< < -------------------<br />
v z<br />
v z<br />
B' if L1 L + 2<br />
------------------- t L1 L2 L + + 3<br />
< < --------------------------------<br />
v z<br />
v z<br />
0 if t L1 L2 L + + 3<br />
> --------------------------------<br />
v z<br />
QUADRUPOLE LENS | 87
Model Library path: <strong>COMSOL</strong>_Multiphysics/Electromagnetics/quadrupole<br />
Modeling Using the Graphical User Interface<br />
MODEL NAVIGATOR<br />
1 In the Model Navigator, select <strong>COMSOL</strong> Multiphysics>Electromagnetics>Magnetostatics<br />
from the list of application modes.<br />
2 Click OK to close the dialog box.<br />
OPTIONS AND SETTINGS<br />
1 Enter the following constant names and expressions in the Constants dialog box<br />
(units and descriptions are optional):<br />
NAME EXPRESSION DESCRIPTION<br />
M 11 Ion mass number<br />
Z 5 Ion charge number<br />
L1 1[m] Length of first quadrupole<br />
L2 2[m] Length of second quadrupole<br />
L3 1[m] Length of third quadrupole<br />
vz 0.01*3e8[m/s] Ion velocity<br />
mp 1.672e-27[kg] Proton mass<br />
Ze 1.602e-19[C] Proton charge<br />
m M*mp Ion mass<br />
q Z*Ze Ion charge<br />
MQ 5.8e3[A/m] Quadrupole magnetization<br />
2 Click OK to close the dialog box.<br />
GEOMETRY MODELING<br />
1 Shift-click the Rectangle/Square button on the Draw toolbar.<br />
2 Specify a rectangle with the following properties; when done, click OK.<br />
PROPERTY EXPRESSION<br />
Width 0.177<br />
Height 0.07<br />
88 | CHAPTER 4: ELECTROMAGNETICS MODELS
PROPERTY EXPRESSION<br />
Position: Base Corner<br />
Position: x 0<br />
Position: y -0.035<br />
3 Click the Rotate button on the Draw toolbar. Rotate the rectangle by 45 degrees<br />
around the origin.<br />
4 Click the Ellipse/Circle (Centered) button on the Draw toolbar.<br />
5 Specify a circle with the following properties; when done, click OK.<br />
PROPERTY EXPRESSION<br />
Radius 0.2<br />
Position: Base Center<br />
Position: x 0.2<br />
Position: y 0.2<br />
6 Select both the circle and the rectangle, then click the Intersection button on the<br />
Draw toolbar.<br />
7 Make a copy of your composed object (CO1) and paste it at the same location, that<br />
is with zero displacements.<br />
8 Rotate the copied object (CO2) by 90 degrees around the origin.<br />
9 Paste two more copies of CO1 at the same location, and rotate them by 180 and<br />
270 degrees respectively.<br />
10 Create a circle centered at the origin with a radius of 0.2 m.<br />
11 Create another circle centered at the origin, with a radius of 0.12 m.<br />
12 Click the Create Composite Object button and create an object using the formula<br />
C1+C2-(CO1+CO2+CO3+CO4).<br />
13 Draw a circle centered at the origin with a radius of 0.2 m.<br />
QUADRUPOLE LENS | 89
The geometry should now look like that in the figure below.<br />
Figure 4-10: The <strong>COMSOL</strong> Multiphysics geometry of the quadrupole lens.<br />
PHYSICS SETTINGS<br />
Boundary Conditions<br />
Use the default condition Magnetic insulation at all exterior boundaries.<br />
Subdomain Settings<br />
1 From the Physics menu, select Subdomain Settings. Select Subdomain 1.<br />
2 Click the Load button. In the Materials/Coefficients Library dialog box that appears,<br />
select Basic Material Properties>Iron in the Materials area.<br />
3 Leave the default settings in Subdomain 4.<br />
4 In all the other subdomains, set the constitutive relation to B = µ 0 H + µ 0 M and<br />
specify the magnetization components according to the table below.<br />
PROPERTY SUBDOMAIN 2 SUBDOMAIN 3 SUBDOMAIN 5 SUBDOMAIN 6<br />
M (x component) MQ/sqrt(2) -MQ/sqrt(2) MQ/sqrt(2) -MQ/sqrt(2)<br />
M (y component) MQ/sqrt(2) MQ/sqrt(2) -MQ/sqrt(2) -MQ/sqrt(2)<br />
MESH GENERATION<br />
1 From the Mesh menu, select Free Mesh Parameters.<br />
90 | CHAPTER 4: ELECTROMAGNETICS MODELS
2 From the Predefined mesh sizes list, select Extra fine.<br />
3 Click the Remesh button.<br />
4 When the mesher has finished, click OK to close the dialog box.<br />
COMPUTING THE SOLUTION<br />
Click the Solve button on the Main toolbar.<br />
POSTPROCESSING AND VISUALIZATION<br />
The default plot shows the norm of the magnetic flux density. Follow the instructions<br />
to view the magnetic field.<br />
1 Click the Plot Parameters button on the Main toolbar.<br />
2 On the Surface page, select Magnetic field, norm from the Predefined quantities list.<br />
3 On the Contour page, select the Contour plot check box. From the<br />
Predefined quantities list, select Magnetic potential, z component.<br />
4 In the Contour color area, click first the Uniform color option button and then the<br />
Color button. Select a white color, then click OK. Clear the Color legend check box.<br />
5 Click Apply to see the magnetic field. The magnetic field lines follow the same<br />
pattern as the magnetic potential contour lines (see Figure 4-8 on page 86).<br />
To see how the ions travel through the system of quadrupoles, do the following:<br />
6 On the Surface page, change the Color table to Thermal.<br />
7 On the Particle Tracing page, select the Particle tracing plot check box and apply the<br />
following settings:<br />
PROPERTY EXPRESSION<br />
Mass m<br />
Fx -q*vz*By_qa*(1-2*(partt>L1/vz)+2*(partt>(L1+L2)/vz)<br />
-(partt>(L1+L2+L3)/vz))<br />
Fy q*vz*Bx_qa*(1-2*(partt>L1/vz)+2*(partt>(L1+L2)/vz)<br />
-(partt>(L1+L2+L3)/vz))<br />
Start Points, x 0.03*cos(range(0,0.05*pi,2*pi))<br />
Start Points, y 0.03*sin(range(0,0.05*pi,2*pi))<br />
8 On the Line Color page, click the Use expression option button.<br />
9 Click the Color Expression button. Set the Color table to Cyclic and the expression to<br />
1+(partt>L1/vz)+(partt>(L1+L2)/vz)+(partt>(L1+L2+L3)/vz). Click OK.<br />
QUADRUPOLE LENS | 91
10 Click the Advanced button. Set the Relative tolerance to 1e-6, the End time for static<br />
flow fields to 5/3e6, and the Maximum number of steps to 1e5. Click OK.<br />
11 On the Contour page, set the Expression to sqrt(x^2+y^2). For Contour levels,<br />
select Vector with isolevels and enter 0.01 0.03.<br />
12 Click the General tab. To create a suitable plot title, click the Title button, and then<br />
click the option button for a user-defined title. In the edit field for the title, type:<br />
Surface: Magnetic field, norm [A/m] Particle Tracing: qvxB(t)<br />
13 Click OK.<br />
14 Click OK in the Plot Parameters dialog box to close it and generate the plot.<br />
15 Click the Zoom In button on the Main toolbar to zoom in on the center of the model<br />
geometry as in Figure 4-9 on page 87.<br />
92 | CHAPTER 4: ELECTROMAGNETICS MODELS
Spherical Capacitor<br />
Introduction<br />
This example is a study of a capacitor consisting of two spherical copper conductors<br />
separated by glass.<br />
You can compute the capacitance of a capacitor in two ways. By definition, the<br />
capacitance is given by the expression<br />
C =<br />
Q<br />
--------<br />
V12 where V 12 is the voltage difference between the two conductors and Q is the charge<br />
of the two conductors, positive and negative, respectively, when connected in a DC<br />
circuit.<br />
The energy required to charge a capacitor is given by the expression<br />
The energy defined above should equal the energy of the electrostatic field:<br />
W e<br />
W e<br />
=<br />
Because this integral is readily available in the Electrostatics application mode, the<br />
capacitance is obtained from the expression<br />
Ω<br />
With the second method, an analytical expression for the capacitance is calculated and<br />
used for a comparison with the numerical solution. Thus, assume charges +Q and −Q<br />
on the inner and outer spherical conductor, respectively. Denote the radii of the two<br />
spheres by R i and R o , respectively. Applying Gauss’s law to a spherical surface with<br />
radius R (R i < R < R o) gives<br />
∫<br />
C =<br />
=<br />
Q 2<br />
-------<br />
2C<br />
D ⋅ EdV<br />
Q 2<br />
----------<br />
2We Q<br />
E<br />
4πεR 2<br />
=<br />
---------------- er SPHERICAL CAPACITOR | 93
The potential difference between the spheres is then<br />
Hence, the analytical expression for the capacitance is<br />
Model Definition<br />
In <strong>COMSOL</strong> Multiphysics, you solve the spherical capacitor problem using the<br />
axisymmetric 2D Electrostatics application mode. It is easy to compute the capacitance<br />
from the <strong>COMSOL</strong> Multiphysics user interface using the available integration tools.<br />
DOMAIN EQUATIONS<br />
The electric scalar potential V, must obey Poisson’s equation,<br />
where ε 0 is the permittivity of free space, ε r is the relative permittivity and ρ is the space<br />
charge density. The electric field and displacement are obtained from the gradient of V<br />
BOUNDARY CONDITIONS<br />
A ground potential boundary condition describes the condition at the outer electrode.<br />
At the inner electrode, the boundary condition gives the surface charge:<br />
A symmetry boundary condition describes the condition at the symmetry axis.<br />
Model Library path: <strong>COMSOL</strong>_Multiphysics/Electromagnetics/<br />
spherical_capacitor<br />
94 | CHAPTER 4: ELECTROMAGNETICS MODELS<br />
R i<br />
Q<br />
V – ∫ E⋅erdR ---------<br />
4πε<br />
1<br />
----- ------<br />
1<br />
= = ⎛<br />
⎝<br />
– ⎞<br />
⎠<br />
R o<br />
R i<br />
Q<br />
C ---<br />
1<br />
4πε -----<br />
1<br />
= = ⁄ ⎛ – ------ ⎞<br />
V ⎝ ⎠<br />
R i<br />
– ∇⋅( ε0εr∇V) = ρ<br />
E = – ∇V<br />
D = ε0εr E<br />
– n ⋅ D =<br />
ρs R o<br />
R o
Modeling Using the Graphical User Interface<br />
MODEL NAVIGATOR<br />
1 Select Axial symmetry (2D) from the Space dimension list.<br />
2 In the list of application modes, select<br />
<strong>COMSOL</strong> Multiphysics>Electromagnetics>Electrostatics.<br />
3 Click OK.<br />
OPTIONS AND SETTINGS<br />
1 From the Options menu, choose Axes/Grid Settings.<br />
2 Set axis and grid settings according to the following table. To enter the settings on<br />
the Grid page, first clear the Auto check box. When done, click OK.<br />
AXIS GRID<br />
r min -0.2 r spacing 0.05<br />
r max 0.3 Extra r 0.19<br />
z min -0.2 z spacing 0.05<br />
z max 0.2 Extra z<br />
3 In the Constants dialog box, enter the following variable name and expression, and<br />
then click OK.<br />
NAME EXPRESSION<br />
Q0 5e-12<br />
GEOMETRY MODELING<br />
1 Draw a circle C1 with radius 0.19 centered at (0, 0).<br />
2 Draw a circle C2 with radius 0.05 centered at (0, 0).<br />
3 Draw a rectangle with opposite corners at (−0.2, −0.2) and (0, 0.2).<br />
4 Open the Create Composite Object dialog box from the Draw toolbar or the Draw<br />
menu.<br />
5 Form a composite object by typing C1-(C2+R1) in the Set formula edit field.<br />
SPHERICAL CAPACITOR | 95
6 Click OK to close the dialog box, then click the Zoom Extents button on the Main<br />
toolbar.<br />
PHYSICS SETTINGS<br />
Boundary Conditions<br />
From the Physics menu, choose Boundary Settings. Enter boundary conditions<br />
according to the following table and then click OK.<br />
SETTINGS BOUNDARIES 1, 2 BOUNDARIES 4, 5 BOUNDARIES 3, 6<br />
Type Axial symmetry Surface charge Ground<br />
ρs Q0/(4*pi*0.05^2)<br />
Subdomain Settings<br />
In this model, use the materials library for defining the material properties:<br />
1 Open the Subdomain Settings dialog box, and select Subdomain 1.<br />
2 Click the Load button to open the Materials/Coefficients Library dialog box.<br />
3 Open the Basic Material Properties folder and select Glass (quartz) from the list of<br />
materials and click OK.<br />
4 Now the defined material’s relative permittivity is used in the subdomain settings.<br />
Click OK.<br />
96 | CHAPTER 4: ELECTROMAGNETICS MODELS
MESH GENERATION<br />
1 Initialize the mesh by clicking the Initialize Mesh button on the Main toolbar.<br />
2 Click the Refine Mesh button on the Main toolbar to refine the mesh once.<br />
COMPUTING THE SOLUTION<br />
Click the Solve button on the Main toolbar.<br />
POSTPROCESSING AND VISUALIZATION<br />
The resulting electrostatic potential is zero at the outer conductor and positive and<br />
constant at the inner conductor as shown in the default surface plot of V.<br />
Capacitance Calculation<br />
You can compute the capacitance of the capacitor using the available postprocessing<br />
functionality in <strong>COMSOL</strong> Multiphysics:<br />
1 Choose Boundary Integration from the Postprocessing menu and integrate the<br />
expression V/(0.05*pi) for Boundaries 4 and 5. This gives an average value of<br />
0.157676 for the potential on the inner conductor.<br />
2 Choose Subdomain Integration from the Postprocessing menu, select the Compute<br />
volume integral (for axisymmetric modes) check box, and choose Electrostatics<br />
(es)>Electric energy density from the Predefined quantities list to compute volume<br />
SPHERICAL CAPACITOR | 97
integral of the electric energy density, We_es. This gives a value of 3.94188·10 −13<br />
joule for the total electric energy. It is now possible to compute the capacitance in<br />
two different ways:<br />
C1 = Q/V<br />
which gives the result<br />
C1 = 3.17106e-011<br />
and<br />
C2 = Q^2/(2*We)<br />
which gives the result<br />
C2 = 3.17107e-11<br />
Compare this to the analytical result<br />
C0 = 4.2*4*pi*epsilon0_es/(1/0.05-1/0.19)<br />
which gives the result<br />
C0 = 3.171053e-11<br />
Clearly, both numerical results are in good agreement with the analytical expression.<br />
98 | CHAPTER 4: ELECTROMAGNETICS MODELS
5<br />
Equation-Based Models<br />
This chapter contains models using the <strong>COMSOL</strong> Multiphysics PDE language to<br />
solve partial differential equations.<br />
99
The Black-Scholes Equation<br />
Introduction<br />
There are different types of stock options:<br />
A call option is the right to buy a security at a specified price (called the exercise or<br />
strike price) during a specified period of time.<br />
A put option is the right to sell a security at a specified price during a specified period<br />
of time.<br />
American options can be exercised at any time up to and including the day the option<br />
expires. European options can be exercised only on the day the option expires.<br />
The famous Black-Scholes equation computes the cost u of a European stock option<br />
with the following parameters:<br />
x, the underlying asset price<br />
r, the continuous compounding rate of interest<br />
100 | CHAPTER 5: EQUATION-BASED MODELS<br />
σ, the standard deviation of the asset’s rate of return (also known as volatility)<br />
A put option’s value on the exercise day is<br />
where K is the strike price. The problem domain is infinite and consists of the entire<br />
real axis across the time domain 0 ≤t ≤T.<br />
The assumptions made in deriving the Black-Scholes equation are:<br />
The underlying stock pays no dividends.<br />
∂u 1<br />
--σ<br />
∂t<br />
2<br />
2 x 2<br />
x 2<br />
∂ u ∂u<br />
+ + rx = ru<br />
∂<br />
∂x<br />
The price of the stock, one period ahead, has a log-normal distribution with mean<br />
and standard deviation that are constant over the life of the option.<br />
The existence of a risk-free interest rate which is constant over the life of the option.<br />
You can lend and borrow at the risk-free interest rate.<br />
2<br />
uTx ( , ) = max( K– x,<br />
0),
Black and Scholes derived an analytical expression for the solution to the above<br />
problem. However, the formula works only for certain cases. For instance, you cannot<br />
use it when σ and r are functions of x and t. Using the PDE formulation, you can<br />
determine the price for such cases.<br />
Model Definition<br />
Because you must work within a finite domain 0 ≤ x≤ X,<br />
it becomes necessary to<br />
specify not only the boundary conditions for t = T but also for x = 0 and x = X. It is<br />
therefore necessary to analyze the problem’s characteristics to determine the location<br />
of the input and output boundaries.<br />
EQUATION DEFINITION<br />
To put the equation in coefficient form, rewrite the equation as<br />
∂u<br />
∂t<br />
In the following, denote<br />
∂ 1<br />
--σ<br />
∂x<br />
2<br />
2 x 2 ⎛ ∂u⎞<br />
∂ 1<br />
⎝ ∂x⎠<br />
rx --σ<br />
∂x<br />
2<br />
2 x 2<br />
⎛ – ⎛ ⎞⎞∂u<br />
+ + – rc = 0.<br />
⎝ ⎝ ⎠⎠∂x<br />
∂ 1<br />
r rx --σ<br />
∂x<br />
2<br />
2 x 2<br />
= – ⎛ ⎞ .<br />
⎝ ⎠<br />
To reduce the problems with inflow boundaries, start by considering a put option:<br />
Study the value of a put option at a strike price K = 40 with σ = 0.3 and r = 0.12.<br />
BOUNDARY CONDITIONS AND INITIAL CONDITIONS<br />
Make the domain be 0 ≤ x ≤ 80 with time running from 12 to 0. Then the initial<br />
condition at t = 12 and x = 80 is 0 based on the put option’s value. The initial<br />
condition in the region 0 ≤ x ≤<br />
40 varies linearly from 0 to 40. At the end of the<br />
simulation domain, the boundary is free (use a homogeneous boundary condition).<br />
Modeling in <strong>COMSOL</strong> Multiphysics<br />
Model the Black-Scholes equation using the following approach:<br />
Create a 1D time-dependent model, using the time-stepping algorithm to solve for<br />
c as a function of x and t, the time. The time steps go backward in time. Using a<br />
variable substitution to reverse the sign of the time, the d a coefficient becomes −1.<br />
To model the initial condition, use the logical expression (x 40, the initial value is zero.<br />
THE BLACK-SCHOLES EQUATION | 101
Model Library path: <strong>COMSOL</strong>_Multiphysics/Equation-Based_Models/<br />
black_scholes_put<br />
Modeling Using the Graphical User Interface<br />
MODEL NAVIGATOR<br />
1 Select 1D in the Space dimension list.<br />
2 In the application mode list, open <strong>COMSOL</strong> Multiphysics>PDE Modes and then PDE,<br />
Coefficient Form.<br />
3 Select Time-dependent analysis. Make sure Lagrange - Quadratic elements are selected.<br />
4 Click OK.<br />
OPTIONS AND SETTINGS<br />
1 From the Options menu, open the Axes/Grid Settings dialog box.<br />
2 In the x min and x max edit fields, type -1 and 81, respectively.<br />
3 Click OK.<br />
4 From the Options menu, open the Constants dialog box.<br />
5 Enter the following constants; when done, click OK.<br />
NAME EXPRESSION<br />
r 0.12<br />
sigma 0.3<br />
GEOMETRY MODELING<br />
Draw a line from 0 to 80:<br />
1 On the Draw menu, point to Specify Objects and then click Line.<br />
2 In the x edit field, type 0 80.<br />
3 Click OK.<br />
PHYSICS MODELING<br />
Subdomain Settings<br />
1 From the Physics menu, open the Subdomain Settings dialog box.<br />
102 | CHAPTER 5: EQUATION-BASED MODELS
2 Select Subdomain 1 and enter the PDE coefficients as follows:<br />
COEFFICIENT VALUE<br />
c 1/2*sigma^2*x^2<br />
a r<br />
f 0<br />
da -1<br />
ea 0<br />
β (-r+sigma^2)*x<br />
3 Click the Init tab and type (x
Optimizing a Flywheel Profile<br />
Introduction<br />
Note: This model requires the Optimization Lab.<br />
The radial stress component in an axially symmetric and homogeneous flywheel of<br />
constant thickness exhibits a sharp peak near the inner radius. From there, it decreases<br />
monotonously until it reaches zero at the flywheel’s outer rim; see Figure 5-1. The<br />
uneven stress distribution—apparent also for the azimuthal component—reveals a<br />
design that does not make optimal use of the material available.<br />
Figure 5-1: Radial (blue) and azimuthal (red) stress components in a homogeneous<br />
flywheel of constant thickness.<br />
This model solves the problem of finding the thickness profile that results in a radial<br />
stress distribution that is as even as possible for given values of the flywheel’s mass and<br />
moment of inertia. The model was inspired by Ref. 1.<br />
104 | CHAPTER 5: EQUATION-BASED MODELS
Model Definition<br />
Before describing the optimization problem, this section derives the dynamical<br />
equations, which you implement using a PDE, General Form application mode in 1D.<br />
STRESSES IN A ROTATING FLYWHEEL<br />
In a rotating flywheel, stresses due to the flywheel’s weight are typically very small<br />
compared to dynamically induced stresses; therefore this model neglects gravitational<br />
stress. Expressed in terms of U ≡ u/r, where u is the local radial displacement (m) and<br />
r is the radial coordinate, the stress components along the radial and azimuthal<br />
directions in a rotationally symmetric disk made of a homogeneous, isotropic, and<br />
elastic material with Young’s modulus E (N/m 2 ) and Poisson’s ratio ν read:<br />
E<br />
σr 1 ν 2<br />
dU<br />
= -------------- r + ( 1 + ν)U<br />
–<br />
dr<br />
σ ϕ<br />
E<br />
1 ν 2<br />
dU<br />
= -------------- νr + ( 1 + ν)U<br />
–<br />
dr<br />
Inserting these expressions in the equation of motion for an infinitesimal mass<br />
element, results in the second-order ordinary differential equation (ODE)<br />
r 2<br />
–<br />
2<br />
r 2<br />
d U dU<br />
1 v<br />
– ( 3 + Φ)r+<br />
( 1 – ( 1 + ν)Φ)U<br />
d<br />
dr<br />
2<br />
–<br />
--------------ρω<br />
E<br />
2 r 2<br />
= r0 < r< r1 (5-1)<br />
(5-2)<br />
valid for a centrally bored flywheel with inner radius r 0 (m) and outer radius r 1 (m)<br />
rotating with the angular velocity ω (rad/s). In this equation, the flywheel’s thickness,<br />
H, which can be a function of r, enters through the dimensionless function<br />
Φ r<br />
---dH<br />
d H<br />
≡ = r log⎛-------<br />
⎞<br />
H dr<br />
dr<br />
⎝ ⎠<br />
At the inner radius the displacement is zero and at the outer radius the radial stress<br />
component vanishes, which corresponds to the following boundary conditions:<br />
U r = r0<br />
(5-3)<br />
(5-4)<br />
Given the function Φ, Equation 5-2 together with Equations 5-4 form a well-posed<br />
ODE problem. With the solution U = U(r) at hand, you can then determine the stress<br />
components through the Equations 5-1.<br />
H 0<br />
dU<br />
= 0,<br />
r + ( 1 + v)U<br />
dr<br />
r = =<br />
0 r1<br />
OPTIMIZING A FLYWHEEL PROFILE | 105
THE OPTIMIZATION PROBLEM<br />
For the special case of constant flywheel thickness, H(r) = H 0, the function Φ is<br />
identically zero. As Figure 5-1 shows and you verify later, this shape results in an<br />
uneven stress distribution, with a maximum for σ r at r = r 0 .<br />
This model concerns optimizing the flywheel’s profile to obtain a radial stress<br />
distribution that is as even as possible under the design requirements of specified<br />
flywheel mass and moment of inertia. To formulate the task in mathematical terms,<br />
tentatively introduce the objective function<br />
106 | CHAPTER 5: EQUATION-BASED MODELS<br />
(5-5)<br />
where σ r,mean denotes the average radial stress value along the flywheel’s radial<br />
extension, and σ 0 is a normalization constant. The latter is introduced to make the<br />
integrand dimensionless and its value is chosen to be roughly an order of magnitude<br />
smaller than σ r to give Q stress a suitable magnitude. The optimization problem is then<br />
to find the shape H = H( r ) that minimizes Q stress under the additional constraints<br />
and<br />
Qstress[ H]<br />
=<br />
( σr – σr, mean)<br />
2<br />
---------------------------------------- dr<br />
2<br />
σ0 where m 0 and I 0 are the desired mass and moment of inertia, respectively.<br />
r 1<br />
∫<br />
r 0<br />
r 1<br />
m ≡ 2πρ Hrdr = m0 r 1<br />
∫<br />
r 0<br />
However, Equation 5-5 alone does not give a reasonable result; suppressing profiles<br />
where dH/dr is not smooth requires a second term in the objective function:<br />
∫<br />
I πρ Hr 3 ≡ dr<br />
= I0 r 0<br />
Qsmoothness[ H]<br />
=<br />
A<br />
⎛dH⎞ ⎝dr⎠ 2<br />
dr<br />
(5-6)<br />
Here A is a normalization constant to be chosen such that Q smoothness and Q stress are<br />
comparable in magnitude; as long as this condition is satisfied, the model is fairly<br />
insensitive to the value of A.<br />
r 1<br />
∫<br />
r 0
MODEL DATA<br />
Table 5-1 gives the input data for the model. As the initial design, take a flywheel of<br />
constant thickness H 0 . The material properties correspond to those of steel.<br />
TABLE 5-1: MODEL DATA<br />
PROPERTY VALUE DESCRIPTION<br />
r 0 0.01 m Inner flywheel radius<br />
r 1 0.60 m Outer flywheel radius<br />
H0 0.03 m Initial flywheel thickness<br />
E 2.1·10 11 N/m 2<br />
Young’s modulus<br />
ν 0.3 Poisson’s parameter<br />
ρ 7800 kg/m 3<br />
Density<br />
ω 2π·50 rad/s Angular velocity<br />
σ 0 10 7 Pa Normalization constant, stress term<br />
A 1 Normalization constant, smoothness term<br />
OPTIMIZING A FLYWHEEL PROFILE | 107
Results and Discussion<br />
Figure 5-2 shows the optimized flywheel profile (black lines) with the original flat<br />
flywheel of the same mass and moment of inertia included for comparison (gray lines).<br />
Figure 5-2: Optimized thickness profile.<br />
Figure 5-3 displays the radial and azimuthal stress components for both the initial and<br />
the optimized flywheel profile. In the optimized flywheel, the stress components are<br />
almost equal and nearly constant for most of the radial cross-section. The maximal<br />
stress, which occurs in the radial direction at the inner radius, is roughly 102 MPa for<br />
108 | CHAPTER 5: EQUATION-BASED MODELS
the optimized profile compared to 174 MPa for the flat flywheel—a reduction by more<br />
than 40%.<br />
Figure 5-3: Radial (blue) and azimuthal (red) stress components for initial (dashed) and<br />
optimized (solid) flywheel profiles.<br />
Reference<br />
1. G.R. Kress, “Shape Optimization of a Flywheel,” Struct. Multidisc. Optim.,<br />
vol. 19, pp. 74–81, 2000.<br />
Model Library path: <strong>COMSOL</strong>_Multiphysics/Equation-Based_Models/<br />
flywheel_profile<br />
Modeling Using the Graphical User Interface<br />
MODEL NAVIGATOR<br />
1 Start <strong>COMSOL</strong> Multiphysics.<br />
2 In the Model Navigator, click Multiphysics, then click Add Geometry.<br />
OPTIMIZING A FLYWHEEL PROFILE | 109
3 In the Add Geometry dialog box, set the Space dimension to 1D.<br />
4 Enter the Independent variables r phi z and set the Unit system to None. Click OK.<br />
5 From the Application Modes tree, select<br />
110 | CHAPTER 5: EQUATION-BASED MODELS<br />
<strong>COMSOL</strong> Multiphysics>PDE Modes>PDE, General Form.<br />
6 In the Dependent variables edit field, type U, then click Add.<br />
7 From the Application Modes tree, select <strong>COMSOL</strong> Multiphysics>Optimization and<br />
Sensitivity>Optimization, then click Add.<br />
8 Click OK to close the Model Navigator.<br />
GEOMETRY MODELING<br />
1 Shift-click the Line button on the Draw toolbar to open the Line dialog box.<br />
2 In the Coordinates area, type 0.01 0.60 in the r edit field.<br />
3 Click OK.<br />
4 Click the Zoom Extents button on the Main toolbar.<br />
OPTIONS AND SETTINGS<br />
1 From the Options menu, select Constants.<br />
2 Define constants according to the following table; when done, click OK.<br />
NAME EXPRESSION DESCRIPTION<br />
r0 0.01 Inner flywheel radius (m)<br />
r1 0.60 Outer flywheel radius (m)<br />
H0 0.03 Initial flywheel thickness (m)<br />
E 2.1e11 Young's modulus (N/m^2)<br />
nu 0.3 Poisson's ratio<br />
C E/(1-nu^2) Constant in ODE and stress equations<br />
rho 7.8e3 Density (kg/m^3)<br />
omega 2*pi*50 Angular velocity (rad/s)<br />
sigma0 1e7 Normalization constant, stress term (Pa)<br />
A 1 Normalization constant, smoothness term<br />
SCALAR EXPRESSIONS<br />
1 From the Options menu, select Expressions>Scalar Expressions.
2 Define the following scalar expressions; when done, click OK.<br />
NAME EXPRESSION DESCRIPTION<br />
sigma_r C*(r*Ur+(1+nu)*U) Stress, r-component<br />
sigma_phi C*(nu*r*Ur+(1+nu)*U) Stress, phi-component<br />
Phi (r/H)*Hr Expression in ODE<br />
q_stress (sigma_r-sigma_r_mean)^2/<br />
sigma0^2<br />
Objective function, stress term<br />
q_smoothness A*Hr^2 Objective function, smoothness<br />
term<br />
The function Φ ≡ (r/H)dH/dr appears in the source term for the ODE. Because it<br />
is proportional to dH/dr, it is zero for the flat flywheel.<br />
INTEGRATION COUPLING VARIABLES<br />
1 From the Options menu, select Integration Coupling Variables>Subdomain Variables.<br />
2 Select Subdomain 1. Define the integration coupling variables specified in the<br />
following table (use the default settings for Integration order and Global destination):<br />
NAME EXPRESSION<br />
R 1<br />
sigma_r_mean sigma_r/R<br />
m0 2*pi*rho*H0*r<br />
m 2*pi*rho*H*r<br />
I0 pi*rho*H0*r^3<br />
I pi*rho*H*r^3<br />
3 Click OK.<br />
PHYSICS SETTINGS<br />
First, define the PDE for U ≡ u/r.<br />
Subdomain Settings—PDE, General Form<br />
1 From the Multiphysics menu, select 1 PDE, General Form (g).<br />
2 From the Physics menu, select Subdomain Settings.<br />
3 Specify the PDE coefficients for Subdomain 1 according to the following table:<br />
PROPERTY VALUE<br />
Γ -r^2*Ur-(1+nu)*r*U<br />
F rho*omega^2*r^2/C-(nu-Phi)*r*Ur-(1+nu)*(1-Phi)*U<br />
OPTIMIZING A FLYWHEEL PROFILE | 111
4 Click OK.<br />
Boundary Conditions—PDE, General Form<br />
1 From the Physics menu, select Boundary Settings.<br />
2 Specify the following boundary conditions; when done, click OK.<br />
SETTINGS BOUNDARY 1 BOUNDARY 2<br />
Type Dirichlet Neumann<br />
G 0 0<br />
R -U<br />
Next, define the design variable, objective function, and constraints for the<br />
optimization problem.<br />
Subdomain Settings–Optimization<br />
1 From the Multiphysics menu, select 2 Optimization (opt).<br />
2 From the Physics menu, select Subdomain Settings.<br />
3 Select Subdomain 1.<br />
4 On the Objective page, type q_stress+q_smoothness in the q 1 edit field.<br />
5 On the Pointwise Constraints page, specify the following constraint:<br />
LB EXPRESSION UB CONSTRAINT ORDER<br />
0.25*H0 H 2.5*H0 1<br />
6 On the Variables page, specify the optimization variable as in the following table:<br />
VARIABLE INIT ELEMENT<br />
H H0 Lagrange - Linear<br />
The model involves only the first-order derivative dH/dr, so linear Lagrange<br />
elements suffice for H.<br />
7 Click OK.<br />
Scalar Settings–Optimization<br />
1 From the Physics menu, select Scalar Settings.<br />
112 | CHAPTER 5: EQUATION-BASED MODELS
2 On the Scalar Constraints page, define the constraints for mass and moment of inertia<br />
according to the following table:<br />
LB EXPRESSION UB<br />
0 m-m0 0<br />
0 I-I0 0<br />
3 Click OK.<br />
MESH GENERATION<br />
1 From the Mesh menu, select Free Mesh Parameters.<br />
2 On the Global page, set the Maximum element size to 2.5e-3.<br />
3 Click the Boundary tab.<br />
4 From the Boundary selection list, select 1, then set the Maximum element size to 1e-3.<br />
5 From the Boundary selection list, select 2, then set the Maximum element size to 5e-4.<br />
6 Click OK.<br />
COMPUTING THE SOLUTION—CONSTANT THICKNESS<br />
Click the Solve button on the Main toolbar to solve the PDE problem for U for the<br />
case of constant flywheel thickness.<br />
The default solution plot of U should resemble that in figure below.<br />
Local radial displacement, u, over radial coordinate, r, for constant flywheel thickness.<br />
POSTPROCESSING AND VISUALIZATION—CONSTANT THICKNESS<br />
First inspect the maximal radial-stress value for the flat flywheel:<br />
OPTIMIZING A FLYWHEEL PROFILE | 113
1 From the Postprocessing menu, select Point Evaluation.<br />
2 From the Point selection list, select 1.<br />
3 In the Expression edit field, type sigma_r, then click OK.<br />
The result—roughly 1.74e8, that is, 174 MPa—appears in the message log at the<br />
bottom of the user interface.<br />
Reproduce the plots in Figure 5-1 of the stress components σr and σϕ with the<br />
following steps.<br />
1 From the Postprocessing menu, choose Domain Plot Parameters.<br />
2 On the General page, select the Keep current plot check box.<br />
3 Click the Line/Extrusion tab. Make sure Subdomain 1 is selected.<br />
4 Find the y-axis data area, and in the Expression edit field, type sigma_r.<br />
5 Click Apply to generate the first graph.<br />
6 Change the Expression to sigma_phi.<br />
7 Click the Line Settings button.<br />
8 From the Line color list, select Color. Click OK.<br />
9 Click OK to generate the second graph.<br />
10 In the figure window, click the Edit Plot toolbar button.<br />
11 Find the Title area, and adjust the title and axis labels as appropriate (enclose<br />
subscript text with the tags and , and type \phi to write ϕ<br />
).<br />
12 Click OK.<br />
Leave the figure window open.<br />
COMPUTING THE SOLUTION—OPTIMIZATION PROBLEM<br />
1 Click the Solver Parameters button on the Main toolbar.<br />
2 Select the Optimization/Sensitivity check box.<br />
3 Select the Plot while solving check box. Although optional, this setting is very useful<br />
because it lets you follow the optimization solver’s progress by displaying after each<br />
model evaluation an updated plot as defined by the current settings in the Plot<br />
Parameters dialog box. In addition, the value of the objective function appears above<br />
the plot.<br />
4 Click the Optimization/Sensitivity tab.<br />
5 From the Analysis list, select Optimization.<br />
114 | CHAPTER 5: EQUATION-BASED MODELS
6 In the Tolerances area, set the Optimality tolerance to 1e-4.<br />
7 Click OK.<br />
8 Click the Solve button on the Main toolbar.<br />
The solution time is roughly 1 minute.<br />
POSTPROCESSING AND VISUALIZATION—OPTIMIZATION PROBLEM<br />
Begin by verifying that the relative normalization between the two terms in the<br />
objective function has a suitable value by plotting the derivative dH/dr.<br />
1 Click the Plot Parameters button on the Main toolbar.<br />
2 Click the Line tab.<br />
3 From the Predefined quantities list, select Optimization (opt)>Hr.<br />
4 Click OK to generate the following plot.<br />
dH/dr as a function of r for the optimized flywheel profile.<br />
The smooth nature of the plot, shows that the normalization constant A is sufficiently<br />
large to suppress short-scale variations in the thickness, H. Conversely, if you were to<br />
specify a significantly lower A value and re-solve the optimization problem, you would<br />
notice sharp features in the dH/dr curve, indicating that you should not lower A<br />
further.<br />
Having concluded that the solution is sound, proceed to inspect the maximal<br />
radial-stress value for the optimized flywheel profile:<br />
1 From the Postprocessing menu, select Point Evaluation.<br />
OPTIMIZING A FLYWHEEL PROFILE | 115
2 Make sure that Point 1 is still selected, then click OK.<br />
The result in the message log should be close to 102 MPa.<br />
Reproduce the plots in Figure 5-3 by first adding the optimized results for the stress<br />
components to the figure-window plot you created earlier and then adjusting line<br />
styles, title, and axis labels.<br />
1 From the Postprocessing menu, choose Domain Plot Parameters.<br />
2 Click Apply to generate the graph for the azimuthal stress component.<br />
3 Change the Expression in the y-axis data area to sigma_r.<br />
4 Click the Line Settings button.<br />
5 From the Line color list, select Cycle. Click OK.<br />
6 Click OK to generate the graph for the radial stress.<br />
7 In the figure window, click the Edit Plot toolbar button.<br />
8 In the Axes tree, select the first Line object. From the Line style list select Dashed line.<br />
9 Repeat the previous step for the second Line object.<br />
10 Select Axes to activate the Axis page.<br />
11 In the Title area, adjust the title and y-axis label as appropriate, then click OK.<br />
To reproduce the profile plot in Figure 5-2, follow these instructions:<br />
1 From the Postprocessing menu, choose Domain Plot Parameters.<br />
2 Click the General tab. From the Plot in list, select New figure. Leave the Keep current<br />
plot check box selected.<br />
3 Click the Line/Extrusion tab. In the Expression edit field in the y-axis data area, type 0.<br />
4 Click the Line Settings button. From the Line color list, select Color then click the<br />
Color button. In the Line Color dialog box, select black, then click OK.<br />
5 From the Line style list, select Dash-dot line.<br />
6 Click OK to close the Line Settings dialog box.<br />
7 In the Domain Plot Parameters dialog box, click Apply to generate the first line.<br />
8 Change the Expression to H0/2, then click the Line Settings button.<br />
9 Click the Color button. Select a gray shade, then click OK.<br />
10 Change the Line style to Solid line, then click OK.<br />
11 Click Apply.<br />
12 Change the Expression to -H0/2, then click Apply.<br />
116 | CHAPTER 5: EQUATION-BASED MODELS
13 Change the Expression to -H/2, then click the Line Settings button.<br />
14 Click the Color button. Select black, then click OK to close the Line Color dialog box.<br />
15 Click OK to close the Line Settings dialog box.<br />
16 Click Apply.<br />
17 Change the Expression to H/2, then click OK.<br />
18 In the second figure window, click the Edit Plot toolbar button.<br />
19 On the Grid page, clear the Show grid check box, then return to the Axis page.<br />
20 Select the Axis equal check box, adjust title and axis labels, and then click OK.<br />
Finally, to change the plot in the main user interface to the one you see when you open<br />
the model in the Model Library, do as follows:<br />
1 Click the Plot Parameters button on the Main toolbar.<br />
2 Click the Line tab.<br />
3 In the Expression edit field, type H/2.<br />
4 Click OK.<br />
OPTIMIZING A FLYWHEEL PROFILE | 117
Electrical Signals in a Heart<br />
This model is kindly provided by Prof. Simonetta Filippi and Dr. Christian Cherubini<br />
from Università Campus Biomedico di Roma, Italy.<br />
Introduction<br />
Modeling the electrical activity in cardiac tissue is an important step in understanding<br />
the patterns of contractions and dilations in the heart. The heart produces rhythmic<br />
electrical pulses, initiated from a point known as the sinus node. The electrical pulses,<br />
in turn, trigger the mechanical contractions of the muscle. In a healthy heart these<br />
electrical pulses are damped out, but a number of heart conditions involve an elevated<br />
risk of re-entry of the signals. This means that the normal steady pulse is disturbed, a<br />
severe and acute condition which is often referred to as arrhythmia.<br />
This section presents two mathematical models describing different aspects of electrical<br />
signal propagation in cardiac tissue: the FitzHugh-Nagumo equations and the<br />
Complex Ginzburg-Landau equations, both of which are solved on the same<br />
geometry. Interesting patterns emerging from these types of models are, for example,<br />
spiral waves, which, in the context of cardiac electrical signals, can produce effects<br />
similar to those observed in cardiac arrhythmia.<br />
EXCITABLE MEDIA AND THE FITZHUGH-NAGUMO EQUATIONS<br />
It has been shown that many important characteristics of electrical signal propagation<br />
in cardiac tissue can be reproduced by a class of equations which describe excitable<br />
media, that is, materials consisting of elementary segments or cells with the following<br />
basic characteristics:<br />
Well-defined rest state<br />
Threshold for excitation<br />
118 | CHAPTER 5: EQUATION-BASED MODELS<br />
A diffusive-type coupling to its nearest neighbors<br />
Excitable media is a rather general concept, which is useful for modeling of (in addition<br />
to the electrical signals in cardiac tissue) a number of different phenomena, including<br />
nerve pulses, the spreading of forest fires, and certain types of chemical reactions. One<br />
of the most important qualitative characteristics displayed by excitable media, and<br />
equally a common denominator between the diversity of phenomena mentioned
above, is the almost immediate damping out of signals below a certain threshold. On<br />
the other hand, signals exceeding this threshold propagate without damping.<br />
The heart works by passing ionic current inside the muscle, thus triggering the<br />
rhythmic contractions that pump blood in and out. The ions move through small pores<br />
or gates in the cellular membrane, which can be either open (excitation state) or closed<br />
(rest state).<br />
In nerve cells and cardiac cells the three abstract characteristics of excitable media are<br />
manifested as<br />
Rest cell membrane potential<br />
Threshold for opening the ionic gates in the cellular membrane<br />
The diffusive spreading of the electrical signals<br />
The state of the membrane gates is random on a microscopic scale, but the probability<br />
of a given state can be modelled as a continuous function of the voltage, thus allowing<br />
an averaged macroscopic continuum description of the current flow.<br />
The FitzHugh-Nagumo equations for excitable media describe the simplest<br />
physiological model with two variables, an activator and an inhibitor. In these heart<br />
models the activator variable corresponds to the electric potential, and the inhibitor is<br />
a variable that describes the voltage-dependent probability of the pores in the<br />
membrane being open and ready to transmit ionic current.<br />
CHAOTIC DYNAMICS AND THE COMPLEX LANDAU-GINZBURG EQUATIONS<br />
The complex Landau-Ginzburg equations provide a relatively simple way of modeling<br />
some aspects of the transition, displayed by many dynamical systems under the<br />
influence of strong external stimulus, from periodic oscillatory behavior into a chaotic<br />
state with gradually increasing amplitude of oscillations and decreasing periodicity.<br />
Although their first use was to describe the theory of superconductivity, the complex<br />
Landau-Ginzburg equations are also generic in their nature (as are the<br />
FitzHugh-Nagumo equations), and examples of dynamical systems which you can<br />
model successfully using these equations are:<br />
The formation of vortices behind a slender obstacle in transversal fluid flow<br />
Oscillating chemical reactions of the Belousov-Zhabotinsky type<br />
In this model the complex Landau-Ginzburg equations simulate the dynamics of the<br />
spiral waves in excitable media.<br />
ELECTRICAL SIGNALS IN A HEART | 119
Model Definition<br />
The geometry here is a simplified 3D model of a heart with two chambers, represented<br />
with semispherical cavities 1 .<br />
Figure 5-4: Model geometry.<br />
THE FITZHUGH-NAGUMO EQUATIONS<br />
The equations are the following:<br />
∂u1 ∂t<br />
∂u2 ∂t<br />
Here u 1 is an action potential (the activator variable), and u 2 is a gate variable (the<br />
inhibitor variable). The parameter α represents the threshold for excitation, ε<br />
represents the excitability, and β, γ, and δ are parameters that affect the rest state and<br />
dynamics of the system.<br />
The boundary conditions for u 1 are insulating, using the assumption that no current<br />
is flowing into or out of the heart. The initial condition defines an initial potential<br />
distribution u 1 where one quadrant of the heart is at a constant, elevated potential V 0 ,<br />
while the rest remains at zero. The adjacent quadrant has instead an elevated value ν 0<br />
for the inhibitor u 2 . It is convenient to implement this initial distribution using the<br />
following logical expressions, where TRUE evaluates to 1 and FALSE to 0:<br />
1. Note that it is possible to import more realistic human/animal heart geometries, with anisotropies and<br />
inhomogenities as well as proper dimensions, into <strong>COMSOL</strong> Multiphysics using the CAD import capabilities.<br />
120 | CHAPTER 5: EQUATION-BASED MODELS<br />
= ∆u+ ( α– u1) ( u1 – 1)u1+<br />
( – u2) =<br />
εβu 1 γu 2<br />
( – – δ)
u1( 0, xyz , , ) = V0( ( x + d)<br />
> 0)<br />
⋅ ( ( z + d)<br />
> 0)<br />
u2( 0, xyz , , ) = v2( ( – x + d)<br />
> 0)<br />
⋅ ( ( z + d)<br />
> 0)<br />
Here d is equal to 10 −5 , and it is included in the expressions to shift the elevated<br />
potential slightly off the main axes.<br />
THE COMPLEX LANDAU-GINZBURG EQUATIONS<br />
The complex Landau-Ginzburg equations are:<br />
∂u1 ∂t<br />
∂u2 ∂t<br />
The two variables u 1 and u 2 are the activator and inhibitor, respectively. The constants<br />
c 1 and c 2 are parameters reflecting the properties of the material. These constants also<br />
determine the existence and nature of the stable solutions.<br />
As in the previous model, the boundary conditions are kept insulating. The initial<br />
condition, which gives a smooth transition step near z = 0, are the following:<br />
Modeling in <strong>COMSOL</strong> Multiphysics<br />
2 2<br />
u2<br />
– ∆(<br />
u1 – c1u2 ) = u1 – ( u1 – c3u2 ) ( u1 + )<br />
2 2<br />
u2<br />
– ∆(<br />
c1u + u<br />
1 2)<br />
= u2 – ( c3u1 + u2) ( u1 + )<br />
u1( 0, xyz , , ) = tanh(<br />
z)<br />
u2( 0, xyz , , ) =<br />
– tanh(<br />
z)<br />
The simplified geometry is quite straightforward to create using the drawing tools in<br />
<strong>COMSOL</strong> Multiphysics. The FitzHugh-Nagumo and Landau-Ginzburg equations are<br />
also readily entered in one of the PDE-based application modes 2 .<br />
It is important to note that these equations are strongly nonlinear. It is therefore<br />
necessary (especially in full 3D models like these) to use a much finer mesh or use<br />
higher element order than in these examples to get results with some degree of<br />
reliability for the time intervals of interest. This is particularly important in solving the<br />
complex Landau-Ginzburg equations, which describe inherently chaotic phenomena.<br />
They are highly sensitive to perturbations in the initial value and similarly to numerical<br />
errors during the course of the time-dependent solution. We recommend the use of<br />
the fourth-order Hermite element for the complex Landau-Ginzburg equation.<br />
2. With this stage completed, it would also be straightforward to replace the rather simple<br />
FitzHugh-Nagumo equations with a physiologically more realistic mathematical model.<br />
ELECTRICAL SIGNALS IN A HEART | 121
For the reasons above, the results presented here are only intended as a first rough<br />
estimate of the qualitative behavior that you can expect the system to show under a<br />
given stimulus. Consequently, higher-order elements, finer meshing, and smaller<br />
relative and absolute time dependent tolerances clearly give quantitatively more correct<br />
simulation results. These improvements may require several hours of computational<br />
time to solve the equations, while the rough model described here should solve within<br />
around 20 minutes on a standard PC. When attempting these types of large models we<br />
strongly recommend the use of 64-bit platforms.<br />
Results<br />
THE FITZHUGH-NAGUMO EQUATIONS<br />
The plots in Figure 5-5 below show the action potential u1 . To visualize the solution<br />
on the inside, a quarter of the outside shell of the heart and one of the chamber<br />
surfaces are suppressed in the plot.<br />
The parameters used in the model along with the initial pulse lead to a reentrant wave<br />
which travels around the tissue without damping in a characteristic spiral pattern.<br />
Figure 5-5: Solution to the FitzHugh-Nagumo equations at times t = 120 s (left plot) and<br />
t = 500 s (right plot).<br />
122 | CHAPTER 5: EQUATION-BASED MODELS
THE LANDAU-GINZBURG EQUATIONS<br />
Figure 5-6 below shows the species u 1 at different times.<br />
Figure 5-6: Solution to the Complex Landau-Ginzburg equations at times t = 45 s (left)<br />
and t = 75 s (right).<br />
The equation parameters and initial condition used here lead the diffusing species (u 1)<br />
to display characteristic spiral patterns with growing complexity over time.<br />
Modeling Using the Graphical User Interface<br />
The instructions below describe how to create the model containing the<br />
FitzHugh-Nagumo equations for excitable media. To create the model containing the<br />
complex Landau-Ginzburg equations, follow the instructions from the beginning until<br />
you have completed the “Geometry Modeling” section. Then jump to the section<br />
called “Modifications.”<br />
Model Library path: <strong>COMSOL</strong>_Multiphysics/Equation-Based_Models/<br />
heart_electrical_fhn<br />
MODEL NAVIGATOR<br />
1 Start <strong>COMSOL</strong> Multiphysics.<br />
2 In the Model Navigator, select 3D from the Space dimension list.<br />
3 Expand the <strong>COMSOL</strong> Multiphysics folder, then expand the PDE Modes subfolder, and<br />
finally select the PDE, General Form application mode.<br />
4 Enter the dependent variables u1 and u2 by typing u1 u2 in the Dependent variables<br />
edit field at the bottom of the window.<br />
ELECTRICAL SIGNALS IN A HEART | 123
5 Click OK to confirm and close the Model Navigator.<br />
GEOMETRY MODELING<br />
1 Click the Sphere button on the Draw toolbar on the left. Enter a Radius of 54 for the<br />
sphere, then click OK.<br />
2 Click the Ellipsoid button on the Draw toolbar. Enter 54, 54, and 70 for the x-, y-,<br />
and z-semiaxes, respectively. Click OK.<br />
Next create the egg-shaped solid by fusing the top half of the sphere with the<br />
bottom half of the ellipsoid. As a first step, divide the two solids across the middle<br />
by using a work plane.<br />
3 To create a work plane, select Draw>Work-Plane Settings. In the Work-Plane Settings<br />
dialog box, click the Vertices tab. Expand the ELP1 folder in the Vertex selection area<br />
on the left, select Vertex 1, and then click the >> button to add it to the Selected<br />
vertices area. In the same manner, add Vertices 2 and 6 to the Selected vertices.<br />
When done, click OK.<br />
4 In the 2D Geom2 geometry, click Zoom Extents on the Main toolbar at the top of<br />
the main user interface and draw a rectangle that completely covers the blue circle<br />
by using the Rectangle button on the Draw toolbar. (Note that the blue curves show<br />
the contours of the 3D geometry in the 2D plane.) Select Draw>Embed, then click<br />
OK.<br />
The rectangular surface should now have been added to the 3D geometry, splitting<br />
both the sphere and the ellipse in two halves.<br />
5 To create the separated geometry objects for the halves, select the rectangular<br />
surface, confirm the selection by right-clicking, and then similarly select and confirm<br />
the spherical solid. With both the spherical solid and the rectangular surface<br />
selected, click the Coerce to Solid button on the Draw toolbar, then click the Split<br />
object button. Finally, remove the bottom half of the sphere by clicking on it to<br />
select it and press the Delete button on the keyboard.<br />
6 Go back to the 2D geometry and select the rectangle, then choose Draw>Embed,<br />
and then click OK. Repeat Step 5 for the elliptical solid instead of the sphere. Note<br />
that this time you need to remove the top half of the elliptic solid (for the sphere it<br />
was the bottom half).<br />
7 Select both objects by pressing Ctrl+A and go to Draw>Create Composite Object.<br />
Make sure that the Keep interior boundaries check box is cleared and click the Union<br />
button. Click OK.<br />
124 | CHAPTER 5: EQUATION-BASED MODELS
8 To create the cavity inside the heart, press first Ctrl+C and then Ctrl+V. In the Paste<br />
dialog box, click OK to create a copy of the egg-shaped solid (leave the x, y, and z<br />
displacements at zero). Then choose Modify>Scale from the Draw menu. In the Scale<br />
factor area, type 2/3 in the x, y, and z edit fields. Click OK.<br />
9 Open the Create Composite Object dialog box again (choose Draw>Create Composite<br />
Object). Enter the expression CO1-CO2 in the Set formula edit field, then click OK to<br />
subtract the smaller solid from the larger one. To see the cavities inside the solid you<br />
can click the Increase Transparency button on the Draw toolbar a couple of times.<br />
10 To create the wall separating the two chambers click the Cylinder button on the<br />
Draw toolbar and enter 45 for the radius and 10 for the height. Type the values -5,<br />
0, and -5 respectively in the x, y, and z edit fields in the Axis base point frame. Enter<br />
1, 0, and 0 as the x, y, and z values in the Axis direction vector frame. Click OK.<br />
11 Once again, open the Create Composite Object dialog box from the Draw menu.<br />
Select both geometry objects, make sure the Keep interior boundaries check box is<br />
not selected, and then click the Union button. Click OK.<br />
The final geometry should look as shown in Figure 5-4 on page 120.<br />
VARIABLES AND EXPRESSIONS<br />
1 Choose Options>Constants.<br />
2 In the Constants dialog box, enter the following constants; when done, click OK.<br />
NAME VALUE DESCRIPTION<br />
alpha 0.1 Excitation threshold<br />
beta 0.5 System parameter<br />
gamma 1 System parameter<br />
delta 0 System parameter<br />
epsilon 0.01 Excitability<br />
V0 1 Elevated potential value<br />
nu0 0.3 Elevated inhibitor value<br />
d 1e-5 Off-axis shift distance<br />
PHYSICS SETTINGS<br />
Subdomain Settings<br />
1 Choose Physics>Subdomain Settings.<br />
ELECTRICAL SIGNALS IN A HEART | 125
2 Enter the subdomain settings according to the following table:<br />
SETTINGS SUBDOMAIN 1<br />
F (row 1) (alpha-u1)*(u1-1)*u1-u2<br />
F (row2) epsilon*(beta*u1-gamma*u2-delta)<br />
Γ (row 1) -u1x -u1y -u1z<br />
Γ (row2) 0 0 0<br />
3 On the Init page, enter the following initial conditions:<br />
DEPENDENT VARIABLE INITIAL CONDITION EXPRESSION<br />
u1(t 0 ) V0*((x+d)>0)*((z+d)>0)<br />
u2(t 0 ) nu0*((-x+d)>0)*((z+d)>0)<br />
4 If you can afford the increase in memory usage and solution time needed for better<br />
accuracy, click the Element tab and select Hermite - Quartic from the Predefined<br />
elements list. Otherwise skip this step and use the default second-order Lagrange<br />
elements.<br />
5 Click OK.<br />
Boundary Conditions<br />
1 Choose Physics>Boundary Settings.<br />
2 Select all boundaries by pressing Ctrl+A.<br />
3 On the Type page, click the Neumann boundary condition button.<br />
Leave the G coefficient components at their default zero values.<br />
4 Click OK.<br />
COMPUTING THE SOLUTION<br />
1 Choose Solve>Solver Parameters.<br />
2 From the Solver list, select Time dependent. In the Time stepping area on the General<br />
page, type range(0,5,500) in the Times edit field.<br />
3 In the Linear system solver list, select GMRES. Make sure that the Preconditioner is set<br />
to Incomplete LU, then click OK.<br />
4 Click the Solve button on the Main toolbar.<br />
126 | CHAPTER 5: EQUATION-BASED MODELS
POSTPROCESSING AND VISUALIZATION<br />
1 To create the right plot in Figure 5-5 on page 122, choose Postprocessing>Plot<br />
Parameters and select the Boundary check box on the General page. Clear all other<br />
check boxes in the Plot type area, then click OK.<br />
2 Choose Options>Suppress>Suppress Boundaries. Select Boundaries 2 and 4–9, then<br />
click OK to hide these boundaries.<br />
3 Click the Postprocessing Mode button on the Main toolbar to see the plot.<br />
4 To create the left plot in Figure 5-5 on page 122, choose Postprocessing>Plot<br />
Parameters, select 125 from the Solution at time list on the General page, and then<br />
click OK.<br />
MODIFICATIONS FOR USING COMPLEX LANDAU-GINZBURG EQUATIONS<br />
Model Library path: <strong>COMSOL</strong>_Multiphysics/Equation-Based_Models/<br />
heart_electrical_clg<br />
Follow the steps under the sections “Model Navigator” and “Geometry Modeling”<br />
just described. Then proceed with the following instructions.<br />
Variables and Expressions<br />
1 Choose Options>Constants.<br />
2 In the Constants dialog box, specify the following constants; when done, click OK.<br />
NAME VALUE DESCRIPTION<br />
c1 2 PDE parameter<br />
c3 -0.2 PDE parameter<br />
Subdomain Settings<br />
1 Choose Physics>Subdomain Settings.<br />
2 Enter the following expressions for the PDE coefficient Γ:<br />
DEPENDENT VARIABLE Γ x Γ y Γ z<br />
u1 -u1x+c1*u2x -u1y+c1*u2y -u1z+c1*u2z<br />
u2 -c1*u1x-u2x -c1*u1y-u2y -c1*u1z-u2z<br />
ELECTRICAL SIGNALS IN A HEART | 127
3 Enter the following for the source term F:<br />
DEPENDENT VARIABLE F<br />
u1 u1-(u1-c3*u2)*(u1^2+u2^2)<br />
u2 u2-(c3*u1+u2)*(u1^2+u2^2)<br />
4 Click the Init tab, then enter the following initial values; when done, click OK.<br />
DEPENDENT VARIABLE INITIAL VALUE<br />
u1(t 0 ) tanh(z)<br />
u2(t 0 ) -tanh(z)<br />
Boundary Conditions<br />
Follow the instructions under “Boundary Conditions” on page 126 (the boundary<br />
conditions are the same for both equations).<br />
Computing the Solution<br />
Follow the steps under “Computing the Solution” on page 126 with the following<br />
modifications:<br />
128 | CHAPTER 5: EQUATION-BASED MODELS<br />
In the Time stepping area on the General page, enter the Times range(0,5,75).<br />
Set both the Relative tolerance and the Absolute tolerance to 1e-7.<br />
Postprocessing and Visualization<br />
Follow the steps under “Postprocessing and Visualization” on page 127 to produce<br />
the corresponding plots for the Landau-Ginzburg equations. Note that to produce the<br />
plot on the left in Figure 5-6 on page 123 you need to select 50 from the Solution at<br />
time list on the General page.<br />
References<br />
2. F.H. Fenton, E.M. Cherry, H.M. Hastings, and S.J. Evans, “Real-time computer<br />
simulations of excitable media: JAVA as a scientific language and as a wrapper for C and<br />
FORTRAN programs,” BioSystems 64, pp. 73–96, 2002.<br />
3. Y. Kuramoto, Chemical Oscillations, Waves and Turbulence, Dover Publications,<br />
2003.<br />
4. J. Keener and J. Sneyd, Mathematical Physiology, Springer, 1998.
An Integro-Partial Differential<br />
Equation 3<br />
Introduction<br />
This example investigates how to solve the integro-partial differential equation<br />
∂ ⎛ ∂T<br />
κ ⎞ –<br />
∂x⎝<br />
∂x<br />
⎠<br />
4Di ------------------------εσT<br />
2 2<br />
Do – Di<br />
4<br />
where ρ is the density, C p is the heat capacity, κ is the thermal conductivity, σ is Stefan’s<br />
constant (the Stefan-Boltzmann constant), ε is the emissivity, and k(x, x') is the kernel<br />
corresponding to the radiation view factor. This equation arises in the physical<br />
description of 1D heat conduction and radiation along a pipe. Figure 5-7 shows the<br />
model geometry.<br />
Before setting up the model, make the following assumptions:<br />
Inside the tube, neglect convection and consider only radiation and conduction.<br />
Assume blackbody radiation with ε = 1.<br />
Model heat transfer only in the x direction (assume θ symmetry).<br />
The pipe’s outer wall is perfectly insulated so that no heat escapes to the outside<br />
world by either radiation or conduction.<br />
The definition of the kernel k(x, x') is<br />
4Di 2 2<br />
Do – Di<br />
where ξ = | x − x' |/ D i as explained in Ref. 1.<br />
------------------------εσ kxx' ( , )Tx' ( ) d<br />
⋅ ------<br />
∂T<br />
+ ∫<br />
= ρC ------ p ∂t<br />
4 x'<br />
Di 3. This model is courtesy of Daniel Smith and Ali Shajii of MKS Instruments, Wilmington, Mass., USA.<br />
L<br />
0<br />
2ξ<br />
1<br />
3 + 3ξ<br />
2 ξ2 ( + 1)<br />
3 2 /<br />
–<br />
-------------------------------<br />
AN INTEGRO-PARTIAL DIFFERENTIAL EQUATION | 129
Do<br />
0 < x < L<br />
Figure 5-7: Model geometry and boundary conditions.<br />
Also consider the following boundary conditions and initial condition:<br />
Modeling in <strong>COMSOL</strong> Multiphysics<br />
To model the equation, use the Heat Transfer by Conduction application mode. In<br />
this application mode you can include the radiation effects in the source term, Q, using<br />
an integration-coupling variable.<br />
To enter convolution integrals of the type needed here, use the dest operator, which<br />
forces <strong>COMSOL</strong> Multiphysics to evaluate the expression on which it operates on the<br />
destination points instead of the source points. In the expression k(x, x'), x' is the<br />
variable to integrate over, whereas the model does not integrate over x. To specify that<br />
x should remain a variable that can take on values from the entire domain, write it as<br />
dest(x) when defining the integration-coupling variable. In the case of a coupling<br />
variable, dest(f(x)) makes <strong>COMSOL</strong> Multiphysics evaluate f(x) on the destination<br />
domain and not the source domain.<br />
130 | CHAPTER 5: EQUATION-BASED MODELS<br />
Di<br />
q = 0. No heat loss<br />
from outer surface<br />
T( 0, t)<br />
=<br />
t<br />
300 + 1200tanh⎛--------------<br />
⎞ K<br />
⎝1 min⎠<br />
TLt ( , ) = 300 K<br />
Tx0 ( , ) =<br />
300 K
Results<br />
The temperature distribution along the length of the pipe at t = 3600 s appears in<br />
Figure 5-8.<br />
Figure 5-8: Temperature distribution along the pipe at t = 3600 s.<br />
It is easy to make a comparison with a radiation-free model by removing the source<br />
term from the heat transfer equation. The equation to solve now becomes<br />
∂ ⎛ ∂T<br />
κ ⎞ ∂T<br />
.<br />
∂x⎝<br />
∂x⎠<br />
=<br />
ρCp∂ t<br />
AN INTEGRO-PARTIAL DIFFERENTIAL EQUATION | 131
Figure 5-9 plots the solutions to both the radiation-free heat transfer and the original<br />
PDE with radiation as a heat source.<br />
Figure 5-9: The temperature distribution with radiation (solid line) and without<br />
radiation (dashed line).<br />
Comparison with the Full 3D Radiation Model<br />
To illustrate the validity of the 1D model, you can set up the entire stationary 3D<br />
model using the Heat Transfer Module. Its General Heat Transfer application mode<br />
handles surface-to-surface radiation boundary conditions, making it easy to verify the<br />
results (Figure 5-10).<br />
132 | CHAPTER 5: EQUATION-BASED MODELS
Figure 5-10: 3D temperature distribution in the pipe.<br />
Figure 5-11 compares the temperature distributions along the axial direction for the<br />
two models (1D and 3D). Clearly the results are in good agreement.<br />
Figure 5-11: The temperature distributions from the 1D model (square markers) and the<br />
3D model (triangle markers).<br />
Reference<br />
1. R. Siegel and J. Howell, Thermal Radiation Heat Transfer, 4th ed., Taylor &<br />
Francis Group, New York, 2001.<br />
AN INTEGRO-PARTIAL DIFFERENTIAL EQUATION | 133
Model Library path: <strong>COMSOL</strong>_Multiphysics/Equation-Based_Models/<br />
integro_partial<br />
Modeling Using the Graphical User Interface<br />
MODEL NAVIGATOR<br />
1 Select 1D in the Space dimension list.<br />
2 In the list of application modes, select<br />
134 | CHAPTER 5: EQUATION-BASED MODELS<br />
<strong>COMSOL</strong> Multiphysics>Heat Transfer>Conduction>Transient analysis.<br />
3 Click OK.<br />
GEOMETRY MODELING<br />
1 Draw a line from 0 to 0.2. To do so, press Shift and click the Line button on the<br />
Draw toolbar. In the LIne dialog box, enter the coordinates 0 0.2, then click OK.<br />
2 Click the Zoom Extents button on the Main toolbar.<br />
OPTIONS AND SETTINGS<br />
Constants and Expressions<br />
1 From the Options menu, select Constants. Enter the following names, expressions,<br />
and descriptions (the descriptions are optional); when done, click OK.<br />
NAME EXPRESSION DESCRIPTION<br />
kappa 13[W/(m*K)] Thermal conductivity<br />
rho 8700[kg/m^3] Density<br />
C_p 300[J/(kg*K)] Heat capacity<br />
sigma 5.67e-8[W/(m^2*k^4)] Stefan's constant<br />
epsilon 1 Emissivity<br />
T_cold 300[K] Temperature, cold end<br />
DT_max 1200[K] Maximum temperature difference<br />
T_init T_cold Initial temperature<br />
D_i 2.54[cm] Inner diameter<br />
D_o D_i*1.1 Outer diameter
2 Go to the Options menu and select Expressions>Subdomain Expressions. Select<br />
Subdomain 1, then enter the following two expressions; when done, click OK.<br />
NAME EXPRESSION<br />
Q_source 4*sigma/(D_o^2-D_i^2)*irrad<br />
Q_loss -4*D_i/(D_o^2-D_i^2)*sigma*epsilon*T^4<br />
Coupling Variables<br />
1 From the Options menu, select Integration Coupling Variables>Subdomain Variables,<br />
then enter the following variable (type the complete expression on a single line);<br />
when done, click OK.<br />
NAME EXPRESSION<br />
irrad T^4*(1-(2*(abs(x-dest(x))/D_i)^3+3*(abs(x-dest(x))/<br />
D_i))/(2*(((x-dest(x))/D_i)^2+1)^1.5))<br />
This is the integral term in the original equation, which you specify in this way using<br />
the dest operator. This coupling variable does not have a unit, so for other<br />
quantities that include the irrad variable (in this case, Q_source and the heat<br />
source setting that uses Q_source), <strong>COMSOL</strong> Multiphysics indicates inconsistent<br />
units.<br />
PHYSICS SETTINGS<br />
Subdomain Settings<br />
1 From the Physics menu, select Subdomain Settings, then enter these expressions for<br />
the material properties:<br />
NAME EXPRESSION<br />
κ kappa<br />
ρ rho<br />
Cp C_p<br />
Q Q_source+Q_loss<br />
2 Click the Init tab. In the T(t 0 ) edit field type T_init, then click OK.<br />
Boundary Conditions<br />
1 From the Physics menu, select Boundary Settings.<br />
2 In the Boundary selection list, select Boundary 1.<br />
AN INTEGRO-PARTIAL DIFFERENTIAL EQUATION | 135
3 In the Boundary condition list, select Temperature. In the T 0 edit field enter the<br />
expression T_cold+DT_max*tanh(t/1[min]). Dividing t by the time constant<br />
1[min] makes the input to tanh unitless, as is appropriate.<br />
4 Select Boundary 2, and in the Boundary condition list select Temperature. In the T 0<br />
edit field type T_cold, then click OK.<br />
MESH GENERATION<br />
1 Click the Initialize Mesh button on the Main toolbar. Doing so results in 15 elements<br />
as you can see in the message log.<br />
2 Click the Refine Mesh button on the Main toolbar twice to end up with 60 elements.<br />
COMPUTING THE SOLUTION<br />
1 From the Solve menu, select the Solver Manager.<br />
2 On the Initial Value page, click the Initial value expression button. Click OK.<br />
3 From the Solve menu, select Solver Parameters.<br />
4 On the General page go to the Solver list on the left side of the window and select<br />
Time dependent. In the Times edit field, type range(0,60,3600). Click OK.<br />
5 Click the Solve button on the Main toolbar.<br />
POSTPROCESSING AND VISUALIZATION<br />
To reproduce the plot in Figure 5-8, follow these steps:<br />
1 From the Postprocessing menu, select Domain Plot Parameters.<br />
2 On the General page, go to the Solutions to use area and select the solution for time<br />
3600 only.<br />
3 Click the Line/Extrusion tab, then click Apply to plot the temperature distribution.<br />
Comparing the Results with a Radiation-Free Model<br />
To compare the temperature distribution in the radiation model with that of a model<br />
without radiation, plot the temperature distributions from the two variations in the<br />
same figure.<br />
1 Again, choose Postprocessing>Domain Plot Parameters. Click the Line/Extrusion tab.<br />
Click Apply to plot the temperature T, then return to the General page and select the<br />
Keep current plot check box at the bottom of the dialog box. Click OK.<br />
2 From the Physics menu, select Subdomain Settings. Click the Physics tab. In the Q edit<br />
field type 0. Click OK. (This step removes the effect of the radiation on the<br />
temperature distribution.)<br />
136 | CHAPTER 5: EQUATION-BASED MODELS
3 Click the Solve button.<br />
4 Choose Postprocessing>Domain Plot Parameters dialog box.<br />
5 Click the General tab. In the Solutions to use area, select the solution for time 3600<br />
only.<br />
6 Click the Line/Extrusion tab. Click the Line Settings button, then select Dashed line<br />
from the Line style list. Click OK to close the Line Settings dialog box.<br />
7 Back in the Domain Plot Parameters dialog box, click OK.<br />
The last step plots the temperature T in the same window as the previous temperature<br />
distribution, and the result should resemble Figure 5-9.<br />
Visualizing the Effect of the Nonlocal Coupling<br />
Note: This step requires that you run <strong>COMSOL</strong> Multiphysics with MATLAB.<br />
To examine the effect of the nonlocal behavior, first export the model to the workspace<br />
(select File>Export>FEM Structure or press Ctrl+F), then enter these commands:<br />
[K,L,M,N] = assemble(fem,'u',fem.sol,'T',3600);<br />
n = size(N,1);<br />
spy([K,N',L;N,sparse(n,n),M]);<br />
The off-diagonal nonzero entries in the sparsity plot reveal that the Jacobian for this<br />
problem is a full matrix.<br />
AN INTEGRO-PARTIAL DIFFERENTIAL EQUATION | 137
The KdV Equation and Solitons<br />
Introduction<br />
The Korteweg-de Vries (KdV) equation, formulated in 1895 by Korteweg and de<br />
Vries, models water waves. It contrasts sharply to the Burgers equation, because it<br />
introduces no dissipation and the waves travel seemingly forever. In 1965, Zabusky<br />
and Kruskal named such waves as solitons.<br />
The KdV equation with boundary conditions and initial value for this model is<br />
formulated as<br />
The equation models the steepening and dispersion of wavefronts but does not<br />
support a train of simple harmonic waves. Such trains comprise the wavecrests<br />
normally associated with the ocean: simply a momentary constructive interference of<br />
contributing waves moving at different speeds. However, the equation does support<br />
solitons, single “humps” that travel without changing shape or speed for unexpectedly<br />
long distances.<br />
Indeed, Perry and Schimke (Ref. 2) concluded from shipboard oceanographic<br />
measurements that bands of choppy water in the Andaman Sea, which lies east of the<br />
Bay of Bengal and west of Burma and Thailand, are associated with large-amplitude<br />
oceanic internal waves. Satellite images have since clarified that these waves originate<br />
on shallow banks on a layer between warm and cool water. Further, Osborne and<br />
Burch (Ref. 1) analyzed oceanographic data in an effort to assess the forces of<br />
underwater current fluctuations associated with such waves on offshore drilling rigs.<br />
They concluded that the visually observed roughness bands are caused by internal<br />
solitons that follow the KdV equation (Ref. 3).<br />
A more recent development is the application of the KdV equation to another type of<br />
waves—light waves. Today solitons have their primary practical application in optical<br />
fibers. Specifically, a fiber’s linear dispersion properties level out a wave while the<br />
nonlinear properties give a focusing effect. The result is a very stable, long-lived pulse<br />
(Ref. 3). It is amazing that researchers have discovered a formula for such waves:<br />
138 | CHAPTER 5: EQUATION-BASED MODELS<br />
ut + uxxx 6uux in Ω [ – 8,<br />
8]<br />
u( – 8,<br />
t)<br />
u( 8, t),<br />
periodic<br />
ux0 ( , ) 6sech ( x)<br />
2<br />
= =<br />
=<br />
=<br />
–
This equation says that the pulse speed is what determines the pulse amplitude and the<br />
pulse width. The following simulation illustrates this effect. An initial pulse, which<br />
does not conform to the formula, immediately breaks down into two pulses of<br />
different amplitudes and speeds. The two new pulses do follow the formula and thus<br />
can travel forever. While the formula does not reveal how solitons interact, the<br />
simulation shows that they can collide and reappear, seemingly unchanged, just as<br />
linear waves do, another counterintuitive observation that is difficult to observe<br />
without predictions by computing.<br />
Model Definition<br />
u<br />
v<br />
= -------------------------------------------------------------------<br />
2 1<br />
2cosh ⎛--v⎞( x– vt–<br />
f)<br />
⎝2⎠ In the model, the term uu x describes the focusing of a wave and u xxx refers to its<br />
dispersion. The balancing of these two terms permits waves to travel with their shape<br />
unchanged.<br />
Because <strong>COMSOL</strong> Multiphysics does not evaluate third derivatives directly, you<br />
rewrite the original equation above as a system of two variables to solve it:<br />
u1t + u2x = 6u1u 1x<br />
u 1xx<br />
Using the general form PDE, you need to define two dependent variables, u1 and u2,<br />
and identify the d a , Γ, and F coefficients in the following equation:<br />
Only the first equation has a time derivative, and it is with respect to u 1 , so only<br />
d a(1,1) is 1; the other three components are zero.<br />
The divergence in this model is a space derivative with respect to x. This means that<br />
the Γ component from the first equation is u 2 , which you type as u2. The Γ<br />
component from the second equation is u 1x, which you express in <strong>COMSOL</strong><br />
Multiphysics as u1x.<br />
The F term components are the right-hand side of the equations: F 1 is 6u 1 u 1x (type<br />
6*u1*u1x), and F 2 is u 2 (type u2).<br />
=<br />
u 2<br />
∂u<br />
da + ∇ ⋅ Γ =<br />
F<br />
∂t<br />
THE KDV EQUATION AND SOLITONS | 139
The initial condition for u 1 uses a hyperbolic cosine function to provide an interesting<br />
wave form to start with. For u 2, you must provide the second space derivative of this<br />
function to provide consistent initial conditions.<br />
Results<br />
The following plot shows how solitons collide and reappear with their shape intact.<br />
References<br />
1. A.R. Osborne and T.L. Burch, “Internal Solitons in the Andaman Sea,” Science,<br />
vol. 208, no. 4443, pp. 451–460, 1980.<br />
2. R.B. Perry and G.R. Schimke, “Large-Amplitude Internal Waves Observed off the<br />
Northwest Coast of Sumatra,” J. Geophys. Res., vol. 70, no. 10, pp. 2319–2324,<br />
1965.<br />
3. G. Strang, Applied Mathematics, Wellesley-Cambridge, 1986.<br />
140 | CHAPTER 5: EQUATION-BASED MODELS
Model Library path: <strong>COMSOL</strong>_Multiphysics/Equation-Based_Models/<br />
kdv_equation<br />
Modeling Using the Graphical User Interface<br />
MODEL NAVIGATOR<br />
1 Select 1D in the Space dimension list.<br />
2 In the list of application modes, open the <strong>COMSOL</strong> Multiphysics>PDE Modes folder and<br />
then PDE, General Form. Select Time-dependent analysis.<br />
3 Type u1 u2 (space separated) in the Dependent variables edit field to define two<br />
dependent variables, u 1 and u 2.<br />
4 Click OK.<br />
OPTIONS AND SETTINGS<br />
1 From the Options menu, open the Axes/Grid Settings dialog box.<br />
2 In the x limits area, set x min to -9 and x max to 9.<br />
3 Click OK to close the dialog box.<br />
GEOMETRY MODELING<br />
Click the Line button on the Draw menu and draw a line from −8 to 8.<br />
PHYSICS MODELING<br />
Periodic Boundary Conditions<br />
1 On the Physics menu, point to Periodic Conditions and then click Periodic Boundary<br />
Conditions.<br />
2 On the Source page, select Boundary 1 and type u1 in the Expression column.<br />
3 Press Enter. The constraint name pconstr1 appears in the Constraint name column.<br />
4 Click the Destination tab.<br />
5 Select destination Boundary 2 and enter destination expression u1.<br />
6 Click the Source Vertices tab.<br />
7 Select Vertex 1, then click the >> button.<br />
8 Click the Destination Vertices tab.<br />
THE KDV EQUATION AND SOLITONS | 141
9 Select Vertex 2, then click the >> button.<br />
10 Click the Source tab.<br />
11 Select Boundary 1 and type u2 in the Expression column.<br />
12 Press Enter. The constraint name pconstr2 appears in the Constraint name column.<br />
13 Click the Destination tab.<br />
14 Select destination Boundary 2 and enter destination expression u2.<br />
15 Click the Source Vertices tab.<br />
16 Select Vertex 1 and click the >> button.<br />
17 Click the Destination Vertices tab.<br />
18 Select Vertex 2 and click the >> button.<br />
19 Click OK.<br />
Boundary Mode<br />
1 From the Physics menu, choose Boundary Settings.<br />
2 Select both boundaries and click the Neumann boundary condition button. The<br />
default Dirichlet boundary condition would override the periodic boundary<br />
conditions.<br />
SETTINGS BOUNDARIES 1, 2<br />
Type Neumann<br />
G(1) 0<br />
G(2) 0<br />
3 Click OK.<br />
Subdomain Mode<br />
1 From the Physics menu, choose Subdomain Settings.<br />
2 Select Subdomain 1, then enter the following PDE coefficients:<br />
PROPERTY VALUE<br />
Γ(1) u2<br />
Γ(2) u1x<br />
F(1) 6*u1*u1x<br />
F(2) u2<br />
d a(11) 1<br />
d a(12) 0<br />
142 | CHAPTER 5: EQUATION-BASED MODELS
PROPERTY VALUE<br />
da(21) 0<br />
da(22) 0<br />
3 Click the Init tab.<br />
4 Enter initial conditions.<br />
PROPERTY VALUE<br />
u1(t0 ) -6*sech(x)^2<br />
u2(t0 ) -24*sech(x)^2*tanh(x)^2<br />
+12*sech(x)^2*(1-tanh(x)^2)<br />
5 Click OK.<br />
MESH GENERATION<br />
1 Open the Free Mesh Parameters dialog box.<br />
2 Type 0.1 in the Maximum element size edit field.<br />
3 Click OK.<br />
4 Click the Initialize Mesh toolbar button.<br />
COMPUTING THE SOLUTION<br />
1 Open the Solver Parameters dialog box.<br />
2 Type range(0,0.025,2) in the Times edit field. This provides 81 equally spaced<br />
time intervals from 0 to 2 seconds.<br />
3 Click the Time Stepping tab.<br />
4 Type 2 in the Maximum BDF order edit field in the Advanced area. This is to ensure<br />
stability in the time-stepping algorithm.<br />
THE KDV EQUATION AND SOLITONS | 143
5 Click OK and then click the Solve button.<br />
Figure 5-12: The solution to the KdV equation at 0.25 s (plot shows −u 1).<br />
POSTPROCESSING AND VISUALIZATION<br />
By default, the software plots the solution at the last time point. The model computes<br />
the negated solution, which is positive. The best way to visualize it is to extrude the<br />
result along time to create a time-series plot.<br />
1 Open the Domain Plot Parameters dialog box.<br />
2 Make sure all time steps are selected in the Solutions to use list on the General page.<br />
3 Click the Line/Extrusion tab.<br />
4 Click the Extrusion plot button.<br />
5 Select Subdomain 1 in Subdomain selection list.<br />
6 Type the quantity -u1 in the Expression edit field in the y-axis data area.<br />
7 Click OK. In the plot window that appears, click the Go to XY View button.<br />
144 | CHAPTER 5: EQUATION-BASED MODELS
Shallow Water Equations<br />
The shallow water equations are frequently used for modeling both oceanographic and<br />
atmospheric fluid flow. Models of such systems lead to the prediction of areas<br />
eventually affected by pollution, coastal erosion, and polar ice-cap melting.<br />
Comprehensive modeling of such phenomena using physical descriptions such as the<br />
Navier-Stokes equations can often be problematic, due to the scale of the modeling<br />
domains as well as through resolving free surfaces. The shallow water equations, of<br />
which there are a number of representations, provide an easier description of such<br />
phenomena.<br />
This 1D model investigates the settling of a wave over a variable bed as a function of<br />
time. The initial wave and the shape of the bed are represented by mathematical<br />
relations so that it is easy to change parameters such as the wave amplitude or the bed’s<br />
shape.<br />
Introduction<br />
This example uses the Saint-Venant’s shallow water equations, which are the<br />
following:<br />
and<br />
-----<br />
∂z<br />
+ ∇ ⋅ ( zv)<br />
= 0<br />
∂t<br />
∂<br />
-------------<br />
( zv)<br />
∇ zvv<br />
∂t<br />
T<br />
+ ⋅ ( ) + gz∇zs– ν∆( zv)<br />
=<br />
0<br />
where z is the thickness of the water layer (m), v is the velocity (m/s), g is the gravity<br />
constant (m/s 2 ), and ν is the kinematic viscosity (m 2 /s). The definition of the<br />
SHALLOW WATER EQUATIONS | 145
thickness of the water layer, z, is z s − z f , where z s and z f are the measures in<br />
Figure 5-13 below. For further details, see Ref. 1.<br />
Figure 5-13: Representative vertical section through the fluid domain showing the bed of<br />
a lake and the water surface.<br />
Artificial Stabilization<br />
With time, the flow develops discontinuities known as hydraulic jumps. Use artificial<br />
stabilization to replace the jumps by steep fronts that can be resolved on the grid. Small<br />
amplitude waves on still water of depth z move with velocity gz . The maximal<br />
propagation velocity is vphase =<br />
v + gz for water waves.<br />
Stabilize the solution by adding artificial viscosity chosen to make the cell Reynolds<br />
number of order unity. To do so, add the term tune v phase h ∂( vz )/∂x to the physical<br />
viscous momentum flux ν ∂( vz )/∂x. Here tune is a O(1) tuning parameter and h is the<br />
local element size. You add the contribution to the divergence term of the<br />
conservation law so that it does not affect the shock speeds. The modification is first<br />
order in element size.<br />
Model Definition<br />
This model studies a simple example of shallow water in a channel with bottom<br />
topography shown in Figure 5-14. Notice the difference in scale between the x and<br />
y directions.<br />
146 | CHAPTER 5: EQUATION-BASED MODELS<br />
z f<br />
z s<br />
x
Figure 5-14: Sea bed profile, z f, used in the model.<br />
Dirichlet boundary conditions (v = 0) are implemented at both ends, while the physics<br />
are described by the equations above. The initial condition is a wave profile, which the<br />
following expression defines:<br />
z 0<br />
2 10 2 –<br />
– 5 10 3 – =<br />
⋅ + ⋅ e<br />
z f<br />
( x – 3)<br />
2<br />
–<br />
---------------------<br />
1 2<br />
SHALLOW WATER EQUATIONS | 147
where z f is the analytical expression for the sea bed profile (see Figure 5-14). The<br />
elevation of the water surface is z + z f, while Figure 5-15 shows z 0 + z f.<br />
Figure 5-15: The initial water surface profile, z 0 + z f , and the sea bed profile, z f .<br />
148 | CHAPTER 5: EQUATION-BASED MODELS
Results and Discussion<br />
The simulation runs for 60 seconds. Figure 5-16 shows the water surface and slope of<br />
the sea bed at six output times toward the beginning of the simulation.<br />
Figure 5-16: The water level and the slope of the sea bed at six output times. Time spans<br />
from t = 0 to t = 15 at steps of 3 seconds.<br />
The simulation clearly shows the influence of the topography of the sea bed on the<br />
elevation of the water surface. Another interesting visualization of the results is an<br />
animation, which is easy to create using <strong>COMSOL</strong> Multiphysics.<br />
SHALLOW WATER EQUATIONS | 149
Modeling in <strong>COMSOL</strong> Multiphysics<br />
The modeling procedure is straightforward using the PDE, General Form application<br />
mode with two dependent variables: Z and ZV. It is easy to define expressions, such as<br />
the one that describes the initial wave profile, z 0, in the appropriate dialog box.<br />
Reference<br />
1. O. Pironneau, Finite Element Methods for Fluids, John Wiley & Sons, 1989.<br />
Model Library path: <strong>COMSOL</strong>_Multiphysics/Equation-Based_Models/<br />
shallow_water<br />
Modeling Using the Graphical User Interface<br />
1 Double-click the <strong>COMSOL</strong> Multiphysics icon to open the Model Navigator.<br />
2 Select 1D from the Space dimension list.<br />
3 Select <strong>COMSOL</strong> Multiphysics>PDE Modes>PDE, General Form>Time-dependent analysis.<br />
4 Type Z ZV in the Dependent variables edit field.<br />
5 Click OK.<br />
OPTIONS AND SETTINGS<br />
1 Select Constants in the Options menu.<br />
2 Enter the following constants:<br />
NAME EXPRESSION<br />
nu1 1e-6<br />
ge 9.8<br />
x0 6<br />
a 0.005<br />
k1 0.0015<br />
tune 0.1<br />
3 Click OK.<br />
4 Select Expressions>Scalar Expressions in the Options menu.<br />
150 | CHAPTER 5: EQUATION-BASED MODELS
5 Enter the following scalar expressions:<br />
NAME EXPRESSION<br />
Zf a*exp(-(x-x0)^2)+k1*x<br />
dZfdx (-2*x+2*x0)*a*exp(-(x-x0)^2)+k1<br />
Zs Z+Zf<br />
Z0 0.02-Zf+0.005*exp(-(x-3)^2/1^2)<br />
vphase abs(ZV/Z)+sqrt(ge*Z)<br />
nu nu1+vphase*h*tune<br />
6 Click OK.<br />
GEOMETRY MODELING<br />
1 Select Specify Objects>Line in the Draw menu.<br />
2 Type 0 10 in the x edit field. This creates a line from 0 to 10 along the x-axis.<br />
3 Click OK.<br />
4 Click the Zoom Extents button in the main toolbar.<br />
PHYSICS SETTINGS<br />
Subdomain Settings<br />
1 Select Subdomain Settings in the Physics menu.<br />
2 Select Subdomain 1 in the Subdomain selection list.<br />
3 Type ZV in the first edit field (first row) in the Flux vector area.<br />
4 Type ZV*ZV/Z-nu*ZVx in the second edit field in the Flux vector area.<br />
5 Click the F tab.<br />
6 Type 0 in the first edit field in the Source term area.<br />
7 Type -ge*Z*(Zx+dZfdx) in the second edit field in the Source term area.<br />
8 Click the Init tab to set the initial conditions.<br />
9 Type Z0 in the Z(t 0 ) edit field. Type 0 in all other edit fields.<br />
10 Click OK.<br />
Boundary Settings<br />
1 Select Boundary Settings from the Physics menu.<br />
2 Select both Boundary 1 and Boundary 2 from the Boundary selection list.<br />
3 Click the R tab.<br />
SHALLOW WATER EQUATIONS | 151
4 Type 0 in the first edit field (first row).<br />
5 Type -ZV in the second edit field.<br />
6 Click OK.<br />
MESH GENERATION<br />
1 Select Free Mesh Parameters in the Mesh menu.<br />
2 Type 0.05 in the Maximum element size edit field.<br />
3 Click Remesh and OK.<br />
COMPUTING THE SOLUTION<br />
1 Select Solver Parameters in the Solve menu.<br />
2 In the Time stepping area, type range(0,60) in the Times edit field.<br />
3 Type 1e-5 in the Relative tolerance edit field.<br />
4 Type 1e-7 in the Absolute tolerance edit field.<br />
5 Click OK.<br />
6 Click the Solve button.<br />
POSTPROCESSING AND VISUALIZATION<br />
The most interesting part of the results is obtained by looking at the scalar expression<br />
Zs, corresponding to the surface topography, at different times compared to the<br />
topography of the bottom.<br />
1 Click the Plot Parameters button.<br />
2 Click the Line tab.<br />
3 Type Zs in the Expression edit field; then click Apply.<br />
4 Click the General page.<br />
5 Select 6 from the Solution at time list.<br />
6 Select the Keep current plot check box.<br />
7 Click the Line tab.<br />
8 Type Zf in the Expression edit field.<br />
9 Click OK.<br />
152 | CHAPTER 5: EQUATION-BASED MODELS
Shell Diffusion<br />
Introduction<br />
A goal for many applications is to predict physics in thin structures, such as shells,<br />
without modeling the thickness of the structure. This is because large aspect ratios can<br />
cause meshing and geometry analysis problems. The model reported here<br />
demonstrates how to use the tangential derivative variables in <strong>COMSOL</strong><br />
Multiphysics to solve partial differential equations in curved 3D shells and 2D<br />
boundaries without modeling their thickness.<br />
Model Definition<br />
The steel tank shown below has two pipe connections. One is grounded and the other<br />
connects to a dead current source. This model calculates the current density in the tank<br />
shell along with the potential distribution across the surface.<br />
400 V<br />
EQUATIONS<br />
The fundamental equation to solve is the current conduction, or charge conservation,<br />
equation.<br />
Here, σ is the electric conductivity (S/m) and V is the electric potential (V).<br />
0 V<br />
∇⋅( – σ∇V)<br />
= 0<br />
(5-7)<br />
The material is a 1 mm thick steel sheet with a conductivity of 4.032·10 6 S/m. You<br />
are working with a surface in 3D so there is no thickness in the model. To account for<br />
the charge conservation in Equation 5-7 you must multiply the current flux expression<br />
with the shell thickness d:<br />
∇⋅( – σd∇V)<br />
=<br />
0 .<br />
SHELL DIFFUSION | 153
Results<br />
Figure 5-17 reveals the potential distribution across the surface.<br />
Figure 5-17: Electric potential distribution across the surface (V).<br />
Figure 5-18 adds the current field as an arrow plot, showing clearly how the current<br />
collects toward the grounded connection.<br />
154 | CHAPTER 5: EQUATION-BASED MODELS
Figure 5-18: Arrow plot of the local current field.<br />
Figure 5-19: Local magnitude of the electric current density (A/m 2 ).<br />
SHELL DIFFUSION | 155
The plot of the magnitude of the local current density in Figure 5-19 is interesting<br />
because you can use it to calculate the resistive heating in the material as an extension<br />
to the model.<br />
Modeling in <strong>COMSOL</strong> Multiphysics<br />
The current conduction equation is modeled here using a Weak Form, Boundary<br />
application mode. For example, you can express Poisson’s equation, −∆u = F, in 2D<br />
using the weak-term sequence -ux_test*ux-uy_test*uy+u_test*F. Tangential<br />
derivative variables come into play only in the shell, which you represent as a boundary.<br />
To call the tangential derivative variables in <strong>COMSOL</strong> Multiphysics, add a T suffix to<br />
the variable name. For example, the tangential derivative corresponding to ux is uTx.<br />
To fully appreciate the weak-level formulation, some knowledge of the weak form in<br />
the finite element method is recommended. Further information is available in the<br />
section “Theoretical Background” on page 360 in the <strong>COMSOL</strong> Multiphysics<br />
Modeling Guide.<br />
Model Library path: <strong>COMSOL</strong>_Multiphysics/Equation-Based_Models/<br />
shell_diffusion<br />
Modeling Using the Graphical User Interface<br />
MODEL NAVIGATOR<br />
1 Start <strong>COMSOL</strong> Multiphysics.<br />
2 In the Model Navigator, select 3D in the Space dimension list. In the list of application<br />
modes, select <strong>COMSOL</strong> Multiphysics>PDE Modes>Weak Form, Boundary.<br />
3 Type V in the Dependent variables edit field, then click OK.<br />
OPTIONS AND SETTINGS<br />
1 From the Options menu, choose Constants.<br />
2 Enter the following constants (the descriptions are optional); when done, click OK.<br />
NAME EXPRESSION DESCRIPTION<br />
sigma 4.032e6 Conductivity (S/m)<br />
d 1e-3 Shell thickness (m)<br />
156 | CHAPTER 5: EQUATION-BASED MODELS
GEOMETRY MODELING<br />
Create the geometry by drawing the shell’s profile of revolution and then subtracting<br />
a hole:<br />
1 From the Draw menu, choose Work-Plane Settings.<br />
2 Click the Quick tab and then click the y-z button. Click OK.<br />
3 In the 2D drawing, double-click SOLID on the status bar to disable automatic<br />
coercion to solid objects.<br />
4 Shift-click the Line button on the Draw toolbar and create an open polygon with<br />
corners in (0, 0), (0.15, 0), (0.15, 1), and (0.05, 1) by entering the corresponding<br />
x and y coordinates in the Line dialog box and then clicking OK.<br />
5 Click the Fillet/Chamfer button on the Draw toolbar.<br />
6 Open the B1 folder and select Vertices 1 and 2 (the two corners in the polygon<br />
object). Make sure the Fillet button is selected and type 0.05 in the Radius edit field.<br />
7 Click OK to create two fillets with radii of 0.05.<br />
8 Select Revolve from the Draw menu and use the default settings.<br />
9 Return to the 2D sketch and draw a centered circle centered at (0, 0.2) with a radius<br />
of 0.05.<br />
10 Select Extrude from the Draw menu, type 0.2 in the Distance edit field, and click OK.<br />
11 Press Ctrl+A to select both objects and then click the Coerce to Face button on the<br />
Draw toolbar.<br />
12 Double-click on the geometry object with the right mouse button to open up the<br />
Object Properties dialog box. Select faces 16, 17, 19, 20, and 25–30 in the Face<br />
selection list and then click Delete to remove them. Click OK.<br />
BOUNDARY CONDITIONS<br />
1 From the Physics menu, choose Boundary Settings.<br />
2 Press Ctrl+A to select all boundaries.<br />
3 On the Weak page, type<br />
sigma*d*(-VTx_test*VTx-VTy_test*VTy-VTz_test*VTz) in the weak edit<br />
field. Click OK.<br />
EDGE SETTINGS<br />
1 From the Physics menu, choose Edge Settings.<br />
2 Select Edges 14, 15, 25, and 29. Type 400-V in the constr edit field.<br />
3 Select Edges 40–43. Type -V in the constr edit field, then click OK.<br />
SHELL DIFFUSION | 157
COMPUTING THE SOLUTION<br />
Click the Solve button.<br />
POSTPROCESSING AND VISUALIZATION<br />
Generate Figure 5-17 on page 154 with the following steps:<br />
1 Click the Plot Parameters button on the Main toolbar.<br />
2 On the General page, clear the Slice check box and select the Boundary check box.<br />
3 On the Boundary page, type V in the Expression edit field in the Boundary data area.<br />
4 Click Apply to generate the plot.<br />
To generate Figure 5-18, add an arrow plot:<br />
5 On the Arrow page, select the Arrow plot check box.<br />
6 Select Boundaries from the Plot arrows on list. On the Boundary Data page, enter the<br />
x,- y-, and z-components -sigma*VTx, -sigma*VTy, and -sigma*VTz.<br />
7 In the Arrow parameters area, select Cone from the Arrow type list and Normalized<br />
from the Arrow length list. Clear the Auto check box and set the Scale factor to 0.7.<br />
8 Click Apply to generate the plot.<br />
158 | CHAPTER 5: EQUATION-BASED MODELS<br />
Finally, to generate Figure 5-19 execute the following instructions:<br />
9 Clear the Arrow plot check box, then click the Boundary tab.<br />
10 Change the Expression to sigma*sqrt(VTx^2+VTy^2+VTz^2).<br />
11 On the General page, click the Title button.<br />
12 In the Title dialog box, click the right option button.<br />
13 Enter the Title Current density [A/m2], then click OK.<br />
14 Click OK to close the Plot Parameters dialog box and generate the plot.
Spherically Symmetric Transport<br />
Introduction<br />
Many models of industrial-transport problems allow the assumption that the problem<br />
is spherically symmetric. This assumption is of great importance because it eliminates<br />
two space coordinates and leaves a 1D problem that is computationally fast and has<br />
very small memory requirements. Some applications where spherical symmetry<br />
assumptions are useful include:<br />
Reaction and diffusion in catalytic pellets in chemical reactors<br />
Heat and mass transfer in the processing of upgraded iron-ore pellets<br />
Any other process that takes place in beads that are nearly spherical<br />
For spherical symmetry to be valid, the following assumptions must apply:<br />
The computational domain has a spherical shape<br />
The outer-perimeter boundary condition does not change with the position on the<br />
surface, that is, it does not vary with the space angles θ and ϕ<br />
At any given time for a time-dependent problem, the material properties depend<br />
only on the radial distance from the center, r, and not on the space angles θ and<br />
For a time-dependent problem, the initial condition depends only on the radial<br />
distance from the center, r, and not on the space angles θ and ϕ<br />
Model Definition<br />
This following example simulates the initial transient heating process of a pelletized<br />
piece of magnetite ore. This is the first step in the process of making hematite ore<br />
pellets, an important raw material for the steel industry.<br />
During the initial heating of a magnetite pellet the temperature is in a range that allows<br />
you to disregard any phase change of moisture. Thus it is possible to use a transient<br />
heat-conduction equation with constant properties in spherical symmetry. You can also<br />
scale the equation for easy parameterization of the radius.<br />
SPHERICALLY SYMMETRIC TRANSPORT | 159<br />
ϕ
Figure 5-20 depicts some pellets together with a push pin as a scale reference.<br />
Figure 5-20: Hematite pellets after drying and oxidation (end product).<br />
The figure shows that these pellets are indeed not perfectly spherical. Nonetheless, this<br />
model takes advantage of the assumption of spherical symmetry.<br />
DOMAIN EQUATIONS<br />
Starting with the time-dependent heat conduction equation<br />
and expanding it in spherical polar coordinates, the result is the equation<br />
where ρ is the density (kg/m 3 ), cp gives the heat capacity (J/(kg·K)), k denotes the<br />
thermal conductivity (W/(m·K)), and Q is an internal heat source (W/m 3 ). Further,<br />
r, θ, and ϕ are the space coordinates.<br />
Assuming a perfect sphere of radius Rp and no change in temperature with differing<br />
space angles, or ∂T ⁄ ∂θ<br />
= ∂T ⁄ ∂ϕ<br />
= 0 , gives<br />
160 | CHAPTER 5: EQUATION-BASED MODELS<br />
∂T<br />
ρc ------ p + ∇ ⋅ ( – k∇T ) = Q<br />
∂t<br />
ρc ------<br />
∂T<br />
p k<br />
∂t<br />
1<br />
r2 ---- ∂<br />
----- r<br />
∂r<br />
2∂T ⎛ ------ ⎞ 1<br />
⎝ ∂r ⎠ r2 ----------------sinθ<br />
∂<br />
----- sinθ ∂θ<br />
∂T ⎛ ------ ⎞ 1<br />
⎝ ∂θ⎠<br />
r2 θ<br />
2<br />
-------------------sin<br />
∂2T ∂ϕ 2<br />
– + + --------- = Q<br />
ρc ------<br />
∂T<br />
----<br />
1<br />
p<br />
.<br />
∂t<br />
∂<br />
----- – kr<br />
∂r<br />
2∂T<br />
+ ⎛ ------ ⎞<br />
⎝ ∂r ⎠<br />
=<br />
Q<br />
r 2
To avoid division by zero at r = 0, which causes numerical problems, multiply this<br />
equation by r 2<br />
r . (5-8)<br />
2 ∂T<br />
ρcp ------ -----<br />
∂<br />
– kr<br />
∂t ∂r<br />
2∂T<br />
+ ⎛ ------ ⎞ r<br />
⎝ ∂r ⎠<br />
2 = Q<br />
Using a dimensionless radial coordinate by scaling the equation provides the option<br />
to quickly change the pellet’s radius without changing or parameterizing the geometry<br />
size4 r<br />
. Introducing the dimensionless coordinate<br />
ˆ<br />
and substituting in Equation 5-8 leads to<br />
on the following domain:<br />
In a similar manner, it is possible to derive equations similar to Equation 5-9 for<br />
porous media flow, diffusion-reaction problems, and so on.<br />
The model uses the following material data:<br />
SYMBOL NAME VALUE<br />
ρ Density 2000 kg/m 3<br />
r<br />
ˆ<br />
-----r<br />
∂<br />
, ----- ------<br />
1<br />
Rp ∂r Rp ∂<br />
∂r ˆ<br />
= = -----<br />
r ˆ2 ∂T<br />
ρc ------<br />
∂<br />
p ∂t ∂r ˆ<br />
----- k – rˆ2<br />
-----------<br />
2<br />
∂T<br />
∂r ˆ<br />
⎛ ⎞<br />
+ ⎜ ------ ⎟ r<br />
⎝ ⎠<br />
ˆ2 = Q<br />
r = 0<br />
r =<br />
1<br />
r<br />
R p<br />
cp Heat capacity 300 J/(kg·K)<br />
k Conductivity 0.5 W/(m·K)<br />
Rp Pellet radius 0.005 m<br />
Q Heat source 0 W/m 3<br />
(5-9)<br />
4. Note that scaling the variables to get well-conditioned problems is not necessary in <strong>COMSOL</strong><br />
Multiphysics because the solvers use automatic variable scaling.<br />
SPHERICALLY SYMMETRIC TRANSPORT | 161
BOUNDARY CONDITIONS AND INITIAL CONDITIONS<br />
Because of symmetry about r = 0, there is zero flux through this point, meaning<br />
.<br />
At the surface, , you use a convective heating expression with a heat transfer<br />
coefficient, hs (W/(m 2 ·K), for the influx of heat (W/m 2 ∂T<br />
∂r<br />
):<br />
ˆ<br />
------ = 0<br />
r ˆ<br />
= 1<br />
162 | CHAPTER 5: EQUATION-BASED MODELS<br />
qin = hs( Text – T)<br />
. (5-10)<br />
This expression describes a hot gas with a temperature T ext flowing around the pellet.<br />
T ext is chosen at 95 °C. The heat transfer coefficient is set to 1000 W/(m 2 ·K). The<br />
initial condition is set to 25 °C.<br />
Results<br />
t=10s<br />
Figure 5-21: Temperature profiles from t = 0 to t = 10 s.<br />
t=0s<br />
Figure 5-21 shows the temperature profiles from 0 to 10 seconds. Each line represents<br />
an increment of 0.5 s from the preceding line. From the topmost line it is clear that
the center of the pellet has not reached steady state at 10 s. You can also plot the time<br />
evolution of the temperature at the center of the pellet.<br />
Figure 5-22: Time evolution of temperature in the center of a pellet with radius<br />
R p = 5 mm<br />
Figure 5-22 shows even more clearly how long the process must yet go before it<br />
reaches steady state. An interesting next step is to experiment with different particle<br />
radii, R p , and different heating times.<br />
Figure 5-23: Time evolution in the center of a pellet with radius R p = 2.5 mm.<br />
SPHERICALLY SYMMETRIC TRANSPORT | 163
Simply reducing the radius somewhat lets the model reach steady state within 7 s.<br />
Modeling in <strong>COMSOL</strong> Multiphysics<br />
To implement Equation 5-9 and the boundary conditions of this problem, use the 1D<br />
time-dependent version of the PDE, General Form application mode:<br />
For more information about using this application mode, please refer to the section<br />
“The Scalar General Form Equation” on page 258 in the <strong>COMSOL</strong> Multiphysics<br />
Modeling Guide.<br />
The space coordinate in the model is r . For typographical reasons we use rh in this<br />
model for “r-hat.” Identifying the general form with Equation 5-9, the following<br />
settings generate the correct equation:<br />
ˆ<br />
COEFFICIENT EXPRESSION<br />
ea 0<br />
da r ˆ2 ρcp Γ (flux vector)<br />
F (source term) 0<br />
You must take special care when setting the heat-influx boundary condition on the<br />
pellet surface. h s( T ext − T) = k ∂T/∂r on the surface, so you need to compensate G<br />
accordingly:<br />
164 | CHAPTER 5: EQUATION-BASED MODELS<br />
2<br />
∂ u ∂u<br />
ea + da + ∇ ⋅ Γ = F in Ω<br />
2<br />
∂t<br />
∂t<br />
– n ⋅ Γ G ⎛∂R⎞ ⎝∂u⎠ T<br />
⎧<br />
⎪<br />
⎪<br />
⎪<br />
⎨<br />
⎪ = + µ<br />
on ∂Ω<br />
⎪<br />
⎪ 0 = R<br />
on ∂Ω<br />
⎩<br />
– kr<br />
ˆ2<br />
-----------<br />
2<br />
∂T<br />
∂r ˆ<br />
------<br />
R p<br />
r ˆ2<br />
R p<br />
G =<br />
------h s( Text – T)<br />
.
Model Library path: <strong>COMSOL</strong>_Multiphysics/Equation-Based_Models/<br />
spherical_symmetry_ore<br />
Modeling Using the Graphical User Interface<br />
MODEL NAVIGATOR<br />
1 Open the Model Navigator. Click the Multiphysics button and click the Add Geometry<br />
button.<br />
2 The Add Geometry dialog box appears. In the Space dimension list select 1D, and in<br />
the Independent variables edit field enter rh theta phi. In the Unit system list select<br />
None. Click OK.<br />
3 In the list of application modes, select<br />
<strong>COMSOL</strong> Multiphysics>PDE Modes>PDE, General Form>Time-dependent analysis. Do<br />
not click OK yet.<br />
4 In the Dependent variables edit field type T.<br />
5 In the Application mode name edit field type ore_pellet.<br />
6 In the Element list verify that Lagrange - Quadratic is selected.<br />
7 Click Add, then click OK.<br />
OPTIONS AND SETTINGS<br />
From the Options menu select Constants. Enter the following names, expressions, and<br />
(optionally) descriptions; when done, click OK.<br />
NAME EXPRESSION DESCRIPTION<br />
rho 2000 Density (kg/m^3)<br />
cp 300 Heat capacity (J/(kg*K))<br />
k 0.5 Conductivity (W/(m*K))<br />
Rp 0.005 Pellet radius (m)<br />
Qs 0 Heat source (W/m^3)<br />
hs 1000 Heat transfer coefficient (W/(m^2*K))<br />
Text 368 External temperature (K)<br />
Tinit 298 Initial value (K)<br />
SPHERICALLY SYMMETRIC TRANSPORT | 165
GEOMETRY MODELING<br />
1 Select the menu item Draw>Specify Objects>Line.<br />
2 In the rh edit field enter 0 1, then click OK.<br />
3 Click the Zoom Extents button on the main toolbar.<br />
PHYSICS SETTINGS<br />
Subdomain Settings<br />
1 From the Physics menu choose Subdomain Settings.<br />
2 Go to the Subdomain selection list and choose Subdomain 1. Enter the coefficients<br />
from the following table:<br />
COEFFICIENT VALUE/EXPRESSION<br />
Γ -k*rh^2/Rp^2*Trh<br />
F rh^2*Qs<br />
e a<br />
d a<br />
Note: Trh is <strong>COMSOL</strong> Multiphysics syntax for ∂T/∂(rh) if T and rh are defined<br />
variables.<br />
3 Click the Init tab, and in the T(t 0 ) edit field enter Tinit.<br />
4 Click OK.<br />
Boundary Conditions<br />
1 From the Physics menu choose Boundary Settings.<br />
2 In the Boundary Settings dialog box enter the following settings; when done, click<br />
OK.<br />
166 | CHAPTER 5: EQUATION-BASED MODELS<br />
0<br />
rh^2*rho*cp<br />
SETTINGS BOUNDARY 1 BOUNDARY 2<br />
Boundary condition type Neumann Neumann<br />
G 0 rh^2/Rp*hs*(Text-T)
Note: Clicking the Neumann boundary condition button disables the R edit field and<br />
sets it to 0. You can also manually type 0 in the R field to get a Neumann condition.<br />
MESH GENERATION<br />
1 Go to the Mesh menu and select Free Mesh Parameters.<br />
2 Set the Maximum element size scaling factor to 0.4 and click Remesh.<br />
3 Click OK.<br />
COMPUTING THE SOLUTION<br />
1 From the Solve menu choose Solver Parameters.<br />
2 Find the Times edit field and enter the time steps as range(0,0.25,10).<br />
3 Click OK.<br />
4 Click the Solve button on the Main toolbar.<br />
POSTPROCESSING AND VISUALIZATION<br />
To create a line plot with all temperature profiles for the time steps in Figure 5-21 on<br />
page 162, follow these steps:<br />
1 Select the menu item Postprocessing>Domain Plot Parameters.<br />
2 On the General page, in the Plot type area click the Line/Extrusion plot option button.<br />
3 Verify that all the entries in the Solutions to use list are selected (the default).<br />
4 Go to the Line/Extrusion page, and select the Line plot button.<br />
5 In the y-axis data area go to the Predefined quantities list and select T.<br />
6 Click the General tab. Click the Title/Axis button and enter the Title Temperature,<br />
the First axis label Dimensionless radius, and the Second axis label T (K). Click<br />
OK.<br />
7 Click OK to close the Domain Plot Parameters dialog box and create the plot.<br />
To create a line plot with time evolution of the temperature at the center as in<br />
Figure 5-22 on page 163, follow these steps:<br />
1 Select the menu item Postprocessing>Domain Plot Parameters.<br />
2 Go to the General page, then to the Plot type area, and then select the Point plot<br />
option button.<br />
3 Verify that all the entries in the Solutions to use list are selected (the default).<br />
SPHERICALLY SYMMETRIC TRANSPORT | 167
4 Click the Point tab.<br />
5 In the y-axis data area find the Predefined quantities list and select T.<br />
6 In the Boundary selection list choose 1.<br />
7 Click the General tab. Click the Title/Axis button and set all fields to Auto.<br />
8 Click OK, then OK again.<br />
Finally, if you want to make an animation, execute the following instructions:<br />
1 Click the Plot Parameters button on the Main toolbar (or press F12).<br />
2 On the Animate page click the Start Animation button to launch the <strong>COMSOL</strong> Movie<br />
Player window, then click OK to close the Plot Parameters dialog box.<br />
168 | CHAPTER 5: EQUATION-BASED MODELS
The Telegraph Equation<br />
Introduction<br />
This model examines how telegraph wire transmits a pulse of voltage using the<br />
telegraph equation. The telegraph equation models mixtures between diffusion and<br />
wave propagation by introducing a term that accounts for effects of finite velocity to a<br />
standard heat or mass transport equation.<br />
This example models a small section of a telegraph wire and contains a study of the<br />
pulse of voltage moving along it. A parametric analysis provides results showing the<br />
shape of the pulse with varying damping coefficients.<br />
Model Definition<br />
The model is simple to define. The geometry is a one-dimensional line of length 1. To<br />
model the pulse, the initial condition is a bell-shaped voltage distribution. The<br />
boundary conditions define the flux at both ends of the wire section, which allows the<br />
voltage to vary freely.<br />
DOMAIN EQUATIONS<br />
The telegraph equation is the following:<br />
where:<br />
α and β are positive constants.<br />
c is the transport velocity.<br />
u is the voltage (the dependent variable).<br />
The model begins with the values α = β = 0.25 and c = 1.<br />
BOUNDARY CONDITIONS<br />
utt + ( α+ β)ut+<br />
αβu c 2 = uxx The boundary conditions at both ends are homogeneous Neumann conditions:<br />
ux( t, 0)<br />
= 0<br />
ux( t, 1)<br />
=<br />
0<br />
THE TELEGRAPH EQUATION | 169
INITIAL CONDITION<br />
The following equations for the initial condition describe a bell-shaped pulse with the<br />
highest point at 0.2 and a base width of 0.4:<br />
Results<br />
The figure below shows the results of the first simulation. It is clear that the pulse gets<br />
smoother as it propagates along the wire section. Figure 5-24 shows the shape of the<br />
pulse at t = 0, 0.5, and 1:<br />
Figure 5-24: Shape of the pulse at t = 0, 0.5, and 1: α + β = 0.5.<br />
Small values of the term αβ result in a smoother pulse compared to larger values, while<br />
the term α + β sets the amount of damping. The following plots shows the influence<br />
170 | CHAPTER 5: EQUATION-BASED MODELS<br />
u( 0, x)<br />
= e<br />
3 x<br />
– ⎛------- ⎝<br />
– 1⎞<br />
0.2 ⎠<br />
ut( 0, x)<br />
=<br />
0<br />
2
of the term α+β on the damping. A value of α+β = 1 yields the pulse in Figure 5-25 at<br />
t = 0, 0.5, and 1:<br />
Figure 5-25: Shape of the pulse at t = 0, 0.5, and 1: α + β = 1.<br />
THE TELEGRAPH EQUATION | 171
In the figure above the height of the pulse decreases only slightly from the initial value.<br />
In Figure 5-26, the decrease in height is more pronounced owing to a damping term<br />
that is four times as large as the one used for Figure 5-25.<br />
Figure 5-26: Shape of the pulse at t = 0, 0.5, and 1: α + β = 2.<br />
Applying the telegraph equation to 2D and 3D models follows the same protocol<br />
shown here but produces a more complex systems of equations.<br />
Modeling in <strong>COMSOL</strong> Multiphysics<br />
To set up the telegraph equation, use a Coefficient Form PDE application mode for<br />
time-dependent analysis.<br />
Model Library path: <strong>COMSOL</strong>_Multiphysics/Equation-Based_Models/<br />
telegraph_equation<br />
172 | CHAPTER 5: EQUATION-BASED MODELS
Modeling Using the Graphical User Interface<br />
MODEL NAVIGATOR<br />
1 Select 1D in the Space dimension list.<br />
2 In the list of application modes, browse to <strong>COMSOL</strong> Multiphysics>PDE Modes>PDE,<br />
Coefficient Form.<br />
3 Select Time-dependent analysis, wave type. Make sure that Lagrange - Quadratic<br />
elements is selected in the Element list.<br />
4 Click OK.<br />
OPTIONS AND SETTINGS<br />
1 From the Options menu, choose Constants.<br />
2 Enter the following constants in the Constants dialog box:<br />
NAME EXPRESSION<br />
c 1<br />
alpha 0.25<br />
beta 0.25<br />
3 Click OK.<br />
GEOMETRY MODELING<br />
1 Click the Line button and draw a line of length 1 from 0 to 1 on the x-axis.<br />
2 Click the Zoom Extents button on the Main toolbar.<br />
PHYSICS SETTINGS<br />
Boundary Conditions<br />
1 From the Physics menu, choose Boundary Settings.<br />
2 Select Boundaries 1 and 2. From the Boundary condition list select Neumann.<br />
3 Click OK.<br />
Subdomain Settings<br />
1 From the Physics menu, choose Subdomain Settings.<br />
THE TELEGRAPH EQUATION | 173
2 On the Coefficients page in the Subdomain Settings dialog box, enter these PDE<br />
coefficients (the e a and d a coefficients are the default values):<br />
PROPERTY SUBDOMAIN 1<br />
c c*c<br />
a alpha*beta<br />
f -(alpha+beta)*ut<br />
d a<br />
e a<br />
3 Click the Init tab and enter the following initial conditions:<br />
PROPERTY SUBDOMAIN 1<br />
4 Click OK.<br />
MESH GENERATION<br />
Initialize the mesh and refine it once.<br />
COMPUTING THE SOLUTION<br />
1 From the Solve menu, choose Solver Parameters.<br />
2 Click the Time Stepping tab.<br />
174 | CHAPTER 5: EQUATION-BASED MODELS<br />
0<br />
1<br />
u(t 0) exp(-3*(x/0.2-1)^2)<br />
ut(t 0) 0
3 Select the Manual tuning of step size check box. Type 0.002 in the Maximum time<br />
step edit field. To get a good solution to the telegraph equation with this mesh, a<br />
time step of around 0.002 is sufficient. It means that the solver takes about 500<br />
steps.<br />
4 Click OK.<br />
5 Click the Solve button on the Main toolbar to run the analysis.<br />
POSTPROCESSING AND VISUALIZATION<br />
1 From the Postprocessing menu, choose Plot Parameters.<br />
2 Select the Keep current plot check box and plot the solution at time 0, 0.5, and 1.<br />
3 From the Options menu, choose Constants.<br />
4 In the Constants dialog box, change alpha and beta to 0.5.<br />
5 Click OK.<br />
6 Click the Solve button.<br />
Continue to investigate the effect of the α and β coefficients by changing their values.<br />
THE TELEGRAPH EQUATION | 175
A Transport Problem<br />
Introduction<br />
This model features a pure stationary transport problems with a single convective term.<br />
It shows how to address oscillations and instabilities that arise from the numerical<br />
method. Here you stabilize a formulation with continuous Langrange elements by<br />
streamline diffusion and using a formulation with discontinuous elements with<br />
upwinding.<br />
Model Definition<br />
The following 1st-order equation models pure stationary transport in the direction of<br />
the constant vector β:<br />
Here Γ is the inflow boundary, and the vector β = (β x , β y ) points into the domain Ω.<br />
The exact solution is constant on the characteristics<br />
where t is a real number. Thus, if a characteristic intersects Γ at the point (x, y), then<br />
the value of u is u 0(x, y) along the entire characteristic.<br />
In this example, the domain Ω is the unit square and β = (1, 1). Thus Γ corresponds<br />
to the left and lower edges of the square. Use the expression u 0 = y > x to define the<br />
boundary conditions u = 1 on the left boundary and u = 0 on the lower boundary. The<br />
exact solution then equals<br />
176 | CHAPTER 5: EQUATION-BASED MODELS<br />
⎧<br />
⎨<br />
⎩<br />
uxy ( , )<br />
β⋅( ∇u)<br />
= 0 Ω<br />
u = u0 Γ<br />
x = x0+ tβx y = y0+ tβy ⎧<br />
=<br />
⎨<br />
⎩<br />
1 y> x<br />
0 y< x
Streamline Diffusion<br />
Streamline diffusion stabilizes oscillations and instabilities that arise from the<br />
numerical method. Streamline diffusion is an example of a Petrov-Galerkin method<br />
where the test-function space differs from the solution space. The modified test<br />
functions give rise to additional terms in the weak formulation of the problem. The<br />
streamline-diffusion contribution to the transport equation is<br />
h<br />
– ------ ( βxûx + βyûy ) ( βxu+ β<br />
x yu )<br />
y<br />
2<br />
where the “hat” symbol denotes the corresponding test functions.<br />
The Convection and Diffusion, Convection and Conduction, and Incompressible<br />
Navier-Stokes application modes have built-in artificial diffusion of several types,<br />
including streamline diffusion. This model explicitly adds the streamline-diffusion<br />
contributions.<br />
The section “Stabilization Techniques” on page 481 in the <strong>COMSOL</strong> Multiphysics<br />
Modeling Guide describes general techniques for introducing contributions from<br />
artificial diffusion.<br />
Upwinding Using Discontinuous Basis Functions<br />
When you use continuous basis functions, the usual Galerkin method must be<br />
numerically stabilized, for example using streamline diffusion. Another approach is to<br />
use discontinuous basis functions (also know as the discontinuous Galerkin method).<br />
The term must be treated carefully because if u is discontinuous over an<br />
element boundary, this term is a δ-function on the boundary. Assume the vector field<br />
β is continuous within an element and has a continuous normal component across<br />
element boundaries (this is certainly true for the constant β used here). Define the<br />
upstream and downstream sides of an element boundary such that β points in the<br />
downstream direction, and define the normal vector n to be pointing in the opposite<br />
direction, from the downside to the upside. Also let the superscripts u and d β⋅( ∇u)<br />
indicate<br />
evaluation on the respective sides of a boundary.<br />
It is then possible to assemble the contribution from the discontinuities as<br />
û (note that if β happens to be parallel to the boundary, “up” and<br />
“down” are undefined, but this is no problem because the factor β · n is then zero<br />
anyway). Using the test function on the downwind side gives sufficient stabilization<br />
d ( β ⋅ n)<br />
u d u u<br />
( – )<br />
A TRANSPORT PROBLEM | 177
since it means that information is always taken from the upwind side and transported<br />
downwind (upwinding stabilization).<br />
When using discontinuous elements, it does not make sense to impose a boundary<br />
condition on u by constraints because the value of u is not well defined on an element<br />
boundary. Instead use the same transport term, where you can imagine an element<br />
upstream of Γ with a value u0 . Thus assemble a contribution û at<br />
element boundaries belonging to the inflow boundary Γ.<br />
d ( β ⋅ n)<br />
u d ( – u0) Note: This upwinding method is not suited for problems with diffusion terms.<br />
Results<br />
The PDE is stationary but has a discontinuity in the solution. The model shows how<br />
you can prevent instabilities from propagating into areas where the solution should be<br />
constant by using streamline diffusion or upwinding.<br />
The plot shows the discontinuities between elements stabilized with upwinding.<br />
178 | CHAPTER 5: EQUATION-BASED MODELS
Modeling in <strong>COMSOL</strong> Multiphysics<br />
When setting up this model, think of the equation as a special case (c = 0) of a general<br />
convection-diffusion equation:<br />
Using the Convection-Diffusion application mode, this transport problem is easy to<br />
set up and solve. A second step adds explicit streamline diffusion.<br />
Further steps change the model to use discontinuous elements and upwinding. In<br />
<strong>COMSOL</strong> Multiphysics all boundaries have an “up” and “down” side defined<br />
independent of the β direction. However, you can use the expression<br />
(bx*dnx+by*dny
GEOMETRY MODELING<br />
1 On the Draw menu point to Specify Objects, select Square, then click OK.<br />
Because you do not change any settings in the Square dialog box, you create the<br />
default square with its corner at (0, 0) and with a side length of 1.<br />
2 Press the Zoom Extent button on the Main toolbar.<br />
OPTIONS AND SETTINGS<br />
Constants and Expressions<br />
1 From the Options menu select Expressions>Global Expressions.<br />
2 Enter the following names and expressions; when done, click OK.<br />
NAME EXPRESSION<br />
bx 1<br />
by 1<br />
u0 y>x<br />
PHYSICS SETTINGS<br />
Boundary Conditions<br />
1 From the Physics menu choose Boundary Settings.<br />
2 Enter the following settings in the Boundary Settings dialog box; when done, click<br />
OK.<br />
SETTINGS BOUNDARIES 1, 2 BOUNDARIES 3, 4<br />
Type Dirichlet Neumann<br />
r u0 -<br />
Subdomain Settings<br />
1 From the Physics menu choose Subdomain Settings.<br />
2 Select Subdomain 1.<br />
3 Change these PDE coefficients in the Subdomain Settings dialog box:<br />
PROPERTY SUBDOMAIN 1<br />
c 0<br />
f 0<br />
da 0<br />
β bx by<br />
180 | CHAPTER 5: EQUATION-BASED MODELS
4 Click the Weak tab.<br />
5 Type -h*(bx*ux_test+bx*uy_test)/sqrt(2)*(bx*ux+bx*uy) in the weak edit<br />
field.<br />
6 Click OK.<br />
To add streamline diffusion automatically, instead use the Convection and Diffusion<br />
application mode. When in that mode open the Subdomain Settings dialog box, click<br />
the Artificial Diffusion button and select the Streamline diffusion check box to add<br />
stabilization by streamline diffusion.<br />
MESH GENERATION<br />
Click the Initialize Mesh button on the Main toolbar.<br />
COMPUTING THE SOLUTION<br />
Click the Solve button on the Main toolbar.<br />
POSTPROCESSING AND VISUALIZATION<br />
Click the 3D Surface Plot button on the Plot toolbar to visualize the solution.<br />
Investigate the effect of streamline diffusion stabilization by turning it off and then<br />
setting the weak contribution to 0. You can increase the accuracy by refining the mesh.<br />
Continue with the same model using discontinuous elements and upwinding instead<br />
of Lagrange elements and streamline diffusions.<br />
PHYSICS SETTINGS<br />
Boundary Conditions<br />
1 From the Physics menu choose Boundary Settings.<br />
2 Select all the boundaries and click the Neumann boundary conditions button.<br />
3 Click the Weak tab.<br />
4 Enter the following settings in the Boundary Settings dialog box; when done, click<br />
OK.<br />
TERM ALL<br />
weak (bx*dnx+by*dny
Subdomain Settings<br />
1 From the Physics menu choose Subdomain Settings.<br />
2 Select Subdomain 1, click the Weak tab, and enter these terms:<br />
TERM ALL<br />
weak 0<br />
dweak 0<br />
constr 0<br />
bnd.weak (bx*dnx+by*dny
The Two-Term Boltzmann Equation 5<br />
Introduction<br />
Fluid models of plasma dynamics require a full and consistent set of electron transport<br />
and rate coefficients. In the drift-diffusion approximation for the electron density, n,<br />
and the mean electron energy, ε , the electron mobility, µ e , electron diffusivity, De , and<br />
energy mobility, µ ε , energy diffusivity, Dε are required inputs, and are functions of<br />
background neutral particle number density, N, and mean electron energy. The rate<br />
coefficients, kj , for the inelastic collisions occurring in a plasma are strong functions of<br />
the electron energy distribution function (EEDF). In general, the EEDF cannot be<br />
assumed to be Maxwellian; a better approximation is obtained by solving a two-term<br />
truncation of a spherical-harmonic expansion in velocity space of the Boltzmann<br />
equation (Ref. 1). The rate coefficients and transport properties are then computed as<br />
appropriate integrals over the EEDF. The inputs are the gas temperature, neutral<br />
particle number density, electric field, and a set of electron-impact cross sections. Each<br />
electron-impact cross section is a table of collision cross section versus energy.<br />
Figure 5-27: Plasma discharge in an oxygen-filled glass sphere. Image courtesy of<br />
Technorama, Switzerland.<br />
In this example, you solve the two-term Boltzmann equation for an oxygen plasma to<br />
obtain the EEDF. The electron-oxygen collisions occurring in an oxygen plasma are<br />
listed in Table 5-2 and the corresponding cross sections are plotted in Figure 5-28.<br />
5. This model is courtesy of Daniel Smith of MKS Instruments, Wilmington, Mass., USA.<br />
THE TWO-TERM BOLTZMANN EQUATION | 183
(The model neglects electron-electron collisions, although their inclusion would be<br />
relatively straightforward; for further details on this issue, see Ref. 1.)<br />
Figure 5-28: Electron-impact cross sections for molecular oxygen.<br />
TABLE 5-2: ELECTRON-OXYGEN COLLISIONS IN AN OXYGEN PLASMA.<br />
INDEX LEGEND REACTION TYPE ∆ε (eV)<br />
1 mom O 2 + e → O 2 + e Momentum 0<br />
2 att O 2 + e → O + O -<br />
Attachment 0<br />
3 rot O 2 + e → O 2 (rot) + e Excitation 0.02<br />
4 vib1 O 2 + e → O 2 (v = 1) + e Excitation 0.19<br />
5 vib2 O 2 + e → O 2 (v = 1) + e Excitation 0.19<br />
6 vib3 O 2 + e → O 2 (v = 2) + e Excitation 0.38<br />
7 vib4 O 2 + e → O 2 (v = 2) + e Excitation 0.38<br />
8 vib5 O 2 + e → O 2 (v = 3) + e Excitation 0.75<br />
9 vib6 O 2 + e → O 2 (v = 3) + e Excitation 0.75<br />
10 exc1 O 2 + e → O 2 (a 1 ∆) + e Excitation 0.977<br />
11 exc2 O 2 + e → O 2 (b 1 Σ) + e Excitation 1.627<br />
12 exc3 O 2 + e → O + O + e Dissociation 4.5<br />
13 exc4 O 2 + e → O + O + e Dissociation 6.0<br />
184 | CHAPTER 5: EQUATION-BASED MODELS
TABLE 5-2: ELECTRON-OXYGEN COLLISIONS IN AN OXYGEN PLASMA.<br />
INDEX LEGEND REACTION TYPE ∆ε (eV)<br />
14 exc5 O 2 + e → O + O + e Dissociation 8.4<br />
15 exc6 O 2 + e → O + O + e Dissociation 9.97<br />
16 ion1 O 2 + e → O 2 + + 2e Ionization 12.06<br />
Model Definition<br />
The assumption of a Maxwellian EEDF can lead to substantial errors in the rate<br />
coefficients. This is particularly true in electronegative gases with a low ionization<br />
threshold where attachment removes the low-energy electrons and strong ionization<br />
“chops off” the tail of the EEDF. The two-term Boltzmann equation accounts for<br />
these effects. Here, a truncation of the velocity-space spherical-harmonic expansion<br />
f( v)<br />
= f0( v)<br />
+ f1( v)<br />
cosθ+ …, cosθ ≡ v⋅E⁄ ( vE)<br />
inserted in the full Boltzmann equation results in a system of two PDEs: one for the<br />
isotropic part, f 0 , and one for the first anisotropic perturbation, f 1 , of the EEDF. These<br />
two first-order PDEs can be combined into a single second-order PDE for f 0:<br />
∂ ε ∂f0 ---------- ⎛---- E⎞<br />
∂ε<br />
∂ε<br />
⎝N⎠ 2<br />
σεε 2 ⎛<br />
⎛<br />
kBT ∂f0 f0 + ---------- ⎞<br />
⎞<br />
⎜ +<br />
⎝<br />
⎝ e ∂ε<br />
⎠<br />
⎟<br />
⎠<br />
3σ m<br />
σ ε<br />
Ck ∈ {exc., dissoc.}<br />
Ck ∈ {ionization} =<br />
∑<br />
= S, f1 2 me = ------ σ<br />
M k S = Ck k ∈ {elastic}<br />
Ck ∈ {attachment}<br />
k ∉ {elastic}<br />
----<br />
E<br />
N<br />
1 ∂f0 = ------σm∂ε<br />
(5-11)<br />
Here f 0 and f 1 are functions of ε = m ev 2 /(2e), the electron energy in electronvolts; σ m<br />
is the effective momentum-transfer cross section (m 2 ); m e is the electron mass (kg); M<br />
is the mass of an oxygen molecule (kg); T is the neutral gas temperature (K); k B is<br />
Boltzmann’s constant, e is the elementary charge, E is the external electric field (V/<br />
m); N is the number density of molecular oxygen; and each σ k (m 2 ) is a cross section<br />
corresponding to collision k. Notice that the source term, S, for the inelastic collisions<br />
is nonlocal in energy space. The interpretation of this is that electrons with energy<br />
above the activation threshold, ∆ε, inelastically collide with neutral O 2 molecules,<br />
which results in the electrons being reinserted into the EEDF at a lower energy. In the<br />
case of ionization (k = 16), two equally energetic electrons are reinserted into the<br />
∑<br />
= – εσk( ε)f0(<br />
ε)<br />
= – [ εσk( ε)f0(<br />
ε)<br />
– ( ε+ ∆εk)σk(<br />
ε+ ∆εk)f0(<br />
ε+ ∆εk)<br />
]<br />
– [ εσk( ε)f0(<br />
ε)<br />
– 22ε ( + ∆εk)σk(<br />
2ε + ∆εk)f0(<br />
2ε + ∆εk)<br />
]<br />
THE TWO-TERM BOLTZMANN EQUATION | 185
EEDF (the two electrons having equal energy is a simplifying assumption whose<br />
validity is best for low energies; see Ref. 1). For attachment, electrons are simply<br />
removed from the EEDF. Further, f 0 is subject to the integral constraint<br />
and the boundary conditions<br />
Having solved for f 0 (ε), you compute the mobility and the diffusion coefficient as<br />
where γ ≡ (2e/me ) 1/2 and ε is the mean electron energy in electronvolts:<br />
186 | CHAPTER 5: EQUATION-BASED MODELS<br />
1 2 ⁄<br />
∞<br />
∫<br />
λ ≡ ε f0dε – 1 = 0<br />
f 0<br />
∂f0 ∂ε<br />
0<br />
= 0 at ε = ∞<br />
µ eN( ε)<br />
= 0 at ε = 0<br />
DeN( ε)<br />
ε = ε<br />
(5-12)<br />
(5-13)<br />
(5-14)<br />
(5-15)<br />
In the energy equation, the energy mobility and the energy-diffusion coefficient are<br />
µ εN( ε)<br />
The all-important rate coefficients are computed from the following integrals:<br />
∞<br />
γ ε ∂f0 = – -- -------<br />
3∫<br />
dε<br />
σm∂ε 0<br />
0<br />
∞<br />
--<br />
γ ε<br />
= -------f<br />
3∫<br />
σ 0dε m<br />
0<br />
3 2 ⁄<br />
∞<br />
∫<br />
DεN( ε)<br />
γ<br />
= – -----<br />
3ε<br />
γ<br />
=<br />
-----<br />
3ε<br />
f0( ε)<br />
dε<br />
∞<br />
∫<br />
0<br />
∞<br />
∫<br />
0<br />
ε 2 ∂f0 ------- dε<br />
σm∂ε ε 2<br />
-------f<br />
σ 0dε m<br />
(5-16)
(5-17)<br />
For comparative purposes, you can plot the computed rate coefficients against the ones<br />
calculated by assuming a Maxwellian EEDF<br />
where the electron “temperature,” τe (eV), is related to the mean electron energy by<br />
τe =<br />
2ε ⁄ 3 .<br />
Results and Discussion<br />
k j<br />
= γ σj( ε)εf0(<br />
ε)<br />
dε<br />
f 0<br />
=<br />
Figure 5-29 compares the Maxwellian EEDF to the EEDF computed from the two-<br />
term Boltzmann equation. The strong ionization at high electron energies tends to<br />
“chop off” the high energy tail in the EEDF. In the case of oxygen, attachment is also<br />
strong and it tends to “mop up” the low-energy electrons.<br />
Figure 5-29: EEDF for an oxygen plasma calculated using the Maxwellian<br />
approximation (black) and the two-term Boltzmann equation (red).<br />
∞<br />
∫<br />
0<br />
2<br />
π<br />
⎛ ⎞<br />
⎝ τ ⎠<br />
e<br />
– 3 ⁄ 2<br />
------τ ---ε<br />
e exp –<br />
Figure 5-30 similarly compares the ionization rate coefficient, k 16 , calculated with the<br />
EEDF from the two-term Boltzmann approximation with the corresponding<br />
Maxwellian result. As the figure shows, the Maxwellian EEDF overpredicts the rate<br />
coefficient for ionization—at a mean electron energy of 2 eV by nearly 10 orders of<br />
magnitude.<br />
THE TWO-TERM BOLTZMANN EQUATION | 187
Furthermore, the calculated rate coefficients for all 16 electron-impact reactions are<br />
plotted in Figure 5-31, and Figure 5-32 displays the corresponding transport<br />
properties (µ e N, De N, µ εN , and DεN ) as functions of ε<br />
.<br />
Figure 5-30: Ionization rate coefficient calculated for Maxwellian (black) and<br />
non-Maxwellian (red) EEDF.<br />
188 | CHAPTER 5: EQUATION-BASED MODELS
Figure 5-31: Rate coefficients calculated using the two-term Boltzmann equation.<br />
THE TWO-TERM BOLTZMANN EQUATION | 189
Figure 5-32: Transport properties calculated using the two-term Boltzmann equation.<br />
These computed rate coefficients and transport properties can be fed into a full fluid<br />
model for the electron density and energy, either as a look up table or by<br />
approximating the rate coefficients with a curve fit.<br />
Finally, using MATLAB, you can visualize the effect of the inelastic collisions on the<br />
Jacobian matrix using the spy command. The sparsity-pattern plot in Figure 5-33<br />
shows that the Jacobian matrix is different from the traditional banded matrix formed<br />
with a regular 1D convection-diffusion equation. Because the inelastic collisions<br />
dominate the system, it is essential that they contribute to the Jacobian matrix.<br />
Modeling in <strong>COMSOL</strong> Multiphysics<br />
To solve Equation 5-11, use a PDE, General Form application mode in 1D, letting the<br />
x-coordinate represent the electron energy expressed in electronvolts. An additional<br />
auxiliary 2D geometry allows you to handle the nonlocal couplings in the source term,<br />
S, using extrusion coupling variables (see the section “Extrusion Coupling Variables”<br />
on page 275 of the <strong>COMSOL</strong> Multiphysics User’s Guide for further details). To<br />
implement the integral constraint Equation 5-12, use an integration coupling variable<br />
and <strong>COMSOL</strong> Multiphysics’ interface for solving ODEs; for descriptions of these<br />
features, see the sections “Integration Coupling Variables” on page 269 of the<br />
190 | CHAPTER 5: EQUATION-BASED MODELS
<strong>COMSOL</strong> Multiphysics User’s Guide and “Solving ODEs and Global Equations” on<br />
page 340 of the <strong>COMSOL</strong> Multiphysics Modeling Guide, respectively. The collision<br />
cross-section data, obtained from Ref. 2, is included in a set of text files that comes<br />
with your <strong>COMSOL</strong> Multiphysics installation.<br />
Figure 5-33: Sparsity-pattern plot of the assembled Jacobian matrix. The far off-diagonal<br />
elements are a result of the nonlocal couplings.<br />
References<br />
1. G.J.M. Hagelaar and L.C. Pitchford, “Solving the Boltzmann equation to obtain<br />
electron transport coefficients and rate coefficients for fluid models,” Plasma Sources<br />
Sci. Technol., vol. 14, pp. 722–733, 2005.<br />
2. The Siglo Database, CPAT and Kinema Software,<br />
http://www.siglo-kinema.com/database/index.htm<br />
Model Library path: <strong>COMSOL</strong>_Multiphysics/Equation-Based_Models/<br />
two_term_boltzmann<br />
Modeling Using the Graphical User Interface<br />
MODEL NAVIGATOR<br />
1 Start <strong>COMSOL</strong> Multiphysics.<br />
2 From the Space dimension list in the Model Navigator, select 1D.<br />
THE TWO-TERM BOLTZMANN EQUATION | 191
3 From the Application Modes list, choose<br />
192 | CHAPTER 5: EQUATION-BASED MODELS<br />
<strong>COMSOL</strong> Multiphysics>PDE Modes>PDE, General Form.<br />
4 In the Dependent variables edit field, change the name to f.<br />
5 Click Multiphysics, then click Add.<br />
6 Click Add Geometry. From the Space dimension list, select 2D. Click OK.<br />
7 Click OK to close the Model Navigator.<br />
GEOMETRY MODELING<br />
1 Click the Geom1 tab.<br />
2 Shift-click the Line button on the Draw toolbar. In the Coordinates area, enter 0 500<br />
in the x edit field to draw a line between x = 0 and x = 500. Click OK.<br />
3 In the same manner, draw a second line between x = 500 and x = 550.<br />
4 Click the Zoom Extents button on the Main toolbar.<br />
5 Click the Geom2 tab.<br />
6 Using the Rectangle dialog box, which you open by shift-clicking the Rectangle/<br />
Square button on the Draw toolbar, draw two rectangles, R1 and R2, with the<br />
properties in the table below. Click OK after specifying each rectangle.<br />
PROPERTY R1 R2<br />
Width 250 250<br />
Height 50 50<br />
Base Corner Corner<br />
x 0 250<br />
y 0 0<br />
7 Click the Zoom Extents button on the Main toolbar.<br />
OPTIONS AND SETTINGS<br />
Model Settings<br />
Because this x-coordinate in this model signifies energy, and the energy is expressed in<br />
the nonstandard unit electronvolt, disable <strong>COMSOL</strong> Multiphysics’ unit support:<br />
1 From the Physics menu, open the Model Settings dialog box.<br />
2 On the Geom2 page, select None from the Base unit system list.<br />
3 Click the Geom1 tab, and do the same for this geometry.<br />
4 Click OK to close the dialog box.
Constants<br />
1 From the Options menu, open the Constants dialog box.<br />
2 Define the following constants (the descriptions are optional); when done, click OK.<br />
NAME EXPRESSION DESCRIPTION<br />
e 1.602e-19 The elementary charge (C)<br />
m_e 9.109e-31 Electron mass (kg)<br />
gam sqrt(2*e/m_e) Energy-velocity conversion factor<br />
k_B 1.381e-23 Boltzmann’s constant (J/K)<br />
N_A 6.022e23 Avogadro’s constant (1/mol)<br />
T_g 300 Gas temperature (K)<br />
tau_g k_B*T_g/e Gas temperature (eV)<br />
tau_ei 0.025 Initial electron temperature (eV)<br />
M_O2 0.032/N_A O2 molecule mass (kg)<br />
EoN 32 Reduced electric field (Td)<br />
dH3 0.02 Threshold energy, reaction 3 (eV)<br />
dH4 0.19 Threshold energy, reaction 4 (eV)<br />
dH5 0.19 Threshold energy, reaction 5 (eV)<br />
dH6 0.38 Threshold energy, reaction 6 (eV)<br />
dH7 0.38 Threshold energy, reaction 7 (eV)<br />
dH8 0.57 Threshold energy, reaction 8 (eV)<br />
dH9 0.75 Threshold energy, reaction 9 (eV)<br />
dH10 0.977 Threshold energy, reaction 10 (eV)<br />
dH11 1.627 Threshold energy, reaction 11 (eV)<br />
dH12 4.5 Threshold energy, reaction 12 (eV)<br />
dH13 6.0 Threshold energy, reaction 13 (eV)<br />
dH14 8.4 Threshold energy, reaction 14 (eV)<br />
dH15 09.97 Threshold energy, reaction 15 (eV)<br />
dH16 12.06 Threshold energy, reaction 16 (eV)<br />
Here, EoN is the value of the reduced electric field—that is, the ratio between the<br />
electric field and the neutral particle number density—expressed in townsend (1 Td<br />
= 10 −21 V·m 2 ). When computing the solution, you use EoN as the solver parameter.<br />
Functions<br />
Next define functions sig1, …, sig16 that encode the electron-impact cross sections<br />
σ 1 , …, σ 16 for the collisions listed in Table 5-2 using data provided in text files.<br />
THE TWO-TERM BOLTZMANN EQUATION | 193
1 From the Options menu, open the Functions dialog box.<br />
2 Click New. In the Function name edit field, type sig1.<br />
3 Click the Interpolation option button.<br />
4 In the Use data from list, select File. Browse to the folder models/<br />
Equation-Based_Models in your <strong>COMSOL</strong> Multiphysics installation directory.<br />
Select the file two_term_boltzmann_cs1.txt, then click OK.<br />
5 From the Interpolation method list, select Linear. From the Extrapolation method list,<br />
select Specific number, then set the Value outside range to 0.<br />
6 Repeat Steps 2–5 to define the functions sig2, …, sig16 by loading, in turn, the<br />
text files two_term_boltzmann_cs2.txt, …, two_term_boltzmann_cs16.txt.<br />
7 Click OK to close the Functions dialog box.<br />
Global Expressions<br />
1 Choose Options>Expressions>Global Expressions.<br />
2 Define the expressions listed in the following table (the descriptions are optional).<br />
NAME EXPRESSION DESCRIPTION<br />
sigma_eps 2*(m_e/M_O2)*sig1(x) Elastic-collision cross<br />
section<br />
sigma_m sig1(x) Effective momentum-transfer<br />
cross section<br />
W_es -sigma_eps*x^2 PDE energy-space<br />
flow-velocity coefficient<br />
D_es (1/3)*(x/sigma_m)*(EoN*1e-21)^2+<br />
sigma_eps*tau_g*x^2<br />
194 | CHAPTER 5: EQUATION-BASED MODELS<br />
PDE energy-space diffusion<br />
coefficient<br />
tau_e (2/3)*eps_mean Electron temperature (eV)<br />
f_M (2/sqrt(pi))*tau_e^(-3/2)*exp(-x/tau_e) Maxwellian EEDF<br />
f_init (2/sqrt(pi))*tau_ei^(-3/2)*exp(-x/tau_ei) Initial EEDF<br />
C2 -x*sig2(x)*f Inelastic source/sink<br />
C3 (x+dH3)*sig3(x+dH3)*f3-x*sig3(x)*f Inelastic source/sink<br />
C4 (x+dH4)*sig4(x+dH4)*f4-x*sig4(x)*f Inelastic source/sink<br />
C5 (x+dH5)*sig5(x+dH5)*f5-x*sig5(x)*f Inelastic source/sink<br />
C6 (x+dH6)*sig6(x+dH6)*f6-x*sig6(x)*f Inelastic source/sink<br />
C7 (x+dH7)*sig7(x+dH7)*f7-x*sig7(x)*f Inelastic source/sink<br />
C8 (x+dH8)*sig8(x+dH8)*f8-x*sig8(x)*f Inelastic source/sink<br />
C9 (x+dH9)*sig9(x+dH9)*f9-x*sig9(x)*f Inelastic source/sink<br />
C10 (x+dH10)*sig10(x+dH10)*f10-x*sig10(x)*f Inelastic source/sink
NAME EXPRESSION DESCRIPTION<br />
C11 (x+dH11)*sig11(x+dH11)*f11-x*sig11(x)*f Inelastic source/sink<br />
C12 (x+dH12)*sig12(x+dH12)*f12-x*sig12(x)*f Inelastic source/sink<br />
C13 (x+dH13)*sig13(x+dH13)*f13-x*sig13(x)*f Inelastic source/sink<br />
C14 (x+dH14)*sig14(x+dH14)*f14-x*sig14(x)*f Inelastic source/sink<br />
C15 (x+dH15)*sig15(x+dH15)*f15-x*sig15(x)*f Inelastic source/sink<br />
C16 2*(2*x+dH16)*sig16(2*x+dH16)*f16<br />
-x*sig16(x)*f<br />
Inelastic source/sink<br />
S C2+C3+C4+C5+C6+C7+C8+C9+C10+<br />
C11+C12+C13+C14+C15+C16<br />
Inelastic collision source<br />
R_norm -nojac(k16-k2)*sqrt(x)*f Growth-renormalization term<br />
Here, f3, …, f16 represent the nonlocal factor f(ε + ∆ε k ) or (in the case of f16)<br />
f(ε + 2∆ε k ) in Equation 5-11; later, you define these as extrusion coupling variables<br />
using the auxiliary geometry Geom2.<br />
To preserve the normalization of f 0 in the presence of collision processes that do not<br />
conserve the electron number, the growth-renormalization term, R_norm, must be<br />
added to the right-hand side of the PDE multiplied by the constraint λ defined by<br />
Equation 5-12; see Ref. 1 for a discussion. For this model, the electron-number<br />
changing processes are the attachment and ionization reactions (no. 2 and 16 in<br />
Table 5-2). The nojac operator in the expression for R_norm instructs <strong>COMSOL</strong><br />
Multiphysics not to include the argument, k16-k2, in the Jacobian computation;<br />
see “The nojac Operator” on page 164 of the <strong>COMSOL</strong> Multiphysics User’s Guide<br />
for additional information on this operator.<br />
3 Click OK to close the Global Expressions dialog box.<br />
Integration Coupling Variables<br />
Compute the integrals appearing in Equations 5-12–5-17 and make them globally<br />
available in the model by defining corresponding integration coupling variables.<br />
1 With Geom1 active, choose<br />
Options>Integration Coupling Variables>Subdomain Variables.<br />
2 Select Subdomain 1, then define integration coupling variables according to the<br />
table below. In all cases, use the default settings for Integration order (4) and<br />
Global destination (selected).<br />
NAME EXPRESSION<br />
f_norm sqrt(x)*f<br />
eps_mean x^(3/2)*f<br />
THE TWO-TERM BOLTZMANN EQUATION | 195
NAME EXPRESSION<br />
mu_N -(1/3)*gam*fx*x/sigma_m<br />
D_N (1/3)*gam*f*x/sigma_m<br />
mu_epsN -(1/(3*eps_mean))*gam*fx*x^2/sigma_m<br />
D_epsN (1/(3*eps_mean))*gam*f*x^2/sigma_m<br />
k1 gam*sig1(x)*x*f<br />
k2 gam*sig2(x)*x*f<br />
k3 gam*sig3(x)*x*f<br />
k4 gam*sig4(x)*x*f<br />
k5 gam*sig5(x)*x*f<br />
k6 gam*sig6(x)*x*f<br />
k7 gam*sig7(x)*x*f<br />
k8 gam*sig8(x)*x*f<br />
k9 gam*sig9(x)*x*f<br />
k10 gam*sig10(x)*x*f<br />
k11 gam*sig11(x)*x*f<br />
k12 gam*sig12(x)*x*f<br />
k13 gam*sig13(x)*x*f<br />
k14 gam*sig14(x)*x*f<br />
k15 gam*sig15(x)*x*f<br />
k16 gam*sig16(x)*x*f<br />
k1_M gam*sig1(x)*x*f_M<br />
k2_M gam*sig2(x)*x*f_M<br />
k3_M gam*sig3(x)*x*f_M<br />
k4_M gam*sig4(x)*x*f_M<br />
k5_M gam*sig5(x)*x*f_M<br />
k6_M gam*sig6(x)*x*f_M<br />
k7_M gam*sig7(x)*x*f_M<br />
k8_M gam*sig8(x)*x*f_M<br />
k9_M gam*sig9(x)*x*f_M<br />
k10_M gam*sig10(x)*x*f_M<br />
k11_M gam*sig11(x)*x*f_M<br />
k12_M gam*sig12(x)*x*f_M<br />
k13_M gam*sig13(x)*x*f_M<br />
k14_M gam*sig14(x)*x*f_M<br />
196 | CHAPTER 5: EQUATION-BASED MODELS
NAME EXPRESSION<br />
k15_M gam*sig15(x)*x*f_M<br />
k16_M gam*sig16(x)*x*f_M<br />
3 Click OK.<br />
Extrusion Coupling Variables<br />
To implement the nonlocal collision source terms, use extrusion coupling variables.<br />
1 With Geom1 still selected, choose<br />
Options>Extrusion Coupling Variables>Subdomain Variables.<br />
2 On the Source page, select both subdomains, then enter the following data:<br />
NAME EXPRESSION TRANSFORMATION TYPE SOURCE TRANSFORMATION<br />
f_extr f General transformation x<br />
f_extr_ion f General transformation x<br />
3 Click the Destination tab.<br />
4 From the Geometry list, select Geom2, and from the Level list, select Subdomain.<br />
5 From the Variable list, select f_extr. Select Subdomains 1 and 2, then select the<br />
Use selected subdomains as destination check box.<br />
6 Set the Destination transformation to x+y.<br />
7 From the Variable list, select f_extr_ion. Select Subdomain 1 only, then select the<br />
Use selected subdomains as destination check box.<br />
8 Set the Destination transformation to 2*x+y, then click OK.<br />
9 Now with Geom2 selected, choose<br />
Options>Extrusion Coupling Variables>Subdomain Variables.<br />
10 On the Source page, select both subdomains, then enter the following data:<br />
NAME EXPRESSION TRANSFORMATION TYPE SOURCE TRANSFORMATION<br />
f3 f_extr General transformation x x y y<br />
11 Define the variables f4, …, f15 using the same data as for f3 in the previous step.<br />
12 Select only Subdomain 1, then enter the following data:<br />
NAME EXPRESSION TRANSFORMATION TYPE SOURCE TRANSFORMATION<br />
f16 f_extr_ion General transformation x 2*x y y<br />
13 Click the Destination tab.<br />
THE TWO-TERM BOLTZMANN EQUATION | 197
14 From the Geometry list, select Geom1, and from the Level list, select Subdomain.<br />
15 Select Subdomain 1.<br />
16 From the Variable list, select f3. Select the Use selected subdomains as destination<br />
check box, and set the Destination transformation for x to x and that for y to dH3.<br />
17 Repeat the previous step for each of the variables f4, …, f16, using as the<br />
Destination transformation for y dH4, …, dH16, respectively.<br />
18 Click OK to close the Subdomain Extrusion Variables dialog box.<br />
PHYSICS MODELING<br />
Global Equations<br />
To implement the normalization constraint in Equation 5-12, first define a state for λ:<br />
1 From the Physics menu, open the Global Equations dialog box.<br />
2 Enter the following settings; when done, click OK.<br />
NAME EQUATION INIT INITT DESCRIPTION<br />
lam f_norm-1 1e-5 0 Normalization constraint<br />
3 From the Base unit system list, select None, then click OK.<br />
Subdomain Settings<br />
1 Click the Geom1 tab.<br />
2 From the Physics menu, open the Subdomain Settings dialog box.<br />
3 Specify the following PDE coefficients:<br />
SETTINGS SUBDOMAIN 1 SUBDOMAIN 2<br />
Γ W_es*f-D_es*fx 0<br />
F S+lam*R_norm -f<br />
e a 0 0<br />
d a 0 0<br />
Note, in particular, the addition to the source term for Subdomain 1 of the<br />
growth-renormalization term multiplied by the integral constraint, λ. On<br />
Subdomain 2, which is introduced solely to allow consistent definitions for the<br />
extrusion coupling variables, you simply set f 0 to zero.<br />
4 Click the Init tab. Select Subdomain 1, then type f_init in the f(t 0 ) edit field.<br />
5 Click OK.<br />
198 | CHAPTER 5: EQUATION-BASED MODELS
Boundary Conditions<br />
Implement the boundary conditions in Equation 5-13, substituting x = 500 for<br />
infinity.<br />
1 From the Physics menu, open the Boundary Settings dialog box.<br />
2 Select the Interior boundaries check box.<br />
3 Specify boundary conditions as in the following table; when done, click OK.<br />
SETTINGS BOUNDARY 1 BOUNDARIES 2, 3<br />
Type Neumann Dirichlet<br />
G 0 0<br />
R -f<br />
MESH GENERATION<br />
1 From the Mesh menu, open the Free Mesh Parameters dialog box.<br />
2 On the Global page, type 1.02 in the Element growth rate edit field.<br />
3 On the Subdomain page, select Subdomain 1. Set the Maximum element size to 20.<br />
4 On the Boundary page, select Boundary 1. Set the Maximum element size to 0.05.<br />
5 Click Remesh, then click OK.<br />
6 Select Geom2.<br />
7 From the Mesh menu, open the Free Mesh Parameters dialog box.<br />
8 Click the Custom mesh size option button, then set the Maximum element size to 10.<br />
9 Click the Boundary tab. Select Boundaries 1, 2, and 5, then set the<br />
Maximum element size to 1.5.<br />
10 Click the Point tab. Select Point 1, then set the Maximum element size to 0.05.<br />
11 Click Remesh, then click OK.<br />
COMPUTING THE SOLUTION<br />
1 Click the Solver Parameters button on the Main toolbar.<br />
2 From the Solver list, select Parametric.<br />
3 In the Parameter names edit field, type EoN, and in the Parameter values edit field,<br />
type range(1.953,(49-1.953)/99,49) range(50,(414-50)/24,414).<br />
4 Click OK.<br />
5 Click the Solve button on the Main toolbar.<br />
THE TWO-TERM BOLTZMANN EQUATION | 199
POSTPROCESSING AND VISUALIZATION<br />
First, verify the normalization constraint Equation 5-12 for the solution.<br />
1 Click the Geom1 tab.<br />
2 From the Postprocessing menu, choose Subdomain Integration.<br />
3 Select Subdomain 1. In the Expression edit field, type sqrt(x)*f.<br />
4 In the Solution to use area, select an arbitrary solution from the Parameter value list,<br />
then click Apply.<br />
The result, which should be 1 (or very close to 1), appears in the message log below<br />
the drawing area.<br />
5 Try a few other solutions. When done, click OK.<br />
Reproduce the EEDF plots in Figure 5-29 on page 187 with the following steps:<br />
1 From the Postprocessing menu, choose Domain Plot Parameters.<br />
2 On the General page, select 26.664556 from the Solutions to use list. Select the<br />
Keep current plot check box.<br />
3 Click the Line/Extrusion tab.<br />
4 In the Expression edit field, type f_M.<br />
5 Click the Line Settings button. From the Line color list, select Color, then click the<br />
Color button. Select the black swatch, then click OK.<br />
6 Click OK to close the Line Settings dialog box.<br />
7 In the Domain Plot Parameters dialog box, click Apply.<br />
8 In the Expression edit field, type f.<br />
9 Click the Line Settings button. From the Line color list, select Color, then click the<br />
Color button. Select a red swatch, then click OK.<br />
10 On the General page, click the Title/Axis button.<br />
11 Click the option button next to the Title edit field; leave the edit field empty.<br />
12 Click the option button next to the First axis label edit field, then enter the label<br />
Electron energy [eV].<br />
13 Click the option button next to the Second axis label edit field, then enter the label<br />
EEDF [eV-3/2]. Select the associated Log scale check box.<br />
14 Click OK to close the Title/Axis dialog box.<br />
15 In the Domain Plot Parameters dialog box, click OK.<br />
200 | CHAPTER 5: EQUATION-BASED MODELS
16 In the figure window, click the Zoom Window button, then select the area 0 < x < 20<br />
and 10 −5 < y < 10 0 in the upper left corner to finish the plot.<br />
Proceed to generate the plots of the ionization-rate coefficients in Figure 5-30:<br />
1 From the Postprocessing menu, choose Global Variables Plot.<br />
2 In the Expression edit field, type k16_M, then click the Add Entered Expression button.<br />
3 In the x-axis data area, click the lower option button, then click the Expression<br />
button. In the Expression edit field, type eps_mean, then click OK to close the<br />
X-Axis Data dialog box.<br />
4 Click the Line Settings button. From the Line color list, select Color, then click the<br />
Color button. Select black, then click OK.<br />
5 Select the Legend check box, then click OK to close the Line Settings dialog box.<br />
6 Click the Title/Axis button.<br />
7 Click the option button next to the Title edit field; leave the edit field empty.<br />
8 Click the option button next to the First axis label edit field, then enter the label<br />
Mean electron energy [eV].<br />
9 Click the option button next to the Second axis label edit field, then enter the label<br />
Ionization rate coefficient [m3/s]. Select the associated<br />
Log scale check box.<br />
10 Click OK to close the Title/Axis dialog box.<br />
11 Click Apply to generate the first graph.<br />
12 Select the Keep current plot check box.<br />
13 In the Quantities to plot list, select k16_M, then click the<br />
Remove Selected Quantities to Plot button.<br />
14 In the Expression edit field, type k16, then click the Add Entered Expression button.<br />
15 Click the Line Settings button.Click the Color button. Select red, then click OK twice.<br />
16 Click Apply to generate the second graph and finish the plot.<br />
Next, reproduce Figure 5-31:<br />
1 In the Quantities to plot list, select k16, then click the<br />
Remove Selected Quantities to Plot button.<br />
2 In the Expression edit field, type k1, then click the Add Entered Expression button.<br />
3 Repeat the previous step 15 times for, in turn, k2, …, k16.<br />
THE TWO-TERM BOLTZMANN EQUATION | 201
4 Click the Line Settings button. Select Cycle from the Line color, Line style, and<br />
Line marker lists, then click OK.<br />
5 Click the Title/Axis button. Change the Second axis label to Rate coefficients<br />
[m3/s], then click OK.<br />
6 From the Plot in list, select New figure, then click Apply to generate the plot.<br />
To reproduce the plot of the transport properties in Figure 5-32, do as follows:<br />
1 Click in the Quantities to plot list, then press Ctrl+A to select all entries. Click the<br />
Remove Selected Quantities to Plot button.<br />
2 In the Expression edit field, type mu_N, then click the Add Entered Expression button.<br />
3 Repeat the previous step for mu_epsN, D_N, and D_epsN.<br />
4 Click the Title/Axis button. Change the Second axis label to Mobility*N,<br />
diffusivity*N. Clear the associated Log scale check box, then click OK.<br />
5 From the Plot in list, select New figure, then click OK to generate the plot and close<br />
the Global Variables Plot dialog box.<br />
Finally, if you have access to MATLAB, you can reproduce the sparsity-pattern plot of<br />
the assembled Jacobian matrix in Figure 5-33 in the following way:<br />
1 Press Ctrl+F or choose File>Export>FEM Structure as 'fem'.<br />
2 In the MATLAB command window, enter the following commands:<br />
[KC,LC] = femlin(fem);<br />
spy(KC)<br />
The sparsity-pattern plot appears in the last opened figure window.<br />
202 | CHAPTER 5: EQUATION-BASED MODELS
6<br />
Fluid Dynamics Models<br />
This chapter includes examples of fluid dynamics modeling using the<br />
incompressible Navier-Stokes equations for stationary and time-dependent fluid<br />
flow and the Euler equations for compressible flow in gas dynamics.<br />
203
Backstep with Argyris Element<br />
Introduction<br />
This model shows the use of stream functions to model incompressible fluid flow in a<br />
divergence-free approach. Instead of conventional p2-p1 Lagrange elements, the<br />
model uses C 1 -continuous Argyris elements to discretize the incompressible<br />
Navier-Stokes equations. Formulating the flow equations in terms of a stream function<br />
eliminates the continuity equation altogether.<br />
Model Definition<br />
The stream function Ψ is introduced through the following definition:<br />
204 | CHAPTER 6: FLUID DYNAMICS MODELS<br />
∂Ψ ∂Ψ<br />
( uv , ) = ∇× Ψ =<br />
⎛ , – ⎞ .<br />
⎝∂y∂x⎠ That is, the velocity field is the curl of the stream function. Therefore the divergence<br />
of the velocity field is identically zero wherever the stream function is smooth enough.<br />
Introducing the stream function is in itself motivated by the requirement that the<br />
divergence of the velocity field should vanish: you can write any divergence-free field<br />
as the curl of some vector field, known as a vector potential. The velocity field<br />
determines the stream function Ψ only up to the gradient of some function, which<br />
means that the stream function corresponding to a given velocity field is not unique.<br />
The Argyris elements belong to the C 1 -class of functions, implying that they have<br />
continuous first derivatives and function values. Therefore the continuity equation is<br />
satisfied weakly everywhere in the domain. Also, pressure has been eliminated from the<br />
equations, but you can determine the pressure field afterwards by solving a<br />
Poisson-type equation. To get this equation you essentially take the divergence of the<br />
momentum equations.<br />
Argyris Element Properties<br />
The advantage of using Argyris elements in the discretization is that the continuity<br />
equation is always satisfied. Convergence toward a solution is not inhibited by poor<br />
fulfillment of the incompressibility criterion. There are, however, some disadvantages.<br />
When using the Argyris elements, 21 degrees of freedom are associated with any
triangle compared to 15 for the standard p2-p1 Lagrange elements. Due to different<br />
node usage, the total number of degrees of freedom in the model is roughly the same<br />
in the two cases, but the Argyris elements are more tightly connected to one another,<br />
which leads to increased memory usage. Further, the Argyris elements are in all<br />
respects more complex, thus it takes more time to prepare the problem for the solvers.<br />
Results<br />
Fifth-order Argyris elements provide very high accuracy for smooth solutions. This<br />
model has a discontinuity in the gradient of the velocity field at the backstep corner.<br />
The Argyris element has degrees of freedoms representing this quantity in its corners.<br />
This causes some convergence and accuracy problems, which mean that you must use<br />
the parametric solver. The results, however, are of similar accuracy as in the<br />
introductory backstep model, “Example—Steady Incompressible Flow” on page 154<br />
in the <strong>COMSOL</strong> Multiphysics Modeling Guide, on a mesh of half the size in number<br />
of elements.<br />
Model Library path: <strong>COMSOL</strong>_Multiphysics/Fluid_Dynamics/<br />
backstep_argyris<br />
Using the Graphical User Interface<br />
MODEL NAVIGATOR<br />
1 In the Model Navigator, select 2D from the Space dimension list.<br />
2 In the list of application modes, select<br />
<strong>COMSOL</strong> Multiphysics>PDE Modes>PDE, General Form>Stationary analysis.<br />
3 In the Dependent variables edit field, type u v.<br />
4 Click OK.<br />
You set the element type to Argyris later on.<br />
OPTIONS AND SETTINGS<br />
Model Settings<br />
Because the PDE application modes do not support units, change the base unit system<br />
as follows:<br />
BACKSTEP WITH ARGYRIS ELEMENT | 205
1 From the Physics menu, choose Model Settings.<br />
2 From the Base unit system list, select None.<br />
3 Click OK.<br />
Constants<br />
1 From the Options menu, choose Constants to set the values needed to parameterize<br />
the model.<br />
2 In the Constants dialog box, enter the following constants representing fluid<br />
properties and the velocity (the descriptions are optional); when done, click OK.<br />
NAME EXPRESSION DESCRIPTION<br />
rho0 1.23 Fluid density (kg/m^3)<br />
eta0 1.79e-5 Dynamic viscosity (kg/(m*s))<br />
V_mean 0.1 Average inlet velocity (m/s)<br />
GEOMETRY MODELING<br />
1 Shift-click the Rectangle/Square button on the Draw toolbar to specify a rectangle.<br />
2 In the Rectangle dialog box, type 0.08 in the Width edit field and 0.0101 in the<br />
Height edit field.<br />
3 Click OK.<br />
4 Click the Zoom Extents button on the Main toolbar.<br />
5 Shift-click the Rectangle/Square button on the Draw toolbar to specify another<br />
rectangle.<br />
6 In the Rectangle dialog box, type 0.02 in the Width edit field and 0.0049 in the<br />
Height edit field.<br />
7 Click OK.<br />
8 Press Ctrl+A to select both rectangles.<br />
9 Click the Difference button on the Draw toolbar.<br />
PHYSICS SETTINGS<br />
Point Settings<br />
Because the equations contain only derivatives of the real dependent variable—the<br />
stream function Ψ—you must set a reference level somewhere to remove the ambiguity<br />
in the solution.<br />
1 From the Physics menu, choose Point Settings.<br />
206 | CHAPTER 6: FLUID DYNAMICS MODELS
2 Select Point 1 and enter the following constraint:<br />
SETTINGS POINT 1<br />
constr -psi 0<br />
Boundary Conditions<br />
1 From the Physics menu, choose Boundary Settings.<br />
2 Select Boundary 1, then click the R tab.<br />
3 Enter the following boundary coefficients:<br />
SETTINGS BOUNDARY 1 BOUNDARIES 2–5 BOUNDARY 6<br />
R(1) V_mean*6*s*(1-s)-u -u 0<br />
R(2) -v -v 0<br />
The equation for the boundary condition is R = 0, so these values make sure that u<br />
and v are equal to zero, except on the inlet boundary (Boundary 1), where u, the<br />
velocity in the x-direction, is a parabolic velocity profile that represents a fully<br />
developed laminar flow. The parameter s is an curve length parameter that runs<br />
from 0 to 1 along the direction of the boundary.<br />
4 Click OK.<br />
Subdomain Settings<br />
1 From the Physics menu, choose Subdomain Settings.<br />
2 On the Γ and F tabs, respectively, enter the PDE coefficients from the following<br />
table:<br />
SETTINGS SUBDOMAIN 1<br />
Γ(1,1) 2*eta0*ux<br />
Γ(1,2) eta0*(uy+vx)<br />
Γ(2,1) eta0*(uy+vx)<br />
Γ(2,2) 2*eta0*vy<br />
F(1) rho0*(u*ux+v*uy)<br />
F(2) rho0*(u*vx+v*vy)<br />
These settings implement the equations for the fluid flow.<br />
3 Click the Element tab.<br />
4 In the Shape edit field, type sharg_2_5('psi').<br />
5 In the gporder edit field, type 8 8.<br />
BACKSTEP WITH ARGYRIS ELEMENT | 207
6 In the cporder edit field, type 5 5.<br />
7 Click OK.<br />
The standard integration order for the Argyris element is 10 (and the standard<br />
constraint order is half of that value, 5). In this case only derivatives of psi appear in<br />
equations and boundary conditions. Therefore an integration order of 8 is sufficient.<br />
Reducing the order reduces assembly time.<br />
Expression Variables<br />
1 From the Options menu, select Expressions>Subdomain Expressions.<br />
2 In the Subdomain Expressions dialog box, define the following variables.<br />
VARIABLE NAME LEVEL DOMAIN EXPRESSION<br />
u Subdomain 1 psiy<br />
ux Subdomain 1 psiyx<br />
uy Subdomain 1 psiyy<br />
v Subdomain 1 -psix<br />
vx Subdomain 1 -psixx<br />
vy Subdomain 1 -psixy<br />
3 Click OK.<br />
4 From the Options menu, select Expressions>Boundary Expressions.<br />
5 In the Boundary Expressions dialog box define the following variables.<br />
VARIABLE NAME LEVEL DOMAINS EXPRESSION<br />
u Boundary 1–6 psiy<br />
v Boundary 1–6 -psix<br />
6 Click OK.<br />
MESH GENERATION<br />
1 From the Mesh menu, choose Free Mesh Parameters.<br />
2 In the Free Mesh Parameters dialog box, click the Custom mesh size button, then type<br />
2e-3 in the Maximum element size edit field.<br />
3 Click the Point tab.<br />
4 Select Point 4 and in the Maximum element size edit field type 4e-4.<br />
5 Click the Remesh button, then click OK.<br />
208 | CHAPTER 6: FLUID DYNAMICS MODELS
COMPUTING THE SOLUTION<br />
It is possible to use the parametric solver to increase the velocity—and thereby the<br />
Reynolds number—step by step. Either give an explicit list of parameter values or let<br />
the solver automatically decide an optimum step length. The last option is usually the<br />
proper choice when using the parametric solver for difficult problems such as those<br />
with medium to high Reynolds number flows.<br />
1 From the Solve menu, choose Solver Parameters.<br />
2 In the Solver list, select Parametric.<br />
3 Go to the Parameter area. In the Parameter names edit field, type V_mean. Then, in<br />
the Parameter values edit field, type 0.1 0.544.<br />
4 Click the Advanced tab.<br />
5 In the Null-space function list, select Orthonormal.<br />
6 From the Solution form list, select General. This is because the weak form gives<br />
expressions that include u, which is not a dependent variable when you use Argyris<br />
elements.<br />
7 Click OK, then click the Solve button on the Main toolbar to start the simulation.<br />
POSTPROCESSING AND VISUALIZATION<br />
The software displays the solution for the last parameter value. The value of the stream<br />
function itself is hardly interesting, but you can take advantage of the fact that contour<br />
lines of the stream function are the same as streamlines of the velocity field. The<br />
zero-level contour is of particular interest because it immediately shows the extent of<br />
the recirculation region and the location of the stagnation point.<br />
1 From the Postprocessing menu, open the Plot Parameters dialog box.<br />
2 In the Plot type area, clear the Surface check box. Then, select the Contour check box.<br />
3 Change the value in the Element refinement edit field to 10. Before you can enter the<br />
number, you must clear the Auto check box.<br />
4 Click the Contour tab.<br />
5 Type psi in the Expression edit field.<br />
6 In the Contour levels area, click the button under Vector with isolevels, and then type<br />
range(0,0.0005,0.003) in the edit field.<br />
BACKSTEP WITH ARGYRIS ELEMENT | 209
7 Click OK to close the dialog box and generate the following plot.<br />
210 | CHAPTER 6: FLUID DYNAMICS MODELS
Flow Past a Cylinder<br />
Introduction<br />
The flow of fluid behind a blunt body such as an automobile is difficult to compute<br />
due to the unsteady flows. The wake behind such a body consists of unordered eddies<br />
of all sizes that create large drag on the body. In contrast, the turbulence in the thin<br />
boundary layers next to the streamlined bodies of aircraft and fish create only weak<br />
disturbances of flow.<br />
An exception to this occurs when you place a slender body at right angles to a slow<br />
flow because the eddies organize. A von Karman vortex street appears with a<br />
predictable frequency and involves the shedding of eddies from alternating sides.<br />
Everyday examples of this phenomenon include singing telephone wires and an<br />
automobile radio antenna vibrating in an air stream.<br />
From an engineering standpoint, it is important to predict the frequency of vibrations<br />
at various fluid speeds and thereby avoid undesirable resonances between the<br />
vibrations of the solid structures and the vortex shedding. To help reduce such effects,<br />
plant engineers put a spiral on the upper part of high smokestacks; the resulting<br />
variation in shape prohibits the constructive interference of the vortex elements that<br />
the structure sheds from different positions.<br />
Model Definition<br />
To illustrate how you can study such effects, the following model examines unsteady,<br />
incompressible flow past a long cylinder placed in a channel at right angle to the<br />
oncoming fluid. The cylinder is offset somewhat from the center of the flow to<br />
destabilize what otherwise would be steady-state symmetrical flow. The simulation<br />
time necessary for a periodic flow pattern to appear is difficult to predict. A key<br />
predictor is the Reynolds number, which is based on cylinder diameter. For low values<br />
(below 100) the flow is steady. In this simulation, the Reynolds number equals 100,<br />
which gives a developed Karman vortex street, but the flow still is not fully turbulent.<br />
The frequency and amplitude of oscillations are stable features, but flow details are<br />
extremely sensitive to perturbations. To gain an appreciation for this sensitivity, you<br />
can compare flow images taken at the same time but with such minor differences as are<br />
created by different tolerances for the time stepping. It is important to note that this<br />
sensitivity is a physical reality and not simply a numerical artifact.<br />
FLOW PAST A CYLINDER | 211
Before calculating the time-varying forces on the cylinder, you can validate the method<br />
of computation at a lower Reynolds number using the direct nonlinear solver. This<br />
saves time because you can find and correct simple errors and mistakes before the final<br />
time-dependent simulation, which requires considerable time.<br />
The viscous forces on the cylinder are proportional to the gradient of the velocity field<br />
at the cylinder surface. Evaluating the velocity gradient on the boundary by directly<br />
differentiating the FEM solution is possible but not very accurate. The differentiation<br />
produces 1st-order polynomials when 2nd-order elements are used for the velocity<br />
field. A far better approach is to use a pair of reaction force operators to compute the<br />
integrals of the viscous forces, comparable to 2nd-order accurate integrals of the<br />
viscous forces. An alternative approach would be to use a pair of weak-constraint<br />
variables to enforce the no-slip condition. Preferably use the reaction force operator<br />
instead of weak constrains when computing integrals of reaction forces or fluxes in<br />
postprocessing.<br />
The drag and lift forces themselves are not as interesting as the dimensionless drag and<br />
lift coefficients. These depend only on the Reynolds number and an object’s shape, not<br />
its size. The coefficients are defined as<br />
using the following parameters:<br />
F D and F L are the drag and lift forces<br />
ρ is the fluid’s density<br />
U mean is the mean velocity<br />
212 | CHAPTER 6: FLUID DYNAMICS MODELS<br />
C D<br />
2FD = --------------------------<br />
2<br />
ρUmeanD D is the characteristic length, in this case the cylinder’s diameter<br />
C L<br />
2FL =<br />
--------------------------<br />
2<br />
ρUmeanD
Results<br />
Figure 6-1 shows the flow pattern resulting from the geometry.<br />
Figure 6-1: A plot of the last time step clearly shows the von Karman path.<br />
The flow around a cylinder is a common benchmark test for CFD algorithms. Various<br />
research teams have tried their strengths on this problem using different techniques.<br />
Results from some of these experiments have been collected by Schäfer and Turek (Ref.<br />
1), who also used them to compute a probable value for the “real” answer.<br />
Reference<br />
1. M. Schäfer and S. Turek, “Benchmark computations of laminar flow around<br />
cylinder”, E.H. Hirschel (editor), Flow Simulation with High-Performance<br />
Computers II, Volume 52 of Notes on Numerical Fluid Mechanics, Vieweg, 1996,<br />
pp. 547–566.<br />
Model Library path: <strong>COMSOL</strong>_Multiphysics/Fluid_Dynamics/cylinder_flow<br />
FLOW PAST A CYLINDER | 213
Modeling Using the Graphical User Interface<br />
MODEL NAVIGATOR<br />
1 In the Model Navigator, select 2D from the Space dimension list.<br />
2 In the list of application modes, select<br />
214 | CHAPTER 6: FLUID DYNAMICS MODELS<br />
<strong>COMSOL</strong> Multiphysics>Fluid Dynamics>Incompressible Navier-Stokes>Steady-state<br />
analysis. Accept the default entry in the Element list, Lagrange - P2 P1 elements.<br />
3 Click OK.<br />
OPTIONS AND SETTINGS<br />
1 From the Options menu, select Axes/Grid Settings.<br />
2 In the Axes/Grid Settings dialog box, specify the following settings. To enter the grid<br />
spacing, first click the Grid tab and then clear the Auto check box.<br />
AXIS GRID<br />
x min -0.3 x spacing 0.2<br />
x max 2.5 Extra x<br />
y min -0.3 y spacing 0.05<br />
y max 0.7 Extra y 0.41<br />
3 Click OK.<br />
4 From the Options menu, select Constants.<br />
5 Enter the following names, expressions, and descriptions (optional):<br />
NAME EXPRESSION DESCRIPTION<br />
rho0 1[kg/m^3] Density<br />
eta0 1e-3[Pa*s] Dynamic viscosity<br />
Umax 0.3[m/s] Maximum inlet velocity<br />
6 Click OK.<br />
These values together with the cylinder having a diameter of 0.1 m lead to a Reynolds<br />
number of 20.<br />
GEOMETRY MODELING<br />
1 From the Draw menu, select the Rectangle/Square button. With the mouse, create a<br />
rectangle R1 from (0, 0) to (2.2, 0.41).
2 From the Draw menu, select the Ellipse/Circle (Centered) button. Using the mouse,<br />
create a circle C1 with center at (0.2, 0.2) and a radius of 0.05. Use the right mouse<br />
button to ensure that you are creating a circle and use the tick mark at y = 0.15 to<br />
obtain the correct radius.<br />
3 Create the composite object. From the Draw toolbar, click the Create Composite<br />
Object button. In the Set formula edit field enter R1-C1. Click OK.<br />
PHYSICS SETTINGS<br />
Boundary Conditions<br />
1 From the Physics menu, choose Boundary Settings.<br />
2 In the Boundary Settings dialog box, enter the following:<br />
SETTINGS BOUNDARY 1 BOUNDARIES 2, 3, 5–8 BOUNDARY 4<br />
Boundary type Inlet Wall Outlet<br />
Boundary condition Velocity No slip Pressure,<br />
no viscous stress<br />
u0 4*Umax*s*(1-s)<br />
v0 0<br />
p0 0<br />
FLOW PAST A CYLINDER | 215
3 Click OK.<br />
Subdomain Settings<br />
Define the properties of the fluid:<br />
1 From the Physics menu, select Subdomain Settings.<br />
2 In the Subdomain Settings dialog box, enter the following material properties:<br />
SETTINGS SUBDOMAIN 1<br />
ρ rho0<br />
η eta0<br />
3 Click OK.<br />
MESH GENERATION<br />
1 From the Mesh menu, choose Free Mesh Parameters.<br />
2 Click the Custom mesh size button, enter 0.03 in the Maximum element size edit<br />
field, enter 1.2 in the Element growth rate edit field, and enter 0.1 in the Mesh<br />
curvature factor edit field.<br />
3 Click OK.<br />
4 Click the Initialize Mesh button on the Main toolbar.<br />
COMPUTING THE SOLUTION<br />
Click the Solve button on the Main toolbar to solve the model.<br />
POSTPROCESSING AND VISUALIZATION<br />
The quantities in the benchmark study are the drag and lift coefficients. These you can<br />
calculate easily by integrating reaction force operators (which are really Lagrange<br />
multipliers corresponding to the viscous forces) and the pressure over the surface of<br />
the cylinder. First calculate the drag coefficient:<br />
1 From the Postprocessing menu, choose Boundary Integration.<br />
2 Select Boundaries 5 to 8, corresponding to the cylinder surface. Enter the drag force<br />
expression -reacf(u)*2/(rho0*(2*Umax/3)^2*0.1) in the Expression edit field.<br />
3 Click Apply.<br />
216 | CHAPTER 6: FLUID DYNAMICS MODELS<br />
The result, 5.579373, appears in the message log and agrees well with the interval<br />
[5.57, 5.59] given in Ref. 1. Now calculate the lift coefficient.<br />
4 Change the integrand in the Expression edit field to -reacf(v)*2/<br />
(rho0*(2*Umax/3)^2*0.1).
5 Click OK.<br />
Also this value, 0.010683, is in perfect agreement with Schäfer and Turek (Ref. 1),<br />
who give the interval [0.0104, 0.0110] for acceptable solutions.<br />
Time-Dependent Simulation<br />
Now that you know that the machinery works for low Reynolds numbers and steady<br />
flow, you can do a time-dependent simulation at Re = 100.<br />
OPTIONS AND SETTINGS<br />
In the Constants dialog box change the maximum inflow velocity Umax to 1.5[m/s],<br />
corresponding to a Reynolds number of 100.<br />
PHYSICS SETTINGS<br />
1 From the Physics menu, choose Boundary Settings.<br />
2 In the Boundary Settings dialog box, select Boundary 1.<br />
3 In the u0 edit field, type 4*Umax*s*(1-s)*flc1hs(t[1/s]-0.1,0.1).<br />
4 Click OK.<br />
The flc1hs function guarantees that the inlet velocity is smoothly ramped up from<br />
zero to its maximum value.<br />
COMPUTING THE SOLUTION<br />
During the first few seconds of the simulation, before the system reaches a state of<br />
steady periodic motion, the output is not really interesting. Therefore you can save<br />
memory by saving only the value five times per second up to 3.5 seconds, and then fifty<br />
times per second for another second and a half. Perform the following steps for the<br />
time-dependent simulation of drag and lift:<br />
1 From the Physics menu, select Properties.<br />
2 Select Transient from the Analysis type list. Click OK.<br />
1 From the Solve menu, select Solver Parameters.<br />
2 In the Solver list, select Time dependent.<br />
3 In the Times edit field type range(0,0.2,3.5) range(3.52,0.02,7).<br />
4 In the Absolute tolerance edit field type 1e-4. Click OK.<br />
5 Click the Solve button on the Main toolbar.<br />
FLOW PAST A CYLINDER | 217
POSTPROCESSING AND VISUALIZATION<br />
The difference from the former case can be seen immediately. Downstream of the<br />
cylinder, the Karman path is clearly visible (see Figure 6-1 earlier in this discussion).<br />
To see the evolution of the vortex trail from zero velocity until the flow is fully<br />
developed, click the Animation button on the Plot toolbar on the left-hand side of the<br />
user interface. Notice that the time scale of the movie changes after 3.5 seconds.<br />
You can also investigate the forces on the tube as a function of time using the reaction<br />
force operator and the Boundary Integration dialog box:<br />
1 From the Postprocessing menu, select Boundary Integration. Make sure the Expression<br />
edit field still contains-reacf(v)*2/(rho0*(2*Umax/3)^2*0.1). Select<br />
Boundaries 5–8 and click Plot; then click OK. Click the Edit Plot button in the figure<br />
window and change the title and y-axis label to Lift. Click OK.<br />
The plot clearly shows the oscillations in the lift force.<br />
Figure 6-2: Time evolution of the total lift force on the cylinder.<br />
Finally, you can investigate how suspended particles behave in the flow stream.<br />
Consider, for example, small water droplets entering with the air flow.<br />
1 In the Plot Parameters dialog box, go to the Particle Tracing page.<br />
2 Select the Particle tracing plot check box. In the Plot type list, select Points.<br />
3 In the Predefined forces list, select the Khan and Richardson force (ns).<br />
4 On the Start Points page, enter 0 in the x edit field and then enter<br />
range(0.1,0.05,0.3) in the y edit field.<br />
218 | CHAPTER 6: FLUID DYNAMICS MODELS
5 Go to the Initial Values page. Clear the Auto check box and enter 3.6 in the Start<br />
time edit field to study the particles only for fully developed flow.<br />
6 In the Initial velocity edit fields, type u and v to give the particles the same initial<br />
velocity as the inflow.<br />
7 Go to the Point Settings page, find the When particles leaves domain list, and select<br />
Disappear.<br />
8 On the Release page, select Time between releases and specify the time as 0.4.<br />
9 Click the Advanced button.<br />
10 Select the Manual tuning of step size check box and enter 0.02 in the Initial time step<br />
edit field and 0.01 for Maximum time step.<br />
11 Click OK to close the Advanced Parameters window.<br />
12 Go to the Animate page and click Start Animation. Remember that the time scale of<br />
the movie changes after 3.5 seconds.<br />
FLOW PAST A CYLINDER | 219
Terminal Falling Velocity of a Sand<br />
Grain<br />
Introduction<br />
The first stop for polluted water entering a water work is normally a large tank, where<br />
large particles are left to settle. More generally, gravity settling is an economical<br />
method of separating particles. If the fluid in the tank is moving at a controlled low<br />
velocity, the particles can be sorted in separate containers according to the time it takes<br />
for them to reach the bottom.<br />
This model simulates a spherical sand grain falling in water. The grain accelerates from<br />
standstill and rapidly reaches its terminal velocity. The results agree very well with<br />
experimental studies. The model is an axially symmetric fluid-flow simulation in a<br />
moving coordinate system, coupled to an ordinary differential equation (ODE)<br />
describing the grain’s motion.<br />
Model Definition<br />
The model couples the flow simulation in cylindrical coordinates with an ODE for the<br />
force balance of the particle. Due to axial symmetry, you can model the flow in 2D<br />
instead of 3D. The figure below shows the modeling domain.<br />
220 | CHAPTER 6: FLUID DYNAMICS MODELS
DOMAIN EQUATIONS<br />
The fluid flow is described by the Navier-Stokes equations<br />
∂u T<br />
ρ – ∇ ⋅ η( ∇u+ ( ∇u)<br />
) + ρu ⋅ ∇u<br />
+ ∇p = F<br />
∂t<br />
∇ ⋅ u = 0<br />
where ρ denotes the density (kg/m 3 ), u the velocity (m/s), η the viscosity (Ns/m 2 ),<br />
and p the pressure (Pa). The fluid is water with a viscosity of 1.51·10 −3 Ns/m 2 and a<br />
density of 1000 kg/m 3 . The model uses the accelerating reference system of the sand<br />
grain. This means that the volume force density F is given by:<br />
F r<br />
= 0, Fz = – ρ( a + g)<br />
where a (m/s 2 ) is the acceleration of the grain and g = 9.81 m/s 2 is the acceleration<br />
due to gravity. The ODE that describes the force balance is:<br />
mx ··<br />
=<br />
Fg + Fz where m (kg) denotes the mass of the particle, x (m) the position of the particle, F g<br />
(N) the gravitational force, and F z the z-component of the force that the water exerts<br />
on the sand grain. The gravitational force is given by:<br />
F g<br />
=<br />
– ρgrainVgraing where V grain (m 3 ) is the volume of the sand grain and ρ grain (kg/m 3 ) its density. The<br />
force that the water exerts on the grain is calculated by integrating the normal<br />
component of the stress tensor over the surface of the particle. Because the model is<br />
axially symmetric, only the force’s z-component is nonzero:<br />
∫<br />
Fz 2π rn – pI η∇u ( ∇u)<br />
T<br />
= ⋅ [ + ( + ) ] dS<br />
S<br />
where r (m) is the radial coordinate and n is the normal vector on the surface of the<br />
grain.<br />
·<br />
The initial values for position and velocities are u0 = v0 = x0 = x0 = 0 .<br />
BOUNDARY CONDITIONS<br />
At the surface of the sphere, the velocity relative the sphere is zero. Therefore, the<br />
model uses a no-slip condition, u = 0. At the inlet of the fluid domain the velocity<br />
equals the falling velocity: u 0 x . Symmetry, n · u = 0, applies at the outer<br />
·<br />
=<br />
( , )<br />
TERMINAL FALLING VELOCITY OF A SAND GRAIN | 221
oundary of the water domain, and a neutral condition,<br />
n – pI η∇u ( ∇u)<br />
, describes the outlet. An axial symmetry condition<br />
models the symmetry axis at r = 0.<br />
T<br />
⋅ [ + ( + ) ] =<br />
0<br />
Results<br />
Figure 6-3 shows the velocity field at the final simulation time, t = 1 s, when the<br />
particle has reached steady state.<br />
Figure 6-3: The velocity field at steady state. Note that the velocities are plotted in the<br />
reference system of the sand grain.<br />
The following series of snapshots display velocity field from a moment just after the<br />
sand grain is released until it is approaching steady state. Notice the recirculation<br />
forming above the grain.<br />
222 | CHAPTER 6: FLUID DYNAMICS MODELS
Figure 6-4: The velocity field around the sand grain at a series of times (t = 0.025 s, 0.05 s,<br />
0.075 s, 0.1 s, 0.15 s, 0.2 s, 0.3 s, 0.5 s, and 0.75 s). For a color legend, see Figure 6-3.<br />
TERMINAL FALLING VELOCITY OF A SAND GRAIN | 223
Figure 6-5 shows the falling velocity of the grain as a function of time.<br />
Figure 6-5: Falling velocity (m/s) of the grain versus time. After the solution time of 1 s,<br />
the velocity approaches the terminal velocity.<br />
The terminal velocity equals 0.291 m/s. When this state is reached, the gravity and the<br />
forces from the water cancel out. Figure 6-6 shows the forces on the sand grain.<br />
Figure 6-6: The forces on the sand grain. The force that the water exerts on the sphere<br />
(upper line) increases as the grain gains speed. The gravity force (lower line) remains the<br />
same, and the total force (middle line) tends toward zero as the solution approaches steady<br />
state.<br />
Several approximate equations have been proposed for the terminal velocity of a sphere<br />
falling in a fluid. Ref. 1 cites the following expression for the total force that the fluid<br />
exerts on the sphere, as a function of the velocity:<br />
224 | CHAPTER 6: FLUID DYNAMICS MODELS
where d (m) is the diameter of the sphere, ρ (kg/m 3 ) the fluid density, v (m/s) the<br />
velocity, and Re = (ρ v d)/µ is the Reynolds number, with µ (Ns/m 2 ) being the<br />
viscosity of the fluid. The gravity force is given analytically as F g = π d 3 (ρ − ρ s ) g/6,<br />
where ρ s (kg/m 3 ) is the density of the sphere. Equating the two forces and<br />
introducing the values used in the simulation gives an approximate terminal velocity of<br />
0.284 m/s.<br />
The same reference discusses correction factors for non-spherical particles. You can<br />
easily adapt the model to hold for a general axially symmetric object (by redrawing the<br />
geometry) or even an arbitrarily shaped object (by modeling in 3D).<br />
Reference<br />
1. J.M. Coulson and J.F. Richardson, Chemical Engineering vol. 2, 4th ed., 1993.<br />
Model Library path: <strong>COMSOL</strong>_Multiphysics/Fluid_Dynamics/falling_sand<br />
Modeling Using the Graphical User Interface<br />
MODEL NAVIGATOR<br />
1 In the Model Navigator, select Axial symmetry (2D) from the Space dimension list.<br />
2 In the list of application modes, select <strong>COMSOL</strong> Multiphysics>Fluid<br />
Dynamics>Incompressible Navier-Stokes>Transient analysis.<br />
3 Click Multiphysics, and then Add.<br />
4 Click the Application Mode Properties button and set Weak constraints to On and<br />
Constraint type to Non-ideal. Click OK.<br />
5 Click OK to close the dialog box.<br />
OPTIONS AND SETTINGS<br />
π<br />
F --d<br />
4<br />
2 ρv 2 1.84Re 0.31 –<br />
0.293Re 0.06<br />
( +<br />
) 3.45<br />
=<br />
1 From the Options menu, select Constants.<br />
TERMINAL FALLING VELOCITY OF A SAND GRAIN | 225
2 Enter the following constant names, expressions, and (optionally) descriptions:<br />
NAME EXPRESSION DESCRIPTION<br />
rho_water 1000[kg/m^3] Density, water<br />
eta_water 1.51e-3[Pa*s] Dynamic viscosity, water<br />
r_grain 1[mm] Radius, grain<br />
V_grain 4/3*pi*r_grain^3 Volume, grain<br />
rho_grain 2900[kg/m^3] Density, grain<br />
m_grain V_grain*rho_grain Mass, grain<br />
g 9.81[m/s^2] Acceleration due to gravity<br />
Fg -m_grain*g Gravitational force on grain<br />
3 Click OK to close the Constants dialog box.<br />
GEOMETRY MODELING<br />
1 Go to Draw>Specify Objects and specify a rectangle with the following properties:<br />
PROPERTY EXPRESSION<br />
Width 6e-3<br />
Height 14e-3<br />
Position: Base Corner<br />
Position: r 0<br />
Position: z -6e-3<br />
2 Click the Zoom Extents button to see the rectangle you just created.<br />
3 Specify a circle centered at (0, 0) with the radius 10 −3 .<br />
4 Select both objects, then click the Difference button.<br />
PHYSICS SETTINGS<br />
Global Equations<br />
1 From the Physics menu, choose Global Equations.<br />
2 Enter the following ODEs; when done, click OK.<br />
NAME EQUATION INIT (U) INIT (UT)<br />
X Xt-Xdot 0 0<br />
Xdot Xdott-(Fz+Fg)/m_grain 0 0<br />
226 | CHAPTER 6: FLUID DYNAMICS MODELS
Boundary Conditions<br />
1 In the Boundary Settings dialog box, enter boundary coefficients as indicated in the<br />
table below; when done, click OK.<br />
SETTINGS BOUNDARIES 1, 3 BOUNDARY 2 BOUNDARY 4 BOUNDARY 5 BOUNDARIES 6, 7<br />
Boundary<br />
type<br />
Boundary<br />
condition<br />
U0 f0 Symmetry<br />
boundary<br />
Axial<br />
symmetry<br />
The warning for inconsistent unit in the setting for the normal inflow velocity is<br />
caused because the variable Xdot from the ODE for the particle’s position does not<br />
have a unit. You can ignore this warning.<br />
2 Choose Options>Integration Coupling Variables>Boundary Variables.<br />
3 On the Source tab, select Boundaries 6 and 7. Specify a boundary integration<br />
coupling variable with the Name Fz and the Expression -2*pi*lm2. Leave the<br />
Integration order at the default value 4 and the Global destination set to on. The<br />
Lagrange multiplier lm2 is equal to the z component of the total stress tensor times<br />
the r coordinate. Using the expression -T_z_ns*2*pi*r gives a similar solution but<br />
with a worse accuracy and a slightly higher memory consumption.<br />
4 Click OK to close the dialog box.<br />
Inlet Open<br />
boundary<br />
Velocity Normal<br />
stress<br />
-Xdot<br />
Subdomain Settings<br />
In the Subdomain Settings dialog box, enter the subdomain settings indicated in the<br />
table below.<br />
PROPERTY VALUE<br />
ρ rho_water<br />
η eta_water<br />
Fr 0<br />
Fz -rho_water*(Xdott+g)<br />
MESH GENERATION<br />
1 Open the Free Mesh Parameters dialog box<br />
2 Select Fine among the Predefined mesh sizes.<br />
Symmetry<br />
boundary<br />
Wall<br />
Symmetry No slip<br />
3 Click the Custom mesh size button and Set the Element growth rate to 1.1.<br />
0<br />
TERMINAL FALLING VELOCITY OF A SAND GRAIN | 227
4 On the Boundary page, set the Maximum element size for Boundary 3 to 2e-4, and<br />
for Boundaries 6 and 7 to 1e-4.<br />
5 Click the Remesh button.<br />
6 Click OK to close the dialog box.<br />
COMPUTING THE SOLUTION<br />
1 Open the Solver Manager.<br />
2 On the Output page, select the Include time derivatives check box.<br />
3 Click OK to close the dialog box.<br />
1 Open the Solver Parameters dialog box.<br />
2 On the General tab, enter range(0,0.025,1) in the Times edit field.<br />
3 In the Absolute tolerance edit field, enter 1e-5.<br />
4 Click OK to close the dialog box.<br />
5 Click the Solve button on the Main toolbar.<br />
POSTPROCESSING AND VISUALIZATION<br />
The default plot shows the velocity field in the reference system of the grain.<br />
1 Open the Plot Parameters dialog box.<br />
2 On the Surface page, click the Surface Data tab and then click the Range button.<br />
3 In the Color Range dialog box, clear the Auto check box and enter 0.0 and 0.338 in<br />
the Min and Max edit fields, respectively. Click OK.<br />
4 On the Streamline page, select the Streamline plot check box.<br />
5 From the Streamline plot type list, select Magnitude controlled.<br />
6 On the Line Color page, click the Color button. In the Streamline Color dialog box,<br />
select a black color. Click OK.<br />
7 Click OK to see the combined surface and streamline plot in Figure 6-3.<br />
228 | CHAPTER 6: FLUID DYNAMICS MODELS<br />
You can also visualize the velocity as a function of time:<br />
8 Choose Postprocessing>Domain Plot Parameters.<br />
9 On the Point page, select Point 1 and type -Xdot in the Expression edit field.<br />
10 Click Apply to reproduce the plot in Figure 6-5.<br />
To view all the forces in the same figure, follow these instructions:<br />
11 On the Point page, select an arbitrary point and enter Fz in the Expression edit field.<br />
12 Click Apply to plot the viscous and pressure contributions to the force against time.
13 On the General page, select the Keep current plot check box.<br />
14 On the Point page, click the Line Settings button. Select a red color, then click OK.<br />
15 In the Expression edit field, enter Fg. Click Apply.<br />
16 Click the Line settings button again and select a black color.<br />
17 In the Expression edit field, enter Fg+Fz.<br />
18 Click OK to reproduce the plot in Figure 6-6 and close the dialog box.<br />
TERMINAL FALLING VELOCITY OF A SAND GRAIN | 229
Fluid Valve<br />
Introduction<br />
Many different applications such as printers involve the periodic opening and closing<br />
of fluid-flow channels. This is generally a difficult problem to model as it implies a<br />
moving boundary condition for the part of the geometry that acts as an obstacle for<br />
the flow.<br />
An alternative is to use a material property (viscosity), which is easy to vary over time.<br />
In this case, specify a very large viscosity (ideally it should be an infinite viscosity) that<br />
in effect stops the flow in regions where this large viscosity is present. To simulate the<br />
movement of this region of large viscosity, the model includes a logical expression in<br />
the subdomain settings.<br />
The model describes a valve where it is possible to direct the flow into one of the two<br />
channels. Flow of varying degrees can also occur in both channels during the opening<br />
and closing stages.<br />
Model Definition<br />
Figure 6-7 shows the model domain.<br />
Inlet<br />
Figure 6-7: Depiction of the geometry and the operation of the fluid valve. Flow enters<br />
from one inlet at the left, but can leave the valve through two outlets at the right. The choice<br />
of outlet depends upon the position of the valve pin. In this model, two valve pins oscillate<br />
between the following positions: in front of one outlet channel to in front of the other.<br />
Sometimes flow is possible through both outlets, depending on the position of the pins.<br />
In this model, the valve pin moves according to a sinusoidal function of time. The inlet<br />
velocity is constant.<br />
230 | CHAPTER 6: FLUID DYNAMICS MODELS<br />
Valve pin<br />
Outlet<br />
Outlet
DOMAIN EQUATIONS<br />
The fluid flow is described by the Navier-Stokes equations:<br />
(6-1)<br />
where ρ denotes the density (kg/m 3 ), u the velocity vector (m/s), η the viscosity (Ns/<br />
m 2 ), and p the pressure (Pa). The modeled fluid is air with viscosity 10 −5 Ns/m 2 and<br />
density 1 kg/m 3 .<br />
The movement of the valve is described with an analytic expression pin, which returns<br />
the value of one in the area corresponding to the valve pin and zero elsewhere. The<br />
viscosity is then expressed by<br />
(6-2)<br />
where η0 is the fluid viscosity, η∞ is a very large viscosity (ideally infinite), and pin is<br />
described by<br />
where<br />
∂u T<br />
ρ – ∇⋅η( ∇u+ ( ∇u)<br />
) + ρu ⋅ ∇u<br />
+ ∇p =<br />
∂t<br />
0<br />
∇ ⋅ u = 0<br />
η = η0+ pin ⋅ η∞ pin = xpinypin xpin = ( x> x0) ( x< x1) ypin = 1 – ( y> y1) + ( y> y2) y 1 and y 2 depend on time, t, according to:<br />
y 1<br />
= – y0 + ymaxsin( 2πt )<br />
y2 =<br />
y0 + ymaxsin( 2πt )<br />
(6-3)<br />
(6-4)<br />
(6-5)<br />
(6-6)<br />
and where y 0 , x 0 , x 1 , and y max are fixed in time and describe the size of the valve pin<br />
and the amplitude with which the pin moves.<br />
BOUNDARY CONDITIONS<br />
At the inlet, the model uses a fully developed laminar flow. The velocity is set to a<br />
parabolic velocity profile with maximum velocity vmax equal to 0.25 m/s. At the<br />
outlets, a neutral boundary condition states that the normal component of the stress<br />
tensor is zero:<br />
FLUID VALVE | 231
All other boundaries have a no-slip condition<br />
Results<br />
232 | CHAPTER 6: FLUID DYNAMICS MODELS<br />
n – pI η∇u ( ∇u)<br />
T<br />
⋅ [ + ( + ) ] = 0<br />
u =<br />
0<br />
(6-7)<br />
(6-8)<br />
Figure 6-8 shows the velocity field (modulus of the velocity vector) when the valve is<br />
completely open. Firstly, the plot shows that the inlet is smaller than the compartment<br />
that it enters, so that some distance is required before the flow reaches another<br />
parabolic profile for the main body of the inlet chamber. If you investigate the velocity,<br />
some recirculation occurring at the corners of the chamber beside the inlet is visible.<br />
Secondly, the structure of the outlet channels leads to a slight thinning toward the<br />
middle of the channels. This provides a slight acceleration, and subsequently greater<br />
velocity magnitude, in these regions.<br />
Figure 6-8: Velocity field when the valve is completely open.<br />
Figure 6-9 shows the velocity field when the valve is halfway closed from above and<br />
fully closed from below. The use of a very large viscosity not only simulates the solidity
of the valve pin but also does a good job of providing a no-slip boundary condition at<br />
the edge of the valve pin.<br />
Figure 6-9: Velocity field when the valve is half way closed from above (top) and fully closed<br />
from below (bottom).<br />
FLUID VALVE | 233
Figure 6-10 shows a plot of the flow rates (integral of the velocity vector over the<br />
outlets) in the upper and lower channels as well as the total flow rate. The figure<br />
illustrates the periodic flow due to the periodic motion of the valve pin.<br />
Figure 6-10: The blue line (solid) shows flow rate in the upper branch as a function of time,<br />
while the dotted line shows the flow rate in the lower branch. The dashed line shows the sum<br />
of the flow in the two branches.<br />
Modeling in <strong>COMSOL</strong> Multiphysics<br />
The inequalities used to describe the pin motion are, in the <strong>COMSOL</strong> Multiphysics<br />
implementation, replaced by smooth step functions. The smooth step function in this<br />
model is flc2hs, which returns a C 2 -continuous step with a given step width.<br />
Model Library path: <strong>COMSOL</strong>_Multiphysics/Fluid_Dynamics/fluid_valve<br />
Modeling Using the Graphical User Interface<br />
1 Start <strong>COMSOL</strong> Multiphysics.<br />
234 | CHAPTER 6: FLUID DYNAMICS MODELS
2 In the Model Navigator on the New page, select 2D from the Space dimension list.<br />
3 From the list of application modes, select <strong>COMSOL</strong> Multiphysics><br />
Fluid Dynamics>Incompressible Navier-Stokes>Transient analysis.<br />
4 Click OK.<br />
GEOMETRY MODELING<br />
1 Shift-click the Rectangle/Square button in the Draw toolbar.<br />
2 Specify the rectangle settings according to the following table; when done, click OK.<br />
PROPERTY EXPRESSION<br />
Width 0.01<br />
Height 3e-3<br />
Position: Base Corner<br />
Position: x 0<br />
Position: y -1.5e-3<br />
3 Click the Zoom Extents button on the Main toolbar.<br />
4 Draw another rectangle according to:<br />
PROPERTY EXPRESSION<br />
Width 5e-4<br />
Height 3e-3<br />
Position: Base Center<br />
Position: x 9e-3<br />
Position: y 0<br />
5 Open the Axes/Grid Settings dialog box from the Options menu.<br />
6 Enter the following axis settings:<br />
PROPERTY EXPRESSION<br />
x min 0.009<br />
x max 0.019<br />
y min 0<br />
y max 5e-3<br />
7 Click the Grid page, clear the Auto check box and set y spacing to 5e-4.<br />
8 Click OK.<br />
FLUID VALVE | 235
9 Click the 3rd Degree Bézier Curve button in the Draw toolbar.<br />
10 Click in the points (0.01, 0.0015), (0.013, 0.0015), (0.013, 0.0045), and (0.016,<br />
0.0045).<br />
11 Switch to the Line tool by clicking the Line button in the Draw toolbar.<br />
12 Click the points (0.018, 0.0045), (0.018, 0.0035), and (0.016, 0.0035).<br />
13 Switch back to the 3rd Degree Bézier Curve and click the points (0.013, 0.0035),<br />
(0.013, 5·10 −4 ), and (0.01, 5·10 −4 ).<br />
14 Close the geometry object by right-clicking anywhere in the drawing area.<br />
15 To make the lower branch, use the mirror tool. Make sure that the upper branch<br />
geometry object is selected and click the Mirror button in the Draw toolbar.<br />
16 Let the Point on line settings remain at the default settings. Change the Normal<br />
vector from (1, 0) to (0, 1).<br />
17 Click OK.<br />
18 Draw a circle with radius 5·10 −4 centred in the point (0.01, 0).<br />
19 Click the Zoom Extents button.<br />
20 Click the Create Composite Object button in the Draw toolbar to open the Create<br />
Composite Object dialog box.<br />
21 Clear the Keep interior boundaries check box, type R1+CO1+CO2-C1 in the Set<br />
formula edit field, and click Apply.<br />
22 Select the Keep interior boundaries check box, type R2+CO3 in the Set formula edit<br />
field, and click OK.<br />
23 The last step of the geometry modeling is to fillet the left corners. Click the Fillet/<br />
Chamfer button in the Draw toolbar.<br />
24 Select Points 1 and 2, enter 1e-3 in the Radius edit field and click OK.<br />
OPTIONS AND SETTINGS<br />
1 Open the Constants dialog box from the Options menu and enter constants<br />
according to the following table. When done, click OK.<br />
NAME EXPRESSION DESCRIPTION<br />
x0 8.7[mm] Valve left end point<br />
x1 9.2[mm] Valve right end point<br />
scale 1e-4 Step function scaling<br />
y_max 1.5[mm] Valve pin amplitude<br />
eta_0 1e-5[Pa*s] Fluid viscosity<br />
236 | CHAPTER 6: FLUID DYNAMICS MODELS
NAME EXPRESSION DESCRIPTION<br />
eta_inf 1[Pa*s] Large viscosity<br />
rho 1[kg/m^3] Fluid density<br />
v_max 0.25[m/s] Maximum inlet velocity<br />
2 From the Options menu, choose Expressions>Scalar Expressions.<br />
3 Enter scalar expressions according to the following table. When done, click OK.<br />
NAME EXPRESSION<br />
x_range flc2hs((x-x0)[1/m],scale)*(1-flc2hs((x-x1)[1/m],scale))<br />
y_range 1-flc2hs((y-y1)[1/m],scale)+flc2hs((y-y2)[1/m],scale)<br />
y1 -1.5[mm]+y_max*sin(2*pi*t[1/s])<br />
y2 1.5[mm]+y_max*sin(2*pi*t[1/s])<br />
pin y_range*x_range<br />
eta eta_0+eta_inf*pin<br />
pin_vel y_max*pi*2[1/s]*cos(2*pi*t[1/s])<br />
The reason for the [1/m] entries for the input arguments to flc2hs is to make them<br />
dimensionless. Likewise, the input argument to the sin and cos functions must be<br />
dimensionless; appending [1/s] to the variable t for time accomplishes this.<br />
4 Select Integration Coupling Variables>Boundary Variables from the Options menu.<br />
5 Select Boundary 15 from the Boundary selection list. Type u_up in the Name edit<br />
field and u in the Expression edit field. Leave the Integration order at 4 and Global<br />
destination active.<br />
6 Select Boundary 14 from the Boundary selection list. On the second row, type<br />
u_down in the Name edit field and u in the Expression edit field. Leave the Integration<br />
order at 4 and Global destination active.<br />
7 Click OK.<br />
PHYSICS SETTINGS<br />
Subdomain Settings<br />
Define the properties of the fluid:<br />
1 Open the Subdomain Settings dialog box from the Physics menu.<br />
2 Select all subdomains.<br />
3 Set the Density to rho and the Dynamic viscosity to eta.<br />
4 Click OK.<br />
FLUID VALVE | 237
Boundary Conditions<br />
Open the Boundary Settings dialog box from the Physics menu and enter boundary<br />
conditions according to the following table. When done, click OK.<br />
SETTINGS BOUNDARY 1 BOUNDARIES 5, 6 BOUNDARIES 14, 15 ALL OTHERS<br />
Boundary type Inlet Inlet Open boundary Wall<br />
Boundary condition Velocity Velocity Normal stress No slip<br />
U0 4*v_max*s*<br />
(1-s)<br />
pin_vel - -<br />
f0 - - 0 -<br />
MESH GENERATION<br />
1 Open the Free Mesh Parameters dialog box from the Mesh menu.<br />
2 On the Global page, click the Custom mesh size button, and then set Maximum<br />
element size to 0.0004 and Element growth rate to 1.5.<br />
3 Click the Subdomain tab.<br />
4 Select Subdomain 2 from the Subdomain selection list. Set Maximum element size to<br />
0.0001.<br />
5 Click Remesh, then click OK.<br />
COMPUTING THE SOLUTION<br />
1 Open the Solver Parameters dialog box from the Solve menu.<br />
2 In the Time stepping area, set Times to range(0,0.02,1.5), Relative tolerance to<br />
0.001, and Absolute tolerance to 0.0001.<br />
3 On the Time Stepping page, select Free from the Time steps taken by solver list. The<br />
default CFL number-based time step uses a viscous time scale as a lower limit. This<br />
limit is not suitable when using the viscosity to model a solid.<br />
4 Click OK.<br />
5 Click the Solve button on the Main toolbar.<br />
POSTPROCESSING AND VISUALIZATION<br />
To create the image in Figure 6-8, do the following steps.<br />
1 Open the Plot Parameters dialog box from the Postprocessing menu.<br />
2 On the General page, clear the Geometry edges check box and make sure that the<br />
Surface check box is selected.<br />
238 | CHAPTER 6: FLUID DYNAMICS MODELS
3 On the Surface page, select Velocity field from the Predefined quantities list on the<br />
Surface Data tab and click Apply.<br />
To create the images in Figure 6-9 do the following steps:<br />
4 On the General page, select the time step at 0.22 from the Solution at time list.<br />
5 Select the Contour plot type.<br />
6 On the Contour page, type eta in the Expression edit field.<br />
7 In the Contour levels frame, select the Vector with isolevels and type<br />
range(1e-3,1e-5,1.1e-3).<br />
8 In the Contour color area, select Uniform color, click the Color button, and select<br />
white. Click OK to close the Contour Color dialog box. Clear the Color legend check<br />
box.<br />
9 Click Apply in the Plot Parameters dialog box.<br />
To create the top image, repeat the above steps but for time step 0.92.<br />
Use the following steps to create Figure 6-10:<br />
1 Open the Domain Plot Parameters dialog box from the Postprocessing menu.<br />
2 On the General page, select the Keep current plot check box.<br />
3 Click the Point tab and select Point 1 from the Point selection list.<br />
4 Type u_up in the Expression edit field.<br />
5 Click the Line Settings button and set Line color to a blue color by first selecting Color<br />
from the Line color list and then clicking the Color button. Select Solid line from the<br />
Line style list. Click OK.<br />
6 Click Apply.<br />
7 Type u_down in the Expression edit field.<br />
8 Click the Line Settings button and set Line color to a red color and Line style to<br />
Dotted line. Click OK.<br />
9 Click Apply.<br />
10 Repeat for the expression u_down+u_up with a dashed, black line.<br />
FLUID VALVE | 239
Micromixer<br />
Introduction<br />
This example studies a laminar static mixer with two parallel sets of split-reshape-<br />
recombine mixing elements. Figure 6-11 shows the geometry of a single mixing<br />
element.<br />
Inlet<br />
Figure 6-11: The micromixer splits the incoming fluid in the direction perpendicular to<br />
the interface separating the two fluid layers. After recombining them, the mixer stacks the<br />
two flows on top of each other, resulting in four fluid layers.<br />
Each mixing element doubles the number of fluid layers, resulting in a fast mixing<br />
process. This technique is suited for laminar flow mixing and has small pressure losses.<br />
In this model, the mixing structure consists of two parallel sets of mixing elements,<br />
where each set is two elements long. You measure the mixing quality with the relative<br />
variance of the concentration profile, S, calculated as<br />
where K x is the yz-plane intersecting the mixing structure at coordinate x, and c is the<br />
mean concentration.<br />
240 | CHAPTER 6: FLUID DYNAMICS MODELS<br />
Outlet<br />
s x<br />
S = -------------<br />
∫<br />
s inlet<br />
sx ( c– c)<br />
2 =<br />
dA<br />
K x
Model Definition<br />
DOMAIN EQUATIONS<br />
The fluid flow is described by the Navier-Stokes equations<br />
where ρ denotes the density (kg/m 3 ), u the velocity (m/s), η denotes the viscosity<br />
(N·s/m 2 ), and p represents the pressure (Pa). The modeled fluid is water with a<br />
viscosity of 1·10 −3 N·s/m 2 and a density of 1000 kg/m 3 .<br />
The mass flux is given by diffusion and convection, and the resulting mass balance is<br />
where D denotes the diffusion coefficient (m 2 /s) and c gives the concentration (mol/<br />
m 3 ). The modeled species is bicarbonate ions with a diffusion coefficient of<br />
1.49 · 10 −9 m 2 /s.<br />
BOUNDARY CONDITIONS<br />
∂u T<br />
ρ – ∇⋅η( ∇u+ ( ∇u)<br />
) + ρu ⋅ ∇u<br />
+ ∇p =<br />
∂t<br />
0<br />
∇ ⋅ u = 0<br />
∇ ⋅ ( – D∇c+ cu ) = 0<br />
At the inlet the model assumes fully developed laminar flow. It sets the velocity to a<br />
parabolic profile with a mean velocity of 0.01 m/s. At the outlet, the model sets the<br />
pressure to zero. All other boundaries have a no-slip condition<br />
u = 0.<br />
The inlet concentration has a discontinuous profile where the upper half has a<br />
concentration of 27 mol/m 3 and the lower half is pure water. The boundary condition<br />
is defined such that<br />
c inlet<br />
⎧c0<br />
z > 0<br />
=<br />
⎨<br />
⎩0<br />
z ≤ 0.<br />
MICROMIXER | 241
Results<br />
Figure 6-12 shows the final concentration profile. The concentration values in some<br />
points of the solution are slightly negative; this is due to the numerical method.<br />
Figure 6-12: Following three split-reshape-recombine cycles, the outflow has eight fluid<br />
layers.<br />
Using boundary integration to calculate the relative variance of the concentration at<br />
the inlet and outlet, this setup reaches a mixing quality of 0.31 (for perfect mixing this<br />
value would be 0, and a value of 1 means no mixing at all). To improve this quality,<br />
add mixing elements.<br />
Model Library path: <strong>COMSOL</strong>_Multiphysics/Fluid_Dynamics/micromixer<br />
242 | CHAPTER 6: FLUID DYNAMICS MODELS
Modeling Using the Graphical User Interface<br />
MODEL NAVIGATOR<br />
1 Open the Model Navigator, go to the Space dimension list and select 3D. Click the<br />
Multiphysics button.<br />
2 Select the application mode<br />
<strong>COMSOL</strong> Multiphysics>Fluid Dynamics>Incompressible Navier-Stokes>Steady-state<br />
analysis, then click the Add button.<br />
3 Select <strong>COMSOL</strong> Multiphysics>Convection and Diffusion>Convection and Diffusion. Click<br />
the Add button once again.<br />
4 Click OK.<br />
OPTIONS AND SETTINGS<br />
1 From the Options menu select Constants.<br />
2 Define the following names, expressions, and (optionally) descriptions:<br />
NAME EXPRESSION DESCRIPTION<br />
rho 1e3[kg/m^3] Density<br />
eta 1e-3[Pa*s] Dynamic viscosity<br />
U_mean 0.01[m/s] Mean inlet velocity<br />
c0 27[mol/m^3] Inlet concentration<br />
D 1.49e-9[m^2/s] Diffusion coefficient<br />
3 Click OK.<br />
GEOMETRY MODELING<br />
This section describes how to build the model geometry step by step. Because it is a<br />
rather lengthy procedure, we have included the finished geometry as a CAD file to give<br />
you the option of skipping this modeling stage. Thus, if you prefer to use the finished<br />
geometry, you can skip directly to “Importing the Geometry from a CAD File” on<br />
page 248.<br />
The geometry consists of a rectangular channel that is split and recombines several<br />
times. Start by defining a work plane.<br />
1 From the Draw menu select Work-Plane Settings. Click OK to select the default x-y<br />
work plane at z = 0.<br />
2 Select the menu item Options>Axes/Grid Settings.<br />
MICROMIXER | 243
3 Verify that you are on the Axis page. Enter the following settings:<br />
PROPERTY EXPRESSION<br />
x min -1e-3<br />
x max 3e-3<br />
y min -1e-3<br />
y max 1e-3<br />
4 Go to the Grid page. Clear the Auto check box, then in both the x spacing and y<br />
spacing edit fields enter 1e-4.<br />
5 Click OK.<br />
Constructing a Single Mixing Element<br />
1 Go to the Draw toolbar on the left side of the user interface and click the Line<br />
button. Draw a seven-sided polygon in the drawing area by clicking, in order, the<br />
coordinates (0, 0), (0, 0.5·10 −3 ), (0.7·10 −3 , 0.7·10 −3 ), (1.3·10 −3 , 0.7·10 −3 ),<br />
(2·10 −3 , 0.5·10 −3 ), (2·10 −3 , −0.5·10 −3 ), (1·10 −3 , 0.1·10 −3 ), and (0, 0). Finally,<br />
click the right mouse button to create the solid object. (Soon you will learn about<br />
an alternative method for creating polygons.)<br />
2 From the Draw menu choose Extrude. In the Distance edit field enter 2e-3, then click<br />
OK.<br />
3 Click the Move button on the Draw toolbar. Set the Displacement: z to -1e-3, then<br />
click OK.<br />
4 Press Ctrl+C and then Ctrl+V to make a copy of the extruded object and paste it.<br />
In the Paste dialog box that opens, leave all Displacement components at 0. Click OK.<br />
5 On the Draw toolbar click the Rotate button. Set the Rotation angle to 90, then set<br />
the Rotation axis direction vector to x, y, and z values of 1, 0, and 0, respectively. Click<br />
OK.<br />
6 Return to the Draw toolbar and again click the Rotate button. Set the Rotation angle<br />
to 180. This time go to the Point on rotation axis area, and in the x, y, and z edit<br />
fields enter 1e-3, 0, and 0, respectively. Click OK.<br />
7 Press Ctrl+A to select both objects, then click the Intersection button on the Draw<br />
toolbar.<br />
8 Make a copy of the object by pressing Ctrl+C, then Ctrl+V, and choosing OK.<br />
9 Go to the Draw toolbar and click the Rotate button. Set the Rotation angle to 180,<br />
then set the Rotation axis direction vector to x, y, and z values of 1, 0, and 0,<br />
respectively. Click OK.<br />
244 | CHAPTER 6: FLUID DYNAMICS MODELS
Connecting a Second Mixing Element in the Series<br />
1 Press Ctrl+A to select both objects.<br />
2 Go to the Draw toolbar and click the Mirror button and in the Normal vector row<br />
enter values for x, y, and z of 0, 1, and 0, respectively. Click OK.<br />
3 Click the Move button on the Draw toolbar. Set the Displacement: x to 2.5e-3. Click<br />
OK.<br />
Making Square Channel Connections Between the Mixing Elements<br />
1 From the Draw menu select the Geom2 work plane.<br />
2 From the Draw menu select the Rectangle/Square button and note that the cursor<br />
changes to a crosshair (alternatively, select Draw>Draw Objects>Rectangle/Square).<br />
Using the mouse, drag the cursor to create a rectangle with its base corner at<br />
(−0.5·10 −3 , −0.5·10 −3 ), a width of 0.5·10 −3 , and a height of 1·10 −3 .<br />
3 Select the menu item Draw>Extrude. In the Distance edit field enter 1e-3, then click<br />
OK.<br />
4 On the Draw toolbar click the Move button. Set the Displacement: z to -0.5e-3.<br />
5 On the Draw toolbar click the Array button. Change the Displacement: x to 2.5e-3<br />
and the Array size: x to 3. Click OK to create the array.<br />
Getting Two Mixing Channels in Parallel<br />
1 Press Ctrl+A to select all the objects.<br />
2 From the Draw toolbar select Move. Set the Displacement: y to 1e-3. Click OK.<br />
3 Press Ctrl+C and Ctrl+V to copy and paste the objects. Set the Displacement: y to<br />
-2e-3, then click OK.<br />
Connecting the Two Parallel Channels to a Single Channel at Both Ends<br />
1 From the Draw menu select the Geom2 work plane.<br />
2 On the Draw toolbar, Shift-click the Rectangle/Square button. In the Rectangle dialog<br />
box create a rectangle with its base corner at (−3.5·10 −3 , −0.7·10 −3 ), a width of<br />
10 −3 , and a height of 1.4·10 −3 .<br />
3 From the Draw menu choose Extrude. Set the Distance to 1.4e-3, then click OK.<br />
4 Go to the Draw toolbar and click the Move button. Set the Displacement: z to<br />
-0.7e-3, then click OK.<br />
5 Press Ctrl+C and Ctrl+V to copy and paste the objects; set the Displacement: x to<br />
10.5e-3, then click OK.<br />
MICROMIXER | 245
6 Click on the tab at the top of the drawing area to return to the Geom2 work plane.<br />
On the Visualization/Selection toolbar on the left side of the user interface choose<br />
Projection of All 3D Geometries.<br />
7 Draw a four-sided polygon with corners at the points (−2.5·10 −3 , 0),<br />
(−0.5·10 −3 , 0.5·10 −3 ), (−0.5·10 −3 , 1.5·10 −3 ), and (−2.5·10 −3 , 0.7·10 −3 ). To do<br />
so, select the menu item Draw>Specify Objects>Line (or Shift-click the Line button in<br />
the Draw toolbar). In the resulting dialog box find the Style list and select Closed<br />
polyline (solid). In the x edit field enter the sequence of x-coordinates from the<br />
coordinate pairs just given, then do the same for the y-coordinates in the y edit field.<br />
Click OK.<br />
8 Next, extrude the polygon: select the menu item Draw>Extrude, then in the Distance<br />
edit field type 2e-3. Click OK.<br />
9 Move the extruded polygon. From the Draw toolbar select the Move tool. You<br />
default to the Displacement area, and in the z edit field enter -1e-3.<br />
Setting Up a Second Work Plane<br />
1 From the Draw menu select Work-Plane Settings, then click Add. A new work plane,<br />
Geom3, appears. Select the z-x plane and click OK.<br />
2 On the Visualization/Selection toolbar choose Projection of All 3D Geometries.<br />
3 Click the Zoom Extents button on the Main toolbar.<br />
4 From the Options menu open the Axes/Grid Settings dialog box. On the Grid page<br />
clear the Auto check box. In both the x spacing and y spacing edit fields enter 1e-4.<br />
5 Using the Closed polyline (solid) technique already described, draw a four-sided<br />
polygon with corners at the points (−0.7·10 −3 , −2.5·10 −3 ), (0.7·10 −3 , −2.5·10 −3 ),<br />
(0.5·10 −3 , −0.5·10 −3 ), and (−0.5·10 −3 , −0.5·10 −3 ).<br />
6 Select Draw>Extrude, then in the Distance edit field type 2e-3. Click OK.<br />
7 Select the two extruded geometries (EXT9 and EXT10). Go to the Draw toolbar<br />
and click the Intersection button.<br />
8 Go back to the Draw toolbar and click the Mirror button. Set the x, y, and z values<br />
of the Normal vector to 0, 1, and 0, respectively. Click OK.<br />
Doubling the Number of Fluid Layers<br />
When building the outflow connections, notice that you can double the fluid layers<br />
one more time by guiding the channels properly.<br />
1 Click the appropriate tab at the top of the drawing area to return to the Geom2<br />
work plane.<br />
246 | CHAPTER 6: FLUID DYNAMICS MODELS
2 Using the Closed polyline (solid) technique already described, draw a five-sided<br />
polygon with corners at the points (5·10 −3 , 0.5·10 −3 ), (6·10 −3 , 0.1·10 −3 ),<br />
(7·10 −3 , −0.7·10 −3 ), (7·10 −3 , 0.7·10 −3 ), and (5·10 −3 , 1.5·10 −3 ).<br />
3 Select Draw>Extrude, then in the Distance edit field type 2e-3. Click OK.<br />
4 Move the extruded polygon. From the Draw toolbar select the Move tool. You<br />
default to the Displacement area, and in the z edit field enter -1e-3. Click OK.<br />
5 Go to the Geom3 work plane.<br />
6 Using the Closed polyline (solid) technique already described, draw a six-sided<br />
polygon with corners at the points (0.5·10 −3 , 5·10 −3 ), (0.8·10 −3 , 6·10 −3 ),<br />
(0.7·10 −3 , 7·10 −3 ), (0, 7·10 −3 ), (0.1·10 −3 , 6·10 −3 ), and (−0.5·10 −3 , 5·10 −3 ).<br />
7 Select Draw>Extrude, then in the Distance edit field type 3e-3. Click OK.<br />
8 From the Draw toolbar select the Move tool. You default to the Displacement area,<br />
and in the y edit field enter -1e-3. Click OK.<br />
9 Select the EXT9 and EXT10 geometries; on the Draw toolbar click the Intersection<br />
button.<br />
10 Press Ctrl+C and Ctrl+V to make a copy of the new object. In the Paste dialog box,<br />
leave all Displacement components at 0. Click OK.<br />
11 Go to the Draw toolbar and click the Rotate button. Set the Rotation angle to 180,<br />
then set the Rotation axis direction vector to x, y, and z values of 1, 0, and 0,<br />
respectively. Click OK.<br />
12 Press Ctrl+A to select all the geometry objects.<br />
13 From the Draw toolbar choose Create Composite Object. Clear the Keep interior<br />
boundaries check box, then click OK.<br />
MICROMIXER | 247
This completes the geometry-modeling stage. The resulting geometry should look like<br />
that in the figure below.<br />
Model geometry.<br />
Importing the Geometry from a CAD File<br />
If you followed the step-by-step instructions for how to generate the geometry, skip<br />
this section and proceed to “Physics Settings—Incompressible Navier-Stokes” below.<br />
To import the model geometry CAD file follow these steps:<br />
1 From the File menu select Import>CAD Data From File.<br />
2 In the Import CAD Data From File dialog box, browse to the folder models/<br />
<strong>COMSOL</strong>_Multiphysics/Fluid_Dynamics in the <strong>COMSOL</strong> installation directory.<br />
3 Select the file micromixer.mphbin, then click Import.<br />
PHYSICS SETTINGS—INCOMPRESSIBLE NAVIER-STOKES<br />
Boundary Conditions<br />
1 From the Multiphysics menu select 1 Incompressible Navier-Stokes (ns).<br />
248 | CHAPTER 6: FLUID DYNAMICS MODELS
2 From the Physics menu open the Boundary Settings dialog box. Enter settings from<br />
the following table; when done, click OK.<br />
SETTINGS BOUNDARY 1 BOUNDARY 136 ALL OTHERS<br />
Boundary type Inlet Outlet Wall<br />
Boundary condition Velocity Pressure, no viscous<br />
stress<br />
No slip<br />
u0 (9/4)*U_mean*16*s1*<br />
(1-s1)*s2*(1-s2)<br />
- -<br />
v0 0 - -<br />
w0 0 - -<br />
p0 - 0 -<br />
Subdomain Settings<br />
1 Select the menu item Physics>Subdomain Settings.<br />
2 Select Subdomain 1. Set the Density to rho and the Dynamic viscosity to eta.<br />
3 Click the Init tab and then select Subdomain 1. Set the following initial conditions;<br />
when finished, click OK.<br />
VARIABLE VALUE<br />
u(t0) U_mean<br />
v(t0) 0<br />
w(t0) 0<br />
p(t0) 0<br />
PHYSICS SETTINGS—CONVECTION AND DIFFUSION<br />
Boundary Conditions<br />
1 From the Multiphysics menu select 2 Convection and Diffusion (cd).<br />
2 Select the menu item Physics>Boundary Settings. Enter the following settings; when<br />
done, click OK.<br />
SETTINGS BOUNDARY 1 BOUNDARY 136 ALL OTHERS<br />
Type Concentration Convective flux Insulation/Symmetry<br />
c0 c0*(z
2 Select all the subdomains, then enter coefficients from the following table:<br />
NAME EXPRESSION<br />
D (isotropic) D<br />
R 0<br />
u u<br />
v v<br />
w w<br />
3 Click the Artificial Diffusion button. In the resulting dialog box, select the Streamline<br />
diffusion check box. Click OK.<br />
4 Click the Init tab. In the c(t 0 ) edit field enter c0.<br />
5 Click OK.<br />
MESH GENERATION<br />
1 From the Mesh menu select Free Mesh Parameters.<br />
2 Click the Custom mesh size button and enter 3e-4 in the Maximum element size edit<br />
field.<br />
3 Click Remesh, then click OK.<br />
COMPUTING THE SOLUTION<br />
Because the fluid’s properties do not change with concentration, this example solves<br />
the Navier-Stokes equations independently.<br />
1 Click the Solver Manager button on the Main toolbar.<br />
2 Go to the Solve For page. Select Incompressible Navier-Stokes (ns), then click OK.<br />
3 Click the Solver Parameters button on the Main toolbar.<br />
4 On the General page, select Geometric multigrid from the Linear system solver list and<br />
then click OK. This also sets up the Vanka smoother with pressure as the Vanka<br />
variable.<br />
5 Click the Solve button on the Main toolbar to calculate the flow field.<br />
Solving the Mass Balance<br />
With the flow field computed, it is time to turn to the mass balance equation. The<br />
example solves the mass balance on a finer mesh so it can resolve the high gradients in<br />
the interface between the fluid layers.<br />
1 From the Mesh menu open the Free Mesh Parameters dialog box.<br />
250 | CHAPTER 6: FLUID DYNAMICS MODELS
2 Click the Custom mesh size button and in the Maximum element size edit field enter<br />
1.25e-4.<br />
3 Click Remesh, then click OK.<br />
Adjust the solver settings to solve for the mass balance:<br />
1 From the Solve menu open the Solver Manager dialog box.<br />
2 Click the Solve For tab. Select Convection and Diffusion (cd).<br />
3 Click the Initial Value tab, then click the Store Solution button.<br />
4 In the Initial value area, click the Stored solution option button. Click OK.<br />
5 From the Solve menu open the Solver Parameters dialog box.<br />
6 From the Linear system solver list, choose BiCGStab. Click OK. The BiCGStab solver<br />
is slightly more memory-efficient than GMRES, which is an alternative solver for<br />
large linear systems.<br />
7 Compute the final solution by clicking the Solve button on the Main toolbar.<br />
POSTPROCESSING AND VISUALIZATION<br />
Follow these instructions to reproduce the plot in Figure 6-12:<br />
1 From the Postprocessing menu open the Plot Parameters dialog box.<br />
2 On the General page, locate the Element refinement label, clear the Auto check box,<br />
then in the associated edit field enter 2.<br />
3 In the Plot type area clear the Slice check box and select the Boundary check box.<br />
4 Go to the Boundary page. In the Predefined quantities list select<br />
Convection and Diffusion (cd)>Concentration, c.<br />
5 Click OK.<br />
Finally calculate the mixing quality:<br />
1 From the Postprocessing menu open the Boundary Integration dialog box.<br />
2 Select Boundary 1 (the inlet), then in the Expression edit field enter (c-c0/2)^2.<br />
3 Click Apply to perform the integration. The result appears in the report log at the<br />
bottom of the user interface.<br />
4 Select Boundary 136 (the outlet). Click OK to perform the integration and close the<br />
dialog box.<br />
5 Dividing the outlet value by the inlet value gives a measure of the mixing quality.<br />
MICROMIXER | 251
Shock Tube<br />
Introduction<br />
Shock waves arise from sudden jumps in gas properties such as temperature or<br />
pressure. We generally associate shock waves with violent processes such as supersonic<br />
flight or explosion blasts. However, even the slow movement of a piston in a tube can<br />
create flows that eventually turn into shock waves due to the inherent dynamics of the<br />
conservation of mass, momentum, and energy.<br />
Discontinuities in flows were the topic of debate in the late 19th century, and even<br />
Lord Rayleigh at some point concluded they could not exist. What finally settled the<br />
issue was photographic evidence from a shock-tube experiment such as the one<br />
described here.<br />
A shock tube is a device for studying shock waves. Prior to starting an experiment, a<br />
diaphragm inside the tube blocks any flow. You then increase the pressure on one side,<br />
for example, by using a compressor, and start the flow by rupturing the diaphragm.<br />
The gas then expands down the other half of the tube. Through optical means you can<br />
observe the flow and model the action of shocks. A pressurized tube of this type can<br />
store substantial amounts of energy, allowing for the study of quite violent flows—<br />
albeit for only very short periods.<br />
Model Definition<br />
The effects of viscosity and heat conduction are small for the time scales of interest<br />
here. Therefore the Euler equations of gas dynamics define the flow as movement of a<br />
compressible inviscid gas in the tube according to<br />
where u is the velocity, ρ is the density, and p is the pressure.<br />
The speed of sound a in a polytropic gas is given by:<br />
252 | CHAPTER 6: FLUID DYNAMICS MODELS<br />
ρt + uρx + uxρ = 0<br />
p x<br />
ut + uu ----- x + = 0<br />
ρ<br />
pt upx a 2 + + ρux =<br />
0
a 2<br />
Here γ gives the ratio of specific heats at constant pressure to constant volume; for a<br />
diatomic gas such as air, γ is 7/5. Thus you can write the equations as<br />
Modeling in <strong>COMSOL</strong> Multiphysics<br />
A clever way to conserve on model development time and computational cost is to<br />
solve this problem in a 2D geometry, using the y-coordinate as time. To do so, set up<br />
a rectangular domain in the ranges –1.5 < x < 1.5 and 0 < y < 1. As initial conditions,<br />
use the following values:<br />
As these equations are numerically difficult to solve, stabilization with streamline<br />
diffusion facilitates convergence of the numerical scheme.<br />
To derive the streamline-diffusion contributions, create a test function by taking each<br />
of the original equations and replacing the first-order derivatives with the<br />
corresponding test functions. Multiply the results by δh and the original equations to<br />
obtain equations for the streamline-diffusion contributions<br />
=<br />
γ p<br />
--<br />
ρ<br />
0 = – ( ρt + uρx + ux ρ)<br />
p x<br />
0 = – ⎛ut+ uu -----<br />
⎝ x + ⎞<br />
ρ ⎠<br />
0 = – ( pt + upx + γ pux) ⎧<br />
⎪<br />
⎪<br />
⎪<br />
⎪<br />
⎨<br />
⎪<br />
⎪<br />
⎪<br />
⎪<br />
⎩<br />
u = 0<br />
ρ<br />
p<br />
⎧<br />
= ⎨<br />
⎩<br />
⎧<br />
= ⎨<br />
⎩<br />
2 x < 0<br />
1 x > 0<br />
2 x < 0<br />
1 x > 0<br />
δh ρ ˆ t uρ ˆ – ( + x + ûx ρ)<br />
( ρt+ uρx + ux ρ)<br />
p<br />
δh ût uûx<br />
ˆ ⎛ x<br />
+ + ----- ⎞<br />
px –<br />
⎛ut+ uu -----<br />
⎝ ρ ⎠<br />
x + ⎞<br />
⎝ ρ ⎠<br />
δh p ˆ t up ˆ –<br />
( + x + γ pûx)<br />
( pt + upx + γ pux) SHOCK TUBE | 253
The above equations denote test functions using the “hat” symbol. This streamline<br />
diffusion is of the Petrov-Galerkin type, which is one of the predefined types of<br />
artificial diffusion that you find, for example, in the Incompressible Navier-Stokes<br />
application mode.<br />
In the model, you enter the Euler equations using a general form PDE with three<br />
dependent variables for pressure, density, and velocity. Use a weak term to add the<br />
streamline diffusion.<br />
To resolve the shock wave, use the adaptive mesh generation in <strong>COMSOL</strong><br />
Multiphysics.<br />
Results<br />
The plots below show distance across the tube’s diaphragm on the horizontal axis and<br />
time along the vertical axis, where temperature and pressure are color coded. At t = 0<br />
you can see constant states on both sides of the membrane, which is centered at x = 0.<br />
Specifically, in Figure 6-13, pressure is high to the left and low to the right; in<br />
Figure 6-14, temperature is uniform throughout the tube.<br />
Figure 6-13: The pressure distribution in the shock tube. The y-axis represents time.<br />
254 | CHAPTER 6: FLUID DYNAMICS MODELS
Figure 6-14: The nondimensional temperature distribution. The y-axis represents time.<br />
The plots show the typical flow features of shock-tube problems. There are two<br />
possible types of jump solutions. At the time of a shock, all variables have jump<br />
discontinuities, and the second type of jump solution is a contact surface where<br />
pressure is continuous.<br />
This case shows a shock traveling right, a contact surface moving more slowly to the<br />
right, and finally an expansion fan receding to the left into the denser, undisturbed gas.<br />
Model Library path: <strong>COMSOL</strong>_Multiphysics/Fluid_Dynamics/shock_tube<br />
Modeling Using the Graphical User Interface<br />
MODEL NAVIGATOR<br />
1 In the Model Navigator, select 2D from the Space dimension list.<br />
2 Click the Multiphysics button.<br />
SHOCK TUBE | 255
3 Click the Add Geometry button.<br />
4 Keep 2D in the Space dimension list and type x time z in the Independent variables<br />
edit field.<br />
5 Click OK.<br />
6 In the <strong>COMSOL</strong> Multiphysics>PDE Modes folder, select PDE, General Form.<br />
7 Type rho u p in the Dependent variables edit field.<br />
8 Click Add and then click OK.<br />
OPTIONS AND SETTINGS<br />
1 From the Options menu, choose Constants.<br />
2 In the Constants dialog box, define the following constants with names and<br />
expressions:<br />
NAME EXPRESSION<br />
gamma 1.4<br />
delta 1<br />
3 Click OK.<br />
4 From the Options menu, choose Axes/Grid Settings.<br />
5 Enter axis settings:<br />
AXIS<br />
x min -1.5<br />
x max 1.5<br />
time min -0.5<br />
time max 1.5<br />
6 Click OK.<br />
GEOMETRY MODELING<br />
1 Click the Rectangle/Square button in the Draw toolbar.<br />
2 Draw a rectangle with opposite corners in the points(−1.5, 0) and (1.5, 1).<br />
PHYSICS SETTINGS<br />
Expression Variables<br />
1 On the Options menu, point to Expressions and then click Subdomain Expressions.<br />
256 | CHAPTER 6: FLUID DYNAMICS MODELS
2 Select Subdomain 1 and enter the following expression variables:<br />
PROPERTY VALUE<br />
F1 -(rhotime+u*rhox+rho*ux)<br />
F2 -(utime+u*ux+px/rho)<br />
F3 -(ptime+u*px+gamma*p*ux)<br />
3 Click OK.<br />
Boundary Conditions<br />
1 From the Physics menu, choose Boundary Settings.<br />
2 In the Boundary Settings dialog box, enter the following settings:<br />
SETTINGS BOUNDARIES 1, 4 BOUNDARY 2 BOUNDARY 3<br />
G(1) 0 0 0<br />
G(2) 0 0 0<br />
G(3) 0 0 0<br />
R(1) 0 (x
3 Click the Init tab and set the following initial conditions:<br />
PROPERTY VALUE<br />
rho(t0 ) 1<br />
u(t0 ) 0<br />
p(t0 ) 1<br />
4 Click the Weak tab.<br />
5 In the weak edit field, type the following streamline diffusion contributions as one<br />
single line, separating each contribution with a space:<br />
258 | CHAPTER 6: FLUID DYNAMICS MODELS<br />
delta*h*(rhotime_test+u*rhox_test+rho*ux_test)*F1<br />
delta*h*(utime_test+u*ux_test+px_test/rho)*F2<br />
delta*h*(ptime_test+u*px_test+gamma*p*ux_test)*F3<br />
6 Click OK.<br />
MESH GENERATION<br />
Click the Initialize Mesh button on the Main toolbar.<br />
COMPUTING THE SOLUTION<br />
1 From the Solve menu, choose Solver Parameters.<br />
2 Select the Adaptive mesh refinement check box.<br />
3 Click the Advanced tab.<br />
4 In the Scaling of variables area, select None in the Type of scaling list.<br />
5 Click OK.<br />
6 Click the Solve button on the Main toolbar.<br />
POSTPROCESSING AND VISUALIZATION<br />
1 Open the Plot Parameters dialog box.<br />
2 On the Surface page, visualize the pressure by selecting PDE, General Form (g)>p from<br />
the Predefined quantities list on the Surface Data page.<br />
3 Click Apply.<br />
This generates the plot in Figure 6-13.<br />
4 Similarly, to visualize the nondimensional temperature, type p/rho in the Expression<br />
edit field on the Surface Data page.<br />
5 Click OK.<br />
This closes the Plot Parameters dialog box and generates the plot in Figure 6-14.
Sloshing Tank<br />
Introduction<br />
This 2D model demonstrates the ability of <strong>COMSOL</strong> Multiphysics to simulate<br />
dynamic free surface flow with the help of a moving mesh. The study models fluid<br />
motion with the incompressible Navier-Stokes equations. The fluid is initially at rest in<br />
a rectangular tank. The motion is driven by the gravity vector swinging back and forth,<br />
pointing up to 4 degrees away from the downward y direction at its extremes.<br />
Figure 6-15: Snapshots of the velocity field at t = 1 s, t = 1.2 s, t = 1.4 s, and t = 1.6 s. The<br />
inclination of the gravity vector is indicated by the leaning of the tank.<br />
Because the surface of the fluid is free to move, this model is a nonstandard<br />
computational task. The ALE (arbitrary Lagrangian-Eulerian) technique is, however,<br />
well suited for addressing such problems. Not only is it easy to set up using the Moving<br />
Mesh (ALE) application mode in <strong>COMSOL</strong> Multiphysics, but it also has the<br />
advantage that it represents the free surface boundary with a domain boundary on the<br />
moving mesh. This allows for the accurate evaluation of surface properties such as<br />
SLOSHING TANK | 259
curvature, making surface tension analysis possible. Note, however, that this example<br />
model neglects surface tension effects.<br />
Model Definition<br />
DOMAIN EQUATIONS<br />
This model describes the fluid dynamics with the incompressible Navier-Stokes<br />
equations:<br />
where ρ is the density, u = (u, v) is the fluid velocity, p is the pressure, I is the unit<br />
diagonal matrix, η is the viscosity, and F is the volume force. In this example model,<br />
the material properties are for glycerol: η = 1.49 Pa·s, and ρ = 1.27·10 3 kg/m 3 . The<br />
gravity vector enters the force term as<br />
where g = 9.81 m/s 2 , φmax = 4π ⁄ 180 , and f = 1 Hz.<br />
With the help of the Moving Mesh (ALE) application mode, you can solve these<br />
equations on a freely moving deformed mesh, which constitutes the fluid domain. The<br />
deformation of this mesh relative to the initial shape of the domain is computed using<br />
Winslow smoothing. For more information, please refer to “The Moving Mesh<br />
Application Mode” on page 455 in the <strong>COMSOL</strong> Multiphysics Modeling Guide.<br />
<strong>COMSOL</strong> Multiphysics takes care of the transformation of the Navier-Stokes<br />
equations to the formulation on the moving mesh.<br />
BOUNDARY CONDITIONS FOR THE FLUID<br />
There are two types of boundaries in the model domain. Three solid walls, that are<br />
modeled with slip conditions, and one free boundary (the top boundary). The slip<br />
boundary condition for the Navier-Stokes equations is<br />
where n = (n x , n y ) T is the boundary normal. To enforce this boundary condition,<br />
select the Symmetry boundary type in the Incompressible Navier-Stokes application<br />
260 | CHAPTER 6: FLUID DYNAMICS MODELS<br />
∂u T<br />
ρ + ρu ⋅ ∇u<br />
– ∇ ⋅ ( – pI + η∇u ( + ( ∇u)<br />
) )<br />
∂t<br />
= F<br />
∇ ⋅ u = 0<br />
Fx = ρg sin(<br />
φmaxsin( 2πft)<br />
)<br />
= – ρg<br />
cos(<br />
φmaxsin( 2πft)<br />
)<br />
F y<br />
u⋅n =<br />
0
mode. Because the normal vector depends on the degrees of freedom for the moving<br />
mesh, a constraint force would act not only on the fluid equations but also on the<br />
moving mesh equations. This effect would not be correct, and one remedy is to use<br />
non-ideal weak constraints. Ideal weak constraints (the other type of weak constraints)<br />
do not remove this effect of the constraint force. For more information about weak<br />
constraints, see “Using Weak Constraints” on page 350 in the <strong>COMSOL</strong> Multiphysics<br />
Modeling Guide. The Incompressible Navier-Stokes application mode does not make<br />
use of weak constraints by default, so you need to activate the non-ideal weak<br />
constraints.<br />
The following weak expression, which you add to the model, enforces the slip<br />
boundary condition without a constraint force acting on the moving mesh equations:<br />
λ ˆ ( u⋅n) – λ( û ⋅ n)<br />
for some Lagrange multiplier variable λ. Here λ and u denote test functions. See the<br />
step-by-step instructions later in this model documentation for details.<br />
The fluid is free to move on the top boundary. The stress in the surrounding<br />
environment is neglected. Therefore the stress continuity condition on the free<br />
boundary reads<br />
– pI η ∇u ( ∇u)<br />
T<br />
( + ( + ) ) ⋅ n = – p0n where p 0 is the surrounding (constant) pressure and η the viscosity of the fluid.<br />
Without loss of generality, p 0 = 0 for this model.<br />
BOUNDARY CONDITIONS FOR THE MESH<br />
(6-9)<br />
In order to follow the motion of the fluid with the moving mesh, it is necessary to (at<br />
least) couple the mesh motion to the fluid motion normal to the surface. It turns out<br />
that for this type of free surface motion, it is important to not couple the mesh motion<br />
to the fluid motion in the tangential direction. If you would do so, the mesh soon<br />
becomes so deformed that the solution no longer converges. The boundary condition<br />
for the mesh equations on the free surface is therefore<br />
( xt, yt) T ⋅ n =<br />
u⋅n where n is the boundary normal and (x t , y t ) T the velocity of mesh (see “Mathematical<br />
Description of the Mesh Movement” on page 446 in the <strong>COMSOL</strong> Multiphysics<br />
Modeling Guide). In the Moving Mesh (ALE) application mode, you specify this<br />
boundary condition by selecting the tangent and normal coordinate system in the<br />
SLOSHING TANK | 261
deformed mesh and by specifying a mesh velocity in the normal direction, where you<br />
enter the right-hand side expression from above as u*nx+v*ny. The Moving Mesh<br />
(ALE) application mode uses non-ideal weak constraints by default, and for this<br />
boundary condition it adds the weak expression<br />
to ensure that there are no constraint forces acting on the fluid equations. Here again,<br />
λ denotes some Lagrange multiplier variable (not the same as before) and λ, x, and y<br />
denote test functions. There is no need to modify this expression. Choose<br />
Physics>Equation System>Boundary Settings and select the free boundary (boundary 3)<br />
to see how to enter this expression in <strong>COMSOL</strong> Multiphysics. The expression implies<br />
that there is a flux (or force) on the free boundary for the moving mesh coordinate<br />
equations ∇x ⋅ n = λnxand ∇y ⋅n= λny, respectively. Furthermore, to be able to<br />
follow the fluid motion with the mesh motion, the moving mesh must not be<br />
constrained in the tangential direction on the side walls. In the Moving Mesh (ALE)<br />
application mode, you specify this boundary condition by using the global coordinate<br />
system and setting the mesh displacement to zero in the x direction. At the bottom of<br />
the tank the mesh is fixed, which you obtain in a similar way by setting the mesh<br />
displacements to zero in both the x and y directions.<br />
Results<br />
Figure 6-16 below and Figure 6-15 on page 259 show the tank at a few different<br />
points in time. The colors represent the velocity field. Whereas you set up the model<br />
using a fixed tank and a swinging gravity vector, deformation plots enable you to give<br />
the tank an inclination at the postprocessing stage. The inclination angle of the tank is<br />
exactly the same as the angle of the gravity vector from its initial vertical position.<br />
262 | CHAPTER 6: FLUID DYNAMICS MODELS<br />
λ ˆ<br />
( xt, yt) T ( ( – u)<br />
⋅ n)<br />
λ x ˆ y ˆ<br />
(,) T – ( ⋅ n)
Figure 6-16: Velocity field inside the tank at t = 6 s.<br />
To illustrate the dynamics in the tank, you can plot the wave height versus time at one<br />
of the vertical walls, as in the following plot.<br />
Figure 6-17: Wave height at X = 0.5 m for t ∈ [0, 6 s].<br />
SLOSHING TANK | 263
Model Library path: <strong>COMSOL</strong>_Multiphysics/Fluid_Dynamics/sloshing_tank<br />
Modeling Using the Graphical User Interface<br />
1 Start <strong>COMSOL</strong> Multiphysics.<br />
2 In the Model Navigator, click the Multiphysics button.<br />
3 Select 2D from the Space dimension list.<br />
4 Select <strong>COMSOL</strong> Multiphysics>Deformed Mesh>Moving Mesh (ALE)>Transient analysis<br />
and click Add.<br />
5 Click the Application Mode Properties button.<br />
6 Select Winslow from the Smoothing method list. Click OK.<br />
7 Select <strong>COMSOL</strong> Multiphysics>Fluid Dynamics>Incompressible Navier-Stokes>Transient<br />
analysis and click Add.<br />
8 Click OK.<br />
GEOMETRY MODELING<br />
1 Shift-click the Rectangle/Square button in the Draw toolbar.<br />
2 Specify the rectangle settings according to the table below.<br />
PROPERTY EXPRESSION<br />
Width 1<br />
Height 0.3<br />
Position: Base Corner<br />
Position: X -0.5<br />
Position: Y 0<br />
3 Click OK to close the Rectangle dialog box.<br />
4 Click the Zoom Extents button on the Main toolbar.<br />
264 | CHAPTER 6: FLUID DYNAMICS MODELS
OPTIONS AND SETTINGS<br />
1 Open the Constants dialog box from the Options menu and enter the following<br />
constants. The descriptions are optional. When done, click OK.<br />
NAME EXPRESSION DESCRIPTION<br />
rho 1270[kg/m^3] Glycerol density<br />
nu 1.49[Pa*s] Glycerol viscosity<br />
phi_max (4*pi/180)[rad] Maximum angle of inclination<br />
freq 1[Hz] Frequency<br />
g 9.81[m/s^2] Acceleration due to gravity<br />
2 From the Options menu, choose Expressions>Scalar Expressions.<br />
3 Enter the following scalar variables with names, expressions, and descriptions (the<br />
descriptions are optional); when done, click OK.<br />
NAME EXPRESSION DESCRIPTION<br />
phi phi_max*sin(2*pi*freq*t) Angle of inclination<br />
grav_x g*sin(phi) Gravity vector x component<br />
grav_y -g*cos(phi) Gravity vector y component<br />
PHYSICS SETTINGS<br />
Properties<br />
1 In the Incompressible Navier-Stokes application mode, choose Properties from the<br />
Physics menu.<br />
2 In the Application Mode Properties dialog box, select On from the Weak constraints<br />
list and Non-ideal from the Constraint type list; then click OK.<br />
Subdomain Settings<br />
Open the Subdomain Settings dialog box and apply the settings in the table below.<br />
SETTINGS SUBDOMAIN 1<br />
ρ rho<br />
η nu<br />
Fx grav_x*rho<br />
Fy grav_y*rho<br />
SLOSHING TANK | 265
Boundary Conditions<br />
1 Open the Boundary Settings dialog box from the Physics menu and enter boundary<br />
conditions according to the table below. When done, click OK.<br />
SETTINGS BOUNDARIES 1, 2, 4 BOUNDARY 3<br />
Boundary type Wall Open boundary<br />
Boundary condition Slip Normal stress<br />
f0 0<br />
2 Go to the Multiphysics menu and select Moving Mesh (ALE) (ale).<br />
3 In the Boundary Settings dialog box, apply the following boundary conditions for the<br />
mesh displacements (only tangential movements on the sides and a fixed mesh at the<br />
bottom):<br />
SETTINGS BOUNDARIES 1, 4 BOUNDARY 2<br />
dx 0 0<br />
dy 0<br />
4 On Boundary 3, select Tangent and normal coord. sys. in deformed mesh in the<br />
Coordinate system list. Then click the Mesh velocity button and type u*nx+v*ny in<br />
the vn edit field to specify the normal mesh velocity as u · n.<br />
5 On the Weak Constr. tab of the Boundary Settings dialog box, clear the Use weak<br />
constraints check box on Boundaries 1, 2, and 4. The strong constraints that you<br />
specified in the previous step are sufficient on these boundaries. Leave the Use weak<br />
constraints check box selected on Boundary 3.<br />
6 Click OK to close the dialog box.<br />
MESH GENERATION<br />
Click the Initialize Mesh button on the Main toolbar to initialize the mesh.<br />
COMPUTING THE SOLUTION<br />
1 Open the Solver Parameters dialog box from the Solve menu.<br />
2 Enter range(0,0.1,6) in the Times edit field on the General page.<br />
3 Type 0.001 in the Relative tolerance edit field. This provides a 0.1% relative<br />
tolerance, which is one order of magnitude less than the default value.<br />
4 Click the Time Stepping tab.<br />
5 Select Exclude algebraic from the Error estimation strategy list. This excludes the<br />
pressure and the moving mesh variables from the error estimation. The equations<br />
266 | CHAPTER 6: FLUID DYNAMICS MODELS
for those variables do not include time derivatives and become algebraic when<br />
solving the equation system using the method of lines.<br />
6 Click OK.<br />
7 Click the Solve button on the Main toolbar.<br />
POSTPROCESSING AND VISUALIZATION<br />
The default plot shows the x-component of the moving mesh deformation, in the<br />
spatial frame.<br />
1 To plot the velocity field of the glycerol instead, go to the Surface tab in the Plot<br />
Parameters dialog box and select Incompressible Navier-Stokes (ns)>Velocity field<br />
from the list of expressions.<br />
2 On the General page, clear the Geometry edges check box. Click Apply to see the plot<br />
and use the Solution at time list on the General tab to browse through the output<br />
times.<br />
You can visualize the tank’s inclination by clever use of the deformation plot feature:<br />
3 On the Deform page, select the Deformed shape plot check box and set the Scale factor<br />
to 1. Enter Y*sin(phi) in the X component edit field and -X*sin(phi) in the Y<br />
component edit field on the Subdomain Data tab.<br />
4 Still on the Deform page, click the Boundary Data tab. Once again, enter Y*sin(phi)<br />
in the X component edit field and -X*sin(phi) in the Y component edit field.<br />
5 On the Boundary tab, select the Boundary plot check box. Enter 1 in the Expression<br />
edit field. Select to use a Uniform color and pick a black color using the Color button.<br />
6 To get a more liquid-looking plot, you may want to go to the Surface page and set<br />
the Color table to GrayScale.<br />
7 Click Apply to see the plot.<br />
8 To see the waves in action, go to the Animate page, click Start Animation, and then<br />
click OK.<br />
To get a more comprehensive overview of the sloshing, you can plot the<br />
y-displacement from equilibrium in a point:<br />
1 Open the Domain Plot Parameters dialog box from the Postprocessing menu.<br />
2 On the Point tab, select Point 4 from the Point selection list.<br />
3 Enter dy_ale in the Expression edit field, then click OK to see the plot.<br />
SLOSHING TANK | 267
268 | CHAPTER 6: FLUID DYNAMICS MODELS
7<br />
Geophysics Models<br />
This chapter presents models of geophysics applications such as groundwater flow,<br />
contaminant transport, and the flow of fluids in rock fractures. You will find many<br />
more models and specialized application modes in the Earth Science Module.<br />
269
Groundwater Flow and Solute<br />
Transport<br />
Introduction<br />
270 | CHAPTER 7: GEOPHYSICS MODELS<br />
This model demonstrates the application of <strong>COMSOL</strong> Multiphysics to a benchmark<br />
case of steady-state subsurface fluid flow and transient solute transport along a vertical<br />
cross section in an unconfined aquifer. Because of profound geologic heterogeneity,<br />
the model must estimate solute transport subject to highly irregular flow conditions<br />
with strong anisotropic dispersion. Van der Heijde (Ref. 1) classifies this case as<br />
“Level 2,” with enough potentially difficult parameter combinations to test a code’s<br />
ability to tackle realistic hydrologic situations. Sudicky (Ref. 2) developed this problem<br />
to demonstrate a Laplace transform Galerkin code. This problem subsequently has<br />
been used to evaluate other flow and transport models, including MT3DMS by Zheng<br />
and Wang (Ref. 3).<br />
This model makes use of several useful <strong>COMSOL</strong> Multiphysics features:<br />
Multiphysics coupling between fluid flow and solute transport<br />
Freely defined equations using the PDE, Coefficient Form application mode<br />
Upper boundary is water table with time-dependent solute source<br />
Incorporation of subsurface geological heterogeneity<br />
Customized expressions used to create anisotropic dispersion tensor<br />
Model Definition<br />
The hydrologic setting for this problem is described in Figure 7-1 (a) (see Ref. 2), for<br />
groundwater flow at steady state. The aquifer is composed largely of fine-grained silty<br />
sand of hydraulic conductivity K 1 = 5·10 −4 cm/s, equivalent to K 1 = 5·10 −6 m/s,<br />
with lenses of relatively course material of hydraulic conductivity K 2 = 1·10 −2 cm/s,<br />
equivalent to K 2 = 1·10 −4 m/s. Generally, groundwater moves from the upper surface<br />
of the saturated zone, the water table, to the outlet at x = 250 m. The water table is a<br />
free surface, that is, fluid pressure equals zero, across which there is vertical recharge,<br />
denoted by R, of 10 cm/yr equivalent to 3.215·10 −9 m/s. The groundwater divide, a<br />
line of symmetry, occurs at x = 0. The base of the aquifer is impermeable.
Figure 7-1 (b) shows conditions related to solute transport. The aquifer initially is<br />
pristine, and concentrations equal zero. For the first five years, a relative concentration<br />
of 1.0 is loaded over the interval 40 m < x < 80 m at the water table. The solute source<br />
is removed in year 5, and the concentration along this segment immediately drops to<br />
zero. The contaminant migrates within the aquifer via advection and dispersion.<br />
Throughout the domain, porosity, denoted by n, is 0.35, the longitudinal dispersivity,<br />
α L , and transverse vertical dispersivity, α T , are 0.5 m and 0.005 m, respectively, and the<br />
effective molecular diffusion coefficient, D m, is 1.34·10 −5 cm 2 /s, equivalent to<br />
1.34·10 −9 m 2 /s.<br />
Figure 7-1: Definition of the flow-field problem (a) and the transport-of-solute problem<br />
(b).<br />
FLUID FLOW: DOMAIN EQUATIONS AND BOUNDARY CONDITIONS<br />
Governing equations for fluid flow and solute transport were specified in separate<br />
PDE, Coefficient Form application modes in <strong>COMSOL</strong> Multiphysics.<br />
Steady groundwater flow generally is expressed with a conservation equation built with<br />
Darcy’s law (Ref. 4, Ref. 5):<br />
(a)<br />
(b)<br />
GROUNDWATER FLOW AND SOLUTE TRANSPORT | 271
272 | CHAPTER 7: GEOPHYSICS MODELS<br />
∇ ⋅ ( K∇h) + R = 0<br />
where K is hydraulic conductivity (L/T); x i is spatial distance in direction i (L); R is<br />
the volumetric rate of recharge to water table per unit volume of aquifer (T −1 ), and<br />
the dependent variable h is hydraulic head (L). Hydraulic head, a function of pressure<br />
and gravitational potential, is defined<br />
h = hp+ y<br />
(7-1)<br />
where h p is pressure head (L); and y is elevation (L). Equation 7-1 states the driving<br />
force for groundwater flow at field scales is h. For any given water particle, h equals<br />
the height of the water column h p above the particle plus the particle’s elevation y. It<br />
should be pointed out here that y is the name assigned to the independent variable x i<br />
for the vertical direction.<br />
The equations for groundwater flow and solute transport are linked by the average<br />
linear velocity v, or seepage velocity:<br />
(7-2)<br />
where n is porosity (L 3 /L 3 ), or the fraction of the aquifer containing water. n appears<br />
in the denominator of Equation 7-2 because only a portion of a given aquifer block is<br />
available for flow.<br />
The boundary conditions for the groundwater flow problem are shown in Figure 7-1<br />
(a) and stated below. A zero flux Neumann condition represents the symmetry<br />
boundary at x = 0 m and the impermeable boundary at y = 0 m as follows:<br />
Hydraulic head is specified at x = 250 m with a Dirichlet condition:<br />
v i<br />
∂h<br />
∂x<br />
x = 0<br />
K∂h<br />
= –<br />
n ∂<br />
--- xi<br />
∂h<br />
= = 0<br />
∂y<br />
y = 0<br />
hxt ( , ) = h0 Representing the water table is slightly more complicated. A Neumann boundary is<br />
used to model the known recharge:<br />
∂h<br />
– K =<br />
R<br />
∂y
Specifying that this flux is entirely vertical requires multiplication by the y component<br />
of the normal vector n in <strong>COMSOL</strong> Multiphysics.<br />
An important advantage of specifying a flux condition on the water table is the<br />
opportunity to fine tune the model setup. If the flow problem is well posed, h naturally<br />
equals y at the water table, because h p is zero (that is, atmospheric pressure) at a free<br />
surface. In this model, the water table geometry is first determined by educated guess<br />
and is fine tuned manually in successive simulations until there is a good match<br />
between elevations and hydraulic head predictions on the boundary (Ref. 2).<br />
SOLUTE TRANSPORT: DOMAIN EQUATIONS, BOUNDARY CONDITIONS,<br />
AND INITIAL CONDITIONS<br />
Solute transport typically is time dependent for geologic problems and is described<br />
with the advection-dispersion equation (Ref. 4, Ref. 5):<br />
∂ ⎛ ∂C<br />
Dij + viC⎞ =<br />
∂x<br />
⎝ ∂xj<br />
⎠<br />
i<br />
where D ij is the hydrodynamic dispersion tensor (L 2 /T); C is the dissolved<br />
concentration (M/L 3 ); v i is the average linear velocity (defined above); and t is time.<br />
The dispersion tensor defines solute spreading by mechanical mixing and molecular<br />
diffusion. Equations for the tensor entries are:<br />
where Dii are the principal components of the dispersion tensor (L 2 /T); Dij , Dji are<br />
the cross terms of the dispersion tensor (L 2 /T); the subscript L denotes longitudinal<br />
dispersivity (L); the subscript T denotes transverse dispersivity (L); is<br />
the magnitude of the velocity vector (L/T); and D* represents effective molecular<br />
diffusion Dm in saturated porous media, (L 2 2 2<br />
v =<br />
vx+ vy /T), where D* < Dm
274 | CHAPTER 7: GEOPHYSICS MODELS<br />
where the relative concentration C 0 is 1.0 through year 5 (t 0 ). After the solute source<br />
is removed, the concentration along this segment drops to zero. This model<br />
implements the time dependence of the source using a logical expression (a logical and<br />
function) in the <strong>COMSOL</strong> Multiphysics boundary settings.<br />
The Dirichlet condition at the left boundary is<br />
A Neumann condition is needed for the zero gradient boundaries:<br />
Finally, the initial condition specifies that the aquifer is pristine, when<br />
Results and Discussion<br />
⎧C0<br />
, 0 < t< t0 C = ⎨<br />
⎩0,<br />
t > t0 ∂h<br />
∂x<br />
x = 250<br />
C( 0, yt , ) = 0<br />
∂h<br />
= = 0<br />
∂y<br />
y = 0<br />
Cxy0 ( , , ) =<br />
0<br />
FLUID FLOW<br />
Figure 7-2 provides hydraulic heads estimated with the <strong>COMSOL</strong> Multiphysics<br />
steady-state groundwater flow simulation. The hydraulic heads and streamlines shown<br />
in Figure 7-2 correspond nicely to the benchmark results provided by Sudicky (Ref.<br />
2). The slight differences between the two plots are attributable to meshing: the mesh<br />
size varies naturally with the geometry.<br />
The water table geometry determined for the simulation (see Figure 7-2) nearly<br />
duplicates the benchmark geometry obtained in Ref. 2. The good match between the<br />
flow fields is expected because the initial water table geometry used with <strong>COMSOL</strong><br />
Multiphysics was designed to closely resemble the benchmark geometry. In the<br />
simulations reported here, therefore, only nuances of geometry were resolved through<br />
iteration. Figure 7-3 provides residuals from the geometry fitting; that is, the fractional
difference between h and y along the final water table boundary. As Figure 7-3<br />
illustrates, the error in the geometry settings is 1% or less.<br />
Figure 7-2: <strong>COMSOL</strong> Multiphysics estimates of hydraulic head and flow lines. The<br />
solution reproduces the results in Ref. 2.<br />
Figure 7-3: Fractional error in water table geometry computed using hydraulic head<br />
predicted by <strong>COMSOL</strong> Multiphysics, H, and water table elevation, y.<br />
GROUNDWATER FLOW AND SOLUTE TRANSPORT | 275
SOLUTE TRANSPORT<br />
276 | CHAPTER 7: GEOPHYSICS MODELS<br />
Solute transport solutions from the model are almost identical to the ones presented<br />
in Ref. 2. This is clearly shown in the contour intervals for three times in Figure 7-4.<br />
The minor variation between the <strong>COMSOL</strong> Multiphysics and benchmark solutions<br />
results from different mesh densities. In 1989, Sudicky concluded that the results<br />
illustrated in Ref. 2 are relatively free of numerical dispersion, as the low concentration<br />
contours closely follow the flow pattern. The surface plot for <strong>COMSOL</strong> also displays<br />
this property, in that even the lowest concentrations in Figure 7-4 still follow the<br />
irregular flow lines of Figure 7-2.<br />
Figure 7-4: Plume concentrations calculated with <strong>COMSOL</strong> Multiphysics at three times:<br />
(a) t = 8 years, (b) t = 12 years, and (c) t = 20 years.<br />
(a)<br />
(b)<br />
(c)
The results from this model show that <strong>COMSOL</strong> Multiphysics is an effective tool for<br />
simulating fluid flow and solute transport in the heterogeneous porous media and<br />
highly irregular flow fields that are common to field scale applications.<br />
References<br />
1. P.K.M. van der Heijde, “Model Testing: A Functionality Analysis, Performance<br />
Evaluation, and Applicability Assessment Protocol,” Groundwater Models for<br />
Resources Analysis and Management, A.I. El-Kadi (ed.), CRC Press, Lewis<br />
Publishers, Boca Raton, FL, pp. 39–58, 1995.<br />
2. E.A. Sudicky, “The Laplace transform Galerkin technique: application to mass<br />
transport in groundwater,” Water Resour. Res., vol. 25, no. 8, pp. 1833–1846, 1989.<br />
3. C. Zheng and P. Wang, MT3DMS: A Modular Three-Dimensional Multispecies<br />
Transport Model for Simulation of Advection, Dispersion and Chemical Reactions<br />
of Contaminants in Groundwater Systems, University of Alabama, 239 pp, 1998.<br />
4. J. Bear, Dynamics of Fluids in Porous Media, Elsevier Scientific Publishing<br />
Company, 764 pp, 1972.<br />
5. J. Bear, Hydraulics of Groundwater, McGraw-Hill, New York, 210 pp, 1979.<br />
Model Library path: <strong>COMSOL</strong>_Multiphysics/Geophysics/groundwater_flow<br />
Modeling Using the Graphical User Interface<br />
1 Start <strong>COMSOL</strong> Multiphysics.<br />
2 In the Model Navigator click the Multiphysics button.<br />
3 Select <strong>COMSOL</strong> Multiphysics>PDE Modes>PDE, Coefficient Form and type H in the<br />
Dependent variables edit field.<br />
4 Click the Add button.<br />
5 Select PDE, Coefficient Form again.<br />
6 Change the name of the dependent variable to C in the Dependent variables edit field.<br />
7 Click the Add button.<br />
8 Click OK.<br />
GROUNDWATER FLOW AND SOLUTE TRANSPORT | 277
GEOMETRY MODELING<br />
278 | CHAPTER 7: GEOPHYSICS MODELS<br />
1 Shift-click the Line button on the Draw toolbar on the left.<br />
2 In the Line dialog box, enter the following data; when done, click OK.<br />
PROPERTY EXPRESSION<br />
X 0 250 250 180 155 127 80 0<br />
Y 0 0 5.35 5.575 6.045 6.455 6.603 6.645<br />
Style Closed polyline (solid)<br />
3 Double-click the EQUAL button on the status bar below the drawing area, to turn off<br />
the default “axis equal” setting. Click the Zoom Extents button on the Main toolbar.<br />
This way you make full use of the drawing area at the cost of losing the view of the<br />
geometry’s actual proportions.<br />
4 Shift-click the Rectangle/Square button on the Draw toolbar. In the Rectangle dialog<br />
box, specify the rectangle R1 according to the following table; when done, click OK.<br />
PROPERTY R1 R2<br />
Width 120 70<br />
Height 2 2<br />
Base Corner Corner<br />
x 0 180<br />
y 2 2<br />
5 Repeat the previous step for the rectangle R2.<br />
The model geometry is now complete, and should look like that in the figure below<br />
(press Ctrl+A to get the same view).<br />
Model geometry. Note the different scales on the horizontal and vertical axes.
OPTIONS AND SETTINGS<br />
1 From the Options menu, choose Constants.<br />
2 Define the following constants (the descriptions are optional):<br />
NAME EXPRESSION DESCRIPTION<br />
R 3.215e-9 Vertical recharge<br />
H_in 5.3486 Hydraulic head at right boundary<br />
K1 5e-6 Hydraulic conductivity, sand<br />
K2 0.0001 Hydraulic conductivity, lenses<br />
C_in 1 Relative concentration, solute source<br />
n 0.35 Porosity<br />
alpha_L 0.5 Longitudinal dispersivity<br />
alpha_T 0.005 Transverse vertical dispersivity<br />
D_m 1.34e-9 Effective molar diffusion coefficient<br />
3 Click OK.<br />
PHYSICS SETTINGS<br />
Subdomain Expressions<br />
1 On the Options menu, point to Expressions and then click Subdomain Expressions.<br />
2 Enter the following expressions in the Subdomain Expressions dialog box:<br />
NAME EXPRESSION IN SUBDOMAIN 1 EXPRESSION IN SUBDOMAIN 2 AND 3<br />
vx -K1*Hx/n -K2*Hx/n<br />
vy -K1*Hy/n -K2*Hy/n<br />
absv sqrt(vx^2+vy^2) sqrt(vx^2+vy^2)<br />
Dxx alpha_L*vx^2/<br />
absv+alpha_T*vy^2/absv+D_m<br />
Dyy alpha_L*vy^2/<br />
absv+alpha_T*vx^2/absv+D_m<br />
3 Click OK.<br />
Subdomain Settings—Darcy’s Law<br />
1 From the Multiphysics menu, choose 1 PDE, Coefficient Form (c).<br />
2 From the Physics menu, choose Subdomain Settings.<br />
alpha_L*vx^2/<br />
absv+alpha_T*vy^2/absv+D_m<br />
alpha_L*vy^2/<br />
absv+alpha_T*vx^2/absv+D_m<br />
Dxy (alpha_L-alpha_T)*vx*vy/absv (alpha_L-alpha_T)*vx*vy/absv<br />
3 Select Subdomain 1, then set c equal to -K1. All the other coefficients should be 0.<br />
GROUNDWATER FLOW AND SOLUTE TRANSPORT | 279
280 | CHAPTER 7: GEOPHYSICS MODELS<br />
4 Select Subdomains 2 and 3. Set c equal to -K2. All the other coefficients should be 0.<br />
5 Click OK.<br />
Boundary Conditions—Darcy’s Law<br />
1 From the Physics menu, choose Boundary Settings.<br />
2 Enter boundary conditions according to the following table; when done, click OK.<br />
SETTINGS BOUNDARIES1–3, 5 BOUNDARIES 7, 8, 10, 11, 15 BOUNDARIES 16–18<br />
Type Neumann boundary Neumann boundary Dirichlet boundary<br />
condition<br />
condition<br />
condition<br />
q 0 0<br />
g 0 -ny*R<br />
h 1<br />
r H_in<br />
Subdomain Settings—Advection-Dispersion Equation<br />
1 From the Multiphysics menu, choose 2 PDE, Coefficient Form (c2).<br />
2 From the Physics menu, open the Subdomain Settings dialog box.<br />
3 Select all subdomains, then enter coefficients according to the following table:<br />
COEFFICIENT VALUE<br />
c Dxx Dxy Dyy<br />
a 0<br />
f 0<br />
da 1<br />
α -vx -vy<br />
β 0 0<br />
γ 0 0<br />
4 Click OK.<br />
Boundary Conditions—Advection-Dispersion Equation<br />
1 From the Physics menu, choose Boundary Settings.
2 Enter boundary conditions according to the following table; when done, click OK.<br />
SETTINGS BOUNDARIES<br />
1, 3, 5, 8, 10, 11, 15<br />
Type Dirichlet<br />
boundary<br />
condition<br />
MESH GENERATION<br />
1 From the Mesh menu, select Free Mesh Parameters.<br />
2 On the Global page, select the Custom mesh size button.<br />
3 In the Resolution of narrow regions edit field, type 4 to specify the minimum number<br />
of mesh layers. For an elongated geometry like the one in this model, tuning this<br />
parameter is often an effective way to obtain a good mesh.<br />
4 Click Remesh.<br />
5 When the mesher has finished, click OK.<br />
COMPUTING THE SOLUTION<br />
1 Click the Solver Manager button on the Main toolbar.<br />
2 In the Solver Manager dialog box, click the Solve For tab.<br />
3 Select PDE, Coefficient Form (c), then click Solve.<br />
4 Select PDE, Coefficient Form (c2), then click OK.<br />
5 Open the Solver Parameters dialog box.<br />
6 From the Solver list, select Time dependent.<br />
7 In the Times edit field, type 360*86400*range(0,20). Click OK.<br />
8 Click the Restart button to compute a new solution.<br />
POSTPROCESSING AND VISUALIZATION<br />
Use the first sequence of commands to plot Figure 7-2 on page 275:<br />
1 From the Postprocessing menu, choose Plot Parameters.<br />
2 Click the Surface tab.<br />
BOUNDARY 2 BOUNDARY 7 BOUNDARIES<br />
16, 18<br />
Neumann<br />
boundary<br />
condition<br />
Dirichlet boundary<br />
condition<br />
Neumann<br />
boundary<br />
condition<br />
BOUNDARY 17<br />
Neumann<br />
boundary<br />
condition<br />
q 0 0 0<br />
g 0 K1*Hx/n*C K2*Hx/n*C<br />
h 1 1<br />
r 0 C_in*(40
282 | CHAPTER 7: GEOPHYSICS MODELS<br />
3 On the Surface Data page, select PDE, Coefficient Form (c)>H from the Predefined<br />
quantities list.<br />
4 Click the Streamline tab.<br />
5 Select the Streamline plot check box.<br />
6 On the Streamline Data page, select PDE, Coefficient Form (c)>grad(H) from the<br />
Predefined quantities list.<br />
7 Click the Specify start point coordinates button and enter the following values:<br />
x 15 30 45 60 75 90 130 145 160 175 190 205 220 235<br />
y 5 5 5 5 5 5 5 5 5 5 5 5 5 5<br />
8 Click the Line Color tab, then click the Color button. In the Streamline Color dialog<br />
box, select black and then click OK.<br />
9 Click the Advanced button. Set the Maximum number of integration steps to 40000,<br />
then click OK.<br />
10 Click OK to close the Plot Parameters dialog box and generate the plot.<br />
You can also plot the plume concentrations in Figure 7-4 on page 276:<br />
1 Open Plot Parameters dialog box again.<br />
2 Click the Surface tab and select PDE, Coefficient Form (c2)>C from the Predefined<br />
quantities list on the Surface Data page.<br />
3 Click the Contour tab and select PDE, Coefficient Form (c2)>C from the Predefined<br />
quantities list on the Contour Data page.<br />
4 In the Contour levels area, click the Vector with isolevels button and enter 0.05 0.1<br />
0.15 0.19 0.25 0.30 0.35 0.4 0.45 0.5 in the edit field.<br />
5 Click the General tab, select the Contour check box, and clear the Streamline check<br />
box. Click OK.<br />
6 To get a good view of the solution, double-click EQUAL on the status bar and then<br />
click the Zoom Extents button on the Main toolbar.<br />
To plot this concentration for a different time you can select the time you want in the<br />
Solution at time list on the General page in the Plot Parameters dialog box (for<br />
Figure 7-4 (a) select 2.48832e8, for Figure 7-4 (b) select 3.73248e8, and for Figure 7-4<br />
(c) select 6.2208e8, that is, the concentration after 8, 12, and 20 years).
A Rock Fracture Flow Model<br />
Introduction<br />
A potential flow model describing fluid movement in a rock fracture uses the Reynolds<br />
equation, also known as the “cubic law” equation<br />
which involves the following variables:<br />
Fluid density, ρ<br />
The gravitational constant, g<br />
The fluid’s dynamic viscosity, µ<br />
The fracture’s aperture or width, a(x, y)<br />
The scaled pressure, H = H(x, y), also called hydraulic head<br />
This model uses interpolation of aperture data defined in a text file.<br />
Model Definition<br />
ρg<br />
∇ ---------a<br />
12µ<br />
3 ⋅ ⎛<br />
⎝<br />
∇H⎞<br />
⎠<br />
= 0<br />
The definition of that last variable, hydraulic head is<br />
p<br />
H = z+<br />
-----ρg<br />
where z equals the height and p represents fluid pressure.<br />
After eliminating the constant factor in the diffusion coefficient, you end up with the<br />
equation<br />
∇ a 3 ⋅ ( ∇H)<br />
=<br />
0<br />
Notice that you cannot eliminate the aperture expression a 3 because this example<br />
assumes that a is a nonconstant function of x and y, and thus it falls under the influence<br />
of the divergence operator.<br />
A ROCK FRACTURE FLOW MODEL | 283
284 | CHAPTER 7: GEOPHYSICS MODELS<br />
Modeling in <strong>COMSOL</strong> Multiphysics<br />
<strong>COMSOL</strong> Multiphysics does not include an application mode for potential flow, but<br />
you can use the Diffusion application mode for this model; the PDE solved here is<br />
identical to the Reynolds equation. You must make one minor mental adjustment here:<br />
In the user interface the hydraulic head is referred to as the concentration. You can<br />
however rename the dependent variable as h when adding the application mode in the<br />
Model Navigator.<br />
The computational domain is rectangular and well inside the sampled aperture data<br />
matrix. Set a hydraulic head of 20 mm at the upper boundary and 0 mm at the lower<br />
boundary. This creates a pressure difference of 20 mm that drives the fluid flow. Both<br />
the left and right boundaries have insulation/symmetry boundary conditions.<br />
The <strong>COMSOL</strong> installation includes a text file, aperture_data.txt, containing the<br />
sample aperture data for this model in the form of a 100-by-100 matrix. This<br />
synthetically generated data set corresponds to an aperture with a fractal dimension of<br />
2.6. You import the aperture data to the <strong>COMSOL</strong> Multiphysics user interface by<br />
defining an interpolation function, which you then use as the aperture a in the<br />
cubic-law equation.
Results<br />
The plot in Figure 7-5 shows the flux using colored surface data and the hydraulic<br />
head as the z-coordinate (height).<br />
Figure 7-5: The flux and the hydraulic head.<br />
The plot in Figure 7-6 on page 286 provides a visualization of the aperture data.<br />
A ROCK FRACTURE FLOW MODEL | 285
286 | CHAPTER 7: GEOPHYSICS MODELS<br />
Figure 7-6: The interpolated aperture data shown as a combined surface and height plot.<br />
Model Library path: <strong>COMSOL</strong>_Multiphysics/Geophysics/rock_fracture<br />
Modeling Using the Graphical User Interface<br />
MODEL NAVIGATOR<br />
1 In the Model Navigator, select 2D in the Space dimension list.<br />
2 From the Application Modes tree, select <strong>COMSOL</strong> Multiphysics>Convection and<br />
Diffusion>Diffusion>Steady-state analysis.<br />
3 Change the entry in the Dependent variables edit field to H and the Application mode<br />
name to reynolds. Make sure Lagrange - Quadratic is selected in the Element list.<br />
4 Click OK.
OPTIONS AND SETTINGS<br />
Because the Diffusion application mode assumes that the dependent variable is a<br />
concentration, the units in the user interface will be incorrect for this model’s<br />
application. Therefore, begin by turning the unit system off.<br />
1 From the Physics menu, choose Model Settings.<br />
2 From the Base unit system list, select None.<br />
3 Click OK.<br />
Define the interpolation function for the aperture data:<br />
1 From the Options menu, choose Functions.<br />
2 In the Functions dialog box, click the New button.<br />
3 In the New Function dialog box, type aperture in the Function name edit field.<br />
4 Click Interpolation and select File in the Use data from list.<br />
5 Click Browse and browse to /models/<strong>COMSOL</strong>_Multiphysics/Geophysics/<br />
aperture_data.txt in the <strong>COMSOL</strong> installation directory.<br />
6 Select the Store data in model check box to make the model MPH-file<br />
self-contained. The possible drawback with this option is that you need to recreate<br />
the function if you modify the data file.<br />
7 Click Open to select this file and close the Open Data dialog box and then click OK to<br />
close the New Function dialog box.<br />
8 Optionally, select the Use space coordinates as default function arguments check box.<br />
If you choose this option, you can leave out the arguments when calling aperture<br />
in the subsequent modeling instructions.<br />
9 Click OK.<br />
GEOMETRY MODELING<br />
1 Shift-click the Rectangle/Square button on the Draw toolbar.<br />
2 In the Rectangle dialog box, specify the Width as 80 and the Height as 50, and locate<br />
the lower-left corner at x equal to 10 and y equal to 20. Click OK to create the<br />
rectangle R1.<br />
3 Click the Zoom Extents button on the Main toolbar to adjust the coordinate system<br />
with respect to the size of the rectangle.<br />
A ROCK FRACTURE FLOW MODEL | 287
PHYSICS SETTINGS<br />
288 | CHAPTER 7: GEOPHYSICS MODELS<br />
Subdomain Settings<br />
1 From the Physics menu, open the Subdomain Settings dialog box.<br />
2 Enter the following PDE coefficients; when done, click OK.<br />
SETTINGS SUBDOMAIN 1<br />
D (isotropic) aperture(x,y)^3<br />
R 0<br />
Boundary Conditions<br />
1 Open the Boundary Settings dialog box and enter boundary conditions as below:<br />
SETTINGS BOUNDARIES 1, 4 BOUNDARY 2 BOUNDARY 3<br />
Boundary condition Insulation/Symmetry Concentration Concentration<br />
H0 0 20<br />
2 Click OK.<br />
COMPUTING THE SOLUTION<br />
1 Open the Solver Parameters dialog box.<br />
2 Select the Adaptive mesh refinement check box.<br />
3 Click the Adaptive tab.<br />
4 Set the Maximum number of refinements to 10 and the Maximum number of elements<br />
to 10000. This number might be too high depending on the amount of memory in<br />
your system. Users uncertain of available memory should start with a lower number.<br />
5 Click OK to close the dialog box.<br />
6 Click the Solve button on the Main toolbar to compute the solution.<br />
POSTPROCESSING AND VISUALIZATION<br />
1 Open the Plot Parameters dialog box from the Postprocessing menu.<br />
2 Click the Surface tab. On the Surface Data page, select Diffusion (reynolds)>Diffusive<br />
flux, h from the Predefined quantities list.<br />
3 Still on the Surface page, click the Height Data tab. Select the Height data check box<br />
and then select Diffusion (reynolds)>Concentration, h from the Predefined quantities<br />
list.<br />
4 Clear the Color legend check box.
5 On the General page, open the Title dialog box. Click the right button to specify the<br />
title manually and type Surface: Flux Height: Hydraulic head.<br />
6 Click OK to close the Title dialog box, and then click Apply to create the plot in<br />
Figure 7-5 on page 285.<br />
7 To view the aperture data, return to the Surface page. On both the Height Data and<br />
Surface Data pages, type aperture(x,y) in the Expression edit field.<br />
8 Select the Color legend check box.<br />
9 On the General page, open the Title dialog box. In the Title edit field, type Surface<br />
and height: Aperture (mm).<br />
10 Click OK twice to close the dialog boxes and create the plot in Figure 7-6 on page<br />
286.<br />
A ROCK FRACTURE FLOW MODEL | 289
290 | CHAPTER 7: GEOPHYSICS MODELS
8<br />
Heat Transfer Models<br />
The following models illustrate heat transfer using the Conduction application<br />
mode. Heat transfer also takes part in many multiphysics models. For more<br />
information about the heat transfer application modes and introductory models,<br />
see “Heat Transfer” on page 167 in the <strong>COMSOL</strong> Multiphysics Modeling Guide.<br />
291
Heating with a Moving Laser<br />
Introduction<br />
Laser beams are commonly used to locally heat the surface of various substrates, for<br />
example, in laser welding or thermal annealing such as on layered silicon devices. The<br />
laser beam typically moves over a surface in a periodic fashion to produce the desired<br />
localized heating. In the case of layered silicon devices, each layer is very thin, making<br />
the modeling of the penetration depth caused by the moving laser a strongly<br />
time-dependent problem.<br />
Laser<br />
Motion<br />
Figure 8-1: A moving laser heats a thin silicon substrate.<br />
This example models the localized transient heating caused by a laser beam that moves<br />
in circles over a silicon substrate. The beam’s penetration depth, which you can<br />
describe with an absorption coefficient, depends on the ambient temperature. The<br />
geometry under study represents the top layer of a silicon device. The model examines<br />
the penetration depth and the influence of the laser motion on the transient<br />
temperature distribution.<br />
This model considers the laser beam as having an infinitesimal width and thus treats it<br />
as a line heat source. As such it is not meaningful to study the maximum temperature<br />
because it is mesh dependent. However, the overall heat flux and temperature<br />
distribution on a macroscopic level are both accurate.<br />
292 | CHAPTER 8: HEAT TRANSFER MODELS<br />
Silicon substrate
Model Definitions<br />
The model simulates the substrate as a 3D object (Figure 8-1) with these dimensions:<br />
Thickness: 1 mm<br />
Width: 10 mm-by-10 mm<br />
It handles the variation of laser intensity with penetration depth using a 1D geometry<br />
that represents the substrate’s thickness.<br />
Bottom Top<br />
Figure 8-2: The 1D model geometry.<br />
The model makes use of the Conduction application mode to describe the transient<br />
heat transfer in the 3D geometry. The transient energy-transport equation for heat<br />
conduction is<br />
∂T<br />
ρCp + ∇ ⋅ ( – k∇T<br />
) = Q<br />
∂t<br />
where ρ is the density, Cp is the specific heat capacity, k<br />
is the thermal conductivity<br />
tensor, and Q is the heat source term, which you here set to zero (this case models the<br />
source in a different way).<br />
The material properties are those of silicon, using an anisotropic conductivity of<br />
(k xx , k yy , k zz ) = (163, 163, 16) in units of W/(m·K), a density of 2330 kg/m 3 , and a<br />
specific heat capacity of 703 J/(kg·K).<br />
For the model, assume the boundaries are insulating.<br />
In the 1D geometry, this model uses the Weak Form, Subdomain application mode to<br />
model the laser penetration. In the equation describing the penetration<br />
HEATING WITH A MOVING LASER | 293
I represents the relative laser intensity (the variable in the Weak Form, Subdomain<br />
application mode), x' represents the 1D coordinate, and k abs is the absorption<br />
coefficient. The absorption coefficient can depend on the temperature, and the<br />
expression used in this model is<br />
k abs<br />
The volumetric heat source term, Q, in the 3D geometry is then<br />
where P in is the total power of the incoming laser beam.<br />
Both of these equations are included in the Weak Form, Subdomain application mode,<br />
where they become one equation:<br />
294 | CHAPTER 8: HEAT TRANSFER MODELS<br />
∂I<br />
∂x'<br />
8·10 3 m 1 –<br />
= – kabsI<br />
I_test*(Ix-k_abs*I)+k_abs*I*P_in*T_test<br />
=<br />
10 (m·K) 1 – –<br />
( T – 300 K)<br />
Q = PinkabsI The first part of this expression describes the penetration equation, and the second part<br />
comes from the heat-source term in the 3D Heat Transfer application mode.<br />
At the left boundary, apply a homogeneous Neumann condition, and at the right<br />
boundary set the relative intensity, I, to unity. The total incoming laser power, P in , is<br />
50 W.<br />
The model implements the heat source’s motion when coupling the 3D temperature<br />
variable, T, to the 1D equation. It does so with a subdomain extrusion coupling<br />
variable using a general transformation. A time-dependent transformation expression<br />
results in a moving heat source. This case describes a circular repeating motion using<br />
the transformation expressions<br />
x = Rsin( ω t),<br />
y = Rcos( ω t),<br />
z =<br />
x'<br />
where x, y, and z correspond to the 3D coordinates, and x' represents the 1D<br />
coordinate. Furthermore, R is the radius of circular motion, ω is the angular velocity,<br />
and t is time. The model uses the parameter values R = 0.02 m and ω = 10 rad/s, the<br />
latter value corresponding to a period of roughly 0.628 s for the laser motion.<br />
This method—using a separate geometry and equation to model the source term—is<br />
very useful because it provides that term directly at the test-function level.<br />
Furthermore, it models the source motion separately with the transformation
expressions, making it simple to alter. It is indeed the best way to model a moving point<br />
or line source.<br />
The 3D model makes use of an extruded triangular mesh, which has a fine resolution<br />
close to the laser incident line and is coarse elsewhere. This results in a high-resolution<br />
solution with minimum computation requirements. The mesh results in around<br />
10,000 elements and 6200 degrees of freedom.<br />
Figure 8-3: The 3D mesh produced by extruding a 2D triangular mesh, refined along the<br />
circular laser incident line.<br />
HEATING WITH A MOVING LASER | 295
Results and Discussion<br />
Figure 8-4 depicts the temperature distribution at the laser-beam incident surface.<br />
Figure 8-4: Temperature distribution after 1 s of laser heating.<br />
The figure clearly shows a hot spot where the laser beam is located at a specific time.<br />
Furthermore, the results show a cold side and a warm side next to the vertical line<br />
below the laser beam. The warm side represents the area where the beam has just swept<br />
through.<br />
296 | CHAPTER 8: HEAT TRANSFER MODELS
A better way to study these effects is by plotting the temperature at the top surface<br />
along the circular laser-beam incident pattern as in Figure 8-5.<br />
Figure 8-5: Temperature distribution along the laser-beam incident trajectory on the top<br />
surface after 0.7 s.<br />
Here the laser beam moves from right to left, and the warm side is on the right side of<br />
the peak. Locally the temperature reaches around 510 K, but this value is completely<br />
mesh dependent. Nevertheless, the temperature distribution just a few mesh elements<br />
away represents the real temperature quite well.<br />
HEATING WITH A MOVING LASER | 297
Finally, Figure 8-6 shows beam penetration into the substrate. The heating at the<br />
bottom of the substrate is practically zero.<br />
Figure 8-6: Relative laser-beam intensity as a function of sample depth.<br />
Model Library path: <strong>COMSOL</strong>_Multiphysics/Heat_Transfer/laser_heating<br />
Modeling Using the Graphical User Interface<br />
MODEL NAVIGATOR<br />
1 In the Model Navigator, select 3D in the Space dimension list and click the Multiphysics<br />
button.<br />
2 Select Heat Transfer>Conduction>Transient analysis in the list of application modes<br />
(in the <strong>COMSOL</strong> Multiphysics folder if the license contains additional modules).<br />
3 Select Lagrange - Linear in the Element list and click Add.<br />
4 Click Add Geometry and select 1D from the Space dimension list. Click OK to close the<br />
dialog box.<br />
298 | CHAPTER 8: HEAT TRANSFER MODELS
5 Select <strong>COMSOL</strong> Multiphysics>PDE Modes>Weak Form, Subdomain>Time-dependent<br />
analysis in the list of application modes.<br />
6 Enter I in the Dependent variables edit field.<br />
7 Click Add.<br />
8 Click OK to exit the Model Navigator and begin modeling.<br />
OPTIONS AND SETTINGS<br />
In the Constants dialog box enter the following names and expressions. The<br />
descriptions are optional.<br />
NAME EXPRESSION DESCRIPTION<br />
P_in 50[W] Laser beam power<br />
r 2[cm] Radius of trajectory circle<br />
omega 10[rad/s] Angular velocity<br />
GEOMETRY MODELING 3D<br />
1 Click the Geom1 tab to go to the 3D geometry.<br />
2 Open the Work-Plane Settings dialog box in the Draw menu. Click OK to get a default<br />
xy work plane at z = 0.<br />
3 Select Draw>Specify Objects>Square to create a square with the width 0.1 m,<br />
centered at the origin (select Center from the Base list). When done, click OK.<br />
4 Select Draw>Specify Objects>Circle to create a circle with the radius 0.02 m, centered<br />
at the origin. When done, click OK.<br />
5 Click the Zoom Extents button on the Main toolbar.<br />
MESH GENERATION 3D<br />
1 Open the Mesh>Free Mesh Parameters dialog box.<br />
2 Select Coarser from the Predefined mesh sizes list.<br />
3 On the Boundary page select Boundaries 5–8 and enter 1e-3 in the Maximum<br />
element size edit field.<br />
4 Click OK to close the dialog box.<br />
5 Click the Initialize Mesh button to generate the mesh.<br />
6 Select Mesh>Extrude Mesh and enter 1e-3 in the Distance edit field.<br />
7 On the Mesh page enter 5 for the Number of element layers and click OK.<br />
HEATING WITH A MOVING LASER | 299
GEOMETRY MODELING 1D<br />
1 Click the Geom2 tab to go to the 1D geometry.<br />
2 Specify a line from 0 to 1e-3, then click the Zoom Extents button.<br />
MESH GENERATION 1D<br />
1 Open the Free Mesh Parameters dialog box.<br />
2 On the Boundary page select Boundary 2. Enter 1e-5 for the Maximum element size<br />
and 1.1 for the Element growth rate.<br />
3 Click OK to close the dialog box.<br />
4 Click the Initialize Mesh button to generate the mesh.<br />
PHYSICS SETTINGS 3D<br />
Subdomain Settings<br />
1 Click the Geom1 tab to go to the 3D geometry.<br />
1 Open the Physics>Subdomain Settings dialog box and select both subdomains.<br />
2 Click Load and select Silicon from the Basic Material Properties folder in the Materials/<br />
Coefficients Library dialog box. Click OK when done.<br />
3 Select k (anisotropic) and enter 163, 163, and 16 for the diagonal elements k xx, k yy,<br />
and k zz , respectively.<br />
4 On the Init page enter 300 for the initial temperature.<br />
5 Click OK to close the dialog box.<br />
Boundary Conditions<br />
Use the default Thermal insulation boundary condition for all exterior boundaries.<br />
Coupling Variables<br />
1 Select Options>Extrusion Coupling Variables>Subdomain Variables.<br />
2 Select both subdomains and define a variable with the Name T and the Expression T.<br />
Select to use a General transformation and make sure the source transformation reads<br />
x: x, y: y, z: z.<br />
3 On the Destination page select Geom2 from the Geometry list and Subdomain from<br />
the Level list. Select the check box in front of Subdomain 1 and apply the destination<br />
transformation<br />
x: r*sin(omega*t), y: r*cos(omega*t), z: x.<br />
4 Click OK to close the dialog box.<br />
300 | CHAPTER 8: HEAT TRANSFER MODELS
PHYSICS SETTINGS 1D<br />
Subdomain Settings<br />
1 Click the Geom2 tab to go to the 1D geometry.<br />
2 Open the Physics>Subdomain Settings dialog box and select Subdomain 1.<br />
3 On the Weak page enter (Ix-I_abs)*I_test+I_abs*P_in*T_test in the weak<br />
edit field and 0 in the dweak edit field.<br />
4 On the Init page enter 1 for the Initial value I(t 0 ).<br />
5 Click OK to close the dialog box.<br />
Boundary Settings<br />
1 Open the Physics>Boundary Settings dialog box,<br />
2 Enter 0 in the constr edit field for Boundary 1, then enter 1-I in the same edit field<br />
for Boundary 2.<br />
3 Click OK to close the dialog box.<br />
Scalar Expressions<br />
In the Scalar Expressions dialog box make the following entries; when done, click OK.<br />
NAME EXPRESSION DESCRIPTION<br />
k_abs 8e3[1/m]-10[1/(m*K)]*(T-300[K]) Absorption coefficient<br />
I_abs k_abs*I Relative absorption<br />
The unit warnings appear because the coupling variable T and the Weak Form,<br />
Subdomain variable I have no associated units; you can ignore these warnings.<br />
COMPUTING THE SOLUTION<br />
1 In the Solver Parameters dialog box, make the following changes; when done, click<br />
OK.<br />
EDIT FIELD VALUE<br />
Times range(0,0.02,1)<br />
Absolute tolerance 1<br />
Linear system solver Direct (UMFPACK)<br />
2 Click the Solve button on the Main toolbar to compute the solution.<br />
HEATING WITH A MOVING LASER | 301
POSTPROCESSING AND VISUALIZATION<br />
1 If you are still in the 1D geometry, click the Geom1 tab and then the Postprocessing<br />
Mode button to switch to postprocessing in 3D.<br />
The default plot shows the temperature distribution in five slices through the<br />
substrate.<br />
2 Open the Plot Parameters dialog box. Clear the Slice check box and select the<br />
Boundary check box. On the Boundary page select Thermal from the Color table list.<br />
Click OK to see a boundary plot of the temperature.<br />
3 Because the substrate is very thin you can get a better view of it by rescaling the<br />
z-axis. Select Options>Axes/Grid Settings and clear the Axis equal check box. After<br />
clicking OK to close the dialog box, click the Zoom Extents button on the Main<br />
toolbar.<br />
4 To see what goes on inside the silicon substrate, hide the boundaries that are in the<br />
way. To do so, open the Suppress Boundaries dialog box from the Options menu and<br />
suppress Boundaries 1, 2, 4, 5, and 12. Then click the Postprocessing Mode button<br />
once again.<br />
To see the temperature distribution along the trajectory, proceed with the following<br />
steps:<br />
5 Open the Domain Plot Parameters dialog box from the Postprocessing menu.<br />
6 On the General page, pick a time from the Solutions to use list (the plot in Figure 8-5<br />
corresponds to the selection 0.7).<br />
7 On the Line/Extrusion page, select Edges 13, 16, and 19.<br />
8 In the x-axis data area, click first the lower option button and then the Expression<br />
button.<br />
9 In the X-Axis Data dialog box, type atan2(y,x) in the Expression edit field to get<br />
the usual angular coordinate, ϕ<br />
, along the first axis.<br />
10 From the Unit list select o , then click OK to close the X-Axis Data dialog box.<br />
11 Finally, click OK in the Domain Plot Parameters dialog box to see the plot.<br />
302 | CHAPTER 8: HEAT TRANSFER MODELS
Heat-sink Experiments Using the<br />
Component Library<br />
Introduction<br />
The most common method for investigating a process or system is to first study the<br />
individual components in detail. You would probably start by setting up detailed<br />
models for the various components and then try to merge them in some way to<br />
describe the system as a whole. With <strong>COMSOL</strong> Multiphysics you can merge individual<br />
models to investigate how they interact as components in a system.<br />
This exercise illustrates the use of the component library to merge different types of<br />
heat sinks with a heating device. The resulting models give an estimate of the thermal<br />
resistance of each heat sink and of the temperature distribution in the heating device.<br />
The model set up is similar to the benchmarking method for heat sinks used by Alpha<br />
Company Ltd. in Japan.<br />
The models defined here are rather simple as they use a semi-empirical expression for<br />
the heat transfer coefficient between the heat sink and the air that flows over it. It is<br />
also possible to simulate the air flow in detail and thus the coupled heat transfer-flow<br />
problem in <strong>COMSOL</strong> Multiphysics, but this is outside the scope of this specific<br />
example.<br />
The purpose of this example is to guide you through the procedure for merging<br />
different components into a single model of a system.<br />
Model Definition<br />
In this study, four different heat sinks from Alpha Company Ltd. are combined with<br />
one heating device. All the heat sinks have a base of 19 mm-by-19 mm and a height of<br />
HEAT-SINK EXPERIMENTS USING THE COMPONENT LIBRARY | 303
10 mm. The following figure shows the geometry of the heat sinks, all of which are<br />
made of aluminum 6063.<br />
Figure 8-7: The four heat sinks are the types lpd19, n19, s1519, and ub19, all from Alpha<br />
Company Ltd.<br />
The heating device measures 12.7 mm-by-12.7 mm and is 3 mm thick. It consists of<br />
an aluminum block with three heating elements made of steel. The next figure shows<br />
its geometry.<br />
Figure 8-8: The heating device consists of three heating elements embedded in an<br />
aluminum block.<br />
304 | CHAPTER 8: HEAT TRANSFER MODELS<br />
lpd19<br />
n19<br />
s1519 ub19
The physics inside the heat sinks is described by a heat balance where heat flux takes<br />
place by conduction. The thermal conductivity of aluminum 6063 is available in the<br />
material properties database in <strong>COMSOL</strong> Multiphysics.<br />
The boundary condition at the top surface of the heat sinks sets the heat flux<br />
perpendicular to the boundary proportional to the temperature difference between the<br />
heat sink and the surrounding air according to the following equation:<br />
– k∇T ⋅ n = hT ( – Tamb) (8-1)<br />
The heat transfer coefficient, h, is obtained using a semi-empirical expression as a<br />
function of temperature and distance from the leading edge of the heat sink, in this<br />
case as a function of x in the next figure. In the previous equation, k denotes the<br />
thermal conductivity, T equals the temperature, and n is the normal vector to the<br />
boundary. The boundary conditions at the bottom of the heat sink describe an influx<br />
of heat from the device being cooled.<br />
The physics in the heating device is described by a heat balance, with the flux given by<br />
conduction, and with a heat-source term in each of the heating elements. The heating<br />
elements are made of steel, while the aluminum block is made of aluminum 6063. The<br />
thermal transport properties are available in the material properties database.<br />
The boundary conditions describe thermal insulation at all boundaries except for the<br />
top surface, which is in contact with a heat sink. At this boundary the temperature is<br />
equal to that of the heat sink.<br />
The top surface of the heating device has the dimensions of 12.7 mm-by-12.7 mm,<br />
while the bottom surface of the heat sink is 19 mm-by-19 mm. After the merger of one<br />
of the heat sinks and the heating device, the part of the bottom surface of the heat sink<br />
that does not make contact with the heating device is thermally insulated as shown in<br />
Figure 8-9.<br />
Insulated surface<br />
Figure 8-9: The surface is the part of the heat sink that is insulated.<br />
HEAT-SINK EXPERIMENTS USING THE COMPONENT LIBRARY | 305
Once the two components are merged, all physics and boundary conditions are<br />
obtained from the components except for the insulation boundary condition shown in<br />
Figure 8-9. This boundary condition is actively defined in the model of the entire<br />
system.<br />
Results<br />
Figure 8-10 shows the calculated thermal resistance for the four heat sinks when they<br />
are merged with the heating device. The thermal resistance is calculated as<br />
306 | CHAPTER 8: HEAT TRANSFER MODELS<br />
( Tcontact – Tamb) thermal resistance =<br />
----------------------------------------------<br />
P<br />
(8-2)<br />
where T contact denotes the temperature in the middle of the contact surface between<br />
the heat sink and the heating device, and P equals the total heating power of 5 W. The<br />
definition of the thermal resistance is taken from Alpha Company, Ltd.<br />
The models seem to overestimate the thermal resistance of the n19 heat sink but are<br />
otherwise in decent agreement with the experiments reported by Alpha Company, Ltd.<br />
Figure 8-10: Thermal resistance as a function of the rate of air flowing over the heat sink.<br />
The next figure shows the temperature distribution in the lpd19 heat sink in the cases<br />
where it is modeled by itself with a constant heat flux at the bottom surface, and then<br />
when the heating device is attached at the bottom. In both cases the heating power is<br />
5 W and the flow rate of the cooling air is 4 m/s. The results are very similar except<br />
for the almost circular-shaped isosurface that is present in the merged model. In all<br />
cases the thermal resistance is slightly larger for the heat sink when attached to the
heating device compared to the standalone model, where a constant heat flux is set at<br />
the base surface. This is an expected behavior because the flux is limited to the contact<br />
surface in the model of the entire system.<br />
Figure 8-11: Temperature distribution in the standalone model of a lpd19 heat sink and<br />
in the model merged with the heating device (right).<br />
The n19 heat sink displays a higher thermal resistance, which results in a maximum<br />
temperature of roughly 329 K, which is slightly higher than that for the lpd19 heat<br />
sink. The s1519 heat sink displays a lower resistance than that of the n19 but a<br />
resistance higher than that for the lpd19. The heat sink denoted ub19 is the one with<br />
the best cooling performance in this study. Under the same conditions as shown in the<br />
previous figure it gives a maximum temperature of approximately 317 K.<br />
In experiments performed by Alpha Company Ltd. the difference in performance<br />
between the lpd19, n19, and s1519 heat sinks is very small, smaller than the<br />
simulations in this study. However, this might be caused by the fact that the n19 and<br />
s1519 heat sinks are better inducers of turbulence, which improves the cooling<br />
performance. This is in line with the measured pressure losses, which are higher for the<br />
n19 and s1519. In addition, both of these models show a nonlinear dependence on<br />
the pressure drop as a function of flow, a behavior typical for turbulent flow. The<br />
experiments and the models both agree that the ub19 heat sink has the best<br />
performance under the testing conditions.<br />
Model Library path: Component_Library/heat_sink_lpd19<br />
HEAT-SINK EXPERIMENTS USING THE COMPONENT LIBRARY | 307
Modeling Using the Graphical User Interface<br />
1 Start <strong>COMSOL</strong> Multiphysics.<br />
2 In the Model Navigator, select 3D from the Space dimension list.<br />
3 Choose the application mode <strong>COMSOL</strong> Multiphysics>Heat Transfer>Conduction.<br />
4 Click OK.<br />
GEOMETRY MODELING<br />
1 From the File menu, select Import>CAD Data From File.<br />
2 Choose the <strong>COMSOL</strong> Multiphysics file file type and select the file<br />
heat_sink_lpd19.mphbin. Click Import.<br />
OPTIONS AND SETTINGS<br />
1 From the Options menu, open the Constants dialog box.<br />
2 Enter the following constants for later use (the descriptions are optional); when<br />
done, click OK.<br />
NAME EXPRESSION DESCRIPTION<br />
T_amb 25[degC] Ambient temperature<br />
m_norm 3.590681[cm^3]*2700[kg/m^3] Mass of clad<br />
U_av 1[m/s] Average velocity<br />
m_hs 2.9[g] Mass of device<br />
fact m_norm/(m_norm-m_hs) Velocity scaling<br />
P 5[W] Total heating power<br />
3 Choose Options>Expressions>Scalar Expressions.<br />
4 In the Scalar Expressions dialog box, enter the following names, expressions, and<br />
(optionally) descriptions; when done, click OK.<br />
NAME EXPRESSION DESCRIPTION<br />
L_in x+9.5005[mm] Inlet distance<br />
U_avn U_av*fact Average scaled velocity<br />
C1 10^(0.8616*log10((T+T_amb)[1/K]/2)-3.7142)<br />
C2 (0.1949*(log10((T+T_amb)[1/K]/2))^2-<br />
1.3494*log10((T+T_amb)[1/K]/2)+2.8469)^0.33<br />
C3 (350.9[K]/T)*U_avn*L_in/(-8e-12*(T[1/K])^2<br />
+4e-8*T[1/K]+5e-6)[m^2/s]<br />
308 | CHAPTER 8: HEAT TRANSFER MODELS
NAME EXPRESSION DESCRIPTION<br />
h_hs (1[W/(m*K)]/L_in)*C1*C2*<br />
(0.332*flc2hs(5e5-C3,1e5)*C3^0.5+<br />
0.0296*flc2hs(C3-5e5,1e5)*C3^0.8)<br />
Heat transfer coefficient<br />
q P/area Heat flux<br />
5 Choose Options>Integration Coupling Variables>Boundary Variables.<br />
6 In the Boundary Integration Variables dialog box, select Boundary 3.<br />
7 Create a boundary integration variable with the Name area defined by the<br />
Expression 1. Leave the Integration order at 4 and the Global destination check box<br />
selected. When done, click OK.<br />
PHYSICS SETTINGS<br />
Subdomain Settings<br />
1 From the Physics menu, open the Subdomain Settings dialog box.<br />
2 Select Subdomain 1.<br />
3 Click the Load button to open the Materials/Coefficients Library dialog box.<br />
4 In the Materials area, open the Basic Material Properties library, select Aluminum<br />
6063-T83, and then click OK.<br />
5 Click the Init tab. In the Initial value area, set T(t 0 ) to T_amb.<br />
6 Click the Element tab. From the Predefined elements list, select Lagrange - Linear to<br />
use linear elements for the temperature field.<br />
7 Click OK.<br />
Boundary Conditions<br />
1 From the Physics menu, open the Boundary Settings dialog box.<br />
2 Specify boundary conditions according to the following table; when done, click OK.<br />
SETTINGS BOUNDARY 3 BOUNDARIES 1, 2, 4–118<br />
Boundary condition Heat flux Heat flux<br />
q0 q 0<br />
h 0 h_hs<br />
Tinf 0 T_amb<br />
If the highlighting of inconsistent units is active, notice that <strong>COMSOL</strong> Multiphysics<br />
indicates that the unit for the expression q is inconsistent. This is due to the integration<br />
coupling variable involved in computing the area. You can disregard this warning.<br />
HEAT-SINK EXPERIMENTS USING THE COMPONENT LIBRARY | 309
MESH GENERATION<br />
Click the Initialize Mesh button on the Main toolbar.<br />
COMPUTING THE SOLUTION<br />
1 From the Solve menu, open the Solver Parameters dialog box.<br />
2 From the Solver list, select Parametric.<br />
3 In the Parameter names edit field, type U_av.<br />
4 In the Parameter values edit field, type range(1,0.2,4).<br />
5 Click OK to close the dialog box. Click the Solve button on the Main toolbar.<br />
POSTPROCESSING AND VISUALIZATION<br />
To generate Figure 8-11 follow these instructions:<br />
1 From the Postprocessing menu open the Plot Parameters dialog box. On the General<br />
page clear the Slice check box. Select the Isosurface check box.<br />
2 Click the Isosurface tab. In the Isosurface levels area set the Number of levels to 10.<br />
3 Click OK to close the dialog box and plot the isosurfaces.<br />
Continue to model the second component, which is the heating device being cooled<br />
by the heat sink.<br />
Model Library path: Component_Library/heating_device<br />
1 Start <strong>COMSOL</strong> Multiphysics.<br />
2 In the Model Navigator select 3D in the Space dimension list.<br />
3 In the list of application modes select<br />
<strong>COMSOL</strong> Multiphysics>Heat Transfer>Conduction.<br />
4 Click OK.<br />
GEOMETRY MODELING<br />
1 Select Work-Plane Settings from the Draw menu. Click OK.<br />
2 Shift-click the Rectangle/Square (Centered) button on the Draw toolbar. In the Width<br />
field enter 12.7e-3, and set the Base to Center.<br />
3 Click OK.<br />
4 Click the Zoom Extents button on the Main toolbar to center the geometry.<br />
310 | CHAPTER 8: HEAT TRANSFER MODELS
5 From the Draw menu, select Extrude. Set the Distance to -2e-3, then click OK.<br />
6 From the Draw menu, select Work-Plane Settings. In the Plane area, click the y-z<br />
option button. Click OK.<br />
7 Click the Projection of All 3D Geometries button on the Draw toolbar.<br />
8 Draw a circle of radius 0.7·10 −3 centered at the point (0, −0.001).<br />
9 Select the circle by left-clicking on it. Press Ctrl+C to make a copy of the object.<br />
10 Press Crtl+V, set -3.5e-3 as its displacement in the x direction, and click OK.<br />
11 Press Crtl+V again, and this time use 3.5e-3 as the x displacement. Click OK.<br />
12 Select the three circles by holding down the shift key and clicking on each of them.<br />
13 From the Draw menu, select Extrude. Set the Distance to 6e-3, then click OK.<br />
14 Click the Move button on the Draw toolbar. Set the distance in x direction to -3e-3,<br />
then click OK.<br />
15 Select all objects (press Ctrl+A) and then click the Union button on the Draw toolbar.<br />
OPTIONS AND SETTINGS<br />
1 From the Options menu, open the Constants dialog box.<br />
2 Enter the following constants for later use (the descriptions are optional); when<br />
done, click OK.<br />
NAME EXPRESSION DESCRIPTION<br />
h_hd 200[W/(m^2*K)] Heat transfer coefficient<br />
T_out 40[degC] Outer temperature<br />
P_he 5[W]/3 Power per heating element<br />
3 Choose Options>Integration Coupling Variables>Subdomain Variables.<br />
4 In the Subdomain Integration Variables dialog box, select Subdomain 4.<br />
5 Create a subdomain integration variable with the Name volume defined by the<br />
Expression 1. Leave the Integration order at the default value 4 and the Global<br />
destination check box selected.<br />
6 Click OK to close the dialog box.<br />
PHYSICS SETTINGS<br />
Subdomain Settings<br />
1 From the Physics menu, open the Subdomain Settings dialog box.<br />
2 Select Subdomains 2–4.<br />
HEAT-SINK EXPERIMENTS USING THE COMPONENT LIBRARY | 311
3 Click the Load button to open the Materials/Coefficients Library dialog box.<br />
4 In the Materials area, open the Basic Material Properties library, select Steel AISI 4340,<br />
and then click OK.<br />
5 In the Q edit field, type P_he/volume.<br />
6 Choose Subdomain 1, then click the Load button.<br />
7 From the Basic Material Properties library, select Aluminum 6063-T83, then click OK.<br />
8 Click the Init tab. Select all subdomains, then type T_out in the T(t0 ) edit field in<br />
the Initial value area.<br />
9 Click the Element tab, then select Lagrange - Linear for all subdomains.<br />
10 Click OK to close the dialog box.<br />
Boundary Conditions<br />
1 From the Physics menu, open the Boundary Settings dialog box.<br />
2 Specify boundary conditions as in the following table; when done, click OK.<br />
SETTINGS BOUNDARY 4 BOUNDARIES 1–3, 5<br />
Boundary condition Heat flux Thermal insulation<br />
q0 0<br />
h h_hd<br />
Tinf T_out<br />
MESH GENERATION<br />
Click the Initialize Mesh button on the Main toolbar.<br />
COMPUTING THE SOLUTION<br />
Click the Solve button on the Main toolbar.<br />
Now merge the two components into a single <strong>COMSOL</strong> Multiphysics model.<br />
Model Library path: <strong>COMSOL</strong>_Multiphysics/Heat_Transfer/dev_merge_lpd19<br />
1 Start <strong>COMSOL</strong> Multiphysics.<br />
2 In the Model Navigator select 3D in the Space dimension list.<br />
3 Click OK.<br />
4 From the File menu, select Open Component Library.<br />
312 | CHAPTER 8: HEAT TRANSFER MODELS
5 Choose the heating device component, then click the Merge button.<br />
6 In the Merge Component dialog box, click the Merge button.<br />
The component is now inserted into Geometry 1.<br />
7 From the File menu, select Open Component Library.<br />
8 This time choose the heat sink lpd19 component, then click the Merge button.<br />
9 Click the Merge button again to merge the components into a single geometry with<br />
a single application mode.<br />
10 To mate the two objects, go to the Draw menu and choose Create Pairs.<br />
11 In the Create Pairs dialog box, select both objects and then click OK.<br />
PHYSICS SETTINGS<br />
Subdomain Settings<br />
1 From the Physics menu, open the Subdomain Settings dialog box.<br />
2 Click the Init tab. Select all subdomains, then type T_amb in the T(t 0 ) edit field in<br />
the Initial value area.<br />
3 Click the Element tab, then select Lagrange - Linear for all subdomains.<br />
4 Click OK to close the dialog box.<br />
Boundary Conditions<br />
1 From the Physics menu, open the Boundary Settings dialog box.<br />
2 Select Boundary 3, then change the Boundary condition to Thermal insulation.<br />
3 Click OK to close the dialog box.<br />
MESH GENERATION<br />
Click the Initialize Mesh button on the Main toolbar.<br />
COMPUTING THE SOLUTION<br />
1 From the Solve menu, open the Solver Parameters dialog box.<br />
2 From the Solver list, select Parametric.<br />
3 In the Parameter names edit field, type U_av.<br />
4 In the Parameter values edit field, type range(1,0.2,4).<br />
5 Click OK to close the dialog box.<br />
6 Click the Solve button on the Main toolbar.<br />
HEAT-SINK EXPERIMENTS USING THE COMPONENT LIBRARY | 313
POSTPROCESSING AND VISUALIZATION<br />
To generate Figure 8-10 follow these steps:<br />
1 From the Postprocessing menu, open the Domain Plot Parameters dialog box.<br />
2 On the Point page, select Point 226.<br />
3 In the Expression edit field, type (T-T_amb)/P_he.<br />
4 Click the Line Settings button. Choose Circle as Line marker, then click OK.<br />
5 Click OK to close the dialog box and generate the first graph.<br />
6 Click the Edit Plot toolbar button on the Figure window.<br />
7 In the Edit Plot dialog box, edit the plot title and axis labels; when done, click OK.<br />
8 Repeat the merging process to create similar plots for the other three heat sinks from<br />
Alpha Company Ltd.: types n19, s1519, and ub19.<br />
314 | CHAPTER 8: HEAT TRANSFER MODELS
9<br />
Multidisciplinary Models<br />
Multidisciplinary models combine finite element analysis with other<br />
computational engineering tools and applications such as control system design,<br />
signal processing, state-space modeling, and dynamic simulations. Typically, the<br />
finite element model is embedded in the multidisciplinary model to detail physical<br />
processes.<br />
315
Magnetic Brake<br />
Introduction<br />
A magnet brake in its simplest form consists of a disk of conductive material and a<br />
permanent magnet. The magnet generates a constant magnetic field, in which the disk<br />
is rotating. When a conductor moves in a magnetic field it induces currents, and the<br />
Lorentz forces from the currents slow the disk.<br />
Model Definition<br />
For a disk rotating with angular velocity ω about the z-axis, the velocity v at a point<br />
(x, y) is given by<br />
When the disk is inserted in the air gap and it encounters the magnetic field B 0 , the<br />
configuration induces a current density j according to Lorentz’ equation<br />
316 | CHAPTER 9: MULTIDISCIPLINARY MODELS<br />
v = ω( – yx0 , , ).<br />
⎧<br />
⎪<br />
1<br />
E+ v× ( B + B0) = ------ j<br />
⎪<br />
σd<br />
⎨<br />
⎪ ∇ × E = 0<br />
⎪<br />
⎩<br />
∇ × B = µj.
These equations use the following variables and material properties:<br />
B represents the magnetic field<br />
E is the electric field<br />
µ is the permeability<br />
σ is the electric conductivity<br />
d is the plate’s thickness<br />
This example uses the Dirichlet boundary condition B = 0.<br />
In this model, the magnetic flux B has only a vertical component, and the currents and<br />
electric field have no z-components. Solving for B gives the following scalar partial<br />
differential equation:<br />
∇ ∇ B µσdω( B + B0) y<br />
– ⋅ ⎛ +<br />
⎛ ⎞⎞<br />
⎝ ⎝– x⎠⎠<br />
= 0<br />
where B is the z-component of B and B 0 equals the z-component of B 0 .<br />
Now consider how the system evolves over time. The induced torque slows the disc<br />
down, and you must set up an ordinary differential equation (ODE) to model the<br />
angular velocity ω.<br />
To obtain the time derivative of the angular velocity ω, compute the torque arising<br />
from the induced currents. For a small surface element, the force equals<br />
dF = j× ( B+ B0) dxdy<br />
and integrating over the disk gives the total torque:<br />
M =<br />
∫<br />
Disk<br />
--r<br />
1<br />
× { ( ∇ × B)<br />
× ( B+ B .<br />
µ<br />
0)<br />
}dxdy<br />
In this case, M has only a z-component with the value<br />
M =<br />
∫<br />
Disk<br />
--<br />
1<br />
y .<br />
µ<br />
B ∂<br />
------ x<br />
∂x<br />
B ∂ ⎛ – ------ ⎞ ⋅ ( B + B0)<br />
dxdy<br />
⎝ ∂y⎠<br />
Thus the ODE for the angular velocity ω can be formulated as<br />
J ,<br />
ω d<br />
------- =<br />
M<br />
dt<br />
MAGNETIC BRAKE | 317
where the moment of inertia J for a disk with radius r equals<br />
Modeling in <strong>COMSOL</strong> Multiphysics<br />
318 | CHAPTER 9: MULTIDISCIPLINARY MODELS<br />
J m .<br />
r2<br />
--ρdr<br />
2<br />
4 π<br />
= =<br />
----------------<br />
2<br />
The models show different ways to solve this problem:<br />
1 Start by determining the magnetic field for a given angular velocity.<br />
2 Continue by exporting to Simulink getting a time-dependent solution. Simulink<br />
models the additional ODE for the angular velocity of the disk. For each time step<br />
in Simulink, <strong>COMSOL</strong> Multiphysics solves a stationary PDE for the magnetic field<br />
given the current angular velocity.<br />
3 Finish by doing the same thing entirely within <strong>COMSOL</strong> Multiphysics using<br />
coupling variables and an additional ODE for the angular velocity. Now <strong>COMSOL</strong><br />
Multiphysics solves for the angular velocity and the magnetic field simultaneously.<br />
The discretized problem is a differential-algebraic equation system (DAE).<br />
Results<br />
There is agreement between the results from the Simulink simulation and the results<br />
from <strong>COMSOL</strong> Multiphysics. In the plots for ω and dω/dt against time, dω/dt is<br />
proportional to the torque on the disk.<br />
Model Library path: <strong>COMSOL</strong>_Multiphysics/Multidisciplinary/<br />
magnet_brake_simulink
Modeling Using the Graphical User Interface—Fixed ω<br />
MODEL NAVIGATOR<br />
1 Select 2D in the Space dimension list.<br />
2 In the list of application modes, open the <strong>COMSOL</strong> Multiphysics>PDE Modes folder and<br />
then the PDE, Coefficient Form node.<br />
3 Select Stationary analysis.<br />
4 Type B in the Dependent variables edit field.<br />
5 Click OK.<br />
OPTIONS AND SETTINGS<br />
1 From the Options menu, choose Constants.<br />
2 Enter the following constants; when done, click OK.<br />
NAME EXPRESSION<br />
K mu*5.99e7*0.02<br />
w 2*pi*200<br />
J 8960*0.02*0.1^4*pi/2<br />
mu 4e-7*pi<br />
B0_2 0.1<br />
The variable w represents the fixed angular velocity ω. The variable K is the product of<br />
µ, σ, and d.<br />
GEOMETRY MODELING<br />
1 In the Draw menu, point to Specify Objects and then click Circle.<br />
2 In the Circle dialog box, type 0.1 in the Radius edit field and keep the center in the<br />
origin.<br />
3 Click OK.<br />
4 In the Draw menu, point to Specify Objects and then click Square.<br />
5 In the Square dialog box, type 0.04 in the Width edit field. In the Position area, select<br />
Center in the Base list, and enter 0.05 and 0 in the x and y edit fields, respectively.<br />
6 Click OK.<br />
7 In the Draw menu, point to Specify Objects and click Point.<br />
8 In the Point dialog box, type -0.1 and -0.1 in the x and y edit fields, respectively.<br />
9 Click OK.<br />
MAGNETIC BRAKE | 319
10 Click the Zoom Extents button.<br />
You will use the point at (−0.1, −0.1) to introduce an additional scalar state variable<br />
corresponding to the angular velocity in the final version of this model.<br />
PHYSICS SETTINGS<br />
Boundary Conditions<br />
Use the default Dirichlet boundary conditions.<br />
Subdomain Settings<br />
1 From the Physics menu, choose Subdomain Settings.<br />
2 Enter PDE settings as shown in the following table:<br />
SETTINGS SUBDOMAINS 1, 2<br />
c 1<br />
a, f, da 0<br />
α K*w*y -K*w*x<br />
γ -K*w*B0*y K*w*B0*x<br />
3 Click OK to close the dialog box.<br />
320 | CHAPTER 9: MULTIDISCIPLINARY MODELS
Expression Variables<br />
Define a variable B 0 (B0) in the two subdomains using an expression variable:<br />
1 On the Options menu, point to Expressions and then click Subdomain Expressions.<br />
2 Select Subdomain 1 and enter the name B0 in the Name column and 0 in the<br />
Expression column.<br />
3 Select Subdomain 2 and enter the expression B0_2.<br />
4 Click OK.<br />
Coupling Variables<br />
Define a coupling variable for the torque divided by the moment of inertia:<br />
1 On the Options menu, point to Integration Coupling Variables and then click<br />
Subdomain Variables.<br />
2 Select Subdomain 1 and 2 and enter the variable MdivJ in the Name column.<br />
3 Enter the expression (B+B0)*(y*Bx-x*By)/mu/J. Keep the default integration<br />
order 4 and the default global destination.<br />
4 Click OK.<br />
MESH GENERATION<br />
1 Open the Free Mesh Parameters dialog box by selecting Free Mesh Parameters from<br />
the Mesh menu, click the Custom mesh size button and type in the 0.04 in the<br />
Maximum element size edit field.<br />
2 Click the Subdomain tab.<br />
MAGNETIC BRAKE | 321
3 Select Subdomain 2 and type 0.01 in the Maximum element size edit field.<br />
4 Click OK and then click the Initialize Mesh button.<br />
COMPUTING THE SOLUTION<br />
Click the Solve button on the Main toolbar to compute the solution.<br />
Modeling Using the Programming Language—Fixed ω<br />
1 Clear the FEM structure, set the variable name and choose quadratic elements:<br />
322 | CHAPTER 9: MULTIDISCIPLINARY MODELS
clear fem<br />
fem.dim = 'B';<br />
fem.shape = 2;<br />
2 Specify the constants K, w, J, mu, and B0_2:<br />
fem.const = {...<br />
'K','mu*5.99e7*0.02',...<br />
'w','2*pi*200',...<br />
'J','8960*0.02*0.1^4*pi/2',...<br />
'mu','4e-7*pi',...<br />
'B0_2',0.1};<br />
3 Create the geometry:<br />
fem.geom = circ2(0.1)+square2(0.04,'pos',[0.05,0],'base','cent');<br />
4 Specify the boundary conditions: homogeneous Dirichlet conditions at the edge of<br />
the disk (boundary elements 5, 6, 7, and 8):<br />
fem.bnd.h = 1;<br />
fem.bnd.r = 0;<br />
fem.bnd.ind = {5:8};<br />
5 Specify the PDE coefficients:<br />
fem.equ.c = 1;<br />
fem.equ.al = {{{'K*w*y' '-K*w*x'}}};<br />
fem.equ.ga = {{{'-K*w*B0*y' 'K*w*B0*x'}}};<br />
fem.equ.expr = {'B0' {'0' 'B0_2'}};<br />
6 Specify the integration coupling variable MdivJ from Subdomains 1 and 2:<br />
clear el<br />
el.elem = 'elcplscalar';<br />
el.var = {'MdivJ'};<br />
el.g = {'1'};<br />
clear src<br />
src.expr{1} = {'(B+B0)*(y*Bx-x*By)/mu/J'};<br />
src.ipoints{1} = {'4'};<br />
src.ind{1} = {'1' '2'};<br />
el.src{1} = {{},{},src};<br />
el.geomdim = {{}};<br />
el.global = {'1'};<br />
fem.elemcpl = {el};<br />
7 Generate the mesh:<br />
fem.mesh = meshinit(fem,'hmax',0.04,'hmaxsub',[2 0.01]);<br />
8 Solve the problem using the stationary solver and plot the solution:<br />
fem.xmesh = meshextend(fem);<br />
fem.sol = femstatic(fem);<br />
postplot(fem,'tridata','B','tribar','on',...<br />
MAGNETIC BRAKE | 323
'trirefine',10,'axisequal','on');<br />
Exporting to Simulink—Time-Dependent ω<br />
This example begins in the same way as the previous model, except the solution of the<br />
time-dependent problem is obtained using Simulink instead of extended multiphysics.<br />
Note: This section requires that you run <strong>COMSOL</strong> Multiphysics with MATLAB and<br />
Simulink.<br />
Set up Problem for Fixed ω<br />
1 Make sure you are running <strong>COMSOL</strong> Multiphysics with MATLAB, and that you<br />
have installed Simulink along with MATLAB.<br />
2 First set up the problem for fixed ω as described from page 319 or on page page 322<br />
if you are using the programming language.<br />
Export the Model to Simulink<br />
1 On the File menu, point to Export and then click Simulink Model to open the Export<br />
Simulink Model dialog box.<br />
2 Select Export>Simulink on the File menu.<br />
3 Enter magnet_struct as the model name. Use General static as the Simulink block<br />
type.<br />
4 Click the Variables tab and type w B0_2 in the Variables edit field in the Input area.<br />
To add the variable dwdt at the origin, click Add, type dwdt in the Variable name edit<br />
324 | CHAPTER 9: MULTIDISCIPLINARY MODELS
field, and make sure that the Subdomain button is selected. Type 0 in both the x and<br />
y edit fields, and type MdivJ in the Expression field.<br />
This creates a structure that the <strong>COMSOL</strong> Multiphysics block in Simulink can use<br />
to run the <strong>COMSOL</strong> Multiphysics model as part of the Simulink simulation.<br />
5 Open a Simulink model that can use the <strong>COMSOL</strong> Multiphysics model by typing<br />
magnet_break_mdl. As an alternative you can enter the Simulink model by<br />
following the instructions in the following section.<br />
USING THE PROGRAMMING LANGUAGE<br />
You can also perform the Simulink export on the MATLAB command line.<br />
1 Start by exporting the FEM structure to MATLAB by selecting<br />
Export>FEM Structure on the File menu. If you are using the programming language<br />
to enter the model you can ignore this step.<br />
2 Then type the command.<br />
magnet_struct = femsim(fem,'input',{'w' 'B0_2'},...<br />
'output',{{'MdivJ' [0 0]'}},...<br />
MAGNETIC BRAKE | 325
'outnames',{'dwdt'},'static','on')<br />
This creates a structure which the <strong>COMSOL</strong> Multiphysics block within Simulink<br />
can use to run the <strong>COMSOL</strong> Multiphysics model as part of the Simulink simulation.<br />
The syntax {'MdivJ' [0 0]'} means that the output dwdt is computed by<br />
evaluating the expression MdivJ in the point (0, 0). Use the syntax of the<br />
postinterp command to specify outputs in this way.<br />
3 Open a Simulink model that can use the <strong>COMSOL</strong> Multiphysics model by typing<br />
magnet_break_mdl. As an alternative you can enter the Simulink model by<br />
following the instructions in the following section.<br />
DESIGN IN SIMULINK<br />
Start Simulink and draw a model as in the following figure. You find the <strong>COMSOL</strong><br />
Multiphysics Subsystem block in the <strong>COMSOL</strong> Multiphysics block library. To set up the<br />
input and the output ports, double-click the <strong>COMSOL</strong> Multiphysics Subsystem block and<br />
enter the Simulink Structure name magnet_struct.<br />
1 Set the initial condition for the Integrator block to 2*pi*200.<br />
2 In the Simulation Parameters dialog box set the solver type to ode15s, set the relative<br />
tolerance to 1e-2 and the absolute tolerance to 1e-3.<br />
3 Start the simulation.<br />
The scopes show graphs of ω and dω/dt against time that correspond to the plots on<br />
page 318.<br />
326 | CHAPTER 9: MULTIDISCIPLINARY MODELS
Model Library path: <strong>COMSOL</strong>_Multiphysics/Multidisciplinary/<br />
magnet_brake<br />
Modeling Using the Graphical User Interface —Time-Dependent ω<br />
The modeling approach in this section uses the extended multiphysics feature to solve<br />
the time-dependent problem. Introduce a new variable w, active at a single point within<br />
the geometry using a Weak Form, Point application mode.<br />
USING THE PREVIOUS MODEL<br />
First set up the problem for fixed ω as described from page 319, but click the Refine<br />
Mesh button on the Main toolbar for a finer mesh. Without the export to Simulink,<br />
you can afford a finer mesh that increases the accuracy.<br />
MODEL NAVIGATOR<br />
1 Open the Model Navigator from the Multiphysics menu.<br />
2 In the list of application modes, open the <strong>COMSOL</strong> Multiphysics>PDE Modes folder,<br />
and select Weak Form, Point.<br />
3 Type w in the Dependent variables edit field.<br />
4 Click Add.<br />
5 Click OK.<br />
OPTIONS AND SETTINGS<br />
1 Open the Constants dialog box from the Options menu.<br />
2 Select the variable w in the list and rename it w0. Later on, use this constant as initial<br />
value for w, the angular velocity.<br />
3 Click OK.<br />
PHYSICS SETTINGS<br />
Point Settings<br />
1 Open the Point Settings dialog box from the Physics menu.<br />
2 Click the Init tab.<br />
3 Select Point 1 and enter w0 as initial value in the w(t 0 ) edit field.<br />
4 Click the Weak tab.<br />
MAGNETIC BRAKE | 327
5 Enter PDE settings as shown for the weak point mode.<br />
WEAK TERM POINT 1<br />
weak w_test*MdivJ<br />
dweak w_test*w_time<br />
constr 0<br />
6 Select Points 2 through 9 and clear the Active in this domain check box.<br />
7 Click OK.<br />
Defining Coupling Variables<br />
The coupling variable MdivJ that integrates the torque has already been set up. You<br />
need to add a coupling variable that makes the angular velocity, w, available throughout<br />
the domain.<br />
1 On the Options menu, point to Extrusion Coupling Variables and then click Point<br />
Variables.<br />
2 Select Point 1 and enter the variable name w and the expression w.<br />
3 Click the General transformation button.<br />
4 Click the Destination tab.<br />
328 | CHAPTER 9: MULTIDISCIPLINARY MODELS
5 Select Subdomain in the Level list and then select the check boxes for Subdomains 1<br />
and 2.<br />
6 Click OK.<br />
COMPUTING THE SOLUTION<br />
1 Open the Solver Parameters dialog box and select Time dependent in the Solver list.<br />
2 Type range(0,0.2,8) in the Times edit field and then type 1e-3 in the Relative<br />
tolerance edit field and 1e-5 in the Absolute tolerance edit field.<br />
3 Click the Time Stepping tab.<br />
4 Select the Time steps from solver in the Times to store in output list.<br />
5 Click OK.<br />
6 Click the Solve button on the Main toolbar.<br />
POSTPROCESSING AND VISUALIZATION<br />
Using the solution data, you can visualize the results in a number of ways:<br />
Click the Animate button to create an animation of the dissipation of B over time.<br />
For a graph of the ω against time, open the Domain Plot Parameters dialog box from<br />
the Postprocessing menu. On the General page, select all the time steps in the list and<br />
MAGNETIC BRAKE | 329
select Point plot. Click the Point tab, select Point1, and type w in the Expression edit<br />
field. Click OK.<br />
For a graph of dω/dt against time, follow the same procedure as for ω but type<br />
MdivJ in the Expression edit field instead.<br />
330 | CHAPTER 9: MULTIDISCIPLINARY MODELS
Process Control Using a PID<br />
Controller<br />
Introduction<br />
In the chemical process industry it is often important to control a specific process. PID<br />
control (proportional-integral-derivative-control) is one way to achieve that, but it can<br />
be difficult to optimize the parameters in the PID algorithm. This example illustrates<br />
how you can implement a PID control algorithm to simulate a process control system<br />
and to find the optimal PID parameters.<br />
This model is a generic example but could resemble the environment in a combustion<br />
chamber where the concentration at the ignition point is crucial. Two gas streams with<br />
different oxygen concentrations are mixed in the combustion chamber. The<br />
concentration is measured at the ignition point before complete mixing of the streams<br />
is reached. The control algorithm alters the inlet velocity of the gas with the lower<br />
oxygen content to achieve the desired total concentration at the ignition point.<br />
Model Definition<br />
The model geometry appears in the following figure. At the upper inlet, a gas stream<br />
with high oxygen content enters the reactor at a velocity of 10 mm/s, while a gas with<br />
a lower oxygen level enters from the left. The oxygen concentration is measured at a<br />
measurement point, and the inlet velocity of the less concentrated stream is altered by<br />
the PID control algorithm to achieve the desired concentration at that point.<br />
PROCESS CONTROL USING A PID CONTROLLER | 331
Controlled inlet<br />
The model uses the Navier-Stokes equations to describe the fluid flow and the<br />
Convection and Diffusion application mode for the mass balance.<br />
332 | CHAPTER 9: MULTIDISCIPLINARY MODELS<br />
(9-1)<br />
(9-2)<br />
It is possible to formulate the boundary conditions for the mass-transport equation by<br />
assuming that you know the two inlet concentrations. In addition, assume that the<br />
reactant transport at the outlet is mainly driven by convection, that is, neglect diffusion<br />
in the main direction of the convective flow. An insulation/symmetry boundary<br />
condition describes all walls. The boundary conditions for the mass balance are:<br />
BOUNDARY CONSTRAINT<br />
Upper inlet c = cin,top Controlled inlet c = cin,inlet Upper inlet<br />
Measurement point<br />
∂u T<br />
ρ – ∇ ⋅ [ η( ∇u+ ( ∇u)<br />
) ] + ρu ⋅ ∇u<br />
+ ∇p = F<br />
∂t<br />
∇ ⋅ u = 0<br />
∂c<br />
δ ---- ts + ∇ ⋅ ( – D∇c) =<br />
R – u ⋅ ∇c<br />
∂t<br />
Outlet
BOUNDARY CONSTRAINT<br />
Outlet<br />
Walls N · n = 0<br />
Here c is the concentration; c in,top and c in,inlet are the inlet concentrations (mol/m 3 )<br />
for the upper and controlled inlets, respectively; D is the applied diffusivity (m 2 /s);<br />
and N is the molar flux (mol/(m 2 ·s)).<br />
The model uses the following boundary conditions for the fluid flow:<br />
BOUNDARY CONSTRAINT<br />
Upper inlet u =(0, −v in,top)<br />
Controlled inlet u = (u in, 0)<br />
Outlet p 0 = 0<br />
Inlet sections n · u = 0<br />
Walls u = 0<br />
Here u is the velocity vector (m/s), v in,top is the inlet velocity at the top inlet, and u in<br />
is the PID controlled velocity. At the outlet, set the pressure to p 0 (Pa). No-slip<br />
boundary conditions describe all walls except the inlet sections where slip conditions<br />
apply, allowing for a smooth transition to a laminar velocity profile.<br />
The PID control algorithm used to calculate u in is<br />
with the following parameters:<br />
PARAMETER VALUE<br />
c set<br />
k P<br />
k I<br />
k D<br />
n ⋅ ( – D∇c) = 0<br />
uin =<br />
kP( c– cset) + kI ( c– cset) +<br />
0.5 mol/m 3<br />
0.5 m 4 /(mol·s)<br />
1 m 4 /(mol·s 2 )<br />
10 -3 m 4 /mol<br />
t<br />
∫<br />
0<br />
dt kD ----<br />
∂<br />
( c– c<br />
∂t set)<br />
(9-3)<br />
In practice, the derivative constant, k D , is set to 0 in most cases as this parameter can<br />
be difficult to determine and the term may increase the fluctuations in the system.<br />
PROCESS CONTROL USING A PID CONTROLLER | 333
Results<br />
The two plots in Figure 9-1 show the oxygen concentration and the velocity stream<br />
lines in the chamber after approximately 0.01 s and 1.5 s, respectively. The figures<br />
show that the measured concentration depends strongly on the flow field. At start-up,<br />
when the inlet velocity of the stream entering from the left is very low, the sensor is<br />
entirely exposed to the highly concentrated stream, and as the left inlet velocity<br />
increases the opposite relation occurs.<br />
Figure 9-1: Oxygen concentration and velocity streamlines after approximately 0.01 s<br />
(top) and 1.5 s (bottom).<br />
Figure 9-2 shows the inlet velocity and concentration in the measurement point as a<br />
function of time for two different values for the k P parameter. The solid line represents<br />
the results for a k P value of 0.5 m 4 /(mol·s) while the dashed line corresponds to k P<br />
334 | CHAPTER 9: MULTIDISCIPLINARY MODELS
equal to 0.1 m 4 /(mol·s). The results evaluated for the smaller k P value oscillate more<br />
before stabilizing. Thus, it is clear that for this case the higher k P value yields a more<br />
stable process control.<br />
Figure 9-2: PID-controlled inlet velocity (top) and concentration in the measurement<br />
point (bottom) as a function of time for k P = 0.5 m 4 /(mol·s) (solid) and k P = 0.1 m 4 /<br />
(mol·s) (dashed).<br />
Model Library path: <strong>COMSOL</strong>_Multiphysics/Multidisciplinary/PID_control<br />
PROCESS CONTROL USING A PID CONTROLLER | 335
Modeling Using the Graphical User Interface<br />
MODEL NAVIGATOR<br />
1 Go to the Model Navigator and select 2D from the Space dimension list.<br />
2 In the list of application modes select <strong>COMSOL</strong> Multiphysics>Fluid<br />
Dynamics>Incompressible Navier-Stokes>Transient analysis.<br />
3 Click the Multiphysics button in the lower right corner, then click Add.<br />
4 Similarly, add the <strong>COMSOL</strong> Multiphysics>Convection and Diffusion>Convection and<br />
Diffusion>Transient analysis application mode.<br />
5 Click OK.<br />
OPTIONS AND SETTINGS<br />
Constants<br />
1 Go to the Options menu and choose Constants.<br />
2 Make the following entries in the Constants dialog box; when finished, click OK.<br />
NAME EXPRESSION DESCRIPTION<br />
v_in_top 0.01[m/s] Velocity, upper inlet<br />
cin_top 1[mol/m^3] Concentration, upper inlet<br />
cin_inlet 0.2[mol/m^3] Concentration, controlled inlet<br />
c00 0.5[mol/m^3] Initial concentration, chamber interior<br />
eta 3e-5[Pa*s] Dynamic viscosity<br />
rho 1.2[kg/m^3] Density<br />
D 1e-4[m^2/s] Diffusivity<br />
c_set 0.5[mol/m^3] Setpoint concentration<br />
k_P_ctrl 0.5[m^4/(mol*s)] Proportional parameter<br />
k_I_ctrl 1[m^4/(mol*s^2)] Integral parameter<br />
k_D_ctrl 1e-3[m^4/mol] Derivative parameter<br />
Grid Settings<br />
1 Go to the Options menu and select Axes/Grid Settings.<br />
336 | CHAPTER 9: MULTIDISCIPLINARY MODELS
2 On the Axis page enter x-y limits (expressed in the default length unit meters) for the<br />
axes as displayed below.<br />
AXIS VALUE<br />
x min -0.015<br />
x max 0.015<br />
y min -0.01<br />
y max 0.02<br />
3 Click the Grid tab.<br />
4 Clear the Auto check box and enter the following extra grid values:<br />
GRID VALUE<br />
Extra x -0.014 -0.012 -0.01 -0.004 -0.002 0 0.002 0.008 0.01 0.012<br />
Extra y -0.004 -0.002 0 0.002 0.004 0.008<br />
5 Click OK.<br />
GEOMETRY MODELING<br />
1 When creating the geometry you alternate between using the Line and 2nd Degree<br />
Bézier Curve tools located on the Draw toolbar to the left. For curved shapes use the<br />
curve tool, and for straight lines use the line tool. Click on the points given in the<br />
following table using the corresponding drawing tool. Use the coordinates<br />
displayed in the lower-left corner of the screen to find the points.<br />
DRAW TOOL POINTS (X, Y)<br />
Line (0.012,-0.002) (0.012,-0.004) (-0.01,-0.004)<br />
Curve (-0.01,-0.002) (-0.012,-0.002)<br />
Line (-0.014,-0.002) (-0.014,0) (-0.012,0)<br />
Curve (-0.01,0) (-0.01,0.002)<br />
Line (-0.004,0.002)<br />
Curve (-0.002,0.002) (-0.002,0.004)<br />
Line (-0.002,0.008) (0,0.008) (0,0.004)<br />
Curve (0,0.002) (0.002,0.002)<br />
Line (0.008,0.002) (0.008,0)<br />
Curve (0.008,-0.002) (0.01,-0.002)<br />
Line Right-click to close the geometry<br />
PROCESS CONTROL USING A PID CONTROLLER | 337
2 To add the measurement point, click the Point button in the Draw toolbar to the<br />
left and click on the coordinates (0, −2·10 −3 ).<br />
3 Click the Zoom Extents button on the Main toolbar to center the geometry.<br />
PHYSICS SETTINGS<br />
Subdomain Settings—Incompressible Navier-Stokes<br />
1 Go to the Multiphysics menu and select Incompressible Navier-Stokes (ns).<br />
2 From the Physics menu, choose Subdomain Settings.<br />
3 In the Subdomain Settings dialog box select Subdomain 1 and type rho in the Density<br />
edit field.<br />
4 In the Dynamic viscosity edit field type eta. Click OK.<br />
Boundary Conditions—Incompressible Navier-Stokes<br />
1 From the Physics menu, choose Boundary Settings.<br />
2 In the Boundary Settings dialog box enter the following boundary conditions:<br />
SETTINGS BOUNDARY 1 BOUNDARY 7 BOUNDARIES<br />
2, 3, 6, 8<br />
Boundary<br />
type<br />
Boundary<br />
condition<br />
u0 3 Click OK.<br />
Subdomain Settings—Convection and Diffusion<br />
1 From the Multiphysics menu, choose Convection and Diffusion (cd).<br />
2 From the Physics menu, choose Subdomain Settings select Subdomain 1.<br />
3 In the D (isotropic) edit field type D to define an isotropic diffusion coefficient.<br />
4 In the x-velocity edit field type u.<br />
5 In the y-velocity edit field type v.<br />
6 Click the Init tab.<br />
338 | CHAPTER 9: MULTIDISCIPLINARY MODELS<br />
BOUNDARIES<br />
4, 5, 9–11, 13–17<br />
BOUNDARY 12<br />
Inlet Inlet Symmetry<br />
boundary<br />
Wall Outlet<br />
Velocity Velocity - No slip Pressure, no<br />
viscous stress<br />
u_in_ctrl*<br />
(u_in_ctrl>=0)<br />
v0 p0 0 -v_in_top<br />
You will define u_in_ctrl as a scalar expression shortly.<br />
0<br />
0
7 In the c(t 0 ) edit field enter the initial concentration c00, then click OK.<br />
Boundary Conditions—Convection and Diffusion<br />
1 From the Physics menu, choose Boundary Settings.<br />
2 In the Boundary Settings dialog box enter the following boundary conditions:<br />
SETTINGS BOUNDARY 1 BOUNDARIES 2–6,<br />
8–11, 13–17<br />
3 Click OK.<br />
PID ALGORITHM SETUP<br />
It is possible to specify the PID algorithm as a scalar expression. However, some of the<br />
terms in the algorithm require some additional specifications. The algorithm contains<br />
the concentration in the measurement point, the time derivative of the concentration<br />
in the point, and the time integration of the concentration difference between the<br />
measured and wanted concentrations.<br />
1 Go to the Options menu and choose Expressions>Scalar Expressions.<br />
2 Set the Name to u_in_ctrl and define the Expression as<br />
nojac(k_P_ctrl*(conc-c_set)+k_I_ctrl*Int+k_D_ctrl*ctime). The nojac<br />
operator makes sure the above expression gives no Jacobian contribution. The<br />
resulting effect is the same as using nonideal weak constraints, namely a one-way<br />
coupling instead of the normal two-way coupling. Because of the use of a coupling<br />
variable, the unit becomes undefined for this variable and other quantities where<br />
you use it.<br />
3 Click OK.<br />
4 To specify the concentration and its time derivative in the point, go to the Options<br />
menu and choose Integration Coupling Variables>Point Variables.<br />
5 Select Point 10 and enter conc in the Name edit field and c in the Expression edit<br />
field.<br />
6 For the same point enter ctime in the Name edit field and ct in the Expression edit<br />
field. ct is the predefined expression for the time derivative of the concentration.<br />
7 Click OK.<br />
BOUNDARY 7 BOUNDARY 12<br />
Type Concentration Insulation/<br />
Symmetry<br />
Concentration Convective flux<br />
c0 cin_inlet cin_top<br />
8 To specify the time integral of the concentration difference in the point, go to the<br />
Physics menu and open the Global Equations dialog box.<br />
PROCESS CONTROL USING A PID CONTROLLER | 339
9 Type Int in the Name (u) edit field.<br />
10 In the Equation edit field type Intt-(conc-c_set).<br />
11 Click OK to exit the Global Equations dialog box.<br />
MESH GENERATION<br />
1 Go to the Mesh menu and choose Free Mesh Parameters.<br />
2 On the Global tab, select Finer in the Predefined mesh sizes list.<br />
3 To reduce the number of elements along the curved boundaries, click the Custom<br />
mesh size button and type 0.5 in the Mesh curvature factor edit field.<br />
4 Click Remesh, then click OK.<br />
COMPUTING THE SOLUTION<br />
1 Go to the Solve menu and select Solver Parameters.<br />
2 On the General page, set the Times vector to range(0,0.04,6).<br />
3 On the Time Stepping page, select Time steps from solver from the Times to store in<br />
output list to make all time steps the solver takes available for postprocessing.<br />
4 Select Intermediate from the Time steps taken by solver list to give the solver some<br />
freedom to set its own time steps. Using this option restricts the solver to take at<br />
least one time step in each subinterval of the time list.<br />
5 Click OK to exit the Solver Parameters dialog box.<br />
6 Click the Solve button on the Main toolbar to start the simulation.<br />
POSTPROCESSING AND VISUALIZATION<br />
The default visualization plots the magnitude of the velocity field at the end of the<br />
simulation interval. Follow the instructions below to reproduce the simultaneous plots<br />
of the oxygen concentration and the velocity stream lines at two different times<br />
presented in Figure 9-1 on page 334.<br />
1 Go to the Postprocessing menu and choose Plot Parameters to open the Plot<br />
Parameters dialog box.<br />
2 On the General page, select the solution near t = 0.01 s from the Solution at time list.<br />
3 On the Surface page, click the Surface Data tab.<br />
4 In the Predefined quantities list, select Convection and Diffusion (cd)>Concentration, c.<br />
5 Click the Streamline tab.<br />
340 | CHAPTER 9: MULTIDISCIPLINARY MODELS
6 Select the Streamline plot check box. In the Predefined quantities list on the<br />
Streamline Data tab keep the default selection, Incompressible<br />
Navier-Stokes (ns)>Velocity field.<br />
7 From the Streamline plot type list select Magnitude controlled.<br />
8 Click Apply to view the upper plot in Figure 9-1.<br />
9 Return to the General tab, then select the solution near t = 1.5 s from the Solution at<br />
time list. Click OK to generate the lower plot in Figure 9-1.<br />
To visualize the inlet velocity and the measured concentration as functions of time, use<br />
domain plots:<br />
1 Open the Domain Plot Parameters dialog box from the Postprocessing menu.<br />
2 Click the Point tab.<br />
3 Select Point 1 and enter u_in_ctrl*(u_in_ctrl>=0) in the Expression edit field.<br />
4 Click Apply.<br />
5 Click the General tab and select to plot in New figure in the Plot in list.<br />
6 Click the Point tab, select Point 10, and select Concentration, c from the Predefined<br />
quantities list.<br />
7 Click OK.<br />
To see the above plots for different values of k P, alter the k P value and solve the model<br />
again without closing the plot frames:<br />
1 Open the Constants dialog box from the Options menu and change the value of<br />
k_P_ctrl to 0.1 [m^4/(mol*s)].<br />
2 Click the Solve button to solve the model for the new parameter value.<br />
3 Open the Domain Plot Parameters dialog box from the Postprocessing menu.<br />
4 On the General page, select to plot in Figure 2 and select the Keep current plot check<br />
box.<br />
5 Click the Point tab and make sure Point 10 and Concentration, c are selected.<br />
6 Click the Line Settings button. Set the Line style to Dashed line, then click OK.<br />
7 Click Apply to generate the lower plot in Figure 9-2 on page 335.<br />
8 On the General page, select to plot in Figure 1. Select the Keep current plot check box.<br />
9 Click the Point tab, select Point 1, and type u_in_ctrl*(u_in_ctrl>=0) in the<br />
Expression edit field.<br />
10 Click OK to close the dialog box and generate the upper plot in Figure 9-2.<br />
PROCESS CONTROL USING A PID CONTROLLER | 341
Controlling Temperature<br />
Introduction<br />
This example demonstrates controlling the temperature in a heated metal block using<br />
a thermal controller. You make the model in <strong>COMSOL</strong> Multiphysics and export it to<br />
Simulink, using an on-off controller.<br />
Model Definition<br />
The study of this thermal controller involves two distinct modeling situations:<br />
Taken as a whole, this dynamic system assumes only a small number of states,<br />
making it a good candidate for modeling and simulation with Simulink.<br />
One of the model’s elements, the controller, contains a subsystem that involves heat<br />
distribution, which is described with a PDE, the heat equation. It is easy to break<br />
this portion of the problem down and model it in <strong>COMSOL</strong> Multiphysics.<br />
The dynamic system consists of a metal block that exchanges heat with the<br />
environment. A heater and a thermostat switch are situated inside the glass-enclosed<br />
system. The system works as follows: The thermostat turns the heater on or off when<br />
the temperature becomes too low or too high.<br />
Thermostat Heater<br />
The finite-element model of the metal block requires two inputs:<br />
The state of the heater, which can be On (1) or Off (0)<br />
The exterior temperature, T out<br />
As its output, the model supplies the temperature at the thermostat’s location.<br />
342 | CHAPTER 9: MULTIDISCIPLINARY MODELS<br />
Metal Block<br />
Temperature<br />
Exterior<br />
Temperature
The PDE describes the overall system’s temperature distribution given the<br />
temperature of the heater and the exterior environment. If the heat transfer is so fast<br />
that the heat distribution is more or less constant (in space, not in time), a single state<br />
is sufficient. Otherwise, controlling the temperature requires modeling a PDE in<br />
<strong>COMSOL</strong> Multiphysics and then including those results in the Simulink environment<br />
as illustrated here.<br />
The heat equation is:<br />
ρC ∂T<br />
------ – ∇ ⋅ ( k∇T)<br />
= Q<br />
∂t<br />
The boundary conditions come from the level of insulation around the system. On<br />
well-insulated sides the temperature flux is zero, which gives the Neumann boundary<br />
condition n ⋅ ( k∇T) = 0 . The poorly insulated sides involve the Neumann condition<br />
n ⋅ ( k∇T) = kg ⁄ lg ⋅ ( Tout – T)<br />
, where kg and lg are the thermal conductivity and the<br />
thickness of the glass sheet that separates the metal block and the exterior.<br />
Glass<br />
layer<br />
Heat source<br />
Insulation<br />
Thermostat<br />
Because only the temperature distribution in the xy-plane is of interest, you can use a<br />
2D model. For the units to make sense, think of the domain as having a depth<br />
(z direction) of 1 m.<br />
Modeling in <strong>COMSOL</strong> Multiphysics<br />
This model is based on the SI system, but to more appropriately represent the time<br />
scale of the problem, the time is counted in minutes. This means that you must scale<br />
all quantities with units that contain the basic unit of time by a factor 60 compared to<br />
their standard SI values. This model data in the following lists includes this conversion<br />
for the thermal conductivity k and the heat source Q.<br />
CONTROLLING TEMPERATURE | 343
Metal block:<br />
Dimensions 30 × 20 × 100 cm = 0.3 × 0.2 × 1 m<br />
Density ρ = 7.82·10 3 kg/m 3<br />
Heat capacity C = 449 J/(kg·K)<br />
Thermal conductivity k = 82 W/(m·K) = 4.92·10 3 J/(m·min·K)<br />
Glass sheet:<br />
Thermal conductivity k g = 0.9 W/(m·K) = 54 J/(m·min·K)<br />
Thickness l g = 1 mm = 10 −3 m<br />
Heater:<br />
Dimensions 4 × 4 × 100 cm = 0.04 × 0.04 × 1 m<br />
Heat source Q = 2 kW/V heater = 2·10 3 /(1·0.04 2 ) W/m 3 = 7.5·10 7 J/(m 3 ·min)<br />
Do the modeling in <strong>COMSOL</strong> Multiphysics in two steps:<br />
1 Set up a basic model of the steel plate for the Simulink export.<br />
2 Make the model of the on-off controller in Simulink.<br />
Results<br />
The model uses Simulink to simulate the on-off controller. Simulink handles the<br />
nonlinear behavior of the on-off controller well. The PDE model for the plate is linear,<br />
you can do the Simulink export using the linearized state-space form to improve<br />
performance. You can also use the mode reduction facility of the Simulink export to<br />
improve performance in Simulink, but it only works for linear or linearized PDE<br />
models.<br />
As an alternative approach, it is possible to model a PI controller, either in Simulink or<br />
using an ODE directly in <strong>COMSOL</strong> Multiphysics.<br />
344 | CHAPTER 9: MULTIDISCIPLINARY MODELS
The following set of images shows the result of the Simulink simulation with the on-off<br />
controller. The left figure shows the thermostat temperature at node 3 and the right<br />
figure shows the result when the thermostat has been move to node 8.<br />
Notice a few interesting details in the solutions. For instance, the distance between the<br />
thermostat and the exterior has an effect on the delay between the peaks of the two<br />
curves. Node 8 is farther from the exterior than node 3, so the delay is larger in the<br />
second plot than in the first.<br />
Notice also the qualitative differences between the two simulations. This extra<br />
information comes as a bonus for solving a detailed heat-flow problem that accounts<br />
for the geometry and the heat-diffusion properties.<br />
Model Library path: <strong>COMSOL</strong>_Multiphysics/Multidisciplinary/<br />
thermal_controller_simulink<br />
Using the Graphical User Interface—No Controller<br />
Before exporting the model description to Simulink, run a time-dependent simulation<br />
in <strong>COMSOL</strong> Multiphysics, running with the heater turned on with an initial<br />
temperature of 20 degrees in the plate.<br />
MODEL NAVIGATOR<br />
1 Select 2D in the Space dimension list.<br />
2 In the list of application modes, open <strong>COMSOL</strong> Multiphysics>Heat Transfer and then<br />
select Conduction and finally Transient analysis.<br />
CONTROLLING TEMPERATURE | 345
3 Use the default dependent variable name T. Make sure the Lagrange - Quadratic<br />
element type is selected in the Elements list.<br />
4 Click OK.<br />
GEOMETRY MODELING<br />
1 In the Draw menu, point to Specify Objects and then click Rectangle.<br />
2 In the Rectangle dialog box, type 0.3 and 0.2 in the Width and Height edit fields.<br />
3 Click OK.<br />
4 Click the Zoom Extents button.<br />
5 In the Draw menu, point to Specify Objects and then click Square.<br />
6 In the Square dialog box, type 0.04 in the Width edit field. In then Position area,<br />
select Center in the Base list and enter 0.1 and 0.1 in the x and y edit fields.<br />
7 Click OK.<br />
8 In the Draw menu, point to Specify Objects and then click Point.<br />
9 In the Point dialog box, type 0.05 0.2 and 0.1 0.1 in the x and y edit fields,<br />
respectively, to create two points at (0.05, 0.1) and (0.2, 0.1).<br />
10 Click OK.<br />
346 | CHAPTER 9: MULTIDISCIPLINARY MODELS
OPTIONS AND SETTINGS<br />
1 From the Options menu, choose Constants.<br />
2 Enter the following constants:<br />
NAME EXPRESSION<br />
HeatState 1<br />
Tout 20<br />
3 Click OK.<br />
PHYSICS SETTINGS<br />
Boundary Conditions<br />
1 From the Physics menu, choose Boundary Settings.<br />
2 Enter the following boundary conditions:<br />
SETTINGS BOUNDARY 1 BOUNDARIES 2, 3, 8<br />
Boundary condition Heat flux Thermal insulation<br />
h 54/1e-3<br />
T inf<br />
3 Click OK.<br />
Subdomain Settings<br />
1 From the Physics menu, choose Subdomain Settings.<br />
2 Enter the following material properties:<br />
3 Click the Init tab.<br />
4 Enter the following initial values:<br />
5 Click OK.<br />
Tout<br />
SETTINGS SUBDOMAIN 1 SUBDOMAIN 2<br />
k (isotropic) 4.92e3 4.92e3<br />
ρ 7.82e3 7.82e3<br />
C p 449 449<br />
Q 0 7.5e7*HeatState<br />
SETTINGS SUBDOMAINS 1, 2<br />
T(t 0 ) 20<br />
CONTROLLING TEMPERATURE | 347
MESH GENERATION<br />
To speed up the computation within Simulink, use a coarse mesh.<br />
1 Open the Free Mesh Parameters dialog box, click the Custom mesh size button and<br />
enter 0.05 in the Maximum element size edit field.<br />
2 Click OK to close the dialog box.<br />
3 Initialize the mesh.<br />
COMPUTING THE SOLUTION<br />
Solve the heat equation using 21 equal steps for 20 minutes, starting at time = 0:<br />
1 Open the Solver Parameters dialog box from the Solve menu.<br />
2 Enter range(0,20) in the Times edit field.<br />
3 Click OK.<br />
4 Click the Solve button to start the simulation.<br />
A plot of the surface temperature at Time = 20 appears as in this figure:<br />
348 | CHAPTER 9: MULTIDISCIPLINARY MODELS
Exporting to Simulink—Temperature Control<br />
The result of exporting a model from <strong>COMSOL</strong> Multiphysics to Simulink is a<br />
structure variable in the MATLAB workspace. To use the model in Simulink, simply<br />
drag the <strong>COMSOL</strong> Multiphysics Subsystem block to your Simulink model as described in<br />
“Modeling in Simulink” on page 350.<br />
The following variables affect the temperature of the metal block:<br />
Exterior temperature, Tout<br />
The state of the heater, HeatState, which can have the values 1 or 0, corresponding<br />
to on or off<br />
The output from the <strong>COMSOL</strong> Multiphysics model is the temperature in the block<br />
where the thermostat is located:<br />
Thermostat temperature, Temp<br />
You need this variable to control the heater.<br />
EXPORTING TO SIMULINK<br />
1 Enter the model as described on page 345.<br />
2 On the File menu, point to Export and then click Simulink Model to open the Export<br />
Simulink Model dialog box.<br />
3 Enter blocksct in Structure name and change Simulink block type to Linearized<br />
dynamic. On the Variables tab, enter HeatState Tout in Input. To add the output<br />
variable Temp, click Add and enter Variable name Temp. Click Point, and select Point<br />
3 in the list. Keep the Expression T. Click OK.<br />
4 Open a Simulink model that can use the <strong>COMSOL</strong> Multiphysics model by typing<br />
in MATLAB<br />
thermal_controller_mdl<br />
As an alternative you can enter the Simulink model by following the instructions in<br />
the section “Modeling in Simulink” below.<br />
USING THE PROGRAMMING LANGUAGE<br />
1 Enter the model as described on page 345.<br />
2 On the File menu, point to Export and then click FEM Structure to export the FEM<br />
Structure to MATLAB.<br />
3 Type the command<br />
CONTROLLING TEMPERATURE | 349
locksct = femsim(fem,'input',{'HeatState' 'Tout'},...<br />
'output',{{'T' zeros(0,1) 'dom' 3}},...<br />
'outnames',{'Temp'},'state','on');<br />
This creates a structure which the <strong>COMSOL</strong> Multiphysics block within Simulink<br />
can use to run the <strong>COMSOL</strong> Multiphysics model as part of the Simulink simulation.<br />
The syntax {'T' zeros(0,1) 'dom' 3} means that the output Temp is computed<br />
by evaluating the expression T in point 3. Use the syntax of the postinterp<br />
command to specify outputs in this way.<br />
4 Open a Simulink model that can use the <strong>COMSOL</strong> Multiphysics model by typing<br />
thermal_controller_mdl<br />
As an alternative you can enter the Simulink model by following the instructions<br />
below.<br />
MODELING IN SIMULINK<br />
1 Start Simulink by typing simulink in the MATLAB Command Window. Draw a<br />
model as shown below. You find the <strong>COMSOL</strong> Multiphysics Subsystem block under<br />
<strong>COMSOL</strong> Multiphysics in the Simulink block library. See the Simulink documentation<br />
for more information about creating models.<br />
350 | CHAPTER 9: MULTIDISCIPLINARY MODELS
2 To set up the input and output ports of the <strong>COMSOL</strong> Multiphysics Subsystem block,<br />
double-click that block and set the structure name to blocksct. Click OK.<br />
3 Specify the values of the constant blocks for Thermostat Setting and Average Exterior<br />
Temperature as in the previous figure.<br />
4 In the Relay block, enter the value 1 as the Switch on point and -1 as the Switch off<br />
point.<br />
CONTROLLING TEMPERATURE | 351
5 In the Sine Wave block, set the amplitude to 10 and the frequency to 2*pi/120,<br />
which corresponds to a period of 120 minutes.<br />
6 Open the Simulation Parameters dialog box by making a selection from the<br />
Simulation menu. Set the Stop time to 240 minutes and the Solver to ode15s. The<br />
stability of discrete heat equations is known to put severe constraints on the time<br />
step of explicit methods. Thus you should select the ode15s solver (implicit) rather<br />
than the explicit integrators.<br />
7 Now solve the system by selecting Start from the Simulation menu.<br />
8 To view the temperature at node 3, double-click the Scope block.<br />
352 | CHAPTER 9: MULTIDISCIPLINARY MODELS
9 Finally switch the thermostat from node 3 to node 8. On the File menu, point to<br />
Export and then click Simulink Model to open the Export Simulink Model dialog box.<br />
10 Select Point 8 in the list. Click OK.<br />
11 Restart the simulation in Simulink.<br />
CONTROLLING TEMPERATURE | 353
354 | CHAPTER 9: MULTIDISCIPLINARY MODELS
10<br />
Multiphysics Models<br />
Multiphysics models include the coupling of several dependent variables from<br />
different physics in the same model. Typical multiphysics applications include<br />
fluid-structure, thermal-structure, and thermal-electric couplings. In <strong>COMSOL</strong><br />
Multiphysics, you can also build extended multiphysics models, which contain<br />
several kinds of physics and equations on more than one geometry. Extended<br />
multiphysics model can include any mix of 0D (ODEs or algebraic equations), 1D,<br />
2D, and 3D geometries.<br />
355
Free Convection<br />
Introduction<br />
This example describes a fluid flow problem with heat transfer in the fluid. An array of<br />
heating tubes is submerged in a vessel with fluid flow entering at the bottom.<br />
Figure 10-1 shows the setup.<br />
Fluid flow<br />
direction<br />
Figure 10-1: Heating tubes and direction of the fluid flow<br />
Model Definition<br />
The first consideration when modeling should always be the true dimension of the<br />
problem. Sometimes there are no variations in the third dimensions, and it can be<br />
extrapolated from the solution of a related 2D case. Neglecting any end effects from<br />
the walls of the vessel, the solution is constant in the direction of the heating tubes,<br />
therefore you can reduce the model to a 2D domain.<br />
356 | CHAPTER 10: MULTIPHYSICS MODELS<br />
Heating tubes
Figure 10-2: Using symmetry to reduce computation time and complexity. The model<br />
describes one section of the array of heating tubes (indicated by the dashed lines).<br />
The next step is finding symmetries. In this case, using symmetry planes, it suffices to<br />
model the thin domain indicated in Figure 10-2.<br />
GOVERNING EQUATIONS<br />
This is a multiphysics model because it involves more than one kind of physics. The<br />
incompressible Navier-Stokes equations from fluid dynamics work together with a heat<br />
transfer equation. There are four unknown field variables (dependent variables):<br />
The velocity field components, u and v<br />
The pressure, p<br />
The temperature, T<br />
They are all related through bidirectional multiphysics couplings.<br />
The incompressible Navier-Stokes equations consist of a momentum balance (a vector<br />
equation) and a mass conservation and incompressibility condition:<br />
∂u 2<br />
ρ + ρu ⋅ ∇u<br />
= – ∇p<br />
+ η∇<br />
u+ F<br />
∂t<br />
∇ ⋅ u =<br />
0<br />
FREE CONVECTION | 357
Here<br />
u is the velocity field.<br />
p is the pressure.<br />
F is a volume force.<br />
ρ is the fluid density.<br />
η is the dynamic viscosity.<br />
∇ is the vector differential operator.<br />
The heat equation is an energy conservation equation that says that the change in<br />
energy is equal to the heat source minus the divergence of the diffusive heat flux:<br />
where C p is the heat capacity of the fluid and ρ is fluid density. Q represents a source<br />
term. The velocity field comes from the incompressible Navier-Stokes equation.<br />
Modeling in <strong>COMSOL</strong> Multiphysics<br />
To build a model in <strong>COMSOL</strong> Multiphysics using the above equations, use two<br />
application modes: the Incompressible Navier-Stokes application mode for fluid flow<br />
and the Convection and Conduction application mode for heat transfer. The<br />
multiphysics couplings enter directly into the physics settings in the application modes.<br />
In this model, the equations are coupled in both directions. First, add free convection<br />
to the momentum balance with the Boussinesq approximation. This approximation<br />
ignores variations in density with temperature, except that the variations give rise to a<br />
buoyancy force lifting the fluid. This force enters the F term in the incompressible<br />
Navier-Stokes equations.<br />
At the same time, the heat equation must account for the velocity field. Using the<br />
predefined Fluid-Thermal Incompressible Flow coupled multiphysics entry, the<br />
velocity components from the incompressible Navier-Stokes equations appear<br />
automatically as the velocity field for the convective heat transfer in the Convection<br />
and Conduction application mode.<br />
358 | CHAPTER 10: MULTIPHYSICS MODELS<br />
ρC ⎛∂T p + u ⋅ ∇T⎞<br />
+ ∇ ⋅ ( – k∇T ) =<br />
Q<br />
⎝∂t⎠
Results<br />
The analysis of the coupled thermal-fluid model provides the velocity field, pressure<br />
distribution, and temperature distribution in the fluid. Figure 10-3 shows a<br />
postprocessing plot of the velocity field and the temperature. Without heating, you<br />
would expect an exit y-velocity that is slightly lower toward the left side, behind the<br />
heating tube (wake effect). In this case, however, you see that the y-velocity is higher<br />
on the left side. This is because of the buoyancy effect of the free convection.<br />
Figure 10-3: The velocity field and temperature distribution in the fluid.<br />
Using integration to find the mean temperature at the outlet shows that the<br />
temperature increases roughly 0.75 K from the inlet to the outlet.<br />
For further analysis, see “Time-Dependent Simulation” on page 372.<br />
Model Library path: <strong>COMSOL</strong>_Multiphysics/Multiphysics/free_convection<br />
FREE CONVECTION | 359
Modeling Using the Graphical User Interface<br />
MODEL NAVIGATOR<br />
Use the following steps to create a new multiphysics model:<br />
1 Click the New tab, and check that 2D is selected in the Space dimension list. The space<br />
dimension must always be selected first, because the available application modes<br />
vary depending on the space dimension.<br />
2 In the application modes list on the left, open the <strong>COMSOL</strong> Multiphysics folder, open<br />
the Fluid-Thermal Interaction folder, and then click Fluid-Thermal Incompressible Flow.<br />
3 Click OK to close the Model Navigator and create a new model.<br />
Selecting the Fluid-Thermal Incompressible Flow predefined multiphysics coupling in the<br />
Model Navigator.<br />
OPTIONS AND SETTINGS<br />
Later in this model you need the fluid properties of the water, the temperatures at the<br />
inlet and on the surface of the heating tubes, and the inlet velocity. It is convenient to<br />
enter this data as constants in the Constants dialog box. In this model, all values are<br />
given in SI units.<br />
1 From the Options menu, choose Constants.<br />
360 | CHAPTER 10: MULTIPHYSICS MODELS
2 First add the density of the fluid:<br />
Enter rho0 in the Name field. Press the Tab key to move the cursor to the Expression<br />
field and enter 1e3[kg/m^3]. The value is saved when you press Enter, click Apply,<br />
or otherwise leave the Expression field. In the Description column, type Fluid<br />
density (adding a description is optional).<br />
3 Continue by adding the remaining properties.<br />
NAME EXPRESSION DESCRIPTION<br />
rho0 1e3[kg/m^3] Fluid density<br />
mu 1e-3[Pa*s] Dynamic viscosity<br />
Cp 4.2e3[J/(kg*K)] Heat capacity<br />
kc 0.6[W/(m*K)] Thermal conductivity<br />
alpha0 0.18e-3[1/K] Thermal expansion coefficient<br />
g0 9.8[m/s^2] Acceleration due to gravity<br />
v_in 5e-3[m/s] Inlet velocity<br />
T_in 293[K] Inlet temperature<br />
T_heat 303[K] Heater temperature<br />
4 When you have entered all constants, click OK.<br />
The model size is on the order of a few centimeters, while the area visible in the user<br />
interface is on the order of meters (remember that you are modeling in SI units).<br />
Before you start drawing the geometry, change the size of the visible drawing area and<br />
the grid spacing:<br />
1 From the Options menu, choose Axes/Grid Settings.<br />
FREE CONVECTION | 361
2 In the Axes/Grid Settings dialog box, type -0.01, 0.01, -0.01, and 0.05 in the<br />
x min, x max, y min, and y max edit fields, respectively.<br />
3 Click the Grid tab and then click to clear the Auto check box. Enter 0.005 in both<br />
the x spacing and y spacing edit fields.<br />
4 Click OK to close the dialog box and apply the settings.<br />
GEOMETRY MODELING<br />
The next step is to create the model geometry. This is easy, involving only a rectangle<br />
and circle geometry object, subtracting one from the other.<br />
1 Draw a rectangle of width 0.005 and height 0.04, with the lower left corner at the<br />
origin. Click the Rectangle/Square toolbar button. It is the first button on the Draw<br />
toolbar, on the left side of the drawing area. Then click at (0,0) using the left mouse<br />
button, and drag the mouse to (0.005,0.04). Release the button.<br />
2 Draw a circle with radius 0.005 centered at (0, 0.015). Click the fourth button on<br />
the Draw toolbar, Ellipse/Circle (Centered). Then, using the right mouse button,<br />
click at (0, 0.015) and drag the mouse in any direction, keeping the button down,<br />
until the circle has a radius of 0.005. Using the right mouse button constrains the<br />
ellipse to a circle.<br />
3 The desired radius of the circle is not 0.005, however, but is 0.0025. To fix this,<br />
double-click the circle object or select Object Properties from the Draw menu. In the<br />
Circle dialog box, enter 0.0025 as Radius and click OK.<br />
362 | CHAPTER 10: MULTIPHYSICS MODELS
4 Select both the circle and the rectangle. Either draw a rubber-band box around both<br />
them, or press the shortcut key Ctrl+A to select all objects.<br />
FREE CONVECTION | 363
5 Click the Difference button on the Draw toolbar and then the Zoom Extents button<br />
on the Main toolbar. The Zoom Extents button adjusts the axes settings so that the<br />
geometry fits nicely into the drawing area.<br />
PHYSICS SETTINGS<br />
Boundary Conditions<br />
Specify the boundary conditions, first for the Convection and Conduction application<br />
mode and then for the Incompressible Navier-Stokes application mode.<br />
1 From the Physics menu, choose Boundary Settings. This opens the Boundary Setting<br />
dialog box and transfers <strong>COMSOL</strong> Multiphysics to Boundary mode. The contents<br />
of this dialog box vary depending on the application mode.<br />
2 Start by insulating all boundaries. This is the default boundary condition, so you do<br />
not need to change anything.<br />
3 Select the inflow boundary by clicking at the corresponding edge in the geometry<br />
or by selecting Boundary 2 from the Boundary selection list. Select Temperature from<br />
the Boundary conditions list and type T_in in the Temperature edit field.<br />
364 | CHAPTER 10: MULTIPHYSICS MODELS
4 Select the heater that exists along Boundaries 6 and 7 from the Boundary selection<br />
list. Then select Temperature in the Boundary conditions list and type T_heat in the<br />
Temperature edit field.<br />
Specifying a temperature of T_heat on Boundaries 6 and 7.<br />
5 Click the outflow boundary (Boundary 4) and select Convective flux in the Boundary<br />
conditions list.<br />
6 Click Apply to confirm the settings for the Convection and Conduction application<br />
mode.<br />
7 Switch to the Incompressible Navier-Stokes application mode by selecting this<br />
mode from the Multiphysics menu. You can now open the corresponding Boundary<br />
Settings dialog box from the Physics menu (you can also use the Model Tree to<br />
access the settings for both applications modes).<br />
8 Select any boundary in the Boundary selection list and then press Ctrl+A to select all<br />
boundaries in the list and then select the Symmetry boundary from the Boundary type<br />
list.<br />
FREE CONVECTION | 365
9 For the inflow boundary, select Boundary 2 and then choose Inlet from the Boundary<br />
type list and Velocity from the Boundary condition list. Type v_in in the Normal inflow<br />
velocity edit field.<br />
Specifying the velocity in the normal direction.<br />
10 Continue by selecting the outflow boundary (Boundary 4). From the Boundary type<br />
list, select Outlet. The default condition Pressure, no viscous stress is correct.<br />
11 Finally select Boundaries 6 and 7 and then select the type Wall and the condition No<br />
slip. Click OK to confirm your choices and close the dialog box.<br />
Subdomain Settings<br />
1 From the Physics menu, choose Subdomain Settings to open the Subdomain Settings<br />
dialog box and put the user interface in Subdomain mode.<br />
366 | CHAPTER 10: MULTIPHYSICS MODELS
2 Select the single subdomain, Subdomain 1, and use the already defined constants to<br />
set the density and the viscosity. Type rho0 and mu in the Density and Dynamic<br />
viscosity edit fields, respectively.<br />
Providing fluid properties and a volume force in the Subdomain Settings dialog box.<br />
3 To model the effect of temperature on the density of the fluid as a buoyancy force<br />
in the y direction, type alpha0*g0*rho0*(T-T_in) in the Volume force, y dir. edit<br />
field (F y). Remember that T is the dependent variable from the Convection and<br />
Conduction application mode. Notice that an extended edit field displays the entire<br />
expression.<br />
In the Subdomain Settings dialog box you can also set initial values. The Navier-Stokes<br />
equations are nonlinear and therefore require an educated guess as an initial solution<br />
to the nonlinear solver. A good initial value is necessary for the model to converge. The<br />
initial values also serve as initial conditions for the time-dependent solver. In this case,<br />
a constant velocity field v in has sufficient quality.<br />
1 Click the Init tab in the Subdomain Settings dialog box.<br />
FREE CONVECTION | 367
2 Set the initial value v(t 0 ) to v_in.<br />
The initial values for the velocity components.<br />
3 Click OK.<br />
Continue with the subdomain settings for the Convection and Conduction application<br />
mode:<br />
1 Use the Multiphysics menu to switch to the Convection and Conduction application<br />
mode.<br />
368 | CHAPTER 10: MULTIPHYSICS MODELS
2 From the Physics menu, choose Subdomain Settings to open the Subdomain Settings<br />
dialog box for the Convection and Conduction application mode.<br />
Specifying the thermal properties.<br />
3 Type kc, rho0, and Cp in the k (isotropic), ρ, and Cp edit fields, respectively.<br />
Notice that u and v appear in the components of the u edit field for the velocity field.<br />
They are the dependent variables for the velocity components from the<br />
Incompressible Navier-Stokes application mode, which account for the convective<br />
transport of heat. This is the predefined multiphysics coupling that the<br />
Fluid-Thermal Incompressible Flow coupled multiphysics entry sets up<br />
automatically.<br />
FREE CONVECTION | 369
4 The temperature also needs an initial value. Use the inlet temperature as the starting<br />
temperature in the entire domain. Click the Init tab and enter T_in in the T(t 0 ) field.<br />
Then click OK to confirm all settings and close the dialog box.<br />
The initial value for the temperature.<br />
MESH GENERATION<br />
In this model, use a predefined setting for a fine mesh:<br />
1 From the Mesh menu, choose Free Mesh Parameters.<br />
2 In the Free Mesh Parameters dialog box, select Finer in the Predefined mesh sizes list.<br />
3 Click OK.<br />
4 Initialize the default mesh clicking the Initialize Mesh button on the Main toolbar.<br />
5 Click the Refine Mesh button on the Main toolbar to refine the mesh once. This<br />
improves the accuracy of the solution.<br />
COMPUTING THE SOLUTION<br />
The required nonlinear solver is the default solver, so you start the solver directly.<br />
From the Solve menu choose Solve Problem, or click the Solve button on the Main<br />
toolbar. Notice the solution progress window where you can monitor and stop the<br />
solution process. The solution converges quickly in this case.<br />
As soon as the solution is ready, <strong>COMSOL</strong> Multiphysics displays a default plot. In this<br />
case, you get a surface plot of the velocity field.<br />
370 | CHAPTER 10: MULTIPHYSICS MODELS
POSTPROCESSING AND VISUALIZATION<br />
In postprocessing mode you can select from many different plot types and set<br />
parameters for the different plots. Using the postprocessing utilities you can visualize<br />
the solution variables, their derivatives, and the space coordinates. Many frequently<br />
used expressions are predefined as application mode variables, directly available from<br />
lists in the Plot Parameters dialog box. Perform the following steps to create the plot<br />
in Figure 10-3:<br />
1 Click the Plot Parameters button on the Main toolbar. This opens the Plot<br />
Parameters dialog box.<br />
2 To obtain a surface plot with superimposed velocity vectors, select the Surface and<br />
Arrow check boxes in the Plot type area on the General page.<br />
3 Click the Surface tab.<br />
4 On the Surface Data page, select Convection and Conduction (cc)>Temperature from<br />
the Predefined quantities list.<br />
5 Click the Arrow tab.<br />
6 Select Incompressible Navier-Stokes (ns)>Velocity field from the Predefined quantities<br />
list on the Subdomain Data page.<br />
7 In the Arrow positioning area, type 10 and 15 in the x points and y points edit fields,<br />
respectively.<br />
8 Finally, in the Arrow parameters area, click the Color button to choose a suitable<br />
arrow color, for example, white. When you have selected a color, click OK to close<br />
the Arrow Color dialog box.<br />
9 Click OK.<br />
ADVANCED POSTPROCESSING<br />
Integrating to Find the Mean Temperature<br />
Because both the velocity and temperature vary along the outlet at the top, you must<br />
use additional postprocessing to get the mean temperature at the exit. The bulk<br />
temperature, or the “cup mixing temperature” is the temperature that the fluid has if<br />
it is collected in a cup at the outflow and is properly mixed. For this 2D example,<br />
assuming constant C p and ρ, the cup mixing temperature is given by the following<br />
expression on Boundary 4 (the outlet):<br />
〈 T〉<br />
∫<br />
∫<br />
T( n⋅u) ds<br />
=<br />
-------------------------------<br />
( n⋅u) ds<br />
FREE CONVECTION | 371
where u is the velocity vector and the n is the unit normal vector of the boundary.<br />
1 To obtain the denominator, choose Boundary Integration from the Postprocessing<br />
menu.<br />
2 Select Boundary 4.<br />
3 In the Expression edit field, type nx*u+ny*v—or just v, because the outward normal<br />
vector on Boundary 4 is e y . Click Apply.<br />
372 | CHAPTER 10: MULTIPHYSICS MODELS<br />
The message log at the bottom of the main user interface shows the value of the<br />
denominator (the decimal sequence might differ slightly between platforms):<br />
Value of integral: 2.501098e-5 [m^2/s], Expression: v, Boundary: 4.<br />
4 In the Boundary Integration dialog box, type T*v/2.5e-5[m^2/s] in the Expression<br />
edit field. This computes the resulting mean temperature.<br />
5 Click OK. The result is displayed in the message log.<br />
You should get a mean temperature of roughly 293.8 K, that is, a temperature rise of<br />
approximately 0.8 K between inlet and outlet.<br />
Time-Dependent Simulation<br />
This example is an extension of the stationary free convection model from the previous<br />
section. In the first step of modeling the heat transfer by forced and free convection,<br />
we found a steady-state solution. See “Modeling Using the Graphical User Interface”<br />
on page 360 on how to create and save the first part of the model.
Modeling Using the Graphical User Interface<br />
The following section assumes that you start from the final state of the steady-state<br />
model.<br />
LOADING A PREVIOUSLY SAVED MODEL<br />
If you have previously saved the results from the first part of the model as a Model<br />
MPH-file, now load it into <strong>COMSOL</strong> Multiphysics (if you are continuing from the<br />
previous steady-state model, skip the following three steps):<br />
1 From the File menu, choose Open. You can also click the Open button on the main<br />
toolbar to load a Model MPH-file.<br />
2 Browse to locate the Model MPH-file and select it.<br />
3 Click Open.<br />
COMPUTING THE SOLUTION<br />
1 From the Solve menu, choose Solver Parameters.<br />
Before solving the model with the time-dependent solver, you must set the analysis<br />
type to transient for both application modes.<br />
2 In the Analysis types area, select Transient from the lists of analysis types for both the<br />
Convection and Conduction (cc) application mode and the<br />
Incompressible Navier-Stokes (ns) application mode.<br />
3 Click the General tab in the Solver Parameters dialog box.<br />
4 The General page for the time-stepping algorithms is now active. The output times<br />
can be a vector, specifying for which times the solution should be saved for<br />
FREE CONVECTION | 373
374 | CHAPTER 10: MULTIPHYSICS MODELS<br />
postprocessing. Type range(0,30) in the Times edit field to specify that the<br />
solution will be sampled every second during 30 seconds.<br />
Setting the parameters for the time-dependent analysis.<br />
5 Click the Time Stepping tab.<br />
6 Select Free from the Time steps taken by solver list. For this model, the time steps<br />
that the solver computes are more efficient than the default time steps used for the<br />
Incompressible Navier-Stokes application mode.<br />
7 Click OK to confirm the choices.<br />
8 Click the Solve button on the Main toolbar to start the time-dependent analysis.<br />
POSTPROCESSING AND VISUALIZATION<br />
The plot shows the solution for the last time step using the same plot settings as before.<br />
Select which time step to display in the Plot Parameters dialog box:<br />
1 Click the Plot Parameters button to open the Plot Parameters dialog box.<br />
2 Click the General tab and select the time step that you want to see from the Solution<br />
at time list.
3 Click Apply to plot the solution at that time.<br />
FREE CONVECTION | 375
Magnetic Drug Targeting in Cancer<br />
Therapy<br />
Introduction<br />
Current research on methods to target chemotherapy drugs in the human body<br />
includes the investigation of bio-compatible magnetic nanocarrier systems. For<br />
example, magnetic liquids such as ferrofluids can play an important role as drug carriers<br />
in the human body (Ref. 1). As such, they can be used for drug targeting in modern<br />
locoregional cancer treatment. A remaining challenge for this medical application is<br />
the choice of clinical setting. Important parameters are optimal adjustment of the<br />
external magnetic field and the choice of ferrofluid properties.<br />
Avoiding damage to healthy human cells from chemotherapy drugs imposes an upper<br />
limit in the treatment dose. This limit impedes the chances of successful treatment of<br />
the tumor cells. One objective of modern cancer research is therefore to concentrate<br />
chemotherapy drugs locally on tumor tissue and to weaken the global exposure to the<br />
organism.<br />
This model of the ferrohydrodynamics of blood demonstrates a simple setup for<br />
investigating an external magnetic field and its interaction with blood flow containing<br />
a magnetic carrier substance. The model treats the liquid as a continuum, which is a<br />
good first step. You can extend this model by particle tracing, making it a multiscale<br />
model. The equations and theory are based on Maxwell’s equations and the<br />
Navier-Stokes equations. You first solve Maxwell’s equations in the full modeling<br />
domain formed by permanent-magnet, blood-vessel, tissue, and air domains. A<br />
magnetic volume force then couples the resulting magnetic field to a fluid-flow<br />
problem in the blood-vessel domain described by the Navier-Stokes equations.<br />
Model Definition 1<br />
The model geometry represents a blood vessel, a permanent magnet, surrounding<br />
tissue, and air in 2D. Blood feeds into the vessel from the left in Figure 10-4. The<br />
velocity and pressure fields are calculated in the blood stream. <strong>COMSOL</strong> Multiphysics<br />
computes the magnetic field (magnetic vector potential) generated by the permanent<br />
1. This model was provided by Dr. Daniel J. Strauss, The Institute for New Materials, Inc.,<br />
www.inm-gmbh.de.<br />
376 | CHAPTER 10: MULTIPHYSICS MODELS
magnet. This magnetic field generates a magnetic volume force that affects the flow<br />
field in the blood vessel.<br />
Blood flow<br />
through vessel<br />
Figure 10-4: Geometric representation of the model.<br />
MAGNETOSTATIC EQUATIONS<br />
Because the magnetic part of this problem is static, Maxwell-Ampere’s law for the<br />
magnetic field H (A/m) and the current density J (A/m 2 ) applies:<br />
Furthermore, Gauss’ law for the magnetic flux density B (Vs/m 2 ) states that<br />
(10-1)<br />
∇ ⋅ B = 0 . (10-2)<br />
The constitutive equations describing the relation between B and H in the different<br />
parts of the modeling domain read:<br />
⎧<br />
⎪<br />
B =<br />
⎨<br />
⎪<br />
⎩<br />
Here µ 0 is the magnetic permeability of vacuum (Vs/(A·m)); µ r is the relative<br />
magnetic permeability of the permanent magnet (dimensionless); B rem is the<br />
remanent magnetic flux (A/m); and M ff is the magnetization vector in the blood<br />
stream (A/m), which is a function of the magnetic field, H.<br />
Defining a magnetic vector potential A such that<br />
Permanent magnet<br />
System boundary<br />
∇ × H = J<br />
µ 0 µ r, magH+<br />
Brem µ 0( H+ Mff( H)<br />
)<br />
µ 0H permanent magnet<br />
blood stream<br />
tissue and air<br />
Human tissue<br />
(10-3)<br />
B = ∇ × A, ∇ ⋅ A =<br />
0 , (10-4)<br />
MAGNETIC DRUG TARGETING IN CANCER THERAPY | 377
you finally, by substitution in Equation 10-1 through Equation 10-3, arrive at the<br />
following vector equation to solve:<br />
Simplifying to a 2D problem with no perpendicular currents, this equation reduces to<br />
378 | CHAPTER 10: MULTIPHYSICS MODELS<br />
1<br />
∇ × ⎛-----∇ × A– M⎞<br />
= 0 . (10-5)<br />
⎝µ ⎠<br />
0<br />
Note that this equation assumes that the magnetic vector potential has a nonzero<br />
component only perpendicularly to the plane, A = (0, 0, A z).<br />
An arc tangent expression with two material parameters α (A/m) and β (m/A)<br />
characterizes the induced magnetization M ff(x, y) = (M ffx, M ffy) of a ferrofluid (Ref.<br />
2):<br />
For the magnetic fields of interest, it is possible to linearize these expressions to obtain<br />
where χ = αβ is the magnetic susceptibility.<br />
(10-6)<br />
Boundary Conditions<br />
Along a system boundary reasonably far away from the magnet (see Figure 10-4) you<br />
can apply a magnetic insulation boundary condition, A z = 0.<br />
FLUID FLOW EQUATIONS<br />
1<br />
∇ × ⎛--∇× A– M⎞<br />
= J<br />
⎝µ ⎠<br />
M x<br />
M y<br />
M x<br />
M y<br />
⎛ β ∂Az⎞ = αatan⎜-----<br />
⎝µ 0∂y<br />
⎟<br />
⎠<br />
⎛ β ∂Az⎞ = αatan⎜-----<br />
⎝µ 0∂x<br />
⎟<br />
⎠<br />
χ ∂Az = -----<br />
µ 0∂y<br />
χ ∂Az =<br />
– -----<br />
µ 0∂x<br />
The Navier-Stokes equations describe the time-dependent mass and momentum<br />
balances for an incompressible flow:
∂u T<br />
ρ – ∇⋅η( ∇u+ ( ∇u)<br />
) + ρu ⋅ ∇u<br />
+ ∇p =<br />
∂t<br />
F<br />
∇ ⋅ u = 0<br />
(10-7)<br />
where η denotes the dynamic viscosity (kg/(m·s)), u the velocity (m/s), ρ the fluid<br />
density (kg/m 3 ), p the pressure (N/m 2 ), and F a volume force (N/m 3 ).<br />
With the assumption that the magnetic nanoparticles in the fluid do not interact, the<br />
magnetic force F = (Fx, Fy) on the ferrofluid for relatively weak fields is given by<br />
F = M ∇ H . Using Equation 10-3, Equation 10-4, and Equation 10-6 then leads<br />
to the expressions<br />
F x<br />
F y<br />
χ ∂Az∂ ------------<br />
2 ∂x<br />
2 Az ∂x 2<br />
∂Az∂ -----------<br />
∂y<br />
2 ⎛ Az⎞ = ⎜ + ------------ ⎟<br />
⎝ ∂x∂y⎠<br />
µ 0 µ r<br />
χ ∂Az∂ ------------<br />
2 ∂x<br />
2 Az ∂Az∂ ------------<br />
∂x∂y ∂y<br />
2 Az ∂y 2<br />
⎛ ⎞<br />
= ⎜ + ----------- ⎟<br />
⎝ ⎠<br />
µ 0 µ r<br />
To get the final expression for the volume force in the blood stream, multiply these<br />
expressions by the ferrofluid mass fraction, k ff .<br />
Boundary Conditions<br />
On the vessel walls, apply no-slip conditions, u = v = 0. At the outlet, you can set an<br />
outlet pressure condition, p = 0. At the inlet boundary, specify a parabolic flow profile<br />
on the normal inflow velocity according to 4 U m s(1−s), where s is a boundary segment<br />
length parameter that goes from 0 to 1 along the inlet boundary segment and U m is<br />
the maximal flow velocity. To emulate the heart beat, the inflow velocity follows a<br />
sinusoidal expression in time:<br />
U0 =<br />
2Ums ( 1 – s)<br />
( sin(<br />
ωt)<br />
+ sin(<br />
ωt)<br />
)<br />
2<br />
MAGNETIC DRUG TARGETING IN CANCER THERAPY | 379
Selecting the angular velocity ω to be 2π rad/s gives a heart beat rate of 60 beats per<br />
minute. Figure 10-5 displays the resulting expression (normalized to unity).<br />
Figure 10-5: Simulated heart beat.<br />
Model Data<br />
Table 10-1 lists the relevant material properties for the model.<br />
TABLE 10-1: MODEL DATA<br />
QUANTITY DESCRIPTION VALUE<br />
µ r,mag Relative permeability, magnet 5·10 3<br />
Brem Remanent flux density, magnet 0.5 T<br />
α Ferrofluid magnetization-curve parameter 10 -4 A/m<br />
β Ferrofluid magnetization-curve parameter 3·10 -5 (A/m) -1<br />
ρ Density, blood 1000 kg/m 3<br />
η Dynamic viscosity, blood 5·10 -3 kg/(m·s)<br />
Results<br />
Figure 10-3 shows a detail from the plot of the magnetic field strength. The highest<br />
B-field strength clearly occurs inside the magnet. To see the low-level variations in the<br />
surrounding tissue and vessels, the plot does not show magnetic flux densities above<br />
0.17 T. The geometric form of the magnet generates strong fields just outside of the<br />
rounded corners. Sharper corners generate even stronger local fields.<br />
380 | CHAPTER 10: MULTIPHYSICS MODELS
Figure 10-6: Magnetic vector potential and magnetic flux density, B field (white areas<br />
surpass the plot color range).<br />
Figure 10-7 shows the velocity field at a heart beat where there is a maximum mean<br />
throughput in the vessel. At the left end there is a parabolic laminar flow profile.<br />
MAGNETIC DRUG TARGETING IN CANCER THERAPY | 381
Figure 10-7: Velocity field at maximum blood throughput (t = 0.25).<br />
Figure 10-8 reveals the velocity field between two heart beats, where the net<br />
throughput is zero.<br />
382 | CHAPTER 10: MULTIPHYSICS MODELS
Figure 10-8: Velocity field at zero blood throughput (t = 1).<br />
Modeling in <strong>COMSOL</strong> Multiphysics<br />
EQUATIONS<br />
To model Equation 10-5, use the Magnetostatics application mode in 2D. In the<br />
Subdomain Settings dialog box, choose the constitutive relation<br />
B =<br />
µ 0 µ rH + Br and make use of the fact that the remanent flux density B r = µ 0 χM, where χ is the<br />
magnetic susceptibility.<br />
STAGED SOLUTION<br />
Because the magnetostatic problem is a stationary nonlinear problem that is<br />
independent of the fluid-flow problem, you need to solve that only once. You can<br />
therefore start by solving only Equation 10-5 with the stationary solver. Then proceed<br />
with solving only the fluid-flow problem, Equation 10-7, with the static magnetic<br />
MAGNETIC DRUG TARGETING IN CANCER THERAPY | 383
potential as input. Solve the fluid-flow problem using the time-dependent solver. This<br />
strategy reduces RAM memory allocation and speeds up the solution.<br />
SOLVER SETTINGS<br />
The convergence tolerance for the time-stepping algorithm should only be based on<br />
the truly time-dependent equations. The continuity equation (second line in<br />
Equation 10-7) is stationary and describes the pressure distribution. Therefore, you<br />
can exclude p from the time-stepping tolerance checks. To do so, select Exclude<br />
algebraic in the Error estimation strategy list on the Time Stepping page of the Solver<br />
Parameters dialog box.<br />
FINITE ELEMENT SHAPE FUNCTIONS<br />
This problem includes second-order space derivatives of A in some coefficients. To get<br />
acceptable accuracy, use third-order Lagrange elements in the Magnetostatics<br />
application mode. The default setting in this application mode is second-order<br />
elements.<br />
References<br />
1. P.A. Voltairas, D.I. Fotiadis, and L.K. Michalis, “Hydrodynamics of Magnetic Drug<br />
Targeting,” J. Biomech., vol. 35, pp. 813–821, 2002.<br />
2. C.M. Oldenburg, S.E. Borglin, and G.J. Moridis, “Numerical Simulation of<br />
Ferrofluid Flow for Subsurface Environmental Engineering Applications,” Transport<br />
in Porous Media, vol. 38, pp. 319–344, 2000.<br />
3. R.E. Rosensweig, Ferrohydrodynamics, Dover Publications, New York, 1997.<br />
Model Library path: <strong>COMSOL</strong>_Multiphysics/Multiphysics/<br />
magnetic_drug_targeting<br />
Modeling Using the Graphical User Interface<br />
MODEL NAVIGATOR<br />
1 Start <strong>COMSOL</strong> Multiphysics.<br />
2 In the Model Navigator, select 2D from the Space dimension list.<br />
384 | CHAPTER 10: MULTIPHYSICS MODELS
3 Select <strong>COMSOL</strong> Multiphysics>Fluid Dynamics>Incompressible Navier-Stokes>Transient<br />
analysis.<br />
4 Click first the Multiphysics button and then the Add button.<br />
5 From the list of application modes, select <strong>COMSOL</strong><br />
Multiphysics>Electromagnetics>Magnetostatics. Click Add.<br />
6 Click OK.<br />
GEOMETRY MODELING<br />
1 Click the Rectangle/Square button at the top of the Draw toolbar. Draw an arbitrary<br />
rectangle by clicking in the drawing area and dragging the mouse.<br />
2 Double-click the rectangle.<br />
3 Make the following changes in the dialog box; when done, click OK.<br />
PROPERTY VALUE<br />
Width 0.02<br />
Height 0.06<br />
x -0.05<br />
y 0<br />
4 Click the Zoom Extents button on the Main toolbar.<br />
5 From the Draw menu, choose Fillet/Chamfer. Click on the rectangle R1 and select all<br />
four vertices by Ctrl-clicking them.<br />
6 Type 1e-3 in the Radius edit field, then click OK.<br />
7 Draw three additional arbitrary rectangles using the Rectangle/Square button and set<br />
the object properties like the first one according to the following table:<br />
RECTANGLE WIDTH HEIGHT BASE X BASE Y<br />
R1 0.22 0.05 -0.14 -0.07<br />
R2 0.22 0.02 -0.14 -0.02<br />
R3 0.22 0.13 -0.14 -0.01<br />
MAGNETIC DRUG TARGETING IN CANCER THERAPY | 385
8 Click the Zoom Extents button on the Main toolbar.<br />
OPTIONS AND SETTINGS<br />
1 From the Options menu, choose Constants.<br />
2 Enter constants with names, expressions (values and units), and descriptions (the<br />
descriptions are optional) according to the following table; when done, click OK.<br />
NAME EXPRESSION DESCRIPTION<br />
mur_mag 1 Relative permeability, magnet<br />
B_rem 1[T] Remanent flux density, magnet<br />
alpha 1e4[A/m] Ferrofluid magnetization-curve parameter<br />
beta 3e-5[m/A] Ferrofluid magnetization-curve parameter<br />
chi_ff alpha*beta Magnetic susceptibility, ferrofluid<br />
k_ff 0.1 Ferrofluid mass fraction in blood stream<br />
rho 1000[kg/m^3] Density, blood<br />
eta 0.005[Pa*s] Dynamic viscosity, blood<br />
U_m 50[cm/s] Maximum flow velocity<br />
f 60[1/min] Heart-beat rate<br />
omega 2*pi[rad]*f Pulse angular velocity<br />
386 | CHAPTER 10: MULTIPHYSICS MODELS
Scalar Expressions<br />
1 On the Options menu, point to Expressions and then click Scalar Expressions.<br />
2 Define the following expressions (the descriptions are optional):<br />
NAME EXPRESSION DESCRIPTION<br />
mu0 mu0_qa Permeability of vacuum<br />
M_ffx k_ff*(chi_ff/mu0)*Azy Induced ferrofluid<br />
magnetization, x-component<br />
M_ffy -k_ff*(chi_ff/mu0)*Azx Induced ferrofluid<br />
magnetization, y-component<br />
F_ffx k_ff*(Azx*Azxx+Azy*Azxy)* Ferrofluid volume force,<br />
chi_ff/(mu0*(1+chi_ff)^2) x-component<br />
F_ffy k_ff*(Azx*Azxy+Azy*Azyy)* Ferrofluid volume force,<br />
chi_ff/(mu0*(1+chi_ff)^2) y-component<br />
3 Click OK.<br />
PHYSICS SETTINGS<br />
Application Mode Properties<br />
Change the default element type to be a cubic Lagrange element:<br />
1 From the Multiphysics menu, choose Magnetostatics (qa).<br />
2 From the Physics menu, choose Properties.<br />
3 In the Application Mode Properties dialog box, select Lagrange - Cubic in the Default<br />
element type list. Click OK.<br />
Subdomain Settings—Magnetostatics<br />
1 From the Physics menu, choose Subdomain Settings.<br />
2 On the Physics page, select Subdomain 2.<br />
3 Set the Constitutive relation to B = µ 0 H + µ 0 M.<br />
4 In the left and right M edit fields, enter M_ffx and M_ffy, respectively.<br />
5 Select Subdomain 5, then set the Constitutive relation to B = µ 0µ r H + Br .<br />
6 In the µ r edit field, enter mur_mag. In the right Br edit field for the y-component of<br />
the remanent flux density, enter B_rem. Leave the corresponding x-component at<br />
zero.<br />
7 Click OK.<br />
MAGNETIC DRUG TARGETING IN CANCER THERAPY | 387
Boundary Conditions—Magnetostatics<br />
The default setting is magnetic insulation, so you do not have to make any changes.<br />
To be reassured, choose Physics>Boundary Settings and inspect the boundaries.<br />
Subdomain Settings—Navier-Stokes<br />
1 From the Multiphysics menu, choose Incompressible Navier-Stokes (ns).<br />
2 From the Physics menu, choose Subdomain Settings.<br />
3 Press Ctrl+A to select all five subdomains.<br />
4 Clear the Active in this domain check box.<br />
5 Select Subdomain 2 from the list and select the Active in this domain check box.<br />
6 Specify the fluid properties according to the following table:<br />
QUANTITY VALUE/EXPRESSION<br />
ρ rho<br />
η eta<br />
Fx F_ffx<br />
Fy F_ffy<br />
7 Click the Artificial Diffusion button to add streamline diffusion to the model. This is<br />
necessary because of the high Reynolds number flow.<br />
8 In the Artificial Diffusion dialog box, make sure the Streamline diffusion check box is<br />
selected.<br />
9 On the Init page, leave all initial conditions at zero.<br />
10 Click OK.<br />
Boundary Conditions—Navier-Stokes<br />
1 From the Physics menu, choose Boundary Settings.<br />
2 Specify boundary conditions according to the following table:<br />
SETTINGS BOUNDARY 3 BOUNDARIES 4, 6 BOUNDARY 16<br />
Boundary<br />
type<br />
Boundary<br />
condition<br />
U0 p 0<br />
388 | CHAPTER 10: MULTIPHYSICS MODELS<br />
Inlet Wall Outlet<br />
Velocity<br />
2*s*(1-s)*U_m*(sin(omega*t)+<br />
sqrt(sin(omega*t)^2))<br />
No slip Pressure, no<br />
viscous stress<br />
0
3 Click OK.<br />
MESH GENERATION<br />
1 Choose Mesh>Free Mesh Parameters, and in the dialog box that opens, click the<br />
Subdomain tab.<br />
2 Select Subdomain 2 from the list and enter 0.002 in the Maximum element size edit<br />
field. Click Remesh and OK.<br />
COMPUTING THE SOLUTION<br />
1 Click the Solver Manager button on the Main toolbar.<br />
2 On the Solve For page, select only Magnetostatics (qa). Click OK.<br />
3 Click the Solver Parameters button on the Main toolbar.<br />
4 On the General page, select Stationary from the Analysis list. Click OK.<br />
5 Click the Solve button on the Main toolbar to compute the solution for A z.<br />
6 When the solver has finished, click the Solver Manager button.<br />
7 On the Initial Value page, go to the Values of variables not solved for and linearization<br />
point area and click the Current solution option button.<br />
8 On the Solve For page, select only Incompressible Navier-Stokes (ns). Click OK.<br />
9 Click the Solver Parameters button on the Main toolbar.<br />
MAGNETIC DRUG TARGETING IN CANCER THERAPY | 389
10 On the General page, select Transient from the Analysis list and type<br />
range(0,0.05,2) in the Times edit field.<br />
11 On the Time Stepping page, select Exclude algebraic from the Error estimation strategy<br />
list (see “Solver Settings” on page 384 for an explanation). Click OK.<br />
12 Click the Solve button on the Main toolbar.<br />
The solution takes a few minutes to compute.<br />
POSTPROCESSING AND VISUALIZATION<br />
To generate Figure 10-6 on page 381, follow these instructions.<br />
1 Click the Plot Parameters button on the Main toolbar.<br />
2 On the General page, select the Surface and Contour check boxes in the Plot type area.<br />
3 Click the Surface tab. On the Surface Data page, select Magnetostatics (qa)>Magnetic<br />
flux density, norm from the Predefined quantities list.<br />
4 On the Contour page, select Magnetostatics (qa)>Magnetic potential, z component.<br />
5 Click OK.<br />
To generate Figure 10-7 on page 382 and Figure 10-8 on page 383, proceed in the<br />
following way:<br />
1 Click the Plot Parameters button on the Main toolbar.<br />
2 On the General page, select 0.25 from the Solution at time list.<br />
3 Click the Surface tab. On the Surface Data page, select Incompressible Navier-Stokes<br />
(ns)>Velocity field from the Predefined quantities list.<br />
4 Click Apply to generate the plot in Figure 10-7.<br />
5 On the General page, change the entry in the Solution at time list to 1.<br />
6 Click OK to generate the plot in Figure 10-8.<br />
To generate a movie, do as follows:<br />
1 Open the Plot Parameters dialog box again and go to the Animate tab.<br />
2 Click OK and wait for the movie to be generated (this step can take some time).<br />
When the movie is finished, you can save it as an AVI or QuickTime file using the<br />
Save button in the movie window.<br />
390 | CHAPTER 10: MULTIPHYSICS MODELS
Marangoni Convection<br />
Introduction<br />
Marangoni convection occurs when the surface tension of an interface (generally<br />
liquid-air) depends on the concentration of a species or on the temperature<br />
distribution. In the case of temperature dependence, the Marangoni effect is also called<br />
thermo-capillary convection. It is of primary importance in the fields of:<br />
Welding<br />
Crystal growth<br />
Electron beam melting of metals<br />
Direct experimental studies are not easy to carry out in these systems because the<br />
materials are often metals and temperatures are very high. One possibility is to replace<br />
the real system with an experimental setup using a transparent liquid at ambient<br />
temperatures.<br />
Model Definition<br />
This model describes the 2D stationary behavior of a vessel filled with silicone oil, for<br />
which the thermo-physical properties are known. The aim of the study is to compute<br />
the temperature field that induces a flow through the Marangoni effect. The model<br />
shows this effect using the simple geometry in the figure below.<br />
GOVERNING EQUATIONS<br />
A stationary momentum balance describes the velocity field and the pressure<br />
distribution (Navier-Stokes equations):<br />
MARANGONI CONVECTION | 391
The first term gives the rate of momentum gain by viscous transfer, the second by<br />
convection, and the third by pressure forces. The equation contains the following<br />
variables and properties:<br />
η is the dynamic viscosity (kg/(m·s)).<br />
u is the velocity vector (m/s).<br />
ρ is the density (kg/m 3 ).<br />
p is the pressure (Pa).<br />
The F term is a source term representing external forces per unit volume.<br />
To include the heating of the fluid, couple the fluid flow to an energy balance<br />
according to<br />
The expression within the brackets is the heat flux vector, containing a conductive and<br />
a convective part. The equation contains the following variables and properties:<br />
k is the thermal conductivity (W/(m·K)).<br />
T is the temperature (K).<br />
C p is the heat capacity (J/(kg·K)).<br />
Q (W/m 3 ) represents a source term.<br />
You can use the Boussinesq approximation to include the effect of temperature on the<br />
velocity field. In this approximation, variations in temperature produce a buoyancy<br />
force (or Archimedes’ force) that lifts the fluid. Enter this force into the F term in the<br />
Navier-Stokes equation as:<br />
where α is the thermal expansion coefficient (1/K), g is the acceleration due to gravity<br />
(m/s 2 ), and ∆T is the temperature difference (K) between the right and left wall in the<br />
model geometry.<br />
Equation 10-8 describes the forces that the Marangoni effect induces on the interface<br />
(liquid/air):<br />
392 | CHAPTER 10: MULTIPHYSICS MODELS<br />
– η∇<br />
2 u + ρu ⋅ ∇u<br />
+ ∇p = F<br />
∇ ⋅ u = 0<br />
∇ ⋅ ( – k∇T + ρCpTu ) = Q<br />
0<br />
Fx<br />
F ⎛ ⎞<br />
⎝Fy⎠ αgρ T ∆T<br />
⎛ ⎞<br />
= =<br />
⎜ ⎛ – ------- ⎞⎟<br />
⎝ ⎝ 2 ⎠⎠
η u ∂<br />
----- γ<br />
∂y<br />
T ∂<br />
=<br />
------<br />
∂x<br />
(10-8)<br />
where γ is the temperature derivative of the surface tension (N/(m·K)). This equation<br />
states that the shear stress on a surface is proportional to the temperature gradient<br />
(Ref. 1).<br />
Modeling in <strong>COMSOL</strong> Multiphysics<br />
To solve the momentum balance equations, use the Incompressible Navier-Stokes<br />
application mode. For the heat transfer by convection and conduction, use the<br />
Convection and Conduction application mode. There are two multiphysics couplings,<br />
one in each direction:<br />
The Boussinesq approximation means that an expression including temperature acts<br />
as a force in the y direction in the momentum balance.<br />
The convective heat transfer depends on the velocities from the momentum balance.<br />
This means that you must solve the coupled system directly using the nonlinear solver.<br />
To implement the condition that the shear stress is proportional to the temperature<br />
gradient on the surface, use a Weak Form, Boundary application mode where you can<br />
implement Equation using a weak formulation:<br />
lm_test*(eta1*uy-gamma*Tx)+u_test*lm<br />
The last term makes sure that this condition replaces the condition on the x-velocity<br />
from the Slip/Symmetry boundary condition in the Incompressible Navier-Stokes<br />
application mode.<br />
It is also necessary to omit the Dirichlet boundary condition for T at the surface level<br />
to get consistent boundary conditions. To do this, adjust the boundary conditions on<br />
the equation system level.<br />
Finally, to study the Marangoni effect, increase the temperature difference between the<br />
right and left wall in steps. With the restart option, the solver uses the previous solution<br />
as initial value providing fast convergence.<br />
MARANGONI CONVECTION | 393
Results<br />
The Marangoni effect becomes more pronounced as the temperature difference<br />
increases:<br />
Figure 10-9: Marangoni convection with a temperature difference of 0.001 K.<br />
For the very low temperature difference of 0.001 K, the temperature field is almost<br />
decoupled from the velocity field. Therefore, the temperature decreases almost linearly<br />
from left to right.<br />
394 | CHAPTER 10: MULTIPHYSICS MODELS
Figure 10-10: Marangoni convection with a temperature difference of 0.05 K.<br />
For the temperature difference of 0.05 K notice how the Marangoni convection<br />
influences the flow of fluid and the distribution of temperature. The temperature is no<br />
longer decreasing linearly and you can clearly see the advection of the isotherms caused<br />
by the flow.<br />
MARANGONI CONVECTION | 395
Figure 10-11: Marangoni convection with a temperature difference of 2 K.<br />
At higher temperature differences (2 K in Figure 10-11 above), the physical coupling<br />
between the temperature and the velocity field is clearly visible. The heat conduction<br />
is small compared to the convection, and at the surface the fluid accelerates where the<br />
temperature gradient is high.<br />
Reference<br />
1. V.G. Levich, Physicochemical Hydrodynamics, Prentice-Hall, N.J., 1962.<br />
Model Library path: <strong>COMSOL</strong>_Multiphysics/Multiphysics/marangoni<br />
Modeling Using the Graphical User Interface<br />
MODEL NAVIGATOR<br />
1 In the Model Navigator, select 2D from the Space dimension list.<br />
396 | CHAPTER 10: MULTIPHYSICS MODELS
2 Click the Multiphysics button.<br />
3 In the <strong>COMSOL</strong> Multiphysics>Fluid Dynamics folder, select Incompressible Navier-Stokes<br />
and then Steady-state analysis. Make sure Lagrange - P 2 P 1 is selected in the Element<br />
list.<br />
4 Click Add.<br />
5 In the Heat Transfer folder, select Convection and Conduction and then Steady-state<br />
analysis. Make sure Lagrange - Quadratic is selected in the Element list.<br />
6 Click Add.<br />
7 In the PDE Modes folder, select Weak Form, Boundary and then Stationary analysis.<br />
8 Type lm in the Dependent variables edit field.<br />
9 Select Lagrange - Linear in the Element list.<br />
10 Click Add.<br />
11 Click OK.<br />
OPTIONS AND SETTINGS<br />
1 From the Options menu, choose Constants.<br />
2 In the Constants dialog box, define the following constants with names, expressions,<br />
and descriptions (the descriptions are optional); when done, click OK.<br />
NAME EXPRESSION DESCRIPTION<br />
deltaT 1e-3[K] Temperature difference<br />
gamma -8e-5 Temperature derivative of the<br />
surface tension<br />
rho1 760[kg/m^3] Fluid density<br />
eta1 4.94e-4[Pa*s] Dynamic viscosity<br />
k1 0.1[W/(m*K)] Thermal conductivity<br />
Cp1 2090[J/(kg*K)] Heat capacity<br />
alpha1 1.3e-3[1/K] Thermal expansion coefficient<br />
g 9.8[m/s^2] Acceleration due to gravity<br />
GEOMETRY MODELING<br />
1 On the Draw menu, point to Specify Objects and then click Rectangle.<br />
1 In the Rectangle dialog box, type 0.01 in the Width edit field and type 0.005 in the<br />
Height edit field.<br />
2 Click OK.<br />
MARANGONI CONVECTION | 397
3 Click the Zoom Extents button on the Main toolbar.<br />
PHYSICS SETTINGS<br />
Boundary Conditions—Momentum Balance<br />
1 From the Multiphysics menu, choose Incompressible Navier-Stokes (ns).<br />
2 From the Physics menu, choose Boundary Settings.<br />
3 In the Boundary Settings dialog box, enter boundary conditions for the<br />
Incompressible Navier-Stokes mode according to the table below:<br />
SETTINGS BOUNDARIES 1, 2, 4 BOUNDARY 3<br />
Boundary type Wall Symmetry boundary<br />
Boundary condition No slip -<br />
4 Click OK.<br />
Point Settings—Momentum Balance<br />
Set the pressure to zero in the point (0,0) to get a well-defined condition on the<br />
pressure:<br />
1 From the Physics menu, choose Point Settings.<br />
2 In the Point Settings dialog box, select Point 1.<br />
3 Select the Point constraint check box<br />
4 Click OK.<br />
Boundary Conditions—Heat Transfer<br />
1 From the Multiphysics menu, choose Convection and Conduction (cc).<br />
2 From the Physics menu, choose Boundary Settings.<br />
3 In the Boundary Settings dialog box, enter boundary conditions for the Convection<br />
and Conduction mode according to the table below:<br />
SETTINGS BOUNDARY 1 BOUNDARIES 2, 3 BOUNDARY 4<br />
Boundary condition Temperature Thermal insulation Temperature<br />
T0 deltaT 0<br />
4 Click OK.<br />
Boundary Conditions—Liquid/Air Interface<br />
1 From the Multiphysics menu, choose Weak Form, Boundary (wb).<br />
2 From the Physics menu, choose Boundary Settings.<br />
398 | CHAPTER 10: MULTIPHYSICS MODELS
3 In the Boundary Settings dialog box, clear the Active in this domain check box for<br />
Boundaries 1, 2, and 4.<br />
4 Click the Weak tab.<br />
5 Select Boundary 3 and type lm_test*(eta1*uy-gamma*Tx)+u_test*lm in the<br />
weak edit field. This implements Equation 10-8, which states that the shear stress<br />
on a surface is proportional to the temperature gradient.<br />
6 Click OK.<br />
Boundary Conditions—Equation System Level<br />
To get consistent boundary conditions, omit the Dirichlet boundary condition for T<br />
on the vertex connecting Boundary 1 and Boundary 3 and on the vertex connecting<br />
Boundary 4 and Boundary 3:<br />
1 On the Physics menu, point to Equation System and then click Boundary Settings.<br />
2 In the Boundary Settings - Equation System dialog box, click the r tab.<br />
3 Select Boundary 1 and type (s
Subdomain Settings—Momentum Balance<br />
1 From the Multiphysics menu, choose Incompressible Navier-Stokes (ns).<br />
2 From the Physics menu, choose Subdomain Settings.<br />
3 In the Subdomain Settings dialog box, select Subdomain 1 and enter the material<br />
properties and buoyancy force term below for the Incompressible Navier-Stokes<br />
application mode:<br />
SETTINGS SUBDOMAIN 1<br />
ρ rho1<br />
η eta1<br />
Fy alpha1*g*rho1*(T-deltaT/2)<br />
4 Click OK.<br />
Subdomain Settings—Heat Transfer<br />
1 From the Multiphysics menu, choose Convection and Conduction (cc).<br />
2 From the Physics menu, choose Subdomain Settings.<br />
3 In the Subdomain Settings dialog box, enter the material properties and velocities<br />
below for the Convection and Conduction mode:<br />
SETTINGS SUBDOMAIN 1<br />
k (isotropic) k1<br />
ρ rho1<br />
Cp Cp1<br />
u u<br />
v v<br />
4 Click OK.<br />
MESH GENERATION<br />
1 From the Mesh menu, choose Free Mesh Parameters.<br />
2 In the Free Mesh Parameters dialog box, click the Custom mesh size button and type<br />
1.1 in the Element growth rate edit field.<br />
3 Click the Boundary tab.<br />
4 Select Boundary 3 and type 2e-4 in the Maximum element size edit field.<br />
5 Click the Point tab.<br />
6 Select Points 2 and 4 and type 4e-5 in the Maximum element size edit field.<br />
400 | CHAPTER 10: MULTIPHYSICS MODELS
7 Click Remesh and then click OK.<br />
These settings provide a finer mesh close to the liquid surface and especially toward the<br />
right end.<br />
COMPUTING THE SOLUTION<br />
First solve the problem with the small temperature difference, ∆T = 10 −3 K, specified<br />
above. Click the Solve button to compute the solution. See the section “Postprocessing<br />
an Visualization” below on how to plot the temperature and velocity field.<br />
Increase the temperature difference to 0.05 K to make the Marangoni effect more<br />
visible:<br />
1 Set deltaT to 0.05[K] in the Constants dialog box.<br />
2 Click the Restart button.<br />
Finally increase the temperature difference even more (to 2 K):<br />
1 Set deltaT to 2[K] in the Constants dialog box.<br />
2 Click the Restart button<br />
MARANGONI CONVECTION | 401
POSTPROCESSING AND VISUALIZATION<br />
Show the temperature field as a surface plot with overlaid contours and the velocity<br />
field using arrows as in the results plots earlier in this model documentation:<br />
1 From the Postprocessing menu, choose Plot Parameters.<br />
2 Under Plot type in the Plot Parameters dialog box, select the Surface, Contour, and<br />
Arrow check boxes.<br />
3 Click the Surface tab.<br />
4 On the Surface Data tab, select Convection and Conduction (cc)>Temperature in the<br />
predefined quantities list.<br />
5 Click the Contour tab.<br />
6 On the Contour Data tab, select Convection and Conduction (cc)>Temperature in the<br />
predefined quantities list.<br />
7 In the Contour color area, click the Uniform color button and then click the Color<br />
button.<br />
8 Select black in the Contour Color dialog box and click OK.<br />
9 Click the Arrow tab.<br />
10 Verify that the predefined quantity for the arrow data is the velocity field.<br />
11 Click OK.<br />
402 | CHAPTER 10: MULTIPHYSICS MODELS
Simulation of a Microrobot 2<br />
Introduction<br />
This example describes the modeling of one of the legs of a silicon microrobot in<br />
<strong>COMSOL</strong> Multiphysics. The image below shows the microrobot.<br />
The microrobot uses a technique based on polyimide V-groove joints to get each of<br />
the legs to move. The polyimide has a relatively high coefficient of thermal expansion<br />
α, and this causes the leg to bend slightly when the polyimide is heated. Putting several<br />
V-grooves on each leg provides sufficient deflection (see the following figure).<br />
See Ref. 1 for a more detailed description of the microrobot.<br />
Model Definition<br />
EQUATIONS<br />
The model couples a Heat Transfer application mode to a Plane Strain structural<br />
application mode to simulate the bending.<br />
The unknowns of the system are:<br />
u, the displacement along the x-axis<br />
v, the displacement along the y-axis<br />
T, the temperature<br />
Heating<br />
resistors<br />
Cured<br />
polyimide<br />
Silicon leg<br />
2. Model courtesy of Thorbjörn Ebefors, Dept. of Signals, Sensors and Systems (S3), Royal Institute of<br />
Technology (KTH), Stockholm, Sweden.<br />
SIMULATION OF A MICROROBOT | 403
Time scales for the structural mechanics problem are much smaller than for the heat<br />
transfer problem so you can neglect them and analyze the structural model as a static<br />
model. The time dependence of the system is retained through the heat transfer<br />
equation. This assumption is well motivated and results in a shorter simulation time.<br />
The discretized system becomes a differential-algebraic equation system (DAE)<br />
containing the following equations:<br />
404 | CHAPTER 10: MULTIPHYSICS MODELS<br />
The principle of virtual work for plane strain condition states that:<br />
δW = ( – εxtestσx–<br />
εytestσy– 2εxytestτxy + utest ) dV<br />
+<br />
where W is the total stored energy. The stress-strain relation including thermal<br />
expansion reads:<br />
where α is the thermal expansion coefficient.<br />
See “The Plane Strain Application Mode” on page 225 in the <strong>COMSOL</strong> Multiphysics<br />
Modeling Guide for details.<br />
The transient heat equation:<br />
∫<br />
V<br />
∫<br />
S<br />
t t<br />
utestFS ds<br />
+ utestFS ds<br />
t FV<br />
where ρ is the density, C P is the heat capacity, k is the thermal conduction, and Q is<br />
the heat source.<br />
MATERIAL PROPERTIES<br />
To represent the model use several subdomains corresponding to the different parts.<br />
You need six property sets to define each part of the leg of the microrobot (Si, SiNa,<br />
Al, P, SiO, and pSi).<br />
THERMAL LOAD<br />
A heat source of 2·10 13 W/m 3 , corresponding to 100 mW, is turned on in each of the<br />
two heating resistors during the first 10 ms of the 20 ms simulation.<br />
∫<br />
S<br />
σ = Dεel + σ0 = D( ε– αT)<br />
∂T<br />
ρCP + ∇ ⋅ ( k∇T) =<br />
Qt ()<br />
∂t<br />
=<br />
0
BOUNDARY CONDITIONS<br />
An important part of the simulation is the modeling of the cooling effect at the<br />
boundaries. Experiments have verified that most of the heat dissipates in the silicon<br />
structure (the “body” of the robot). Also, the experiments show a minor cooling effect<br />
at the tip of the leg.<br />
Motivated by this, use a heat transfer coefficient of 10 6 W/(m 2 ·K) on the part of the<br />
leg connected to the rest of the robot, a coefficient of 10 5 W/(m 2 ·K) on the tip of the<br />
leg, and insulation on the rest of the structure. These values are somewhat arbitrary,<br />
but the simulation results have been calibrated with experimental data.<br />
The boundary conditions for the structural mechanics part are simply constrained<br />
displacement at the left end of the robot leg and zero force on the rest of the structure.<br />
SIMULATION OF A MICROROBOT | 405
Results and Discussion<br />
As expected, the following plots show that the microrobot leg bends when there is a<br />
heat source and returns to its initial shape with the decrease of the temperature. The<br />
plot sequence shows the temperature increase from 0 s to 20 ms every 5 ms.<br />
The animation shows how the temperature in the robot leg increases and how it bends<br />
downward, as expected. Note that the temperature should be interpreted as a deviation<br />
from the initial state, which is room temperature. After 10 ms, the power is turned off,<br />
406 | CHAPTER 10: MULTIPHYSICS MODELS
and the leg returns toward its undeformed initial state. It is of great interest to<br />
optimize the model, for example, the shape of the V-grooves and the power in each<br />
heating resistance, so that the bending process becomes as fast as possible.<br />
Modeling in <strong>COMSOL</strong> Multiphysics<br />
To model such a system with <strong>COMSOL</strong> Multiphysics you need to select two<br />
application modes: Heat Transfer and Plane Strain.<br />
The coupling appears in the definition of the stress variables by adding the thermal<br />
strain.<br />
The coupling is one-way only (from the heat source to the displacements due to the<br />
heat source).<br />
Reference<br />
1. T. Ebefors, “Polyimide V-groove Joints for Three-Dimensional Silicon<br />
Transducers.” Ph.D. thesis, May 2000, Dept. of Signal, Sensors and Systems (S3),<br />
Royal Institute of Technology (KTH), Stockholm, Sweden.<br />
Model Library path: <strong>COMSOL</strong>_Multiphysics/Multiphysics/microrobot<br />
Modeling Using the Graphical User Interface<br />
MODEL NAVIGATOR<br />
1 Start <strong>COMSOL</strong> Multiphysics or click the New button to open the Model Navigator.<br />
2 Select 2D from the Space dimension list.<br />
3 Click the Multiphysics button.<br />
4 Select the <strong>COMSOL</strong> Multiphysics>Heat Transfer>Conduction application mode and<br />
then Transient analysis.<br />
5 Click Add.<br />
6 Open the Structural Mechanics application modes folder and then the Plane Strain<br />
application mode, and select Static analysis.<br />
7 Click Add.<br />
SIMULATION OF A MICROROBOT | 407
8 Click OK.<br />
GEOMETRY MODELING<br />
The geometry of this model is provided as a DXF file as it is quite complicated.<br />
1 On the File menu, point to Import and then click CAD Data From File. Select DXF file<br />
(*.dxf) in the Files of type list.<br />
2 Browse to models/<strong>COMSOL</strong>_Multiphysics/Multiphysics under the <strong>COMSOL</strong><br />
installation directory.<br />
3 Select microrobot.dxf. Click Import.<br />
4 On the Draw menu, point to Coerce To and then click Solid.<br />
PHYSICS SETTINGS<br />
Because the microrobot legs are composed of several materials with different material<br />
properties, you have to define subdomain settings for each materials. Using subdomain<br />
expression variables makes it easier to enter the subdomain properties of the model.<br />
Define the following parameters for the materials:<br />
The thermal conductivity k_mat<br />
The heat capacity C_mat<br />
The density: rho_mat<br />
408 | CHAPTER 10: MULTIPHYSICS MODELS
Young’s modulus: E_mat<br />
The Poisson ratio: nu_mat<br />
The thermal expansion coefficient: al_mat<br />
The heat source: heat<br />
Expression Variables<br />
Open the Scalar Expressions dialog box from the Options menu. Create a scalar<br />
expression with Name dT, Expression T-273.15, and Description Temperature<br />
difference.<br />
Subdomain Expressions<br />
1 On the Options menu, point to Expressions and then click Subdomain Expressions.<br />
2 In the Subdomain Expressions dialog box, which you open from the Physics menu,<br />
enter the following material properties:<br />
PROPERTY SUBDOMAINS<br />
1, 6, 10, 14<br />
k_mat 140 15 238 0.16 1.4 20<br />
C_mat 707 1000 900 2000 1000 707<br />
rho_mat 2300 2865 1410 2700 2200 2300<br />
E_mat 130e9 95e9 70e9 2e9 70e9 160e9<br />
nu_mat 0.3 0.25 0.3 0.35 0.22 0.3<br />
al_mat 2.5e-6 0.8e-6 23e-6 140e-6 0.5e-6 2e-6<br />
heat 0 0 0 0 0 2e13<br />
From left to right the material properties represent Si, SiN, Al, P, SiO, and pSi.<br />
3 Click OK.<br />
Model Settings<br />
The default equation system form for models including the heat transfer application<br />
modes is the general form, but this is a linear problem, so you can use the coefficient<br />
form. This makes it easier to identify the thermal expansion coefficient in the equation<br />
system.<br />
1 From the Physics menu, choose Model Settings.<br />
2 Select Coefficient from the Equation system form list.<br />
3 Click OK.<br />
SUBDOMAINS<br />
2, 7, 11, 15<br />
SUBDOMAIN 3 SUBDOMAIN 4 SUBDOMAINS<br />
5, 9, 13<br />
Boundary Settings<br />
1 In the Physics menu open the Boundary Settings dialog box.<br />
SUBDOMAINS<br />
8, 12<br />
SIMULATION OF A MICROROBOT | 409
2 Select Boundaries 1, 3, and 5.<br />
3 Select the R x and R y check boxes. This locks the displacement to zero in both the<br />
x and y directions.<br />
4 Click OK.<br />
5 Change the application mode to Heat Transfer by Conduction (ht) in the Multiphysics<br />
menu.<br />
6 Open the Boundary Settings dialog box from the Physics menu and enter the<br />
following settings:<br />
SETTINGS ALL BOUNDARIES EXCEPT 1,<br />
3, 5, 95, 96<br />
7 Click OK.<br />
Subdomain settings<br />
1 Change the application mode to Plane Strain (pn) in the Multiphysics menu.<br />
2 In the Physics menu, open the Subdomain Settings dialog box.<br />
3 Enter following settings for the material properties on the Material page:<br />
The density ρ is set to zero to remove all the dynamics in the model.<br />
4 Click OK.<br />
5 Change the application mode to Heat Transfer by Conduction (ht) in the Multiphysics<br />
menu.<br />
410 | CHAPTER 10: MULTIPHYSICS MODELS<br />
BOUNDARIES 1, 3, 5 BOUNDARIES 95, 96<br />
Type Thermal insulation Heat flux Heat flux<br />
h 1e6 1e5<br />
SETTINGS ALL SUBDOMAINS<br />
E E_mat<br />
ν nu_mat<br />
ρ 0
6 Open the Subdomain Settings dialog box, and set the material properties for the Heat<br />
Transfer equation:<br />
SETTINGS ALL SUBDOMAINS<br />
k (isotropic) k_mat<br />
ρ rho_mat<br />
Cp C_mat<br />
Q (t
2 On the Global tab, click the Custom mesh size button and type 1.7 in the Element<br />
growth rate edit field. This reduces the mesh by allowing the element size to grow<br />
faster away from a region with small details.<br />
3 Click the Remesh button to initialize the mesh, and then click OK.<br />
COMPUTING THE SOLUTION<br />
1 Open the Solver Parameters dialog box by clicking on the corresponding icon in the<br />
Main toolbar.<br />
2 On the General page, type range(0,0.005,0.02) in the Times edit field. This<br />
provides the solution at 5 equally spaced time steps from 0 to 20 ms or every 5 ms.<br />
The tolerances for the time-dependent solver control the actual time stepping.<br />
3 Type 1e-6 in the Absolute tolerance edit field and 1e-5 in the Relative tolerance edit<br />
field. It is important that the absolute tolerance is smaller than the typical<br />
displacements by at least an order of magnitude.<br />
4 Click OK.<br />
5 Click the Solve button on the Main toolbar.<br />
POSTPROCESSING AND VISUALIZATION<br />
1 From the Postprocessing menu, open the Plot Parameters dialog box.<br />
2 On the General page, select the Deformed shape check box to plot using a deformed<br />
shape.<br />
3 Click the Deform tab.<br />
4 On the Subdomain Data tab in the Deformation data area, select<br />
Plane Strain (pn)>Displacement in the Predefined quantities list.<br />
5 To get the following plot, clear the Auto check box for automatic scaling of the<br />
deformed shape. Then type 1 in the Scale factor edit field.<br />
6 Click OK.<br />
412 | CHAPTER 10: MULTIPHYSICS MODELS
7 To get an animation of the results, click the Animate button in the Plot toolbar.<br />
SIMULATION OF A MICROROBOT | 413
Vibrations in Milk Containers<br />
Introduction<br />
This example illustrates a multiphysics application that involves a fluid-structure<br />
interaction. It simulates a filled milk container on a conveyor belt that starts moving.<br />
The methodology presented here defines two subproblems, one for the container walls<br />
and another for the fluid. The two problems merge into one using special interface<br />
conditions that impose continuous normal displacements and normal forces across the<br />
interface boundary.<br />
Plane stress (E 2, ν, ρ 2)<br />
Fluid (E 1 , ρ 1 )<br />
Model Definition<br />
With all variables having a harmonic time dependence, you solve for only one complex<br />
amplitude.<br />
DOMAIN EQUATIONS<br />
In the container walls, use Navier’s equation for plane stress to find the displacements<br />
u and v:<br />
414 | CHAPTER 10: MULTIPHYSICS MODELS<br />
Asinωt
where ρ 2 is density, E 2 is the elasticity modulus (Young’s modulus), and ν is Poisson’s<br />
ratio.<br />
For the fluid assume irrotational flow. Thus you can give the displacements with the<br />
gradient of a displacement potential G:<br />
and the equation for sound waves becomes<br />
where E 1 is the elasticity modulus for the fluid, and ρ 1 the fluid density.<br />
INTERFACE CONDITIONS<br />
E 2<br />
– ρ2ω<br />
2 u<br />
1 ν 2<br />
+ -------------- ( ux + νvy) + -------------------- ( u<br />
x<br />
–<br />
21 ( + ν)<br />
y + vx) = 0<br />
y<br />
– ρ2ω<br />
2 E2 v<br />
1 ν 2<br />
⎧<br />
⎪<br />
⎪<br />
⎨<br />
⎪<br />
E2 ⎪ + -------------- ( vy + νux) + -------------------- ( u<br />
y<br />
–<br />
21 ( + ν)<br />
y + vx) = 0<br />
x<br />
⎩<br />
At the interface, the normal displacements should be continuous, so<br />
where n is the outward-pointing normal. Pressure in the gas, p, follows the<br />
relationship<br />
and force continuity across the interface gives<br />
where n is the inward-pointing normal.<br />
Modeling in <strong>COMSOL</strong> Multiphysics<br />
This model uses an equation-based approach, where the modeling of both the Navier’s<br />
equation and the equation for the sound waves uses PDE modes for PDEs in<br />
coefficient form. The Navier’s equation is active in the wall only, and the equation for<br />
E 2<br />
U = Gx, V = Gy ρ1ω 2 G+ E1∆G= 0<br />
n E1 G E1n u<br />
⋅ ∇ – ⋅ = 0<br />
v<br />
p = ρ1ωG, n σ ρ1ω 2 ⋅ + Gn =<br />
0<br />
VIBRATIONS IN MILK CONTAINERS | 415
the sound waves is active in the fluid domain only. For the coupling, you use the<br />
equation system view to define the fluid-structure interaction at the boundaries<br />
between the two domains.<br />
Results<br />
The solution shows the deformations that occur in the container. Figure 10-12 shows<br />
the deformations (scaled) for a container filled with milk. A second analysis provides<br />
the deformations for a container filled with gas (see Figure 10-13).<br />
Figure 10-12: The deformation (exaggerated) of the container filled with milk.<br />
416 | CHAPTER 10: MULTIPHYSICS MODELS
Figure 10-13: The deformation (exaggerated) of the container filled with gas.<br />
Model Library path: <strong>COMSOL</strong>_Multiphysics/Multiphysics/milk_container<br />
Modeling Using the Graphical User Interface<br />
MODEL NAVIGATOR<br />
1 In the Model Navigator, click the Multiphysics button.<br />
2 Select the first application mode from the table below in the <strong>COMSOL</strong><br />
Multiphysics>PDE Modes section and rename it by typing the name in the Application<br />
mode name edit field.<br />
3 Define the dependent variables by typing the variable names in the table below in<br />
the Dependent variables edit field.<br />
VIBRATIONS IN MILK CONTAINERS | 417
4 Click the Add button.<br />
5 Add the second application mode following the same procedure and then click OK.<br />
APPLICATION MODE APPLICATION<br />
MODE NAME<br />
PDE, coefficient<br />
form<br />
PDE, coefficient<br />
form<br />
OPTIONS AND SETTINGS<br />
1 From the Options menu, choose Constants.<br />
2 In the Constants dialog box, add the following constants for the material properties<br />
and the angular frequency (the constant w):<br />
NAME EXPRESSION<br />
E1 1e10<br />
rho1 1e3<br />
E2 1e8<br />
rho2 1e3<br />
nu 0.3<br />
w 2*pi*10<br />
418 | CHAPTER 10: MULTIPHYSICS MODELS<br />
DEPENDENT<br />
VARIABLES<br />
ELEMENT TYPE<br />
wall u v Lagrange - Quadratic<br />
fluid G Lagrange - Quadratic
3 Click OK.<br />
GEOMETRY MODELING<br />
1 Shift-click the Rectangle/Square button in the Draw toolbar.<br />
2 In the Rectangle dialog box, specify a rectangle with a lower-left corner at<br />
(0.001, 0.001), a width of 0.063, and a height of 0.163.<br />
3 Click OK and then click the Zoom Extents button.<br />
4 Draw another rectangle using the same method. This rectangle’s lower-left corner<br />
is at (0, 0), the width is 0.065, and the height is 0.165.<br />
5 Press Ctrl+A to select both objects and then click the Union button on the Draw<br />
toolbar.<br />
PHYSICS SETTINGS<br />
Boundary Conditions<br />
1 From the Multiphysics menu, select the wall application mode.<br />
2 From the Physics menu, choose Boundary settings.<br />
3 In the Boundary Settings dialog box, select the Interior boundaries check box.<br />
4 Specify the boundary conditions from the table below. Start with Boundary 2. You<br />
can the select the Select by group check box to set Neumann conditions on the<br />
remaining boundaries in one step.<br />
SETTINGS BOUNDARIES 1,3-8 BOUNDARY 2<br />
Type Neumann Dirichlet<br />
h(1,1) 1<br />
h(1,2) 0<br />
h(2,1) 0<br />
h(2,2) 1<br />
r(1) 0.001<br />
r(2) 0<br />
5 Click OK.<br />
You do not need to define boundary conditions for the fluid because the fluid domain<br />
consists of interior boundaries only.<br />
Subdomain Settings<br />
1 From the Physics menu, choose Subdomain Settings.<br />
VIBRATIONS IN MILK CONTAINERS | 419
2 In the Subdomain Settings dialog box, select Subdomain 2 from the Subdomain<br />
selection list and then clear the Active in this domain check box to deactivate the fluid<br />
domain.<br />
3 Select Subdomain 1 and then click the c, a, and f tabs and enter the PDE coefficients<br />
for the wall domain according to the following table:<br />
COEFFICIENT SUBDOMAIN 1<br />
c(1,1) E2/(1-nu^2) E2/2/(1+nu)<br />
c(1,2) 0 E2/2/(1+nu) E2*nu/(1-nu^2) 0<br />
c(2,1) 0 E2*nu/(1-nu^2) E2/2/(1+nu) 0<br />
c(2,2) E2/2/(1+nu) E2/(1-nu^2)<br />
a(1,1) -w^2*rho2<br />
a(1,2) 0<br />
a(2,1) 0<br />
a(2,2) -w^2*rho2<br />
f(1) 0<br />
f(2) 0<br />
4 Click OK.<br />
5 From the Multiphysics menu, select the fluid application mode.<br />
6 From the Physics menu, choose Subdomain Settings.<br />
7 In the Subdomain Settings dialog box, select Subdomain 1 in the Subdomain selection<br />
list and then clear the Active in this domain check box to deactivate the wall domain.<br />
8 Select Subdomain 2 and enter the PDE coefficients for the fluid domain according<br />
to the following table:<br />
COEFFICIENT SUBDOMAIN 2<br />
c E1<br />
a -w^2*rho1<br />
f 0<br />
420 | CHAPTER 10: MULTIPHYSICS MODELS
9 Click OK.<br />
Boundary Conditions—Equation System<br />
To get continuous normal forces and normal displacements on the interior boundaries,<br />
use the Boundary Settings dialog box for the equation system.<br />
1 On the Physics menu, point to Equation System and then click Boundary Settings.<br />
2 Specify the following components for the q coefficient on Boundaries 4–7 that<br />
separate the fluid and the wall:<br />
COMPONENT BOUNDARY 4 BOUNDARY 5 BOUNDARY 6 BOUNDARY 7<br />
q(1,1) 0 0 0 0<br />
q(1,2) 0 0 0 0<br />
q(1,3) w*rho1 0 0 -w*rho1<br />
q(2,1) 0 0 0 0<br />
q(2,2) 0 0 0 0<br />
q(2,3) 0 w*rho1 -w*rho1 0<br />
q(3,1) E1 0 0 -E1<br />
q(3,2) 0 E1 -E1 0<br />
q(3,3) 0 0 0 0<br />
3 Click OK.<br />
MESH GENERATION<br />
1 From the Mesh menu, choose Free Mesh Parameters.<br />
VIBRATIONS IN MILK CONTAINERS | 421
2 Click the Custom mesh size button and type 1.7 in the Element growth rate edit field.<br />
3 Click OK.<br />
4 Click the Initialize Mesh button.<br />
COMPUTING THE SOLUTION<br />
For this model, use the stationary solver (the default solver). Click the Solve button to<br />
solve the problem.<br />
POSTPROCESSING AND VISUALIZATION<br />
1 From the Postprocessing menu, choose Plot Parameters.<br />
2 In the Plot type area on the General page, select the Deformed shape check box.<br />
3 Click the Surface tab.<br />
4 On the Surface Data tab, select Geometry and Mesh>y-coordinate from the Predefined<br />
quantities list.<br />
5 Click the Deform tab.<br />
6 In the Deformation data area, select PDE, Coefficient Form (wall)>u, v from the<br />
Predefined quantities list on the Subdomain Data tab to use the x- and<br />
y-displacements for the deformed shape.<br />
7 Click OK.<br />
SECOND ANALYSIS—USING A GAS-FILLED CONTAINER<br />
To model a container filled with gas instead of milk, update the fluid parameters:<br />
OPTIONS AND SETTINGS<br />
Change the following constants in the Constants dialog box:<br />
NAME EXPRESSION<br />
E1 1e5<br />
rho1 1<br />
COMPUTING THE SOLUTION<br />
Solve the problem again with the new material properties for the fluid. You get a<br />
similar plot of the solution from the second analysis.<br />
422 | CHAPTER 10: MULTIPHYSICS MODELS
Peristaltic Pump<br />
Introduction<br />
In a peristaltic pump, rotating rollers squeeze a flexible tube. As the pushed-down<br />
rollers move along the tube, fluids in the tube follow the motion. The main advantage<br />
of the peristaltic pump is that no seals, valves, or other internal parts ever touch the<br />
fluid. Due to their cleanliness, peristaltic pumps have found many applications in the<br />
pharmaceutical, chemical, and food industries. Besides this, the action of a peristaltic<br />
pump is very gentle, which is important if the fluid is easily damaged. Peristaltic pumps<br />
are therefore used in medical applications, one of which is moving the blood through<br />
the body during open heart surgery. Other pumps would risk destroying the blood<br />
cells.<br />
This <strong>COMSOL</strong> Multiphysics model of a peristaltic pump is a combination of structural<br />
mechanics (to model the squeezing of the tube) and fluid dynamics (to compute the<br />
fluid’s motion); that is, this is an example of fluid-structure interaction, FSI. Because<br />
deformations of the tube drive the fluid, you must perform the fluid portion of the<br />
simulation in a deforming geometry, one that you can define with <strong>COMSOL</strong><br />
Multiphysics’ Moving Mesh (ALE) application mode.<br />
Model Definition<br />
The model is set up in 2D axial symmetry (Figure 10-14). A vinyl tube 0.1 m long has<br />
an inner radius of 1 cm and an outer radius of 1.5 cm; it contains a gas of density<br />
ρ = 1 kg/m 3 and viscosity η = 3·10 −5 Pa·s. A time- and position-dependent force<br />
density is applied to the outer wall of the tube, in the radial direction. This force density<br />
could have been taken from real data from a peristaltic pump, but for simplicity’s sake<br />
this example models it with a Gaussian distribution along the length of the tube. The<br />
Gaussian distribution has a width of 1 cm and is moving with the constant velocity<br />
0.03 m/s in the positive z direction. To represent the engagement of the roll, the force<br />
density, multiplied by a smoothed Heaviside function, kicks in at t = 0.1 s and takes the<br />
force to its full development at t = 0.5 s. Likewise, the disengagement of the roll starts<br />
at t = 1.0 s and ends at t = 1.4 s. The example models the tube’s deformation during<br />
a full cycle of 1.5 s.<br />
PERISTALTIC PUMP | 423
Figure 10-14: The geometry of the peristaltic pump in its initial shape (left) and as it is<br />
deforming under the pressure of the roll (right). The tube is rotationally symmetric with<br />
respect to the z-axis. The color shows the deformation of the tube material.<br />
DOMAIN EQUATIONS<br />
The structural mechanics computations in this model use a 2D axially symmetric<br />
stress-strain formulation. The model uses the assumption that the material is linear and<br />
elastic and does not take geometric nonlinearities into account. With the capabilities<br />
in the <strong>COMSOL</strong> Multiphysics Structural Mechanics Module, you can easily extend<br />
this model to include large deformations or use a more complicated material model.<br />
The fluid flow is described by the Navier-Stokes equations:<br />
424 | CHAPTER 10: MULTIPHYSICS MODELS<br />
(10-9)<br />
where ρ denotes the density (kg/m 3 ), u the velocity (m/s), η the viscosity (Pa·s), and<br />
p the pressure (Pa). The equations are set up and solved in axial symmetry on a<br />
deformed mesh inside the tube.<br />
Further, you model the motion of the deformed mesh with Winslow smoothing. For<br />
more information on this topic, please refer to “The Moving Mesh Application Mode”<br />
on page 455 in the <strong>COMSOL</strong> Multiphysics Modeling Guide.<br />
BOUNDARY CONDITIONS<br />
z<br />
r<br />
∂u T<br />
ρ – ∇⋅η( ∇u+ ( ∇u)<br />
) + ρu ⋅ ∇u<br />
+ ∇p = 0<br />
∂t<br />
∇ ⋅ u =<br />
0<br />
For the structural mechanics computations, the time- and coordinate-dependent load<br />
described serves as the boundary condition at the tube’s outer surface. The top and<br />
bottom ends of the tube are constrained along both coordinate axes, and the inner<br />
surface is free. The reaction forces from the fluid on the tube are very small compared
to the force applied by the rollers, so this model does not take them into account. This<br />
way you can solve first for the structural mechanics and then for the fluid dynamics,<br />
reducing solution time and memory consumption.<br />
The inner surface is free, and the top and bottom ends of the tube are constrained<br />
along both coordinate axes.<br />
For the fluid simulation, the boundary condition at the inlet and the outlet assumes<br />
that the total stress is zero, that is:<br />
n – pI η∇u ( ∇u)<br />
T<br />
⋅ [ + ( + ) ] = 0<br />
(10-10)<br />
Inside the wall of the tube, the moving mesh follows the deformations of the tube. The<br />
mesh deformations being the same as the structural deformations is also used as the<br />
moving mesh boundary condition where the fluid meets the tube wall. The mesh is<br />
fixed to a zero r displacement at the symmetry axis and a zero z displacement at the<br />
top and the bottom of the tube.<br />
COMPUTATION OF VOLUMETRIC FLOW RATES AND TOTAL VOLUME OF<br />
PUMPED FLUID<br />
The model’s dependent variables (those solved for) are the displacements of the tube<br />
wall as well as the fluid’s velocity u = (u, v) and pressure p. To get the volumetric flow<br />
rate of the fluid in m 3 V /s and the total volume of pumped fluid, you must perform<br />
some additional calculations. To get the volumetric flow rate at any instant t, compute<br />
a boundary integral over the pipe’s inlet or outlet boundary:<br />
·<br />
∫<br />
V · in = – 2πr( n⋅u) ds<br />
s in<br />
∫<br />
V · out =<br />
2πr( n ⋅ u)<br />
ds<br />
s out<br />
where n is the outward-pointing unit normal of the boundary, u equals the velocity<br />
vector, and s is the boundary length parameter along which you integrate. In this<br />
particular model, the inlet and outlet boundaries are horizontal so n · u = n x u + n y v<br />
simplifies to v or −v depending on the direction of flow.<br />
In a similar manner, you can integrate the total volume of fluid (m 3 ) contained in the<br />
pump as an integral over the fluid domain, A, with the equation<br />
PERISTALTIC PUMP | 425
Note that A is the deformed domain due to the deformation of the wall.<br />
Finally, it is of interest to track how much volume of fluid, V pump ( t ) (m 3 ), that is<br />
conveyed out of the outlet during a peristaltic cycle, which is equal to the following<br />
time integral:<br />
426 | CHAPTER 10: MULTIPHYSICS MODELS<br />
Vpump() t V .<br />
· = out dt'<br />
To compute this integral, specify the corresponding ODE in <strong>COMSOL</strong> Multiphysics<br />
with proper initial conditions; the software then integrates this equation.<br />
Results<br />
V = 2πrdA Figure 10-15 shows three snapshots from the peristaltic pump in action.<br />
Figure 10-15: Snapshots of the velocity field and the shape of the inside of the tube at<br />
t = 0.3 s, t = 0.7 s, and t = 1.2 s. The colors represent the magnitude of the velocity, and the<br />
arrows its direction.<br />
Figure 10-16 shows the inner volume of the tube as a function of time. At t = 0.3 s,<br />
the roll has begun its engagement phase and is increasing its pressure on the tube. As<br />
less space is left for the gas, it is streaming out of the tube, through both the inlet and<br />
∫<br />
A<br />
∫<br />
t<br />
0<br />
dVpump -------------------- V<br />
dt<br />
· =<br />
out
the outlet. At t = 0.7 s, the roll has been fully engaged for a while. As it is moving up<br />
the tube, so is the gas, both at the inlet and at the outlet. This is where most of the net<br />
flow in the direction from the inlet to the outlet is created. Finally, at t = 1.2 s, the<br />
engagement process is reversed as the roll is disengaging. Fluid is streaming into the<br />
tube from both ends.<br />
Figure 10-16: The inner volume (m 3 ) of the tube as a function of time (s).<br />
Figure 10-17 shows the inlet and outlet flows, and it confirms the overall behavior<br />
indicated in the velocity snapshots. As the roll is engaged, it squeezes gas out through<br />
both the inlet and outlet. When the fully engaged roll moves along the tube, gas flows<br />
steadily in through the inlet and out through the outlet. As the roll is disengaging, the<br />
gas is being sucked back into the tube. Note that a real peristaltic pump usually<br />
removes or minimizes the peaks associated with volume changes with the help of a<br />
second roll that engages at the same time as the first roll disengages. This way there are<br />
hardly any volume changes, and the fluid flows forward all the time. Also note from<br />
Figure 10-17 that by taking the difference of the curves, V and integrating<br />
over time, you generate Figure 10-16.<br />
·<br />
in V ·<br />
–<br />
out<br />
PERISTALTIC PUMP | 427
Figure 10-17: Inlet (blue solid line) and outlet (red dashed line) flow in m 3 /s as functions<br />
of time. Positive values indicate that the gas is flowing in through the inlet and out<br />
through the outlet.<br />
428 | CHAPTER 10: MULTIPHYSICS MODELS
Figure 10-18 sums up the process, plotting the accumulated net flow versus time. It is<br />
worth noting that although the accumulated flow during the first 0.5 s of the cycle is<br />
zero or negative, it is well above zero after the full cycle.<br />
Figure 10-18: Accumulated flow (m 3 ) through the pump versus time (s).<br />
Modeling in <strong>COMSOL</strong> Multiphysics<br />
This model is primarily intended to demonstrate the use of the Moving Mesh (ALE)<br />
application mode, but it also shows some postprocessing features. It defines<br />
integration coupling variables to integrate the total flow rate and to compute the<br />
volume inside the tube. An ordinary differential equation calculates the accumulated<br />
fluid volume that has passed through the pump at certain points in time. The smooth<br />
step function in this model is called flc2hs (a C 2 -continuous step).<br />
Model Library path: <strong>COMSOL</strong>_Multiphysics/Multiphysics/peristaltic_pump<br />
PERISTALTIC PUMP | 429
Modeling Using the Graphical User Interface<br />
1 Start <strong>COMSOL</strong> Multiphysics.<br />
2 In the Model Navigator, set the Space dimension to Axial symmetry (2D) and click the<br />
Multiphysics button.<br />
3 Select <strong>COMSOL</strong> Multiphysics>Structural Mechanics>Axial Symmetry,<br />
Stress-Strain>Transient analysis in the list of application modes and click Add.<br />
4 Select <strong>COMSOL</strong> Multiphysics>Deformed Mesh>Moving Mesh (ALE)>Transient analysis<br />
and click Add.<br />
5 Click the Application Mode Properties button and set the Smoothing method to<br />
Winslow. Click OK.<br />
6 Select <strong>COMSOL</strong> Multiphysics>Fluid Dynamics>Incompressible Navier-Stokes>Transient<br />
analysis and click Add.<br />
7 Click OK to close the Model Navigator.<br />
GEOMETRY MODELING<br />
1 Specify two rectangles according to the table below.<br />
NAME WIDTH HEIGHT BASE R Z<br />
R1 0.01 0.1 Corner 0 0<br />
R2 5e-3 0.1 Corner 0.01 0<br />
2 Click the Zoom Extents button on the Main toolbar.<br />
OPTIONS AND SETTINGS<br />
1 Open the Constants dialog box from the Options menu.<br />
2 Enter constants according to the following table (the descriptions are optional);<br />
when done, click OK.<br />
NAME EXPRESSION DESCRIPTION<br />
t_on 0.3[s] Time when roll is engaged<br />
t_off 1.2[s] Time when roll is disengaged<br />
dt 0.2[s] Time to reach full force<br />
z0 0.03[m] z coordinate where roll starts<br />
v0 0.03[m/s] Vertical velocity of roll<br />
width 0.01[m] Width of Gaussian force distribution<br />
430 | CHAPTER 10: MULTIPHYSICS MODELS
NAME EXPRESSION DESCRIPTION<br />
Ttot 1.5[s] Total time for a pump cycle<br />
Lmax 4e6[N/m^2] Max load<br />
3 From the Options menu, choose Functions.<br />
4 Define a new function for the Gaussian pulse according to following table; when<br />
done, click OK.<br />
NAME ARGUMENTS EXPRESSION<br />
gauss x, sigma 1/(sigma*sqrt(2*pi))*exp(-x^2/(2*sigma^2))<br />
5 Go to Physics>Global Equations and define an ordinary differential equation (see<br />
“Computation of Volumetric Flow Rates and Total Volume of Pumped Fluid” on<br />
page 425) with the following settings; when done, click OK.<br />
NAME (U) EQUATION INIT(U) INIT (UT)<br />
netflow netflowt-(inflow+outflow)/(2*Ttot) 0 0<br />
6 Select Integration Coupling Variables>Boundary Variables from the Options menu and<br />
specify the following boundary integration variables for the inflow and outflow, each<br />
on a separate row in the table; when done, click OK.<br />
SOURCE BOUNDARY NAME EXPRESSION INTEGRATION ORDER GLOBAL DESTINATION<br />
2 inflow 2*pi*r*v 4 Selected<br />
3 outflow 2*pi*r*v 4 Selected<br />
7 Select Integration Coupling Variables>Subdomain Variables from the Options menu and<br />
specify the following subdomain integration variable for the volume; when done,<br />
click OK.<br />
SOURCE SUBDOMAIN NAME EXPRESSION INTEGRATION ORDER GLOBAL DESTINATION<br />
1 Vol 2*pi*r 4 Selected<br />
PHYSICS SETTINGS—STRESS-STRAIN<br />
Subdomain Settings<br />
1 In the Multiphysics menu, select Axial Symmetry, Stress-Strain.<br />
2 From the Physics menu, open the Subdomain Settings dialog box.<br />
3 Select Subdomain 1 and clear the Active in this domain check box.<br />
PERISTALTIC PUMP | 431
4 Select Subdomain 2 and click Load. Select Nylon from the Basic Material Properties<br />
folder in the Materials list. Click OK.<br />
5 Click OK to close the Subdomain Settings dialog box.<br />
Boundary Conditions<br />
Open the Boundary Settings dialog box from the Physics menu.<br />
6 Apply the following boundary settings.<br />
SETTINGS BOUNDARIES 5, 6<br />
0<br />
BOUNDARY 7<br />
Constraint RR Constraint RZ Load FR Load FZ 7 For the F R load on Boundary 7, enter the following expression:<br />
432 | CHAPTER 10: MULTIPHYSICS MODELS<br />
-Lmax*flc2hs((t-t_on)[1/s],dt[1/s])*gauss((z-z0-v0*t)[1/m],<br />
width[1/m])*flc2hs((t_off-t)[1/s],dt[1/s])<br />
The purpose of the unit conversions [1/s] and [1/m] is to make the input to the<br />
flc2hs and gauss functions dimensionless.<br />
8 Click OK.<br />
MESH GENERATION<br />
1 Open the Free Mesh Parameters dialog box from the Mesh menu.<br />
2 On the Global page, click the Custom mesh size button and set the Maximum element<br />
size to 2e-3.<br />
3 Click Remesh, then click OK.<br />
COMPUTING THE SOLUTION<br />
1 In the Solver Manager, go to the Solve For tab and select Axial Symmetry, Stress-Strain.<br />
Only this application mode and its solution variables uor and w should be selected.<br />
Click OK to close the dialog box.<br />
2 In the Solver Parameters dialog box, select Time dependent from the Solver list. Set<br />
Times to range(0,0.01,1.5), Relative tolerance to 0.001 and Absolute tolerance to<br />
1e-5.<br />
3 On the Time Stepping tab, set Time steps taken by solver to Strict.<br />
4 Select BDF in the Method list.<br />
0<br />
See below<br />
0<br />
5 Click OK, then click the Solve button on the Main toolbar.
POSTPROCESSING AND VISUALIZATION<br />
The default plot shows the von Mises effective stress distribution.<br />
1 In the Plot Parameters dialog box, click the Deform tab.<br />
2 Select the Deformed shape plot check box and set the Scale factor to 1.<br />
3 Use the Solution at time list on the General tab and click Apply to study the stress<br />
distribution and the deformation of the tube at a few points in time.<br />
PHYSICS SETTINGS—INCOMPRESSIBLE NAVIER-STOKES<br />
Subdomain Settings<br />
1 In the Multiphysics menu, select Incompressible Navier-Stokes.<br />
2 Open the Subdomain Settings dialog box. Select Subdomain 2 and clear the Active in<br />
this domain check box.<br />
3 In Subdomain 1, set ρ to 1 (kg/m 3 ) and η to 3e-5 (Pa·s).<br />
4 Click OK to close the Subdomain Settings dialog box.<br />
Boundary Conditions<br />
1 Open the Boundary Settings dialog box from the Physics menu.<br />
2 Apply the following boundary conditions; when done, click OK.<br />
SETTINGS BOUNDARY 1 BOUNDARY 2 BOUNDARY 3 BOUNDARY4<br />
Type Symmetry Open Open Inlet<br />
Condition Axial symmetry Normal stress Normal stress Velocity<br />
u0 uaxi_t_axi<br />
v0 wt<br />
f0 0 0<br />
PHYSICS SETTINGS—MOVING MESH<br />
Subdomain Settings<br />
1 In the Multiphysics menu, select Moving Mesh (ALE).<br />
2 Open the Subdomain Settings dialog box. Keep the default Free displacement in<br />
Subdomain 1.<br />
3 In Subdomain 2, select Prescribed displacement. Enter uaxi_axi for dr and w for dz.<br />
These are the structural r and z deformations. The reason you cannot use<br />
physics-induced displacements here is that uaxi_axi is not a solution variable in the<br />
Stress-Strain application mode.<br />
PERISTALTIC PUMP | 433
4 Click OK to close the Subdomain Settings dialog box.<br />
Boundary Conditions<br />
1 Open the Boundary Settings dialog box from the Physics menu.<br />
2 Apply the following boundary settings; when done, click OK.<br />
SETTINGS BOUNDARY 1 BOUNDARIES 2, 3 BOUNDARY 4<br />
Type Mesh displacement Mesh displacement Mesh displacement<br />
dr 0 uaxi_axi<br />
dz 0 w<br />
COMPUTING THE SOLUTION<br />
1 In the Solver Manager, go to the Initial Value tab and click the Store Solution button.<br />
By default, all solutions are selected in the Store Solution dialog box. Click OK to<br />
confirm the selection.<br />
2 In the Values of variables not solved for and linearization point area, click the<br />
Stored solution option button and select All in the Solution at time list. This makes<br />
the solver use the solution for the deformation of the tube when computing the<br />
fluid flow.<br />
3 On the Solve For page, select all variables except uor and w. Click OK.<br />
4 Open the Solver Parameters dialog box, go to the General tab. Set the Absolute<br />
tolerance to 1e-3 and the Relative tolerance to 0.01.<br />
5 On the Time Stepping tab, set the Error estimation strategy to Exclude algebraic.<br />
6 Click OK, then click Solve.<br />
POSTPROCESSING AND VISUALIZATION<br />
The plot still shows the deformations from the stress-strain computation. To see the<br />
velocity field as in Figure 10-15 on page 426, do the following:<br />
1 In the Plot Parameters dialog box, go to the General page and clear the Deformed<br />
shape check box.<br />
2 On the Surface page, select Incompressible Navier Stokes (ns)>Velocity field from the<br />
Predefined quantities list.<br />
3 On the Arrow tab, select Incompressible Navier Stokes (ns)>Velocity field from the<br />
Predefined quantities list. Click the Color button and choose a black color; then click<br />
OK. Select the Arrow plot check box and click Apply.<br />
434 | CHAPTER 10: MULTIPHYSICS MODELS
4 Once again you can select different times to look at on the General page. You see the<br />
deformations even though you are not making a deformation plot because the mesh<br />
is deformed.<br />
5 To animate the velocity field as a function of time, click the Animate tab and then<br />
click Start Animation. It might take some time for your computer to render the<br />
animation.<br />
6 After closing the Plot Parameters dialog box, go to<br />
Postprocessing>Domain Plot Parameters.<br />
7 Use the Expression field on the Point page to plot, for instance, the expressions<br />
inflow, outflow, netflow, or Vol. Because these variables are defined with a global<br />
destination and do not depend on the location, the coordinates do not matter. To<br />
show more than one curve at the same time, select the Keep current plot check box<br />
on the General page.<br />
PERISTALTIC PUMP | 435
436 | CHAPTER 10: MULTIPHYSICS MODELS
11<br />
Quantum Mechanics Models<br />
This chapter contains quantum mechanics models that center on solutions of the<br />
Schrödinger equation.<br />
437
Conical Quantum Dots<br />
This model computes the electronic states for a quantum-dot/wetting-layer system. It<br />
was inspired largely by the work of Dr. M. Willatzen and Dr. R. Melnik (Ref. 1) as well<br />
as B. Lassen.<br />
Introduction<br />
Quantum dots are nanoscale or microscale devices created by confining free electrons<br />
in a 3D semiconducting matrix. The tiny islands or droplets of confined “free<br />
electrons” (those with no potential energy) present many interesting electronic<br />
properties. They are of potential importance for applications in quantum computing,<br />
biological labeling, and lasers, to name only a few.<br />
Scientists can create such structures experimentally using the Stranski-Krastanow<br />
molecular beam-epitaxy technique. In that way they obtain 3D confinement regions<br />
(the quantum dots) by growth of a thin layer of material (the wetting layer) onto a<br />
semiconducting matrix. Quantum dots can have many geometries including<br />
cylindrical, conical, or pyramidal. This model studies the electronic states of a conical<br />
InAs quantum dot grown on a GaAs substrate.<br />
To compute the electronic states taken on by the quantum dot/wetting layer assembly<br />
embedded in the GaAs surrounding matrix, you must solve the 1-band Schrödinger<br />
equation in the effective mass approximation:<br />
where h is Planck’s constant, Ψ is the eigenwave function, E is the eigenvalue (energy),<br />
and m e is the effective electron mass (to account for screening effects).<br />
Model Definition<br />
The model works with the 1-particle stationary Schrödinger equation<br />
438 | CHAPTER 11: QUANTUM MECHANICS MODELS<br />
---------<br />
1<br />
– ⎛∇⋅⎛-------------- ∇Ψ(<br />
r)<br />
⎞⎞<br />
+ Vr ( )Ψ( r)<br />
= EΨ( r)<br />
⎝ ⎝me( r)<br />
⎠⎠<br />
h 2<br />
8π 2<br />
∇<br />
8π 2 ⎛ ⎞<br />
– ⋅ ⎜-------------- ∇Ψ⎟<br />
+ VΨ =<br />
EΨ<br />
⎝ m ⎠<br />
h 2
It solves this eigenvalue problem for the quantum-dot/wetting-layer system using the<br />
following step potential barrier and effective-mass approximations:<br />
V = 0 for the InAs quantum dot/wetting layer and V = 0.697 eV for the GaAs<br />
substrate.<br />
m e = 0.023 m for InAs and m e = 0.067 m for GaAs.<br />
Assume the quantum dot has perfect cylindrical symmetry. In that case you can model<br />
the overall structure in 2D as shown in the following figure.<br />
2D geometry of a perfectly cylindrical quantum dot and wetting layer.<br />
You can now separate the total wave function Ψ into<br />
Ψ = χ( z, r)Θ(<br />
ϕ)<br />
where ϕ<br />
is the azimuthal angle. Then rewrite the Schrödinger equation in cylindrical<br />
coordinates as<br />
CONICAL QUANTUM DOTS | 439
Dividing this equation by<br />
and rearranging its terms lead to the two independent equations<br />
and<br />
– mer Equation 11-1 has obvious solutions of the form<br />
440 | CHAPTER 11: QUANTUM MECHANICS MODELS<br />
(11-1)<br />
(11-2)<br />
where the periodicity condition Θϕ ( + 2π)<br />
= Θ( ϕ)<br />
implies that l, the principal<br />
quantum number, must be an integer. It remains to solve Equation 11-2, which you<br />
can rewrite as<br />
Note that this is an instance of a PDE on coefficient form,<br />
where the nonzero coefficients are<br />
and λ = E l.<br />
8π 2<br />
---------<br />
∂ ⎛ 1<br />
-------<br />
∂χ⎞<br />
1<br />
--<br />
∂ r<br />
-------<br />
∂χ<br />
–<br />
∂z⎝me∂z⎠<br />
+ ⎛ ⎞<br />
r ∂r⎝me∂r⎠<br />
Θ<br />
8π 2<br />
--------- χ<br />
mer 2<br />
------------<br />
ϕ 2<br />
d Θ<br />
– + VχΘ = EχΘ<br />
d<br />
h 2<br />
8π 2<br />
h 2<br />
2 h2<br />
8π 2<br />
---------<br />
h 2<br />
χ( zr , )<br />
mer 2<br />
---------------- Θϕ ( )<br />
2<br />
1<br />
---<br />
Θ<br />
ϕ 2<br />
d Θ<br />
=<br />
d<br />
l 2<br />
–<br />
∂ ⎛ 1 ∂χl⎞ 1<br />
⎜------- ⎟----<br />
∂z⎝me∂z⎠χl<br />
1<br />
--<br />
∂ ⎛ r ∂χl⎞ 1<br />
+ ⎜------- ⎟----<br />
m<br />
r ∂r⎝me∂r⎠χer<br />
l<br />
2 + [ V– E]<br />
------ l<br />
8π<br />
2<br />
= –<br />
---------<br />
∂ ⎛ 1 ∂χl⎞ 1<br />
⎜------- ⎟ --<br />
∂ ⎛ r ∂χl⎞ –<br />
+ ⎜------- ⎟<br />
∂z⎝<br />
∂z<br />
⎠ r ∂r⎝<br />
∂r<br />
⎠<br />
h 2<br />
m e<br />
m e<br />
Θ = exp[<br />
ilϕ]<br />
h 2<br />
----------------- l2<br />
r 2<br />
2<br />
h 2<br />
8π 2 ⎛ ⎞<br />
+ ⎜ ---- + V⎟χl=<br />
Elχl , l ∈ Z<br />
⎝ m ⎠<br />
e<br />
∇ ⋅ ( – c∇u– αu + γ)<br />
+ au + β ⋅ ∇u<br />
= daλu h 2<br />
----------------- l2<br />
c<br />
8π 2 = -----------------, a<br />
me 8π 2 mer 2<br />
= ---- + V, βr 8π 2 ----------------me<br />
1<br />
= – --, d<br />
r a =<br />
1<br />
h 2
Results<br />
This exercise models the eigenvalues for the four lowest electronic energy levels for the<br />
principal quantum number l = 0. The following plots show the eigenwave functions<br />
for those four states.<br />
The four lowest electronic-energy levels for the case l = 0.<br />
Modeling in <strong>COMSOL</strong> Multiphysics<br />
To solve this problem, use the PDE, Coefficient Form version of the PDE modes in<br />
the Model Navigator. The model solves for an eigenvalue/eigenfunction, for which<br />
you must input appropriate physical data and constants.<br />
Reference<br />
1. R. Melnik and M. Willatzen, “Band structure of conical quantum dots with wetting<br />
layers,” Nanotechnology, vol. 15, pp. 1–8, 2004.<br />
CONICAL QUANTUM DOTS | 441
Model Library path: <strong>COMSOL</strong>_Multiphysics/Quantum_Mechanics/<br />
conical_quantum_dot<br />
Modeling Using the Graphical User Interface<br />
MODEL NAVIGATOR<br />
1 Open the Model Navigator. In the Space dimension list select 2D.<br />
2 Click the Multiphysics button.<br />
3 In the Multiphysics area, click the Add Geometry button.<br />
4 In the Add Geometry dialog box, specify the Dependent variables r z phi. Click OK.<br />
5 In the list of application modes select<br />
<strong>COMSOL</strong> Multiphysics>PDE Modes>PDE, Coefficient Form>Eigenvalue analysis.<br />
6 Verify in the Element list that Lagrange - Quadratic is selected.<br />
7 Click OK.<br />
OPTIONS AND SETTINGS<br />
1 From the Options menu select Constants.<br />
2 Enter the following constants; when done, click OK.<br />
NAME EXPRESSION DESCRIPTION<br />
m 5.68e-12 Electron mass (eV/(m/s)^2)<br />
hbar 6.58e-16 Planck's constant/(2*pi) (eV*s)<br />
V_In 0 Potential barrier, InAs (eV)<br />
V_Ga 0.697 Potential barrier, GaAs (eV)<br />
c_In hbar^2/(2*0.023*m) PDE c coefficient, InAs<br />
c_Ga hbar^2/(2*0.067*m) PDE c coefficient, GaAs<br />
l 0 Principal quantum number<br />
By defining a constant for the principal quantum number, you can readily modify<br />
the model to compute the solutions corresponding to nonzero l-values.<br />
GEOMETRY MODELING<br />
1 From the Draw menu select Specify Objects>Rectangle.<br />
442 | CHAPTER 11: QUANTUM MECHANICS MODELS
2 Enter the following settings; when done, click OK.<br />
SIZE POSITION<br />
Width 25 Base Center<br />
Height 100 x 12.5<br />
y 0<br />
3 Click the Zoom Extents button on the Main toolbar.<br />
4 From the Draw menu select Specify Objects>Rectangle.<br />
5 Enter the following settings; when done, click OK.<br />
SIZE POSITION<br />
Width 25 Base Center<br />
Height 2 x 12.5<br />
y 0<br />
6 From the Draw menu select Specify Objects>Line.<br />
7 Enter the following settings; when done, click OK to create the triangle CO1.<br />
PROPERTY VALUE/EXPRESSION<br />
Coordinates, r 0 12 0<br />
Coordinates, z 0 0 3.6<br />
Style Closed polyline (solid)<br />
8 On the Draw toolbar click the Create Composite Object button. Select the objects R2<br />
and CO1. Clear the Keep interior boundaries check box. Click OK.<br />
9 On the Draw toolbar click the Create Composite Object button. Select the objects R1<br />
and CO2. Make sure the Keep interior boundaries check box is selected, then click<br />
OK.<br />
10 On the Draw toolbar click the Scale button, then, in the Scale factor area, enter a<br />
scale factor of 1e-9 for both the r and z axes. Click OK.<br />
11 Click the Zoom Extents button.<br />
Subdomain Settings<br />
1 From the Physics menu select Subdomain Settings.<br />
CONICAL QUANTUM DOTS | 443
2 Enter the PDE coefficients from this table; when done, click OK.<br />
SETTINGS SUBDOMAINS 1, 3 SUBDOMAIN 2<br />
c c_Ga c_In<br />
a c_Ga*(l/r)^2+V_Ga c_In*(l/r)^2+V_In<br />
β -c_Ga/r, 0 -c_In/r, 0<br />
Boundary Conditions<br />
1 From the Physics menu select Boundary Settings.<br />
2 Enter the following boundary conditions; when done, click OK.<br />
SETTINGS BOUNDARIES 2, 9 ALL OTHER BOUNDARIES<br />
Type Dirichlet Neumann<br />
q 0 0<br />
g 0 0<br />
h 1<br />
r 0<br />
MESH GENERATION<br />
From the Mesh menu select Initialize Mesh.<br />
COMPUTING THE SOLUTION<br />
1 From the Solve menu select Solver Parameters.<br />
2 On the General page, type 4 in the Desired number of eigenvalues edit field.<br />
3 Click OK.<br />
4 Click the Solve button on the Main toolbar.<br />
POSTPROCESSING AND VISUALIZATION<br />
1 From the Postprocessing menu select Plot Parameters.<br />
2 On the General page find the Solution to use area, then go to the Eigenvalue list and<br />
select the desired eigenvalue (keep in mind that these solutions are valid for l = 0).<br />
3 Click Apply.<br />
4 On the Surface page, click the Height Data tab and select the Height data check box.<br />
5 Click Apply, then click OK.<br />
444 | CHAPTER 11: QUANTUM MECHANICS MODELS
The Schrödinger Equation for the<br />
Hydrogen Atom<br />
Introduction<br />
This example shows how to compute energy levels and electron orbits for the<br />
hydrogen atom. It models the atom as a 1-particle system using the stationary<br />
Schrödinger equation.<br />
The equation parameters are:<br />
h (6.626·10 −34 Js) is Planck’s constant.<br />
µ is the reduced mass<br />
V is the potential energy.<br />
E is the unknown energy eigenvalue.<br />
Ψ is the quantum mechanical wave function.<br />
Model Definition<br />
The quantity ⏐Ψ⏐ 2 corresponds to the probability density function of the electron’s<br />
position. In this example,<br />
where M equals the mass of the nucleus and m e represents the mass of an electron<br />
(9.1094·10 −31 kg). The hydrogen nucleus consists of a single proton (more than<br />
1,800 times heavier than the electron), so the approximation of µ is valid. Thus you<br />
can treat the problem as a one-particle system.<br />
The system’s potential energy is<br />
h2 8µπ2 – ∇ ⋅ ⎛------------ ∇Ψ⎞<br />
+ VΨ = EΨ<br />
⎝ ⎠<br />
µ<br />
=<br />
Mm e<br />
------------------ ≈ m<br />
M+ m e<br />
e<br />
e 2<br />
V =<br />
– ---------------<br />
4πε0r THE SCHRÖDINGER EQUATION FOR THE HYDROGEN ATOM | 445
where e equals the electron charge (1.602e-19 C), ε 0 represents electric capacitivity in<br />
a vacuum (8.854e-12 F/m), and r gives the distance from the center of the atom.<br />
Results<br />
The solution provides a number of the lowest eigenvalues.<br />
Three quantum numbers (n, l, m) characterize the eigenstates of a hydrogen atom:<br />
n is the principal quantum number.<br />
l is the angular quantum number.<br />
m is the magnetic quantum number that appears in the equations above.<br />
These quantum numbers are not independent but have the following mutual<br />
relationships:<br />
An analytical expression exists for the energy eigenvalues in terms of the quantum<br />
number n<br />
446 | CHAPTER 11: QUANTUM MECHANICS MODELS<br />
n = 123… , , ,<br />
0 ≤ l≤ n– 1<br />
– l ≤ m≤ l.
where<br />
(11-3)<br />
This expression is called the Bohr radius and has an approximate value of 3·10 −11 m.<br />
The first three energy eigenvalues, according to the above expression with µ ≈ m e , are:<br />
E 1 ≈ –2.180·10 −18 J<br />
E 2 ≈ –5.450·10 −19 J<br />
E 3 ≈ –2.422·10 −19 J<br />
E n<br />
a 0<br />
Comparing these numbers with the computed eigenvalues, you can see a 2-fold<br />
degeneracy for n = 2 and a 3-fold degeneracy for n = 3. This degeneracy corresponds<br />
to the following quantum triplets (2,0,0), (2,1,0) and (3,0,0), (3,1,0), (3,2,0). The<br />
computed values are separated due to the approximate numerical solution.<br />
By refining the mesh and solving again, the results are more accurate. The states with<br />
l = 0 correspond to spherically symmetric solutions, while states with l = 1 or 2<br />
correspond to states with one or two radial node surfaces. The 0 energy level<br />
corresponds to the energy of a free electron no longer bounded to the nucleus. Energy<br />
levels closer to 0 correspond to excited states.<br />
The wave function by itself has no direct physical interpretation. Another quantity to<br />
plot is ⏐u⏐ 2 , which is proportional to the probability density (unnormalized) function<br />
⏐Ψ⏐ 2 for the electron position after integration about the z-axis. The plot shows the<br />
unnormalized probability density function.<br />
You can now solve the problem for a different integer value of m as well as with a<br />
different eigenvalue search range. Remember that high energy levels correspond to<br />
large radial components in the solution, so you may have to enlarge the geometry to<br />
produce correct results. Also, try to solve the problem using an asymmetric domain.<br />
To determine the ground state energy, use the adaptive solver. Using as many elements<br />
as before, the software now adapts the mesh to the first eigenfunction in an attempt to<br />
equidistribute the error. This yields an approximation of the ground state energy with<br />
h 2<br />
8π2 = – --------------------------<br />
µa 2<br />
0n 2<br />
=<br />
h2ε0 πµe2 ------------.<br />
THE SCHRÖDINGER EQUATION FOR THE HYDROGEN ATOM | 447
a relative error less than 1e-5, about two orders of magnitude better than the error in<br />
the solution using the initial mesh.<br />
Modeling in <strong>COMSOL</strong> Multiphysics<br />
To solve this problem in <strong>COMSOL</strong> Multiphysics, reduce the dimension of the<br />
problem from three to two by using cylindrical coordinates (ρ, ϕ , z). The Schrödinger<br />
equation transforms into<br />
and you can write the potential energy as<br />
Consider the wave function Ψ as the product of two functions, one with an angular<br />
dependence and the other with a radial and z-coordinate dependence,<br />
448 | CHAPTER 11: QUANTUM MECHANICS MODELS<br />
h2 8µπ2 ------------ 1<br />
--<br />
∂ ⎛ ∂Ψ<br />
ρ ⎞ 1<br />
ρ∂ρ⎝<br />
∂ρ<br />
⎠<br />
ρ 2<br />
-----<br />
ϕ 2<br />
∂Ψ<br />
∂ z 2<br />
⎛ ∂Ψ⎞<br />
– ⎜ + + ⎟ + VΨ = EΨ<br />
⎝ ∂ ⎠<br />
V( ρ, z)<br />
2<br />
e 2<br />
4πε0 ρ2 z2 = – --------------------------------------- .<br />
( + )<br />
Ψ =<br />
Ψ1( ϕ)Ψ2(<br />
ρ, z)<br />
2
Substituting this expression into the equation gives<br />
Multiplying by 8µπ and rearranging terms results in<br />
2 h2 ⁄ ⁄ ( )<br />
where C = 8 µ π 2 / h 2 , or equivalently<br />
The left side is independent of , and the right side is independent of z and ρ, so the<br />
equation is equal to a constant, which you can call –m 2 ϕ<br />
. Thus you can split the<br />
equation into two parts:<br />
and<br />
h2 8µπ2 ------------<br />
1<br />
Ψ --<br />
∂ ⎛<br />
∂Ψ2 1 ρ ⎞ 1<br />
Ψ2<br />
ρ∂ρ⎝<br />
∂ρ<br />
⎠<br />
ρ 2<br />
-----<br />
ϕ 2<br />
⎛ ∂Ψ1 ∂Ψ2⎞ – ⎜ + + Ψ1 ⎟ + VΨ<br />
2 1Ψ2 = EΨ1Ψ 2<br />
⎝ ∂ ∂z<br />
⎠<br />
( )ρ 2 Ψ 1 Ψ 2<br />
The equation for Ψ 1 gives the solution<br />
where A and B are arbitrary real constants, and m = 0, ±1, ±2, … due to the periodic<br />
boundary condition Ψ 1 (0) = Ψ 2 (2πk), k = any integer.<br />
Using the equation for Ψ 2 with m included and multiplying by Ψ 2/ρ, you arrive at<br />
The equation now exists in a form that you can immediately transfer into <strong>COMSOL</strong><br />
Multiphysics. The coordinate variables x and y replace ρ and z, and Ψ 2 becomes u.<br />
2<br />
⎛<br />
-----ρ<br />
∂ ⎛<br />
∂Ψ2 ρ ⎞ -----ρ<br />
∂ ⎛<br />
∂Ψ2 ρ ⎞<br />
⎞<br />
– ⎜ +<br />
⎝Ψ2∂ρ⎝ ∂ρ<br />
⎠ Ψ2∂z ⎝ ∂z<br />
⎠<br />
⎟ Cρ<br />
⎠<br />
2 V Cρ 2 1<br />
+ – E ------<br />
Ψ1 ϕ 2<br />
∂Ψ1, =<br />
∂<br />
ρ<br />
– ⎛------ ∇ ρ∇Ψ<br />
⎝<br />
( ⋅ (<br />
Ψ 2)<br />
) ⎞<br />
⎠<br />
Cρ<br />
2<br />
2 V( ρ, z)<br />
Cρ 2 1<br />
+<br />
– E ------<br />
Ψ1 ϕ 2<br />
∂Ψ1 =<br />
∂<br />
ρ<br />
– ⎛------ ∇ ρ∇Ψ<br />
⎝<br />
( ⋅ (<br />
Ψ 2)<br />
) ⎞<br />
⎠<br />
Cρ<br />
2<br />
2 V( ρ, z)<br />
Cρ 2 + – E m2 = –<br />
2<br />
------<br />
1<br />
Ψ1 ϕ 2<br />
∂Ψ1 =<br />
∂<br />
m2 –<br />
Ψ1 = Asin( mϕ)<br />
+ Bcos( mϕ),<br />
– ( ∇⋅( ρ∇Ψ2) ) CρV( ρ, z)<br />
m2<br />
+ ⎛ + ------- ⎞Ψ2= CρEΨ<br />
⎝ ρ ⎠<br />
2 .<br />
2<br />
2<br />
THE SCHRÖDINGER EQUATION FOR THE HYDROGEN ATOM | 449<br />
2
<strong>COMSOL</strong> Multiphysics describes the coefficient form eigenvalue PDE as<br />
450 | CHAPTER 11: QUANTUM MECHANICS MODELS<br />
– ∇ ⋅ ( c∇u + αu)<br />
+ β∇u + au = daλu .<br />
For this problem, use the following coefficient values:<br />
d a<br />
Set all other coefficient values to 0.<br />
The geometry consists of two concentric semicircular solids. The circles have centers<br />
at (0, 0) with radii of 3·10 −9 m and 5·10 −10 m. Remove the portions to the left of the<br />
y-axis by subtracting a rectangular solid with corners at (−1·10 −9 , −1·10 −9 ) and<br />
(0, 1·10 −9 ), to avoid negative x-values, because the use of cylindrical coordinates<br />
makes ρ positive.<br />
The boundary conditions are as follows:<br />
c = x<br />
xe<br />
a C<br />
2<br />
4πε0 x2 y2 ---------------------------------m<br />
–<br />
+<br />
2<br />
⎧<br />
⎪<br />
⎪<br />
⎨ =<br />
+ ------x<br />
⎪<br />
⎪<br />
⎩ = Cx<br />
The cylinder axis x = 0 is not a boundary in the original problem, but here it<br />
becomes one. You must give the artificial boundary condition n ⋅ ( c∇u) =<br />
0 .<br />
Because c = 0 on the cylinder axis, you should not view this boundary condition as<br />
a Neumann condition that imposes a constraint. Rather it indicates the absence of<br />
constraints.<br />
On the outer circular boundary, the Dirichlet condition u = 0 applies.<br />
The Dirichlet condition corresponds to a zero probability for the electron to be<br />
outside the specified domain. This means that the probability of finding the electron<br />
inside the domain is 1. It is important to have this approximation in mind when solving<br />
for higher-energy eigenvalues because the solution of the physical problem might fall<br />
outside the domain, and no eigenvalues are found for the discretized problem. Ideally<br />
the domain is infinite and higher-energy eigenvalues correspond to the electron being<br />
further away from the nucleus.<br />
Model Library path: <strong>COMSOL</strong>_Multiphysics/Quantum_Mechanics/<br />
hydrogen_atom
Modeling Using the Graphical User Interface<br />
MODEL NAVIGATOR<br />
1 Select 2D from the Space dimension list.<br />
2 In the list of application modes, open <strong>COMSOL</strong> Multiphysics>PDE Modes and then PDE,<br />
Coefficient Form.<br />
3 Select Eigenvalue analysis. Make sure that Lagrange - Quadratic elements are selected<br />
in the Element list.<br />
4 Click OK.<br />
OPTIONS AND SETTINGS<br />
1 Open the Axes/Grid Settings dialog box from the Options menu.<br />
2 Set axis and grid values:<br />
AXIS GRID<br />
x min -4.5e-9 x spacing 1e-9<br />
x max 4.5e-9 Extra x<br />
y min -3.1e-9 y spacing 1e-9<br />
y max 3.1e-9 Extra y 5e-10<br />
3 Open the Constants dialog box from the Options menu.<br />
4 Enter the following constants and expressions:<br />
NAME EXPRESSION<br />
me 9.10939e-31<br />
e 1.6021773e-19<br />
hp 6.626076e-34<br />
e0 8.8541878e-12<br />
C (8*me*pi^2)/hp^2<br />
m 0<br />
These names correspond to the constants m e , e, h, ε 0 , C, and the quantum number m.<br />
First set m equal to 0 to catch the ground state energy among the energy eigenvalues.<br />
GEOMETRY MODELING<br />
1 Draw a circle centered at (0, 0) with a radius of 3·10 -9 .<br />
THE SCHRÖDINGER EQUATION FOR THE HYDROGEN ATOM | 451
2 Draw a circle centered at (0, 0) with a radius of 0.5·10 −9 . Use the tick mark at<br />
y = 0.5·10 −9 to assist in placing the radius correctly.<br />
3 Draw a rectangle from (−3·10 −9 , −3·10 −9 ) to (0, 3·10 −9 ).<br />
4 From the Draw menu, choose Create Composite Object.<br />
5 Enter (C1+C2)-R1 in the Set formula edit field.<br />
6 Click OK.<br />
PHYSICS SETTINGS<br />
Boundary Conditions<br />
1 Open the Boundary Settings dialog box from the Physics menu.<br />
2 Enter boundary coefficients as indicated in the table below:<br />
SETTINGS BOUNDARIES 1–3 BOUNDARIES 4, 7<br />
Type Neumann Dirichlet<br />
q 0 0<br />
g 0 0<br />
h 1<br />
r 0<br />
Subdomain Settings<br />
1 Open the Subdomain Settings dialog box from the Physics menu.<br />
2 Enter the following PDE coefficients.<br />
COEFFICIENT ALL SUBDOMAINS<br />
c x<br />
a -C*(x*e^2)/(4*pi*e0*sqrt(x^2+y^2))+(m^2)/x<br />
da C*x<br />
MESH GENERATION<br />
Use a finer mesh in the inner circular domain, because the solution shows greater<br />
variations in the center region than in the outer regions for low-energy eigenvalues.<br />
1 Open the Free Mesh Parameters dialog box from the Mesh menu.<br />
2 Click the Custom mesh size button and type 1.1 in the Element growth rate edit field.<br />
3 Click the Subdomain tab.<br />
452 | CHAPTER 11: QUANTUM MECHANICS MODELS
4 Select Subdomain 2 and enter 0.05e-9 in the Maximum element size edit field. This<br />
ensures that Subdomain 2 (the inner domain) has a finer mesh than the outer<br />
subdomain.<br />
5 Click the Remesh button.<br />
6 Click OK.<br />
COMPUTING THE SOLUTION<br />
1 Open the Solver Parameters dialog box from the Solve menu.<br />
2 On the General page, type 10 in the Desired number of eigenvalues edit field.<br />
3 Type -2e-18 in the Search for eigenvalues around edit field.<br />
4 Click OK.<br />
5 Click the Solve button on the Main toolbar.<br />
POSTPROCESSING AND VISUALIZATION<br />
The default plot shows the lowest energy eigenvalue, or ground state, of approximately<br />
–2·10 −18 J.<br />
1 Open the Plot Parameters dialog box from the Postprocessing menu.<br />
2 Plot some of the eigenfunctions by selecting the corresponding eigenvalue from the<br />
Eigenvalue list on the General page.<br />
3 Click the Surface tab.<br />
4 On the Surface Data tab, type abs(u)^2 in the Expression edit field.<br />
5 Click OK to plot the probability density function.<br />
Finally, try to determine the ground state energy accurately by enabling the adaptive<br />
solver. Use approximately as many elements as before, but the solver now adapts the<br />
mesh for the first eigenvalue in an attempt to equidistribute the error.<br />
MESH GENERATION<br />
1 Open the Free Mesh Parameters dialog box.<br />
2 On the General page, click the Custom mesh size button and type 1.5 in the Element<br />
growth rate edit field.<br />
3 Click the Subdomain tab and clear the entry in the Maximum element size edit field<br />
for Subdomain 2.<br />
4 Click the Remesh button and then click OK.<br />
THE SCHRÖDINGER EQUATION FOR THE HYDROGEN ATOM | 453
COMPUTING THE SOLUTION<br />
Search for a single eigenvalue using the approximate ground state energy -2e-18 as<br />
shift. This ensures that the eigenvalue solver finds the lowest state.<br />
1 Open the Solver Parameters dialog box.<br />
2 On the General page, select the Adaptive mesh refinement check box.<br />
3 Type 1 in the Desired number of eigenvalues edit field.<br />
4 Click the Adaptive tab.<br />
5 Type 2500 in the Maximum number of elements edit field.<br />
6 Type 10 in the Maximum number of refinements edit field.<br />
7 Click OK.<br />
8 Click the Solve button on the Main toolbar.<br />
454 | CHAPTER 11: QUANTUM MECHANICS MODELS
12<br />
Semiconductor Device Models<br />
Semiconductor device modeling involve diffusion processes for hole and electron<br />
concentrations as well as electric potential distribution. Thermal effects are also a<br />
factor. Semiconductor models often include multiphysics couplings and have highly<br />
nonlinear material properties, making them difficult to solve.<br />
455
Distributed SPICE Model of an<br />
Integrated Bipolar Transistor<br />
Introduction<br />
Integrated semiconductor devices are used in almost all electrical equipment, and the<br />
bipolar junction transistor (BJT) is still a very important device although the MOS<br />
technology has taken over a large part of the market. Especially in technologies with<br />
new types of semiconductors the bipolar transistor can be the best choice for optimum<br />
performance. The BJT consists of three semiconductor layers of alternating dopant<br />
type (N-type and P-type) forming an NPN or a PNP structure. These structures can<br />
control a large current using a much smaller current.<br />
This particular example describes a high-voltage NPN BJT fabricated from a<br />
semiconductor called silicon carbide (SiC). This semiconductor device combines high<br />
voltage properties (> 1000 V) and fast switching (> 1 MHz), which is impossible to<br />
achieve with comparable silicon devices. The applications for the device are in the drive<br />
electronics of electric motors and switched voltage supplies. A higher frequency<br />
decreases the size of the passive devices, like inductors and capacitors.<br />
Due to the complicated system of PDEs necessary to calculate the behavior of a<br />
semiconductor device, 3D simulations are rather impractical. As a result, most such<br />
simulations are performed in 2D, and much effort is put into finding symmetries and<br />
removing inactive areas. However, several design considerations need a calculation<br />
including the full layout of the device, especially in cases where significant voltage<br />
drops from high currents are expected in the metal layers. Further simplifications are<br />
therefore necessary, and a powerful approach for BJT structures is to use distributed<br />
SPICE expressions on a 2D top view layout of the device.<br />
456 | CHAPTER 12: SEMICONDUCTOR DEVICE MODELS
Figure 12-1: 3D view over the layers included in the model. The actual simulation is in<br />
2D, using the top view of this figure.<br />
Model Definition<br />
The potential in each layer obeys the equation<br />
∇ Wn ⋅ ⎛------- ∇V ⎞<br />
⎝ ρ n⎠<br />
=<br />
Jn → m<br />
n<br />
m≠n where W n is the layer thickness, ρ n the layer resistivity, and V n the potential of layer n.<br />
The right side is just the sum of all currents going from layer n to layer m. These<br />
currents are calculated using SPICE expressions, which is a function on the layer<br />
potentials at each point (see Table 12-1 on page 458).<br />
The boundary condition for all boundaries sets the outward current flow to zero.<br />
The electrical connection to the BJT is modeled through point conditions to the base<br />
metal and the emitter metal layers. The entire collector layer is connected to a fixed<br />
applied voltage through a distributed resistance (models a backside contact). The point<br />
conditions can either model a probe tip in on-chip measurements or a bond wire in a<br />
packaged device. The emitter point condition is just a constraint to zero volts for the<br />
dependent variable of this layer. The base contact condition can either be a constraint<br />
on the applied voltage, or a constant current condition. For the latter condition the<br />
model uses a point source.<br />
∑<br />
DISTRIBUTED SPICE MODEL OF AN INTEGRATED BIPOLAR TRANSISTOR | 457
Table 12-1 presents the different SPICE devices along with the expression for each<br />
device. Because the devices are distributed, the unit is per area where applicable.<br />
TABLE 12-1: SPICE DEVICES IN THE MODEL<br />
SPICE MODEL EXPRESSION<br />
Resistor<br />
Capacitor (trans)<br />
Capacitor (ac)<br />
BJT<br />
Note the following about the expressions above:<br />
The subscripts n and m denote one of the subscripts e, b, c, or m, depending on the<br />
layer the expression refers to.<br />
The current always has a counterpart representing the flow in the opposite<br />
direction.<br />
The variables not defined yet are SPICE parameters, which you define as constants in<br />
the <strong>COMSOL</strong> Multiphysics model. The SPICE expressions come from the<br />
Gummel-Poon model of the bipolar transistor with a few simplifications (Ref. 1).<br />
Because the distributed SPICE model is a transistor with no lateral extension, all<br />
parameters referring to lateral losses are ignored (the top view geometry takes the<br />
lateral part into account). The voltage dependence on junction capacitance is ignored<br />
along with some time constants, because the model is already quite complex. The<br />
parameter values are fitted to measurements and device simulations on a silicon carbide<br />
BJT fabricated at KTH (The Royal Institute of Technology), Stockholm, Sweden.<br />
Results and Discussion<br />
J n m<br />
Figure 12-2 shows the base and collector currents as a function of time when the base<br />
is ramped from 2 V to 4 V in 100 ns at a constant collector voltage of 15 V. The figure<br />
458 | CHAPTER 12: SEMICONDUCTOR DEVICE MODELS<br />
→ = ( Vn – Vm) ⁄ Rnm d<br />
→ = Cnm ( Vn – Vm) dt<br />
J n m<br />
J n m<br />
→ = jωC nm( Vn – Vm) Jb → e<br />
I be1<br />
= --------- + Ibe2 Jb → c<br />
Jc → e<br />
B F<br />
=<br />
=<br />
I bc2<br />
I be1<br />
---------<br />
K qb<br />
Jn → m =<br />
– Jm → n
eveals that the transistor has no problem to follow the ramp, and only a small<br />
overshoot in the base current can be detected after 100 ns.<br />
Figure 12-2: Turn on in 100 ns, where<br />
the red curve is the base current and the<br />
blue curve is the collector current.<br />
Figure 12-3: Turn on in 10 ns, and<br />
now the transistor cannot follow the<br />
ramp.<br />
When the rise time is decreased to 10 ns the BJT runs into problems, and Figure 12-3<br />
shows that the actual turn on time is about 30 ns. If faster ramps are required the<br />
simulation results have the information about the details on the limiting factors, but in<br />
some cases an harmonic simulation is easier to interpret. The plot in Figure 12-4 shows<br />
the harmonic component of the collector current density, taken from a harmonic<br />
simulation performed at a bias point of 10 mA base current, 15 V collector voltage,<br />
and at a 100 MHz frequency. This result shows a significant density beneath the base<br />
pad, which does not take part in the current amplification. An improved design would<br />
be to use a second metal layer for the pads, resulting in a more efficiently used device<br />
area.<br />
DISTRIBUTED SPICE MODEL OF AN INTEGRATED BIPOLAR TRANSISTOR | 459
Figure 12-4: The harmonic part of the collector current density at 100 MHz.<br />
These results only qualitatively estimate the switch speed of the device. In an<br />
experimental setup, other parasitic elements influence the result (for example, probes,<br />
package, and cables). The approximation on the capacitances also affects the result.<br />
Modeling in <strong>COMSOL</strong> Multiphysics<br />
Use four PDE, General Form application modes—one for each layer—to group the<br />
voltages. Within each application mode there are two dependent variables, one for the<br />
DC voltage and one for the AC voltage (complex valued).<br />
To model the point current source, use a test function and the weak form settings.<br />
Reference<br />
1. H. K. Gummel and H.C. Poon, “An Integral Charge Control Model of Bipolar<br />
Transistors,” The Bell System Technical Journal, vol. 49, pp. 827–852, 1970.<br />
460 | CHAPTER 12: SEMICONDUCTOR DEVICE MODELS
Model Library path: <strong>COMSOL</strong>_Multiphysics/Semiconductor_Devices/<br />
bipolar_transistor<br />
Modeling Using the Graphical User Interface<br />
MODEL NAVIGATOR<br />
1 Click the Multiphysics button in the Model Navigator.<br />
2 Select 2D from the Space dimension list.<br />
3 Select the <strong>COMSOL</strong> Multiphysics>PDE Modes>PDE, General Form application mode. In<br />
the Dependent variables edit field, enter the names of the variables: Vm_dc Vm_ac.<br />
Enter metal as the application mode name, and select the Lagrange - Linear element.<br />
Click the Add button to add the mode to the model.<br />
4 Add the second application mode of the same type and with the same element. Use<br />
the variable names: Ve_dc Ve_ac. Enter emitter as the application mode name.<br />
5 Add the third application mode of the same type and with the same element. Use<br />
the variable names: Vb_dc Vb_ac. Enter base as the application mode name.<br />
6 And finally, add the fourth application mode of the same type and with the same<br />
element. Use the variable names: Vc_dc Vc_ac. Enter collector as the application<br />
mode name.<br />
7 Click OK.<br />
OPTIONS AND SETTINGS<br />
1 In the Constants dialog box, enter the following variable names and expressions. The<br />
variable t does not affect the time-dependent simulation, because the model uses<br />
the internal time variable.<br />
NAME EXPRESSION DESCRIPTION<br />
Vbe 2.0 Applied base-emitter voltage (V)<br />
Vbe_on 4.0 Final voltage in transient simulations (V)<br />
t_rise 10e-9 Rise time to reach Vbe_on (s)<br />
Vce 15 Applied collector-emitter voltage (V)<br />
Vac 1 Applied AC voltage (V)<br />
Ib_a 0.0 Base current forced into base contact (A)<br />
DISTRIBUTED SPICE MODEL OF AN INTEGRATED BIPOLAR TRANSISTOR | 461
NAME EXPRESSION DESCRIPTION<br />
Vt 0.0259 Thermal voltage<br />
freq 10e6 Frequency (Hz)<br />
omega 2*pi*freq Angular frequency (rad/s)<br />
Wb 0.3e-6 Thickness of base layer (m)<br />
We 0.5e-6 Thickness of emitter layer (m)<br />
Ws 0.5e-6 Thickness of sub-collector layer (m)<br />
Wm 0.2e-6 Thickness of metal layer (m)<br />
rhoB0 4.54e-3 Max resistivity of base layer (Ω·m)<br />
rhoBm 0.783e-3 Min resistivity of base layer (Ω·m)<br />
rhoE 0.293e-3 Resistivity of emitter layer (Ω·m)<br />
rhoS 0.290e-3 Resistivity of sub-collector layer (Ω·m)<br />
rhoM 1e-6 Resistivity of metal layer (Ω·m)<br />
Cbe 3.29e-3 Base-emitter capacitance (F/m 2 )<br />
Cbc 3.38e-3 Base-collector capacitance (F/m 2 )<br />
Rbm 1e-9 Resistance between metal and base layer (Ω·m 2 )<br />
Rem 1e-10 Resistance between metal and emitter layer (Ω·m 2 )<br />
Rs 7e-8 Resistance between the collector layer and the backside (Ω·m 2 )<br />
Nf 1.0 Base-emitter ideality factor<br />
Ne 1.2 Base-emitter second ideality factor<br />
Nc 1.0 Base-collector ideality factor<br />
Nk 0.867 Beta roll-off power factor<br />
Vaf 979 Forward Early voltage (V)<br />
Bf 27.0 Forward current gain<br />
Is 9.37e-42 Base-emitter saturation current (A/m 2 )<br />
Isc 1.91e-42 Base-collector saturation current (A/m 2 )<br />
Ise 9.7e-35 Base-emitter second saturation current (A/m 2 )<br />
Ikf 2.98e7 Beta roll-off current (A/m 2 )<br />
t 0.0 Time for stationary solutions<br />
2 In the Scalar Expressions dialog box, enter the following expressions.<br />
NAME EXPRESSION DESCRIPTION<br />
Ibc2 Isc*exp((Vb-Vc)/(Nc*Vt)) Base-collector current (A·m 2 )<br />
Kq1 1/(1-(Vb-Vc)/Vaf) Voltage dependent factor<br />
462 | CHAPTER 12: SEMICONDUCTOR DEVICE MODELS
Kq2 Ibe1/Ikf Current dependent factor<br />
Kqb Kq1/2*(1+(1+4*Kq2)^Nk) Current and voltage dependent factor<br />
rhoB rhoBm+(rhoB0-rhoBm)/Kqb Current dependent base resistivity (Ω·m 2 NAME EXPRESSION DESCRIPTION<br />
)<br />
Vbe_t Vbe+(t/t_rise*(t=t_rise))*(Vbe_on-Vbe)<br />
Ramping of Vbe to final voltage (V)<br />
Vm Vm_ac+Vm_dc Total metal layer potential (V)<br />
Vmx Vm_acx+Vm_dcx X-derivative of layer potential (V/m)<br />
Vmy Vm_acy+Vm_dcy Y-derivative of layer potential (V/m)<br />
Ve Ve_ac+Ve_dc Total emitter layer potential (V)<br />
Vex Ve_acx+Ve_dcx X-derivative of layer potential (V/m)<br />
Vey Ve_acy+Ve_dcy Y-derivative of layer potential (V/m)<br />
Vb Vb_ac+Vb_dc Total base layer potential (V)<br />
Vbx Vb_acx+Vb_dcx X-derivative of layer potential (V/m)<br />
Vby Vb_acy+Vb_dcy Y-derivative of layer potential (V/m)<br />
Vc Vc_ac+Vc_dc Total collector layer potential (V)<br />
Vcx Vc_acx+Vc_dcx X-derivative of layer potential (V/m)<br />
Vcy Vc_acy+Vc_dcy Y-derivative of layer potential (V/m)<br />
Jbc_ac j*omega*Cbc*(Vb_ac-Vc_ac)<br />
GEOMETRY MODELING<br />
The geometry is constructed from a layout drawing in the GDS file format, which is<br />
the most common format used in the fabrication process of reticles for lithography<br />
equipment. The file format can be converted to a DXF file and imported to <strong>COMSOL</strong><br />
Multiphysics. The spatial unit in the GDS file are given in nanometers (nm). Because<br />
the length unit in <strong>COMSOL</strong> Multiphysics is meters and not nanometers, you must<br />
scale the geometry.<br />
1 In the File menu, select Import and choose CAD Data From File. Click Browse and<br />
select the file bipolar_transistor.dxf, which you find in the models/<br />
<strong>COMSOL</strong>_Multiphysics/Semiconductor_Devices folder. Click Import.<br />
2 Click the Coerce to Solid button on the Draw toolbar to make it a solid geometry.<br />
3 On the Draw menu, point to Modify, and then click Scale. In the x and y scale factor<br />
edit fields, type the value 1e-9. Click OK.<br />
4 Click the Zoom Extents button on the Main toolbar.<br />
DISTRIBUTED SPICE MODEL OF AN INTEGRATED BIPOLAR TRANSISTOR | 463
5 Choose Draw>Specify Objects>Point. In the Point dialog box, type 70e-6 in the x<br />
edit field and 220e-6 in the y edit field in the Coordinates area. Click OK. This defines<br />
the point PT1 at the location of the emitter.<br />
6 Choose Draw>Specify Objects>Point. In the Point dialog box, type 260e-6 in the x<br />
edit field and 70e-6 in the y edit field in the Coordinates area. Click OK. This defines<br />
the point PT2 at the location of the base.<br />
PHYSICS SETTINGS<br />
To simplify the expressions in the subdomains and in the postprocessing, do the<br />
following steps:<br />
1 In the Subdomain Expressions dialog box, type the following expressions for the<br />
given subdomains.<br />
NAME EXPRESSION SUBDOMAIN DESCRIPTION<br />
Ibe1 Is*exp((Vb-Ve)/(Nf*Vt)) 4, 5 Base-emitter current<br />
Ibe2 Ise*exp((Vb-Ve)/(Ne*Vt)) 4, 5 2nd base-emitter current<br />
Jbe_ac j*omega*Cbe*(Vb_ac-Ve_ac) 4, 5 Harmonic base-emitter<br />
current<br />
464 | CHAPTER 12: SEMICONDUCTOR DEVICE MODELS
2 Select Subdomains 1–3, and the enter 0 in all three edit fields in the Expression<br />
columns to make all expression variables equal to zero in those subdomains.<br />
3 In the Subdomain Integration Variables dialog box, type the expressions given in the<br />
table below.<br />
NAME EXPRESSION SUBDOMAIN DESCRIPTION<br />
Ib (Vm-Vb)/Rbm 2 Base current<br />
Ic (Vce-Vc)/Rs all Collector current<br />
Ie (Vm-Ve)/Rem 5 Emitter current<br />
Boundary Conditions<br />
All boundaries should be of Neumann type with all parameters set to zero.<br />
1 Select the PDE, General Form (metal) application mode from the Multiphysics menu.<br />
2 Open the Boundary Settings dialog box.<br />
3 Select all boundaries and select the Neumann boundary condition.<br />
4 Select each of the other modes from the Multiphysics menu and do the same<br />
operations there.<br />
Subdomain Settings (Point Settings, Edge Settings)<br />
There are five subdomains with somewhat different settings.<br />
1 Select the PDE, General Form (metal) application mode from the Multiphysics menu.<br />
2 Open the Subdomain Settings dialog box.<br />
3 Select Subdomains 1, 3, and 4 and then clear the Active in this domain check box.<br />
4 Enter the expressions for the Γ, F, and da coefficients according to the three tables<br />
below and click OK.<br />
SETTINGS SUBDOMAINS 2, 5<br />
Γ1 Wm/rhoM*Vmx Wm/rhoM*Vmy<br />
Γ2 Wm/rhoM*Vmx Wm/rhoM*Vmy<br />
SETTINGS SUBDOMAIN 2 SUBDOMAIN 5<br />
F1 (Vm-Vb)/Rbm (Vm-Ve)/Rem<br />
F2 (Vm-Vb)/Rbm (Vm-Ve)/Rem<br />
DISTRIBUTED SPICE MODEL OF AN INTEGRATED BIPOLAR TRANSISTOR | 465
SETTINGS SUBDOMAINS 2, 5<br />
da,1 0 0<br />
da,2 0 0<br />
5 Select the PDE, General Form (emitter) application mode from the Multiphysics menu.<br />
6 Open the Subdomain Settings dialog box, select Subdomains 1–3 and clear the Active<br />
in this domain check box.<br />
7 Enter the expressions for the other subdomains according to the tables below and<br />
click OK.<br />
SETTINGS SUBDOMAINS 4, 5<br />
Γ1 We/rhoE*Vex We/rhoE*Vey<br />
Γ2 We/rhoE*Vex We/rhoE*Vey<br />
SETTINGS SUBDOMAIN 4 SUBDOMAIN 5<br />
F1 -(Ibe1/Bf+Ibe2+Ibe1/Kqb) (Ve-Vm)/Rem-(Ibe1/Bf<br />
+Ibe2+Ibe1/Kqb)<br />
F2 -(Ibe1/Bf+Ibe2+Ibe1/Kqb) (Ve-Vm)/Rem-(Ibe1/Bf<br />
-Jbe_ac<br />
+Ibe2+Ibe1/Kqb)-Jbe_ac<br />
SETTINGS SUBDOMAINS 4, 5<br />
da,1 -Cbe 0<br />
da,2 0 0<br />
8 Select the PDE, General Form (base) application mode from the Multiphysics menu.<br />
9 Open the Subdomain Settings dialog box. Enter the expressions for the subdomains<br />
according to the tables below, and click OK.<br />
SETTINGS ALL SUBDOMAINS<br />
Γ1 Wb/rhoB*Vbx Wb/rhoB*Vby<br />
Γ2 Wb/rhoB*Vbx Wb/rhoB*Vby<br />
SETTINGS SUBDOMAINS 1, 3 SUBDOMAIN 2 SUBDOMAINS 4, 5<br />
F1 Ibc2 Ibc2+(Vb-Vm)/Rbm Ibc2+Ibe1/Bf+Ibe2<br />
F2 Ibc2+Jbc_ac Ibc2+(Vb-Vm)/Rbm+Jbc_ac Ibc2+Ibe1/Bf+Ibe2+<br />
Jbe_ac+Jbc_ac<br />
466 | CHAPTER 12: SEMICONDUCTOR DEVICE MODELS
SETTINGS SUBDOMAINS 1–3 SUBDOMAINS 4, 5<br />
da,1 -Cbc 0 -Cbe-Cbc 0<br />
da,2 0 0 0 0<br />
10 Select the PDE, General Form (collector) application mode from the Multiphysics<br />
menu.<br />
11 Open the Subdomain Settings dialog box. Enter the expressions for the subdomains<br />
according to the tables below, and click OK.<br />
SETTINGS ALL SUBDOMAINS<br />
Γ1 Ws/rhoS*Vcx Ws/rhoS*Vcy<br />
Γ2 Ws/rhoS*Vcx Ws/rhoS*Vcy<br />
SETTINGS SUBDOMAINS 1–3 SUBDOMAINS 4,5<br />
F1 -Ibc2+(Vc-Vce)/Rs -Ibc2+(Vc-Vce)/Rs+Ibe1/Kqb<br />
F2 -Ibc2+(Vc-Vce)/Rs-Jbc_ac -Ibc2+(Vc-Vce)/Rs+Ibe1/Kqb<br />
-Jbc_ac<br />
SETTINGS ALL SUBDOMAINS<br />
da,1 -Cbc 0<br />
da,2 0 0<br />
You must also specify the settings at the two points representing the probe or bond<br />
wire connections.<br />
1 Select the PDE, General Form (metal) application mode from the Multiphysics menu.<br />
2 Open the Point Settings dialog box.<br />
3 Enter the point expressions (weak form terms and constraints) according to the<br />
following table:<br />
SETTINGS POINT 133 POINT 413<br />
weak 0 0 -Ib_a*Vm_dc_test 0<br />
constr Vm_dc Vm_ac (Vbe_t-Vm_dc)*(Ib_a=0) Vac-Vm_ac<br />
Finally add some cross time-derivative terms, which you cannot specify from the<br />
Subdomain Settings dialog box. Use the equation-system settings for this.<br />
1 Open the Subdomain Settings - Equation System dialog box by selecting<br />
Physics>Equation System>Subdomain Settings.<br />
DISTRIBUTED SPICE MODEL OF AN INTEGRATED BIPOLAR TRANSISTOR | 467
2 Click the d a tab and select Subdomains 1–3. Enter the fields specified in the table<br />
below. Leave all other existing expressions as is.<br />
ROW NUMBER COLUMN NUMBER EXPRESSION<br />
5 7 Cbc<br />
7 5 Cbc<br />
3 Select Subdomains 4 and 5 and fill in the fields specified below.<br />
ROW NUMBER COLUMN NUMBER EXPRESSION<br />
3 5 Cbe<br />
5 3 Cbe<br />
5 7 Cbc<br />
7 5 Cbc<br />
4 Click OK. Now the settings in this dialog box determine the subdomain settings,<br />
which means that the software ignores all changes in the Subdomain Settings dialog<br />
box from now on. <strong>COMSOL</strong> Multiphysics indicates this with a padlock symbol next<br />
to all subdomain numbers. By clicking the Reset Equation button in the Subdomain<br />
Settings - Equation System dialog box, you set all parameters according to the<br />
Subdomain Settings dialog box and it is possible to do changes there again.<br />
468 | CHAPTER 12: SEMICONDUCTOR DEVICE MODELS
Initial Conditions<br />
To speed up the DC simulation, the initial conditions of the metal, base, and collector<br />
layer can be set equal to the constant variables, Vbe and Vce. Due to the changes in the<br />
Subdomain Settings - Equation System dialog box, you must specify all the initial<br />
conditions there.<br />
1 Open the Subdomain Settings - Equation System dialog box, and click the Init tab.<br />
2 Select Subdomain 2 and type Vbe in the Vm_dc(t 0 ) edit field.<br />
3 Select all subdomains and type Vbe in the Vb_dc(t 0 ) edit field and Vce in the<br />
Vc_dc(t 0 ) edit field.<br />
4 Click OK.<br />
MESH GENERATION<br />
Due to the small features in the defined geometry, it is possible to make the mesh<br />
coarser than the default.<br />
1 In the Mesh menu, open the Free Mesh Parameters dialog box.<br />
2 Select the Coarser predefined mesh size.<br />
3 Click the Boundary tab, select all boundaries that is part of the finger structure of the<br />
emitter and base, and enter 4e-6 in the Maximum element size edit field.<br />
4 Click the Remesh button.<br />
5 Click OK.<br />
COMPUTING THE SOLUTION (TIME-DEPENDENT)<br />
This sequence first finds the initial solution and then continues with the<br />
time-dependent simulation.<br />
1 Open the Solver Manager dialog box.<br />
2 Click the Initial value expression button in the Initial value area.<br />
3 Click the Solve For tab and expand all modes. Select all DC variables (ending with<br />
_dc). This makes the solver leave the AC application mode variables unchanged.<br />
Click OK.<br />
4 Click the Solve button on the Main toolbar.<br />
5 When the solution has been found, open the Solver Manager dialog box again.<br />
6 Click the Initial Value tab. Click the Store Solution button, and then click the Stored<br />
solution button in the Initial value area to use the stored solution as the initial value.<br />
Click OK.<br />
DISTRIBUTED SPICE MODEL OF AN INTEGRATED BIPOLAR TRANSISTOR | 469
7 Open the Solver Parameters dialog box, and select the Time dependent solver. In the<br />
Times edit field, type 0 1e-6. To avoid large time steps, type 1e-3 in the Relative<br />
tolerance edit field and 5e-4 in the Absolute tolerance edit field.<br />
8 Click the Time Stepping tab, and select Time steps from solver from the Times to store<br />
in output list.<br />
9 Click OK, then click the Solve button on the Main toolbar.<br />
POSTPROCESSING AND VISUALIZATION (TIME-DEPENDENT)<br />
Use the defined coupling variables to plot the base and collector currents versus time:<br />
1 In the Postprocessing menu, select Domain Plot Parameters.<br />
2 Under the General tab select Point plot. In the Solutions to use area, select<br />
Interpolated times from the Select via list. In the Times edit field, type<br />
range(0,1e-9,1e-7).<br />
3 Click the Point tab and type Ib in the Expression edit field. Select Point 413 (for<br />
example by clicking on the point in the middle of the base pad).<br />
4 Click the Line Settings button. In the Line Settings dialog box, select Color from the<br />
Line color list, and select Triangle from the Line marker list. Click the Color button<br />
and select red from the palette. Click OK.<br />
5 In the Domain Plot Parameters dialog box, click Apply to view the base current.<br />
6 Click the General tab and select the Keep current plot check box.<br />
7 Go back to the Point page and type Ic in the expression edit field.<br />
470 | CHAPTER 12: SEMICONDUCTOR DEVICE MODELS
8 Change the color to blue and click the OK button. You now get the figure below,<br />
which shows how the currents behave during turn on.<br />
COMPUTING THE SOLUTION (TIME-HARMONIC)<br />
This sequence first finds a stationary solution for a base current of 10 mA and then uses<br />
this solution as the linearization point for the time-harmonic simulation:<br />
1 Open the Constants dialog box from the Options menu. Change the variable Vbe to<br />
2.5. Click OK. This gives a better initial condition for the constant current solution.<br />
2 Open the Solver Parameters dialog box. Select the Parametric in the Solver list.<br />
3 Type Ib_a in the Parameter names edit field and 1e-2 in the Parameter values edit<br />
field. Click OK.<br />
4 Open the Solver Manager dialog box and select the Initial value expression option in<br />
the Initial value area. Click OK.<br />
5 Click the Solve button.<br />
6 When the analysis has finished, open the Solver Manager dialog box again.<br />
7 Click the Store Solution button, and select the solution for the value of 0.01 in the<br />
Parameter value list. Click OK. In the Values of variables not solved for and<br />
linearization point area, click the Stored solution option button.<br />
DISTRIBUTED SPICE MODEL OF AN INTEGRATED BIPOLAR TRANSISTOR | 471
8 Under the Solve For tab, expand all modes, deselect all dc variables and select all ac<br />
variables (ending with _ac). Click OK.<br />
9 Open the Solver Parameters dialog box, and select Parametric in the Solver list.<br />
10 Enter freq in the Parameter names edit field, and enter the values 1e6 1e7 1e8 in<br />
the Parameter values edit field.<br />
11 Click the Stationary tab. Select Linear in the Linearity list to ensure that the<br />
parametric sweep uses the linear solver.<br />
12 Click OK.<br />
13 Click the Solve button on the Main toolbar.<br />
POSTPROCESSING AND VISUALIZATION (TIME-HARMONIC)<br />
1 Open the Plot Parameters dialog box.<br />
2 Click the Surface tab and make sure that the Surface plot and (on the Height Data<br />
page) Height data check boxes are selected. Type abs((Vce-Vc)/Rs) in the<br />
Expression edit fields on the Surface Data and Height Data pages. Click OK.<br />
3 Click the Headlight button on the Camera toolbar to the left to make the plot look<br />
nicer. The plot should now look like the following figure. Notice the high collector<br />
current density under the base pad.<br />
472 | CHAPTER 12: SEMICONDUCTOR DEVICE MODELS
DC Characteristics of a MOS<br />
Transistor (MOSFET)<br />
This model calculates the DC characteristics of a MOS (metal-oxide semiconductor)<br />
transistor using standard semiconductor physics. In normal operation, a system turns<br />
on a MOS transistor by applying a voltage to the gate electrode. When the voltage on<br />
the drain increases, the drain current also increases until it reaches saturation. The<br />
saturation current depends on the gate voltage.<br />
Introduction<br />
The MOSFET (metal oxide semiconductor field-effect transistor) is by far the most<br />
common semiconductor device, and the primary building block in all commercial<br />
processors, memories, and digital integrated circuits. During the past decades this<br />
device has experienced tremendous development, and today it is being manufactured<br />
with feature sizes of 90 nm and smaller.<br />
Cross-section TEM (transmission electron microscope) image of a 70-nm MOSFET<br />
fabricated in the clean room at the Royal Institute of Technology in Kista, Sweden (a<br />
project of P.-E. Hellström and others).<br />
This model shows the basic functionality of a MOS transistor, where the gate voltage<br />
controls the drain-source resistance and thus the drain current. At a certain gate<br />
voltage, V GS , and at low drain voltages, the drain current is almost linearly dependent<br />
DC CHARACTERISTICS OF A MOS TRANSISTOR (MOSFET) | 473
on the drain voltage. When the drain voltage increases, the drain current saturates. The<br />
level of saturation depends on the gate voltage.<br />
The gate voltage also influences the coefficient describing the linear dependence<br />
between the gate voltage and gate current at low drain voltages. This coefficient is<br />
generally known as the On resistance (R on). In digital devices the transistor operates<br />
as a switch, making R on an important parameter influencing the transistor’s power loss<br />
and driving ability. Its ability to drive an output is of special importance. This<br />
characteristic is described by the fanout, the number of outputs that a device can drive.<br />
In high-speed systems, parasitic effects make the situation more complicated.<br />
Model Definition<br />
DEVICE GEOMETRY<br />
The structure in Figure 12-5 is a cross section of a simplified MOS transistor. The<br />
electric field in the gate influences the low-doped p-type silicon; specifically, at a certain<br />
gate voltage a thin layer of it, close to the silicon-oxide surface, turns into an n-type<br />
material. This process, called inversion, creates a conducting channel between the<br />
highly doped n-type source and the drain regions. With this channel present, a voltage<br />
across the source and the drain drives a drain current. This model uses the following<br />
dimensions: a gate length of 0.2 µm, a gate oxide thickness of 5 nm, and a source-drain<br />
junction depth of 0.1 µm.<br />
SiO2 Gate<br />
Source Poly-Si<br />
Drain<br />
n + -Si n + -Si<br />
p-Si<br />
Figure 12-5: The model geometry. The simulation replaces the contacts with boundary<br />
conditions.<br />
DOMAIN EQUATIONS<br />
This example models a MOS transistor using the standard drift-diffusion<br />
approximation coupled with Poisson’s equation. With the aid of some generally<br />
accepted simplifications—such as neglecting magnetic fields, assuming a constant<br />
density of states in both the valence and the conductance bands, and assuming a<br />
474 | CHAPTER 12: SEMICONDUCTOR DEVICE MODELS
Boltzmann distribution of the carriers—it is possible to derive these equations from<br />
Maxwell’s equations and Boltzmann transport theory.<br />
The model in this example formulates the problem using three dependent variables: ψ<br />
(the electrostatic potential), n, and p. The three basic semiconductor equations are<br />
where p and n are the hole and electron concentrations, respectively, and N represents<br />
the fixed charge associated with ionized donors.<br />
You can express the electron and hole current densities, J n and J p, with a drift term<br />
and a diffusion term<br />
where µ n and µ p are the carrier mobilities, and D n and D p are the carrier diffusivities.<br />
Another term, R SRH , represents the Shockley-Read-Hall recombination, which is a<br />
general recombination process using traps constituting energy levels in a<br />
semiconductor’s forbidden band gap. In the recombination equation<br />
n i is the intrinsic carrier concentration, τ n and τ p are the carrier lifetimes, and n 1 and<br />
p 1 are parameters related to the trap energy level. If that level is located in the middle<br />
of the band gap (which this model assumes), then n 1 and p 1 equal the intrinsic carrier<br />
concentration, n i.<br />
BOUNDARY CONDITIONS<br />
– ∇ ⋅ ( ε∇ψ) = qp ( – n+<br />
N)<br />
– ∇ ⋅ Jn<br />
= – qRSRH – ∇ ⋅ Jp = qRSRH Jn= – qnµ n∇ψ + qDn∇n Jp = – qpµ p∇ψ – qDp∇p R SRH<br />
np – n2 i<br />
= ----------------------------------------------------------τp(<br />
n+ n1) + τn( p+ p1) For boundaries in contact with an insulator or far away from the active device area, you<br />
can use the symmetry or zero charge (flux) boundary condition for the electrostatic<br />
(diffusion) problem. At boundaries in contact with a metal, the electrostatic potential<br />
is fixed. Assuming infinite recombination velocity at the contact, the mass action law<br />
2<br />
ni =<br />
np<br />
DC CHARACTERISTICS OF A MOS TRANSISTOR (MOSFET) | 475
is valid. Using this law along with the assumption that there is no charge at the contact,<br />
it is possible to calculate the carrier concentrations. The applied voltage equals the<br />
Fermi level in the semiconductor at the contact, so the electrostatic potential at the<br />
contact is the applied voltage plus the potential difference between the Fermi level and<br />
the electrostatic reference level:<br />
where V a is the applied voltage. In this model the reference potential is the vacuum<br />
level. This is often a good choice when several materials with different affinities or work<br />
functions are present. As a result, the electrostatic potential is continuous across all<br />
material interfaces. This reference level also finds use in heterojunction device<br />
simulations. The band diagram in Figure 12-6 shows how this model represents the<br />
metal-oxide semiconductor material system.<br />
Vacuum level<br />
χ Poly<br />
χ SiO2<br />
poly-Si<br />
SiO 2<br />
Figure 12-6: A band diagram of the MOS material system. The necessary parameters to<br />
align the materials are the affinities of the oxide and semiconductor, plus the work<br />
function of the polysilicon gate, which this model assumes has the same properties as<br />
aluminum.<br />
476 | CHAPTER 12: SEMICONDUCTOR DEVICE MODELS<br />
N<br />
---- ⎛N ---- ⎞<br />
EG kT 2 ⎝2⎠ ψ Va – χ ------- Si – -------<br />
2 q<br />
2<br />
⎛ 2<br />
+ + n ⎞<br />
⎜ i ⎟<br />
=<br />
+ ln⎜-----------------------------------------<br />
⎟<br />
⎜ ni ⎟<br />
⎝ ⎠<br />
χ Si<br />
n<br />
N<br />
= ---- +<br />
2<br />
N<br />
p = – ---- +<br />
2<br />
Si<br />
⎛N ---- ⎞<br />
⎝2⎠ 2<br />
+<br />
⎛N ---- ⎞<br />
⎝2⎠ 2<br />
+<br />
2<br />
ni 2<br />
ni
The material parameters in the MOS transistor are:<br />
NOTATION VARIABLE VALUE<br />
ni (Si) ni_Si 1.46⋅10 10 cm -3 (T = 300K)<br />
ε r (Si) epsilonr_Si 11.8<br />
ε r (SiO2) epsilonr_Si 4.2<br />
µ n (Si) mun 1000 cm 2 /Vs (low concentration)<br />
µ p (Si) mup 500 cm 2 /Vs (low concentration)<br />
D n = µ n (Si) kT/q Dn 20.7 cm 2 /s<br />
D p = µ p (Si)kT/q Dp 5.17 cm 2 /s<br />
τ n taun ~0.1 µs<br />
τ p taup ~0.1 µs<br />
E G(Si) Eg_Si 1.08 eV<br />
χ Si X_Si 4.0 eV<br />
χ SiO2 X_SiO2 0.3 eV<br />
χ poly X_poly 4.2 eV<br />
INITIAL-VALUE CALCULATION<br />
The rapid changes and large dynamics of the solution variables in the PDEs require a<br />
special technique to calculate the initial value. This model solves an extra electrostatics<br />
application mode separately to get the initial value for the other application modes.<br />
This extra application mode also solves Poisson’s equation but with the difference that<br />
it replaces the carrier concentrations with the formulas<br />
n = nie p =<br />
nie qψ + χSi + ------<br />
----------------------------------<br />
2<br />
kT<br />
This step produces the exact solution for the full system when all applied voltages are<br />
zero. You perform the steps to get the initial condition with the solver sequence<br />
functionality in the Solver Manager dialog box.<br />
E G<br />
E G<br />
qψ + χSi + ------<br />
2<br />
– ---------------------------------kT<br />
DC CHARACTERISTICS OF A MOS TRANSISTOR (MOSFET) | 477
Results and Discussion<br />
The system’s nonlinear behavior makes it necessary to use the parametric solver to<br />
reach the desired voltage for each contact. This example first raises the gate voltage to<br />
0.8 V and then sweeps the drain voltage to 1 V. Including the first initial-value<br />
calculation, three solution steps are necessary, and by defining a solver sequence you<br />
can execute all of them with one click on the Solve button. The result from the last step<br />
appears in Figure 12-7.<br />
Figure 12-7: Drain current as a function of drain voltage for V GS = 0.8 V. Note that<br />
R onis 1/(slope of the curve) at the point where V DS = 0, which falls at the far left of the<br />
curve.<br />
478 | CHAPTER 12: SEMICONDUCTOR DEVICE MODELS
A surface plot is useful to view the shape of the solution variables. Figure 12-8 shows<br />
the electrostatic potential at the final bias condition. The large negative shift for the<br />
potential is due to the vacuum reference potential.<br />
Figure 12-8: Surface plot of the electrostatic potential inside the MOSFET.<br />
DC CHARACTERISTICS OF A MOS TRANSISTOR (MOSFET) | 479
The conducting channel at the oxide-semiconductor interface becomes visible in a<br />
logarithmic surface plot of the electron concentration (Figure 12-9).<br />
Figure 12-9: The channel close to the interface becomes visible in an electron-concentration<br />
plot. Notice the sharp drop in the channel concentration close to the drain contact, which<br />
is responsible for the saturation of the drain current.<br />
Model Library path: <strong>COMSOL</strong>_Multiphysics/Semiconductor_Devices/<br />
mos_transistor<br />
Modeling Using the Graphical User Interface<br />
MODEL NAVIGATOR<br />
1 In the Model Navigator, select 2D from the Space dimension list.<br />
2 Click the Multiphysics button.<br />
3 Select the application mode <strong>COMSOL</strong> Multiphysics>Electromagnetics>Electrostatics.<br />
4 Enter phi0 in the Dependent variables edit field, and enter init in the Application<br />
mode name edit field.<br />
480 | CHAPTER 12: SEMICONDUCTOR DEVICE MODELS
5 Click Add.<br />
6 Enter phi in the Dependent variables edit field.<br />
7 Click Add.<br />
8 Select the application mode <strong>COMSOL</strong> Multiphysics>Convection and Diffusion><br />
Convection and Diffusion>Steady-state analysis.<br />
9 Enter nc in the Dependent variables edit field, and enter cde in the Application mode<br />
name edit field.<br />
10 Click Add.<br />
11 Click the Application Mode Properties button, select Conservative from the Equation<br />
form list and On from the Weak constraints list. Click OK.<br />
12 Enter pc in the Dependent variables edit field, and enter cdh in the Application mode<br />
name edit field.<br />
13 Click Add.<br />
14 Click the Application Mode Properties button, select Conservative from the Equation<br />
form list and On from the Weak constraints list. Click OK.<br />
15 Click OK.<br />
OPTIONS AND SETTINGS<br />
1 From the Options menu, choose Constants.<br />
2 In the Constants dialog box, define the following constants with names, expressions,<br />
and descriptions (the descriptions are optional):<br />
NAME EXPRESSION DESCRIPTION<br />
q 1.602e-19[C] Elementary charge<br />
T0 300[K] Lattice temperature<br />
k 1.38e-23[J/K] Boltzmann’s constant<br />
epsilonr_si 11.8 Rel. permittivity for Si<br />
epsilonr_sio2 4.2 Rel. permittivity for SiO2<br />
ni 1.5e10[1/cm^3] Intrinsic carrier<br />
concentration for Si<br />
mun_si 1000[cm^2/(V*s)] Electron mobility for Si<br />
mup_si 500[cm^2/(V*s)] Hole mobility for Si<br />
X_si 4.0[V] Electron affinity for Si<br />
X_sio2 0.3[V] Electron affinity for SiO2<br />
X_poly 4.5[V] Work function for poly-Si<br />
DC CHARACTERISTICS OF A MOS TRANSISTOR (MOSFET) | 481
NAME EXPRESSION DESCRIPTION<br />
Eg_si 1.08[V] Band gap of Si<br />
taun 0.1[um] Electron carrier life time<br />
taup 0.1[um] Hole carrier life time<br />
Vt k*T0/q Thermal voltage<br />
x1 -0.1[um] Help coordinate<br />
x2 0.2[um] Help coordinate<br />
yj 0.1[um] Junction depth<br />
NDimpl 1e19[1/cm^3] Peak concentration of<br />
implanted profile<br />
NAsub 5e17[1/cm^3] Substrate doping<br />
ch yj/sqrt(log( Characteristic length of<br />
NDimpl/NAsub)) implanted region<br />
Vg 0.8[V] Gate voltage<br />
Vd 0[V] Drain voltage<br />
3 Click OK.<br />
4 From the Options menu, choose Functions.<br />
5 In the Functions dialog box, click the New button.<br />
6 In the New Function dialog box, type flgauss in the Function name edit field. Click<br />
OK to create the new function.<br />
7 Type x, y, x1, y1, ch in the Arguments edit field, and type the following in the<br />
Expression edit field: (exp(-((y-y1)/ch)^2)*(y=y1))*<br />
(exp(-((x-x1)/ch)^2)*(x>x1)+(x
NAME WIDTH HEIGHT CORNER DESCRIPTION<br />
R2 2.2e-7 5e-9 (-1e-8,0) Gate oxide<br />
R3 3.9e-7 5e-8 (-4e-7,0) Air region<br />
2 Click the Zoom Extents toolbar button.<br />
3 Click the 2nd Degree Bézier Curve button and draw an arc from (−1e−7, −1e−7), with<br />
control point (0, −1e−7), ending it at (0, 0).<br />
4 Continue the arc with straight lines by clicking the Line button and then click the<br />
coordinate sequence (−4e−7, 0) and (−4e−7, −1e−7). Close to a solid by clicking<br />
the right mouse button.<br />
Drawing a curve at coordinates with many decimals or using an expression can be<br />
difficult, and you might be forced to specify extra grid points. Here is an alternative<br />
approach. First draw a curve with a similar shape as the final curve, using the existing<br />
grid points. Then alter the properties of the curve segments with the Object<br />
Properties dialog box. Do the following to draw the small spacer regions on the sides<br />
of the poly-gate:<br />
5 Click the 2nd Degree Bézier Curve button and draw an arc from (−1e−7, 0), with<br />
control point (−1e−7, 1e−7), ending it at (0, 1e−7).<br />
6 Continue the arc with straight lines by clicking the Line button and then click the<br />
coordinate sequence (0, 0) and (−1e−7, 0). Close to a solid by clicking the right<br />
mouse button.<br />
7 From the Draw menu, choose Object Properties.<br />
8 In the Object Properties dialog box, change the properties for each curve segment<br />
according the table below.<br />
CURVE NUMBER POINT NUMBER<br />
(ROW IN TABLE)<br />
X Y WEIGHT<br />
1 1 -5e-8 0 1<br />
2 -1e-8 0 1<br />
2 1 -1e-8 0 1<br />
2 -1e-8 5e-8 1<br />
3 1 -5e-8 0 1<br />
2 -5e-8 5e-8 1/sqrt(2)<br />
3 -1e-8 5e-8 1<br />
9 Select the objects CO1, CO2, and R3, then click the Mirror button on the Draw<br />
toolbar.<br />
DC CHARACTERISTICS OF A MOS TRANSISTOR (MOSFET) | 483
10 In the Mirror dialog box, enter 1e-7 in the x edit field at the Point on line row. Leave<br />
all other fields at their default values and click OK. The geometry should look like<br />
the figure below.<br />
PHYSICS SETTINGS<br />
Expression Variables<br />
1 From the Options menu, choose Expressions>Scalar Expressions.<br />
2 In the Scalar Expressions dialog box, define the following variables with names and<br />
expressions, and descriptions (the Description field is optional):<br />
NAME EXPRESSION DESCRIPTION<br />
Dn Vt*mun Electron diffusivity<br />
Dp Vt*mup Hole diffusivity<br />
n0 ni*exp((phi0+X_si+<br />
Electron concentration in<br />
0.5*Eg_si)/Vt)<br />
thermal equilibrium<br />
p0 ni*exp(-(phi0+X_si+<br />
Hole concentration in<br />
0.5*Eg_si)/Vt)<br />
thermal equilibrium<br />
R_srh (nc*pc-ni^2)/(taun*(pc+ni)+ Shockley-Reed-Hall<br />
taup*(nc+ni))<br />
recombination term<br />
484 | CHAPTER 12: SEMICONDUCTOR DEVICE MODELS
NAME EXPRESSION DESCRIPTION<br />
Initial guess for phi0<br />
phi_init Vt*(-log(p_init/ni)*<br />
(Ndoping=0))-X_si<br />
-0.5*Eg_si<br />
n_init (abs(Ndoping)/2+<br />
sqrt(Ndoping^2/4+ni^2))*<br />
(Ndoping>=0)+<br />
ni^2/(abs(Ndoping)/2+<br />
sqrt(Ndoping^2/4+ni^2))*<br />
(NdopingSubdomain Expressions.<br />
2 In the Subdomain Expressions dialog box, define the following variables:<br />
3 Click OK.<br />
Electron concentration at<br />
thermal equilibrium and<br />
charge neutrality<br />
Hole concentration at<br />
thermal equilibrium and<br />
charge neutrality<br />
Doping concentration<br />
VARIABLE SUBDOMAINS 1, 2, 6 SUBDOMAINS 4, 5, 7 ALL OTHER<br />
SUBDOMAINS<br />
epsilonr epsilonr_si epsilonr_sio2 1<br />
mun mun_si<br />
mup mup_si<br />
Boundary Variables<br />
1 From the Options menu, choose Expressions>Boundary Expressions.<br />
2 In the Boundary Expressions dialog box, define the following variables with names<br />
and expressions:<br />
VARIABLE BOUNDARIES 6, 19 ALL OTHER BOUNDARIES<br />
Jn -q*lm3<br />
Jp q*lm4<br />
DC CHARACTERISTICS OF A MOS TRANSISTOR (MOSFET) | 485
3 Click OK.<br />
Integration Coupling Variables<br />
The drain current Id is defined as an integral of the normal current density along the<br />
drain contact. This can be implemented by using an integration coupling variable:<br />
1 From the Options menu, select Integration Coupling Variables>Boundary Variables.<br />
2 In the Boundary Integration Variables dialog box, select Boundary 19 and then type<br />
Id in the Name column, and type Jn+Jp in the Expression column. Click OK.<br />
Subdomain Settings<br />
1 On the Multiphysics menu, select the Electrostatics (init) application mode.<br />
2 From the Physics menu, select Subdomain Settings.<br />
3 In the Subdomain Settings dialog box, enter the following settings:<br />
SETTINGS SUBDOMAINS 1, 2, 6 ALL OTHER SUBDOMAINS<br />
εr epsilonr epsilonr<br />
ρ q*(p0-n0+Ndoping) 0<br />
4 Click the Init tab, and enter the following initial value:<br />
SETTING ALL SUBDOMAINS<br />
phi0(t0 ) phi_init<br />
5 Click OK.<br />
6 On the Multiphysics menu, select the Electrostatics (es) application mode.<br />
7 Open the Subdomain Settings dialog box and enter the following settings:<br />
SETTINGS SUBDOMAINS 1, 2, 6 ALL OTHER SUBDOMAIN<br />
εr epsilonr epsilonr<br />
ρ q*(pc-nc+Ndoping) 0<br />
8 Click the Init tab, and enter the following initial value:<br />
SETTING ALL SUBDOMAINS<br />
phi(t0 ) phi0<br />
9 Click OK.<br />
10 On the Multiphysics menu, select the Convection and Diffusion (cde) application<br />
mode.<br />
486 | CHAPTER 12: SEMICONDUCTOR DEVICE MODELS
11 Open the Subdomain Settings dialog box, select Subdomains 3–5, 7, and 8, and clear<br />
the Active in this subdomain check box. Then enter the following settings for the<br />
other subdomains:<br />
SETTINGS SUBDOMAINS 1, 2, 6<br />
D (isotropic) Dn<br />
R -R_srh<br />
u mun*phix<br />
v mun*phiy<br />
12 Click the Init tab and enter the following initial value:<br />
SETTING SUBDOMAINS 1, 2, 6<br />
nc(t 0) n0<br />
13 Click OK.<br />
14 On the Multiphysics menu, select the Convection and Diffusion (cdh) application<br />
mode.<br />
15 Open the Subdomain Settings dialog box, select Subdomains 3–5, 7, and 8, and clear<br />
the Active in this subdomain check box. Then enter the following settings for the<br />
other subdomains:<br />
SETTINGS SUBDOMAINS 1, 2, 6<br />
D (isotropic) Dp<br />
R -R_srh<br />
u -mup*phix<br />
v -mup*phiy<br />
16 Click the Init tab, and enter the following initial value:<br />
SETTING SUBDOMAIN 1, 2, 6<br />
pc(t0 ) p0<br />
17 Click OK.<br />
Boundary Conditions<br />
1 On the Multiphysics menu, select the Electrostatics (init) application mode.<br />
2 From the Physics menu, select Boundary Settings. Select the Interior boundaries check<br />
box.<br />
DC CHARACTERISTICS OF A MOS TRANSISTOR (MOSFET) | 487
3 In the Boundary Settings dialog box, enter the following settings:<br />
SETTINGS BOUNDARIES 2, 6, 19 BOUNDARIES 11, 12, 17 BOUNDARIES 1, 3, 5, 7, 18,<br />
21–23<br />
Boundary condition Electric potential Electric potential Zero charge/Symmetry<br />
V0 phi_init Vg-X_poly<br />
4 Click OK.<br />
5 On the Multiphysics menu, select the Electrostatics (es) application mode.<br />
6 Open the Boundary Settings dialog box, select the Interior boundaries check box, and<br />
enter the following settings:<br />
SETTINGS BOUNDARIES 2, 6 BOUNDARY 19 BOUNDARIES<br />
11, 12, 17<br />
Boundary condition Electric<br />
potential<br />
7 Click OK.<br />
8 On the Multiphysics menu, select the Convection and Diffusion (cde) application<br />
mode.<br />
9 Open the Boundary Settings dialog box and enter the following settings:<br />
10 Click OK.<br />
11 On the Multiphysics menu, select the Convection and Diffusion (cdh) application<br />
mode.<br />
12 Open the Boundary Settings dialog box and enter the following settings:<br />
13 Click OK.<br />
MESH GENERATION<br />
1 From the Mesh menu, choose Free Mesh Parameters.<br />
488 | CHAPTER 12: SEMICONDUCTOR DEVICE MODELS<br />
Electric<br />
potential<br />
Electric<br />
potential<br />
V 0 phi_init phi_init+Vd Vg-X_poly<br />
SETTINGS BOUNDARIES 2, 6, 19 ALL OTHER BOUNDARIES<br />
Boundary condition Concentration Insulation/Symmetry<br />
nc0 n_init<br />
SETTINGS BOUNDARIES 2, 6, 19 ALL OTHER BOUNDARIES<br />
Boundary condition Concentration Insulation/Symmetry<br />
pc0 p_init<br />
BOUNDARIES<br />
1, 3, 5, 7, 18, 21–23<br />
Zero charge/<br />
Symmetry
2 Click the Custom mesh size button and enter 0.2 in the Mesh curvature factor edit<br />
field. This gives a slightly higher resolution of the curvature than the default setting.<br />
3 Click the Subdomain tab.<br />
4 Select Subdomains 2 and 6 and type 1e-8 in the Maximum element size edit field.<br />
5 Click the Boundary tab.<br />
6 Select Boundaries 4, 20, 24, and 26 and type 5e-9 in the Maximum element size edit<br />
field.<br />
7 Select Boundary 13 and type 2e-9 in the Maximum element size edit field.<br />
8 Click the Remesh button and then click OK.<br />
COMPUTING THE SOLUTION<br />
1 From the Solve menu, choose Solver Manager.<br />
2 In the Solver Manager dialog box, click the Solve For tab.<br />
3 In the Solve for variables tree, select only the Electrostatics (init) node.<br />
4 Go to the Sequence page and click the Store Current Settings button.<br />
5 In the Store Solver Settings dialog box, enter the Name init and then click OK.<br />
6 Leaving the Solver Manager dialog box open, choose Solve>Solver Parameters.<br />
7 In the Solver Parameters dialog box, change the Solver to Parametric.<br />
8 In the Parameters area on the General page on the right, type Vd in the Parameter<br />
names edit field and range(0,0.02,0.2) range(0.25,0.05,1) in the Parameter<br />
values edit field.<br />
9 Click OK to close the Solver Parameters dialog box.<br />
10 Return to the Solver Manager dialog box and click the Initial Value tab.<br />
11 In the Values of variable not solved for and linearization point area, click the Current<br />
solution button.<br />
12 On the Solve For page, clear the Electrostatics (init) node and select the three other<br />
nodes, that is, Electrostatics (es), Convection and Diffusion (cde), and Convection and<br />
Diffusion (cdh).<br />
13 On the Sequence page, click the Store Current Settings button.<br />
14 In the Store Solver Settings dialog box, enter the Name parametric and then click<br />
OK.<br />
15 In the Stored solver settings area, select both Init and Parametric and then click the<br />
> button to add them to the Solver sequence list.<br />
DC CHARACTERISTICS OF A MOS TRANSISTOR (MOSFET) | 489
16 Select the Solve using solver sequence check box, then click OK to close the Solver<br />
Manager dialog box.<br />
17 Click the Solve button on the Main toolbar to start the simulation. Note that the<br />
solver sequence overrides all other settings in the Solver Parameters and Solver<br />
Manager dialog boxes.<br />
POSTPROCESSING AND VISUALIZATION<br />
1 Open the Plot Parameters dialog box.<br />
2 Click the Surface tab.<br />
3 On the Surface page, enter phi in the Expression edit fields on both the Surface Data<br />
page and the Height Data page. Remember to select the Height data check box on<br />
the Height Data page.<br />
4 Click OK to get the plot in the following figure. Also click the Headlight button on<br />
the Camera toolbar.<br />
5 To plot the drain characteristics open the Domain Plot Parameters dialog box from<br />
the Postprocessing menu.<br />
6 Click the Point plot button to select that plot type and make sure that all parameter<br />
values are selected in the Solutions to use list.<br />
7 On the Point page, type Id in the Expression edit field in the y-axis data area.<br />
490 | CHAPTER 12: SEMICONDUCTOR DEVICE MODELS
8 Select Vertex 1, then click OK. In a separate window you should see the plot below.<br />
DC CHARACTERISTICS OF A MOS TRANSISTOR (MOSFET) | 491
Semiconductor Diode 1<br />
Introduction<br />
A semiconductor diode consists of two regions with different doping: a p-type region<br />
with a dominant concentration of holes, and an n-type region with a dominant<br />
concentration of electrons. The anode contact ties to the p-type region, and the<br />
cathode connects to the n-type region. Impurities that the manufacturing process adds<br />
to the semiconductor material determine each region’s doping type. Scientists typically<br />
denote the dopant concentration with N. A negative value indicates acceptor atoms<br />
(p-type material), and a positive value indicates donor atoms (n-type material).<br />
It is possible to derive a semiconductor model from Maxwell’s equations and<br />
Boltzmann transport theory with the aid of some generally accepted simplifications<br />
such as assuming the absence of magnetic fields and the constant density of states. The<br />
model presented here formulates the problem using three dependent variables: ψ, n,<br />
and p. Even in this model’s simplest form, strong nonlinear dependencies are present.<br />
The three basic semiconductor equations appear below (Ref. 1).<br />
These equations contain the following variables:<br />
ψ indicates electrostatic potential<br />
q equals the elementary charge<br />
p and n are the hole and electron concentrations, respectively<br />
N represents the fixed charge associated with ionized donors<br />
You can express the electron and hole current densities, J n and J p , in terms of ψ, n<br />
and p:<br />
where µ n and µ p are the carrier mobilities, and D n and D p are the carrier diffusivities.<br />
1. Model provided by Erik Danielsson, Royal Institute of Technology, Stockholm.<br />
492 | CHAPTER 12: SEMICONDUCTOR DEVICE MODELS<br />
– ∇ ⋅ ( ε∇ψ) = qp ( – n+<br />
N)<br />
– ∇ ⋅ Jn<br />
= – qRSRH – ∇ ⋅ Jp = qRSRH Jn = – qnµ n∇ψ + qDn∇n Jp =<br />
– qpµ p∇ψ – qDp∇p
The term R SRH represents the Shockley-Read-Hall recombination, which is a general<br />
recombination process using traps in the forbidden band gap of the semiconductor.<br />
Here n i is the intrinsic carrier concentration, τ n and τ p are the carrier lifetimes, and n 1<br />
and p 1 are parameters related to the trap energy level. If the trap level is located at the<br />
middle of the band gap (which the model assumes), then n 1 and p 1 equal n i .<br />
BOUNDARY CONDITIONS<br />
R SRH<br />
np – n2 i<br />
= ----------------------------------------------------------τp(<br />
n+ n1) + τn( p+ p1) For boundaries in contact with an insulator, you can use symmetric boundary<br />
conditions. For boundaries far away from the active device area, the electric field and<br />
carrier currents have zero normal component. You can describe both of these types<br />
with Neumann boundary conditions<br />
n ⋅ ∇ψ<br />
= 0<br />
n⋅Jn= 0<br />
n⋅Jp= 0<br />
At boundaries in contact with a metal, the electrostatic potential is fixed. If you assume<br />
infinite recombination velocity at the contact, the mass action law is valid:<br />
2<br />
ni =<br />
np.<br />
It is now possible to calculate the carrier concentrations using this law along with the<br />
dopant concentration N and the assumption that there is no charge at the contact. The<br />
applied voltage equals the Fermi level in the semiconductor at the contact, so the<br />
electrostatic potential at the contact is the applied voltage plus the energy difference<br />
between the Fermi level and the reference level used for the electrostatic potential. The<br />
energy difference has a logarithmic dependence of the carrier concentrations. The<br />
boundary conditions are<br />
SEMICONDUCTOR DIODE | 493
where V a is the applied voltage. This is the simplest type of electrical contact. It is also<br />
possible to define a specific contact metal (some examples being aluminum or<br />
titanium) and to specify the current at the contact instead of the voltage.<br />
Model Definition<br />
DIODE GEOMETRY<br />
The diode’s geometry appears below.<br />
1.0 µm<br />
2.0 µm 1.0 µm<br />
Anode<br />
Thicker lines indicate electrical contacts. This example applies a potential V a to the<br />
anode, and the cathode is grounded.<br />
494 | CHAPTER 12: SEMICONDUCTOR DEVICE MODELS<br />
N<br />
---- ⎛N ---- ⎞<br />
kT 2 ⎝2⎠ ψ Va ------q<br />
2<br />
⎛ 2<br />
+ + n ⎞<br />
⎜ i ⎟<br />
= + ln⎜-----------------------------------------<br />
⎟<br />
⎜ ni ⎟<br />
⎝ ⎠<br />
Cathode<br />
5.0 µm<br />
n<br />
N<br />
= ---- +<br />
2<br />
N<br />
p = – ---- +<br />
2<br />
⎛N ---- ⎞<br />
⎝2⎠ 2<br />
+<br />
⎛N ---- ⎞<br />
⎝2⎠ 2<br />
+<br />
7.0 µm<br />
2<br />
ni 2<br />
ni
Use the following notation for the dimensions of the device.<br />
VARIABLE VALUE<br />
y1 x1 7·10 -6 m<br />
5·10 -6 m<br />
ju 1·10 -6 m<br />
ac 2·10 -6 m<br />
MESHING<br />
The large dynamic range of the carrier concentrations makes the numerical simulation<br />
of the semiconductor equations a difficult task, especially because the entire range<br />
changes in the vicinity of the junction. Therefore you must select the mesh quite<br />
carefully, otherwise the solution process might not converge or could give inaccurate<br />
results. Thus, this example places a subdomain boundary at the junction to establish<br />
high accuracy. You must make the mesh denser around the junction and at the cathode<br />
and anode. Use the adaptive solver to obtain additional accuracy.<br />
MATERIAL PROPERTIES<br />
The most common material used for semiconductor devices is silicon, and the<br />
following table summarizes some key material properties used in this model.<br />
NOTATION VARIABLE VALUE<br />
ni ni 1.46·10 10 cm -3 (T = 300K)<br />
ε r epsilonr 11.8<br />
µ n mun 800 cm 2 /Vs (low conc.)<br />
µ p mup 200 cm 2 /Vs (low conc.)<br />
D n = µ nkT/q Dn 20.7 cm 2 /s<br />
D p = µ pkT/q Dp 5.17 cm 2 /s<br />
τ n taun ~0.1 µs<br />
τ p taup ~0.1 µs<br />
Mobilities and diffusivities often depend on N, but this effect is relatively small in the<br />
diode structure. The carrier lifetime can vary from a few picoseconds up to several<br />
microseconds and depends on parameters such as doping, temperature, and<br />
recombination centers.<br />
SEMICONDUCTOR DIODE | 495
DOPANT CONCENTRATION FUNCTION<br />
The p-type doping of the diode can be accomplished by implantation or diffusion of<br />
acceptor atoms. The resulting profile from these two steps is often approximated with<br />
a gauss function. In addition, the transition between the n-type doped substrate and<br />
the lower doped n-type epitaxial layer can also be approximated with a Gauss function,<br />
because the dopants diffuse from the highly doped substrate during the high<br />
temperature step of the epitaxial growth. The final expression for the diode doping is<br />
where N Dn is the doping of the epitaxial layer, N Dnmax the doping of the substrate,<br />
and N Apmax the peak of the implantation of diffusion profile. G is the Gauss function<br />
defined by<br />
The following constants are used in the expression for N:<br />
NOTATION VARIABLE VALUE<br />
N Dn NDn 10 15 cm -3<br />
N Dnmax NDnmax 10 17 cm -3<br />
N Apmax NApmax 10 17 cm -3<br />
x 1 ac 2 µm<br />
y 1 y1 7 µm<br />
ch ch calculated from ju<br />
BOUNDARY CONDITIONS<br />
The contact boundary conditions are<br />
496 | CHAPTER 12: SEMICONDUCTOR DEVICE MODELS<br />
N = NDn+ NDnmaxGx ( , – y,<br />
∞, y1) – NApmaxGxyx<br />
( , , 1, 0)<br />
Gxyx ( , , 1, y1) =<br />
⎧<br />
⎪<br />
⎪<br />
⎪<br />
⎪<br />
⎪<br />
⎨<br />
⎪<br />
⎪<br />
⎪<br />
⎪<br />
⎪<br />
⎩<br />
( x – x1) 2<br />
( y– y1) – --------------------<br />
2<br />
– --------------------<br />
e<br />
ch 2<br />
e<br />
e<br />
e<br />
( x – x1) 2<br />
– --------------------<br />
ch 2<br />
( y – y1) 2<br />
– --------------------<br />
ch 2<br />
ch 2<br />
x> x1y > y1 x> x1y ≤ y1 x≤x1y > y1 1 x≤x1y ≤ y1
N<br />
---- ⎛N ---- ⎞<br />
kT 2 ⎝2⎠ ψ Va ------q<br />
2<br />
⎛ 2<br />
+ + n ⎞<br />
⎜ i ⎟<br />
= + ln⎜-----------------------------------------<br />
⎟<br />
⎜ ni ⎟<br />
⎝ ⎠<br />
n<br />
N<br />
= ---- +<br />
2<br />
N<br />
p = – ---- +<br />
2<br />
⎛N ---- ⎞<br />
⎝2⎠ 2<br />
+<br />
⎛N ---- ⎞<br />
⎝2⎠ 2<br />
+<br />
To compute an accurate value of the current you can use weak constraints for the<br />
contact boundary conditions. To implement the weak boundary conditions on n and<br />
p you need to introduce Lagrange multipliers lm 2 and lm 3 on the anode and cathode.<br />
The variables lm2 and lm3 provide a more accurate value than what you obtain by the<br />
expression for the current densities. Therefore, the outward normal current densities<br />
are q*lm2 and -q*lm3, for electrons and holes, respectively.<br />
PARAMETRIC STUDY<br />
Solving the numerical problem for higher anode voltage is extremely difficult. You<br />
must increase the voltage from 0 V in small steps and use the solution from a previous<br />
step as the initial condition for the next one. The parametric solver takes care of this<br />
automatically. The anode voltage Va varies from 0 V to 1 V in steps of 0.025 V.<br />
You must also provide the nonlinear solver with an initial guess for the solution<br />
corresponding to V a = 0 V that is compatible with the boundary conditions.<br />
ψ<br />
The initial guess for lm 2 and lm 3 is zero. Because the problem is nonlinear, you should<br />
convert it to general form to get a correct Jacobian and fast convergence.<br />
<strong>COMSOL</strong> Multiphysics lets you scale the degrees of freedoms by setting reference<br />
values for the degrees of freedom. The relative tolerance in the nonlinear solver is by<br />
2<br />
ni 2<br />
ni N<br />
---- ⎛N ---- ⎞<br />
kT 2 ⎝2⎠ ------q<br />
2<br />
⎛ 2<br />
+ + n ⎞<br />
⎜ i ⎟<br />
= ln⎜-----------------------------------------<br />
⎟<br />
⎜ ni ⎟<br />
⎝ ⎠<br />
n<br />
N<br />
= ---- +<br />
2<br />
N<br />
p =<br />
– ---- +<br />
2<br />
⎛N ---- ⎞<br />
⎝2⎠ 2<br />
+<br />
⎛N ---- ⎞<br />
⎝2⎠ 2<br />
+<br />
2<br />
ni 2<br />
ni SEMICONDUCTOR DIODE | 497
default 10 −6 . The absolute tolerance is the scaling times the relative tolerance. The<br />
solver disregards errors that are below the absolute tolerance. In this case the absolute<br />
tolerance for the variables ψ, u, and v is 10 −6 , while the absolute tolerance for lm 2 and<br />
lm 3 is 10 −4 . The absolute tolerance for lm 2 and lm 3 should be at least 10 −4 , because<br />
the round-off errors in the equations induce errors of this magnitude in lm 2 and lm 3.<br />
For this problem, the parameter step length control works best if you use the highly<br />
nonlinear option.<br />
Results<br />
When no bias is applied, the hole concentration is at thermal equilibrium. With 0.5 V<br />
forward bias, the holes from the p-type region flow into and through the low doped<br />
n-type region without significant recombination (see Figure 12-10). As a result, the<br />
hole concentration increases several orders of magnitude in the n-type region.<br />
Figure 12-10: The hole concentration at 0.5 V forward bias.<br />
COMPUTING THE IV CHARACTERISTICS<br />
To compute the currents through the anode and cathode you have to integrate the<br />
normal component of the current densities<br />
498 | CHAPTER 12: SEMICONDUCTOR DEVICE MODELS
n⋅Jn n⋅Jp which are more accurately available by the Lagrange multipliers lm 2 and lm 3,<br />
respectively. The currents through the anode and cathode are<br />
I a<br />
I c<br />
=<br />
=<br />
10 6 –<br />
10 6 –<br />
∫<br />
anode<br />
q lmu – lm2 ( )<br />
Because the geometry is 2D, the unit A/µm is used for the current. Note that I a and<br />
I c are vectors with one value for each value of the voltage. The exact agreement of the<br />
anode and cathode currents is a consequence of the finite element method. To see this,<br />
consider the weak equations<br />
0 =<br />
0 =<br />
which are valid for all test functions u test and v test in the finite element space. B is the<br />
union of the anode and the cathode. Taking u test = v test = 1 and subtraction of these<br />
equations gives<br />
which shows that I a = I c . The plot in Figure 12-11 shows the current versus the<br />
voltage.<br />
–<br />
∫<br />
cathode<br />
q( lmu – lm3) ⎛<br />
RSRH -------------- u<br />
n test + Jn ⋅ ∇u<br />
⎞<br />
∫ ⎝ test dA<br />
–<br />
⎠ ∫ lm2 utest i<br />
Ω<br />
B<br />
⋅ ds<br />
⎛<br />
RSRH -------------- v<br />
n test + Jp ⋅ ∇v<br />
⎞<br />
∫ ⎝ test⎠<br />
dA<br />
– ∫ lm3 vtest i<br />
Ω<br />
B<br />
∫<br />
B<br />
( lm2 – lm3) ds<br />
=<br />
0<br />
⋅ ds<br />
SEMICONDUCTOR DIODE | 499
Because the current for zero voltage is zero (theoretically), it has been omitted from<br />
the plot.<br />
Figure 12-11: The IV characteristics of the semiconductor diode plotted in a logarithmic<br />
scale.<br />
One very important parameter in the diode equation is the ideality factor, η.<br />
The factor η lies between 1 and 2, where η ∼ 1 represents an ideal diode. In a diode<br />
with η ∼ 2, the current is recombination/generation controlled (Ref. 1). In the<br />
IV-characteristic curve, you can identify two different slopes in the diode’s forward<br />
bias region. These slopes are dependent on the ideality factor, the first with η = 1.6 and<br />
the second with η = 1.08. This situation is common for ordinary silicon diodes; at low<br />
forward biases the current is almost recombination controlled, and when the bias is<br />
increased the current characteristics becomes almost ideal (η ∼ 1).<br />
500 | CHAPTER 12: SEMICONDUCTOR DEVICE MODELS<br />
qV<br />
-----------<br />
⎛ ηkT ⎞<br />
I =<br />
I0⎜e– 1⎟.<br />
⎝ ⎠
References<br />
1. S.M. Sze, Physics of Semiconductor Devices, John Wiley & Sons, 1981, ISBN<br />
0-471-05661-8.<br />
2. S. Selberherr, Analysis and Simulation of Semiconductor Devices, Springer-Verlag,<br />
1984, ISBN 0-387-81800-6.<br />
Model Library path: <strong>COMSOL</strong>_Multiphysics/Semiconductor_Devices/<br />
semiconductor_diode<br />
Modeling Using the Graphical User Interface<br />
MODEL NAVIGATOR<br />
1 In the Model Navigator, select 2D from the Space dimension list.<br />
2 Click the Multiphysics button.<br />
3 In the <strong>COMSOL</strong> Multiphysics>Electromagnetics folder, select Electrostatics. Make sure<br />
Lagrange - Quadratic is selected in the Element list.<br />
4 Enter psi in the Dependent variables edit field.<br />
5 Click Add.<br />
6 In the <strong>COMSOL</strong> Multiphysics>Convection and Diffusion folder, select Convection and<br />
Diffusion and then Steady-state analysis. Make sure Lagrange - Quadratic is selected in<br />
the Element list.<br />
7 Enter cn in the Dependent variables edit field.<br />
8 Click Add.<br />
9 Click the Application Mode Properties button, select Conservative from the Equation<br />
form list and On from the Weak constraints list. Click OK.<br />
10 In the <strong>COMSOL</strong> Multiphysics>Convection and Diffusion folder, select Convection and<br />
Diffusion and then Steady-state analysis. Make sure Lagrange - Quadratic is selected in<br />
the Element list.<br />
11 Enter cp in the Dependent variables edit field.<br />
12 Click Add.<br />
13 Click the Application Mode Properties button. Then select Conservative from the<br />
Equation form list and On from the Weak constraints list. Click OK.<br />
SEMICONDUCTOR DIODE | 501
14 Click OK.<br />
OPTIONS AND SETTINGS<br />
1 From the Options menu, choose Constants.<br />
2 In the Constants dialog box, define the following constants with names and<br />
expressions:.<br />
NAME EXPRESSION DESCRIPTION<br />
q 1.602e-19[C] Elementary charge<br />
T 300[K] Room temperature<br />
k 1.38e-23[J/K] Boltzmann’s constant<br />
epsilonr 11.8 Rel. permittivity for Si<br />
ni 1.46e10[1/cm^3] Intrinsic concentration for Si<br />
mun 800[cm^2/(V*s)] Electron mobility for Si<br />
mup 200[cm^2/(V*s)] Hole mobility for Si<br />
Dn k*T/q*mun Electron diffusivity<br />
Dp k*T/q*mup Hole diffusivity<br />
taun 0.1[us] Electron life time<br />
taup 0.1[us] Hole life time<br />
c q/(k*T) Reciprocal thermal voltage<br />
y1 7[um] Diode dimension<br />
x1 5[um] Diode dimension<br />
ju 1[um] Junction depth<br />
ac 2[um] Anode dimension<br />
NApmax 1e17[1/cm^3] Maximum p-type doping<br />
NDn 1e15[1/cm^3] Drift layer n-type doping<br />
NDnmax 1e17[1/cm^3] Maximum n-type doping<br />
ch ju/sqrt(log(NApmax/NDn)) Doping fall-off constant<br />
3 From the Options menu, choose Axes/Grid Settings.<br />
4 Enter the axis and grid settings in the table below. To enter the grid spacing, first<br />
clear the Auto check box.<br />
AXIS GRID<br />
x min 0 x spacing 1e-6<br />
x max 1e-5 Extra x<br />
502 | CHAPTER 12: SEMICONDUCTOR DEVICE MODELS
AXIS GRID<br />
y min -8e-6 y spacing 1e-6<br />
y max 0 Extra y<br />
5 Click OK.<br />
GEOMETRY MODELING<br />
1 Draw a rectangle from (0, -7e-6) to (5e-6, 0).<br />
2 Turn off the solidify feature by double-clicking the SOLID button on the status bar.<br />
3 Click the Line button and draw a line from (0, -1e-6) to (2e-6, -1e-6).<br />
4 Click the 2nd Degree Bézier Curve button and continue with an arc to (3e-6, -1e-6)<br />
and finish the arc at (3e-6, 0).<br />
5 Click the Point button and add a point at (2e-6, 0).<br />
6 Click the Zoom Extents button on the Main toolbar.<br />
PHYSICS SETTINGS<br />
Expression Variables<br />
1 From the Options menu, point to Expressions, and then click Scalar Expressions.<br />
2 Enter each item in the table below as a single line without the line break.<br />
NAME EXPRESSION DESCRIPTION<br />
N NDn+NDnmax*exp(-((y+y1)/ch)^2)-<br />
NApmax*exp(-(y/ch)^2)*((x=ac)*exp(-((x-ac)/ch)^2))<br />
RSRH (cn*cp-ni^2)/(taup*(cn+ni)+<br />
taun*(cp+ni))<br />
psi_init 1/c*(-log(p_init/ni)*(N=0))<br />
n_init (abs(N)/2+sqrt(N^2/4+ni^2))*<br />
(N>=0)+ni^2/(abs(N)/2+<br />
sqrt(N^2/4+ni^2))*(N
concentrations, and this is the assumed unit for the solution variables. The units for<br />
solution variables cannot be changed by the user.<br />
Integration Coupling Variables<br />
The cathode current Ic is defined as an integral of the normal current density along<br />
the cathode. This can be implemented by using an integration coupling variable:<br />
1 From the Options menu, point to Integration Coupling Variables and then click<br />
Boundary Variables.<br />
2 Select Boundary 2 and then type Ic in the Name column, 1e-6*q*(lm2-lm3) in the<br />
Expression column, and 4 in the Integration order column. Click OK.<br />
Boundary Conditions<br />
1 On the Multiphysics menu, select the Electrostatics (es) application mode.<br />
2 Open the Boundary Settings dialog box and enter the following settings:<br />
SETTINGS BOUNDARIES 1, 3, 6, 7, 8 BOUNDARY 2 BOUNDARY 5<br />
Boundary condition Zero charge/Symmetry Electric potential Electric potential<br />
V0 psi_init Va+psi_init<br />
3 On the Multiphysics menu, select the Convection and Diffusion (cd) application mode.<br />
4 Open the Boundary Settings dialog box and enter the following settings:<br />
SETTINGS BOUNDARIES 1, 3, 6, 7, 8 BOUNDARIES 2, 5<br />
Boundary condition Insulation/Symmetry Concentration<br />
cn0 n_init<br />
5 On the Multiphysics menu, select the Convection and Diffusion (cd2) application<br />
mode.<br />
6 Open the Boundary Settings dialog box and enter the following settings:<br />
SETTINGS BOUNDARIES 1, 3, 6, 7, 8 BOUNDARIES 2, 5<br />
Boundary condition Insulation/Symmetry Concentration<br />
cp0 p_init<br />
Subdomain Settings<br />
1 On the Multiphysics menu, select the Electrostatics (es) application mode.<br />
504 | CHAPTER 12: SEMICONDUCTOR DEVICE MODELS
2 Open the Subdomain Settings dialog box and enter the following settings:<br />
SETTINGS SUBDOMAINS 1, 2<br />
εr epsilonr<br />
ρ q*(N-cn+cp)<br />
3 Click the Init tab, and enter the following initial value:<br />
SETTING SUBDOMAINS 1, 2<br />
psi(t0 ) psi_init<br />
4 On the Multiphysics menu, select the Convection and Diffusion (cd) application mode.<br />
5 Open the Subdomain Settings dialog box and enter the following settings:<br />
SETTINGS SUBDOMAINS 1, 2<br />
D (isotropic) Dn<br />
u mun*psix<br />
v mun*psiy<br />
R -RSRH<br />
6 Click the Init tab and enter the following initial value:<br />
SETTING SUBDOMAINS 1, 2<br />
cn(t0 ) n_init<br />
7 On the Multiphysics menu, select the Convection and Diffusion (cd2) application<br />
mode.<br />
8 Open the Subdomain Settings dialog box and enter the following settings:<br />
SETTINGS SUBDOMAINS 1, 2<br />
D (isotropic) Dp<br />
u -mup*psix<br />
v -mup*psiy<br />
R -RSRH<br />
9 Click the Init tab, and enter the following initial value:<br />
SETTINGS SUBDOMAINS 1, 2<br />
cp(t0 ) p_init<br />
SEMICONDUCTOR DIODE | 505
MESH GENERATION<br />
1 From the Mesh menu, choose Free Mesh Parameters.<br />
2 Click the Boundary tab.<br />
3 Select Boundaries 2, 4, 5, and 9 and type 1e-7 in the Maximum element size edit<br />
field.<br />
4 Click the Remesh button and then click OK.<br />
COMPUTING THE SOLUTION<br />
1 From the Solve menu, choose Solver Parameters.<br />
2 In the Solver list, select Parametric.<br />
3 Type Va in the Parameter names edit field and range(0,0.025,1) in the<br />
Parameter values edit field.<br />
4 Click the Stationary tab. Enter 50 in the Maximum number of iterations edit field.<br />
5 Select the Highly nonlinear problem check box.<br />
6 Click OK and then click the Solve button to start the simulation.<br />
POSTPROCESSING AND VISUALIZATION<br />
The plot visualizes the logarithm of the hole concentration for the parameter value,<br />
Va = 0.5 V.<br />
1 Open the Plot Parameters dialog box from the Postprocessing menu.<br />
2 On the General page, select 0.5 from the Parameter value list.<br />
3 Click the Surface tab. Enter the expression log10(cp) in the Expression edit fields<br />
on the Surface Data tab and the Height Data tab. On the Height Data tab, select the<br />
Height data check box.<br />
4 Click OK to get the plot shown in Figure 12-10 on page 498.<br />
5 To plot the IV characteristics open the Domain Plot Parameters dialog box from the<br />
Postprocessing menu.<br />
6 On the General page, click the Point plot button and select all parameters except 0<br />
from the Solutions to use list.<br />
7 Click the Title/Axis button to open the Title/Axis Settings dialog box. Select the Log<br />
scale check box for the secondary axis. Click OK.<br />
8 On the Point tab, type Ic in the Expression edit field.<br />
9 Select Vertex 1 and click OK. As a separate window you see the plot in Figure 12-11<br />
on page 500.<br />
506 | CHAPTER 12: SEMICONDUCTOR DEVICE MODELS
SPICE Parameter Extraction for a<br />
Semiconductor Diode<br />
This model shows how the Optimization application mode can extract SPICE<br />
parameters from the model of a semiconductor diode for use in an equivalent circuit.<br />
Note: This model requires the Optimization Lab.<br />
Introduction<br />
In the design of a semiconductor device, it is often desirable to develop a compact<br />
model to use when analyzing its behavior in larger systems. SPICE models are compact<br />
descriptions of electronic circuits, where a set of SPICE parameters determines the<br />
device’s behavior in static, transient, and time-harmonic analysis. In developing such a<br />
compact model, the extraction of the SPICE parameters usually requires several<br />
different characteristics that show how the device behaves for a range of operating<br />
conditions. The characteristics can either be the result of measurements or come from<br />
simulations of a more-detailed reference model.<br />
This example reviews the development of a compact model for a semiconductor diode.<br />
The reference finite-element model is “Semiconductor Diode” on page 492. From this<br />
model it is possible to extract the forward characteristics where the diode is biased from<br />
0 V up to 1.5 V. Six SPICE parameters control the forward characteristics of the<br />
compact model. This sets a lower limit on the number of reference data required to<br />
extract the compact model.<br />
Model Definition<br />
SEMICONDUCTOR MODEL<br />
The previously mentioned example in the Model Library solves for a forward bias of<br />
only up to 1 V. This level is not high enough to extract all the needed parameters,<br />
especially the resistor parameter, so the characteristics must go a bit further. As a result,<br />
the first part of this example solves the semiconductor diode with a bias reaching 1.5 V.<br />
SPICE PARAMETER EXTRACTION FOR A SEMICONDUCTOR DIODE | 507
EQUIVALENT DIODE CIRCUIT<br />
A diode is an electrical rectifier that conducts current for positive voltages and insulates<br />
for negative voltages. The current-voltage characteristics (or IV characteristics) for an<br />
ideal semiconductor diode follow the relationship<br />
where V T is the thermal voltage. The compact model of a real diode actually consists<br />
of two ideal diodes in parallel and a resistor in series (see nearby figure). Furthermore,<br />
a parameter called the ideality factor, N, is introduced into the ideal diode equation so<br />
that<br />
508 | CHAPTER 12: SEMICONDUCTOR DEVICE MODELS<br />
⎛ V ⎞<br />
T<br />
I = IS⎜e– 1⎟<br />
⎝ ⎠<br />
⎛ NV ⎞<br />
T<br />
I = IS⎜e– 1⎟<br />
.<br />
⎝ ⎠<br />
One of the ideal diodes also has a parameter for high-level injection, which is a change<br />
in its characteristics for high currents.<br />
The following image shows the complete equivalent circuit for a real diode with the<br />
SPICE parameters next to each device.<br />
R S<br />
I S, N, I KF<br />
I SR , N R<br />
You cannot express the compact model as an explicit relationship between its current<br />
and voltage, so to obtain its characteristics, it is necessary to solve an implicit nonlinear<br />
problem. An easy way to set up this equivalent circuit is to use the SPICE Circuit<br />
Editor available for the AC/DC Module, MEMS Module, and the RF Module. With<br />
a simple circuit file, this feature automatically generates ODE expressions that model<br />
the equivalent diode circuit. In this case the ODE representation does not involve any<br />
time derivatives, so from the mathematical viewpoint you have the special case of static,<br />
algebraic equations. A parametric solution of this system of ODEs can give the current<br />
V<br />
------<br />
V<br />
-----------
for a predefined list of voltages. The SPICE parameters are given as constants in the<br />
equivalent circuit model according to the following table:<br />
PARAMETER CONSTANT DESCRIPTION<br />
IS sim_D1_IS Saturation current<br />
N sim_D1_N Ideality factor<br />
IKF sim_D1_IKF High-injection knee current<br />
ISR sim_D1_ISR Recombination current<br />
NR sim_D1_NR Ideality factor for recombination current<br />
RS sim_D1_RS Series resistance<br />
For users that do not have the AC/DC Module, MEMS Module, or RF Module, there<br />
is a pre-saved model file where the initial steps before the optimization have been done.<br />
OPTIMIZATION<br />
The Optimization Lab searches for values for the six SPICE parameters shown in the<br />
equivalent circuit such that the IV characteristics from the ODE circuit simulations<br />
match the IV characteristics extracted from the reference finite-element diode model.<br />
This is an optimization problem of six unknowns that enter the objective function in a<br />
nonlinear fashion. The initial guess for the parameters is crucial to reduce the search<br />
time.<br />
It is also necessary to define a couple of constraints in the search because otherwise the<br />
two diodes in parallel become hard to distinguish. These diodes have a physical<br />
interpretation, where the upper one controls the main diode characteristics. The<br />
ideality factor of the main diode should lie close to one. The lower diode is responsible<br />
for the recombination effects in the semiconductor, and that effect shows an ideality<br />
factor close to 2. Therefore, a proper constraint is to force the ideality factor N to be<br />
less than the ideality factor N R. A high ideality factor also results in a high saturation<br />
current, I SR , so the same constraint can be used for the saturation currents. That is,<br />
In addition, it is necessary to set lower and upper bounds to all parameters and to use<br />
the logarithmic values for the parameters, I S , I SR , R S , and I KF because they usually<br />
span several orders of magnitude.<br />
To summarize, the optimization problem is<br />
N< NR IS <<br />
ISR SPICE PARAMETER EXTRACTION FOR A SEMICONDUCTOR DIODE | 509
where<br />
minimize<br />
x<br />
510 | CHAPTER 12: SEMICONDUCTOR DEVICE MODELS<br />
1<br />
-- F<br />
2 i( Vi, x)<br />
2<br />
∑<br />
i<br />
Objective function<br />
subject to IS ≤ ISR N ≤ NR Linear constraints<br />
– 20 – 10<br />
1 2<br />
– 20<br />
1<br />
≤x≤ – 10<br />
2<br />
Parameter bounds<br />
2 6<br />
– 7 – 4<br />
I cir<br />
= Icir[ Vx , ] Algebraic equations<br />
x ( log( IS) , N, log( ISR) , NR, log( RS) , log(<br />
IKF) ) .<br />
T<br />
=<br />
The objective is to determine the SPICE parameters (x) so that the equivalent circuit<br />
matches the original diode with respect to the IV characteristics in a least-squares<br />
sense. Again, using a logarithmic scale:<br />
Fi( x)<br />
=<br />
log10( IV ( i)<br />
) – log10( Icir[ Vi, x]<br />
) .<br />
Because I cir depends implicitly on the SPICE parameters, the system of algebraic<br />
equations describing the IV relationship of the equivalent circuit must be solved for<br />
each voltage in the range of the characteristic you wish to match. This must be done<br />
every time the optimization solver evaluates the objective function with updated<br />
SPICE parameters. The function I(V i) could be directly evaluated from the<br />
semiconductor diode example while performing the optimization, but this is a quite<br />
time-consuming evaluation. It is much faster to create an interpolation function from<br />
the IV-characteristics of the semiconductor diode example.<br />
Initial Guess<br />
The initial guess for the parameter values is very important in order to speed up the<br />
search, and in some cases also to get convergence. You can easily extract proper<br />
parameter values directly from the IV characteristics of the semiconductor diode. In<br />
the following figure you can see some straight lines that represents the diode equations<br />
presented earlier, one for each diode in the equivalent circuit.
The intersections between these lines and the y-axis serve as good initial guesses for<br />
the parameters I S and I SR. Next, the ideality factors usually have values close to one<br />
and two, so use those values as initial guess. The parameter I KF determines where the<br />
curve has its knee for large currents, so the current value where this appears is suitable<br />
as an initial guess. The final parameter, R S, also controls the flat region of the curve,<br />
so approximately the maximum voltage divided by the maximum current is a good<br />
guess. The initial parameters from this simple analysis are summarized in this table:<br />
PARAMETER VALUE INITIAL VALUE IN X DESCRIPTION<br />
IS 10 -16 A/m -16 Saturation current<br />
N 1 1 Ideality factor<br />
ISR 10 -14 A/m -14 Recombination current<br />
NR 2 2 Ideality factor for recombination current<br />
RS 10 4 Ωm 4 Series resistance<br />
I KF 10 -6 A/m -6 High injection knee current<br />
The unit for current is A/m because the circuit is compared to a 2D simulation in SI<br />
units.<br />
SPICE PARAMETER EXTRACTION FOR A SEMICONDUCTOR DIODE | 511
Results and Discussion<br />
The optimization uses the built-in optimization solver with a gradient based search.<br />
Fitting the parameters needs about 30 iterations, which takes a few minutes on a<br />
modern PC. The resulting compact model characteristics appear as a green line in the<br />
next figure, which plots the IV characteristics from the finite element reference model<br />
as a blue line. The agreement is quite good over the entire voltage range up to 1.5 V.<br />
Figure 12-12: The green line with squares show the IV characteristics of the equivalent<br />
circuit, the blue line with triangles is that from the <strong>COMSOL</strong> Multiphysics Model Library<br />
model semiconductor_diode.<br />
PARAMETER OPTIMIZED VALUE DESCRIPTION<br />
IS 4.88·10 -17 A/m Saturation current<br />
N 1.08 Ideality factor<br />
ISR 8.68·10 -15 A/m Recombination current<br />
NR 2.00 Ideality factor for recombination current<br />
RS 5.21·10 2 Ωm Series resistance<br />
I KF 1.70·10 -6 A/m High injection knee current<br />
512 | CHAPTER 12: SEMICONDUCTOR DEVICE MODELS
Model Library path: <strong>COMSOL</strong>_Multiphysics/Semiconductor_Devices/<br />
spice_parameter_extraction_diode<br />
Model Library path: <strong>COMSOL</strong>_Multiphysics/Semiconductor_Devices/<br />
spice_parameter_extraction_circuit<br />
Modeling Using the Graphical User Interface<br />
CREATING THE REFERENCE DATA<br />
First start <strong>COMSOL</strong> Multiphysics and open the semiconductor diode example and<br />
resolve it with a longer sweep.<br />
1 In the Model Navigator, click the Model Library tab.<br />
2 Browse to the model<br />
<strong>COMSOL</strong> Multiphysics>Semiconductor Devices>semiconductor diode.<br />
3 Select it, then click OK.<br />
SPICE IMPORT<br />
This section requires that you have the AC/DC Module, MEMS Module, or the RF<br />
Module. Users that do not have any such license can skip this section and continue<br />
with the section “Loading the Pre-Saved Model File” on page 514.<br />
1 From the Physics menu, choose SPICE Circuit Editor.<br />
2 You can just type the netlist as it is shown below, or open the saved netlist file called<br />
diode.cir located in the Model library path for this model. If you choose to open<br />
the netlist file, click the Load Netlist from File toolbar button. The final netlist is<br />
shown below.<br />
Vin 1 0 1<br />
D1 1 0 diode<br />
SPICE PARAMETER EXTRACTION FOR A SEMICONDUCTOR DIODE | 513
.MODEL diode D IS=1e-13 ISR=1e-10 N=1.1 NR=2.0 RS=1e1 IKF=1e-5<br />
3 Click OK to generate the system of global equations.<br />
Skip the next section and continue with the section “Model Navigator”.<br />
LOADING THE PRE-SAVED MODEL FILE<br />
This section is intended for users that did not complete the previous sections. If you<br />
have completed all those steps, you just skip this section and continue with the next<br />
section.<br />
1 From the File menu, choose Open Model Library.<br />
2 In the Model Navigator, open the model <strong>COMSOL</strong> Multiphysics>Semiconductor<br />
Devices>spice parameter extraction circuit.<br />
3 Click OK.<br />
MODEL NAVIGATOR<br />
1 From the Multiphysics menu, choose Model Navigator.<br />
2 In the Model Navigator dialog box, select the <strong>COMSOL</strong> Multiphysics>Optimization and<br />
Sensitivity>Optimization application mode.<br />
3 Click OK.<br />
OPTIONS AND SETTINGS<br />
Constants<br />
1 From the Options menu, choose Constants.<br />
514 | CHAPTER 12: SEMICONDUCTOR DEVICE MODELS
2 In the Constants dialog box, delete the following constants.<br />
NAME<br />
sim_D1_IS<br />
sim_D1_N<br />
sim_d1_ISR<br />
sim_D1_NR<br />
sim_D1_RS<br />
sim_d1_IKF<br />
3 The change the expression of the constant sim_VIN_ARG to Va.<br />
4 Click OK.<br />
Global Expressions<br />
1 From the Options menu, choose Expressions>Global Expressions.<br />
2 In the Global Expressions dialog box, define the following variables with names,<br />
expressions, and (optionally) descriptions:<br />
NAME EXPRESSION DESCRIPTION<br />
sim_D1_IS 10^logIS Saturation current<br />
sim_d1_ISR 10^logISR Saturation current (recombination)<br />
sim_D1_RS 10^logRS Series resistance<br />
sim_d1_IKF 10^logIKF High-injection current<br />
3 Click OK.<br />
PHYSICS SETTINGS<br />
1 From the Physics menu, choose Scalar Settings.<br />
SPICE PARAMETER EXTRACTION FOR A SEMICONDUCTOR DIODE | 515
2 On the Variables page, enter the six parameters according to the following table:<br />
VARIABLE INIT DESCRIPTION<br />
logIS -16 Log of the saturation current<br />
sim_D1_N 1 Ideality factor<br />
logISR -14 Log of the saturation current (recombination)<br />
sim_D1_NR 2 Ideality factor (recombination)<br />
logRS 4 Log of the series resistance<br />
logIKF -4 Log of the high-injection current<br />
The dialog box should look like the figure below when you are done.<br />
516 | CHAPTER 12: SEMICONDUCTOR DEVICE MODELS
3 On the Scalar Constraints page, enter the upper and lower bounds for the parameters<br />
plus two linear constraints according to the following table:<br />
LB EXPRESSION UB<br />
-20 logIS -10<br />
1 sim_D1_N 2<br />
-20 logISR -10<br />
1 sim_D1_NR 2<br />
2 logRS 6<br />
-7 logIKF -4<br />
0 logISR-logIS inf<br />
0 NR-N inf<br />
The dialog box should look like the figure below when you are done.<br />
4 Click the Objective tab. In the Scalar contribution edit field, type<br />
0.5*(log10(Ic)-log10(sim_D1_i))^2. The variable Ic is the current from the<br />
finite element model.<br />
5 Click OK.<br />
COMPUTING THE SOLUTION<br />
1 From the Solve menu, open the Solver Parameters dialog box.<br />
2 Change the value in the edit field Parameter values to range(0.075,0.025,1.5).<br />
3 Go to the Stationary page and clear the Highly nonlinear problem check box.<br />
4 Click OK.<br />
SPICE PARAMETER EXTRACTION FOR A SEMICONDUCTOR DIODE | 517
5 Click the Solve button on the Main toolbar. This solves the semiconductor diode<br />
model using the new range of parameters. When it is done, you can continue with<br />
the optimization.<br />
6 From the Solve menu, open the Solver Manager dialog box.<br />
7 In the frame Values of variables not solved for and Linearization point, click the<br />
Current solution button, and choose All from the Parameter value list.<br />
8 On the Solve For page, select the ODE (OD) and Optimization (opt) items. Make sure<br />
that no other items are selected.<br />
9 Click OK.<br />
10 From the Solve menu, open the Solver Parameters dialog box.<br />
11 Select the Optimization/Sensitivity check box.<br />
12 On the Optimization/Sensitivity page, set the Analysis to Optimization.<br />
13 Click OK.<br />
14 Click the Solve button on the Main toolbar.<br />
The parameter sweep suffers from some overhead because it needs to analyze the<br />
equations from the semiconductor diode problem in each step. It is possible to speed<br />
up the simulation by using interpolation functions. First you create an interpolation<br />
function holding the IV-characteristics from the diode model. Then you delete the<br />
three application modes for that model, and change the objective function so it uses<br />
the interpolation function instead of the variable Ic. Such an operation reduces the<br />
time for the parameter sweep about 8 times.<br />
POSTPROCESSING AND VISUALIZATION<br />
1 From the Postprocessing menu, choose Global Variables Plot.<br />
2 In the Global Variables plot dialog box, type Ic in the Expression edit field and click<br />
the > button.<br />
3 From the Predefined quantities list, choose D1.i and click the > button. You should<br />
now see the two variables in the Quantities to plot list.<br />
4 Click the Line Settings button.<br />
5 In the dialog box that appears choose Cycle for both the Line style list and the Line<br />
marker list.<br />
6 Select the Legend check box and click OK to close the Line Settings dialog box.<br />
7 Click the Title/Axis button. In the dialog box that appears, select the Log scale check<br />
box for the Second axis label.<br />
518 | CHAPTER 12: SEMICONDUCTOR DEVICE MODELS
8 Click OK.<br />
9 Click OK again to see the plot in Figure 12-12 on page 512.<br />
10 To view the calculated SPICE parameters, choose Data Display>Global from the<br />
Postprocessing menu.<br />
11 From the Predefined quantities list, choose Optimization (opt)>sim_D1_N.<br />
12 Click Apply to see the ideality factor in the message log at the bottom of the main<br />
user interface. Do the same for each of the variables logIS, sim_D1_NR, logISR, logRS,<br />
and logIKF to see their values.<br />
13 To see the actual values for the variables in log-scale, just type 10^ in front of the<br />
variable name in the Expression edit field before you click Apply.<br />
SPICE PARAMETER EXTRACTION FOR A SEMICONDUCTOR DIODE | 519
520 | CHAPTER 12: SEMICONDUCTOR DEVICE MODELS
13<br />
Structural Mechanics Models<br />
This section contains a modal analysis of a crankshaft based on a NASTRAN mesh;<br />
a 3D model of a feeder clamp; a parametric study of the stresses in a pulley; and a<br />
model of a communication mast’s diagonal mounting. The model of the<br />
communication mast is a 3D model that highlights the use of assemblies, interactive<br />
meshing, and import of CAD data. There is also a model that performs topology<br />
optimization of a loaded knee (the model requires the Optimization Lab). The<br />
<strong>COMSOL</strong> Multiphysics Modeling Guide includes two benchmark models using<br />
2D stress analysis. A comprehensive set of solved examples is available in the Model<br />
Library that comes with the Structural Mechanics Module.<br />
521
Eigenvalue Analysis of a Crankshaft<br />
This model describes a modal analysis of a crankshaft. The pistons’ reciprocating<br />
movement is transferred to the crankshaft through connecting rods by means of<br />
crankshaft throws. The forces, torques, and bending moments, which are highly<br />
variable both in time and space, subject the crankshaft to very high and complex<br />
loading. The crankshaft design must therefore incorporate careful and precise<br />
calculations of the vibrational characteristics.<br />
Model Definition<br />
GEOMETRY<br />
The geometry comes from a NASTRAN mesh, which you import into the <strong>COMSOL</strong><br />
Multiphysics user interface.<br />
MATERIAL PROPERTIES AND BOUNDARY CONDITIONS<br />
The crankshaft geometry is in millimeters, and a suitable unit system for geometries<br />
given in millimeters is the MPa system. The crankshaft is made of solid steel, and you<br />
give the material properties in the MPa unit system; that is, express the Young’s<br />
modulus in MPa and the density in t/mm 3 .<br />
The boundary conditions are as follows:<br />
The crankshaft’s main bearing surfaces are constrained from moving in the normal<br />
directions; that is, the crankshaft is allowed to rotate and slide at the bearing<br />
surfaces.<br />
The axial movement is constrained at the rear axial bearing surface.<br />
The crankshaft is fixed at the rear surface where the flywheel is mounted.<br />
Results<br />
The analysis provides the 20 first eigenfrequencies, of which several of them show the<br />
same modal shapes. This first eigenmode has an eigenfrequency at approximately<br />
5778 Hz and it has a torsional characteristic. There are five additional eigenfrequencies<br />
in rather close vicinity to this frequency. Each of them also shows similar torsional<br />
characteristics, which suggests that they are all in fact showing the first torsional mode.<br />
522 | CHAPTER 13: STRUCTURAL MECHANICS MODELS
Figure 13-1: The first torsional mode in the crankshaft.<br />
The next distinctly shaped eigenmode has an eigenfrequency at 8132 Hz. It can be<br />
characterized as a bending mode in the crankshaft throws. Here there are also five<br />
additional eigenfrequencies in rather close vicinity to this frequency. Each of these<br />
frequencies shows similar bending shapes as in the previously mentioned eigenmode at<br />
8132 Hz. This suggests that they are all in fact showing the first bending mode in the<br />
crankshaft throws.<br />
EIGENVALUE ANALYSIS OF A CRANKSHAFT | 523
Figure 13-2: The bending mode of the crankshaft throws.<br />
The third distinctly shaped eigenmode has an eigenfrequency at 8891 Hz. This modal<br />
shape can be characterized as a twisting mode in the crankshaft throws. There are, in<br />
the same manner as earlier, five additional eigenfrequencies in rather close vicinity to<br />
this frequency. Each of these frequencies shows similar twisting shapes.<br />
524 | CHAPTER 13: STRUCTURAL MECHANICS MODELS
Figure 13-3: The twisting mode of the crankshaft throws.<br />
Model Library path: <strong>COMSOL</strong>_Multiphysics/Structural_Mechanics/<br />
crankshaft<br />
Modeling Using the Graphical User Interface<br />
MODEL NAVIGATOR<br />
1 Open the Model Navigator, and in the Space dimension list select 3D.<br />
2 In the list of application modes select<br />
<strong>COMSOL</strong> Multiphysics>Structural Mechanics>Solid, Stress-Strain>Eigenfrequency<br />
analysis.<br />
3 Click OK.<br />
GEOMETRY MODELING<br />
1 From the File menu choose Import and then Mesh From File.<br />
EIGENVALUE ANALYSIS OF A CRANKSHAFT | 525
2 Browse to the NASTRAN mesh file located at models/<strong>COMSOL</strong>_Multiphysics/<br />
Structural_Mechanics/crankshaft.nas in the <strong>COMSOL</strong> installation<br />
directory.<br />
3 Click the Import button.<br />
PHYSICS SETTINGS<br />
Model Settings<br />
1 From the Physics menu choose Model Settings.<br />
2 In the Base unit system list select MPa.<br />
3 Click OK.<br />
Boundary Conditions<br />
1 From the Physics menu choose Boundary Settings.<br />
526 | CHAPTER 13: STRUCTURAL MECHANICS MODELS
2 In the Boundary selection list choose Boundaries 27, 55, 65, and 68–74.<br />
3 Click the General notation, Hu=R button, then click the Edit button associated with<br />
the H Matrix. In the matrix position (1, 1) enter nx, in the (1, 2) position enter ny,<br />
and in the (1, 3) position enter nz. Click OK.<br />
These settings constrain the normal direction movements of the main bearing<br />
surfaces.<br />
4 In the Boundary selection list choose 26.<br />
5 Click the Standard notation button, then select the Rx, Ry, and Rz check boxes to fix<br />
this surface.<br />
6 Click OK.<br />
Subdomain Settings<br />
The crankshaft geometry is in millimeters. This means that you must enter the material<br />
properties in the MPa unit system to avoid having to scale the geometry; that is, you<br />
specify the Young’s modulus in MPa and the density in t/mm 3 .<br />
1 From the Physics menu choose Subdomain Settings.<br />
EIGENVALUE ANALYSIS OF A CRANKSHAFT | 527
2 Select Subdomain 1, then enter the following material properties:<br />
PROPERTY VALUE<br />
E 2.0e5<br />
ν 0.33<br />
ρ 7850e-12<br />
3 Click the Element tab.<br />
4 Select Lagrange - Linear in the Predefined elements list. The model uses linear<br />
elements to conform with the NASTRAN mesh.<br />
5 Click OK.<br />
COMPUTING THE SOLUTION<br />
1 From the Solve menu choose Solver Parameters.<br />
2 In the General page go to the Desired number of eigenfrequencies edit field and enter<br />
20. Click OK.<br />
3 Click the Solve button on the Main toolbar.<br />
POSTPROCESSING AND VISUALIZATION<br />
<strong>COMSOL</strong> Multiphysics plots the first eigenmode using a slice plot. To change the plot<br />
to show the deformed shape and other eigenmodes, follow these steps:<br />
1 From the Postprocessing menu choose Plot Parameters.<br />
2 In the Plot type area on the General page, clear the Slice check box, then select the<br />
Boundary and Deformed shape check boxes.<br />
3 Select the second eigenfrequency in the Eigenfrequency list and click Apply to plot it.<br />
4 Select the last eigenfrequency in the Eigenfrequency list and click OK to plot the<br />
twentieth eigenmode and close the Plot Parameters dialog box.<br />
528 | CHAPTER 13: STRUCTURAL MECHANICS MODELS
Deformation of a Feeder Clamp<br />
Introduction<br />
This example, from the field of structural mechanics, analyzes the deformation of a<br />
feeder clamp under stress. The clamp secures a feeder that carries high-frequency<br />
electromagnetic fields, and it’s important that it remains as straight as possible.<br />
This example analyzes deformations in the clamp with two key questions in mind:<br />
How much does the force from the feeder incline the clamp? The inclination must<br />
be less than 1 degree.<br />
Does a prestressed screw of a certain type have enough strength to deform the clamp<br />
so that it adequately anchors the feeder? The gap must shrink by at least 0.5 mm.<br />
Model Definition<br />
Forces on the clamp include those from the feeder as well as those on the sleeve arising<br />
from the clamping screw. In this analysis, the feeder clamp is attached to a wall using<br />
only one of its two mounting holes, so that you can better analyze how it performs<br />
when poorly secured.<br />
DEFORMATION OF A FEEDER CLAMP | 529
.<br />
Ffeeder<br />
LOADING DATA<br />
Assume that an installation technician fastens the feeder into the clamp using a<br />
standard metric M3 screw of Class 8.8 (where the first digit stands for a breaking load<br />
of 800 N/mm 2 , and the second digit indicates a yield strength of 80% of the breaking<br />
strength). Prestressing the screw to the yield limit results in a screw force of 4500 N.<br />
This model tests if a screw force of 80% of this is adequate. A 7-mm washer distributes<br />
the prestressed load evenly onto both sides of the sleeve. The maximum load from the<br />
feeder onto the clamp is 1000 N, and is applied evenly throughout the inside of the<br />
clamp.<br />
Due to symmetry in both loading and the geometry, you can perform a complete<br />
model analysis while looking at only one half of the geometry. For illustrative purposes,<br />
though, this example models the entire geometry.<br />
530 | CHAPTER 13: STRUCTURAL MECHANICS MODELS<br />
Fscrew<br />
Fscrew
Results and Discussion<br />
The z-deformation for the whole clamp is depicted in Figure 13-4.<br />
Figure 13-4: z-deformation.<br />
The maximum inclination about the z-axis can be derived from the difference between<br />
the maximum and the minimum deformation in the y direction.The maximum and<br />
minimum values can be found from the color legend on the right in Figure 13-5. It<br />
can be shown that the sine of the maximum inclination is equal to the difference<br />
between the maximum and the minimum y-deformation, divided by the width of the<br />
clamp in the z direction. For small angles, a, this becomes<br />
0.094 – ( – 0.014)<br />
α -------------------------------------------<br />
20<br />
180<br />
=<br />
⋅ --------π<br />
DEFORMATION OF A FEEDER CLAMP | 531
which gives an inclination of 0.31 degrees which is less than the maximum allowed<br />
angle of 1 degree.<br />
Figure 13-5: Maximum and minimum y-displacement at the center of the clamp cylinder.<br />
To see the maximum displacement in the x direction, you can plot abs(u) > 0.25 mm.<br />
Figure 13-6 shows that the deformation in the feeder clamp gap is larger than<br />
0.25 mm on both sides, which is the minimum requirement for being able to fasten<br />
the feeder adequately. The boundary conditions in this model are valid only as long as<br />
the installation technician does not squeeze the gap in the clamping sleeve completely<br />
shut. However, if the gap is squeezed shut, you can be sure that the requirements are<br />
fulfilled.<br />
532 | CHAPTER 13: STRUCTURAL MECHANICS MODELS
Figure 13-6: Clamp deformation due to the screw force.<br />
Model Library path: <strong>COMSOL</strong>_Multiphysics/Structural_Mechanics/<br />
feeder_clamp<br />
Modeling Using the Graphical User Interface<br />
MODEL NAVIGATOR<br />
1 Start <strong>COMSOL</strong> Multiphysics. This invokes the Model Navigator.<br />
2 On the New page, select 3D from the Space dimension list.<br />
3 Double-click the <strong>COMSOL</strong> Multiphysics>Structural Mechanics folder and select Solid,<br />
Stress-Strain>Static analysis.<br />
4 Click OK.<br />
DEFORMATION OF A FEEDER CLAMP | 533
Notice that this gives you second-order elements, Lagrange - Quadratic, by default.<br />
OPTIONS AND SETTINGS<br />
1 Double-click AXIS on the status bar to turn off the 3D axis.<br />
2 Choose Model Settings from the Physics menu and select MPa from the Base unit<br />
system list. Click OK.<br />
3 Choose Constants from the Options menu.<br />
4 Enter the following constant names, expressions, and descriptions (optional):<br />
NAME OF CONSTANT EXPRESSION DESCRIPTION<br />
Ffeeder 1000 Feeder force<br />
Afeeder pi*20*20 Feeder area<br />
Fscrew 3600 Screw force<br />
D 7 Outer diameter<br />
d 3.75 Inner diameter<br />
Awasher pi/4*(D^2-d^2) Washer area<br />
To add a constant, enter its name in the Name edit field and its corresponding<br />
constant value or defining equation in the Expression edit field. Adding a description<br />
534 | CHAPTER 13: STRUCTURAL MECHANICS MODELS
in the Description edit field is optional. After you finish entering constants, click<br />
Apply to evaluate all the expressions.<br />
5 Click OK.<br />
GEOMETRY MODELING<br />
Creating the First Work-Plane Geometry<br />
1 Choose Work-Plane Settings from the Draw menu and click OK in the dialog box to<br />
enter the default work plane, which is the xy-plane.<br />
2 Choose Axes/Grid Settings from the Options menu to open the corresponding dialog<br />
box.<br />
3 On the Axis page, type -40, 70, -5, and 65 in the x min, x max, y min, and y max edit<br />
fields, respectively. Click Apply to update the axis settings.<br />
4 Click the Grid tab. Clear the Auto check box, and type 5 in both the x spacing and<br />
y spacing edit fields. Add extra grid lines at x = 14.25 and x = 15.75 by entering these<br />
values, with a space separating them, in the Extra x edit field. Click OK.<br />
5 Using the left mouse button, draw a rectangle with corners at (5, 5) and (25, 60).<br />
Use the Rectangle/Square button on the Draw toolbar.<br />
DEFORMATION OF A FEEDER CLAMP | 535
6 Draw a circle with a radius of 15 by selecting the Ellipse/Circle (Centered) toolbar<br />
button. Using the right mouse button, place the center of the circle at (15, 35) and<br />
drag the mouse until you have the correct radius. During dragging, you can monitor<br />
the current value of the radius in the coordinate field to the left in the Status bar.<br />
7 Press Ctrl+A to select both geometry objects.<br />
8 Click the Difference button on the Draw toolbar to remove the circle from the<br />
rectangle.<br />
9 Draw another circle with the same radius at the same position as the deleted one.<br />
Then draw yet another circle centered at (15, 35), but give this one a radius of 10.<br />
Select the Ellipse/Circle (Centered) button on the Draw toolbar and then<br />
click-and-drag using the right mouse button to create a circle.<br />
10 Draw a rectangle with corners at (14.25, 40) and (15.75, 60) by choosing the<br />
Rectangle/Square button and using the extra grid lines.<br />
11 Click the Create Composite Object button on the Draw toolbar. In the Set formula<br />
edit field of the dialog box that opens enter the Boolean expression<br />
(CO1+C1)-(C2+R1). Click OK to create the composite solid object CO2.<br />
536 | CHAPTER 13: STRUCTURAL MECHANICS MODELS
12 If you make a mistake, choose Undo from the Edit menu to revert to the previous<br />
state.<br />
13 Split the created composite solid object into its constituents. To do so, click the<br />
Split Object button on the Draw toolbar.<br />
14 Click the Rectangle/Square toolbar button and use the left mouse button to make a<br />
rectangle with corners at (0, 0) and (30, 5).<br />
DEFORMATION OF A FEEDER CLAMP | 537
Extruding the 2D Geometry Objects into 3D Solid Objects<br />
1 To extrude the 2D rectangle into a 3D object, choose Extrude from the Draw menu.<br />
This selection opens the Extrude dialog box. Make sure that the last created<br />
rectangle is selected and enter 40 in the Distance edit field before clicking OK.<br />
2 The resulting 3D geometry object appears in a 3D view. Click Zoom Extents in the<br />
main toolbar to view the entire block.<br />
3 Click the Move button in the Draw toolbar; in the resulting dialog box first make<br />
sure the 3D block is selected. Then enter a z-displacement of −10 and click OK.<br />
4 Enter the work plane again by selecting 1 Geom2 (2D) from the Draw menu. Click<br />
the Projection of All 3D Geometries button at the lower part of the Draw toolbar.<br />
5 While working in the plane, open the Extrude dialog box from the Draw menu and<br />
select the objects CO1, CO3, and CO5 that came from the first rectangle you<br />
created. Enter an extruding distance of 10. Click OK to extrude the 2D geometry<br />
and enter the 3D view.<br />
538 | CHAPTER 13: STRUCTURAL MECHANICS MODELS
6 Make sure that the recently created 3D objects are selected. Click the Move button<br />
on the Draw toolbar. In the resulting dialog box enter 5 in the z edit field and click<br />
OK.<br />
7 Re-enter the work plane by selecting 1 Geom2 (2D) from the Draw menu.<br />
8 Select the circular-shaped solid object, object CO4, and open the Extrude dialog<br />
box. Enter a distance of 20 and click OK. Click Zoom Extents in the Main toolbar to<br />
see the entire resulting geometry. Click and drag in the figure to rotate the<br />
geometry to get the desired view.<br />
Creating a Second Work Plane<br />
1 It is now necessary to add a work plane, so choose Work-Plane Settings from the Draw<br />
menu. In the resulting dialog box, click the Add button. The software creates a work<br />
DEFORMATION OF A FEEDER CLAMP | 539
plane and automatically assigns it the name Geom3. Select the Quick page. Click the<br />
y-z button and specify an offset of 5 in the x edit field.<br />
2 Click OK to enter the work plane environment and then click the Zoom Extents<br />
button in the work plane. The 3D projection of the geometry onto the work plane<br />
is visible if any of the Projection of All 3D Geometries or Project Work-Plane<br />
Intersection buttons are selected at the bottom of the Draw toolbar. You can snap to<br />
the projection when drawing.<br />
3 Choose Axes/Grid Settings from the Options menu. In the resulting dialog box, go to<br />
the Grid page, uncheck the Auto check box and enter a grid spacing of 5 in both the<br />
x spacing and y spacing fields. Add extra grid lines at x = 56.875 and x = 58.5 by<br />
entering these values, separated with a space, in the Extra x field. Click OK to close<br />
the dialog box.<br />
4 Draw a circle with its center at (55, 10) by choosing Ellipse/Circle (Centered) and<br />
clicking the right mouse button. Drag the cursor from the center to the right and<br />
release the button over one of the extra grid lines. Draw another circle centered at<br />
the same position, but this time release the mouse button over the other extra grid<br />
line. Now you have two circles with radii of 1.875 and 3.5.<br />
5 Press Ctrl+A to select both circles. Click the Difference button on the Draw toolbar<br />
to subtract the smaller circle from the larger one. The resulting object is given the<br />
name CO1.<br />
6 Redraw the smaller of the two circles. The circle is given the name C1 by the<br />
software. Additionally draw a new circle with a radius of 5 with the same center<br />
coordinates. It will be named C2. Click the Rectangle/Square button and use the left<br />
mouse button to draw a rectangle with corners at (55, 5) and (60, 15).<br />
540 | CHAPTER 13: STRUCTURAL MECHANICS MODELS
7 Open the Create Composite Object dialog box by Shift-clicking the associated button<br />
on the Draw toolbar. In the Set formula edit field type R1-C2+C1. Click OK to create<br />
the composite solid object CO2.<br />
Figure 13-7: Extruding the 2D Geometry Object and Creating 3D Solid Object<br />
1 Choose Extrude from the Draw menu. In the resulting dialog box make sure the last<br />
created object, CO2, is selected. Then enter 9.25 in the Distance edit field and click<br />
OK.<br />
2 In 3D view, click the Copy button in the main toolbar and then click the Paste<br />
button. In the Displacement area, enter an x-displacement of 10.75 in the x edit<br />
field, then click OK.<br />
3 Return to the work plane by clicking on the Geom3 tab above the drawing area.<br />
4 To define the area of the washer that distributes pressure from the screw, choose<br />
Embed from the Draw menu. In the resulting dialog box, select CO1 and click OK.<br />
5 In 3D view, click the Copy button in the main toolbar and then click the Paste<br />
button. In the Displacement area, enter an x-displacement of 20 in the x edit field,<br />
then click OK.<br />
DEFORMATION OF A FEEDER CLAMP | 541
6 To round off the top of the clamp and create a hole for the clamping screw, subtract<br />
solid object EXT6 and EXT7 from objects EXT3 and EXT4 using the Create<br />
Composite Object dialog box.<br />
To do so, click the Create Composite Object toolbar button to open the dialog box<br />
and select the Solids option button in the Object type frame.<br />
7 Type (EXT3+EXT4)-EXT6-EXT7 in the Set formula edit field. Click OK.<br />
8 You can add lighting to the plot by clicking the Headlight button in the Camera<br />
toolbar.<br />
Creating a Third Work Plane and the Final 3D Solid Model<br />
1 Press Ctrl+A to select all geometry objects, then choose Work-Plane Settings from<br />
the Draw menu.<br />
2 In the dialog box, click the Add button to create a new work plane, which<br />
automatically gets the name Geom4. On the Face Parallel page select the folder/<br />
solid object EXT1 and the face number 2 from the list. Click the Downward normal<br />
button. Click OK to enter the new work plane.<br />
3 Select Axes/Grid Settings from the Options menu. In the resulting dialog box, click<br />
the Grid tab, clear the Auto check box, and enter a grid spacing of 2.5 in both the<br />
x spacing and y spacing fields. Add extra grid lines at x = 9.5 and x = 20.5 by entering<br />
542 | CHAPTER 13: STRUCTURAL MECHANICS MODELS
these values, separated by a space, in the Extra x edit field. Click OK to close the<br />
dialog box. Click the Zoom Extents button on the Main toolbar.<br />
4 Draw a rectangle with corners at (9.5, −10) and (20.5, −5) using the left mouse<br />
button and the Rectangle/Square toolbar button.<br />
5 Click the Ellipse/Circle (Centered) button, and use the right mouse button to draw a<br />
circle centered at (9.5, −7.5) with a radius of 2.5. Draw a similar circle centered at<br />
(20.5, −7.5).<br />
6 Press Ctrl+A to select all objects. Click the Copy button in the main toolbar, then<br />
click the Paste button. In the Displacement area, enter a y-displacement of -25 in the<br />
y edit field, then click OK.<br />
7 Press Ctrl+A to select all objects and click the Union button in the Draw toolbar.<br />
8 Choose Extrude from the Draw menu. In the dialog box, type 5 in the Distance edit<br />
field. Click OK to enter 3D view.<br />
9 In 3D view, the recently extruded objects are already selected. Holding down the<br />
Shift key, click on the block you created first, EXT1, using the left mouse button to<br />
add it to the selection. Then click the Difference toolbar button to create the<br />
mounting holes in the clamp.<br />
DEFORMATION OF A FEEDER CLAMP | 543
Boundary Conditions<br />
The boundary conditions consist of loads and constraints. The following tables list the<br />
loads (top) and constraints (bottom):<br />
The constraint means that the feeder clamp is fixed (no displacements) at the mount.<br />
All other boundaries are free.<br />
In relatively complicated geometries like this it is often convenient to arrange the<br />
different boundaries in groups. This allows you to set properties for a group of<br />
domains at once. To simplify the specification of the boundary conditions, create five<br />
groups:<br />
clamp, containing the four boundaries which constitute the inside surface of the<br />
large cylinder. These are the boundaries where the feeder force is applied.<br />
mount, containing the six boundaries where the feeder clamp is attached.<br />
washer top, containing the top boundary where the screw force is applied.<br />
washer bottom, containing the bottom boundary, where the screw force is applied.<br />
free, containing the rest of the boundaries, which are free of loads and constraints.<br />
The following steps describe, in addition to the boundary settings, how to create the<br />
boundary domain groups.<br />
1 Open the Boundary Settings dialog box by selecting Boundary Settings from the<br />
Physics menu. This dialog box enables you to select boundaries and enter<br />
expressions for boundary conditions.<br />
2 To create the boundary groups, click the Groups tab. Select the existing group<br />
(unnamed1), enter the name free in the Name edit field, and press Enter.<br />
544 | CHAPTER 13: STRUCTURAL MECHANICS MODELS<br />
BOUNDARY 25 BOUNDARY 68 1BOUNDARIES 17, 18, 45, 47<br />
Page Load Load Load<br />
Fx Fscrew/Awasher Fx -Fscrew/Awasher Fx 0<br />
Fy 0 Fy 0 Fy 0<br />
Fz 0 Fz 0 Fz -Ffeeder/Afeeder<br />
BOUNDARIES 32, 33,<br />
36, 37, 60, 61<br />
Page Constraint<br />
Rx 0<br />
Ry 0<br />
Rz 0
3 Click the New button and enter the name clamp, and press Enter. Similarly, add the<br />
remaining groups mount, washer top, and washer bottom.<br />
Now enter the boundary conditions for the groups:<br />
GROUP WASHER TOP WASHER BOTTOM CLAMP<br />
Page Load Load Load<br />
Fx Fscrew/<br />
Awasher<br />
Fx -Fscrew/<br />
Awasher<br />
Fx 0<br />
Fy 0 Fy 0 Fy 0<br />
Fz 0 Fz 0 Fz -Ffeeder<br />
/Afeeder<br />
GROUP MOUNT<br />
Page Constraint<br />
Rx 0<br />
Ry 0<br />
Rz 0<br />
The free group should have the default settings, so make sure that all loads are zero for<br />
this group and that none of the displacement check boxes are selected on the Constraint<br />
tab.<br />
1 Click the Boundaries tab and select Boundary 25, then choose washer top from the<br />
Group list.<br />
2 Select Boundary 68, then choose washer bottom from the Group list.<br />
3 Select Boundaries 17, 18, 45, and 47, then choose clamp from the Group list.<br />
4 Select Boundaries 32, 33, 36, 37, 60, and 61, then choose mount from the Group<br />
drop down list.<br />
5 Make sure the remaining boundaries belong to the free group.<br />
6 Click OK to close the dialog box.<br />
Subdomain Settings<br />
The domain parameters for this model are:<br />
SETTINGS SUBDOMAINS 1–5<br />
E 2.06e5<br />
ν 0.3<br />
DEFORMATION OF A FEEDER CLAMP | 545
This example models the geometry in millimeters, which means that for consistency<br />
you must specify Young’s modulus, E, in N/mm 2 .<br />
1 Open the Subdomain Settings dialog box by selecting Subdomain Settings from the<br />
Physics menu<br />
2 Select all subdomains by pressing Ctrl+A.<br />
3 Click the Material tab.<br />
4 Ignore the value for the density, a parameter that has no effect on the solution in<br />
this static simulation.<br />
5 Type 2.06e5 in the E edit field.<br />
6 Type 0.3 in the edit field for Poisson’s ratio, ν.<br />
7 Click OK.<br />
MESH GENERATION<br />
Change the default mesh parameters to distribute the mesh elements in a more<br />
reasonable way. The maximal stresses in this model will be found in the sleeve, on the<br />
side facing the wall. Therefore, it makes sense to require a finer mesh in the sleeve than<br />
in the rest of the geometry. To accomplish this, do the following:<br />
1 Choose Free Mesh Parameters from the Mesh menu.<br />
2 Select Coarser from the Predefined mesh sizes list, which saves memory and<br />
computation time.<br />
3 To obtain a higher mesh resolution in the sleeve (Subdomain 2), click the Subdomain<br />
tab, select Subdomain 2, and type 3 in the Maximum element size edit field. This<br />
imposes an upper bound of 3 mm on the element edge lengths in Subdomain 2.<br />
4 Click the Remesh button.<br />
546 | CHAPTER 13: STRUCTURAL MECHANICS MODELS
5 Click OK.<br />
COMPUTING THE SOLUTION<br />
To start computing the solution, click the Solve toolbar button. <strong>COMSOL</strong><br />
Multiphysics displays the results automatically as a slice plot of the von Mises stress.<br />
POSTPROCESSING AND VISUALIZATION<br />
1 Choose Plot Parameters from the Postprocessing menu to open the Plot Parameters<br />
dialog box. On the General page, clear the Slice check box and then select the<br />
Boundary and Deformed shape check boxes to add the corresponding plot types. The<br />
Geometry edges plot is on by default.<br />
2 To plot the deformation in the z direction, select z-displacement in the Predefined<br />
quantities field on the Boundary page.<br />
3 Click Apply to display a plot using the new settings (see Figure 13-4).<br />
4 To change the view of the solution plot, work with the buttons in the Camera<br />
toolbar.<br />
5 To compute the maximum inclination in the z direction, you can derive it from the<br />
difference between the maximum and the minimum deformation in the y direction.<br />
Select y-displacement from the Predefined quantities list on the Boundary page in the<br />
Plot Parameters dialog box.<br />
6 On the General page, select the Element selection check box and type<br />
(x==5)&&(y==35) in the Logical expression for inclusion edit field. Select At least one<br />
from the Element nodes to fulfill expression list and click OK. This plots the<br />
deformation on the inside of the feeder clamp. Click the Go to YZ View button to get<br />
a better view (see Figure 13-5).<br />
7 To see the maximum displacement in the x direction, clear the Element selection<br />
check box on the General page in the Plot Parameters dialog box and type<br />
abs(u)>0.25 in the Expression edit field on the Boundary page. Click OK.<br />
To get a better view of the clamping sleeve, zoom in on the top of the clamp; click the<br />
Go to XY View button and use the Zoom Window button in the Main toolbar (see<br />
Figure 13-6).<br />
DEFORMATION OF A FEEDER CLAMP | 547
Topology Optimization of a Loaded<br />
Knee Structure<br />
Introduction<br />
Imagine that you are designing a light-weight mountain bike frame that should fit in<br />
a box of a certain size and it should weigh no more than 8 kg. Given that you know<br />
the loads on the bike, you can achieve this by distributing the available material while<br />
making sure that the stiffness of the frame is at a maximum. This way you have<br />
formulated the topology optimization of the frame as a material distribution problem.<br />
This model demonstrates how you can apply the SIMP model (Solid Isotropic Material<br />
with Penalization) for structural topology optimization with <strong>COMSOL</strong> Multiphysics.<br />
Model Definition<br />
The maximum stiffness structural optimization problem is often formulated as the<br />
equivalent minimum compliance problem, which can be written as<br />
minimize c( ρ)<br />
such that ε T DεdΩ =<br />
548 | CHAPTER 13: STRUCTURAL MECHANICS MODELS<br />
1<br />
--ε<br />
2<br />
T D( ρ)εdΩ<br />
(13-1)<br />
Here Ω denotes the design domain; ε and u are the strain and displacement vectors;<br />
D refers to the stiffness matrix; f is an applied body load; and t is a boundary traction.<br />
In the SIMP model, the stiffness matrix is expressed as<br />
∫<br />
Ω<br />
=<br />
∫<br />
Ω<br />
fudΩ (13-2)<br />
In the above equation, D 0 represents the stiffness matrix of a given isotropic material,<br />
and p is a penalty parameter. The design variable, ρ(x), which can be interpreted as a<br />
generalized material density, is required to satisfy the following constraints:<br />
∫<br />
Ω<br />
D( ρ,x ) ρ( x)<br />
p = D0 ,<br />
p > 1,<br />
x ∈<br />
Ω<br />
+<br />
∫<br />
Γ t<br />
tuds
0 ≤ ρ( x)<br />
dΩ≤<br />
V,<br />
(13-3)<br />
where V is the material volume available for distribution. A penalty parameter value<br />
above 1 assures that density values of 0 (no material) or 1 (material) are favored ahead<br />
of the intermediate values.<br />
The model geometry is an L-shaped knee structure, see Figure 13-8 below.<br />
y<br />
x<br />
Figure 13-8: Geometry of the structure with loads and constraints.<br />
∫<br />
Ω<br />
0 ≤ ρ( x)<br />
≤ 1<br />
Fixed boundary<br />
Vertical load on boundary<br />
The structure’s uppermost boundary is fixed and you can apply a load in the negative<br />
y direction on the boundary shown in the figure above.<br />
The material properties for the base material are Young’s modulus, E 0 = 200 GPa, and<br />
Poisson’s ratio, ν = 0.33.<br />
According to Ref. 1, the SIMP model can be considered as a two-phase material model<br />
in 2D if the penalty parameter, p, satisfies that<br />
⎧ 2<br />
p max -----------<br />
4 ⎫<br />
≥<br />
⎨ , ------------<br />
⎩1– ν 1 + ν<br />
⎬<br />
⎭<br />
According to Equation 13-4 the smallest admissible p is 3 for ν = 0.33.<br />
(13-4)<br />
TOPOLOGY OPTIMIZATION OF A LOADED KNEE STRUCTURE | 549
THE FINITE ELEMENT MESH<br />
Problems of this type are intrinsically mesh-size dependent. For this model, generate a<br />
mesh with the free quad mesher using a maximum element size of 0.007. The final<br />
mesh, shown in Figure 13-9, consists of approximately 2800 quadrilateral elements.<br />
Figure 13-9: Finite element mesh of the structure.<br />
Results and Discussion<br />
Figure 13-10 and Figure 13-11 show the initial and optimal material distributions in<br />
the structure, respectively. Black areas represent material and white areas represent<br />
void. Unless composite materials are considered, gray areas are unphysical so a useful<br />
optimized design should be essentially black and white, like the one in Figure 13-11.<br />
Figure 13-10: Initial distribution of the design variable.<br />
550 | CHAPTER 13: STRUCTURAL MECHANICS MODELS
Figure 13-11: Distribution of the design variable after optimization.<br />
As discussed in Ref. 1, SIMP structural topology optimization problems are<br />
intrinsically mesh dependent. Because introducing more holes in a structure (without<br />
changing the volume) generally increases its efficiency, a finer mesh usually leads to a<br />
more detailed structure, approaching a fine-scale microstructure for sufficiently small<br />
mesh sizes.<br />
Reference<br />
1. M.P. Bendsøe and O. Sigmund, Topology Optimization Theory, Methods, and<br />
Applications, Springer, 2004.<br />
Modeling in <strong>COMSOL</strong> Multiphysics<br />
You can solve this structural optimization model by coupling two application modes:<br />
The Plane Stress application mode<br />
- solves for the displacements; corresponds to solving Equation 13-1 (2)<br />
- use Young’s modulus according to Equation 13-2<br />
The Optimization application mode<br />
- solves for the design variable by minimizing the internal strain energy,<br />
Equation 13-1 (1)<br />
- define constraints according to Equation 13-3.<br />
TOPOLOGY OPTIMIZATION OF A LOADED KNEE STRUCTURE | 551
The internal strain energy is a predefined variable in <strong>COMSOL</strong> Multiphysics and is<br />
readily available to use as the objective function for the optimization problem. In each<br />
iteration, the software calculates a solution for the structural mechanics problem, based<br />
upon which the internal strain energy is calculated. The optimization routine then<br />
updates the design variable. If the specified convergence criterion is fulfilled, the<br />
solution process terminates; otherwise the new design variable value is used in the next<br />
calculation of the displacement field.<br />
Model Library path: <strong>COMSOL</strong>_Multiphysics/Structural_Mechanics/<br />
loaded_knee<br />
Modeling Using the Graphical User Interface<br />
MODEL NAVIGATOR<br />
1 In the Model Navigator begin by clicking the Multiphysics button.<br />
2 Select <strong>COMSOL</strong> Multiphysics>Structural Mechanics>Plane Stress, then click Add.<br />
3 Select <strong>COMSOL</strong> Multiphysics>Optimization and Sensitivity>Optimization, then click<br />
Add.<br />
4 Click OK to close the Model Navigator.<br />
GEOMETRY MODELING<br />
1 Create two rectangles according to the following table. For each rectangle,<br />
Shift-click the Rectangle/Square button on the Draw toolbar; then specify width,<br />
height, and corner position; and finally click OK.<br />
WIDTH HEIGHT CORNER<br />
0.45 0.45 (0, 0)<br />
0.27 0.27 (0.18, 0.18)<br />
2 Click the Zoom Extents button to fit the model geometry to the drawing area.<br />
3 Select both squares by pressing Ctrl+A, then click the Difference button on the Draw<br />
toolbar.<br />
In the following steps you create a fillet at the inner corner of the L-shape.<br />
4 Click the Fillet/Chamfer button on the Draw toolbar.<br />
5 Select Vertex 3 and set the Radius to 0.04.<br />
552 | CHAPTER 13: STRUCTURAL MECHANICS MODELS
6 Click OK.<br />
Next draw two points to define the boundary region where you later apply the load<br />
on the structure.<br />
7 Draw the first point by shift-clicking the Point button and then entering 0.45 and<br />
0.083 in the x and y edit fields, respectively. Click OK.<br />
8 Repeat the previous step to draw the second point at the coordinates (0.45, 0.097).<br />
The geometry should now look like that in Figure 13-8.<br />
OPTIONS AND SETTINGS<br />
Constants<br />
1 From the Options menu, open the Constants dialog box.<br />
2 Define constants according to the following table:<br />
NAME EXPRESSION DESCRIPTION<br />
F_load 700[kN/m] Applied load<br />
area_frac 0.45 Fraction of area to use for<br />
distributing material<br />
p 3 SIMP penalty parameter<br />
3 Click OK to close the dialog box.<br />
Expressions<br />
1 Choose Options>Expressions>Scalar Expressions.<br />
2 Enter names and expressions according to the following table:<br />
NAME EXPRESSION DESCRIPTION<br />
E_SIMP 2e11[Pa]*rho_design^p Penalized Young's modulus<br />
3 Click OK.<br />
Integration Variables<br />
You can calculate the area of the structure and use it in expressions by defining an<br />
integration variable.<br />
1 Select Options>Integration Coupling Variables>Subdomain Variables.<br />
2 Select Subdomain 1. Type area_tot in the Name column and 1 in the Expression<br />
column.<br />
3 Click OK.<br />
TOPOLOGY OPTIMIZATION OF A LOADED KNEE STRUCTURE | 553
PHYSICS SETTINGS<br />
Subdomain Settings—Plane Stress<br />
1 From the Model Tree or the Multiphysics menu, select the Plane Stress (ps) application<br />
mode.<br />
2 From the Physics menu, open the Subdomain Settings dialog box.<br />
3 Select Subdomain 1, and type E_SIMP in the E edit field.<br />
4 Click OK.<br />
Boundary Conditions—Plane Stress<br />
In the next steps, you fix the structure for rigid body translation and rotation by<br />
prescribing zero displacements along one of the sides, then apply the load.<br />
1 From the Physics menu, open the Boundary Settings dialog box.<br />
2 From the Boundary selection list, select Boundary 3.<br />
3 Select the R x and R y check boxes and make sure that zero is specified in the<br />
corresponding edit fields.<br />
4 Now select Boundary 7.<br />
5 Switch to the Load page, then enter -F_load in the Fy edit field.<br />
All other boundaries have the default free boundary condition.<br />
6 Click OK.<br />
Subdomain Settings—Optimization<br />
1 Select Optimization (opt) from the Model Tree.<br />
2 Open the Subdomain Settings dialog box.<br />
3 Select Subdomain 1 and switch to the Parameters page.<br />
554 | CHAPTER 13: STRUCTURAL MECHANICS MODELS
4 Edit the fields according to the following table:<br />
VARIABLE INIT ELEMENT<br />
rho_design area_frac Lagrange - Linear<br />
This defines shape functions for rho_design, which is the design variable used in<br />
the optimization. The initial value corresponds to a uniform distribution of the<br />
available material throughout the structure.<br />
Next you can constrain the design variable to the range [10 −4 , 1]. According to<br />
Equation 13-3 (2) the lower bound of this interval should be zero. However, this<br />
would cause the stiffness matrix of the plane stress application mode to become<br />
singular.<br />
5 Click the Pointwise Constraints tab.<br />
6 Type 1e-4 in the lb edit field, rho_design in the Expression edit field, and 1 in the<br />
ub edit field.<br />
Next define the variable name and the expression for the integral constraint<br />
Equation 13-3 (1).<br />
7 Click the Integral Constraints tab.<br />
8 Enter area_constr in the Name field and rho_design in the p2 field.<br />
Proceed to define the strain energy density as the objective function. Use the<br />
predefined variable Ws_ps from the Plane Stress application mode.<br />
9 Click the Objective tab.<br />
TOPOLOGY OPTIMIZATION OF A LOADED KNEE STRUCTURE | 555
10 In the q 2 edit field, type Ws_ps.<br />
11 Click OK.<br />
Scalar Settings—Optimization<br />
Here you can define the bounds for the integral constraint, Equation 13-3 (1), which<br />
defines the amount of material available for design.<br />
1 Choose Physics>Scalar Settings.<br />
2 On the Integral Constraints page, in the first table row type 0 in the lb column,<br />
area_tot*area_frac in the ub column, and 0 in the P s column.<br />
3 Click OK.<br />
556 | CHAPTER 13: STRUCTURAL MECHANICS MODELS
MESH GENERATION<br />
1 From the Mesh menu, open the Free Mesh Parameters dialog box.<br />
2 On the Global page, select the Custom mesh size check box.<br />
3 In the Maximum mesh size edit field, type 7e-3.<br />
4 Click OK.<br />
5 Click the Mesh All (Free, Quad) button on the Mesh toolbar.<br />
COMPUTING THE SOLUTION—UNIFORM DISTRIBUTION<br />
First solve the model for a uniform distribution of material, according to the initial<br />
value of the design parameter. Then, use this solution as a starting point for the<br />
optimization. By this procedure you can check that the initial solution looks<br />
reasonable. Alternatively, you can solve the full optimization problem in one go.<br />
1 Click the Solver Parameters button on the Main toolbar.<br />
2 From the Linear system solver list, select Direct (PARDISO).<br />
3 Make sure that Optimization/Sensitivity is not selected.<br />
4 Click OK to close the Solver Parameters dialog box.<br />
5 Click the Solve button on the Main toolbar to compute the solution.<br />
POSTPROCESSING AND VISUALIZATION<br />
The default plot shows the von Mises stress distribution in the structure. To view the<br />
initial distribution of the design variable, follow these steps:<br />
1 Choose Postprocessing>Plot Parameters.<br />
2 On the General page clear the Geometry edges check box.<br />
3 Click the Surface tab.<br />
4 From the Predefined quantities list, select Optimization (opt)>rho_design.<br />
5 In the Surface color area, set the Color table to GrayScale. To make black correspond<br />
to material (ρ = 1) and white to void (ρ = 0), turn the color table on its head by<br />
selecting the Reverse check box.<br />
6 Click OK.<br />
COMPUTING THE SOLUTION—OPTIMIZATION<br />
Now that you have obtained the initial solution, you continue by solving the<br />
optimization problem.<br />
1 Open the Solver Parameters dialog box.<br />
TOPOLOGY OPTIMIZATION OF A LOADED KNEE STRUCTURE | 557
2 Select the Optimization/Sensitivity check box.<br />
3 On the Optimization/Sensitivity page, set the Analysis to Optimization.<br />
4 Click OK.<br />
5 Click the Solver Manager button on the Main toolbar.<br />
6 Select the Current solution check box in the Initial value area.<br />
7 Click OK.<br />
8 Click the Solve button on the Main toolbar to solve the model.<br />
The optimization routine requires approximately 80 iterations and takes roughly 20–<br />
25 minutes depending on the computer. When the solver has finished, you should get<br />
the plot in Figure 13-11.<br />
558 | CHAPTER 13: STRUCTURAL MECHANICS MODELS
Stiffness Analysis of a<br />
Communication Mast’s Diagonal<br />
Mounting<br />
Introduction<br />
Communication masts usually have a framework with a bolted triangular lattice design<br />
as illustrated in Figure 13-12. The diagonals of the framework are assembled from<br />
several parts and welded together.<br />
When operating under a given wind load at a specific location, the antenna’s total<br />
rotation angle should stay below a certain limit to ensure uninterrupted<br />
communications. For the type of mast in this model, the engineers have determined<br />
that its torsional stiffness is too low, and this effect is due to the geometry of the<br />
diagonal mountings. The goal is to increase the stiffness of such a diagonal mounting<br />
by first analyzing an existing 3D CAD geometry followed by an update of the<br />
geometry and a new analysis.<br />
The model demonstrates the import of 3D CAD assemblies into <strong>COMSOL</strong><br />
Multiphysics from a file and through the bidirectional interface to the SolidWorks<br />
STIFFNESS ANALYSIS OF A COMMUNICATION MAST’S DIAGONAL MOUNTING | 559
CAD software. This case also demonstrates the individual meshing of parts with the<br />
interactive meshing tools.<br />
mount thickness<br />
plate thickness<br />
Figure 13-12: Mounting detail of a mast diagonal.<br />
Model Definition<br />
Start by importing and analyzing the diagonal mounting CAD assembly. The assembly<br />
includes only a short section of the diagonal tubing together with the other parts of<br />
the mounting as illustrated in Figure 13-12. Although a symmetry exists in both the<br />
geometry and load for this problem, this example models the entire assembly for<br />
illustrative purposes.<br />
The geometry file is included in the model folder (models/<strong>COMSOL</strong>_Multiphysics/<br />
Structural_Mechanics in the <strong>COMSOL</strong> installation directory) both as a <strong>COMSOL</strong><br />
Multiphysics binary file (mast_diagonal_mounting_pt10_mt10.mphbin)<br />
and as a Parasolid binary file<br />
(mast_diagonal_mounting_pt10_mt10.x_b).<br />
Importing the latter file requires the CAD Import Module.<br />
After obtaining the stiffness of the assembly, assume that the geometry has been<br />
updated to improve the stiffness. Originally 10 mm, the plate thickness and mount<br />
thickness (see Figure 13-12) have been changed to 12 mm and 15 mm, respectively.<br />
You import the updated geometry file for the new analysis. These files are also included<br />
in the model folder with the name mast_diagonal_mounting_pt12_mt15 with the<br />
560 | CHAPTER 13: STRUCTURAL MECHANICS MODELS<br />
Mount<br />
Plate<br />
Tube
extensions .mphbin and .x_b for the <strong>COMSOL</strong> Multiphysics and the Parasolid binary<br />
format, respectively.<br />
A third approach requires that both the CAD Import Module and SolidWorks software<br />
be installed on your computer. Here you use the bidirectional interface to SolidWorks<br />
to import and update the geometry. This method has the advantage that the boundary<br />
settings are saved between geometry updates. For complex problems this can result in<br />
considerable time savings. The necessary SolidWorks assembly and part files are<br />
included in the model folder; these are mast_diagonal_mounting.sldasm,<br />
mount.sldprt, plate.sldprt, and tube.sldprt.<br />
MATERIAL PROPERTIES<br />
Assume that the material is a structural steel. This is the default material with a Young’s<br />
modulus of 2.0·10 11 N/m 2 and a Poisson’s ratio of 0.33.<br />
BOUNDARY CONDITIONS<br />
Figure 13-13 shows the boundaries with an applied load and constrained<br />
displacements. Assume that the diagonal is loaded in tension by a force, F = 30 kN,<br />
which is transferred through the bolt to the mounting.<br />
Fixed displacement<br />
Applied load<br />
Figure 13-13: Boundaries with constrained displacements and applied loads.<br />
STIFFNESS ANALYSIS OF A COMMUNICATION MAST’S DIAGONAL MOUNTING | 561
Neglect contact conditions between the bolt and the mounting hole, and also neglect<br />
the constraint imposed on the mount by the bolt. Assume that the bolt fills out the<br />
entire hole volume. The load is distributed on the appropriate halves of the hole<br />
surfaces according to<br />
where r mh and b mh are the hole’s radius and the thickness, respectively.<br />
THE FINITE ELEMENT MESH<br />
Next use the interactive meshing tool to individually mesh different parts of the<br />
diagonal mounting assembly. This way you can use both structured and unstructured<br />
meshes with various sizes on the different parts.<br />
During the meshing procedure keep this in mind: for the identity boundary pairs, the<br />
destination boundary should have a finer mesh than the source boundary. The<br />
finite-element mesh consists of roughly 9000 tetrahedral elements and about 250<br />
prism elements, giving a total number of approximately 50,000 degrees of freedom.<br />
Figure 13-14 shows a 3D view of the mesh.<br />
Figure 13-14: Finite-element mesh of the diagonal mounting assembly.<br />
562 | CHAPTER 13: STRUCTURAL MECHANICS MODELS<br />
F<br />
p --------------------------------<br />
22r ( mhbmh) 3<br />
-- 1 ⎛ y<br />
--------- ⎞<br />
2 ⎝r⎠ mh<br />
2<br />
=<br />
⋅ ⎛<br />
⎝<br />
– ⎞<br />
⎠
Results<br />
Figure 13-15 shows the deformed shape of the diagonal mounting assembly with a<br />
boundary plot of the displacement in the axial direction of the diagonal. Calculate the<br />
stiffness of the mounting with the equation<br />
S =<br />
where d z is the average axial displacement at the midplane of the holes, and F is the<br />
applied load.<br />
Compare this formula for the stiffness to an ideal stiffness, which would result if the<br />
diagonal tube were welded to the framework and placed under the same load.<br />
Calculate the ideal stiffness with the equation<br />
S id<br />
where r tb and R tb are the tube’s inner and outer radii, and L is the total length<br />
measured in the axial direction up to the mid-plane of the mount holes. For the<br />
material under study, E = 200 GPa is the Young’s modulus.<br />
F<br />
----dz<br />
2<br />
2<br />
Eπ( Rtb – rtb) =<br />
-----------------------------------<br />
L<br />
STIFFNESS ANALYSIS OF A COMMUNICATION MAST’S DIAGONAL MOUNTING | 563
The stiffness ratio, SR =<br />
S ⁄ Sid is 0.38 for the case when the plate thickness and the<br />
mount thickness are 10 mm. With the updated geometry (plate thickness set to 12 mm<br />
and the mount thickness set to 15 mm), the stiffness ratio increases to 0.52.<br />
Figure 13-15: Deformed shape and boundary plot of the axial displacement for the<br />
mounting assembly with an end-plate thickness of 12 mm and mount thickness of 15 mm.<br />
Model Library path: <strong>COMSOL</strong>_Multiphysics/Structural_Mechanics/<br />
mast_diagonal_mounting_mphbin, mast_diagonal_mounting_parasolid,<br />
mast_diagonal_mounting_swlive<br />
Modeling Using the Graphical User Interface<br />
MODEL NAVIGATOR<br />
1 In the Model Navigator go to the New page and select 3D from the Space dimension<br />
list.<br />
2 Select <strong>COMSOL</strong> Multiphysics>Structural Mechanics>Solid, Stress-Strain>Static analysis.<br />
3 Click OK to close the Model Navigator.<br />
564 | CHAPTER 13: STRUCTURAL MECHANICS MODELS
IMPORTING THE CAD GEOMETRY<br />
Multiphysics Geometry File<br />
1 On the File menu select Import>CAD Data From File.<br />
2 In the Files of type list select <strong>COMSOL</strong> Multiphysics file.<br />
3 Select the file models/<strong>COMSOL</strong>_Multiphysics/Structural_Mechanics/<br />
mast_diagonal_mounting_pt10_mt10.mphbin in the <strong>COMSOL</strong> installation<br />
directory.<br />
4 Click Import.<br />
Parasolid File<br />
With the CAD Import Module you might also select the Parasolid file for import.<br />
1 On the File menu select Import>CAD Data From File.<br />
2 On the Files of type list select Parasolid file.<br />
3 Select the file models/<strong>COMSOL</strong>_Multiphysics/Structural_Mechanics/<br />
mast_diagonal_mounting_pt10_mt10.x_b in the <strong>COMSOL</strong> installation<br />
directory.<br />
4 Click Import.<br />
SolidWorks Connection<br />
With the CAD Import Module and SolidWorks software you might want to base the<br />
analysis on the SolidWorks assembly.<br />
Have the file mast_diagonal_mounting.sldasm open in SolidWorks and carry out<br />
the following step in <strong>COMSOL</strong> Multiphysics:<br />
On the File menu select SolidWorks Connection>Initialize to import the assembly into<br />
<strong>COMSOL</strong> Multiphysics.<br />
Creating Boundary Pairs<br />
1 Make sure all assembly parts are selected; if not, press Ctrl+A to select all parts.<br />
The next step identifies the identity boundary pairs and creates the necessary identity<br />
constraints for the quantities that are equal on these boundaries.<br />
2 Click the Create Pairs button on the Draw toolbar.<br />
It is important that the source and destination domains be correctly defined for the<br />
identity pairs in the assembly. The destination should have a finer mesh than the<br />
source. For some of the identified identity boundaries you must interchange the source<br />
and destination so that they agree with the mesh you generate later on.<br />
STIFFNESS ANALYSIS OF A COMMUNICATION MAST’S DIAGONAL MOUNTING | 565
3 From the Physics menu select Identity Pairs>Identity Boundary Pairs.<br />
4 In the Identity pairs list select Pair 1.<br />
5 Click the Interchange source and destination button.<br />
6 Repeat the previous two steps for Pair 2 and Pair 3.<br />
7 Click OK to close the Identity Boundary Pairs dialog box.<br />
OPTIONS AND SETTINGS<br />
Constants<br />
1 On the Options menu select Constants.<br />
2 Enter a variable with the Name Force and an Expression 30[kN].<br />
3 Click OK.<br />
Expressions<br />
1 On the Options menu select Expressions>Global Expressions.<br />
2 Enter expressions as given in the following table. Note that the last two expressions<br />
are for the load components; they specify both the magnitude and direction of the<br />
load that is applied in the opposite direction to the surface normal.<br />
NAME EXPRESSION<br />
mount_th_ac mount_pos1-mount_pos2<br />
mounthole_xarea mount_th_ac*2*mounthole_r<br />
tube_xarea pi*(tube_R^2-tube_r^2)<br />
Stiffness_ideal 2e11*tube_xarea/L_tot<br />
Stiffness_current Force/z_displ<br />
Stiffness_ratio Stiffness_current/Stiffness_ideal<br />
mounthole_Fy -Force/2/mounthole_xarea*3/2*(1-(y/<br />
mounthole_r)^2)*ny<br />
mounthole_Fz -Force/2/mounthole_xarea*3/2*(1-(y/<br />
mounthole_r)^2)*nz<br />
3 Click OK.<br />
Integration Variables<br />
Use integration coupling variables to make globally available the geometry dimensions<br />
as well as the average z displacement of the points on the hole midplanes.<br />
1 On the Options menu select Integration Coupling Variables>Point Variables.<br />
2 From the Point selection list choose 25.<br />
566 | CHAPTER 13: STRUCTURAL MECHANICS MODELS
3 Enter an expression with the Name tube_r and an Expression x.<br />
4 Repeat the previous two steps for the following points and the corresponding<br />
expressions.<br />
POINT SELECTION NAME EXPRESSION<br />
27 tube_R x<br />
44 mount_pos2 x<br />
50 L_tot z<br />
50 mounthole_r y<br />
50 mount_pos1 x<br />
31, 32, 37, 38, 43, 44, 49, 50 z_displ w/8<br />
5 Click OK.<br />
PHYSICS SETTINGS<br />
Point 44<br />
Point 50<br />
Boundary Conditions<br />
1 On the Physics menu select Boundary Settings.<br />
Point 25<br />
Point 27<br />
2 On the Boundaries page locate the Boundary selection list and choose 22 and 30.<br />
STIFFNESS ANALYSIS OF A COMMUNICATION MAST’S DIAGONAL MOUNTING | 567
3 On the Load page enter mounthole_Fy in the F y edit field and enter mounthole_Fz<br />
in the F z edit field.<br />
4 From the Boundary selection list choose 13.<br />
5 On the Constraint page select the Rx , Ry , and Rz check boxes. Make sure their values<br />
are set to zero.<br />
6 Click OK.<br />
MESH GENERATION<br />
Generate the mesh individually for the parts using the interactive meshing tool. Start<br />
by meshing the parts that should have an unstructured mesh by using the free mesher.<br />
1 On the Mesh menu select Free Mesh Parameters.<br />
2 On the Global page locate the Predefined mesh sizes list and select Fine.<br />
3 On the Subdomain page select Subdomains 3 and 4.<br />
4 Click the Mesh Selected button.<br />
5 On the Global page find the Predefined mesh sizes list and select Finer.<br />
6 On the Subdomain page select Subdomain 1.<br />
7 Click the Mesh Selected button. Click OK.<br />
Now use the swept mesher on the tube.<br />
1 On the Mesh menu select Swept Mesh Parameters.<br />
2 From the Predefined mesh sizes list select Fine.<br />
3 From the Subdomain selection list select 2.<br />
4 Click the Mesh Selected button.<br />
5 Click OK.<br />
Figure 13-14 shows the meshed assembly.<br />
COMPUTING THE SOLUTION<br />
Click the Solve button on the Main toolbar to start the analysis.<br />
POSTPROCESSING AND VISUALIZATION<br />
1 On the Postprocessing menu select Plot Parameters.<br />
2 On the General page go to the Plot type area. Clear the Slice check box and select the<br />
Boundary and Deformed shape check boxes.<br />
3 On the Boundary page go to the Predefined quantities list and select z-displacement.<br />
568 | CHAPTER 13: STRUCTURAL MECHANICS MODELS
4 Click OK to close the dialog box and to display the plot in Figure 13-15 on page<br />
564.<br />
5 On the Postprocessing menu select Data Display>Global.<br />
6 From the Predefined quantities list select Global Expressions>Stiffness_ratio.<br />
7 Click OK. The value of the stiffness ratio, 0.41, appears in the message log at the<br />
bottom of the user interface.<br />
UPDATE OF CAD GEOMETRY<br />
Click the Draw Mode button on the Main toolbar.<br />
The following steps describe how to import the CAD geometry from a <strong>COMSOL</strong><br />
Multiphysics geometry file and from a Parasolid file.<br />
Multiphysics Geometry File<br />
1 Press Delete to delete the current geometry (first make sure that the geometry is<br />
selected).<br />
2 On the File menu select Import>CAD Data From File.<br />
3 In the Files of type list select <strong>COMSOL</strong> Multiphysics file.<br />
4 Select the file mast_diagonal_mounting_pt12_mt15.mphbin.<br />
5 Click Import.<br />
Parasolid File<br />
1 Press Delete to delete the current geometry.<br />
2 On the File menu select Import>CAD Data From File.<br />
3 On the Files of type list select Parasolid file.<br />
4 Select the file mast_diagonal_mounting_pt12_mt15.x_b.<br />
5 Click Import.<br />
SolidWorks Connection<br />
Now you can control the plate and mount thicknesses of the SolidWorks assembly from<br />
<strong>COMSOL</strong> Multiphysics. This is possible if you define constants that have the same<br />
name as the variables defining these dimensions in the SolidWorks file.<br />
1 On the Options menu select Constants.<br />
2 Enter a variable with the Name plate_thickness and an Expression 12e-3.<br />
3 Enter a variable with the Name mount_thickness and an Expression 15e-3.<br />
4 Click OK.<br />
STIFFNESS ANALYSIS OF A COMMUNICATION MAST’S DIAGONAL MOUNTING | 569
5 On the File menu select SolidWorks Connection>Update to update and import the<br />
assembly into <strong>COMSOL</strong> Multiphysics.<br />
Creating Boundary Pairs<br />
Repeat the steps under “Creating Boundary Pairs” on page 565 only if you imported<br />
the <strong>COMSOL</strong> Multiphysics geometry or Parasolid file. Boundary pairs are retained<br />
with the SolidWorks connection and do not need to be specified again.<br />
OPTIONS SETTINGS<br />
Integration Variables<br />
The names of the variables are retained. Select the points and enter the corresponding<br />
expressions as described in “Integration Variables” on page 566.<br />
PHYSICS SETTINGS<br />
Boundary Conditions<br />
Repeat the steps under “Boundary Conditions” on page 567 only if you imported the<br />
<strong>COMSOL</strong> Multiphysics geometry or Parasolid file. Boundary conditions are retained<br />
with the SolidWorks connection and need not be specified again.<br />
MESH GENERATION<br />
Repeat the steps under “Mesh Generation” on page 568.<br />
COMPUTING THE SOLUTION<br />
Click the Solve button on the Main toolbar to start the analysis.<br />
POSTPROCESSING AND VISUALIZATION<br />
1 On the Postprocessing menu select Data Display>Global.<br />
2 From the Predefined quantities list select Global Expressions>Stiffness_ratio.<br />
3 Click OK. The value of the stiffness ratio, 0.58, appears in the message log at the<br />
bottom of the user interface.<br />
570 | CHAPTER 13: STRUCTURAL MECHANICS MODELS
Stresses in a Pulley<br />
Introduction<br />
This model contains a study of the stress distribution in a driving pulley. The analysis<br />
shows the stresses as functions of the pulley’s angular velocity.<br />
Model Definition<br />
Figure 13-16 shows the pulley under study (to the right) and the external forces<br />
applied due to the driving belt.<br />
Figure 13-16: Pulley and driving belt with the external forces F 1 and F 2.<br />
Here, F 1 and F 2 are the loads in the load side and in the slack side of the belt,<br />
respectively. The relationship between these forces is given by Reynold’s equation (or<br />
Eytelwein’s equation, as it is referred to in the German literature):<br />
where µ is the coefficient of friction and β is the contact angle between the belt and<br />
the pulley. This equation is valid if a condition of impending slippage between the belt<br />
and the pulley prevails.<br />
It is also necessary to state that the peripheral force (the force that transmits the power)<br />
is<br />
It is then possible to define F 2 as<br />
F 2<br />
F 1<br />
F 1<br />
F 2<br />
ω<br />
------ e µβ<br />
=<br />
M<br />
Fu = F1 – F ---- 2 =<br />
r<br />
θ<br />
β = 170°<br />
STRESSES IN A PULLEY | 571
Now that you know the force in the slack side of the belt, you can derive the loads on<br />
the boundary of the pulley. In mechanics and the theory for flexible wires the following<br />
equilibrium equations appear:<br />
where F n is the normal component and F t the tangential component of the external<br />
forces, S is the tension force, and r is the radius.<br />
If you apply these equations to this model, the loads on the boundary of the pulley<br />
become<br />
and<br />
where θ is the angle for which the forces are calculated (see Figure 13-16).<br />
Due to the rotation of the pulley, inertia loads are generated. These loads can be<br />
calculated as<br />
where r is the radius, ω is the rotation speed, and ρ is the density.<br />
The pulley is fixed at its inner diameter and the inertia loads are active in the entire<br />
geometry.<br />
A parametric analysis shows how the rotational speed affects the stress distribution in<br />
the pulley. Because the power at the pulley shaft remains constant, the torque (defined<br />
as the ratio of the power by the rotational speed) decreases with increased speed. This<br />
means that with increased rotational speed, the inertial load increases while the<br />
driving-belt force decreases.<br />
572 | CHAPTER 13: STRUCTURAL MECHANICS MODELS<br />
F 2<br />
F u<br />
e µβ = ---------------------<br />
( – 1)<br />
F n<br />
F t<br />
Fn( θ)<br />
S<br />
= --r<br />
= µFn =<br />
F2 ------ e<br />
r<br />
µθ<br />
Ft( θ)<br />
= µFn( θ)<br />
F r<br />
rω 2 =<br />
ρ
Results and Discussion<br />
The following plots show the von Mises stress distribution inside the pulley for<br />
different rotational speeds in rpm (revolutions per minute).<br />
As is evident from the plots, the stress distribution changes as the rotational speed<br />
increases.<br />
Figure 13-17: von Mises stress distribution at n = 1000 rpm.<br />
STRESSES IN A PULLEY | 573
Figure 13-18: von Mises stress distribution at n = 5000 rpm.<br />
Figure 13-19: von Mises stress distribution at n = 9000 rpm.<br />
574 | CHAPTER 13: STRUCTURAL MECHANICS MODELS
At the point (0.019, 0.054), the von Mises stress is maximal for the first rotational<br />
speed (n = 1000 rpm). The plot in Figure 13-20 shows how the rotational speed<br />
affects the von Mises stress at this specific point. First the stress decreases, but then the<br />
effect of the inertial loads becomes dominating and the stress begins to increase.<br />
Figure 13-20: von Mises stress as function of rotational speed at point (0.019, 0.054).<br />
STRESSES IN A PULLEY | 575
Figure 13-21 shows the von Mises stresses in as part of the pulley evaluated using the<br />
accurate derivative recovery method. This makes the stress field smoother.<br />
Figure 13-21: Von Mises stresses in a part of the pulley evaluated using accurate derivative<br />
recovery.<br />
Modeling in <strong>COMSOL</strong> Multiphysics<br />
To build the geometry, and especially the shape of the holes, use the tangent drawing<br />
tool.<br />
When solving, adaptive mesh refinement helps to compute accurate stresses, as the<br />
stress concentration is not known in advance.<br />
The accurate derivative recovery (see “Accurate Derivative Recovery” on page 471 of<br />
the <strong>COMSOL</strong> Multiphysics User’s Guide) helps to produce a smooth stress field<br />
during postprocessing.<br />
Model Library path: <strong>COMSOL</strong>_Multiphysics/Structural_Mechanics/pulley<br />
576 | CHAPTER 13: STRUCTURAL MECHANICS MODELS
Modeling Using the Graphical User Interface<br />
MODEL NAVIGATOR<br />
1 In the Model Navigator, select 2D from the Space dimension list.<br />
2 Select <strong>COMSOL</strong> Multiphysics>Structural Mechanics>Plane Stress, then click OK.<br />
OPTIONS AND SETTINGS<br />
1 From the Options menu, open the Constants dialog box.<br />
2 Enter the following constants; when done, click OK.<br />
NAME EXPRESSION DESCRIPTION<br />
P 185[kW] Power at pulley shaft<br />
mu 0.5 Coefficient of friction between pulley<br />
and belt<br />
beta (170*pi/180)[rad] Contact angle between pulley and belt<br />
d 5[cm] Thickness of the pulley<br />
n 100 RPM<br />
3 Open the Scalar Expressions dialog box available from the Options>Expressions menu.<br />
4 Enter the following expressions; when done, click OK.<br />
NAME EXPRESSION DESCRIPTION<br />
r sqrt(x^2+y^2) Radius<br />
theta atan2(y,x) Angle<br />
omega n/1[min]*2*pi[rad] Rotational speed of the pulley<br />
M P/omega Torque at pulley shaft<br />
Fu M/r Peripheral force<br />
F2 Fu/(exp(mu*beta)-1) Belt force in slack side<br />
C F2/(r*d) Variable used in load mode<br />
Fn -C*exp(mu*(theta+beta)) Normal component of the belt load<br />
Ft mu*C*exp(mu*(theta+beta)) Tangential component of the belt<br />
load<br />
5 Choose Options>Axes/Grid Settings.<br />
STRESSES IN A PULLEY | 577
6 Specify axis and grid settings according to the following table. On the Grid page,<br />
clear the Auto check box to enter the grid spacing and extra grid point. When done,<br />
click OK.<br />
AXIS GRID<br />
x min -0.03 x spacing 1e-2<br />
x max 0.03 Extra x<br />
y min 0.03 y spacing 1e-2<br />
y max 0.11 Extra y 4.8e-2<br />
GEOMETRY MODELING<br />
1 Choose Draw>Specify Objects>Circle and define a circle centered at<br />
(1.2e-2, 8.5e-2) with a radius of 1.5e-2.<br />
2 Draw another circle centered at (8e-3, 6e-2) with a radius of 1.2e-2.<br />
3 Select both circles and click the Mirror button on the Draw toolbar. Use the default<br />
setting for the reflection line and click OK.<br />
4 Click the Tangent button on the Draw toolbar.<br />
5 In the Start area, select Edge 3 of CO1.<br />
578 | CHAPTER 13: STRUCTURAL MECHANICS MODELS
6 Click the End button and select Edge 3 of C1.<br />
7 Click OK.<br />
8 Draw three other tangents following the previous indication but this time with the<br />
start and end edges as in the table below.<br />
START GEOMETRY OBJECT START EDGE END GEOMETRY OBJECT END EDGE<br />
C1 2 C2 2<br />
C2 2 CO2 2<br />
CO2 2 CO1 3<br />
STRESSES IN A PULLEY | 579
9 Press Ctrl+A to select all the geometry objects.<br />
10 Click the Coerce to Solid button on the Draw toolbar.<br />
11 Click the Delete Interior Boundaries button on the Draw toolbar.<br />
12 Press first Ctrl+C and then Ctrl+V to copy and paste the geometry.<br />
13 Click OK in the Paste dialog box.<br />
14 Click Rotate and enter -45 in the α edit field for the rotation angle.<br />
580 | CHAPTER 13: STRUCTURAL MECHANICS MODELS
15 Click OK.<br />
16 Select both geometries, copy and paste them at the same location, and rotate the<br />
new geometries with an angle of −90°.<br />
STRESSES IN A PULLEY | 581
17 Copy and paste the new geometries and rotate them with an angle of −90°.<br />
18 Repeat the last step once.<br />
19 Click Zoom Extents.<br />
20 Draw two circles centered at the origin with the radii 0.025 and 0.125, respectively.<br />
21 Click Zoom Extents.<br />
Next, split the right side of the exterior boundary to model the belt contact boundary<br />
(the belt and the pulley are in contact over an angle of 170°).<br />
1 Draw a line from (0, 0.11) to (0, 0.13).<br />
2 Click the Rotate button and type -5 in the α edit field for the rotation angle.<br />
3 Draw a line from (0, −0.11) to (0, −0.13).<br />
4 Click the Rotate button and type 5 in the α edit field for the rotation angle.<br />
5 Select the outer circle C2 and the two lines, B1 and B2.<br />
6 Click the Coerce to Solid button.<br />
7 Select all objects (press Ctrl+A).<br />
8 Click the Difference button.<br />
582 | CHAPTER 13: STRUCTURAL MECHANICS MODELS
PHYSICS SETTINGS<br />
Subdomain Settings<br />
1 From the Physics menu, open the Subdomain Settings dialog box.<br />
2 On the Material page, click Load.<br />
3 Select Aluminum from the library material.<br />
4 In the thickness edit field type d.<br />
5 Click the Load tab.<br />
6 Type r*omega^2*rho_ps*cos(theta) in the Body load x-dir. edit field and<br />
r*omega^2*rho_ps*sin(theta) in the Body load y-dir. edit field.<br />
This step is a transformation from cylindrical coordinates to the Cartesian<br />
coordinate system by entering the components of the radial load in the x and y<br />
directions.<br />
7 Click the Body load is defined as force/volume using the thickness button.<br />
8 Click OK.<br />
Boundary Settings<br />
1 Open the Boundary Settings dialog box from the Physics menu.<br />
2 Apply the following boundary conditions:<br />
BOUNDARY 57, 58, 62, 63<br />
Page Constraint<br />
Rx Ry BOUNDARY 67, 68<br />
Page Load<br />
Fx Fy 3 Click the Edge load is defined as force/area using the thickness button.<br />
4 Click OK.<br />
MESH GENERATION<br />
0<br />
0<br />
Fn*cos(theta)-Ft*sin(theta)<br />
Fn*sin(theta)+Ft*cos(theta)<br />
You can expect the rate of change of stresses in the corner region to be high. Use an<br />
adaptive mesh algorithm to get a more suitable mesh size according to the stress<br />
concentration. It is therefore not necessary to start with a fine mesh. <strong>COMSOL</strong><br />
STRESSES IN A PULLEY | 583
Multiphysics automatically detects areas with a high rate of change of stresses and<br />
refines them.<br />
Click the Initialize Mesh button on the Main toolbar.<br />
The total number of degrees of freedom should be around 11,460 (2656 elements).<br />
COMPUTING THE SOLUTION<br />
The rotational speed is the parameter of the parametric solver and varies from<br />
1000 rpm to 9000 rpm in steps of 500 rpm.<br />
1 Open the Solver Parameters dialog box in the Solve menu.<br />
2 Select Parametric from the Solver list.<br />
3 Type n in the Parameter names edit field.<br />
4 Type range(1e3,5e2,9e3) in the Parameter values edit field.<br />
5 Select Direct (SPOOLES) in the Linear system solver list. The system matrix becomes<br />
symmetric, and this solver can make use of that symmetry to save memory.<br />
Use the adaptive mesh algorithm to refine the mesh during the calculation:<br />
6 Select the Adaptive mesh refinement check box.<br />
7 Click the Adaptive tab and type 1.3 in the Increase number of elements by edit field.<br />
8 Click OK.<br />
584 | CHAPTER 13: STRUCTURAL MECHANICS MODELS
9 Click the Solve button on the Main toolbar.<br />
POSTPROCESSING AND VISUALIZATION<br />
The default plot gives the von Mises stress distribution for the highest rotational speed<br />
(9000 rpm). Use a filled contour plot to clearly see where different stress levels occur.<br />
1 Open the Plot Parameters dialog box from the Postprocessing menu.<br />
2 On the General page, clear the Surface check box in the Plot type area.<br />
3 Click the Contour tab.<br />
4 Select the Contour plot check box.<br />
5 Select the Recovery check box to activate the accurate derivative recovery. You can<br />
compare the stress plot with and without accurate derivative recovery by selecting<br />
and clearing this check box. Notice how the stress field becomes smoother when the<br />
accurate derivative recovery is active.<br />
6 Select the Filled check box at the bottom of the page to create filled contours.<br />
7 Type 10 in the Number of levels edit field.<br />
8 Click Apply to create the plot.<br />
9 To visualize the results for different rotational speeds, use the solution for the<br />
desired rpm value by selecting it from the Parameter value list.<br />
STRESSES IN A PULLEY | 585
10 To get a line plot of the von Mises stress at a specific point as a function of the<br />
rotational speed, open the Cross-Section Plot Parameters dialog box.<br />
11 On the General page, select all the solutions to plot from the Solutions to use list.<br />
12 On the Point page, enter the coordinate of the point (0.019, 0.054).<br />
13 Click OK.<br />
14 Figure 13-20 shows the resulting plot.<br />
A Note About Adaptive Mesh Refinement<br />
During the calculation the solver refines the mesh several time. You can verify this by<br />
looking at the message log at the bottom of the main user interface.<br />
There are two mesh refinements: The first refinement gives about 19,500 DOFs, and<br />
the second refinement gives the final solution with about 31,200 DOFs.<br />
586 | CHAPTER 13: STRUCTURAL MECHANICS MODELS
Go to Mesh mode to see the refined mesh refined after the analysis.<br />
The adaptive mesh algorithm, when coupled with a parametric analysis, only refines the<br />
mesh on the results based on the last parameter. In this specific case the variation of<br />
the gradient of the variable is not important enough to consider different meshes for<br />
the different parameters. In case of large variations of the gradients, we recommend to<br />
proceed using a manual mesh refinement in order to have a mesh that is suitable for all<br />
parameters.<br />
STRESSES IN A PULLEY | 587
588 | CHAPTER 13: STRUCTURAL MECHANICS MODELS
14<br />
Wave Propagation Models<br />
Wave propagation models describe the propagation of electromagnetic waves,<br />
light, fluids, and more. For additional wave propagation models, see the chapters<br />
containing acoustics models, electromagnetics models, and fluid dynamics models.<br />
589
Diffraction Patterns<br />
Introduction<br />
This example simulates a two-slit interference experiment with water waves or sound.<br />
The model mimics the plane-wave excitation with two thin waveguides leading to slits<br />
in a screen and computes the diffraction pattern on the other side of the screen.<br />
Model Definition<br />
Theory predicts amplitude minima along rays where the difference in travel distance is<br />
an odd multiple of half the wavelength, and maxima at even multiples. For<br />
n = 0, ±1, ±2, …:<br />
In this model, the distance D between the slits is 2λ. Maxima should then be present<br />
at θ = 0° and 30°, while minima should appear at θ = 14.48° and 48.59°.<br />
Equation<br />
For time-harmonic propagation, the wave equation turns into the Helmholtz<br />
equation:<br />
Boundary Conditions<br />
The absorbing boundary conditions have the form<br />
where n is the outward boundary normal vector. This follows directly from the<br />
assumption that the total wave consists of an incident plane wave plus an outgoing<br />
plane wave, both at normal incidence:<br />
590 | CHAPTER 14: WAVE PROPAGATION MODELS<br />
min, sinθ n 1 ⎛ + -- ⎞ λ<br />
= ---<br />
⎝ 2⎠D<br />
max, sinθ n λ<br />
⎧<br />
⎪<br />
⎪<br />
⎨<br />
⎪<br />
⎪<br />
= ---<br />
D<br />
⎩<br />
– ∇ ( ∇u)<br />
k 2 ⋅ – u = 0, k =<br />
------<br />
2π<br />
λ<br />
n ⋅ ( ∇u)<br />
+ iku = 2ik, inflow<br />
n ⋅ ( ∇u)<br />
+ iku =<br />
0, outflow
where the first term represents the outgoing wave and the second term the incident<br />
wave. For example, at the left boundary of a computational domain along the x axis,<br />
the normal derivative becomes<br />
which means that<br />
and for u 2 = 1, you get the absorbing boundary condition at the inflow for this model.<br />
Results<br />
∂u<br />
∂n<br />
u u1e ikx u2e ikx –<br />
= +<br />
∂u<br />
– iku<br />
∂x<br />
1e ikx<br />
– iku2e i – kx<br />
+ ik u 2u2e ikx –<br />
= = = – ( – )<br />
∂u<br />
+ iku =<br />
2iku2<br />
∂n<br />
The plot above shows the diffraction pattern clearly. The effect of quantization is that<br />
the numerical wavelength differs from λ, which results in a shift of the angles. You can<br />
correct for this effect by adjusting the value of k in the Helmholtz equation to the<br />
DIFFRACTION PATTERNS | 591
element size. These practices are important for modeling the interference effects of<br />
monochromatic waves.<br />
Model Library path: <strong>COMSOL</strong>_Multiphysics/Wave_Propagation/<br />
diffraction_patterns<br />
Modeling Using the Graphical User Interface<br />
MODEL NAVIGATOR<br />
1 Select 2D from the Space dimension list.<br />
2 In the list of application modes, open <strong>COMSOL</strong> Multiphysics>PDE Modes and then<br />
PDE, Coefficient Form.<br />
3 Select Stationary analysis. Make sure that Lagrange - Quadratic elements are selected<br />
in the Element list.<br />
4 Click OK.<br />
OPTIONS AND SETTINGS<br />
1 Open the Axes/Grid Settings dialog box.<br />
2 Specify axis and grid settings according to the following table; when done, click OK.<br />
AXIS GRID<br />
x min -0.75 x spacing 0.5<br />
x max 2.25 Extra x<br />
y min -1 y spacing 0.5<br />
y max 1 Extra y -0.015 0.015<br />
3 Open the Constants dialog box.<br />
4 Enter the following constants; when done, click OK.<br />
NAME EXPRESSION DESCRIPTION<br />
l 0.1 Wavelength (m)<br />
k 2*pi/l Wave number (rad/m)<br />
GEOMETRY MODELING<br />
1 Draw a circle with its center at (0.5, 0) and a radius of 1.<br />
592 | CHAPTER 14: WAVE PROPAGATION MODELS
2 Draw a rectangle centered at (0, 0) with sides of 1 and 2 units for the x and<br />
y direction, respectively.<br />
3 Select both objects and click the Difference button to create a half circle.<br />
4 Draw a rectangle with its lower left corner at (0, -0.015) and upper right corner at<br />
(0.5, 0.015).<br />
5 Click the Move button and set the y-displacement to 0.1. Leave the x-displacement<br />
at 0.<br />
6 Click OK.<br />
7 Duplicate and place the rectangle by pressing Ctrl+C and then Ctrl+V.<br />
8 Click the Move button again and set the x- and y-axis displacements to 0 and -0.2,<br />
respectively.<br />
9 Select all objects.<br />
10 From the Draw menu, choose Create Composite Object.<br />
11 In the Set formula edit field, type CO1+R1+R2.<br />
12 Clear the Keep interior boundaries check box.<br />
13 Click OK.<br />
14 Click the Zoom Extents button on the Main toolbar.<br />
DIFFRACTION PATTERNS | 593
PHYSICS SETTINGS<br />
Boundary Conditions<br />
1 From the Physics menu, choose Boundary Settings.<br />
2 In the Boundary Settings dialog box, enter these boundary conditions (i denotes the<br />
imaginary unit):<br />
SETTINGS BOUNDARIES 1, 4<br />
(INFLOW)<br />
Subdomain Settings<br />
1 From the Physics menu, choose Subdomain Settings.<br />
2 In the Subdomain Settings dialog box, enter the following PDE coefficients:<br />
MESH GENERATION<br />
1 In the Free Mesh Parameters dialog box, click the Global tab<br />
2 Click the Custom mesh size button, then enter 0.03 in the Maximum element size edit<br />
field (approximately 3 second-order elements per wavelength).<br />
3 Click the Remesh button, then click OK.<br />
COMPUTING THE SOLUTION<br />
Click the Solve button on the Main toolbar.<br />
POSTPROCESSING AND VISUALIZATION<br />
By default, <strong>COMSOL</strong> Multiphysics plots the real part of the solution using the<br />
Rainbow color table. To make the diffraction pattern appear even more clearly, change<br />
to the WaveLight color table as follows:<br />
1 Click the Plot Parameters button on the Main toolbar.<br />
2 On the Surface page, select WaveLight from the Color table list in the Surface color<br />
area.<br />
594 | CHAPTER 14: WAVE PROPAGATION MODELS<br />
BOUNDARIES 2, 3, 5–9 BOUNDARIES 10, 11<br />
(OUTFLOW)<br />
Type Neumann Neumann Neumann<br />
q i*k 0 i*k<br />
g 2*i*k 0 0<br />
SETTINGS SUBDOMAIN 1<br />
c 1<br />
a -k^2<br />
f 0
3 Click OK.<br />
DIFFRACTION PATTERNS | 595
596 | CHAPTER 14: WAVE PROPAGATION MODELS
15<br />
Benchmark Models<br />
Benchmark models are those with known results from experiments and<br />
measurements, from analytical solutions and formulas, or from established<br />
benchmark problems published by organizations such as NAFEMS. Many of the<br />
other examples in the Model Library and the <strong>COMSOL</strong> Multiphysics modules are<br />
benchmark models as well. Most introductory models in the <strong>COMSOL</strong><br />
Multiphysics Modeling Guide compare results to theoretical values or established<br />
benchmark data.<br />
597
Isospectral Drums<br />
Introduction<br />
This example examines an interesting question posed by Mark Kac in 1966 (Ref. 1):<br />
“Can one hear the shape of a drum?”<br />
Striking a drum excites a spectrum of vibration modes that together make up the<br />
instrument’s characteristic sound or acoustic signal. These vibration modes correspond<br />
to the eigenmodes, or eigenfunctions, of the drum’s membrane. Thus you can study<br />
this problem by solving eigenvalue problems for stretched membranes.<br />
If you can find two differently shaped membranes that have identical eigenvalues—in<br />
other words, they are isospectral—then it is not possible to hear the shape of a specific<br />
drum.<br />
In 1992, Gordon, Webb, and Wolpert (Ref. 2) showed that there are indeed sets of<br />
different planar shapes (nonisometric shapes) that are isospectral.<br />
Work by Driscoll (Ref. 3) contains the following example of two planar shapes that<br />
sound the same.<br />
Model Definition<br />
The model shows the eigensolutions (the eigenvalues and eigenmodes) in two<br />
isospectral domains. For both cases, use the solution to the same eigenvalue PDE:<br />
598 | CHAPTER 15: BENCHMARK MODELS<br />
∆u =<br />
λu<br />
The membranes are fixed at the boundaries, that is, a homogeneous Dirichlet<br />
boundary condition applies for all boundaries.<br />
(15-1)
Results<br />
The eigenvalues show that the domains are isospectral. This is one of the eigenmodes<br />
for the first domain:<br />
The eigenvalues are the same for the other domain. The sign of the eigenfunction is<br />
arbitrary and can vary from case to case:<br />
ISOSPECTRAL DRUMS | 599
Using Richardson extrapolation, the results for the first six eigenvalues of the two<br />
domains agree to at least five decimal places with the established values in Ref. 3.<br />
Another postprocessing step shows that the eigensolutions are orthogonal by<br />
integrating the product of two different eigensolutions.<br />
Modeling in <strong>COMSOL</strong> Multiphysics<br />
Build two <strong>COMSOL</strong> Multiphysics models that solve the eigenvalue PDE on two<br />
different 2D domains and compare the sets of eigenvalues. To achieve higher accuracy<br />
in the results, use Richardson extrapolation, which increases the accuracy if you know<br />
the behavior of the numerical error.<br />
The model also shows how to use the with operator to access different eigenmodes<br />
during postprocessing.<br />
References<br />
1. M. Kac, “Can one hear the shape of a drum?,” American Math. Mon.,73 Part II<br />
(1966), pp. 1–23.<br />
2. C. Gordon, D. Webb, and S. Wolpert, “Isospectral plane domains and surfaces via<br />
Riemannian orbifolds,” Invent. Math., 110 (1992), pp. 1–22.<br />
3. T. Driscoll, “Eigenmodes of isospectral drums,” Technical Report-Center for<br />
Theory and Simulation in Science and Engineering, Cornell University, Ithaca,<br />
N.Y., CTC95TR209, May 1995.<br />
Model Library path: <strong>COMSOL</strong>_Multiphysics/Benchmarks/isospectral_drum_1<br />
Modeling Using the Graphical User Interface<br />
MODEL NAVIGATOR<br />
1 From the Space dimension list, select 2D.<br />
2 In the Application Modes tree, choose <strong>COMSOL</strong> Multiphysics>PDE Modes>PDE,<br />
Coefficient Form>Eigenvalue analysis.<br />
3 Make sure Lagrange - Quadratic elements are selected, then click OK.<br />
600 | CHAPTER 15: BENCHMARK MODELS
GEOMETRY MODELING—THE FIRST ISOSPECTRAL DRUM<br />
1 Press Shift and then click the Line button on the Draw toolbar.<br />
2 In the Line dialog box, go to the Coordinates area and enter the following data:<br />
PROPERTY EXPRESSION<br />
x -3 -3 1 1 3 1 -1 -1<br />
y -3 -1 3 1 1 -1 -1 -3<br />
3 From the Style list, select Closed polyline (solid), then click OK.<br />
4 Click the Zoom Extents button on the Main toolbar.<br />
PHYSICS SETTINGS<br />
Subdomain Settings<br />
The following equation describes a general eigenvalue PDE:<br />
– ∇ ⋅ ( c∇u + αu)<br />
+ β∇u + au =<br />
daλu Thus, to implement the PDE in Equation 15-1 use the default values c = 1 and d a = 1.<br />
All other coefficients are equal to 0 by default (the source term f is 1 but it is not part<br />
of the eigenvalue PDE).<br />
Boundary Conditions<br />
There is no need to change the boundary coefficients. The default Dirichlet condition<br />
u = 0 on the boundary is correct. This value corresponds to clamping the drum’s<br />
membrane at the edges.<br />
MESH GENERATION<br />
Click the Initialize Mesh button on the Main toolbar to create a mesh.<br />
COMPUTING THE SOLUTION<br />
Click the Solve button on the Main toolbar to compute the solution. The default<br />
setting gives the six lowest eigenvalues.<br />
POSTPROCESSING AND VISUALIZATION<br />
Plot some of the eigenfunctions associated with the eigenvalues. Select the<br />
corresponding eigenvalue from the Eigenvalue list on the General page in the Plot<br />
Parameters dialog box. The plot shows the oddly shaped drum seen from above.<br />
ISOSPECTRAL DRUMS | 601
Model Library path: <strong>COMSOL</strong>_Multiphysics/Benchmarks/isospectral_drum_2<br />
GEOMETRY MODELING—THE SECOND ISOSPECTRAL DRUM<br />
1 Shift-click the Line button on the Draw toolbar.<br />
2 Enter the following data in the Coordinates area of the Line dialog box:<br />
PROPERTY EXPRESSION<br />
x -3 1 1 3 1 -1 -1 -3<br />
y 1 1 3 1 -1 -1 -3 -1<br />
3 From the Style list, select Closed polyline (solid), then click OK.<br />
4 Click the Zoom Extents button on the Main toolbar.<br />
PHYSICS SETTINGS<br />
In specifying PDE and boundary coefficients, follow the same procedure as for the first<br />
drum.<br />
POSTPROCESSING<br />
Showing that the Eigenmodes are Orthogonal<br />
Use the with operator to access different eigenmodes in order to show that they are<br />
orthogonal:<br />
1 From the Postprocessing menu, choose Subdomain Integration.<br />
2 Select Subdomain 1.<br />
3 Type with(1,u)*with(2,u) in the Expression edit field. This specifies an integrand<br />
that is the product of the first and the second eigenmode.<br />
4 Click OK.<br />
The value, which should be very small (on the order of 10 −15 ), appears in the message<br />
log at the bottom of the <strong>COMSOL</strong> Multiphysics user interface. Ideally, the result<br />
should be zero when the eigenmodes are orthogonal, but using a numerical method<br />
you can expect a small nonzero number.<br />
602 | CHAPTER 15: BENCHMARK MODELS
Note: The following section requires that you run <strong>COMSOL</strong> Multiphysics with<br />
MATLAB.<br />
To improve the accuracy of the eigenvalues, continue with MATLAB using Richardson<br />
extrapolation. First export the model:<br />
From the File menu, choose Export FEM Structure. Then continue with the instructions<br />
on Richardson extrapolation in the section below.<br />
Modeling Using the Programming Language<br />
The following sequence of commands finds the eigenvalues and the corresponding<br />
eigenfunctions for the first drum:<br />
1 Initialize the FEM structure and create the geometry and mesh:<br />
clear fem<br />
fem.shape = 2;<br />
fem.sshape = 2;<br />
fem.geom = poly2([-3,-3, 1, 1, 3, 1, -1, -1], ...<br />
[-3,-1,3,1,1,-1,-1,-3]);<br />
fem.mesh = meshinit(fem);<br />
fem.mesh = meshrefine(fem);<br />
2 The eigenvalue PDE coefficients c and d for this problem are c = 1 and d = 1. Setting<br />
h to 1 ensures zero Dirichlet conditions on the boundaries:<br />
fem.equ.c = 1;<br />
fem.equ.da = 1;<br />
fem.bnd.h = 1;<br />
3 Create the extended mesh and call the eigenvalue solver. Find the resulting<br />
eigenvalues in the field fem.sol.lambda.<br />
fem.xmesh = meshextend(fem);<br />
fem.sol = femeig(fem);<br />
4 To plot the fourth eigenfunction as a surface plot, type<br />
postplot(fem,'tridata','u','solnum',4,'axisequal','on');<br />
5 To model the second drum, replace the line defining the geometry with the<br />
following:<br />
fem.geom = poly2([-3,-3, 1, 1, 3, 1, -1, -1], ...<br />
[-1,1,1,3,1,-1,-1,-3]);<br />
ISOSPECTRAL DRUMS | 603
RICHARDSON EXTRAPOLATION<br />
The Richardson extrapolation part assumes that you have already created an FEM<br />
structure, either by exporting from <strong>COMSOL</strong> Multiphysics or by following the<br />
command-line instructions.<br />
1 To begin, export or create the FEM structure for the first drum.<br />
2 For the Richardson extrapolation, you need three meshes of different levels of<br />
refinement. To save the previous results, copy the FEM structure into three new<br />
FEM structures:<br />
fem1 = fem;<br />
fem2 = fem;<br />
fem3 = fem;<br />
3 First create a coarse mesh and solve the problem:<br />
fem1.mesh = meshinit(fem1);<br />
fem1.mesh = meshrefine(fem);<br />
fem1.xmesh = meshextend(fem1);<br />
fem1.sol = femeig(fem1);<br />
604 | CHAPTER 15: BENCHMARK MODELS<br />
The field fem1.sol.lambda now contains the first six eigenvalues.<br />
4 Second, create an intermediate mesh by refining the coarse mesh and then solve the<br />
problem:<br />
fem2.mesh = meshrefine(fem1);<br />
fem2.xmesh = meshextend(fem2);<br />
fem2.sol = femeig(fem2);<br />
5 Now create a fine mesh by refining again and solve the problem:<br />
fem3.mesh = meshrefine(fem2);<br />
fem3.xmesh = meshextend(fem3);<br />
fem3.sol = femeig(fem3);<br />
6 Now you can extrapolate these three results. To do so you must know the error<br />
behavior. The numerical eigenvalue λ h differs from the exact eigenvalue λ according<br />
to<br />
4 3 ⁄<br />
λh λ c1h c2h 3 ≈<br />
+ + + …<br />
where h is the mesh parameter describing the length of the typical triangle edges. The<br />
exponent 4/3 appears in the error due to the occurrence of concave corners in the<br />
geometry and does not depend on the element order. The second term corresponds<br />
to the standard error of the finite element method using second-order Lagrange<br />
elements.
Because you have three meshes with the parameters h, h/2, and h/4, and because you<br />
also have the three corresponding numerical eigenvalues λ h, λ h/2, and λ h/4, you can<br />
solve for the unknowns λ, c 1 , and c 2 . This procedure yields a linear system<br />
that you can solve by entering the following commands:<br />
v = [1;1/2;1/4]*ones(1,3);<br />
e = ones(3,1)*[0 4/3 4];<br />
A = v.^e;<br />
b = [fem1.sol.lambda;fem2.sol.lambda;fem3.sol.lambda];<br />
x = A\b<br />
lambda1 = x(1,:)<br />
The vector lambda1 now contains the extrapolated values for the first drum. Notice<br />
that the extrapolated values are all smaller than the corresponding non-extrapolated<br />
values. This is because solving an eigenvalue problem is related to solving a certain<br />
equivalent minimization problem, and a better numerical solution typically<br />
corresponds to a lower value. You can also observe the same effect when refining the<br />
mesh (see the vector b as created above).<br />
Now export or create the FEM structure corresponding to the second drum and<br />
repeat the steps above. For comparison, remember to rename the lambda1 vector, for<br />
example, lambda2.<br />
Finally, compare the Richardson extrapolation results for the first six eigenvalues of the<br />
two domains and note that they agree to at least five decimal places.<br />
2.537944 3.655510 5.175560 6.537563 7.248088 9.209311<br />
2.537944 3.655512 5.175560 6.537560 7.248088 9.209319<br />
Scientists have determined values for the first six eigenvalues, and they appear in the<br />
list below to approximately 12 decimal places (Ref. 3).<br />
2.53794399980<br />
3.65550971352<br />
5.17555935622<br />
6.53755744376<br />
7.24807786256<br />
9.20929499840<br />
1 1 1<br />
4 3<br />
1 ( 1⁄ 2)<br />
⁄<br />
( 1 ⁄ 2)<br />
3<br />
4 3<br />
1 ( 1⁄ 4)<br />
⁄<br />
( 1 ⁄ 4)<br />
3<br />
λ<br />
c1 c2 =<br />
λ h<br />
λh ⁄ 2<br />
λh ⁄ 4<br />
ISOSPECTRAL DRUMS | 605
606 | CHAPTER 15: BENCHMARK MODELS
INDEX<br />
A absorbing boundary condition 590<br />
AC/DC Module 55<br />
acoustic energy 13<br />
acoustics 5<br />
of a muffler 12<br />
ALE 259, 429<br />
algebraic multigrid preconditioner 65<br />
anode 492<br />
antinode 23<br />
aperture, of fracture 283<br />
application modes<br />
Convection and Conduction 358<br />
Incompressible Navier-Stokes 357<br />
Structural Mechanics 533<br />
arbitrary Lagrangian-Eulerian technique<br />
259<br />
Archimedes’ force 392<br />
Argyris elements 204<br />
integration order for 208<br />
aspect ratios<br />
avoiding large in geometries 153<br />
axis settings 361<br />
B backstep model 204<br />
benchmark<br />
drag coefficient 216<br />
lift coefficient 216<br />
benchmark models 597<br />
bias, in diode model 498<br />
bipolar junction transistor 456<br />
Black-Scholes equation 100<br />
Bohr radius 447<br />
Boltzmann transport theory 475, 492<br />
Boolean operation 61<br />
boundary condition<br />
absorbing 590<br />
symmetry 493<br />
boundary integration 371<br />
Boussinesq approximation 358, 392<br />
bulk concentration, in transport and ad-<br />
sorption model 33<br />
buoyancy force 358, 392<br />
C capacitance 93, 97<br />
computing 94<br />
capacitor 93<br />
cardiac tissue, signal propagation in 118<br />
cathode 492<br />
coefficient of friction 571<br />
complex Landau-Ginzburg equations 119<br />
Component Library 303<br />
components, merging 312<br />
compressible inviscid flow 252<br />
<strong>COMSOL</strong> Multiphysics Subsystem 349<br />
Constants dialog box 360<br />
constants, defining 360<br />
constitutive relations in electromagnet-<br />
ics 56<br />
contact surface, in shock-tube problems<br />
255<br />
Convection and Conduction application<br />
mode 358<br />
convection-diffusion equation, in transport<br />
and adsorption model 34<br />
coupling variable 328<br />
coupling, local 411<br />
crankshaft 522<br />
cross-section plot 490<br />
cubic law equation 283<br />
current density 55<br />
cylinder, flow of fluid past 211<br />
D damping, in muffler 14<br />
de Vries 138<br />
INDEX| 607
608 | INDEX<br />
dest operator 130<br />
differential algebraic system 318<br />
differential-algebraic equation system<br />
404<br />
diffraction patterns 590<br />
diffusion coefficient 283<br />
diode 492<br />
doping of 496<br />
forward bias region 500<br />
direct solver 65<br />
discontinuous basis functions 177<br />
discontinuous elements 176<br />
discontinuous Galerkin method 177<br />
dispersion tensor 273<br />
distributed SPICE model of integrated bi-<br />
polar transistor 456<br />
divergence 358<br />
divergence operator 283<br />
divergence-free element 204<br />
doping 492<br />
doping function, for diode 496<br />
drag coefficient 216<br />
dynamic viscosity 50, 338, 358<br />
dynamical system 342<br />
E eigenfrequencies<br />
excited by speakers 23<br />
for empty room 22<br />
of a room 21<br />
eigenmodes<br />
classes of 22<br />
of a room 21<br />
eigenvalue analysis 522<br />
electric charge density 55<br />
electric displacement 55<br />
electric energy, in capacitor 93<br />
electric field 55<br />
electric flux density 55<br />
electric potential 66<br />
electromagnetics models 55<br />
electron energy distribution function 183<br />
element, Argyris 204<br />
error behavior for eigenvalue solution<br />
604<br />
Euler equations of gas dynamics 252<br />
European stock option 100<br />
excitable media 118<br />
extrusion coupling variables, for handling<br />
nonlocal couplings 190<br />
Eytelwein’s equation 571<br />
F fanout 474<br />
feeder clamp, deformation of 529<br />
Fermi level 493<br />
ferrohydrodynamics 376<br />
fifth-order element<br />
Argyris 204<br />
FitzHugh-Nagumo equations 119<br />
fluid valve 230<br />
fluid-structure interaction 414, 423<br />
flywheel, optimizing profile of 104<br />
fractal dimension 284<br />
free surface flow 259<br />
friction 571<br />
G gas dynamics 252<br />
gate variable 120<br />
Gauss’ law 57<br />
geophysics 270<br />
grid settings 361<br />
groundwater flow 270<br />
H heat capacity 344<br />
heat source 344<br />
heat transfer 357<br />
heat transfer application mode 343<br />
Heat Transfer Module 132<br />
heating with a moving laser 292<br />
Helmholtz equation 22, 590
higher-order elements 204, 384<br />
hydraulic head 283<br />
hydraulic jumps 146<br />
hydrogen atom 445<br />
I ideality factor, in diode equation 500<br />
Incompressible Navier-Stokes applica-<br />
tion mode 336, 357<br />
initial value 497<br />
integral constraints 190<br />
integrating on boundary 371<br />
integration order<br />
Argyris element 208<br />
interface conditions 414<br />
inviscid flow 252<br />
isospectral drums 598<br />
isospectral membranes 598<br />
iterative solver 65<br />
IV characteristics 498<br />
K Karman vortex street 211<br />
KdV equation 138<br />
Korteweg 138<br />
L Lagrange elements 384<br />
Lagrange multipliers 261, 497<br />
laminar flow, analytical expression for 35<br />
Landau-Ginzburg equations 119<br />
laser beams 292<br />
lift coefficient 216<br />
loaded knee, optimization of 548<br />
loading model 373<br />
Lorentz force 316<br />
Lorentz’ equation 316<br />
M magnet brake 316<br />
magnetic field intensity 55<br />
magnetic flux density 55<br />
magnetic susceptibility 383<br />
magnetite 159<br />
Marangoni convection 391<br />
materials library 90<br />
Maxwell’s equations 475, 492<br />
merging components 312<br />
micromixer 240<br />
microrobot 403<br />
microrobot model 403<br />
mixer, laminar static 240<br />
modal analysis 522<br />
Model Library 1<br />
Model Library models 5<br />
model simplification<br />
3D to 2D 356<br />
symmetry planes 357<br />
momentum balance 357, 391<br />
MOS transistor 473<br />
moving mesh 259<br />
Moving Mesh application mode 259, 429<br />
MPa units 522<br />
muffler, acoustics model of 12<br />
multicomponent diffusivities 46<br />
multidisciplinary model 342<br />
multiphysics modeling 357<br />
multiphysics models<br />
Marangoni convection 391<br />
microrobot 403<br />
vibrations in milk containers 414<br />
N nanocarrier systems 376<br />
NASTRAN mesh 522<br />
Navier’s equation 414<br />
Navier-Stokes equations 204, 221<br />
nojac operator 195<br />
nonlinear solver 497<br />
nonlocal couplings, handling using extru-<br />
O ODEs 220<br />
sion coupling variables 190<br />
on-off controller 344<br />
optimization<br />
of flywheel profile 104<br />
INDEX| 609
610 | INDEX<br />
of loaded knee structure 548<br />
ordinary differential equation 317, 429<br />
orthogonal eigensolutions 602<br />
output times 373<br />
P p2-p1 elements 214<br />
parametric solver 497<br />
peristaltic pump 423<br />
permeability 76, 317<br />
Petrov-Galerkin streamline diffusion 177,<br />
254<br />
PID controller 331<br />
Planck’s constant 438, 445<br />
Plane Stress<br />
pulley model using 571<br />
plasma dynamics 183<br />
Poisson’s ratio 415<br />
polytropic gas 252<br />
potential between cylinders 5<br />
potential flow 283<br />
preconditioner, algebraic multigrid 65<br />
pressure 21, 283, 415<br />
principal quantum number 440<br />
probability density function 447<br />
for electron’s position 445<br />
process control 331<br />
pulley 571<br />
Q quadratic element 322<br />
quadrupole lens 83<br />
quantum dots 438<br />
quantum mechanics models 437<br />
quantum numbers 446<br />
R radiation view factor 129<br />
rate constant in transport and adsorp-<br />
tion model 34<br />
reaction force operator 212, 216, 218<br />
remanent flux density 383<br />
resonator chambers 12<br />
Reynold’s equation 571<br />
Reynolds equation 283<br />
RF Module 55<br />
Richardson extrapolation 600, 604<br />
rock fracture 283<br />
rock fracture flow 283<br />
room, eigenfrequencies of 21<br />
S Saint-Venant’s shallow water equations<br />
145<br />
sand grain, falling in water 220<br />
Schrödinger equation 438<br />
for electron energy levels 445<br />
seepage velocity 272<br />
semiconductor models<br />
diode 492<br />
MOS transistor 473<br />
set difference 364<br />
shallow water equations 145<br />
shock tube 252<br />
Shockley-Read-Hall recombination 475,<br />
493<br />
SIMP model 548<br />
simplified model<br />
3D to 2D 356<br />
symmetry planes 357<br />
Simulink 318, 324<br />
exporting to 349<br />
skin effect 76<br />
sloshing tank 259<br />
smooth step function 429<br />
solitons 138<br />
solute transport 270<br />
sparsity-pattern plot 190<br />
speed of sound 21<br />
Spherical symmetry 159<br />
spherical symmetry 159<br />
SPICE parameters 458<br />
Stefan’s constant 129
stream function 204<br />
streamline diffusion 177, 253<br />
stress analysis of pulley 571<br />
structural mechanics<br />
application mode 533<br />
Structural Mechanics Module 521<br />
subsurface fluid flow 270<br />
surface concentration, in transport and<br />
adsorption model 33<br />
surface reactions 32<br />
surface tension 391<br />
symmetry boundary condition 475, 493<br />
symmetry planes 357<br />
symmetry, in loads and geometry 530<br />
T tangential derivative variable 36, 153<br />
telegraph equation 169<br />
test functions 261<br />
thermal conductivity 343<br />
thermal controller 342<br />
thermal expansion coefficient 392<br />
thermostat 342<br />
thin structures, modeling of 153<br />
time-dependent simulation 372<br />
time-harmonic solution 21<br />
time-stepping, output times from 373<br />
topology optimization 548<br />
townsend unit 193<br />
transistor, bipolar 456<br />
transmission loss, in muffler 12<br />
transport of species 32<br />
transport problem 176<br />
tubular reactor 32<br />
two-term Boltzmann equation 183<br />
typographical conventions 3<br />
U ultraweak term 179<br />
unit system, MPa 522<br />
upwinding stabilization 178<br />
V variable, for tangential derivative 36<br />
vibrations in milk containers 414<br />
viscous transfer 392<br />
W water waves, modeling of 138<br />
wave equation 21<br />
weak constraints 261, 497<br />
for computation of viscous forces 212<br />
weak form 177<br />
Weak Form, Point application mode 327<br />
weak term 181<br />
wetting-layer system 438<br />
Winslow smoothing 260<br />
Y Young’s modulus 415<br />
INDEX| 611
612 | INDEX