Parent Guide to Teen Driving - Washington Department of Licensing
Parent Guide to Teen Driving - Washington Department of Licensing
Parent Guide to Teen Driving - Washington Department of Licensing

Create successful ePaper yourself
Turn your PDF publications into a flip-book with our unique Google optimized e-Paper software.
DEPARTMENT OF LICENSING<br />
The Washing<strong>to</strong>n<br />
<strong>Parent</strong> <strong>Guide</strong><br />
<strong>to</strong> <strong>Teen</strong> <strong>Driving</strong><br />
dol.wa.gov
Parts <strong>of</strong> this guide were developed by<br />
the Idaho <strong>Department</strong> <strong>of</strong> Education and<br />
the State <strong>of</strong> Oregon. Permission has<br />
been given <strong>to</strong> revise and reproduce for<br />
Washing<strong>to</strong>n State. Special thanks go<br />
<strong>to</strong> the State <strong>of</strong> Montana, and Jessica<br />
Har<strong>to</strong>s for their contributions and input.<br />
We provide this guide <strong>to</strong> help you<br />
teach good driving habits. It has<br />
information you can use <strong>to</strong> help reduce<br />
risk. The information in this guide is<br />
not intended <strong>to</strong> be comprehensive.<br />
Use good judgment when you adapt<br />
this information <strong>to</strong> different driving<br />
situations and conditions.
welcome<br />
<strong>to</strong> the world <strong>of</strong> teen driving<br />
We know you want <strong>to</strong> keep your children safe. <strong>Teen</strong>s are<br />
much more at-risk than the rest <strong>of</strong> the population due <strong>to</strong><br />
their inexperience at handling driving situations. The State <strong>of</strong><br />
Washing<strong>to</strong>n passed intermediate licensing laws in 2001 <strong>to</strong><br />
keep teens safe and it’s working - the number <strong>of</strong> fatalities and<br />
collisions have gone down more than 30%.<br />
One <strong>of</strong> the best ways <strong>to</strong> keep teens safe is <strong>to</strong> make sure<br />
they have had adequate instruction. Every hour <strong>of</strong> instruction<br />
keeps them safer on the road, especially as they pass<br />
through the later stages <strong>of</strong> intermediate licensing when you’re<br />
not with them.<br />
Recent research shows that parents report more driving<br />
practice time than their teen. We know that parents mean<br />
well, but unless you are keeping track <strong>of</strong> practice time, your<br />
teen may not be completing all <strong>of</strong> the required hours. It<br />
might be tempting not <strong>to</strong> keep a log or <strong>to</strong> report more driving<br />
practice than is actually completed, but don’t give in, even if<br />
your teen says they are ready <strong>to</strong> take their test. It’s important<br />
<strong>to</strong> track hours because the more practice you give your teen,<br />
the safer they are.<br />
Did you know…?<br />
It will take more than 15 minutes <strong>of</strong> practice-time every day<br />
for 6 months <strong>to</strong> complete 50 hours <strong>of</strong> practice-driving.<br />
It will take more than 30 minutes <strong>of</strong> practice time every day<br />
for 6 months <strong>to</strong> complete 100 hours <strong>of</strong> practice driving.<br />
Use the driving log in the center <strong>of</strong> this book <strong>to</strong> help you track<br />
your driving time <strong>to</strong>gether and your teen’s progress.<br />
<strong>Teen</strong>s are sometimes so focused on getting their license,<br />
they don’t have the restrictions fully in mind. Restrictions<br />
include not having friends in the vehicle and not driving<br />
between 1 am and 5 am. To help you and your teen know
the details and keep the restrictions handy, the last page <strong>of</strong><br />
this manual lists the restrictions and has a space <strong>to</strong> record<br />
the date they end. You can cut out this page and post it on<br />
your refrigera<strong>to</strong>r.<br />
It’s important for teens <strong>to</strong> know what will happen if they break<br />
the intermediate license rules. With that in mind, the other<br />
side <strong>of</strong> the page that you can cut out outlines some <strong>of</strong> the<br />
major things that can happen and how these can affect the<br />
driving privilege. As you already know, one <strong>of</strong> the best ways<br />
<strong>to</strong> teach teens responsibility is <strong>to</strong> outline both the rules and<br />
the consequences for breaking them. The cut-out may help <strong>to</strong><br />
reinforce these.<br />
A study completed in Oregon in January, 2005, reviewed the<br />
records <strong>of</strong> 16, 17, 18, and 19-year old drivers. It compared<br />
teens who <strong>to</strong>ok a formal driver education course <strong>to</strong> those who<br />
chose 100 hours <strong>of</strong> driving practice with their parents. For<br />
teens who <strong>to</strong>ok an approved driver education course:<br />
The collision rate was -2 % lower.<br />
The traffic conviction rate was 39-57% lower.<br />
The driver license suspension rate was 5 -53% lower.<br />
The best teacher is a good role model. Responsible driving<br />
is one <strong>of</strong> the most important things you can do <strong>to</strong> keep your<br />
teen safe. We hope this guide will be valuable <strong>to</strong> both you and<br />
your teen throughout your learning experience.<br />
the Washing<strong>to</strong>n parent guide <strong>to</strong><br />
teen driving
table <strong>of</strong><br />
contents<br />
<strong>Parent</strong>s’ Role n the World <strong>of</strong> <strong>Teen</strong> Dr v ng<br />
What is the <strong>Parent</strong>’s Role in <strong>Teen</strong> <strong>Driving</strong>?. . . . . . . . . . . . . . . . . . . 1<br />
What <strong>Parent</strong>s Need <strong>to</strong> Know . . . . . . . . . . . . . . . . . . . . . . . . . . . . . 3<br />
High-Risk <strong>Driving</strong> Conditions . . . . . . . . . . . . . . . . . . . . . . . . . . . . . 4<br />
Superv se Your <strong>Teen</strong> Dr ver<br />
Tips for Supervising <strong>Teen</strong> <strong>Driving</strong>. . . . . . . . . . . . . . . . . . . . . . . . . . 5<br />
Use a Practice <strong>Driving</strong> Log. . . . . . . . . . . . . . . . . . . . . . . . . . . . . . . 6<br />
Each Time You Practice: . . . . . . . . . . . . . . . . . . . . . . . . . . . . . . . . . 7<br />
Set Fam ly Rules and Gu del nes for Dr v ng<br />
Use a <strong>Parent</strong>-<strong>Teen</strong> <strong>Driving</strong> Agreement. . . . . . . . . . . . . . . . . . . . . . 8<br />
<strong>Driving</strong> Rules/<strong>Guide</strong>lines for Your Family . . . . . . . . . . . . . . . . . . . . 8<br />
Provide a Safe, Reliable Vehicle for Your <strong>Teen</strong> . . . . . . . . . . . . . . . . 9<br />
Impose Consequences for Violating Rules and Ignoring <strong>Guide</strong>lines 9<br />
Before You Even Beg n<br />
<strong>Teen</strong> Driver Training Orientation . . . . . . . . . . . . . . . . . . . . . . . . . . 11<br />
<strong>Parent</strong> Tips for Training Your <strong>Teen</strong> Driver . . . . . . . . . . . . . . . . . . . 13<br />
Vehicle Safety Features . . . . . . . . . . . . . . . . . . . . . . . . . . . . . . . . 13<br />
Know the Vehicle . . . . . . . . . . . . . . . . . . . . . . . . . . . . . . . . . . . . . 15<br />
Blind Spots . . . . . . . . . . . . . . . . . . . . . . . . . . . . . . . . . . . . . . . . . . 16<br />
An Exercise <strong>to</strong> Become Familiar with Blind Spots . . . . . . . . . . . . 17<br />
Bas c Dr v ng Sk lls<br />
Au<strong>to</strong>matic or Manual Transmission?. . . . . . . . . . . . . . . . . . . . . . . 18<br />
Steering Control . . . . . . . . . . . . . . . . . . . . . . . . . . . . . . . . . . . . . . 18<br />
Speed Control. . . . . . . . . . . . . . . . . . . . . . . . . . . . . . . . . . . . . . . . 19<br />
Lane Positions . . . . . . . . . . . . . . . . . . . . . . . . . . . . . . . . . . . . . . . 21<br />
Following Time . . . . . . . . . . . . . . . . . . . . . . . . . . . . . . . . . . . . . . . 22<br />
Searching Skills . . . . . . . . . . . . . . . . . . . . . . . . . . . . . . . . . . . . . . 23<br />
Communication with Other Drivers. . . . . . . . . . . . . . . . . . . . . . . . 24<br />
Use <strong>of</strong> Headlights . . . . . . . . . . . . . . . . . . . . . . . . . . . . . . . . . . . . . 24<br />
Pract ce Dr v ng Log. . . . . . . . . . . . . . . . . . . . . . . . . . . . . . . . . . 26<br />
Step-By-Step Maneuvers<br />
First Things First. . . . . . . . . . . . . . . . . . . . . . . . . . . . . . . . . . . . . . 38<br />
Entering the Vehicle . . . . . . . . . . . . . . . . . . . . . . . . . . . . . . . . . . . 38<br />
Making Adjustments . . . . . . . . . . . . . . . . . . . . . . . . . . . . . . . . . . . 39<br />
Starting the Vehicle. . . . . . . . . . . . . . . . . . . . . . . . . . . . . . . . . . . . 40
Secure the Vehicle After <strong>Driving</strong>. . . . . . . . . . . . . . . . . . . . . . . . . . 41<br />
Backing. . . . . . . . . . . . . . . . . . . . . . . . . . . . . . . . . . . . . . . . . . . . . 41<br />
Backing Up Straight . . . . . . . . . . . . . . . . . . . . . . . . . . . . . . . . . . . 42<br />
Backing Turns . . . . . . . . . . . . . . . . . . . . . . . . . . . . . . . . . . . . . . . . 43<br />
Backing in<strong>to</strong> a Driveway . . . . . . . . . . . . . . . . . . . . . . . . . . . . . . . . 44<br />
Backing Out <strong>of</strong> a Driveway . . . . . . . . . . . . . . . . . . . . . . . . . . . . . . 44<br />
Parking . . . . . . . . . . . . . . . . . . . . . . . . . . . . . . . . . . . . . . . . . . . . . 45<br />
Entering Angle Parking. . . . . . . . . . . . . . . . . . . . . . . . . . . . . . . . . 45<br />
Exiting Angle Parking . . . . . . . . . . . . . . . . . . . . . . . . . . . . . . . . . . 46<br />
Perpendicular Parking . . . . . . . . . . . . . . . . . . . . . . . . . . . . . . . . . 47<br />
Backing in<strong>to</strong> Perpendicular Parking Space. . . . . . . . . . . . . . . . . . 48<br />
Parallel Parking. . . . . . . . . . . . . . . . . . . . . . . . . . . . . . . . . . . . . . . 49<br />
Exiting a Parallel Parking Space. . . . . . . . . . . . . . . . . . . . . . . . . . 49<br />
Parking on Hills. . . . . . . . . . . . . . . . . . . . . . . . . . . . . . . . . . . . . . . 50<br />
Good Habits/Proper Procedures for Parking on Hills . . . . . . . . . . 50<br />
Turns. . . . . . . . . . . . . . . . . . . . . . . . . . . . . . . . . . . . . . . . . . . . . . . 51<br />
Right Turns With a Required S<strong>to</strong>p . . . . . . . . . . . . . . . . . . . . . . . . 51<br />
Right Turns Without a Required S<strong>to</strong>p . . . . . . . . . . . . . . . . . . . . . . 52<br />
Left Turns With a Required S<strong>to</strong>p. . . . . . . . . . . . . . . . . . . . . . . . . . 54<br />
Left Turns Without a Required S<strong>to</strong>p . . . . . . . . . . . . . . . . . . . . . . . 54<br />
Bicycles on the Roadway . . . . . . . . . . . . . . . . . . . . . . . . . . . . . . . 56<br />
Complex Dr v ng Sk lls<br />
Changing Lanes . . . . . . . . . . . . . . . . . . . . . . . . . . . . . . . . . . . . . . 57<br />
Passing. . . . . . . . . . . . . . . . . . . . . . . . . . . . . . . . . . . . . . . . . . . . . 58<br />
Entering the Freeway . . . . . . . . . . . . . . . . . . . . . . . . . . . . . . . . . . 60<br />
Exiting the Freeway . . . . . . . . . . . . . . . . . . . . . . . . . . . . . . . . . . . 61<br />
Railroad Grade Crossings . . . . . . . . . . . . . . . . . . . . . . . . . . . . . . 62<br />
School Zones . . . . . . . . . . . . . . . . . . . . . . . . . . . . . . . . . . . . . . . . 63<br />
Crosswalks . . . . . . . . . . . . . . . . . . . . . . . . . . . . . . . . . . . . . . . . . . 64<br />
Night <strong>Driving</strong>. . . . . . . . . . . . . . . . . . . . . . . . . . . . . . . . . . . . . . . . . 65<br />
Skid Recovery . . . . . . . . . . . . . . . . . . . . . . . . . . . . . . . . . . . . . . . 66<br />
<strong>Driving</strong> in Bad Weather. . . . . . . . . . . . . . . . . . . . . . . . . . . . . . . . . 66<br />
Emergenc es —How <strong>to</strong> Handle Them<br />
Vehicle Malfunctions. . . . . . . . . . . . . . . . . . . . . . . . . . . . . . . . . . . 67<br />
If You Have a Collision . . . . . . . . . . . . . . . . . . . . . . . . . . . . . . . . . 69<br />
If You’re S<strong>to</strong>pped by Law Enforcement . . . . . . . . . . . . . . . . . . . . . 70<br />
What Happens f Your <strong>Teen</strong> Messes Up?<br />
What Happens Until Age 18? . . . . . . . . . . . . . . . . . . . . . . . . . . . . 71<br />
Tough Penalties for First-Year Convictions . . . . . . . . . . . . . . . . . . 71<br />
The Rules for Intermed ate L censes<br />
What is Needed <strong>to</strong> Qualify for a License . . . . . . . . . . . . . . . . . . . 73<br />
After Your <strong>Teen</strong> Gets a License. . . . . . . . . . . . . . . . . . . . . . . . . . . 73<br />
v
parents’ role<br />
in the world <strong>of</strong> teen driving<br />
PWhat s the <strong>Parent</strong>’s Role<br />
n <strong>Teen</strong> Dr v ng?<br />
• Knowing the intermediate license laws<br />
• Knowing all you can about teen driving<br />
• Supervising your teen’s driving<br />
• Establishing family driving rules and limits<br />
Fulfilling the parent’s role in teen driving is very important.<br />
Being a good role model will allow you <strong>to</strong>:<br />
• Know you are increasing your teen’s ability <strong>to</strong> drive safely.<br />
• Know first hand how your teenager is progressing <strong>to</strong>ward<br />
becoming a better driver.<br />
• Know where your teen is and that she or he is not taking<br />
unnecessary risks.<br />
• Talk <strong>to</strong> your teen about substance abuse.<br />
Washing<strong>to</strong>n’s Intermediate License law increases the safety<br />
<strong>of</strong> teen drivers by giving them more time <strong>to</strong> gain valuable<br />
driving experience before becoming fully licensed. Under this<br />
law your teen will get a “restricted” license.<br />
Instruct on Perm t<br />
Your teen:<br />
• Must be at least 15 and enrolled in a traffic safety<br />
education course.<br />
• Must pass a written test if 15-1/2 and not enrolled in a<br />
traffic safety education course.<br />
• May not drive unless another individual that has a valid<br />
license and at least five years <strong>of</strong> driving experience<br />
supervises while sitting beside the driver.
Intermed ate L cense<br />
Your teen:<br />
• Must be at least 16.<br />
• Must pass our driver licensing exam.<br />
• Must hold an instruction permit for at least 6 months before<br />
applying for an intermediate license.<br />
• Must complete at least 50 hours <strong>of</strong> supervised driving, and<br />
10 <strong>of</strong> these hours must happen at night.<br />
• For the first 6 months cannot carry passengers younger<br />
than 20 (other than immediate family).<br />
• For the second 6 months cannot carry more than 3<br />
passengers younger than 20 (other than immediate family).<br />
• For the first year, cannot drive between 1 am and 5 am<br />
unless accompanied by a parent, guardian, or a licensed<br />
driver who is at least 25 years old.<br />
Restrictions are au<strong>to</strong>matically lifted after 1 year if your teen:<br />
• Has not been involved in an au<strong>to</strong> collision<br />
• Has not been convicted <strong>of</strong> or found <strong>to</strong> have committed<br />
a rules-<strong>of</strong>-the-road traffic <strong>of</strong>fense or violated any <strong>of</strong> the<br />
intermediate license restrictions.<br />
On your teen’s 18th birthday, the license au<strong>to</strong>matically<br />
becomes a basic driver license, without the intermediate<br />
restrictions. There is no need <strong>to</strong> visit a driver licensing <strong>of</strong>fice<br />
<strong>to</strong> change it.<br />
2
What <strong>Parent</strong>s Need <strong>to</strong> Know<br />
Dr v ng R sks<br />
<strong>Driving</strong> can be a dangerous activity for anyone; however, it<br />
is more dangerous for young drivers. Novice teen drivers are<br />
involved in collisions more than any other age group. These<br />
are some <strong>of</strong> the reasons:<br />
• Young age/Lack <strong>of</strong> matur ty: <strong>Teen</strong>agers can make more<br />
errors in judgment than those in other age groups. Be<br />
aware that your teen is likely <strong>to</strong> drive differently and <strong>to</strong> take<br />
more risks when you are not in the vehicle.<br />
• Bra n development: <strong>Teen</strong>s should be the world’s best<br />
drivers. Their muscles are well <strong>to</strong>ned, their reaction time is<br />
quick, and their eye-hand coordination is at a peak. Yet<br />
coll s ons k ll more teens than any other cause — a<br />
problem, some researchers believe, that is rooted in the<br />
adolescent brain. A National Institutes <strong>of</strong> Health study<br />
suggests that the region <strong>of</strong> the brain that inhibits risky<br />
behavior is not fully formed until age 25.<br />
• R sky dr v ng behav ors: <strong>Teen</strong>agers may engage in risky<br />
driving behaviors. These include speeding, running red and<br />
yellow lights, running s<strong>to</strong>p signs, tailgating, weaving in and<br />
out <strong>of</strong> traffic, not keeping a safe distance for merging or<br />
changing lanes, misjudging gaps in traffic, and misjudging<br />
the capability <strong>of</strong> their vehicle.<br />
• D stract ons: Any new or inexperienced driver is<br />
challenged when faced with distractions while driving.<br />
Music, cell phones, pets, and passengers should be left at<br />
home while your teen is learning <strong>to</strong> drive.<br />
3
•<br />
Dr v ng nexper ence: <strong>Teen</strong>agers lack driving experience.<br />
It takes a lot <strong>of</strong> practice <strong>to</strong> be able <strong>to</strong> safely maneuver in<br />
everyday situations and unexpected circumstances. <strong>Teen</strong>s<br />
show the greatest improvement within the first year and<br />
1,000 miles <strong>of</strong> driving. They continue <strong>to</strong> improve through<br />
their first 5,000 miles <strong>of</strong> driving.<br />
H gh-R sk Dr v ng Cond t ons<br />
• Dr v ng under the nfluence <strong>of</strong> alcohol or drugs:<br />
Drinking any — yes, any — amount <strong>of</strong> alcohol is impairing.<br />
Not only is the use <strong>of</strong> alcohol and illicit drugs illegal, the<br />
combination <strong>of</strong> alcohol or drugs and driving can be deadly.<br />
• H gh speeds: For teen drivers (especially males), most<br />
severe collisions occur at high speeds. Collision risk,<br />
severity, and force increase as speed increases.<br />
• Passengers: For teen drivers, as the number <strong>of</strong><br />
passengers increases, teen collisions increase. <strong>Driving</strong> is a<br />
“new skill” for teens, and they need <strong>to</strong> pay close attention.<br />
<strong>Teen</strong> passengers can be a major distraction. They may<br />
encourage friends <strong>to</strong> speed, <strong>to</strong> show <strong>of</strong>f, or <strong>to</strong> pay <strong>to</strong>o little<br />
attention <strong>to</strong> driving.<br />
• N ghtt me dr v ng: For teen drivers, the most severe<br />
collisions occur at night and on weekends. Night driving is<br />
a challenge for all drivers, and teen drivers do not have the<br />
experience <strong>to</strong> anticipate and react <strong>to</strong> nighttime conditions<br />
when visibility is poor. Make sure your teen gets plenty <strong>of</strong><br />
practice driving with you at night and in all kinds <strong>of</strong> weather.<br />
Be aware that teenagers driving at night usually lack adult<br />
supervision, carry passengers, and drive at high speeds.<br />
All <strong>of</strong> these multiply risk.<br />
•<br />
Safety belt non-use: <strong>Teen</strong> drivers and passengers use<br />
safety belts less than people in other age groups do. Safety<br />
belts are important because they keep people inside the<br />
vehicle where they are the safest.
Ssupervise your teen driver<br />
Driver education is the beginning <strong>of</strong> the process <strong>of</strong><br />
learning <strong>to</strong> drive. <strong>Teen</strong>s also need many hours<br />
T ps for Superv s ng <strong>Teen</strong> Dr v ng<br />
<strong>of</strong> practice <strong>to</strong> become safer drivers.<br />
Pract ce, pract ce, pract ce! Practice as much as possible,<br />
even after your teen gets a license.<br />
•<br />
•<br />
•<br />
•<br />
•<br />
Who: Practice with only you and your teen in the vehicle.<br />
Other people or pets can distract both <strong>of</strong> you and can also<br />
add stress. Stay calm and focused. Mistakes are part <strong>of</strong><br />
learning, and even though practice driving is serious, it<br />
should be interesting and engaging.<br />
What: You should practice the same driving skills that your<br />
teen is learning. Begin with basic skills such as turning,<br />
parking, and backing up. Then, practice more complex<br />
skills such as changing lanes and merging.<br />
When: In the beginning, practice during daylight hours<br />
with good weather. As your teen’s skills improve, gradually<br />
expose them <strong>to</strong> different roads, weather conditions, and<br />
hours <strong>of</strong> the day.<br />
Where: In the beginning, practice in safe, low-risk driving<br />
areas. Start in empty parking lots or on remote roads. As<br />
your teen’s skills improve, progress <strong>to</strong> quiet neighborhood<br />
streets and later <strong>to</strong> busier roads and highways.<br />
Why: Learning <strong>to</strong> drive is a complex and ongoing process.<br />
New drivers need a lot <strong>of</strong> practice <strong>to</strong> handle daily driving<br />
hazards and unexpected situations. <strong>Teen</strong>s will show the<br />
greatest improvement in the first 1,000 <strong>to</strong> 5,000 miles <strong>of</strong><br />
driving. Both parents and teens need <strong>to</strong> be dedicated and<br />
responsible <strong>to</strong> make the most <strong>of</strong> this time.<br />
5
The leading cause <strong>of</strong> death among 15-24 year olds<br />
in Washing<strong>to</strong>n is due <strong>to</strong> mo<strong>to</strong>r vehicle crashes<br />
Use a Pract ce Dr v ng Log<br />
Use the driving log in the center <strong>of</strong> this book <strong>to</strong> track your<br />
teen’s practice driving and progress.<br />
Dr ver Educat on<br />
Formal driver education may be the most important class<br />
teenagers take. Driver education promotes critical lifelong<br />
skills, proper safety belt use, alcohol- and drug-free driving,<br />
respect, courtesy, cooperation, and healthy behaviors and<br />
choices. The Washing<strong>to</strong>n driver training program is saving<br />
lives, reducing injuries, and dramatically reducing the<br />
negative impacts <strong>of</strong> teen driving by making our teens better<br />
and safer drivers.<br />
<strong>Parent</strong>s, educa<strong>to</strong>rs, state <strong>of</strong>ficials, students, and community<br />
members need <strong>to</strong> create powerful partnerships <strong>to</strong> support<br />
teaching and learning in every community. We need <strong>to</strong><br />
guarantee that young drivers are taught preventive behaviors<br />
<strong>to</strong> manage risk. Since driving is a life-long skill, it is important<br />
<strong>to</strong> establish good habits early. Ask if your local school <strong>of</strong>fers<br />
a driver education course. If not, there are driver training<br />
schools throughout the state. When your teen applies for a<br />
license, a Washing<strong>to</strong>n Traffic Safety Education Completion<br />
Certificate satisfies 30 hours <strong>of</strong> classroom and 6 hours<br />
<strong>of</strong> behind-the-wheel training requirements. Your teen will<br />
still need <strong>to</strong> complete 50 hours <strong>of</strong> practice driving, and 10<br />
<strong>of</strong> these hours must happen at night, with you or another<br />
licensed driver with at least 5 years <strong>of</strong> driving experience.
Each T me You Pract ce:<br />
• Be n the “pract c ng mood.” Practice when both <strong>of</strong> you<br />
are in good moods, are well rested, and have enough time.<br />
• Adjust the m rrors, safety belts, seats, and steer ng<br />
wheel pos t on before start ng the veh cle.<br />
• Always wear your safety belts.<br />
• Come <strong>to</strong> a complete s<strong>to</strong>p at s<strong>to</strong>p signs and at red lights.<br />
• Before mov ng from a s<strong>to</strong>p, look left, then front (straight<br />
ahead), and then right.<br />
• Keep your eyes mov ng. Use your mirrors <strong>to</strong> check<br />
around and behind the vehicle every 6-8 seconds.<br />
• Keep at least a 2- second space between your vehicle<br />
•<br />
and others in traffic flow. Try <strong>to</strong> stay centered in your lane <strong>of</strong><br />
travel.<br />
Avo d the “No-Zone” with trucks or buses. This is about<br />
15 feet on all sides <strong>of</strong> the truck. If you cannot see truck<br />
drivers in their<br />
mirrors, they cannot<br />
see you either.<br />
NO-ZONE<br />
• Speed ncreases<br />
brak ng d stance.<br />
NO-ZONE<br />
NO-ZONE<br />
Doubling your speed<br />
will quadruple your<br />
braking distance. The<br />
faster you’re going<br />
the longer it takes <strong>to</strong><br />
s<strong>to</strong>p.<br />
NO-ZONE<br />
• Veh cle we ght ncreases brak ng d stance. Doubling<br />
your vehicle weight will double your braking distance. If you<br />
are driving a large vehicle or <strong>to</strong>wing a trailer, it takes longer<br />
<strong>to</strong> s<strong>to</strong>p.<br />
7
Sset family rules<br />
and guidelines for driving<br />
Washing<strong>to</strong>n law sets requirements for teen driving, but families<br />
need <strong>to</strong> establish further rules and limits for their teen drivers.<br />
Make sure that family rules are very clear from the beginning.<br />
Talk <strong>to</strong> your teen about driving every chance you get.<br />
Use a <strong>Parent</strong>-<strong>Teen</strong> Dr v ng Agreement<br />
Use a parent-teen driving agreement <strong>to</strong> establish rules and<br />
guidelines for your teen driver, and <strong>to</strong> make sure everyone is<br />
clear about them! A sample agreement can be found on our<br />
website at dol.wa.gov.<br />
Dr v ng Rules/Gu del nes for Your Fam ly<br />
• Requ re safety belt use: This applies <strong>to</strong> your teen and all<br />
passengers at all times.<br />
• Proh b t alcohol and/or drug use: This applies <strong>to</strong> your<br />
teen as the driver <strong>of</strong> any vehicle.<br />
• Proh b t r d ng w th someone who has used alcohol<br />
or drugs: This applies <strong>to</strong> your teen as the passenger in<br />
another vehicle.<br />
• Requ re compl ance w th speed l m ts: Stress that this<br />
applies <strong>to</strong> all roads at all times because collisions at higher<br />
speeds kill.<br />
• Proh b t d stract ons wh le dr v ng: No cell phone use,<br />
eating, drinking, pets, or changing radio or CDs while<br />
driving.
•<br />
•<br />
•<br />
L m t teen passengers: According <strong>to</strong> Washing<strong>to</strong>n’s laws,<br />
with an intermediate license, your teen cannot drive with<br />
non-family passengers under age 20 for the first 6 months,<br />
and can drive with no more than 3 non-family passengers<br />
under age 20 for the second 6 months. Limiting<br />
passengers reduces distractions and the temptation <strong>of</strong><br />
risky behavior.<br />
L m t unsuperv sed n ght dr v ng: According <strong>to</strong><br />
Washing<strong>to</strong>n’s laws, your teen cannot drive between 1 am<br />
and 5 am for the first year unless they are supervised.<br />
Statistics show that teens have a higher collision rate<br />
during these hours. Consider setting an earlier driving<br />
curfew, especially on the weekends, for the first 6 months<br />
your teen drives unsupervised.<br />
Requ re a full report: Ask for information about each trip<br />
before your teen leaves, including where they are going,<br />
with whom, and when they will return so that you know<br />
where they are.<br />
Prov de a Safe, Rel able Veh cle for Your <strong>Teen</strong><br />
• Mid- <strong>to</strong> full-size sedans and station wagons with smaller<br />
engines and airbags are safest for teen drivers.<br />
• Under certain conditions, small trucks and SUVs may be<br />
more prone <strong>to</strong> roll-overs than other types <strong>of</strong> vehicles.<br />
• High-performance cars may encourage teens <strong>to</strong> drive<br />
beyond their experience level.<br />
Impose Consequences for V olat ng Rules<br />
and Ignor ng Gu del nes<br />
• The consequence for violating rules or ignoring guidelines<br />
should be the loss <strong>of</strong> the driving privilege: for a day,<br />
weekend, week, month, etc., depending on the violation.<br />
Consequences other than the loss <strong>of</strong> the driving privilege<br />
won’t send these messages as effectively: “You must be a<br />
responsible driver” and “I am serious about your following<br />
the rules and limits for driving.”<br />
• Requiring your teen <strong>to</strong> complete additional supervised<br />
practice is an option worth considering.<br />
9
Make consequences known: Set consequences for<br />
violations before they occur so that your teen knows what <strong>to</strong><br />
expect. The following are common violations:<br />
• Getting a speeding ticket.<br />
• Coming home after curfew.<br />
• Lying about whereabouts.<br />
• Violating passenger restrictions.<br />
0
B before<br />
you even begin<br />
In 2005 Washing<strong>to</strong>n teens were twice as likely<br />
as other drivers <strong>to</strong> be involved in a collision.<br />
So, before you even get in<strong>to</strong> the vehicle, make sure<br />
that both you and your teen understand the basics.<br />
<strong>Teen</strong> Dr ver Tra n ng Or entat on<br />
Before you begin training, make sure you know common teen<br />
driving errors and ways you can help your teen be a better<br />
driver.<br />
Top 0 Dr v ng Errors<br />
• Inattention <strong>to</strong> the path <strong>of</strong> travel<br />
• <strong>Driving</strong> five or more miles per hour <strong>to</strong>o fast for conditions<br />
• <strong>Driving</strong> <strong>to</strong>o fast through a curve<br />
• Inadequate search or inattention at an intersection and<br />
failing <strong>to</strong> yield <strong>to</strong> cross traffic<br />
• Improper evasive action — quick turn not done correctly<br />
• Failure <strong>to</strong> look far enough ahead<br />
• Failure <strong>to</strong> see action developing at the side <strong>of</strong> the roadway<br />
• Following <strong>to</strong>o closely<br />
• Failure <strong>to</strong> yield right-<strong>of</strong>-way<br />
•<br />
Being distracted
Aggress ve Dr v ng<br />
Drivers who routinely speed, run red lights and s<strong>to</strong>p signs,<br />
tailgate, and otherwise disregard the safety <strong>of</strong> other mo<strong>to</strong>rists<br />
are turning streets and highways in<strong>to</strong> high-risk areas.<br />
Aggressive driving can easily escalate in<strong>to</strong> road rage. We’re<br />
all <strong>to</strong>o familiar with s<strong>to</strong>ries <strong>of</strong> mo<strong>to</strong>rists who’ve killed or injured<br />
other drivers for seemingly trivial reasons.<br />
When s t Aggress ve Dr v ng?<br />
The following attitudes and behaviors indicate that problem<br />
driving behaviors are related <strong>to</strong> aggression rather than<br />
inexperience:<br />
• Constant rushing, lane jumping, and the need <strong>to</strong> “get<br />
ahead.”<br />
• Ignoring road signs and regulations.<br />
• Constantly ridiculing and criticizing other drivers.<br />
• Denying entry in<strong>to</strong> your lane or preventing passing.<br />
• Speeding past another vehicle, revving engine.<br />
• Tailgating so others go faster or get out <strong>of</strong> your way.<br />
• Honking, yelling, or making visible, insulting gestures.<br />
When You Are Confronted by Aggress ve Dr vers:<br />
• First and foremost, make every attempt <strong>to</strong> get out <strong>of</strong> their<br />
way.<br />
• Put your pride in the back seat. Do not challenge them by<br />
speeding up or attempting <strong>to</strong> “hold-your-own” in your travel<br />
lane.<br />
• Avoid eye contact.<br />
• Ignore gestures and refuse <strong>to</strong> return them.<br />
• Report aggressive drivers <strong>to</strong> the proper authorities by<br />
giving a vehicle description, license number, location, and<br />
if possible, the direction <strong>of</strong> travel.<br />
• If you have a cell phone and can use it safely, call 911.<br />
2
<strong>Parent</strong> T ps for Tra n ng Your <strong>Teen</strong> Dr ver<br />
Set a good example<br />
You should always model correct, legal driving behavior<br />
for your teen driver. Also, make sure you and your teen are<br />
familiar with all controls and safety devices in each <strong>of</strong> the<br />
family vehicles.<br />
Expect that your teen w ll make m stakes<br />
Making mistakes is part <strong>of</strong> learning so be positive and calm.<br />
Try <strong>to</strong> separate physical errors (like turning the wheel <strong>to</strong>o<br />
soon) from mental errors (like not detecting a problem) and<br />
coach your teen accordingly. Always praise correct driving<br />
behaviors.<br />
G ve d rect ons clearly, calmly, and well n advance<br />
Explain why and how <strong>to</strong> do things in a s<strong>of</strong>t, steady voice.<br />
Do not assume your teenager knows what you want them<br />
<strong>to</strong> do.<br />
Stay focused and ready<br />
Remember, you are the responsible driver <strong>of</strong> the car so<br />
constantly scan the driving scene and be ready <strong>to</strong> react <strong>to</strong><br />
any driving situation.<br />
• Make sure that you verbally guide your teen through<br />
situations well in advance <strong>of</strong> trouble<br />
• If necessary, be ready <strong>to</strong> react <strong>to</strong> any driving situation and<br />
assist with verbal or physical steering guidance..<br />
Veh cle Safety Features<br />
It is important that you and your teen understand the safety<br />
features in each <strong>of</strong> your vehicles. Together, read your<br />
veh cle manuals for nformat on about, and the proper<br />
use <strong>of</strong>, veh cle safety features.<br />
Safety Belts<br />
In 2005 and 2006, Washing<strong>to</strong>n averaged 471 traffic fatalities<br />
yearly. More than 1 in 3 victims were not wearing safety belts.<br />
Washing<strong>to</strong>n law requires children under 8 years old <strong>to</strong> be in<br />
a child safety or booster seat unless they are 4´9˝ or taller.<br />
Children under age 13 must ride in the back seat where it is<br />
practical <strong>to</strong> do so. Air bags were designed <strong>to</strong> work for adultsized<br />
people, and they can be lethal <strong>to</strong> children.<br />
3
Each <strong>of</strong> the following can significantly reduce injuries in the<br />
event <strong>of</strong> a collision. Pract ce each <strong>of</strong> these w th your teen:<br />
• Read manufacturer’s instructions for proper use <strong>of</strong> safety<br />
belts and car seats.<br />
• Wear safety belts.<br />
• Have children under age 13 sit in the back seat.<br />
• Place children correctly in proper child restraints.<br />
A r bags<br />
Airbags and safety belts are designed <strong>to</strong> be used <strong>to</strong>gether. Air<br />
bags and safety belts keep you in the safest positions during<br />
a collision. Depending on your vehicle, you may have front or<br />
side air bags or both.<br />
Air bags can deploy at speeds <strong>of</strong> up <strong>to</strong> 200 mph and<br />
temperatures <strong>of</strong> almost 500 degrees. The deployment and<br />
deflation happens faster than the eye can see. Front and side<br />
impacts will activate air bags.<br />
Proper Procedures for Use<br />
• Read vehicle manuals <strong>to</strong> know where airbags are located<br />
and when and how they deploy.<br />
•<br />
Sit at least 10 inches from the steering wheel.<br />
Does your Veh cle have Ant lock Brake Systems (ABS)?<br />
Most vehicles made in the last 10 years have antilock brake<br />
systems. ABS is designed <strong>to</strong> help a driver maintain control<br />
during emergency braking situations by keeping the tires<br />
from locking up. However, it does not make a vehicle s<strong>to</strong>p<br />
more quickly. In fact, the rolling traction may produce longer<br />
s<strong>to</strong>pping distances on some dry or limited traction surfaces<br />
such as loose gravel or fresh snow.<br />
Some vehicles are equipped with ABS on all 4 wheels.<br />
Others, such as light pickup trucks, only have ABS on the<br />
rear wheels. Check your vehicle manuals <strong>to</strong> see if you have<br />
ABS and if so, on which wheels.
How Do You Use ABS?<br />
Vehicles with ABS require the foot <strong>to</strong> remain firmly on the<br />
brake pedal when braking hard. This allows the system <strong>to</strong><br />
au<strong>to</strong>matically pump the brakes faster than any person could.<br />
The system usually activates at speeds above 10 mph.<br />
• W th ABS on all wheels, do not pump the brakes. Keep<br />
•<br />
firm pressure on the brake, and if needed, steer away from<br />
the hazard using a minimum amount <strong>of</strong> steering.<br />
W th ABS on the rear wheels only, the front wheels can<br />
lock up. Pump the brakes <strong>to</strong> avoid lock-up.<br />
Know the Veh cle<br />
You and your teen need <strong>to</strong> be familiar with the vehicle<br />
controls and should be able <strong>to</strong> make certain that the vehicle<br />
is safe <strong>to</strong> operate.<br />
Veh cle Controls<br />
In each <strong>of</strong> your vehicles, have your teen practice and then<br />
demonstrate the ability <strong>to</strong> operate each <strong>of</strong> the following<br />
without looking at the controls:<br />
• Transmission<br />
• Turn signals<br />
• Headlights – low and high beams<br />
• Climate controls<br />
• Defrost – front and back<br />
• Door locks<br />
• Window controls<br />
• Parking brake – set and release levers<br />
• Brake and gas pedals<br />
5
Veh cle Read ness<br />
In each <strong>of</strong> your vehicles, have your teen practice and then<br />
demonstrate the ability <strong>to</strong> make certain that the vehicle is<br />
safe <strong>to</strong> operate. Check that the:<br />
• Windows and headlights are clear<br />
• Tires are properly inflated<br />
• Mechanical condition has been checked regularly<br />
• Loose objects get secured in the trunk<br />
• Parking brake works<br />
•<br />
Signal lights and brake lights work<br />
Bl nd Spots<br />
Coach your teen <strong>to</strong> be aware <strong>of</strong> blind spots and regularly<br />
scan them.<br />
They should:<br />
1. Check <strong>to</strong> the rear with the inside mirror.<br />
2. Check <strong>to</strong> the sides with the side-view mirrors.<br />
3. Make a blind spot check in the area slightly beyond the<br />
driver’s peripheral field <strong>of</strong> vision.<br />
4. Look out <strong>of</strong> the front side windows, not the rear side<br />
windows, when checking the mirror blind spot areas.<br />
New drivers tend <strong>to</strong> move the steering wheel in the direction<br />
they move their head. Watch for this and correct if necessary.
An Exerc se <strong>to</strong> Become Fam l ar w th Bl nd Spots<br />
The following exercise shows the area around the vehicle the<br />
driver cannot see:<br />
• While your teen is sitting in the driver’s seat with the engine<br />
<strong>of</strong>f, get out <strong>of</strong> the vehicle and stand close <strong>to</strong> the front<br />
bumper facing the driver.<br />
• Begin taking steps backward and have your teen tap the<br />
horn when he or she can see your feet.<br />
• Place a cone or cup in that spot. This is the pavement area<br />
in front <strong>of</strong> the vehicle that cannot be seen when looking out<br />
<strong>of</strong> the windshield.<br />
• Ask the driver <strong>to</strong> use the inside mirror and/or <strong>to</strong> look over<br />
the right shoulder, and repeat this process <strong>to</strong> the rear <strong>of</strong><br />
the vehicle.<br />
• Walk backwards from the passenger doors on the left and<br />
right sides <strong>of</strong> the vehicle and place cups or cones <strong>to</strong> mark<br />
the side areas visible <strong>to</strong> the driver.<br />
• Have your teen measure these distances and record them.<br />
7
asic<br />
driving skills<br />
BThe basic driving skills in this section are the corners<strong>to</strong>ne <strong>of</strong><br />
safe and responsible driving. Make sure your teen learns,<br />
practices, and can demonstrate these basic driving skills.<br />
Au<strong>to</strong>mat c or Manual Transm ss on?<br />
If possible, new drivers should first learn the basic controls in<br />
a vehicle with au<strong>to</strong>matic transmission and then learn <strong>to</strong> drive<br />
a standard shift vehicle.<br />
Steer ng Control<br />
Modern vehicles require very little steering <strong>to</strong> turn. Look at<br />
the steering wheel as a clock face and place your left hand<br />
between 8 and 9 o’clock and right hand between 3 and<br />
4 o’clock. These are the desired hand positions<br />
that help keep you from turning the wheel<br />
<strong>to</strong>o sharply.<br />
To reduce forearm and hand injuries,<br />
hands should be placed on the lower
half <strong>of</strong> the steering wheel, with knuckles on the outside and<br />
thumbs stretched along the rim <strong>of</strong> the steering wheel.<br />
Make sure your teen learns, practices, and can demonstrate<br />
the following three steering techniques:<br />
Pull-Push Steer ng<br />
Use pull-push steering for most turning maneuvers. Put<br />
your hands in the 8 and 4 o’clock positions. Pull down with<br />
one hand and push up with the other. This results in smooth<br />
steering and reduces the potential for <strong>to</strong>o much steering,<br />
which can lead <strong>to</strong> loss <strong>of</strong> control. Keep the hands and thumbs<br />
on the outside <strong>of</strong> the wheel.<br />
Hand-Over-Hand Steer ng<br />
Use hand-over-hand steering when steering movements are<br />
critical. Use it when parking, making sharp right turns, and<br />
correcting a skid. Use quick movements when beginning<br />
the maneuver, and then use slow smooth movements when<br />
straightening the wheel. Steering errors are directly related <strong>to</strong><br />
vision errors.<br />
One-Hand Steer ng<br />
Use one-hand steering for backing maneuvers that do not<br />
require full left or right turns, or when operating vehicle<br />
controls for information, safety, or comfort.<br />
Speed Control<br />
Speed control techniques are used <strong>to</strong> make smooth starts,<br />
s<strong>to</strong>ps, and turns. These improve fuel efficiency and personal<br />
comfort. These keep the vehicle balanced, increasing vehicle<br />
9
control and decreasing risk <strong>to</strong> yourself and others. Cruise<br />
control is not recommended for the beginning driver.<br />
Make sure your teen learns, practices, and can demonstrate<br />
the following acceleration and braking techniques:<br />
L ght Accelerat on<br />
Light acceleration is achieved by putting light pressure on the<br />
gas pedal. Use it <strong>to</strong> make smooth starts and <strong>to</strong> begin turns<br />
that require a s<strong>to</strong>p.<br />
Progress ve Accelerat on<br />
Progressive acceleration is achieved by steadily increasing<br />
pressure on the gas pedal. Use it <strong>to</strong> get your speed up <strong>to</strong> the<br />
limit. Continue <strong>to</strong> apply the gas until you have reached your<br />
desired speed, then use steady, even pressure <strong>to</strong> keep it.<br />
Cover Brake<br />
Cover braking is achieved by placing the ball <strong>of</strong> your right<br />
foot so that it “hovers” over the brake pedal. Use it when you<br />
anticipate braking.<br />
Controlled Brake<br />
Controlled braking is achieved by applying firm, steady, and<br />
even pressure on the brake pedal. Use it in non-emergency<br />
situations. Apply the brake <strong>to</strong> the point <strong>of</strong> resistance, then use<br />
steady, even pressure.<br />
Tra l Brake<br />
Trail braking is achieved by slightly decreasing pressure on<br />
the brake pedal. Use it during the last two seconds <strong>of</strong> a s<strong>to</strong>p<br />
in order <strong>to</strong> avoid any jerky sensations, <strong>to</strong> back up, <strong>to</strong> inch<br />
forward, <strong>to</strong> drive at a walking pace, and <strong>to</strong> begin a moving<br />
turn.<br />
Threshold Brake<br />
Threshold braking is achieved by applying maximum force<br />
<strong>to</strong> the brake pedal without locking the wheels. Use it in<br />
emergency situations.<br />
20
Lane Pos t ons<br />
Lane positions refer <strong>to</strong> where<br />
your vehicle is in the lane (it does<br />
not refer <strong>to</strong> changing lanes).<br />
Lane positions are used <strong>to</strong><br />
communicate your intentions <strong>to</strong><br />
other drivers and position your<br />
vehicle for a driving maneuver.<br />
Make sure your teen learns,<br />
practices, and can demonstrate the<br />
following three lane positions:<br />
Lane Pos t on<br />
Lane position 1 is in the center <strong>of</strong><br />
the lane. This position allows for<br />
the best separation and distance<br />
from obstacles (such as vehicles,<br />
curbs, and so on) <strong>to</strong> the right and<br />
left.<br />
Use lane position 1 for normal<br />
driving conditions if you have no<br />
plan <strong>to</strong> change driving maneuvers.<br />
Lane Pos t on 2<br />
Lane position 2 is the left side <strong>of</strong><br />
the lane. This position allows for<br />
the best separation from obstacles<br />
on the right and helps <strong>to</strong> improve<br />
your l ne <strong>of</strong> s ght.<br />
Use lane position 2 for left turns<br />
and parking on the left.<br />
Lane Pos t on 3<br />
Lane position 3 is the right side <strong>of</strong><br />
the lane. This position allows for<br />
the best separation from obstacles<br />
on the left and helps <strong>to</strong> improve<br />
your l ne <strong>of</strong> s ght.<br />
Use lane position 3 for parking on<br />
the right.<br />
2
Follow ng T me<br />
Following time is important<br />
for many reasons. You need<br />
enough distance between<br />
you and the vehicle in front<br />
<strong>of</strong> you <strong>to</strong> have time <strong>to</strong> react<br />
in an emergency.<br />
Make sure your teenager<br />
learns, practices, and can<br />
demonstrate the ability <strong>to</strong><br />
judge speed and distance by<br />
using following time.<br />
Determ ne Follow ng T me<br />
To determine following time,<br />
watch as the vehicle in front <strong>of</strong><br />
you passes a stationary object,<br />
such as a road sign. Then, start<br />
counting “one-one-thousand,<br />
two-one-thousand, three-onethousand,<br />
four-one-thousand,”<br />
until you reach the same object.<br />
“One-one-thousand” is about one<br />
second.<br />
Ma nta n 2- Seconds <strong>of</strong><br />
Follow ng T me<br />
Follow at 2 or more seconds when traveling at speeds<br />
under 30 mph.<br />
Follow at or more seconds when traveling:<br />
• At speeds over 30 mph<br />
• In congested traffic<br />
• In poor weather conditions<br />
• Behind a mo<strong>to</strong>rcycle, truck, or bus<br />
22<br />
Definitions<br />
L ne <strong>of</strong> s ght: what you can<br />
see in any area you are looking.<br />
If you are going forward it is the<br />
area you can see in the front <strong>of</strong><br />
the vehicle. If you are backing it is<br />
the area you see <strong>to</strong> the rear.<br />
L ne <strong>of</strong> s ght obstacles:<br />
anything that restricts your view<br />
and the ability <strong>to</strong> gather accurate<br />
information. Examples include<br />
curves in the road, hill crests,<br />
bushes, signs, parked vehicles,<br />
large vehicles, and inclement<br />
weather such as fog and rain.
Make Speed and Space Adjustments<br />
•<br />
•<br />
•<br />
Anytime the driver in front <strong>of</strong> you reduces speed, adjust<br />
your following time so you can see at least 12-15 seconds<br />
ahead.<br />
When traffic or environmental conditions warrant, increase<br />
following time.<br />
Change position within the lane <strong>to</strong> increase l ne <strong>of</strong> s ght.<br />
Search ng Sk lls<br />
A common cause <strong>of</strong> poor driving and collisions is failing <strong>to</strong><br />
see the problem. Make sure your teen learns, practices,<br />
and can demonstrate searching skills including: searching<br />
intersections, and reading signs, signals, markings, and<br />
the instrument panel. One-third <strong>of</strong> all collisions happen at<br />
intersections.<br />
See a Clear Path<br />
Before you step on the gas, always choose your path <strong>of</strong><br />
travel and be sure that it is clear before moving the vehicle in<br />
that direction.<br />
Turn Your Head<br />
Before turning the steering wheel, turn your head in the<br />
direction you intend <strong>to</strong> travel. When you look <strong>to</strong> see what is<br />
in your path <strong>of</strong> travel before you move the vehicle in that<br />
direction, there should be no surprises and no need for quick,<br />
unplanned maneuvers, such as slamming on your brakes or<br />
making sudden lane changes.<br />
Check Your Bl nd Spot<br />
Do a chin-<strong>to</strong>-shoulder turn <strong>of</strong> your head before you pull in<strong>to</strong><br />
traffic, or change lanes.<br />
Do a 3 0 Degree Search<br />
Physically turn your head and body <strong>to</strong> look all the way around<br />
your vehicle before you move in reverse or parallel park.<br />
23
Search Area for Potent al<br />
Problems<br />
Look for any changes or<br />
obstacles. Search 20-30<br />
seconds ahead <strong>of</strong> the vehicle<br />
<strong>to</strong> gather information about<br />
your path <strong>of</strong> travel. Search<br />
12-15 seconds ahead <strong>of</strong> the<br />
vehicle <strong>to</strong> plan your path <strong>of</strong><br />
travel and keep 2-4 seconds<br />
following time.<br />
Check the Rearv ew M rror<br />
Check the rearview mirror after<br />
seeing a change <strong>to</strong> conditions<br />
ahead <strong>of</strong> you, before and after<br />
braking, while s<strong>to</strong>pped in traffic,<br />
before and after turning, and<br />
before and after changing lanes.<br />
Commun cat on w th Other Dr vers<br />
Always communicate your intentions <strong>to</strong> other drivers. Make<br />
sure your teen knows the communication options and when<br />
<strong>to</strong> use them.<br />
Turn s gnals: Use turn signals <strong>to</strong> communicate in which<br />
direction you plan <strong>to</strong> travel.<br />
Lane pos t ons: Use lane positions <strong>to</strong> communicate your<br />
plans <strong>to</strong> change driving maneuvers.<br />
Headl ghts: Use headlights <strong>to</strong> be more visible <strong>to</strong> others.<br />
Horn: Use the horn whenever it can prevent a collision.<br />
Do not use it <strong>to</strong> encourage someone <strong>to</strong> drive faster or get<br />
out <strong>of</strong> your way, <strong>to</strong> greet friends, or around blind pedestrians,<br />
bicyclists, or when approaching horses.<br />
2<br />
Definitions<br />
Bl nd spot: the area that is not<br />
visible until you turn your head<br />
and look.<br />
Path <strong>of</strong> travel: the area you<br />
want the vehicle <strong>to</strong> go <strong>to</strong>.<br />
Path <strong>of</strong> travel obstacles:<br />
anything that interferes with your<br />
vehicle going where you want it <strong>to</strong><br />
go. Examples include s<strong>to</strong>p signs,<br />
speed bumps, yield signs, red or<br />
yellow traffic lights, pedestrians,<br />
mo<strong>to</strong>rcycles, bicycles, animals,<br />
and vehicles <strong>to</strong> the front, rear,<br />
and side.
Use <strong>of</strong> Headl ghts<br />
Washing<strong>to</strong>n law requires headlights <strong>to</strong> be on from 1/2 hour<br />
after sunset until a 1/2 hour before sunrise. You must also use<br />
headlights any time conditions make it difficult <strong>to</strong> see other<br />
people or vehicles.<br />
Low Beam Headl ghts<br />
Use low beam headlights when traveling:<br />
• At all times if possible<br />
• During the day, especially at dawn or dusk<br />
• On heavily traveled roads with traffic going in both<br />
directions<br />
• At night in well-lit areas<br />
• In fog, rain, snow, or mist<br />
• When following 300 feet or less behind another vehicle<br />
H gh Beam Headl ghts<br />
Use high beam headlights when traveling at night in dimly lit<br />
areas when there are no oncoming vehicles.<br />
Sw tch From H gh <strong>to</strong> Low Beams<br />
Switch from high <strong>to</strong> low beams when a vehicle approaches<br />
you in the opposite direction at night. Washing<strong>to</strong>n law<br />
requires you <strong>to</strong> dim your high beams whenever an oncoming<br />
vehicle is within 500 feet.<br />
If the other driver fails <strong>to</strong> switch <strong>to</strong> low beams, you need <strong>to</strong><br />
slow down, use lane pos t on 3, and move your eyes <strong>to</strong> the<br />
right edge <strong>of</strong> the road until the vehicle passes. Do not look<br />
n<strong>to</strong> oncom ng headl ghts or flash h gh beam l ghts at<br />
others. Headlight glare can temporarily blind you.<br />
Definition<br />
Lane pos t on 3: the right<br />
side <strong>of</strong> the lane.<br />
25
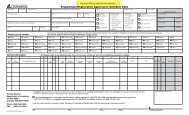
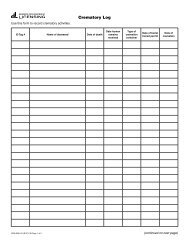
Pract ce Dr v ng Log<br />
Use this log <strong>to</strong> track your teen’s behind-the-wheel practice<br />
and progress.<br />
Time Cumulative Driver’s Adult’s<br />
Date Session <strong>to</strong>pic (hrs/min) hours initials initials
Pract ce Dr v ng Log<br />
Use this log <strong>to</strong> track your teen’s behind-the-wheel practice<br />
and progress.<br />
Time Cumulative Driver’s Adult’s<br />
Date Session <strong>to</strong>pic (hrs/min) hours initials initials
Pract ce Dr v ng Log<br />
Use this log <strong>to</strong> track your teen’s behind-the-wheel practice<br />
and progress.<br />
Time Cumulative Driver’s Adult’s<br />
Date Session <strong>to</strong>pic (hrs/min) hours initials initials
Pract ce Dr v ng Log<br />
Use this log <strong>to</strong> track your teen’s behind-the-wheel practice<br />
and progress.<br />
Time Cumulative Driver’s Adult’s<br />
Date Session <strong>to</strong>pic (hrs/min) hours initials initials
Pract ce Dr v ng Log<br />
Use this log <strong>to</strong> track your teen’s behind-the-wheel practice<br />
and progress.<br />
Time Cumulative Driver’s Adult’s<br />
Date Session <strong>to</strong>pic (hrs/min) hours initials initials
Pract ce Dr v ng Log<br />
Use this log <strong>to</strong> track your teen’s behind-the-wheel practice<br />
and progress.<br />
Time Cumulative Driver’s Adult’s<br />
Date Session <strong>to</strong>pic (hrs/min) hours initials initials
Pract ce Dr v ng Log<br />
Use this log <strong>to</strong> track your teen’s behind-the-wheel practice<br />
and progress.<br />
Time Cumulative Driver’s Adult’s<br />
Date Session <strong>to</strong>pic (hrs/min) hours initials initials
Pract ce Dr v ng Log<br />
Use this log <strong>to</strong> track your teen’s behind-the-wheel practice<br />
and progress.<br />
Time Cumulative Driver’s Adult’s<br />
Date Session <strong>to</strong>pic (hrs/min) hours initials initials
Pract ce Dr v ng Log<br />
Use this log <strong>to</strong> track your teen’s behind-the-wheel practice<br />
and progress.<br />
Time Cumulative Driver’s Adult’s<br />
Date Session <strong>to</strong>pic (hrs/min) hours initials initials
Pract ce Dr v ng Log<br />
Use this log <strong>to</strong> track your teen’s behind-the-wheel practice<br />
and progress.<br />
Time Cumulative Driver’s Adult’s<br />
Date Session <strong>to</strong>pic (hrs/min) hours initials initials
Pract ce Dr v ng Log<br />
Use this log <strong>to</strong> track your teen’s behind-the-wheel practice<br />
and progress.<br />
Time Cumulative Driver’s Adult’s<br />
Date Session <strong>to</strong>pic (hrs/min) hours initials initials
Pract ce Dr v ng Log<br />
Use this log <strong>to</strong> track your teen’s behind-the-wheel practice<br />
and progress.<br />
Time Cumulative Driver’s Adult’s<br />
Date Session <strong>to</strong>pic (hrs/min) hours initials initials
3<br />
step-by-step<br />
maneuvers<br />
F rst Th ngs F rst<br />
The step-by-step maneuvers in this section<br />
are similar <strong>to</strong> those taught in formal driver<br />
education classes in Washing<strong>to</strong>n.<br />
It is important <strong>to</strong> start with the proper procedures for entering<br />
the vehicle, making adjustments, starting the vehicle, and<br />
securing the vehicle. Make sure your teen learns, practices,<br />
and can demonstrate these procedures before you begin<br />
practice driving.<br />
Enter ng the Veh cle<br />
Be Well Rested and Alert<br />
Never drive a vehicle when you are tired or sleepy,<br />
emotionally upset, or under the influence <strong>of</strong> alcohol or drugs<br />
(including prescription and over-the-counter medicines).<br />
Have Key In Hand<br />
When you know you are going <strong>to</strong> your vehicle, have your<br />
key out in your hand. For your personal safety, never search<br />
through your clothes or purse for your keys at your vehicle.<br />
Spend as little time as possible trying <strong>to</strong> open your vehicle.
Approach w th Awareness<br />
As you approach your vehicle, check around it. Then, look<br />
inside <strong>to</strong> ensure no one has entered your vehicle and is<br />
waiting for you. You should park in well-lit areas away from<br />
places where someone could be hiding (bushes, vans, and so<br />
on). Your personal safety could be at risk!<br />
Lock All Doors<br />
The moment you enter your vehicle, lock all doors before you<br />
insert the key in<strong>to</strong> the ignition. Someone can easily jump in<strong>to</strong><br />
an unlocked vehicle.<br />
Insert the key n<strong>to</strong> the gn t on but do not start t yet!<br />
Mak ng Adjustments<br />
Adjust Seat Pos t on<br />
1. Place the seat so that your <strong>to</strong>rso is at least 10 inches from<br />
the steering wheel, and your arms are bent less than 90<br />
degrees at the elbow.<br />
2. Put the ball <strong>of</strong> your right foot on the brake pedal. From your<br />
foot position, make sure you have full range <strong>of</strong> motion in<br />
your ankle, can fully depress the brake without your heel<br />
coming <strong>of</strong>f the floor, and can pivot on your heel <strong>to</strong> put the<br />
ball <strong>of</strong> your foot on the gas pedal.<br />
3. Make adjustments for best vehicle control and personal<br />
comfort.<br />
Adjust Safety Belts<br />
• Put the seat back up straight.<br />
• Sit up straight with your hips and back against the seat.<br />
• Adjust the lap portion <strong>of</strong> the seat belt low across your hips<br />
and pelvis – never across your s<strong>to</strong>mach.<br />
• Adjust the shoulder portion across your chest and<br />
collarbone – never across the front <strong>of</strong> your neck or face,<br />
behind your back, or under your arm.<br />
•<br />
Make sure the lap and shoulder belts are snug.<br />
39
Adjust Wheel T lt<br />
If you have an adjustable steering wheel, tilt it down so<br />
that the <strong>to</strong>p <strong>of</strong> the wheel is no higher than the <strong>to</strong>p <strong>of</strong> your<br />
shoulders.<br />
Adjust Head Restra nt<br />
To best protect you from whiplash injuries, you should adjust<br />
the head restraint so that the <strong>to</strong>p is no higher than the <strong>to</strong>p <strong>of</strong><br />
your ears.<br />
Adjust the M rrors<br />
Th s techn que s gn ficantly reduces the s ze <strong>of</strong> typ cal<br />
bl nd spots. Th s sett ng s great for el m nat ng headl ght<br />
glare <strong>to</strong>o!<br />
• To adjust the dr ver-s de m rror, place your head against<br />
the driver’s side window and adjust the mirror out until you<br />
can just see down the left side <strong>of</strong> your vehicle.<br />
• To adjust the passenger-s de m rror, lean your head <strong>to</strong><br />
the right and in line with the inside rearview mirror. Then<br />
adjust the right outside mirror out until you can just see<br />
down the right side <strong>of</strong> the vehicle.<br />
• To adjust the rearv ew m rror sit straight up with your<br />
hips and back against the seat, and adjust <strong>to</strong> get the best<br />
view out the back window.<br />
Note: Mirrors do not<br />
completely eliminate bl nd<br />
spots. Always do a chin-<strong>to</strong>shoulder<br />
turn <strong>of</strong> your head <strong>to</strong><br />
check bl nd spots before ever<br />
making a lateral maneuver.<br />
Start ng the Veh cle<br />
1. Make sure the transmission is in “PARK” and the parking<br />
brake is set.<br />
2. Place your right foot on the brake and hold it down.<br />
3. Turn the key halfway <strong>to</strong> the “ON” position and allow the<br />
onboard computer <strong>to</strong> boot up.<br />
4. Check gauges and warning lights.<br />
0<br />
Definition<br />
Bl nd spot: the area that is not<br />
visible until you turn your head<br />
and look.
5. Then turn the key the rest <strong>of</strong> the way <strong>to</strong> the “START”<br />
position and release immediately.<br />
6. Keep your headlights on when necessary <strong>to</strong> be visible <strong>to</strong><br />
other drivers.<br />
7. Turn on other necessary accessories – climate control,<br />
wipers, and so on.<br />
8. Before entering traffic, release the parking brake and<br />
signal. Check mirrors, look over your shoulder <strong>to</strong> check<br />
your blind spot and go when clear.<br />
Secure the Veh cle After Dr v ng<br />
1. Place your right foot on the brake and hold it down.<br />
2. Set the parking brake.<br />
3. Shift the transmission <strong>to</strong> “PARK.”<br />
4. Turn <strong>of</strong>f all accessories – lights, wipers, climate control,<br />
and so on.<br />
5. Turn <strong>of</strong>f the vehicle and remove your key from the ignition.<br />
Back ng<br />
Backing increases the risk <strong>of</strong> a collision because it is more<br />
difficult <strong>to</strong> see obstacles behind you. Backing also requires<br />
space <strong>to</strong> maneuver because your back tires do not turn.<br />
When g ven the cho ce, pos t on your veh cle so you can<br />
pull forward nstead.<br />
Make sure your teen learns, pract ces, and can<br />
demonstrate proper back ng procedures.<br />
Common Errors<br />
• Improper body position<br />
• Speed is <strong>to</strong>o fast<br />
• Fails <strong>to</strong> check that the path <strong>of</strong> travel is clear<br />
• Fails <strong>to</strong> look back during the maneuver until the vehicle is<br />
completely s<strong>to</strong>pped<br />
•<br />
Steers incorrectly
2<br />
Back ng Up Stra ght<br />
1. Put your right foot firmly on the brake<br />
pedal.<br />
2. Shift <strong>to</strong> “REVERSE” and release the<br />
parking brake.<br />
3. Do a 3 0 degree search <strong>to</strong> make sure<br />
it is all clear!<br />
4. Yield <strong>to</strong> all pedestrians and vehicles.<br />
5. Hold the steering wheel at the 12<br />
o’clock position.<br />
6. Twist your body and look over your<br />
right shoulder continuously while<br />
backing with occasional side <strong>to</strong> front<br />
glances.<br />
7. Tra l brake (do not accelerate using<br />
the gas pedal) at a walking pace<br />
or even slower when you are near<br />
obstacles, such as vehicles and<br />
pedestrians.<br />
Note: You should never back up long<br />
distances on common roadways – forward<br />
movement is the law!
Back ng Turns<br />
1. Put one hand at the<br />
12 o’clock position and<br />
turn your head in the<br />
direction you intend<br />
the rear <strong>of</strong> the vehicle<br />
<strong>to</strong> travel.<br />
• When turn ng the<br />
rear <strong>of</strong> the veh cle<br />
<strong>to</strong> the r ght, look<br />
back over your right<br />
shoulder.<br />
• When turn ng the<br />
rear <strong>of</strong> the veh cle <strong>to</strong><br />
the left, look back over<br />
your left shoulder.<br />
Definitions<br />
3 0 degree search:<br />
physically turn your head and<br />
body <strong>to</strong> look all the way around<br />
your vehicle.<br />
Tra l brake: a slight decrease<br />
<strong>of</strong> pressure on the brake pedal.<br />
Bl nd spot: the area that is not<br />
visible until you turn your head<br />
and look.<br />
Path <strong>of</strong> travel: the area you<br />
want the vehicle <strong>to</strong> go <strong>to</strong>.<br />
2. Continue <strong>to</strong> look over your shoulder and trail<br />
brake (do not accelerate using the gas pedal)<br />
while moving at a walking pace.<br />
3. Begin the turn when the center <strong>of</strong> the rear tire<br />
is aligned with the curb or edge <strong>of</strong> the road.<br />
3
Back ng n<strong>to</strong> a Dr veway<br />
• Signal once you’ve found a place <strong>to</strong> pull over.<br />
• Check your rearview mirror and bl nd spot for traffic and<br />
pedestrians.<br />
• Leave the traffic lane and s<strong>to</strong>p within 18 inches <strong>of</strong> the curb.<br />
• Shift <strong>to</strong> “REVERSE” and complete a 3 0 degree search <strong>to</strong><br />
make sure it is all clear.<br />
• Look over your shoulder and tra l brake (do not accelerate<br />
using the gas pedal) move at a walking pace.<br />
•<br />
Begin the turn when the center <strong>of</strong> the rear tire is aligned<br />
with the curb.<br />
Back ng Out <strong>of</strong> a Dr veway<br />
1. With your right foot on the brake pedal, shift <strong>to</strong> “REVERSE.”<br />
2. Do a 3 0 degree search <strong>to</strong> make sure it is all clear.<br />
3. Look over your shoulder and tra l brake (do not accelerate<br />
using the gas pedal) at a walking pace.<br />
4. S<strong>to</strong>p short <strong>of</strong> your intended path <strong>of</strong> travel (for example,<br />
before a sidewalk or the roadway). S<strong>to</strong>p before entering<br />
the roadway and make sure you yield <strong>to</strong> all traffic and<br />
pedestrians.<br />
5. Do another 3 0 degree search and when clear, continue<br />
<strong>to</strong> look over your shoulder and tra l brake.<br />
6. Begin the turn when you think the center <strong>of</strong> the rear tire is<br />
aligned with the curb.<br />
7. Complete the turn in the smallest amount <strong>of</strong> space.<br />
8. Step on the brake and shift <strong>to</strong> “DRIVE.”
Park ng<br />
Make sure your teen learns, practices,<br />
and can demonstrate parking in different<br />
situations.<br />
Note: Park ng s ALWAYS proh b ted n<br />
the follow ng s tuat ons:<br />
• In front <strong>of</strong> driveways<br />
• Within 15 feet <strong>of</strong> fire hydrants<br />
• In or near intersections<br />
• On a sidewalk or crosswalk<br />
• Within 30 feet <strong>of</strong> a traffic signal, s<strong>to</strong>p<br />
sign, or yield sign<br />
• Within 20 feet <strong>of</strong> a pedestrian safety zone<br />
Enter ng Angle Park ng<br />
Common Errors When Enter ng Angle<br />
Park ng<br />
• Fails <strong>to</strong> signal<br />
• The vehicle is <strong>to</strong>o close <strong>to</strong> parking space<br />
on the side<br />
• Fails <strong>to</strong> see traffic in the rear<br />
• Speed is <strong>to</strong>o fast<br />
•<br />
Fails <strong>to</strong> target <strong>to</strong> the center <strong>of</strong> space<br />
Proper Procedures for Enter ng Angle<br />
Park ng<br />
1. Signal.<br />
2. Slow or s<strong>to</strong>p the vehicle at least 6-8 feet<br />
from the parking space.<br />
3. Check your bl nd spot on the side <strong>of</strong> the<br />
parking space for traffic and pedestrians.<br />
4. Begin turning when you can see the<br />
center <strong>of</strong> the parking space without your<br />
line <strong>of</strong> sight (or view) cutting across the<br />
parking line.<br />
5
5. Drive very slowly and turn the wheel<br />
sharply <strong>to</strong>ward the center <strong>of</strong> the<br />
space.<br />
6. Once you enter the space, straighten<br />
the wheels and center the vehicle in<br />
the space.<br />
7. S<strong>to</strong>p even with the curb or parking line.<br />
8. Secure your vehicle.<br />
Ex t ng Angle Park ng<br />
Common Errors When Ex t ng Angle<br />
Park ng<br />
• Fails <strong>to</strong> check rear<br />
• Fails <strong>to</strong> signal<br />
• Speed is <strong>to</strong>o fast<br />
• Fails <strong>to</strong> look back while backing<br />
•<br />
Starts turning before bumper is<br />
cleared<br />
Proper Procedures for Ex t ng Angle<br />
Park ng<br />
1. With your foot on the brake, shift <strong>to</strong><br />
“REVERSE.”<br />
2. Do a 360 degree search and yield <strong>to</strong><br />
all traffic and pedestrians.<br />
3. Look over your shoulder and trail<br />
brake (do not accelerate using the<br />
gas pedal) at a walking pace.<br />
4. Check your front for clearance.<br />
5. Begin turning when your front bumper<br />
is even with the rear bumper <strong>of</strong> the<br />
parked vehicle <strong>to</strong> your left or when the<br />
dash <strong>of</strong> your vehicle appears <strong>to</strong> clear<br />
the vehicle <strong>to</strong> the side.<br />
6. Continue <strong>to</strong> look <strong>to</strong> the rear while<br />
backing in<strong>to</strong> the nearest lane.<br />
7. S<strong>to</strong>p smoothly and shift <strong>to</strong> “DRIVE.”
Perpend cular Park ng<br />
Common H gh-R sk Errors<br />
• Fails <strong>to</strong> approach and align <strong>to</strong> space<br />
correctly<br />
• Fails <strong>to</strong> search for, communicate with,<br />
or yield <strong>to</strong> other traffic<br />
• Speed is <strong>to</strong>o fast<br />
• Forgets <strong>to</strong> shift <strong>to</strong> “REVERSE”<br />
• Fails <strong>to</strong> straighten wheels and align in<br />
middle <strong>of</strong> space<br />
Proper Procedures for Perpend cular<br />
Park ng<br />
• Signal and get 6 <strong>to</strong> 8 feet from the<br />
parked vehicles or as far <strong>to</strong> the left <strong>of</strong><br />
the lane as possible.<br />
• Check traffic behind you.<br />
• Drive very slowly and turn the wheel<br />
sharp <strong>to</strong> the right <strong>of</strong> the space.<br />
• Check your right rear fender for<br />
clearance.<br />
• Straighten the wheel when you are<br />
centered in the space.<br />
• If necessary, shift <strong>to</strong> “REVERSE” and<br />
creep back slightly turning the wheel <strong>to</strong><br />
the left.<br />
• Use a forward reference point <strong>to</strong> avoid<br />
hitting a curb.<br />
Cons der Back ng n<strong>to</strong> the Space<br />
• It’s safer <strong>to</strong> drive out <strong>of</strong> a space<br />
• Requires less time and space<br />
• Better view when leaving the space<br />
• Avoids backing out in<strong>to</strong> traffic<br />
•<br />
Others are more likely <strong>to</strong> let you out<br />
7
Back ng n<strong>to</strong> Perpend cular<br />
Park ng Space<br />
Common H gh-R sk Errors<br />
• Fails <strong>to</strong> approach and align <strong>to</strong> space<br />
correctly<br />
• Fails <strong>to</strong> search for, communicate with,<br />
or yield <strong>to</strong> other traffic<br />
• Speed is <strong>to</strong>o fast when turning <strong>to</strong> a 45<br />
degree angle or backing<br />
• Forgets <strong>to</strong> shift <strong>to</strong> ”REVERSE”<br />
•<br />
Fails <strong>to</strong> straighten wheels and align in<br />
middle <strong>of</strong> space<br />
Proper Procedures for Back ng n<strong>to</strong><br />
Perpend cular Park ng<br />
1. Signal <strong>to</strong> the right.<br />
2. Slow the vehicle and approach the<br />
space 3 feet from the parking space.<br />
3. S<strong>to</strong>p when the driver’s body appears<br />
<strong>to</strong> be aligned in the center <strong>of</strong> the<br />
parking space.<br />
4. Signal <strong>to</strong> the left and check for traffic<br />
and pedestrians.<br />
5. Drive very slowly and turn the wheel<br />
fast <strong>to</strong> the left and move <strong>to</strong> a 45degree<br />
angle <strong>to</strong> the space.<br />
6. S<strong>to</strong>p. Shift <strong>to</strong> reverse.<br />
7. Look over right shoulder <strong>to</strong> check<br />
alignment in<strong>to</strong> space.<br />
8. Drive very slowly and turn the wheel<br />
sharp <strong>to</strong>ward the center <strong>of</strong> the<br />
space.<br />
9. Once you enter the space, straighten<br />
the wheels and center the vehicle in<br />
the space.<br />
10. S<strong>to</strong>p even with the curb or parking<br />
line.
Advantages <strong>of</strong> Back ng n<strong>to</strong> the Space<br />
• Requires less time and space.<br />
• Better line <strong>of</strong> sight while leaving the space.<br />
• Avoids backing out in<strong>to</strong> traffic.<br />
•<br />
Others are more likely <strong>to</strong> let you out in<strong>to</strong><br />
traffic flow.<br />
Parallel Park ng<br />
Enter ng a Parallel Park ng Space<br />
1. Check the rearview mirror and signal.<br />
2. S<strong>to</strong>p 2-3 feet beside the front vehicle and<br />
line up rear bumpers.<br />
3. Shift <strong>to</strong> “REVERSE.”<br />
4. Look over your shoulder and tra l brake<br />
(do not accelerate using the gas pedal) at a<br />
walking pace.<br />
5. Look back while inching back and turn wheel<br />
fully <strong>to</strong>ward the curb.<br />
6. When the vehicle is 45 degrees <strong>to</strong> the curb,<br />
and your front wheels align with the back<br />
wheels <strong>of</strong> the other vehicle, straighten the tires<br />
and slowly back up in a straight line.<br />
7. Check the front <strong>of</strong> your vehicle <strong>to</strong> make sure<br />
it clears.<br />
8. When your left rear bumper is even with the<br />
rear vehicle left front bumper, turn wheels<br />
sharply left and continue <strong>to</strong> inch back.<br />
9. When parallel <strong>to</strong> the curb, straighten wheels<br />
and center your vehicle in the space.<br />
Ex t ng a Parallel Park ng Space<br />
1. Reverse and inch back until you can see the<br />
front vehicle’s rear tires.<br />
2. Check your bl nd spot for pedestrians and<br />
traffic.<br />
9
3. Signal and yield <strong>to</strong> other traffic.<br />
4. Search your intended path <strong>of</strong> travel and<br />
enter the nearest travel lane when clear.<br />
5. Cancel signal and check rearview mirror.<br />
Common Parallel Park ng Errors<br />
• Approaches <strong>to</strong>o close or <strong>to</strong>o fast<br />
• Fails <strong>to</strong> shift <strong>to</strong> “REVERSE”<br />
• Fails <strong>to</strong> look back while moving back<br />
• Begins turning <strong>to</strong>o early<br />
• Fails <strong>to</strong> check front swing for clearance<br />
Park ng on H lls<br />
Common Errors for Park ng on H lls<br />
• Fails <strong>to</strong> search for, communicate with, or yield<br />
<strong>to</strong> other traffic and pedestrians when entering or<br />
exiting the roadway<br />
• Speed is <strong>to</strong>o fast on approach<br />
•<br />
Fails <strong>to</strong> set parking brake when securing<br />
the vehicle<br />
Good Hab ts/Proper Procedures for<br />
Park ng on H lls<br />
1. Choose a legal space and signal.<br />
2. Check your review mirror and bl nd spot.<br />
3. Apply the brake and approach parallel <strong>to</strong><br />
and 12 inches from the curb.<br />
4. Make a smooth s<strong>to</strong>p and shift <strong>to</strong><br />
“NEUTRAL.”.<br />
50
5. Turn the wheels in the<br />
proper direction.<br />
• If fac ng uph ll w th<br />
curb, turn wheels left,<br />
<strong>to</strong>ward the roadway<br />
(Figure 1.)<br />
• If fac ng downh ll<br />
w th curb, turn wheel<br />
right, away from the<br />
roadway (Figure 2.)<br />
Definitions<br />
• If there s no curb,<br />
turn wheels right, away from the roadway (Figure 3.)<br />
6. Secure vehicle by shifting <strong>to</strong> “PARK” and setting your<br />
parking brake.<br />
Turns<br />
Make sure your teen practices and can demonstrate proper<br />
right and left turns. As you practice:<br />
• S<strong>to</strong>p at intersections at the marked s<strong>to</strong>p line. If there is no<br />
line, then s<strong>to</strong>p at the crosswalk. If there is no crosswalk,<br />
then s<strong>to</strong>p at the point nearest the intersecting roadway<br />
where you have a view <strong>of</strong> approaching traffic.<br />
• Always look <strong>to</strong> the left, <strong>to</strong> the front, <strong>to</strong> the right, and then <strong>to</strong><br />
the left again before entering any intersection.<br />
• Make all turns from the nearest legal lane in<strong>to</strong> the nearest<br />
legal lane!<br />
R ght Turns With a Requ red S<strong>to</strong>p<br />
Tra l brake: a slight decrease<br />
<strong>of</strong> pressure on the brake pedal.<br />
Bl nd spot: the area that is not<br />
visible until you turn your head<br />
and look.<br />
Path <strong>of</strong> travel: the area you<br />
want the vehicle <strong>to</strong> go <strong>to</strong>.<br />
Common Errors for R ght Turns With a Requ red S<strong>to</strong>p<br />
• S<strong>to</strong>ps over legal s<strong>to</strong>p area<br />
• Fails <strong>to</strong> turn head before turning wheel<br />
• Turns wheel before starting forward motion<br />
• Turns in<strong>to</strong> wrong lane<br />
• Travels in or cuts across the bike lane<br />
• Travels in on-street parking spaces<br />
5
Proper Procedures for R ght Turns With a Requ red S<strong>to</strong>p<br />
1. Signal, check mirrors and bl nd spot. Check the right blind<br />
spot <strong>to</strong> move right and the left blind spot <strong>to</strong> move left.<br />
2. Use controlled brak ng and allow enough space on the<br />
right <strong>to</strong> avoid hitting the curb when turning, about 3 feet<br />
from the right edge <strong>of</strong> the roadway. Be careful not <strong>to</strong> drive<br />
in parking spaces or bike lanes.<br />
3. S<strong>to</strong>p and search the intersection for vehicles, pedestrians<br />
and hazards.<br />
4. Turn your head in the direction <strong>of</strong> the turn before turning<br />
the wheel.<br />
5. Use l ght accelerat on and begin <strong>to</strong> turn when the<br />
dashboard is aligned with the curb.<br />
6. Straighten and use progress ve accelerat on <strong>to</strong> target<br />
speed.<br />
7. Check rearview mirror.<br />
R ght Turns Without a Requ red S<strong>to</strong>p<br />
Common Errors for R ght Turns Without a Requ red S<strong>to</strong>p<br />
• Late or no signal use<br />
• Confusion <strong>of</strong> right-<strong>of</strong>-way,<br />
fails <strong>to</strong> yield<br />
• Fails <strong>to</strong> search intersection in<br />
all directions<br />
• Fails <strong>to</strong> search before turning<br />
wheel<br />
• Turns in<strong>to</strong> incorrect lane<br />
• Accelerates <strong>to</strong>o early<br />
52<br />
Definitions<br />
Bl nd spot: the area that is not<br />
visible until you turn your head<br />
and look.<br />
Controlled brake: firm,<br />
steady, even pressure on the<br />
brake pedal.<br />
L ght accelerat on: light<br />
pressure on the gas pedal.<br />
Progress ve accelerat on:<br />
a steady increase in pressure on<br />
the gas pedal.<br />
Tra l brake: a slight decrease<br />
<strong>of</strong> pressure on the brake pedal.
Proper Procedures for R ght<br />
Turns Without a Requ red S<strong>to</strong>p<br />
1. Signal, check mirrors and bl nd<br />
spot. Check the right blind spot<br />
<strong>to</strong> move right.<br />
2. Use controlled brak ng in a<br />
position about 3 feet from curb,<br />
parked vehicle, parking space or<br />
bike lane.<br />
3. Search intersection in all<br />
directions for vehicles,<br />
pedestrians and hazards.<br />
4. Turn your head in the direction<br />
<strong>of</strong> the turn before turning the<br />
wheel.<br />
5. Begin the turn when the<br />
dashboard is aligned with the<br />
curb.<br />
6. Tra l brake until halfway through<br />
the turn.<br />
7. Straighten and use progress ve<br />
accelerat on <strong>to</strong> target speed.<br />
8. Check rearview mirror.<br />
53
Left Turns With a Requ red S<strong>to</strong>p<br />
Common Errors for Left Turns With a Requ red S<strong>to</strong>p<br />
• Fails <strong>to</strong> make a complete s<strong>to</strong>p<br />
• S<strong>to</strong>ps over the legal s<strong>to</strong>p point<br />
• S<strong>to</strong>ps <strong>to</strong>o close <strong>to</strong> the vehicle ahead<br />
• Fails <strong>to</strong> yield <strong>to</strong> pedestrians<br />
• Cuts across the center yellow line when turning left<br />
Proper Procedures for Left Turns With a Requ red S<strong>to</strong>p<br />
1. Use controlled brak ng and approach in Lane Pos t on 2.<br />
2. S<strong>to</strong>p at the marked s<strong>to</strong>p line, pedestrian crosswalk, or at<br />
the point nearest the intersecting roadway where you have<br />
a view <strong>of</strong> approaching traffic<br />
3. Search the intersection for vehicles, pedestrians, and<br />
hazards.<br />
4. Turn your head in the direction <strong>of</strong> the turn before turning<br />
the steering wheel.<br />
5. Begin turn when your line <strong>of</strong> sight (or view) <strong>to</strong> the center <strong>of</strong><br />
your intended lane does not cut across the curb line.<br />
6. Use l ght accelerat on while turning the steering wheel.<br />
7. Straighten and use progress ve accelerat on <strong>to</strong> target speed.<br />
8. Check rearview mirror.<br />
Left Turns Without a Requ red S<strong>to</strong>p<br />
Common Errors for Left Turns Without a Requ red S<strong>to</strong>p<br />
• Confusion <strong>of</strong> right-<strong>of</strong>-way<br />
• Late or no signal<br />
• Fails <strong>to</strong> check blind spot<br />
• Fails <strong>to</strong> search the intersection for traffic and pedestrians<br />
• Too much steering<br />
• Late steering recovery<br />
• Turns in<strong>to</strong> an incorrect lane<br />
• Brakes <strong>to</strong>o hard<br />
•<br />
Accelerates <strong>to</strong>o soon or <strong>to</strong>o much<br />
5
Proper Procedures for<br />
Left Turns Without a<br />
Requ red S<strong>to</strong>p<br />
1. Signal, check mirrors<br />
and bl nd spot.<br />
2. Use controlled brak ng<br />
and Lane Pos t on 2.<br />
3. Search the intersection<br />
for vehicles, pedestrians,<br />
and hazards.<br />
4. Turn your head in the<br />
direction <strong>of</strong> the turn before<br />
turning the wheel.<br />
5. Begin turning when the<br />
front bumper is even with<br />
the curb line.<br />
6. Turn in<strong>to</strong> the nearest legal<br />
lane <strong>of</strong> travel.<br />
7. Tra l brake until halfway<br />
through the turn.<br />
8. Straighten and use<br />
progress ve accelerat on<br />
<strong>to</strong> reach the proper speed.<br />
9. Check rearview mirror.<br />
Definitions<br />
Controlled brake: firm,<br />
steady, even pressure on the<br />
brake pedal.<br />
Lane pos t on 2: the left side<br />
<strong>of</strong> the line.<br />
L ght accellerat on: light<br />
pressure on the gas pedal.<br />
Progress ve accelerat on:<br />
a steady increase in pressure on<br />
the gas pedal.<br />
Bl nd spot: the area that is not<br />
visible until you turn your head<br />
and look.<br />
Tra l brake: a slight decrease<br />
<strong>of</strong> pressure on the brake pedal.<br />
55
5<br />
B cycles on the Roadway<br />
• Obey speed limits. Excessive speed is a fac<strong>to</strong>r in a<br />
high number <strong>of</strong> collisions involving cyclists.<br />
• Be aware <strong>of</strong> how wide your vehicle is when passing a<br />
cyclist. Don’t pass <strong>to</strong>o close.<br />
• You may move your vehicle in<strong>to</strong> a bike lane <strong>to</strong> make a<br />
right turn if it is unoccupied. You may not use the bike<br />
lane for a right turn if it is occupied by a bicyclist. It’s<br />
illegal and may impede a cyclist. Remember, cyclists<br />
cannot s<strong>to</strong>p as fast as you can.<br />
•<br />
Cyclists can travel at high speeds, <strong>of</strong>ten as fast as<br />
other traffic. Don’t assume there is more time <strong>to</strong> turn<br />
in front <strong>of</strong> a cyclist than in front <strong>of</strong> a vehicle.
complex<br />
driving skills<br />
AFTER your teen masters starting and s<strong>to</strong>pping the vehicle,<br />
backing, parking, and turns, then practice more complex<br />
driving skills. Make sure your teen learns, practices, and can<br />
demonstrate advanced driving skills <strong>to</strong> your satisfaction.<br />
Chang ng Lanes<br />
Common Errors When Chang ng Lanes<br />
• Fails <strong>to</strong> check front, rear, and sides for a stable gap<br />
• Too little space or time <strong>to</strong> move in<strong>to</strong> the new lane<br />
• Fails <strong>to</strong> signal<br />
• Steers <strong>to</strong>o quickly, <strong>to</strong>o much or not smooth and gradual<br />
in<strong>to</strong> the new lane<br />
• Needless slowing<br />
• Fails <strong>to</strong> cancel signal<br />
• Exceeds speed limit<br />
• Crosses multiple lanes<br />
at one time<br />
• Drifts while checking<br />
blind spot<br />
Definition<br />
Proper Procedures for Chang ng Lanes<br />
1. Check mirrors and <strong>to</strong> the front, rear, and<br />
sides <strong>of</strong> your vehicle and the bl nd<br />
spot for a stable gap.<br />
2. Signal and use the proper lane<br />
position.<br />
Bl nd spot: the area that is not<br />
visible until you turn your head<br />
and look.<br />
57
3. Check your bl nd spot again.<br />
4. Maintain your speed or increase speed if necessary —<br />
Never slow unless you need <strong>to</strong>.<br />
5. Move <strong>to</strong> the new lane purposefully and gradually at a slight<br />
angle.<br />
6. Adjust speed <strong>to</strong> surrounding traffic.<br />
7. Cancel the turn signal.<br />
8. Check the rearview mirror.<br />
9. Create separation or “open space” <strong>to</strong> the front, rear, and<br />
sides <strong>of</strong> your vehicle.<br />
Pass ng<br />
Common Errors When<br />
Pass ng<br />
• Not looking ahead for a<br />
clear path<br />
• Fails <strong>to</strong> signal<br />
• Accelerates <strong>to</strong>o soon<br />
• Tailgates a vehicle before<br />
passing it<br />
• Drives <strong>to</strong>o slow while<br />
passing<br />
• Steers <strong>to</strong>o quickly or <strong>to</strong>o<br />
much in<strong>to</strong> the passing lane<br />
• Returns <strong>to</strong> the lane <strong>to</strong>o soon<br />
• Fails <strong>to</strong> cancel the signal<br />
• Exceeds the speed limit<br />
• Passes needlessly<br />
• Passes in a no-passing zone<br />
5<br />
Definitions<br />
Bl nd spot: the area that is not<br />
visible until you turn your head<br />
and look.<br />
Path <strong>of</strong> travel: the area you<br />
want the vehicle <strong>to</strong> go <strong>to</strong>.<br />
Path <strong>of</strong> travel obstacles:<br />
anything that interferes with your<br />
vehicle going where you want it <strong>to</strong><br />
go. Examples include s<strong>to</strong>p signs,<br />
speed bumps, yield signs, red or<br />
yellow traffic lights, pedestrians,<br />
mo<strong>to</strong>rcycles, bicycles, animals,<br />
and vehicles <strong>to</strong> the front, rear,<br />
and side.
Proper Procedures for Pass ng<br />
1. F rst, ask yourself if passing at the<br />
time is necessary, legal, and safe.<br />
2. Search your intended path <strong>of</strong> travel<br />
far ahead for any obstacles.<br />
3. Check mirrors and bl nd spot.<br />
4. Signal in the direction <strong>of</strong> the pass.<br />
5. Increase speed <strong>to</strong> at least 10 mph<br />
faster than the vehicle you are<br />
passing, but stay within the legal<br />
speed limit.<br />
6. Move smoothly in<strong>to</strong> the passing lane.<br />
7. Change your signal <strong>to</strong> the opposite<br />
direction.<br />
8. Check the bl nd spot.<br />
9. Return <strong>to</strong> the lane when you can<br />
see the headlights <strong>of</strong> the vehicle you<br />
passed in your rearview mirror.<br />
10. Cancel signal and resume a safe and<br />
legal speed.<br />
11. Check the rearview mirror.<br />
59
0<br />
Enter ng the Freeway<br />
Common Errors When<br />
Enter ng the Freeway<br />
• Drives <strong>to</strong>o slow<br />
• Fails <strong>to</strong> signal<br />
• Fails <strong>to</strong> yield <strong>to</strong> other vehicles<br />
already on the freeway<br />
• Fails <strong>to</strong> check traffic <strong>to</strong> the front<br />
and rear<br />
• Drifts while checking traffic<br />
• Poor gap judgment<br />
• Turns the steering wheel <strong>to</strong>o<br />
sharply<br />
• Fails <strong>to</strong> cancel the turn signal<br />
Proper Procedures for<br />
Accelerat on Lane<br />
1. Check all mirrors.<br />
2. Keep 4+ seconds <strong>of</strong> space <strong>to</strong><br />
the front <strong>of</strong> you.<br />
3. Accelerate smoothly and<br />
briskly <strong>to</strong> match traffic flow.<br />
Proper Procedures for Merg ng<br />
4. Communicate your intentions<br />
with signals and lane position.<br />
5. Check the front and rear, and<br />
the bl nd spot for a stable<br />
gap in traffic in your intended<br />
path <strong>of</strong> travel.<br />
6. Merge smoothly in<strong>to</strong> the gap<br />
in traffic.<br />
7. Adjust speed <strong>to</strong> surrounding<br />
traffic.<br />
8. Cancel the turn signal.<br />
9. Check the rearview mirror.<br />
10. Create separation or “open<br />
space” <strong>to</strong> the front, rear, and<br />
sides <strong>of</strong> your vehicle.
Ex t ng the Freeway<br />
Common Errors When<br />
Ex t ng the Freeway<br />
• Fails <strong>to</strong> see the exit ramp in<br />
advance<br />
• Reduces speed before the exit<br />
ramp<br />
• Fails <strong>to</strong> signal<br />
• Fails <strong>to</strong> check the rearview mirror<br />
• Fails <strong>to</strong> reduce speed on the exit<br />
ramp<br />
• Fails <strong>to</strong> cancel the turn signal<br />
• Cuts over from left lane at the last<br />
minute<br />
Proper Procedures for<br />
Ex t ng the Freeway<br />
1. Plan for the exit – read the signs.<br />
2. Move <strong>to</strong> the proper lane well in<br />
advance.<br />
3. Signal, and check the rearview<br />
mirror.<br />
4. Maintain speed until you enter<br />
the exit lane.<br />
5. Enter the exit ramp and use<br />
controlled brak ng. Reduce<br />
speed <strong>to</strong> posted speed or less.<br />
6. Adjust your speed and lane<br />
position. Prepare <strong>to</strong> s<strong>to</strong>p or turn.<br />
7. Check the earview mirror.<br />
Note: Adjust procedures for the<br />
follow ng:<br />
•<br />
•<br />
•<br />
•<br />
Traffic s<strong>to</strong>pped on the exit ramp<br />
Short deceleration lane<br />
Very slow ramp speed<br />
Other drivers following you at<br />
high speed or close distance
Ra lroad Grade Cross ngs<br />
Common Errors at Ra lroad Cross ngs<br />
• Does not take railroad crossing seriously<br />
• Fails <strong>to</strong> look and l sten for oncoming trains<br />
• Fails <strong>to</strong> ensure all tracks are clear<br />
• S<strong>to</strong>ps <strong>to</strong>o close <strong>to</strong> the tracks<br />
• Races <strong>to</strong> beat crossing arms when the lights flash<br />
Proper Procedures for Ra lroad Cross ng<br />
1. Slow down, whether the lights are blinking or not, and<br />
check the rearview mirror for traffic behind you.<br />
2. Look and l sten for oncoming trains.<br />
3. Check the number <strong>of</strong> tracks and look down each track in<br />
both directions.<br />
2
4. If a train is coming or the crossing lights are blinking, s<strong>to</strong>p<br />
at least 15 feet from the tracks or at the s<strong>to</strong>p line.<br />
5. When the tracks are clear as far as you can see in both<br />
directions, cross the tracks.<br />
6. When you cross railroad tracks, make sure you can cross<br />
without having <strong>to</strong> s<strong>to</strong>p on the tracks.<br />
School Zones<br />
• Be alert at all times for children and pedestrians in school<br />
zones.<br />
• Follow the signs or flashing lights that warn you that you<br />
are approaching a school or school crossing.<br />
• Obey the slower speed limits.<br />
• Signs may be posted telling drivers that traffic fines are<br />
higher in school zones.<br />
3
Crosswalks<br />
Pedestrians and bicyclists have the right-<strong>of</strong>-way at crosswalks<br />
and intersections, whether the crosswalk is marked or not.<br />
Vehicles approaching an intersection must s<strong>to</strong>p when a<br />
pedestrian or bicyclist is in their half <strong>of</strong> the roadway. Vehicles<br />
turning in<strong>to</strong> an intersection must s<strong>to</strong>p if a pedestrian or<br />
bicyclist is within one lane <strong>of</strong> their half <strong>of</strong> the roadway. Once<br />
the pedestrian or bicyclist is beyond one lane <strong>of</strong> their half <strong>of</strong><br />
the roadway, the vehicle may go.
N ght Dr v ng<br />
Preparat on<br />
Give your teen planned and practical night-driving experience. Set<br />
time when you will both be free from other obligations. Create a<br />
relaxed atmosphere. Select a local route that your teen has driven<br />
on before. Keep in mind the <strong>to</strong>pics you need <strong>to</strong> cover.<br />
N ght Dr v ng and Headl ghts<br />
Switch <strong>to</strong> low beams when approaching another vehicle. If<br />
the other driver fails <strong>to</strong> switch <strong>to</strong> low beam, slow and move <strong>to</strong><br />
lane position 3. Don’t look directly in<strong>to</strong> the headlights; look <strong>to</strong><br />
the right edge <strong>of</strong> the road until the vehicle passes.<br />
You need 2-4 seconds <strong>to</strong> s<strong>to</strong>p. If you can’t see beyond your<br />
vehicle’s headlights within this range, slow down. You may be<br />
“driving blind.”<br />
H gh beam headl ghts in good condition illuminate about<br />
350 feet.<br />
Low beam headl ghts in good condition illuminate about 182<br />
feet.<br />
• If you travel at 50 mph with low beam headlights, you can<br />
see about 2-1/2 seconds <strong>of</strong> lit roadway (182 feet) and you<br />
need a <strong>to</strong>tal <strong>of</strong> 190 feet <strong>to</strong> s<strong>to</strong>p your vehicle.<br />
• If you travel at 30 mph, you can see a little more than 4<br />
seconds ahead with low beam headlights and 8 seconds<br />
ahead with high beam headlights.<br />
• If you travel at 60 mph with high beam headlights, you can<br />
see only 4 seconds ahead.<br />
• To gather critical information you need <strong>to</strong> see 12 <strong>to</strong> 15<br />
seconds ahead. Look well beyond the headlights in lit<br />
areas. In rural areas, choose speeds that give you the best<br />
chance <strong>to</strong> get the information you need <strong>to</strong> make critical<br />
decisions.<br />
5
Sk d Recovery<br />
Skidding can happen at any time, on any surface, while<br />
braking, accelerating, or steering. You are no longer<br />
supposed <strong>to</strong> steer in the direction <strong>of</strong> the skid. Instead, steer<br />
<strong>to</strong>ward the path <strong>of</strong> travel. This will allow you <strong>to</strong> focus on the<br />
front <strong>of</strong> your vehicle and the path that you want <strong>to</strong> travel.<br />
Proper Procedures for Sk d Recovery<br />
1. As you drive, always focus on the path <strong>of</strong> travel.<br />
2. The instant you detect the vehicle skid, turn the steering<br />
wheel back <strong>to</strong>ward the path <strong>of</strong> travel.<br />
Note: It is important <strong>to</strong> get the vehicle back on the path <strong>of</strong><br />
travel before it gets 15 <strong>to</strong> 25 degrees <strong>of</strong>f. That is your point<br />
<strong>of</strong> no return. Once the skid reaches that angle, the vehicle is<br />
going <strong>to</strong> keep going in the direction <strong>of</strong> the skid.<br />
Don’t g ve up – stay <strong>of</strong>f the pedals, keep your eyes on the<br />
target, and keep working <strong>to</strong> get the vehicle under control.<br />
Dr v ng n Bad Weather<br />
• Drive slower than you would in good weather<br />
• Leave more space between your vehicle and those ahead<br />
• Drive with your headlights on<br />
•<br />
Don’t use cruise control<br />
Check weather conditions on your travel route. Use the<br />
<strong>Department</strong> <strong>of</strong> Transportation website www.wsdot.wa.gov.<br />
Be sure <strong>to</strong> carry chains or have traction tires on your vehicle.
emergencies<br />
— How <strong>to</strong> handle them<br />
Veh cle Malfunct ons<br />
Hood Fl es Up<br />
1. Look through the space at the bot<strong>to</strong>m <strong>of</strong> your windshield<br />
<strong>to</strong> keep an open line <strong>of</strong> sight.<br />
2. Steer <strong>to</strong> the s de <strong>of</strong> the road.<br />
3. Secure the hood.<br />
Eng ne Fa ls<br />
This could happen when the engine quits running completely,<br />
becomes flooded, overheats, or is simply out <strong>of</strong> gas. In the event<br />
<strong>of</strong> an engine failure:<br />
1. Stay <strong>of</strong>f the brake – you may need the momentum <strong>to</strong> pull<br />
<strong>of</strong>f the road – steer firmly.<br />
2. Keep eyes on open target area.<br />
3. Use an open palm <strong>to</strong> shift <strong>to</strong> neutral and attempt <strong>to</strong> restart<br />
– if that fails take an open escape path.<br />
4. Turn <strong>of</strong>f the gn t on.<br />
Accelera<strong>to</strong>r St cks<br />
This could be caused by a broken spring, or the pedal being<br />
stuck in the down position. In either case:<br />
1. Sh ft <strong>to</strong> neutral – use an open palm.<br />
2. Search for an escape path.<br />
3. Steer smoothly.<br />
4. Brake gently.<br />
5. Pull <strong>of</strong>f the roadway.<br />
6. Turn <strong>of</strong>f the gn t on.<br />
7
Brakes Fa l<br />
A brake failure can be a complete loss <strong>of</strong> brakes or only the<br />
loss <strong>of</strong> power brake. If the brakes quit working:<br />
1. Keep your eyes on the target area.<br />
2. Control the steer ng.<br />
3. Rap dly pump the brakes.<br />
4. Sh ft <strong>to</strong> a lower gear.<br />
5. Use the park ng brake <strong>to</strong> slow or s<strong>to</strong>p.<br />
6. F nd a s<strong>of</strong>t coll s on area if necessary.<br />
T re Blow Out<br />
Blowouts can cause serious damage <strong>to</strong> vehicles and injury or<br />
death <strong>to</strong> occupants.<br />
1. A m <strong>to</strong> the target area – where you want the car <strong>to</strong> go.<br />
2. Reduce speed gradually:<br />
• Maintain balance<br />
•<br />
Stay <strong>of</strong>f the brake<br />
3. Control the steer ng.<br />
4. F nd a safe place <strong>to</strong> pull <strong>of</strong>f the road.<br />
Eng ne F re<br />
If the vehicle catches on fire:<br />
1. Steer out <strong>of</strong> traffic and away from bu ld ngs and<br />
people.<br />
2. Have everyone leave the veh cle mmed ately and move<br />
away.<br />
3. Do not open the hood.
If You Have a Coll s on<br />
1. S<strong>to</strong>p mmed ately. Do not leave your vehicle where it can<br />
block traffic unless it’s so damaged it can’t be moved.<br />
2. Turn <strong>of</strong>f the gn t on <strong>to</strong> avoid the possibility <strong>of</strong> a fire.<br />
3. A d the njured and give first aid if necessary. Never move<br />
an injured person unless there is danger <strong>of</strong> fire or another<br />
collision.<br />
4. Prevent further damage by warn ng oncom ng traffic<br />
with flares or reflec<strong>to</strong>rs.<br />
5. If t s an emergency, call 9 .<br />
6. Exchange nformat on. Be sure <strong>to</strong> get:<br />
• Names and addresses<br />
• Driver license numbers<br />
• License plate numbers<br />
• An insurance company name, address, telephone<br />
number, and policy number<br />
7. Note the names <strong>of</strong> passengers and the r pos t ons n<br />
the car.<br />
8. Record the names and addresses <strong>of</strong> w tnesses.<br />
9. F le a coll s on report when necessary. Washing<strong>to</strong>n<br />
requires a collision report be filed with the Washing<strong>to</strong>n<br />
State Patrol when:<br />
• Damage <strong>to</strong> any vehicle is over $700 as a result <strong>of</strong><br />
damages from this collision.<br />
• Injury or death results from the collision.<br />
• Damage <strong>to</strong> any person’s property, other than a vehicle<br />
involved in the collision, is over $700.<br />
9
If You’re S<strong>to</strong>pped by Law Enforcement<br />
1. Be prepared <strong>to</strong> show your:<br />
• Driver license<br />
• Vehicle registration<br />
• Pro<strong>of</strong> <strong>of</strong> insurance<br />
2. Wa t for the <strong>of</strong>ficer <strong>to</strong> ask you for these documents before<br />
you reach for them.<br />
3. Tell the <strong>of</strong>ficer where you will get the items from:<br />
“My registration is in the glove box, may I get it now?”<br />
70
what happens<br />
if your teen messes up?<br />
What Happens Unt l Age ?<br />
Until then:<br />
•<br />
•<br />
•<br />
•<br />
For the first violation – a warning letter is sent <strong>to</strong> the parent<br />
or guardian<br />
For a second violation – your teen’s license will be<br />
suspended for six months (or until age 18 if that comes<br />
first), and the parent or guardian receives a copy <strong>of</strong> the<br />
suspension<br />
For a third violation – your teen’s license will be suspended<br />
until age 18 and the parent or guardian receives a copy <strong>of</strong><br />
the suspension.<br />
Any amount <strong>of</strong> alcohol in the blood is considered <strong>Driving</strong><br />
Under the Influence (DUI).If your teen is arrested for DUI<br />
and:<br />
• Fa ls a breath test – Your teen’s license will be revoked<br />
for one year or until age 21, whichever is longer. If there<br />
has been a prior alcohol-related <strong>of</strong>fense within the last<br />
seven years, the license will be revoked for two years.<br />
•<br />
Refuses <strong>to</strong> take a breath test – Your teen’s license will<br />
be revoked for one year.<br />
Tough Penalt es for F rst-Year Conv ct ons<br />
During the first year, with an intermediate license, if your teen<br />
commits any traffic violation or is in a collision, the passenger<br />
and nighttime restrictions will continue until age 18.<br />
7
72<br />
the rules<br />
for intermediate licenses<br />
What s Needed <strong>to</strong> Qual fy for a L cense<br />
To get a license your teen must:<br />
• Have an instruction permit for at least six months.<br />
• Complete an approved traffic safety education course and<br />
at least 50 hours <strong>of</strong> supervised driving practice, and 10 <strong>of</strong><br />
these hours must happen at night.<br />
The supervising driver must be someone who is at least 21<br />
years old and has had a valid driver license for at least five<br />
years.<br />
After Your <strong>Teen</strong> Gets a L cense<br />
Here are driving restrictions:<br />
• For the first s x months, your teen can’t drive with<br />
people under the age <strong>of</strong> 20 unless they are a member <strong>of</strong><br />
your immediate family. This means no friends.<br />
• For the second s x months, your teen can’t drive with<br />
more than three people under the age <strong>of</strong> 20 unless they are<br />
members <strong>of</strong> your immediate family.<br />
•<br />
For the first year, your teen cannot drive between 1 am<br />
and 5 a.m.<br />
The above restrictions will end on ______________.<br />
If these rules are not followed, your teen could get a ticket<br />
and pay fines or have the license suspended and your<br />
insurance rates could go up. <strong>Driving</strong> comes with responsibility.<br />
Remember, driving is a privilege – not a right.
Safe-driving<br />
agreement<br />
S<strong>Parent</strong> and <strong>Teen</strong> Safe-<strong>Driving</strong> Agreement<br />
We, the parent(s) or guardian(s) and the teen driver agree:<br />
The teen driver will: (check all that apply)<br />
drive<br />
safely and obey all traffic laws.<br />
not<br />
operate any vehicle while under the influence <strong>of</strong> alcohol<br />
or drugs.<br />
ensure<br />
everyone in the vehicle wears a seat belt.<br />
follow<br />
all intermediate license restrictions.<br />
not<br />
send or read text messages or talk on a cell phone<br />
while driving.<br />
share driving plans – destination and times.<br />
call if expecting <strong>to</strong> be more than 30 minutes late.<br />
not drive after 10 p.m. unless given permission.<br />
not consume alcohol or drugs.<br />
not ride with a driver who is under the influence <strong>of</strong> alcohol<br />
or drugs and will seek other transportation or call a parent<br />
or guardian at any hour from any place for a safe ride.<br />
not let anyone else use the vehicle.<br />
be allowed <strong>to</strong> use the vehicle based on the following<br />
grades earned at school:<br />
______________________________________________<br />
______________________________________________<br />
73
The parent(s) or guardian(s) will: (check all that apply)<br />
<br />
<br />
drive safely and obey all traffic laws.<br />
not operate any vehicle while under the influence <strong>of</strong> alcohol<br />
or drugs.<br />
track<br />
the teen driver’s behind-the-wheel practice and<br />
progress using a practice driving log.<br />
listen <strong>to</strong> the teen driver’s explanations or concerns<br />
regarding the vehicle or the terms <strong>of</strong> the agreement.<br />
provide respectful feedback when accompanying the teen<br />
driver in a mo<strong>to</strong>r vehicle.<br />
serve as a good role model when operating a vehicle.<br />
coach good driving skills and habits <strong>to</strong> the teen driver.<br />
not ride with a driver who is under the influence <strong>of</strong> alcohol<br />
or drugs, and will seek other transportation as needed.<br />
take the teen driver home at any hour from any place,<br />
without conflict or question at that time, though a<br />
discussion <strong>of</strong> the event would happen later.<br />
If the teen driver violates this agreement or commits one<br />
<strong>of</strong> the following traffic <strong>of</strong>fenses vehicle privileges will be<br />
lost for the following number <strong>of</strong> days: (fill in days for each)<br />
_____ First <strong>of</strong>fense<br />
_____ Preventable collision<br />
_____ Second <strong>of</strong>fense<br />
_____ Serious traffic violation<br />
_____ Third <strong>of</strong>fense<br />
_____ Drug or alcohol <strong>of</strong>fense<br />
Other conditions or responsibilities agreed <strong>to</strong>:<br />
________________________________________________<br />
________________________________________________<br />
X________________________________________________<br />
<strong>Teen</strong> driver signature Date<br />
X________________________________________________<br />
<strong>Parent</strong>/Guardian signature Date<br />
X________________________________________________<br />
<strong>Parent</strong>/Guardian signature Date<br />
We will review this agreement on _____________________ .<br />
74<br />
Date
The Washing<strong>to</strong>n<br />
<strong>Parent</strong> <strong>Guide</strong><br />
<strong>to</strong> <strong>Teen</strong> <strong>Driving</strong><br />
This guide supports the important partnerships<br />
N/6/07 100M<br />
between state driver licensing, driver education,<br />
teen drivers, and their parents. It is our hope that<br />
this information will help you <strong>to</strong> help your teen<br />
become a safe and responsible driver.