Wolfgang Puck - Meijer
Wolfgang Puck - Meijer
Wolfgang Puck - Meijer

Create successful ePaper yourself
Turn your PDF publications into a flip-book with our unique Google optimized e-Paper software.
DL_HM0240Manual 6/30/09 4:47 PM Page 1<br />
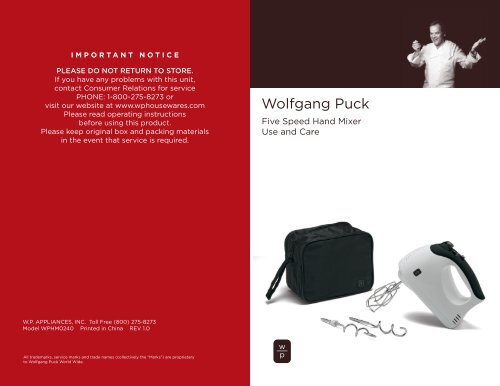
IMPORTANT NOTICE<br />
PLEASE DO NOT RETURN TO STORE.<br />
If you have any problems with this unit,<br />
contact Consumer Relations for service<br />
PHONE: 1-800-275-8273 or<br />
visit our website at www.wphousewares.com<br />
Please read operating instructions<br />
before using this product.<br />
Please keep original box and packing materials<br />
in the event that service is required.<br />
W.P. APPLIANCES, INC. Toll Free (800) 275-8273<br />
Model WPHM0240 Printed in China REV 1.0<br />
All trademarks, service marks and trade names (collectively the “Marks”) are proprietary<br />
to <strong>Wolfgang</strong> <strong>Puck</strong> World Wide.<br />
<strong>Wolfgang</strong> <strong>Puck</strong><br />
Five Speed Hand Mixer<br />
Use and Care<br />
<strong>Meijer</strong>.com
DL_HM0240Manual 6/30/09 4:47 PM Page 1<br />
IMPORTANT SAFEGUARDS<br />
When using electrical appliances, basic safety precautions should always<br />
be followed, including the following:<br />
1 Read all instructions carefully.<br />
2 To protect against risk of electrical shock, do not put mixer, cord or<br />
plug in water or other liquid.<br />
3 Close supervision is necessary when any appliance is used by or<br />
near children.<br />
4 Turn unit off and unplug from outlet when not in use, before putting<br />
on or taking off parts, and before cleaning. To disconnect, turn unit<br />
off, grasp plug, and pull from the wall. Never yank on cord.<br />
5 Avoid contact with moving parts. Keep hands, hair, clothing as well<br />
as spatulas and other utensils, away from beaters or dough hooks<br />
during operation to prevent injury and/or damage to the mixer.<br />
6 Remove beaters and dough hooks from mixer before washing.<br />
7 Do not operate any appliance with a damaged cord or plug or after<br />
the appliance malfunctions or is dropped or damaged in any manner.<br />
Return the appliance to an authorized service facility for examination,<br />
repair, or electrical or mechanical adjustment.<br />
8 The use of attachments not recommended or sold by the appliance<br />
manufacturer may cause fire, electric shock, or injury.<br />
9 Do not use outdoors.<br />
10 Do not let cord hang over edge of table or counter or touch hot<br />
surfaces, including the stove.<br />
11 Mixing flammable non-food substances can be harmful.<br />
12 Do not use this appliance for other than intended use.<br />
SAVE THESE INSTRUCTIONS<br />
HOUSEHOLD USE ONLY<br />
This appliance has a polarized plug (one blade is wider than the other). As a<br />
safety feature, this plug will fit in a polarized outlet only one way. If the plug<br />
does not fit fully in the outlet, reverse the plug. If it still does not fit, contact a<br />
qualified electrician. Do not attempt to defeat this safety feature.<br />
Before Your First Use<br />
Carefully unpack the mixer and remove all packaging materials. Wash the<br />
dough hooks and beaters in warm, soapy water to remove any dust that may<br />
have accumulated during packaging. Do not immerse the mixer body, cord or<br />
plug in water. Wipe the mixer body with a damp cloth.<br />
1 2<br />
<strong>Meijer</strong>.com
DL_HM0240Manual 6/30/09 4:47 PM Page 3<br />
<strong>Wolfgang</strong> <strong>Puck</strong>,<br />
owner of the famous<br />
Spago restaurants and<br />
one of the most influential<br />
chef-restauranteurs in<br />
America, is credited with<br />
reviving California’s rich<br />
culinary heritage. His<br />
cooking innovations, a<br />
result of blending fresh<br />
California ingredients with his classical French techniques, are<br />
enjoyed by world leaders, stars and fellow chefs alike. He established<br />
other trend-setting restaurants like Postrio in San Francisco, Chinois<br />
on Main in Santa Monica, Trattoria del Lupo, Cut, and his latest<br />
creation, Jai, an Asian fusion restaurant in San Diego. Home chefs can<br />
also share Mr. <strong>Puck</strong>’s talents through his cookbooks, cutlery,<br />
cookware and, of course, through his appliances!<br />
3<br />
Table of Contents<br />
Important Safeguards 1<br />
Before Your First Use 2<br />
About <strong>Wolfgang</strong> <strong>Puck</strong> 3<br />
Know Your Hand Mixer 5<br />
Features of Your Hand Mixer 7<br />
Using Your Mixer 8<br />
Cleaning Your Mixer 8<br />
Speed Control Guide 9<br />
Recipes 10<br />
Limited Warranty 18<br />
Contact Information back<br />
<strong>Meijer</strong>.com
DL_HM0240Manual 6/30/09 4:47 PM Page 5<br />
Storage Bag<br />
Twisted Wire<br />
Beaters with<br />
No Center Post<br />
Know Your<br />
Hand Mixer<br />
5 6<br />
Beater Eject<br />
Button<br />
Speed Selector<br />
Power Burst<br />
Button<br />
Dough Hooks<br />
<strong>Meijer</strong>.com
DL_HM0240Manual 6/30/09 4:47 PM Page 7<br />
Features of Your Hand Mixer<br />
Your five speed hand mixer with power burst can hand all of your mixing<br />
tasks from bread dough to emulsifications. The convenient power burst<br />
button blast through the heaviest ingredients with east. A soft grip<br />
rubberized ergonomic handle fits easily and comfortably in your hand<br />
without slipping. The speed selector and power burst are just a thumbs<br />
length away.<br />
Twisted wire beaters without center posts allow ingredients to pass<br />
easily through the beaters without clogging. Plow through hard butter,<br />
and add nuts and candies without having them break into tiny pieces,<br />
and avoid spattering food out of your bowls. We have included dough<br />
hooks to allow you to seamlessly knead dough, or incorporate your<br />
favorite meat loaf recipes. And when your finished, place your hand<br />
mixer in the convenient storage bag with an inside pocket for the<br />
beaters and dough hooks.<br />
Using Your Mixer<br />
Inserting Beaters and Dough Hooks<br />
figure 1<br />
Be sure the unit is unplugged before inserting<br />
beaters or dough hooks. To insert the twisted<br />
wire beaters, firmly grasp the mixer by the handle<br />
and insert the beaters into the openings. Push<br />
each beater in as far as it will go. The beater will<br />
click as it locks into place. To insert the dough<br />
hooks, ensure that the dough hook with the<br />
plastic guide on the upper stem is placed into<br />
the right-hand side of the hand mixer motor<br />
housing, the dough hook without the plastic<br />
figure 2<br />
guide will go into the left-hand side of the motor<br />
housing (see figure 1). Plug the mixer’s power<br />
cord into a 120 volt 60 Hz AC only outlet. Your<br />
mixer is now ready to use.<br />
Removing Beaters and Dough Hooks<br />
Be sure your hand mixer is in the “0” (Off)<br />
position and unplugged before removing beaters<br />
or dough hooks. Your mixer has an eject button<br />
to easily remove beaters or dough hooks (see<br />
figure 2). Press the eject button, and the beaters or dough hooks will drop<br />
out of their locks for easy cleaning.<br />
Controlling the Mixer Speed<br />
To operate your mixer, move the speed control from the “0” (Off) position<br />
to the desired speed (see figure 2). During operation, you may change the<br />
speed of the mixer by selecting a new speed.<br />
Using the Power Burst Feature<br />
The power burst feature of your mixer is perfect for tough mixing jobs.<br />
The power burst increases the speed to the mixers maximum at the touch<br />
of a button. You can use this feature should you feel or hear the mixer<br />
slowing or straining during tough mixing jobs. When you release the<br />
power burst button, the mixer will automatically return to the selected<br />
speed on your mixer.<br />
Interrupting the Mixing Process<br />
To stop your mixer during operation, move the speed control to the<br />
“0” (Off) position. This will stop the beaters or dough hooks from turning.<br />
Cleaning Your Mixer<br />
Be sure the mixer is unplugged before cleaning. Do not immerse the<br />
hand mixer motor housing or plug in water or any other liquid, simply<br />
wipe the housing with a clean, damp cloth. The beaters and dough hooks<br />
should be removed from the hand mixer and washed in warm, soapy<br />
water. The beaters and dough hooks can be placed in the top rack<br />
of your dishwasher.<br />
7 8<br />
<strong>Meijer</strong>.com
DL_HM0240Manual 6/30/09 4:47 PM Page 9<br />
Speed Control Guide<br />
Speed 1 - Stir<br />
Always start with speed 1 when mixing ingredients as this will prevent<br />
your ingredients from spattering out of the bowl. Speed 1 is best used<br />
for a slow start when mixing liquid ingredients, or for combining dry and<br />
wet ingredients that do not require heavy mixing<br />
Speed 2 - Mix<br />
Use when a recipe calls for combining ingredients together. Use for corn<br />
bread, muffins, and light cream cheese spreads.<br />
Speed 3 - Blend<br />
Used for combining heavier cream cheese spreads, cake mixes, or<br />
creaming butter and sugar.<br />
Speed 4 – Beat<br />
Used for cake frostings, packaged puddings, whipping heavy cream.<br />
Speed 5 – Whip<br />
Emulsifying egg whites, mashing potatoes.<br />
Power Burst<br />
Use this feature when if you hear your mixer slowing or straining during<br />
tough mixing jobs.<br />
Sugar Dough<br />
Makes about 1 1/2 pounds or two 9-inch tart shells<br />
INGREDIENTS<br />
1 sleeve sugar-free chocolate wafers, crumbled<br />
2 1/3 cups cake or pastry flour<br />
1/3 cup sugar<br />
1/2 pound (2 sticks) unsalted butter, chilled, cut into small pieces<br />
2 egg yolks<br />
1 or 2 tablespoons heavy cream<br />
METHOD<br />
1 Attach the beaters to the mixer. Using speed 3, mix the chilled butter<br />
with the sugar in a medium bowl. Add the egg yolks one at a time.<br />
Reduce speed to 1 and gradually add the flour to the butter mixture,<br />
a third at a time. The mixture should resemble crumbles. Add the<br />
cream. Increase the mixer speed to 3 and mix dough until<br />
a ball is formed.<br />
2 Place dough ball onto a lightly floured surface, press down into a<br />
circle. Wrap with plastic wrap and refrigerate for at least 1 hour.<br />
3 Use as needed.<br />
9 10<br />
<strong>Meijer</strong>.com
DL_HM0240Manual 6/30/09 4:47 PM Page 11<br />
Heavenly Chocolate Mousse<br />
Serves 8<br />
INGREDIENTS<br />
4 egg yolks<br />
3/4 cup sugar<br />
5 ounces bittersweet chocolate<br />
5 ounces unsweetened chocolate<br />
1/2 cup heavy cream<br />
8 large egg whites<br />
2 teaspoons lemon juice<br />
METHOD<br />
1 Attach the beaters to the mixer. In a large bowl, mix egg yolks with<br />
1/4 cup sugar until they become a pale yellow.<br />
2 Melt chocolate over a bain-marie or in a heat-proof bowl over<br />
simmering water.<br />
3 In small saucepan, bring cream to a boil and stir it into the<br />
melted chocolate.<br />
4 Stir the chocolate mixture into the egg yolks and sugar. Set aside.<br />
5 With the mixer attached with the beaters, beat egg whites and<br />
lemon juice until they reach soft peaks. Add remaining 1/2 cup sugar<br />
slowly with the mixer on speed 3. Increase speed to 5 and continue<br />
to beat until whites are stiff and very shiny, approximately 7 minutes.<br />
6 Stir one third of the whites into the chocolate mixture to lighten it.<br />
Fold in the remaining beaten egg whites, a third at a time.<br />
7 Pour into individual serving glasses or bowls and chill at last six<br />
hours or overnight.<br />
Note: If the chocolate and egg yolk mixture should tighten, place<br />
the mixture back over the bain-marie, and vigorously whisk in 3 or 4<br />
tablespoons of the beaten egg whites. The chocolate will smooth<br />
out so you can continue with the recipe.<br />
PRESENTATION<br />
Serve in individual glass dishes topped with whipped cream<br />
and shaved chocolate.<br />
Chocolate Chip Cookies<br />
Makes about 2 1/2 dozen cookies<br />
INGREDIENTS<br />
1 3/4 cups all-purpose flour<br />
1/2 cup unsweetened cocoa<br />
3/4 teaspoon baking soda<br />
1/4 teaspoon salt<br />
8 ounces (2 sticks) unsalted butter,<br />
at room temperature, cut into small pieces<br />
1 cup light brown sugar<br />
3/4 cup granulated sugar<br />
2 large eggs<br />
1 1/2 teaspoons vanilla extract<br />
1 1/2 ounces bittersweet chocolate, melted over water bath or in microwave<br />
2 cups (1/2 pound) coarsely chopped pecans or walnuts,or toasted<br />
and cooled unsalted peanuts, coarsely chopped<br />
1 3/4 cups semisweet chocolate chips<br />
METHOD<br />
1 Sift together the flour, cocoa, baking soda, and salt. Set aside.<br />
2 In a large bowl, soften the butter with the mixer equipped with the<br />
beaters. Mix on speed 4 until butter is softened. Add the brown and<br />
granulated sugars, increasing the speed to 5. After the sugar is incorporated,<br />
continue to mix until fluffy, stopping to scrape down sides<br />
of bowl when necessary. Reduce speed to 3 and add the eggs, one<br />
at a time, and the vanilla.<br />
3 Stop mixer, scrape in the melted chocolate, and beat until<br />
thoroughly combined with mixer set to speed 4. Reduce speed<br />
to lowest setting. Gradually add flour mixture, and beat just until<br />
combined. Add nuts and chocolate chips, and again beat just until<br />
combined. If the dough is soft, wrap in plastic wrap and refrigerate<br />
until firm, 1 to 2 hours.<br />
4 Position rack in center of oven and preheat oven to 350°. Line two<br />
baking trays with parchment paper.<br />
5 Using a small ice cream scoop, divide the dough into mounds, about<br />
2 tablespoons each, forming small balls of dough. (Dough can be<br />
rolled, placed on trays, and refrigerated until needed.) Arrange the<br />
rolled balls on the prepared baking trays, about 2 inches apart. Bake<br />
until slightly firm to the touch, about 15 minutes, reversing trays front<br />
to back after 7 to 8 minutes. Remove cookies from trays with a wide<br />
metal spatula and cool on wire rack. If reusing a baking tray, cool<br />
slightly before arranging balls of dough on it.<br />
11 12<br />
<strong>Meijer</strong>.com
DL_HM0240Manual 6/30/09 4:47 PM Page 13<br />
Makes four 8-inch pizzas<br />
INGREDIENTS<br />
1 package active dry or<br />
fresh yeast<br />
1 teaspoon honey<br />
1 cup warm water (105° to 115°)<br />
METHOD<br />
Pizza Dough<br />
3 cups all-purpose flour<br />
1 teaspoon kosher salt<br />
1 tablespoon extra-virgin olive oil,<br />
plus more for brushing<br />
Toppings of your choice<br />
Basic Pasta Dough<br />
Makes about 1 1/2 pounds, serves 6 to 8<br />
INGREDIENTS<br />
1 1/2 cups semolina flour<br />
1 1/2 cups all-purpose flour<br />
2 teaspoons salt<br />
4 large eggs<br />
2 tablespoons olive oil<br />
1 In a small mixing bowl dissolve the yeast and honey with 1/4 cup<br />
METHOD<br />
of the warm water.<br />
1 In a large bowl, combine salt and flours.<br />
2 Fit the mixer with the dough hooks.<br />
2 Create a well in the middle of the flour. Crack the eggs and place<br />
3 In a large bowl, use speed 1 to mix flour and salt thoroughly for<br />
them in the well; pour oil over eggs.<br />
4 to 5 seconds. Increase speed to 3 and add the oil and the yeast<br />
3 With the mixer fitted with the dough hooks, begin kneading the<br />
mixture to the flour. Slowly add the remaining 3/4 cup of warm<br />
dough with the mixer on speed 3. Increase the speed to 5 and knead<br />
water. As you are mixing, all of the dough from the sides of the<br />
until a ball is formed.<br />
bowl must be incorporated. A ball will start to form; continue<br />
beating for 5 minutes.<br />
4 Make sure to knead all of the remaining flour which may be on<br />
bottom or sides of bowl. Continue to knead ball by hand onto a<br />
4 Turn the dough onto a lightly floured surface and continue to knead<br />
lightly floured surface until a smooth ball is achieved.<br />
5<br />
by hand 2 or 3 minutes longer. The dough should be smooth and firm.<br />
Cover the dough with clean, damp towel and let it rise in a warm spot for<br />
30 minutes.<br />
Divide the dough into 4 equal parts and roll into balls.<br />
Work each ball by pulling down the sides and tucking under the<br />
bottom. Repeat 4 or 5 times. Then on a smooth, unfloured surface,<br />
roll the ball under the palm of your hand until the top of the dough is<br />
smooth and firm, about 1 minute. Cover the dough with a clean,<br />
damp towel and let rise in a warm place for 15 minutes. At this point,<br />
the balls can be wrapped in plastic wrap and refrigerated for up to<br />
2 days. Make sure you wrap loose, but secure enough that the<br />
dough does not ooze out.<br />
5<br />
6<br />
Wrap in plastic wrap and let rest at room temperature for<br />
30 minutes.<br />
Cut dough into 4 equal pieces and roll out 1 piece at a time, keeping<br />
the remaining dough wrapped until needed. Cut as desired.<br />
6 Place a pizza stone on the middle rack and preheat the oven<br />
to 500°.<br />
7 To prepare each pizza,dip the ball of dough into flour, shake off<br />
excess flour, place dough on a clean, lightly floured surface, and start<br />
to stretch the dough. Press down on the center, spreading the dough<br />
to form an 8-inch circle, with outer border a little thicker than the<br />
inner circle. Lightly brush the inner circle of the dough with oil and<br />
arrange the toppings of your choice over the inner circle.<br />
8 Using a lightly floured baker's peel or a rimless flat baking tray,<br />
slide pizza onto the baking stone and bake until the pizza crust<br />
is nicely browned,10 to 12 minutes. Transfer the pizza to a firm<br />
surface and cut into slices with a pizza cutter or very sharp<br />
knife. Serve immediately.<br />
13 14<br />
<strong>Meijer</strong>.com
DL_HM0240Manual 6/30/09 4:47 PM Page 15<br />
Makes 20 to 22 biscuits<br />
INGREDIENTS<br />
Buttermilk Biscuits<br />
2 3/4 cups all-purpose flour<br />
1 1/2 tablespoons sugar<br />
1 tablespoon plus 1 teaspoon baking powder<br />
2 teaspoons salt<br />
1/4 teaspoon baking soda<br />
10 tablespoons (5 ounces) chilled unsalted butter, cut into small pieces<br />
1/4 cup minced onion<br />
1 tablespoon chopped fresh or 2 teaspoons dried thyme<br />
1 cup buttermilk<br />
1 or 2 tablespoons milk or cream<br />
1/4 cup grated Parmesan cheese, optional<br />
METHOD<br />
1 With the mixer fitted with the beaters, mix the flour, sugar, baking<br />
powder, salt and baking soda in a large bowl on speed 1.<br />
2 Add the onion, thyme, and chilled butter pieces. Increase mixer speed<br />
to 4 and blend chilled butter into batter. Reduce speed to 2 and slowly<br />
add the buttermilk.<br />
3 When dough comes together, remove the beaters and attach<br />
the dough hooks. Continue to knead on speed 3 until a round ball<br />
is formed.<br />
4 Place dough ball onto well-floured surface and, with a rolling pin,<br />
roll out dough to 1-inch thickness.<br />
5 Cut biscuits with biscuit cutter, and place onto a parchment lined<br />
baking sheet. Refrigerate for at least 1 hour before baking.<br />
6 Preheat oven to 350°. Brush the tops of biscuits with milk or cream,<br />
and then sprinkle with Parmesan cheese. Bake 25-30 minutes, or<br />
until golden brown.<br />
Recipe Notes<br />
15 16<br />
<strong>Meijer</strong>.com
DL_HM0240Manual 6/30/09 4:47 PM Page 17<br />
Recipe Notes<br />
Limited Warranty<br />
This warranty covers all defects in workmanship or materials in the<br />
mechanical and electrical parts, arising under normal usage and care, in<br />
this product for a period of 12 months from the date of purchase<br />
provided you are able to present a valid proof-of-purchase. A valid<br />
proof-of-purchase is a receipt specifying item, date purchased, and<br />
cost of item. A gift receipt with date of purchase and item is also an<br />
acceptable proof-of-purchase. Product is intended for household use only.<br />
Any commercial use voids the warranty.<br />
This warranty covers the original retail purchaser or gift recipient. During<br />
the applicable warranty period within normal household use,we will<br />
repair or replace, at our discretion, any mechanical or electrical part<br />
which proves defective, or replace unit with a comparable model.<br />
To obtain service under the terms of this warranty,<br />
call Toll Free (800) 275-8273.<br />
THIS LIMITED WARRANTY COVERS UNITS PURCHASED AND USED<br />
WITHIN THE UNITED STATES AND DOES NOT COVER:<br />
• Damages from improper installation.<br />
• Defects other than manufacturing defects.<br />
• Damages from misuse, abuse, accident, alteration, lack of proper<br />
care and maintenance, or incorrect current or voltage.<br />
• Damage from service by other than an authorized dealer or<br />
service center.<br />
This warranty gives you special legal rights and you may also have other<br />
rights to which you are entitled which may vary from state to state.<br />
17<br />
18<br />
<strong>Meijer</strong>.com