Bridging Two Wounds - Negative Pressure Wound Therapy from ...
Bridging Two Wounds - Negative Pressure Wound Therapy from ...
Bridging Two Wounds - Negative Pressure Wound Therapy from ...

Create successful ePaper yourself
Turn your PDF publications into a flip-book with our unique Google optimized e-Paper software.
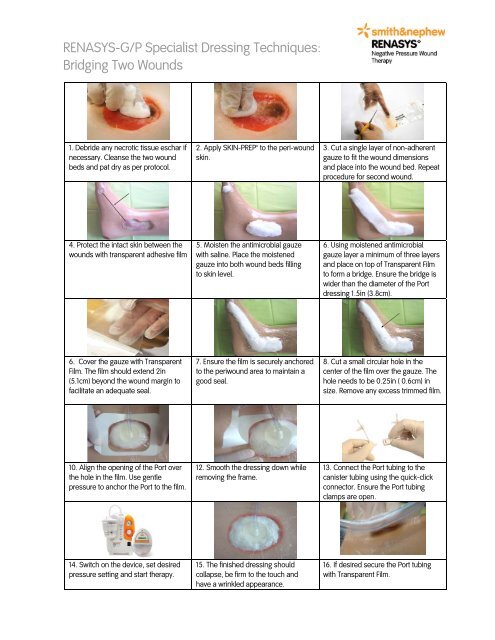
RENASYS-G/P Specialist Dressing Techniques:<br />
<strong>Bridging</strong> <strong>Two</strong> <strong><strong>Wound</strong>s</strong><br />
1. Debride any necrotic tissue eschar if<br />
necessary. Cleanse the two wound<br />
beds and pat dry as per protocol.<br />
4. Protect the intact skin between the<br />
wounds with transparent adhesive film<br />
6. Cover the gauze with Transparent<br />
Film. The film should extend 2in<br />
(5.1cm) beyond the wound margin to<br />
facilitate an adequate seal.<br />
10. Align the opening of the Port over<br />
the hole in the film. Use gentle<br />
pressure to anchor the Port to the film.<br />
14. Switch on the device, set desired<br />
pressure setting and start therapy.<br />
2. Apply SKIN-PREP to the peri-wound<br />
skin.<br />
5. Moisten the antimicrobial gauze<br />
with saline. Place the moistened<br />
gauze into both wound beds filling<br />
to skin level.<br />
7. Ensure the film is securely anchored<br />
to the periwound area to maintain a<br />
good seal.<br />
12. Smooth the dressing down while<br />
removing the frame.<br />
15. The finished dressing should<br />
collapse, be firm to the touch and<br />
have a wrinkled appearance.<br />
3. Cut a single layer of non-adherent<br />
gauze to fit the wound dimensions<br />
and place into the wound bed. Repeat<br />
procedure for second wound.<br />
6. Using moistened antimicrobial<br />
gauze layer a minimum of three layers<br />
and place on top of Transparent Film<br />
to form a bridge. Ensure the bridge is<br />
wider than the diameter of the Port<br />
dressing 1.5in (3.8cm).<br />
8. Cut a small circular hole in the<br />
center of the film over the gauze. The<br />
hole needs to be 0.25in ( 0.6cm) in<br />
size. Remove any excess trimmed film.<br />
13. Connect the Port tubing to the<br />
canister tubing using the quick-click<br />
connector. Ensure the Port tubing<br />
clamps are open.<br />
16. If desired secure the Port tubing<br />
with Transparent Film.
RENASYS-G/P Specialist Dressing Techniques:<br />
<strong>Bridging</strong> away <strong>from</strong> the wound<br />
1. Debride any necrotic tissue eschar if<br />
necessary. Cleanse the wound bed<br />
and pat dry as per protocol.<br />
4. Moisten the antimicrobial gauze<br />
with saline.<br />
7. Using moistened antimicrobial<br />
gauze layer a minimum of three layers<br />
and place on top of Transparent Film<br />
to form a bridge. Ensure the bridge is<br />
wider than the diameter of the Port<br />
dressing 1.5in (3.8cm).<br />
10. Cut a small circular hole in the<br />
center of the film over the gauze. The<br />
hole needs to be 0.25in (0.6cm) in<br />
size. Remove any excess trimmed<br />
film.<br />
13. Connect the Port tubing to the<br />
canister tubing using the quick-click<br />
connector. Ensure the Port tubing<br />
clamps are open.<br />
2. Apply SKIN-PREP to the periwound<br />
skin.<br />
5. Place the moistened gauze into the<br />
wound bed filling to skin level.<br />
8. Cover the gauze with Transparent<br />
Film. The film should extend 2in<br />
(5.1cm) beyond the wound margin to<br />
facilitate an adequate seal.<br />
11. Align the opening of the Port over<br />
the hole in the film. Use gentle<br />
pressure to anchor the Port to the film.<br />
14. Switch on the device, set desired<br />
pressure setting and start therapy.<br />
©2011 Smith & Nephew, Inc., All rights reserved. Trademark of Smith & Nephew. Certain trademarks registered in the US Patent & Trademark Office.<br />
3. Cut a single layer of non-adherent<br />
wound contact layer to fit the wound<br />
dimensions and place in the wound<br />
bed.<br />
6. Cover the intact skin where the<br />
bridge will be placed with transparent<br />
adhesive film.<br />
9. Ensure the film is securely anchored<br />
to the periwound area to maintain a<br />
good seal.<br />
12. Smooth the dressing down while<br />
removing the frame.<br />
15. The finished dressing should<br />
collapse, be firm to the touch, and<br />
have a wrinkled appearance.<br />
REN-0063-0311