

The Natalie Skirt - Sew Beautiful Magazine
The Natalie Skirt - Sew Beautiful Magazine
The Natalie Skirt - Sew Beautiful Magazine

You also want an ePaper? Increase the reach of your titles
YUMPU automatically turns print PDFs into web optimized ePapers that Google loves.
DOUBLE LAYER SKIRT FROM<br />
THE “NATALIE” PATTERN<br />
(shown on page 64 in<br />
<strong>Sew</strong> <strong>Beautiful</strong> Issue #144)<br />
MATERIALS LIST<br />
“<strong>Natalie</strong>” pattern from the <strong>Sew</strong> <strong>Beautiful</strong><br />
pattern collection (size 14 shown).<br />
Black cotton sateen shown (determine<br />
yardage - finished length of skirt x 3)<br />
Floral cotton print for piping trim<br />
Piping cord for ruffle seams and center<br />
front panel seams.<br />
3/4 inch elastic for waistband<br />
DMC Cotton Embroidery Floss to match<br />
print fabric shown is #322 (DK DK Baby<br />
Blue) and #597 (Turquoise)<br />
Wing needle for tucks<br />
Stitch n Ditch tear away stabilizer<br />
Tapestry needle for floss running stitch<br />
White wash-away marking pen<br />
<strong>The</strong> <strong>Natalie</strong> <strong>Skirt</strong><br />
By Janet Gilbert<br />
© 2012 <strong>Sew</strong> <strong>Beautiful</strong> <strong>Magazine</strong> • www.<strong>Sew</strong><strong>Beautiful</strong>mag.com<br />
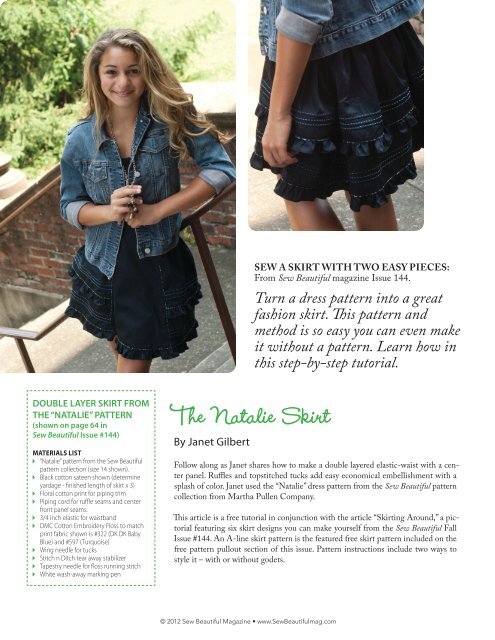
SEW A SKIRT WITH TWO EASY PIECES:<br />
From <strong>Sew</strong> <strong>Beautiful</strong> magazine Issue 144.<br />
Turn a dress pattern into a great<br />
fashion skirt. This pattern and<br />
method is so easy you can even make<br />
it without a pattern. Learn how in<br />
this step-by-step tutorial.<br />
Follow along as Janet shares how to make a double layered elastic-waist with a center<br />
panel. Ruffles and topstitched tucks add easy economical embellishment with a<br />
splash of color. Janet used the “<strong>Natalie</strong>” dress pattern from the <strong>Sew</strong> <strong>Beautiful</strong> pattern<br />
collection from Martha Pullen Company.<br />
This article is a free tutorial in conjunction with the article “<strong>Skirt</strong>ing Around,” a pictorial<br />
featuring six skirt designs you can make yourself from the <strong>Sew</strong> <strong>Beautiful</strong> Fall<br />
Issue #144. An A-line skirt pattern is the featured free skirt pattern included on the<br />
free pattern pullout section of this issue. Pattern instructions include two ways to<br />
style it – with or without godets.
PREPARATION<br />
1. Trace the front panel of the “<strong>Natalie</strong>” pattern. Cut the<br />
pattern on waistline marking. You can also make your own<br />
front panel from a straight rectangle or create one with a<br />
slight angle on each side as shown.<br />
2. To accommodate a ruffle hem, remove 2-inches from your<br />
desired finished length.<br />
3. Cut out 2 front panels. Set one aside as a front lining.<br />
4. <strong>The</strong> elastic skirt sides and back require two rectangles cut<br />
or torn from 60-inch fabric. For a smaller sized skirt, two<br />
45 inch wide pieces could be used.<br />
5. <strong>The</strong> length of the bottom layer is equal to the side seam of<br />
the front panel + 3/4 inch allowed for tucks.<br />
6. For the double layer affect on the side/back skirt, make<br />
the length of the top layer five inches shorter than the<br />
bottom layer and 3 to 4 inches for smaller sizes.<br />
7. Ruffle is gathered at a 2 to 1 ratio and is finished with a<br />
narrow hem. For a 2-inch finished ruffle cut five, 3-3/4inch<br />
to 3-1/2-inch wide fabric strips from selvage to<br />
selvage.<br />
CONSTRUCTION<br />
Wing Needle Folded Tucks<br />
(Side/Back Elastic skirt)<br />
1. To create the tucks on the bottom edge of both side/back<br />
skirt layers, measure 2 inches from the bottom raw edge<br />
and mark the first line using a white wash away marking<br />
pen on the right side of the fabric.<br />
2. Mark second tuck line 1 inch about first and third tuck<br />
line 1 inch above second, making tuck lines spaced 1 inch<br />
apart.<br />
3. Working a single tuck at a time, starting from the bottom<br />
and working upward, fold the skirt on the bottom line<br />
and pin.<br />
4. Stitch 1/8-inch from fold edge using a wing needle and a<br />
modified machine Pinstitch.<br />
• On my Bernina, I set the pinstitch to a length<br />
of 3 and a width of 0. This gave me the desired<br />
stitch without the side stitch.<br />
• I used Stitch n Ditch tear away stabilizer<br />
behind my fabric when I stitched. I cut the<br />
stabilizer into long 1-inch strips.<br />
• Tucks could also just be stitch with a straight<br />
stitch and a regular machine needle.<br />
5. Repeat these steps to complete the rest of the tucks.<br />
6. For a touch of color, weave three strands of DMC<br />
embroidery floss through the pinstitch holes with a<br />
tapestry needle. I used DMC Floss #322 (DK DK Baby<br />
Blue) and #597 (Turquoise). <strong>The</strong> holes created by the<br />
pinstitch create perfectly spaced running stitches.<br />
7. Repeat these steps to complete the tucks along the bottom<br />
edge of the bottom skirt layer. Set bottom layer aside<br />
8. Make self-made piping by covering cording with bias<br />
strips of floral fabric. Pin and stitch to the bottom edge<br />
of the top skirt layer only. To reduce bulk, grade the seam<br />
allowance of the piping.<br />
9. Set aside skirt layers to prepare ruffles.<br />
© 2012 <strong>Sew</strong> <strong>Beautiful</strong> <strong>Magazine</strong> • www.<strong>Sew</strong><strong>Beautiful</strong>mag.com<br />
PREPARE RUFFLES<br />
1. Join ruffle strips end to end to create one very long strip.<br />
2. Narrow hem strip with a rolled hem foot.<br />
3. Use a ruffle foot to gather entire strip, or run two rows of<br />
gathering stitches that run the length of each section. Pull<br />
bobbin threads to gather strip.<br />
4. Cut strips to fit per instructions.<br />
SKIRT ASSEMBLY<br />
1. Cut a ruffle strip to fit width of top skirt layer and stitch<br />
to bottom, piped edge with right sides together (push<br />
back gathers to flatten each end of ruffle approximately<br />
1/2 inch for seam allowance). Finish seam and press up.<br />
Top stitch 1/8 inch from seam line.<br />
2. Pin the right side of the shorter, top skirt to the wrong<br />
side of the longer, bottom skirt and stitch the waist seam<br />
1/2 inch.<br />
3. Flip top skirt to the front, enclosing seam between layers<br />
and press seam.<br />
4. Top stitch 1/8 inch from the seam edge, then stitch<br />
1-inch from the edge to create a casing for the elastic.<br />
5. Insert 3/4 inch elastic through the casing. Stitch elastic<br />
ends to secure within side seam allowances.<br />
6. Baste stitch layers of skirt together at each end. <strong>The</strong>se are<br />
the seams that will join the center panel (fig 1).<br />
Baste<br />
seams<br />
Front<br />
side<br />
Back<br />
Piping<br />
FIGURE 1<br />
Front<br />
side<br />
Elastic<br />
Baste Seams<br />
Tucks<br />
Layer 2<br />
Tucks<br />
7. Prepare the front panel: Fuse a 1-1/2 inch strip of fusible<br />
interfacing cut the width of the center panel to the wrong<br />
side at the waistline.<br />
8. Stitching from the bottom up, sew self-made piping to<br />
each side of the front skirt panel. To reduce bulk, grade<br />
the inside seam of the piping. Finish the seam with a<br />
serger or a zig-zag stitch.<br />
9. Stitch the lining panel to the front skirt panel across top<br />
edge. Trim seam allowance to 1/4 inch and press. Under<br />
stitch the lining seam to keep it from rolling (fig. 2).
Piping<br />
on RS<br />
Wrong<br />
Side<br />
Center<br />
Panel<br />
Lining<br />
Wrong<br />
Side<br />
Center<br />
Front<br />
Panel<br />
FIGURE 2<br />
Fuse<br />
interfacing<br />
Piping<br />
on RS<br />
10. Separate the lining from the center front panel. Pin<br />
double layered skirt to center panel with right sides<br />
together. Align top edge of elastic waist to center panel/<br />
lining seam. Stitch together with a 1/2 seam allowance.<br />
Press seams toward center.<br />
11. Before stitching lining in place, stitch piping and a twoinch<br />
ruffle around the bottom of the entire skirt with a<br />
1/2 seam allowance. Press seam up. Top stitch 1/8 inch<br />
from seam line (fig. 3).<br />
Fold<br />
seam<br />
back<br />
Fold<br />
seam<br />
back<br />
Seam<br />
Front<br />
Panel<br />
FIGURE 3<br />
Fold<br />
seam<br />
back<br />
12. Press under side seam allowances and bottom edge 1/2<br />
inch on skirt lining. Fold lining to inside of skirt and<br />
enclose seams. Hand slip stitch the lining along each side<br />
and across bottom seam to finish skirt.<br />
© 2012 <strong>Sew</strong> <strong>Beautiful</strong> <strong>Magazine</strong> • www.<strong>Sew</strong><strong>Beautiful</strong>mag.com


