

Pintuck Landscapes… - Fiberella!
Pintuck Landscapes… - Fiberella!
Pintuck Landscapes… - Fiberella!

Create successful ePaper yourself
Turn your PDF publications into a flip-book with our unique Google optimized e-Paper software.
<strong>Pintuck</strong> <strong>Landscapes…</strong><br />
with Optional Needlepunch<br />
A creative mini project from Paula Scaffidi AKA <strong>Fiberella</strong><br />
www.fiberella.com<br />
ACCESSORIES<br />
Bernina <strong>Pintuck</strong> Foot (or Feet)<br />
Largest to smallest: #30, #31, #32,<br />
#33. Use one; or more for added textural<br />
interest and depth in your landscapes.<br />
Recommendation: #30 &<br />
#32 pair well; #31 or #32 if just using<br />
one.<br />
Optional Bernina Needlepunch<br />
Machine needle felting is one of my<br />
favorite things in the sewing universe!<br />
SUPPLIES<br />
Fabric - Solid or blurry colors; cut<br />
or tear pieces roughly 8” x 10”<br />
Needlepunch friendly fabrics: lightweight<br />
wool, wool blends, silk noil (raw silk),<br />
linen, Brussels washer linen; cheesecloth<br />
or scrim.. Kona cloth in dark colors is also<br />
workable with slightly heavier roving<br />
applications. <strong>Pintuck</strong> only: silk organza,<br />
synthetic sheers and denim can be added<br />
to the list above<br />
Thread - Any variety of colors in<br />
cotton, silk, polyester, rayon, etc. Be<br />
sure to match thread weight to the<br />
needle size.<br />
Twin needle(s) - sizes are marked:<br />
needle spacing / needle size. Each foot<br />
requires a specific needle spacing,<br />
but the needle size can vary to match<br />
thread wt. See chart at right.<br />
Optional Stabilizer - For delicate<br />
fabric, OESD’s Aqua Mesh is suitable<br />
for pintucking and needlepunching. I<br />
find Aqua Mesh Plus ideal while<br />
sewing pintucks; but avoid its use<br />
with needlepunch. The adhesive<br />
gums up the barbs on punch needles.<br />
Optional Needlepunch requires<br />
Roving (unspun fiber) - You’ll need a<br />
variety of colors at your fingertips.<br />
Finest quality merino and specialty<br />
roving in colorful assortments are<br />
available at www.fiberella.com.<br />
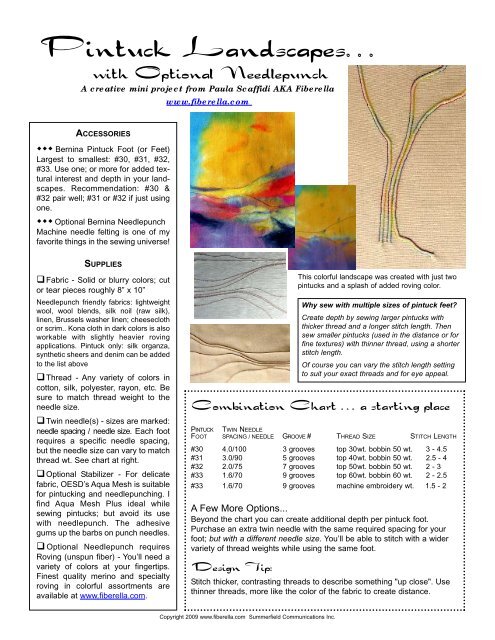
Combination Chart … a starting place<br />
PINTUCK TWIN NEEDLE<br />
FOOT SPACING / NEEDLE GROOVE # THREAD SIZE STITCH LENGTH<br />
#30 4.0/100 3 grooves top 30wt. bobbin 50 wt. 3 - 4.5<br />
#31 3.0/90 5 grooves top 40wt. bobbin 50 wt. 2.5 - 4<br />
#32 2.0/75 7 grooves top 50wt. bobbin 50 wt. 2 - 3<br />
#33 1.6/70 9 grooves top 60wt. bobbin 60 wt. 2 - 2.5<br />
#33 1.6/70 9 grooves machine embroidery wt. 1.5 - 2<br />
A Few More Options...<br />
Beyond the chart you can create additional depth per pintuck foot.<br />
Purchase an extra twin needle with the same required spacing for your<br />
foot; but with a different needle size. You’ll be able to stitch with a wider<br />
variety of thread weights while using the same foot.<br />
Design Tip:<br />
Stitch thicker, contrasting threads to describe something "up close". Use<br />
thinner threads, more like the color of the fabric to create distance.<br />
Copyright 2009 www.fiberella.com Summerfield Communications Inc.<br />
This colorful landscape was created with just two<br />
pintucks and a splash of added roving color.<br />
Why sew with multiple sizes of pintuck feet?<br />
Create depth by sewing larger pintucks with<br />
thicker thread and a longer stitch length. Then<br />
sew smaller pintucks (used in the distance or for<br />
fine textures) with thinner thread, using a shorter<br />
stitch length.<br />
Of course you can vary the stitch length setting<br />
to suit your exact threads and for eye appeal.
Selecting Threads…<br />
Look for color options in your stash with<br />
appropriate thread wt. for your needle size<br />
For a shadow effect, use a different value of<br />
thread in each needle<br />
Add interest to pintucks by using contrasting<br />
colors, especially a warm and a cool<br />
Variegated thread is fun<br />
Or try more than one luster of thread… like<br />
a shiny blue paired with a sparkly white as you<br />
coast over the water, etc.<br />
It's ok to use a thread wt. one size too small<br />
for your needles; but I don't recommend ever<br />
using a thread that’s too thick for the needle size.<br />
Fabrics with blurry colorations can help you<br />
begin to visualize a landscape. I saw trees,<br />
shrubs and ground in this one.<br />
This aqua wool fabric is ideal for needlepunch.<br />
Threading the Machine<br />
Check your specific machine manual for "Threading the Twin<br />
Needle". Presser foot must be up while threading except while<br />
threading the needle itself. Basically, thread the right needle as<br />
usual; taking care to have it pass along the right side of the tension<br />
disc. You can feel and very gently move the disc off to the side with<br />
your fingertip. Thread the left needle passing the thread on the left<br />
side of the disc; and skip the very last thread guide at the needle.<br />
Tip: For faster thread change, plan to maintain the same color in the<br />
right needle (which has to be threaded before the left needle). By<br />
changing the left needle only, you will not have to re-do the right<br />
needle. Just raise the presser foot. Clip the thread feeding the left<br />
needle at the spool. Pull the cut segment of thread out through the<br />
left needle and re-thread. ALWAYS THREAD THE RIGHT NEEDLE FIRST.<br />
See the points or peaks in the image to the left and above in one<br />
spot? I’ve simply used the reverse button to form these. With needledown,<br />
just hold the reverse button and guide the fabric to and fro.<br />
Machine Settings<br />
Straight stitching only! Make sure your stitch width is set to zero.<br />
Loosen the top thread tension a little whenever your bobbin thread is thinner than your top thread (see chart page 1).<br />
Needle down is handy for most pintuck techniques, including reverse sewing.<br />
Many Bernina foot pedals have the ability to raise and lower the needles with a tap. I love this feature.<br />
If you are lucky enough to have a knee lift, I encourage you to use it. Try using your left foot on the pedal.<br />
On Bernina you can tie off very easily in a number of ways. I like to set my regular zig zag stitch to zero width, making it<br />
a straight stitch; and set the stitch length very short (in the satin stitch range). Bernina temporary altered stitch memory<br />
will remember these adjustments, but only until you turn off your machine. So during your work session, you can toggle<br />
back and forth to the adjusted zig zag stitch to sew several straight stitches of very short length to tie off when needed.<br />
This "knots" your pintuck when you wish to stop or begin in the middle of your landscape.<br />
Copyright 2009 www.fiberella.com Summerfield Communications Inc.
Simple Beginnings…<br />
Edge-to-edge pintucks<br />
Reveal a landscape with just a few lines. Peaceful and calm feelings are<br />
easily expressed with gently curving horizontal lines. Diagonals will suggest<br />
movement, and invite you into the landscape. Verticals lend a sense<br />
of stability or place. All of these are easy to sew from edge-to-edge.<br />
Cool fabric or thread colors will enhance a calm feeling. Have fun playing<br />
with thread and fabric color changes. See how these colors affect your<br />
mood. EnJOY.<br />
Re-state your first pintuck line by "tracking" it in one of the side grooves on<br />
your pintuck foot. Take your eye off of the needle; instead, watch a single line<br />
of thread from the previous pintuck enter a particular groove. Just keep your<br />
eye there and stitch along. Can you see the little toes on the feet?<br />
If you choose to alternate the edge you begin stitching from, your contrasting<br />
thread colors will reverse their up/down position in the landscape. Begin to<br />
notice the hardness, softness of the line that this change offers as a design<br />
tool.<br />
Iron as needed. Place fabric face down with pintucks nested into a padded<br />
ironing surface; steam press to maintain a smooth base. Cool before moving.<br />
Create another parallel line using a different groove. You can produce perfectly<br />
parallel lines to form pleasing repeat patterns.<br />
I love the look of gently flowing, "part time parallel lines" in the landscape.<br />
They're interesting. Perfectly parallel all of the time = too predictable. So for<br />
variety, "track" a section of a previous pintuck under the foot… and then just<br />
veer off because you felt like it! Just ride the bump to a new open spot and<br />
coast somewhere, somewhat parallel to the last line, changing the curve at<br />
will. As you stitch along, begin to notice the beautiful shapes of the spaces<br />
in-between pintuck lines. Try to watch these "space shapes" emerge as you<br />
are stitching.<br />
Another option is to "track" a previous pin tuck and then "hop the rail" to<br />
another groove; stitch a bit and then hop to another groove. This works well<br />
when you have more grooves to play with.<br />
You can dash into the landscape from the side, stitch at random but aim to<br />
eventually catch a prior pintuck with one of the grooves for some parallel<br />
coasting along.<br />
I enJOY repeating this cycle of creating a line, and a perfectly parallel line<br />
or more; establishing something of a pattern…… and then adding in a<br />
stronger surprise change of direction.<br />
Blend a diagonal pintuck line in with a horizontal by “catching a groove”.<br />
Turn your work 90 degrees. Have you made any branches or trees without<br />
knowing it?<br />
Top to bottom verticals and gently bending diagonals are great for trees.<br />
Vertical lines feel quite stable. We consider buildings and monuments as<br />
stable, permanent. The wind may come along and cause your trees to sway.<br />
Is it windy today? How would you show a gentle breeze?<br />
Vary the sizes of trees to add visual depth. This works especially well using<br />
with more than one size of pintuck foot. Use your smallest grooves for smaller<br />
branches and distant trees.<br />
Copyright 2009 www.fiberella.com Summerfield Communications Inc.<br />
Vertically it’s a large tree trunk.<br />
.... Horizontally it’s land.<br />
Be sure to look at your work from all directions as<br />
you’re creating . You will be surprised how often<br />
amazing things emerge without aiming for them!<br />
Broken Lines...<br />
One line leads to another. Eventually<br />
some lines will need to stop midway.<br />
Bernina machines have temporary<br />
altered memory, making the securing<br />
of pintucks quick and easy. How-to is<br />
on the next page....
Composing <strong>Landscapes…</strong><br />
Develop ideas with the use of small “thumbnail” sketches.<br />
You can also cut or crop your sewn 8” x 10” compositions<br />
down, finding more pleasing proportions and shapes in<br />
smaller areas. Then create another larger work with the<br />
design as your guide.<br />
Horizontal lines are restful…. We lie down when<br />
we're tired.<br />
Vertical lines are stable… We don't expect them<br />
to fall.<br />
Diagonal lines indicate movement… You can<br />
add a path or river so others can travel into your<br />
landscape.<br />
DOODLE OFTEN. TURN SIDEWAYS OR UPSIDE-DOWN!<br />
Add a little perspective… diagonal line segments are easy to sew<br />
Invite someone into your landscape by adding a path, road or river. Converging diagonal lines start out wide<br />
toward the bottom of your landscape; and become closer together as they move diagonally up into the landscape.<br />
Even just a single diagonal line will create both movement and depth. It's easy.<br />
You can begin a pintuck anywhere. Plan to slant two lines toward each other. See diagrams for ideas.<br />
To routinely lock off the stitches at the start and end of a pintuck, use a series of short stitches. Simply set<br />
your usual zig zag stitch to a ZERO stitch width and a stitch length in the satin stitch range… very short.<br />
Bernina temporary altered memory will keep these settings until you turn off your machine. So every time you<br />
are ready to lock on or lock off a pintuck, just hit your zig zag button and stitch about six to eight little stitches.<br />
Tip: The thinner the thread, the tinier these stitches can be.<br />
Stitch "converging" lines, two lines that get closer and closer together in the distance for a path, road, river<br />
or stream. The two slanting lines don't have to touch; just stitch them increasingly closer together to convey<br />
distance. Using tiny stitches to tie-off you can stop a diagonal line on the horizon, where land meets sky.<br />
Getting excited? Add clashing and/or hot thread colors for a passionate feeling. Thin threads in cooler colors<br />
will recede. Thick threads, bigger pintucks in warm or hot colors will advance.<br />
Crossed Lines are lovely. Try some.<br />
Pivots are shown below and to the right.<br />
Pivoting technique makes it possible to sew<br />
desired, angles and smaller, tighter curves.<br />
Bernina Feetures Books are well worth the<br />
investment. In addition to lots of other feet,<br />
you’ll find pintuck and pivot info in in Volume I.<br />
Copyright 2009 www.fiberella.com Summerfield Communications Inc.
Optional Needlepunch…<br />
Shine a light from your imagination. Fill your world with<br />
the wonder of color. You can just keep layering roving<br />
until you arrive at a combination you’re comfortable<br />
with. So there are no worries.<br />
Is there sunshine or moonlight in your landscape?<br />
Locate a light source in your mind's eye. Imagine the<br />
wavelengths of light illuminating the contours of the<br />
earth from its angled position.<br />
“Color” with roving between the pintuck lines; color outside<br />
of them. You can lay down roving”brushstrokes” so<br />
they go right across a pintuck.<br />
In the pintuck landscape at the right, I added imaginary<br />
color to a bleak color palette.<br />
Check your needlepunch manual for proper set-up.<br />
Needlepunch is a feed dogs down activity... so you’ll be<br />
moving your fabric around to guide arranged roving shingles<br />
under the punch needles.<br />
Begin by pulling shingle of roving or fiber. Hold the roving<br />
with a gentle press about three inches from its end. Use the<br />
other hand, thumb and pointer, to pull a "shingle" of roving.<br />
These should be about three inches long; and will shrink to<br />
about 2 ½ inches as you Needlepunch them into place.<br />
Desired thickness: you should almost but not quite be able<br />
to see through the shingles (even after you've machine<br />
felted them down).<br />
To make variegated brushstrokes you can pull more than<br />
one color at the same time.<br />
Only lay out one, two or up to three shingles at a time.<br />
To avoid puckering of the base fabric, it's best to run the<br />
machine between any overlapping shingles.<br />
Arrange color placement to please the eye. It great fun to<br />
move roving shingles around at random; and then<br />
needlepunch when the arrangement pleases your eye. Hold<br />
it up in a mirror. Maybe a touch of..... ?<br />
A suggestion of a cloud breezes across the pin tuck tree on the<br />
left. The tree is a simple V, stitched using the reverse button. On<br />
the right, the tree has a Y formation; and a part-time parallel third<br />
line. First I stitched the vertical; then I carefully inserted both of the<br />
twin needles right alongside this same vertical pintuck. I tied off<br />
with short stitches and sewed my way to the top. Then a last pintuck<br />
widened the trunk at the base and added the third branch.<br />
Roving How-to &Where-to…<br />
EnJOY!<br />
To learn more, visit the Resource page on www.fiberella.com<br />
Copyright 2009 www.fiberella.com Summerfield Communications Inc.<br />
Gently keep the base fabric flat against the<br />
machine bed; but don't press down hard. If you<br />
do, how can you move the fabric around? :-)<br />
Relax. Lighten up your touch, and move the<br />
fabric to keep the needle cluster punching on<br />
roving, not directly hitting the cloth. This protects<br />
more delicate fabrics like cotton which is prone<br />
to needle marks.<br />
Work your way across the shingles with<br />
moderate motor speed and slow fabric movement.<br />
Hold the fabric not the roving.<br />
Keeping the punch needles on the roving at<br />
all times, I recommend fully punching one shingle<br />
before going on to the next. This allows for<br />
a smooth base fabric in the end. You can begin<br />
in the middle of each brushstroke; or toward an<br />
end. However you do it, allow the "brushstrokes"<br />
of roving to dance their way across the surface,<br />
shrinking toward where the punch needles are fastening<br />
them. You’ve punched enough when the<br />
roving shows underneath.