A History Lesson Precision Aerobatics Extra 330L
A History Lesson Precision Aerobatics Extra 330L
A History Lesson Precision Aerobatics Extra 330L

You also want an ePaper? Increase the reach of your titles
YUMPU automatically turns print PDFs into web optimized ePapers that Google loves.
This was to achieve the correct CG with the<br />
lighter power option, especially with a canister<br />
that has its own center of gravity which sits further<br />
back than a Pitts style. This particular<br />
aspect is often counteracted by the extra weight<br />
of the canister and header, but still something to<br />
consider when setting up a model of this<br />
nature. Bear in mind that set up with the DA<br />
100 or similar, these changes are not necessary,<br />
but don’t be afraid to personalize a model like<br />
this if you feel the need or have reason to.<br />
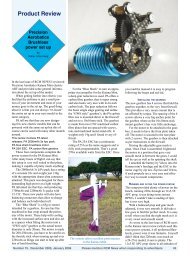
The kit comes ‘canister ready’ which is an<br />
important option for many these days with<br />
more and more emphasis on noise and the<br />
restriction there of. However, because this<br />
model is designed to take a large range of<br />
power and muffler options, there is most likely<br />
some additional work that will be required if<br />
inboard canisters are used. It really depends on<br />
what you decide to fit in there and how you<br />
want to set it up as to the work you may need<br />
to do. A look on the build and support forum<br />
on RCU will give many examples of the different<br />
ways of accomplishing this, so there really<br />
is no guess work. Being of wooden construction,<br />
any work you choose to do is delightfully<br />
simple and the easy access from the top also<br />
helps. On mine, I moved the fuel tank tray up<br />
for the canister, (I believe subsequent production<br />
runs will have this as standard) and back<br />
over the wing tube to allow room for smoke<br />
tray and then boxed in the compartment below.<br />
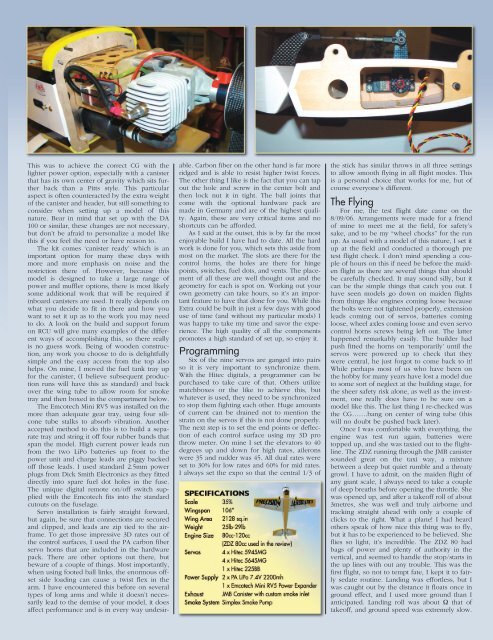
The Emcotech Mini RV5 was installed on the<br />
more than adequate gear tray, using four silicone<br />
tube stalks to absorb vibration. Another<br />
accepted method to do this is to build a separate<br />
tray and string it off four rubber bands that<br />
span the model. High current power leads run<br />
from the two LiPo batteries up front to the<br />
power unit and charge leads are piggy backed<br />
off those leads. I used standard 2.5mm power<br />
plugs from Dick Smith Electronics as they fitted<br />
directly into spare fuel dot holes in the fuse.<br />
The unique digital remote on/off switch supplied<br />
with the Emcotech fits into the standard<br />
cutouts on the fuselage.<br />
Servo installation is fairly straight forward,<br />
but again, be sure that connections are secured<br />
and clipped, and leads are zip tied to the airframe.<br />
To get those impressive 3D rates out of<br />
the control surfaces, I used the PA carbon fiber<br />
servo horns that are included in the hardware<br />
pack. There are other options out there, but<br />
beware of a couple of things. Most importantly,<br />
when using footed ball links, the enormous offset<br />
side loading can cause a twist flex in the<br />
arm. I have encountered this before on several<br />
types of long arms and while it doesn’t necessarily<br />
lead to the demise of your model, it does<br />
affect performance and is in every way undesir-<br />
able. Carbon fiber on the other hand is far more<br />
ridged and is able to resist higher twist forces.<br />
The other thing I like is the fact that you can tap<br />
out the hole and screw in the center bolt and<br />
then lock nut it in tight. The ball joints that<br />
come with the optional hardware pack are<br />
made in Germany and are of the highest quality.<br />
Again, these are very critical items and no<br />
shortcuts can be afforded.<br />
As I said at the outset, this is by far the most<br />
enjoyable build I have had to date. All the hard<br />
work is done for you, which sets this aside from<br />
most on the market. The slots are there for the<br />
control horns, the holes are there for hinge<br />
points, switches, fuel dots, and vents. The placement<br />
of all these are well thought out and the<br />
geometry for each is spot on. Working out your<br />
own geometry can take hours, so it’s an important<br />
feature to have that done for you. While this<br />
<strong>Extra</strong> could be built in just a few days with good<br />
use of time (and without my particular mods) I<br />
was happy to take my time and savor the experience.<br />
The high quality of all the components<br />
promotes a high standard of set up, so enjoy it.<br />
Programming<br />
Six of the nine servos are ganged into pairs<br />
so it is very important to synchronize them.<br />
With the Hitec digitals, a programmer can be<br />
purchased to take care of that. Others utilize<br />
matchboxes or the like to achieve this, but<br />
whatever is used, they need to be synchronized<br />
to stop them fighting each other. Huge amounts<br />
of current can be drained not to mention the<br />
strain on the servos if this is not done properly.<br />
The next step is to set the end points or deflection<br />
of each control surface using my 3D pro<br />
throw meter. On mine I set the elevators to 40<br />
degrees up and down for high rates, ailerons<br />
were 35 and rudder was 45. All dual rates were<br />
set to 30% for low rates and 60% for mid rates.<br />
I always set the expo so that the central 1/3 of<br />
the stick has similar throws in all three settings<br />
to allow smooth flying in all flight modes. This<br />
is a personal choice that works for me, but of<br />
course everyone’s different.<br />
The Flying<br />
For me, the test flight date came on the<br />
8/09/06. Arrangements were made for a friend<br />
of mine to meet me at the field, for safety’s<br />
sake, and to be my “wheel chocks” for the run<br />
up. As usual with a model of this nature, I set it<br />
up at the field and conducted a thorough pre<br />
test flight check. I don’t mind spending a couple<br />
of hours on this if need be before the maiden<br />
flight as there are several things that should<br />
be carefully checked. It may sound silly, but it<br />
can be the simple things that catch you out. I<br />
have seen models go down on maiden flights<br />
from things like engines coming loose because<br />
the bolts were not tightened properly, extension<br />
leads coming out of servos, batteries coming<br />
loose, wheel axles coming loose and even servo<br />
control horns screws being left out. The latter<br />
happened remarkably easily. The builder had<br />
push fitted the horns on ‘temporarily’ until the<br />
servos were powered up to check that they<br />
were central, he just forgot to come back to it!<br />
While perhaps most of us who have been on<br />
the hobby for many years have lost a model due<br />
to some sort of neglect at the building stage, for<br />
the sheer safety risk alone, as well as the investment,<br />
one really does have to be sure on a<br />
model like this. The last thing I re-checked was<br />
the CG…….bang on center of wing tube (this<br />
will no doubt be pushed back later).<br />
Once I was comfortable with everything, the<br />
engine was test run again, batteries were<br />
topped up, and she was taxied out to the flightline.<br />
The ZDZ running through the JMB canister<br />
sounded great on the taxi way, a mixture<br />
between a deep but quiet rumble and a throaty<br />
growl. I have to admit, on the maiden flight of<br />
any giant scale, I always need to take a couple<br />
of deep breaths before opening the throttle. She<br />
was opened up, and after a takeoff roll of about<br />
3metres, she was well and truly airborne and<br />
tracking straight ahead with only a couple of<br />
clicks to the right. What a plane! I had heard<br />
others speak of how nice this thing was to fly,<br />
but it has to be experienced to be believed. She<br />
flies so light, it’s incredible. The ZDZ 80 had<br />
bags of power and plenty of authority in the<br />
vertical, and seemed to handle the stop/starts in<br />
the up lines with out any trouble. This was the<br />
first flight, so not to tempt fate, I kept it to fairly<br />
sedate routine. Landing was effortless, but I<br />
was caught out by the distance it floats once in<br />
ground effect, and I used more ground than I<br />
anticipated. Landing roll was about Ω that of<br />
takeoff, and ground speed was extremely slow.