

Tumble Tramp Assembly Instructions & Double Mini ... - Ross Athletic
Tumble Tramp Assembly Instructions & Double Mini ... - Ross Athletic
Tumble Tramp Assembly Instructions & Double Mini ... - Ross Athletic

Create successful ePaper yourself
Turn your PDF publications into a flip-book with our unique Google optimized e-Paper software.
<strong>Tumble</strong> <strong>Tramp</strong> <strong>Assembly</strong> <strong>Instructions</strong><br />
& <strong>Double</strong> <strong>Mini</strong> <strong>Instructions</strong><br />
**WARNING – THE TUMBLE TRAMP AND DOUBLE MINI MAY CAUSE<br />
CATASTROPHIC INJURY INCLUDING PARALYSIS AND DEATH. DO NOT<br />
USE WITHOUT PROPER TRAINING AND PROPER SUPERVISION**<br />
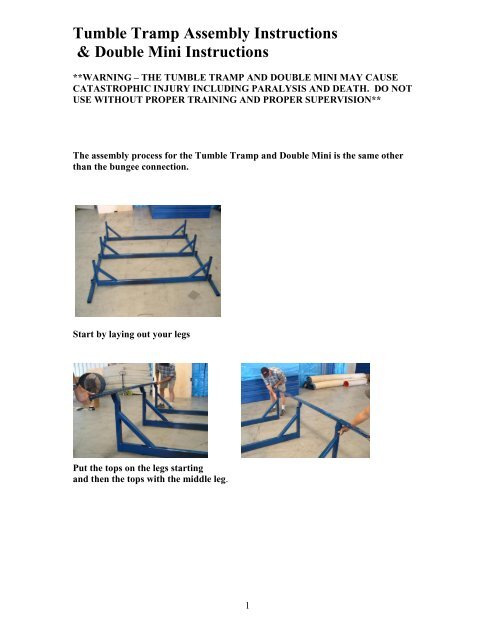
The assembly process for the <strong>Tumble</strong> <strong>Tramp</strong> and <strong>Double</strong> <strong>Mini</strong> is the same other<br />
than the bungee connection.<br />
Start by laying out your legs<br />
Put the tops on the legs starting<br />
and then the tops with the middle leg.<br />
1
If you are connecting two or more sections of <strong>Tumble</strong> <strong>Tramp</strong> you will need to<br />
use the H-clip to connect the two together.<br />
Once you have all the sections connected, insert the bolts into the nuts and tighten<br />
with a wrench.<br />
***DO NOT ATTEMPT TO ATTACH SPRINGS UNTIL ALL BOLTS ARE<br />
TIGHTENED!***<br />
2
Lay out bed with the yellow Place a quick link on each corner of the<br />
stripes on the top. <strong>Tumble</strong> <strong>Tramp</strong>. There is a total of 4 quick<br />
links.<br />
Each corner of the bed has 4 D-Rings. Start by attaching one spring per corner<br />
working from corner to corner in a circular motion. Attach the spring on the first<br />
D-ring and the first triangle on the frame. This first triangle will also have the<br />
quick link attached to it. Once the first springs are in place, go to the second D-ring<br />
and attach it to the third triangle on the frame. (You will skip a triangle on the<br />
frame)<br />
**HINT: Use one of the springs to help pull the other springs from the bed to the<br />
frame.**<br />
3
You will skip a spot on the frame for each D-ring spring. Continue to work in the<br />
circular motion until the first 4 D-ring springs have been attached on all four<br />
corners.<br />
Once you have attached the four springs per corner, you will have to go back and<br />
attach a second spring per D-ring. Each D-ring will have two springs attached to it.<br />
Attach the second spring to the spot on the frame that you skipped during the initial<br />
spring installation.<br />
***Note – You will only use two springs per bed bar on the <strong>Double</strong> <strong>Mini</strong>***<br />
4
Once there are eight springs attached per corner you can start to attach the<br />
remaining springs. Find the middle of the bed and connect a spring. Do this on<br />
both sides. Once the middle springs are connected connect two springs to the right<br />
and two springs to the left of the center spring. Skip a triangle on the frame and<br />
then connect 10 springs. Do this on both sides, in each direction. If you need to skip<br />
a triangle sooner in order to keep the springs straight, go ahead and do it. The goal<br />
is to keep the bed tight and no wrinkles in it. If a wrinkle starts to occur, remove<br />
some of the springs and angle them a little toward the end of the tramp. This will<br />
remove the wrinkle or move it towards the end. Follow this process to the end of the<br />
tramp. When you finish, there may be a wrinkle at the end.<br />
Once you install the bungee and the twine the wrinkle will disappear.<br />
The bed will be very tight once the springs have been installed.<br />
5
This <strong>Tumble</strong> <strong>Tramp</strong> bungee is installed differently than the <strong>Double</strong> <strong>Mini</strong>. Please see<br />
the last page for <strong>Double</strong> <strong>Mini</strong> bungee instructions.<br />
Once installation of the bed is complete, you can proceed to the bungee cord step.<br />
Tie the bungee in a knot around one of the corner quick links. Run the cord through<br />
the ends of the bed and through the quick link on the opposite corner.<br />
Run the cord across to the beginning quick link once again, pulling the cord as tight<br />
as possible, then back across to the opposite quick link. From there thread it<br />
through the bed once again. Once the cord has been threaded through the bed<br />
webbing twice, run it back and forth between the quick links until all cord has been<br />
used and then tie off.<br />
6
Attach the twine to the quick link and start to wrap it around the cord bringing the<br />
two sections of the cord together.<br />
At this point your <strong>Tumble</strong> <strong>Tramp</strong> is almost complete.<br />
7
Attach the Velcro along the length of the frame. Your pads will attach to the Velcro<br />
and secure them in place.<br />
This completes your <strong>Tumble</strong> <strong>Tramp</strong> assembly.<br />
***SEE NEXT PAGE FOR DOUBLE MINI BUNGEE INSTRUCTIONS***<br />
8
DOUBLE MINI BUNGEE INSTRUCTIONS<br />
Unlike the <strong>Tumble</strong> <strong>Tramp</strong>, the bungee cord on the <strong>Double</strong> <strong>Mini</strong> does NOT go<br />
through the loops of the double mini bed. The bungee is stretched back and forth<br />
as many times as possible as well as tight as possible. Once the bungee has been<br />
installed it is time to use the twine to bring the bed and bungee together. This keeps<br />
tension on the end of the bed. – NOTE: You are to use only two springs per bed bar.<br />
9