Patient Instructions for Specimen Collection - IU Health
Patient Instructions for Specimen Collection - IU Health
Patient Instructions for Specimen Collection - IU Health

Create successful ePaper yourself
Turn your PDF publications into a flip-book with our unique Google optimized e-Paper software.
<strong>Specimen</strong> <strong>Collection</strong> & Preparation Section 3<br />
Modified June 2012 46<br />
<strong>Patient</strong> <strong>Instructions</strong><br />
Includes the following:<br />
Fasting<br />
Glucose Tolerance Test<br />
<strong>Collection</strong> of Pinworm Samples<br />
Collecting Times/24 hr Urines<br />
Random Clean Catch Mid Stream Urine Samples<br />
<strong>Collection</strong> of Stool <strong>Specimen</strong>s<br />
FIT Test <strong>Collection</strong><br />
Salivary Cortisol <strong>Collection</strong><br />
Sputum <strong>Collection</strong>
<strong>Specimen</strong> <strong>Collection</strong> & Preparation Section 3<br />
Modified June 2012 47<br />
PATIENT INSTRUCTIONS FOR FASTING<br />
1. Your doctor has requested laboratory tests, which require you to fast.<br />
2. Fasting means that you are not to eat or drink anything <strong>for</strong> at least 8 hrs, but preferably not<br />
<strong>for</strong> 10-12 hrs.<br />
3. No coffee, tea, gum or smoking is permitted.<br />
4. You may have water only as necessary<br />
5. The ideal time to have this testing done is first thing in the morning.<br />
6. Please check with your doctor about any medication you are taking while fasting.<br />
7. If you have any other concerns, please contact your doctor, or the laboratory where the<br />
testing is to be done.<br />
PATIENT INSTRUCTIONS FOR GLUCOSE TOLERANCE TEST<br />
1. Your physician has scheduled you <strong>for</strong> a Glucose Tolerance Test. This is a screening tool used to<br />
assess the possibility of your being diabetic.<br />
2. The test itself takes from 1-5 hrs depending on the particular Glucose Tolerance test ordered.<br />
3. You must be fasting, when the test is per<strong>for</strong>med.<br />
4. Do not eat or drink anything 10-12 hours be<strong>for</strong>e your appointment.<br />
5. No coffee, tea, gum, or smoking is permitted.<br />
6. You may drink water, only as necessary.<br />
7. First, a sample of blood will be collected prior to drinking a solution of glucose (sugar).<br />
8. After drinking the glucose solution, additional blood samples will be taken in periodic intervals<br />
depending on the type of Glucose Tolerance test your physician has ordered.<br />
9. Please stay in the laboratory area during the test. Some patients may experience dizziness during the<br />
test, and may require medical assistance from our staff.<br />
10. Do not eat, drink, or smoke during the test. You may drink water and remain at rest.<br />
11. If you have any questions, please contact the laboratory <strong>for</strong> clarification.
<strong>Specimen</strong> <strong>Collection</strong> & Preparation Section 3<br />
PATIENT INSTRUCTIONS FOR COLLECTION OF PINWORM SAMPLES<br />
A. <strong>Collection</strong> using Starplex® Sterile Pinworm Paddle<br />
1. Remove cap. A clear plastic paddle is attached. One side of the paddle is marked “sticky<br />
side”. It is coated with a non-toxic, sterilized, mildly adhesive material. Do not touch this<br />
surface with the fingers<br />
2. Press the sticky surface against the perianal (around anus) skin with moderate pressure. The<br />
ideal time <strong>for</strong> this procedure is, early in the morning be<strong>for</strong>e arising, urination, defecation, and<br />
bathing.<br />
3. Print the patient’s name and other in<strong>for</strong>mation requested on the container label.<br />
4. Deliver the container to the laboratory.<br />
B. <strong>Collection</strong> using Sterile Swab<br />
1. Remove swab from tube. Do not touch the swab with the fingers.<br />
2. Gently rub the swab over the perianal (around skin), and then insert about ¼ inch into the anal<br />
canal. The ideal time <strong>for</strong> this procedure is, early in the morning be<strong>for</strong>e arising, urination,<br />
defecation, and bathing.<br />
3. Replace swab in tube.<br />
4. Print the patient’s name on the tube.<br />
5. The ideal time <strong>for</strong> this procedure is, early in the morning be<strong>for</strong>e arising, urination, defecation,<br />
and bathing.<br />
6. Deliver the container to the laboratory.<br />
Modified June 2012 48
<strong>Specimen</strong> <strong>Collection</strong> & Preparation Section 3<br />
PATIENT INSTRUCTIONS FOR COLLECTING TIMED/24hr URINES<br />
A diagnostic test has been ordered to determine specific factors from the urine. For the test to be<br />
accurate, your urine must be saved <strong>for</strong> 24 hours. Drink normal amounts of liquids during the urine<br />
collection. On the day of the test:<br />
1. Empty bladder when you first get up in the morning. DISCARD this Urine. Record<br />
the time on the container.<br />
2. From that time, save all urine up to and including the first morning specimen at the<br />
end of the 24 hours ( or other designated time period). During collection and until the<br />
specimen is brought to the laboratory, the urine should be refrigerated or kept on ice<br />
(in a bucket).<br />
3. Record on the urine container, the time the last part of the specimen was collected.<br />
4. Be careful not to deposit toilet tissue in the specimen or allow it to become<br />
contaminated with fecal material.<br />
5. If the container has a preservative, (orange sticker or written), handle the container<br />
with caution. Specific instructions are available on the yellow label, and/or by calling<br />
the laboratory.<br />
6. Bring the container with the urine to the laboratory as soon as possible. As a part of<br />
some tests, a blood sample must also be collected. Check with the laboratory to verify<br />
that a sample is not needed.<br />
7. After hours please call 317-491-6000.<br />
Modified June 2012 49
<strong>Specimen</strong> <strong>Collection</strong> & Preparation Section 3<br />
PATIENT INSTRUCTIONS FOR RANDOM CLEAN CATCH MID STREAM URINE<br />
Female <strong>Collection</strong><br />
1. Wash hands thoroughly with soap and water. Dry with paper towel<br />
2. With one hand, spread genital skin folds apart.<br />
3. Using antiseptic skin towelette, wash vulva, wiping from front to back<br />
4. Discard towelette<br />
5. Repeat, wiping from front to back.<br />
6. Void first portion of urine into toilet.<br />
7. Void midstream portion into sterile container. Do not touch the inside of the container.<br />
8. Stop collection when container is about half full, complete void into the toilet.<br />
9. Screw cap on container.<br />
10.Wash hands<br />
11.Give sample to lab personnel.<br />
Male <strong>Collection</strong><br />
1. Wash hands thoroughly with soap and water. Dry with paper towel.<br />
2. Pull back <strong>for</strong>eskin, if uncircumcised and cleanse glans penis with antiseptic skin towelette.<br />
3. Void first portion of urine into the toilet and then void the midstream portion into the urine<br />
container. Do not touch the inside of the container.<br />
4. Stop collection when container is about half full, complete void into the toilet<br />
5. Screw cap on container<br />
6. Wash hands.<br />
7. Give sample to lab personnel.<br />
Modified June 2012 50
<strong>Specimen</strong> <strong>Collection</strong> & Preparation Section 3<br />
PATIENT INSRUCTIONS FOR COLLECTION OF STOOL SPECIMENS<br />
A diagnostic test has been ordered to determine if specific organisms are present in your stool. For the test to<br />
be accurate, your stool must be collected in the following manner. Directions must be read carefully, and<br />
followed exactly. Return containers to the lab within 24 hrs. Please check with the laboratory prior to<br />
collection <strong>for</strong> operating hours.<br />
1. Listed below are agents, which can interfere with the test, if you took any of these 7-10 days be<strong>for</strong>e this<br />
stool collection. Please consult your doctor.<br />
a. Barium e. Magnesium or bismuth compounds<br />
b. Antacids f. Antidiarrheal medicine<br />
c. Enemas g. Antibiotics (2-3 week wait is optimal)<br />
d. Laxatives<br />
2. <strong>Collection</strong> <strong>for</strong> Egg and Parasites (E+P) and Stool Culture<br />
ATTENTION: SOLUTIONS ARE POISONOUS; DO NOT DRINK<br />
a. Your collection kit contains three (3) containers:<br />
A pink lid plastic container with 10 % <strong>for</strong>malin preservative (<strong>for</strong> E+P Screen and E+P Complete)<br />
A gray lid plastic container with PVA-fixative solution (<strong>for</strong> E+P Complete)<br />
An orange lid plastic container with Cary Blair preservative solution (<strong>for</strong> Stool Culture)<br />
Note: the PVA fixative and 10% Formalin are Poisonous if taken internally.<br />
b. The stool should be passed into a clean dry container (such as a urine cup or margarine container),<br />
and transferred into the 3 separate containers. Do not pass urine into the same collection container.<br />
Collect only one day. More than one bowel movement can be used during the one day of collection,<br />
to get enough stool <strong>for</strong> all the containers.<br />
c. Fill the pink, gray, and orange lid containers with stool to bring the liquid level up to the “Fill to<br />
Here” line.<br />
d. Tighten lids. Mash or emulsify the stool in the container with the paddle. Mix well by shaking<br />
containers. Keep at Room Temperature<br />
e. Label all containers with the patient’s name, birth date, date and time of collection. Return containers<br />
to the lab within 24 hrs. Please check with the laboratory prior to collection <strong>for</strong> operating hours.<br />
3. <strong>Collection</strong> <strong>for</strong> C. difficile PCR test<br />
a. Transfer a minimum of 1 ml. of liquid or soft stool into the empty, clean container such as a urine cup<br />
or a margarine container. (Formed or solid stool is not acceptable <strong>for</strong> this test.)<br />
b. Label the container with the patient’s name, birth date, date and time of collection.<br />
c. Refrigerate and return the filled container to the lab as soon as possible.<br />
4. Infant Stool <strong>Collection</strong><br />
a. Line the diaper with plastic be<strong>for</strong>e putting on. Scrape the stool off the plastic and put in the required<br />
container(s)<br />
b. Stool scraped directly from the diaper is not a good sample.<br />
5. Please contact the laboratory at 317-491-6000 if you have any questions.<br />
Modified June 2012 51
<strong>Specimen</strong> <strong>Collection</strong> & Preparation Section 3<br />
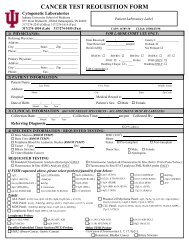
PATIENT INSTRUCTIONS FOR COLORECTAL CANCER SCREENING (FIT)<br />
Collect stool sample using the sample deposit and sample collection instructions below. Next follow instructions<br />
<strong>for</strong> completing the requisition and submitting your sample <strong>for</strong> testing.<br />
Sample Deposit:<br />
1) Pull yellow tab to roll out the label on sample collection tube.<br />
2) Print your name, date of birth(DOB) and date/time sample is collected on the label of the sample<br />
collection tube.<br />
3) Lift toilet seat and position collection paper across rim of toilet bowl.<br />
4) Secure adhesive tabs to the sides of toilet rim. Lower toilet seat.<br />
5) Deposit stool sample on top of collection paper.<br />
Sample <strong>Collection</strong>:<br />
1) Unscrew purple cap of labeled collection tube – do not pour out liquid.<br />
2) Poke spiral applicator into stool at 6 different sites.<br />
3) Use only enough fecal material to cover tip of applicator. Do not clump, scoop or fill tube.<br />
4) Screw the applicator back into the tube and secure tightly.<br />
5) Stool and collection paper can now be flushed.<br />
Requisition Form Completion:<br />
1) Fill out all of your patient in<strong>for</strong>mation at the top of the <strong>for</strong>m.<br />
2) Please provide date and time of stool sample collection. This is very important.<br />
3) Make sure to provide all of your insurance copy in<strong>for</strong>mation and include a copy of your insurance card if<br />
possible.<br />
Submitting Sample(s) <strong>for</strong> Testing:<br />
1) Remove plastic bag with absorbent paper from box.<br />
2) Insert sample collection tube into plastic bag. Seal bag.<br />
3) Insert plastic bag with sample collection tube into mailing box.<br />
4) Fold and place the completed requisition <strong>for</strong>m and copy of insurance card in mailing box.<br />
5) Peel tape from mailing box and fold flap at prefold line. Press firmly to seal.<br />
6) Place box in US mail within 3 days of collection. Postage is paid.<br />
Modified June 2012 52
<strong>Specimen</strong> <strong>Collection</strong> & Preparation Section 3<br />
PATIENT INSTRUCTIONS FOR SPUTUM COLLECTION<br />
1. Collect sputum specimen first thing in the morning.<br />
2. Rinse your mouth with water, and spit the water into a sink.<br />
3. Take three deep breaths, inhaling deeply, until there is a “tickling” feeling at the end of the<br />
breath.<br />
4. Cough deeply.<br />
5. Spit the sputum into a sterile container provided by the lab.<br />
6. Be careful not to touch the specimen with your lips or fingers.<br />
7. Remember that saliva and nasal discharge are not sputum.<br />
8. If you cannot bring the sample to the lab immediately, store it in the refrigerator.<br />
Modified June 2012 53
<strong>Specimen</strong> <strong>Collection</strong> & Preparation Section 3<br />
Modified June 2012 54