Back & Neck Exercise Pamphlet - University of Missouri
Back & Neck Exercise Pamphlet - University of Missouri
Back & Neck Exercise Pamphlet - University of Missouri

Create successful ePaper yourself
Turn your PDF publications into a flip-book with our unique Google optimized e-Paper software.
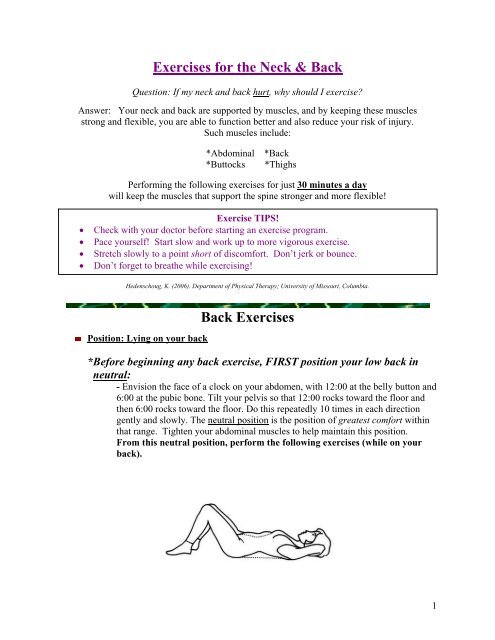
<strong>Exercise</strong>s for the <strong>Neck</strong> & <strong>Back</strong><br />
Question: If my neck and back hurt, why should I exercise?<br />
Answer: Your neck and back are supported by muscles, and by keeping these muscles<br />
strong and flexible, you are able to function better and also reduce your risk <strong>of</strong> injury.<br />
Such muscles include:<br />
*Abdominal *<strong>Back</strong><br />
*Buttocks *Thighs<br />
Performing the following exercises for just 30 minutes a day<br />
will keep the muscles that support the spine stronger and more flexible!<br />
<strong>Exercise</strong> TIPS!<br />
• Check with your doctor before starting an exercise program.<br />
• Pace yourself! Start slow and work up to more vigorous exercise.<br />
• Stretch slowly to a point short <strong>of</strong> discomfort. Don’t jerk or bounce.<br />
• Don’t forget to breathe while exercising!<br />
Hedenschoug, K. (2006). Department <strong>of</strong> Physical Therapy; <strong>University</strong> <strong>of</strong> <strong>Missouri</strong>, Columbia.<br />
Position: Lying on your back<br />
<strong>Back</strong> <strong>Exercise</strong>s<br />
*Before beginning any back exercise, FIRST position your low back in<br />
neutral:<br />
- Envision the face <strong>of</strong> a clock on your abdomen, with 12:00 at the belly button and<br />
6:00 at the pubic bone. Tilt your pelvis so that 12:00 rocks toward the floor and<br />
then 6:00 rocks toward the floor. Do this repeatedly 10 times in each direction<br />
gently and slowly. The neutral position is the position <strong>of</strong> greatest comfort within<br />
that range. Tighten your abdominal muscles to help maintain this position.<br />
From this neutral position, perform the following exercises (while on your<br />
back).<br />
1
1. Bridge-Up<br />
Lie on your back with your knees bent.<br />
Keep your feet and palms flat on the floor.<br />
Slowly raise your hips upward, tightening<br />
your buttocks. Raise your hips high enough<br />
to straighten your back. Hold for 5 seconds.<br />
Lower your hips to the floor.<br />
Repeat 10 times.<br />
Copyright VHI 1999-2005<br />
2. Partial Curl-Up<br />
Cross your arms loosely.<br />
Tighten your abdomen and curl halfway up,<br />
keeping your head in line with your shoulders.<br />
Hold for 5 seconds and then uncurl to lie down.<br />
Repeat 10 times.<br />
3. Hamstring Stretch<br />
Copyright VHI 1999-2005<br />
Put a towel behind one knee or calf.<br />
Use the towel to pull the leg toward your chest,<br />
keeping the leg straight or slightly bent.<br />
Hold for 20 seconds and then lower the leg.<br />
Repeat 3 times, and then switch legs.<br />
Copyright VHI 1999-2005<br />
Copyright VHI 1999-2005<br />
2
4. Trunk Rotation<br />
Position: Lying on your stomach<br />
1. Press-Up<br />
Position: On hands and knees<br />
1. Cat Stretch<br />
Drop both knees to one side and turn your head,<br />
looking in the other direction.<br />
Keep your shoulders flat on the floor.<br />
Hold for 20 seconds, then slowly switch sides.<br />
Perform 3 times on each side.<br />
Copyright VHI 1999-2005<br />
Lie face down, feet slightly apart, forehead on the floor.<br />
Push yourself up on your forearms, keeping your neck straight.<br />
Stop when you feel light pressure in your lower back.<br />
Hold for 20 seconds, then slowly lie back down.<br />
Repeat 3 times.<br />
Copyright VHI 1999-2005<br />
Begin by tightening you abdominal and buttocks<br />
muscles to press your back upward.<br />
Let your head drop slightly. Hold for 5 seconds.<br />
Next, slowly relax your abdominal and buttocks<br />
muscles, lifting your head and letting your back sag.<br />
Keep your weight evenly distributed.<br />
Hold for 10 seconds.<br />
Repeat 3 times.<br />
Copyright VHI 1999-2005<br />
3
2. Arm Reach<br />
3. Arm Reach with Leg Reach<br />
4. Spine Stretch<br />
Stretch one arm straight out in front <strong>of</strong> you.<br />
Do not raise your head or let your supporting shoulder sag.<br />
To prevent your trunk from sagging, tighten your abdominal<br />
muscles! Hold for 5 seconds, then lower arm to ground.<br />
Repeat 10 times, then switch arms.<br />
Copyright VHI 1999-2005<br />
Extend one leg straight back while extending opposite<br />
arm straight forward.<br />
Do not arch your back or let your head or body sag.<br />
Tighten your abdominal muscles!<br />
Hold for 5 seconds, then lower knee and arm to ground.<br />
Repeat 10 times, then switch legs.<br />
Copyright VHI 1999-2005<br />
Assume the hands and knees position.<br />
Begin to sit backwards onto your heels<br />
until you feel a good, painless stretch in<br />
your buttocks. Hold for 20 seconds, then<br />
return to hands and knees position.<br />
Repeat 3 times.<br />
Copyright VHI 1999-2005<br />
4
Position: Standing<br />
1. Hip Flexor Stretch<br />
Kneel on the floor. Put one foot on the floor<br />
in front <strong>of</strong> you with the knee slightly bent.<br />
If needed, hold on to a chair for balance.<br />
Tighten your abdomen.<br />
Move your hips forward, keeping your back<br />
and shoulders upright. Feel the stretch<br />
in front <strong>of</strong> your hip. Hold for 15 seconds.<br />
Return to starting position.<br />
Repeat 3 times, then switch sides.<br />
2. Quadriceps Stretch<br />
Stand arm’s length from a wall.<br />
Place one hand on it.<br />
With your other hand,<br />
grasp your ankle on the same side.<br />
Pull the heel towards your buttocks,<br />
and then stand with your knees together.<br />
Do not arch your back.<br />
Hold for 15 seconds.<br />
Repeat 3 times, then switch legs.<br />
3. Calf Stretch<br />
Face a wall 2 feet away.<br />
Step toward the wall with one foot.<br />
Place both palms on the wall and<br />
bend your front knee. Lean forward,<br />
keeping the back leg straight and<br />
heel on the floor. Hold for 15 seconds.<br />
Repeat 3 times, then switch legs.<br />
Copyright VHI 1999-2005<br />
Copyright VHI 1999-2005<br />
Copyright VHI 1999-2005<br />
5
Range-<strong>of</strong>-Motion <strong>Exercise</strong>s<br />
<strong>Neck</strong> <strong>Exercise</strong>s<br />
Slowly turn your head to the right side<br />
as far as is comfortable. Hold for 10 seconds.<br />
Return your head to center.<br />
Do the same turn to the left side.<br />
Repeat 3 times on each side.<br />
Drop your chin down slowly toward your<br />
chest as far as is comfortable. Hold for 10<br />
seconds. Bring your head back up.<br />
Repeat 3 times.<br />
Tilt your head to the side toward your left<br />
shoulder. Hold for 10 seconds.<br />
Return your head to center.<br />
Do the same toward the right side.<br />
Repeat 3 times on each side.<br />
(1) First, perform a chin tuck. (2) From this position,<br />
tilt your head backward so you can see the ceiling.<br />
Hold for 10 seconds, then bring your head upright.<br />
Repeat 3 times.<br />
Copyright VHI 1999-2005<br />
Copyright VHI 1999-2005<br />
Copyright VHI 1999-2005<br />
Copyright VHI 1999-2005 Copyright VHI 1999-2005<br />
6
Isometric <strong>Exercise</strong>s<br />
Press your forehead into your Place your hand against the side<br />
palms slowly. Resist any forward <strong>of</strong> your head. Push slowly with your<br />
motion with your hands. hand while resisting with your neck<br />
Hold for 5 seconds, then relax. muscles. Hold for 5 seconds.<br />
Repeat 10 times. Repeat 10 times.<br />
Copyright VHI 1999-2005 Copyright VHI 1999-2005<br />
Place both hands against the back Place your hand on the side <strong>of</strong> your<br />
<strong>of</strong> your head. Try to push your head head. Try to turn your chin to your<br />
back, while resisting any movement shoulder, but resist any motion with<br />
with your hands. Hold for 5 seconds. your hand. Hold for 5 seconds.<br />
Repeat 10 times. Repeat 10 times.<br />
Copyright VHI 1999-2005<br />
Hedenschoug, K. (2006). Department <strong>of</strong> Physical Therapy; <strong>University</strong> <strong>of</strong> <strong>Missouri</strong>, Columbia.<br />
Aerobic Conditioning<br />
Copyright VHI 1999-2005<br />
Question: Why do I need to participate in aerobic exercise? Isn’t strengthening the muscles in<br />
my neck and back enough?<br />
Answer: Aerobic exercise conditions the heart and lungs, improves circulation, tones muscles,<br />
and helps you to control your weight. All <strong>of</strong> this helps you to maintain a healthy back!<br />
Getting Started:<br />
• Start with a 5-10 minute walk. Add a few more minutes each day.<br />
• Progress to taking three 10-minute walks each day.<br />
• Walk to visit a friend instead <strong>of</strong> talking on the phone.<br />
• Walk around the entire store or mall before you shop.<br />
• Make it a GOAL to walk 30 minutes each day!<br />
7
CHOOSE AN ACTIVITY YOU ENJOY!<br />
Walking Swimming<br />
Bicycling Running<br />
Skiing Water Aerobics<br />
Basketball Volleyball<br />
Tennis Hiking<br />
Monitor How Hard You Are Exercising!<br />
• During the aerobic activity you choose, aim for a rating <strong>of</strong> between 4 and 6 on the<br />
following scale (“somewhat severe breathlessness” to “severe breathlessness”). A<br />
rating within this range indicates that you are exercising at a proper level <strong>of</strong><br />
intensity.<br />
Borg Scale for Rating Perceived Shortness <strong>of</strong> Breath<br />
0 Nothing at all.<br />
0.5 Very, very slight (just noticeable).<br />
1 Very slight.<br />
2 Slight.<br />
3 Moderate.<br />
Somewhat severe.<br />
Severe.<br />
7 Very severe.<br />
8<br />
9 Very, very severe (almost maximal).<br />
10 Maximal.<br />
Hedenschoug, K. (2006). Department <strong>of</strong> Physical Therapy; <strong>University</strong> <strong>of</strong> <strong>Missouri</strong>, Columbia.<br />
8
5 Keys to PREVENTION <strong>of</strong> <strong>Neck</strong> & <strong>Back</strong> Injury<br />
#1 Posture<br />
By maintaining proper posture in all positions, you can reduce the stress on your spine.<br />
This helps to prevent back injury.<br />
Check Your Standing Posture<br />
To improve your standing posture, following these<br />
steps:<br />
• Breathe deeply.<br />
• Relax your shoulders, hips, and knees.<br />
• Think <strong>of</strong> the ears, shoulders, hips, and<br />
ankles as a series <strong>of</strong> dots. Now, adjust<br />
your body to connect the dots in a<br />
straight line.<br />
• Tuck your buttocks in just a bit if you<br />
need to.<br />
#2 Rest<br />
Proper rest is vital to the maintenance and function <strong>of</strong> a healthy back.<br />
#3 Body mechanics<br />
It is important to keep your back “locked in” while performing all activities. This means<br />
that you should maintain proper posture while performing all activities. The following<br />
are examples <strong>of</strong> correct and incorrect ways <strong>of</strong> doing everyday activities. Notice the<br />
position <strong>of</strong> the spine in the correct examples.<br />
#4 Lifting<br />
Most back injuries occur while lifting! Use proper lifting techniques to prevent injury.<br />
#5 <strong>Exercise</strong><br />
Make it your goal to maintain good mobility and strength in your back. <strong>Exercise</strong> should<br />
be a daily routine activity for the rest <strong>of</strong> your life!<br />
Hedenschoug, K. (2006). Department <strong>of</strong> Physical Therapy; <strong>University</strong> <strong>of</strong> <strong>Missouri</strong>, Columbia.<br />
9