instructions for worktop jig mk.2 300-700mm - Faithfull Tools
instructions for worktop jig mk.2 300-700mm - Faithfull Tools
instructions for worktop jig mk.2 300-700mm - Faithfull Tools

Create successful ePaper yourself
Turn your PDF publications into a flip-book with our unique Google optimized e-Paper software.
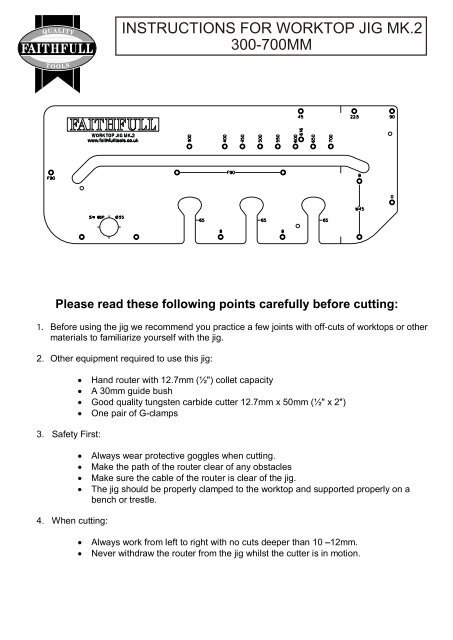
INSTRUCTIONS FOR WORKTOP JIG MK.2<br />
<strong>300</strong>-700MM<br />
Please read these following points carefully be<strong>for</strong>e cutting:<br />
1. Be<strong>for</strong>e using the <strong>jig</strong> we recommend you practice a few joints with off-cuts of <strong>worktop</strong>s or other
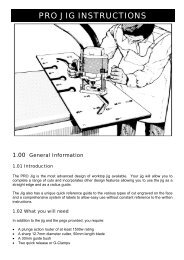
LEFT HAND 90º JOINT RIGHT HAND 90º JOINT<br />
FEMALE<br />
MALE<br />
PENINSULAR JOINT<br />
TYPES OF JOINTS<br />
MALE<br />
FEMALE<br />
LH RH<br />
MALE<br />
MALE<br />
FEMALE<br />
45º JOINT<br />
(CORNER JOINT)<br />
MALE FEMALE MALE
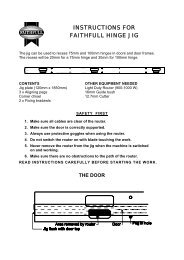
PENCIL MARK<br />
POSTFORMED EDGE<br />
POSTFORMED EDGE<br />
90º JOINTS<br />
45º JOINTS<br />
600<br />
Note: This dimension is based on a 600mm wide <strong>worktop</strong><br />
CUTTING TO SIZE<br />
35<br />
POSTFORMED EDGE<br />
CUT OFF AREA<br />
POSTFORMED EDGE<br />
POSTFORMED EDGE<br />
PENCIL MARK<br />
C L<br />
228<br />
MIN 800mm MIN 800mm<br />
650mm
1. Place <strong>worktop</strong> face down and post<strong>for</strong>med edge towards you.<br />
2. Place 3 pins in the holes marked F90.<br />
3. Place the fourth pin the hole marked <strong>300</strong>, 400, 450,500,...700 depending on the width of the <strong>worktop</strong>.<br />
4. Position the <strong>jig</strong> as shown in the diagram below and make sure all four pins are pushed firmly against the <strong>worktop</strong><br />
edge.<br />
5. Secure the <strong>jig</strong> with G-clamps.<br />
POSTFORMED EDGE<br />
WORKTOP FACE DOWN<br />
START HERE<br />
Cutting <strong>instructions</strong><br />
1. Set the depth of cut <strong>for</strong> 10-12mm <strong>for</strong> your first roughing cut.<br />
2. Position the router on the left hand side of the slot and start cutting by pulling the router towards the edge of the<br />
slot closest to you.<br />
3. Increase the depth of cut and repeat step 2 until the roughing cut is completed.<br />
4. For the finish cut, position the router on the left hand side of the slot (with the router set <strong>for</strong> the full depth of cut) and<br />
cut by pushing the router towards the edge of the slot furthest away from you.<br />
Cutting the slots <strong>for</strong> female joining bolts<br />
1. Place <strong>worktop</strong> face down with the post <strong>for</strong>med edge towards you as shown in the diagram.<br />
2. Place 3 location pins in the holes marked B as shown in the diagram.<br />
3. Place the <strong>jig</strong> as shown in the diagram below and make sure all 3 pins are pushed firmly against the edge of the<br />
<strong>worktop</strong>.<br />
4. Secure the <strong>jig</strong> with the G-clamps.<br />
5. Two cuts of 10mm are required <strong>for</strong> the slots.<br />
6. Repeat step 5 <strong>for</strong> all the slots required.<br />
POSTFORMED EDGE<br />
RIGHT HAND 90º JOINTS<br />
FEMALE<br />
WORKTOP FACE DOWN
START HERE<br />
RIGHT HAND 90º JOINTS<br />
MALE<br />
1. Place the <strong>worktop</strong> face up and the post<strong>for</strong>med edge as shown in the diagram.<br />
2. Place 2 pins in the holes marked M90.<br />
3. Position the <strong>jig</strong> as shown in the diagram below, and make sure both pins are pushed firmly against the <strong>worktop</strong><br />
edge.<br />
4. Secure the <strong>jig</strong> with G-clamps.<br />
POSTFORMED EDGE<br />
WORKTOP FACE UP<br />
Cutting <strong>instructions</strong><br />
1. Set the depth of cut <strong>for</strong> 10-12mm <strong>for</strong> your first roughing cut.<br />
2. Position the router on the left hand side of the slot and start cutting by pulling the router towards the edge of the<br />
slot closest to you.<br />
3. Increase the depth of cut and repeat step 2 until the roughing cut is completed.<br />
4. For the finish cut, position the router on the left hand side of the slot (with the router set <strong>for</strong> the full depth of cut) and<br />
cut by pushing the router towards the edge of the slot furthest away from you.<br />
Cutting the slots <strong>for</strong> male joining bolts<br />
1. Place <strong>worktop</strong> face down with the post <strong>for</strong>med edge as shown in the diagram.<br />
2. Place 3 location pins in the holes marked B as shown in the diagram.<br />
3. Place the <strong>jig</strong> as shown in the diagram below and make sure all 3 pins are pushed firmly against the edge of the<br />
<strong>worktop</strong>.<br />
4. Secure the <strong>jig</strong> with the G-clamps.<br />
5. Two cuts of 10mm are required <strong>for</strong> the slots.<br />
6. Repeat step 5 <strong>for</strong> all the slots required.<br />
WORKTOP FACE DOWN<br />
POSTFORMED EDGE
LEFT HAND 90º JOINTS<br />
FEMALE<br />
1. Place <strong>worktop</strong> face up and post<strong>for</strong>med edge towards you.<br />
2. Place 3 pins in the holes marked F90.<br />
3. Place the fourth pin the hole marked <strong>300</strong>, 400, 450,500,...700 depending on the width of the <strong>worktop</strong>.<br />
4. Position the <strong>jig</strong> as shown in the diagram below and make sure all four pins are pushed firmly against the <strong>worktop</strong><br />
edge.<br />
5. Secure the <strong>jig</strong> with G-clamps.<br />
POSTFORMED EDGE<br />
WORKTOP FACE UP<br />
START HERE<br />
Cutting <strong>instructions</strong><br />
1. Set the depth of cut <strong>for</strong> 10-12mm <strong>for</strong> your first roughing cut.<br />
2. Position the router on the left hand side of the slot and start cutting by pulling the router towards the edge of the<br />
slot closest to you.<br />
3. Increase the depth of cut and repeat step 2 until the roughing cut is completed.<br />
4. For the finish cut, position the router on the left hand side of the slot (with the router set <strong>for</strong> the full depth of cut) and<br />
cut by pushing the router towards the edge of the slot furthest away from you.<br />
Cutting the slots <strong>for</strong> female joining bolts<br />
1. Place <strong>worktop</strong> face down with the post <strong>for</strong>med edge towards you as shown in the diagram.<br />
2. Place 3 location pins in the holes marked B as shown in the diagram.<br />
3. Place the <strong>jig</strong> as shown in the diagram below and make sure all 3 pins are pushed firmly against the edge of the<br />
<strong>worktop</strong>.<br />
4. Secure the <strong>jig</strong> with the G-clamps.<br />
5. Two cuts of 10mm are required <strong>for</strong> the slots.<br />
6. Repeat step 5 <strong>for</strong> all the slots required.<br />
WORKTOP FACE DOWN<br />
POSTFORMED EDGE
LEFT HAND 90º JOINTS<br />
MALE<br />
1. Place the <strong>worktop</strong> face down and the post<strong>for</strong>med edge as shown in the diagram.<br />
2. Place 2 pins in the holes marked M90.<br />
3. Position the <strong>jig</strong> as shown in the diagram below, and make sure both pins are pushed firmly against the <strong>worktop</strong><br />
edge.<br />
4. Secure the <strong>jig</strong> with G-clamps.<br />
START HERE<br />
POSTFORMED EDGE<br />
WORKTOP FACE DOWN<br />
Cutting <strong>instructions</strong><br />
1. Set the depth of cut <strong>for</strong> 10-12mm <strong>for</strong> your first roughing cut.<br />
2. Position the router on the left hand side of the slot and start cutting by pulling the router towards the edge of the<br />
slot closest to you.<br />
3. Increase the depth of cut and repeat step 2 until the roughing cut is completed.<br />
4. For the finish cut, position the router on the left hand side of the slot (with the router set <strong>for</strong> the full depth of cut) and<br />
cut by pushing the router towards the edge of the slot furthest away from you.<br />
Cutting the slots <strong>for</strong> male joining bolts<br />
1. Place <strong>worktop</strong> face down with the post <strong>for</strong>med edge as shown in the diagram.<br />
2. Place 3 location pins in the holes marked B as shown in the diagram.<br />
3. Place the <strong>jig</strong> as shown in the diagram below and make sure all 3 pins are pushed firmly against the edge of the<br />
<strong>worktop</strong>.<br />
4. Secure the <strong>jig</strong> with the G-clamps.<br />
5. Two cuts of 10mm are required <strong>for</strong> the slots.<br />
6. Repeat step 5 <strong>for</strong> all the slots required.<br />
POSTFORMED EDGE<br />
WORKTOP FACE DOWN
RIGHT HAND 45º JOINTS<br />
FEMALE<br />
1. Place the <strong>worktop</strong> face up and the post<strong>for</strong>med edge as shown in the diagram.<br />
2. Place 2 pins in the holes marked F45.<br />
3. Position the <strong>jig</strong> as shown in the diagram below. Make sure the back edge of the <strong>jig</strong> is lined up with the pencil<br />
mark (650mm from the centre line - see cutting to size diagram).<br />
4. Make sure both pins are pushed firmly against the <strong>worktop</strong> edge.<br />
5. Secure the <strong>jig</strong> with the G-clamps.<br />
POSTFORMED EDGE<br />
START HERE<br />
WORKTOP FACE UP<br />
Cutting <strong>instructions</strong><br />
1. Set the depth of cut <strong>for</strong> 10-12mm <strong>for</strong> your first roughing cut.<br />
2. Position the router on the left hand side of the slot and start cutting by pulling the router towards the edge of the<br />
slot closest to you.<br />
3. Increase the depth of cut and repeat step 2 until the roughing cut is completed.<br />
4. For the finish cut, position the router on the left hand side of the slot (with the router set <strong>for</strong> the full depth of cut) and<br />
cut by pushing the router towards the edge of the slot furthest away from you.<br />
Cutting the slots <strong>for</strong> female joining bolts<br />
1. Place <strong>worktop</strong> face down with the post <strong>for</strong>med edge as shown in the diagram.<br />
2. Make sure the shaded area is cut off <strong>for</strong> the appropriate width of the <strong>worktop</strong> (see cutting to size diagram).<br />
3. Place 3 location pins in the holes marked B as shown in the diagram.<br />
4. Place the <strong>jig</strong> as shown in the diagram below and make sure all 3 pins are pushed firmly against the edge of the<br />
<strong>worktop</strong>.<br />
5. Secure the <strong>jig</strong> with the G-clamps.<br />
6. Two cuts of 10mm are required <strong>for</strong> the slots.<br />
7. Repeat step 5 <strong>for</strong> all the slots required.<br />
WORKTOP FACE DOWN<br />
POSTFORMED EDGE
RIGHT HAND 45º JOINTS<br />
MALE<br />
1. Place the <strong>worktop</strong> face down and the post<strong>for</strong>med edge as shown in the diagram.<br />
2. Place 2 pins in the holes marked M45.<br />
3. Position the <strong>jig</strong> as shown in the diagram below, and make sure both pins are pushed firmly against the <strong>worktop</strong><br />
edge.<br />
4. Secure the <strong>jig</strong> with the G-clamps.<br />
START HERE<br />
POSTFORMED EDGE<br />
WORKTOP FACE DOWN<br />
Cutting <strong>instructions</strong><br />
1. Set the depth of cut <strong>for</strong> 10-12mm <strong>for</strong> your first roughing cut.<br />
2. Position the router on the left hand side of the slot and start cutting by pulling the router towards the edge of the<br />
slot closest to you.<br />
3. Increase the depth of cut and repeat step 2 until the roughing cut is completed.<br />
4. For the finish cut, position the router on the left hand side of the slot (with the router set <strong>for</strong> the full depth of cut) and<br />
cut by pushing the router towards the edge of the slot furthest away from you.<br />
Cutting the slots <strong>for</strong> male joining bolts<br />
1. Place <strong>worktop</strong> face down with the post <strong>for</strong>med edge as shown in the diagram.<br />
2. Place 3 location pins in the holes marked B as shown in the diagram.<br />
3. Place the <strong>jig</strong> as shown in the diagram below and make sure all 3 pins are pushed firmly against the edge of the<br />
<strong>worktop</strong>.<br />
4. Secure the <strong>jig</strong> with the G-clamps.<br />
5. Two cuts of 10mm are required <strong>for</strong> the slots.<br />
6. Repeat step 5 <strong>for</strong> all the slots required.<br />
POSTFORMED EDGE<br />
WORKTOP FACE DOWN
LEFT HAND 45º JOINTS<br />
FEMALE<br />
1. Place the <strong>worktop</strong> face down and the post<strong>for</strong>med edge as shown in the diagram.<br />
2. Place 2 pins in the holes marked F45.<br />
3. Position the <strong>jig</strong> as shown in the diagram below. Make sure the back edge of the <strong>jig</strong> is lined up with the pencil<br />
mark (650mm from the centre line - see cutting to size diagram).<br />
4. Make sure both pins are pushed firmly against the <strong>worktop</strong> edge.<br />
5. Secure the <strong>jig</strong> with the G-clamps.<br />
POSTFORMED EDGE<br />
POSTFORMED EDGE<br />
START HERE<br />
WORKTOP FACE DOWN<br />
Cutting <strong>instructions</strong><br />
1. Set the depth of cut <strong>for</strong> 10-12mm <strong>for</strong> your first roughing cut.<br />
2. Position the router on the left hand side of the slot and start cutting by pulling the router towards the edge of the<br />
slot closest to you.<br />
3. Increase the depth of cut and repeat step 2 until the roughing cut is completed.<br />
4. For the finish cut, position the router on the left hand side of the slot (with the router set <strong>for</strong> the full depth of cut) and<br />
cut by pushing the router towards the edge of the slot furthest away from you.<br />
Cutting the slots <strong>for</strong> female joining bolts<br />
1. Place <strong>worktop</strong> face down with the post <strong>for</strong>med edge as shown in the diagram.<br />
2. Make sure the shaded area is cut off <strong>for</strong> the appropriate width of the <strong>worktop</strong> (see cutting to size diagram).<br />
3. Place 3 location pins in the holes marked B as shown in the diagram.<br />
4. Place the <strong>jig</strong> as shown in the diagram below and make sure all 3 pins are pushed firmly against the edge of the<br />
<strong>worktop</strong>.<br />
5. Secure the <strong>jig</strong> with the G-clamps.<br />
6. Two cuts of 10mm are required <strong>for</strong> the slots.<br />
7. Repeat step 5 <strong>for</strong> all the slots required.<br />
WORKTOP FACE DOWN
LEFT HAND 45º JOINTS<br />
MALE<br />
1. Place the <strong>worktop</strong> face up and the post<strong>for</strong>med edge as shown in the diagram.<br />
2. Place 2 pins in the holes marked M45.<br />
3. Position the <strong>jig</strong> as shown in the diagram below, and make sure both pins are pushed firmly against the <strong>worktop</strong><br />
edge.<br />
4. Secure the <strong>jig</strong> with the G-clamps.<br />
START HERE<br />
POSTFORMED EDGE<br />
WORKTOP FACE UP<br />
Cutting <strong>instructions</strong><br />
1. Set the depth of cut <strong>for</strong> 10-12mm <strong>for</strong> your first roughing cut.<br />
2. Position the router on the left hand side of the slot and start cutting by pulling the router towards the edge of the<br />
slot closest to you.<br />
3. Increase the depth of cut and repeat step 2 until the roughing cut is completed.<br />
4. For the finish cut, position the router on the left hand side of the slot (with the router set <strong>for</strong> the full depth of cut) and<br />
cut by pushing the router towards the edge of the slot furthest away from you.<br />
Cutting the slots <strong>for</strong> male joining bolts<br />
1. Place <strong>worktop</strong> face down with the post <strong>for</strong>med edge as shown in the diagram.<br />
2. Place 3 location pins in the holes marked B as shown in the diagram.<br />
3. Place the <strong>jig</strong> as shown in the diagram below and make sure all 3 pins are pushed firmly against the edge of the<br />
<strong>worktop</strong>.<br />
4. Secure the <strong>jig</strong> with the G-clamps.<br />
5. Two cuts of 10mm are required <strong>for</strong> the slots.<br />
6. Repeat step 5 <strong>for</strong> all the slots required.<br />
WORKTOP FACE DOWN<br />
POSTFORMED EDGE
EXTRA FEATURES<br />
CUTTING ANGLES/CHAMFERS<br />
1. Place a pin in the hole marked 0, and another pin in the hole corresponding to the angle you require, 90°, 22.5°, or 45°.<br />
2. Position the <strong>jig</strong> as shown in the corresponding diagram above.<br />
3. Use top edge of <strong>jig</strong> to mark the required angle, or secure with G-clamps and use top edge of the <strong>jig</strong> as a guided edge <strong>for</strong><br />
cutting.<br />
Note: If using a router then make sure the cutter cuts into the post<strong>for</strong>med edge to avoid chipping and do not set the router<br />
to cut more than 12mm per pass.<br />
Note: If using a router the cut will be 9mm away from the <strong>worktop</strong> edge because of the bush/cutter offset. Take this into<br />
consideration when positioning the <strong>jig</strong>.<br />
SQUARE END CUTTING WORKTOPS<br />
START HERE<br />
ENGRAVED<br />
LINES<br />
The <strong>jig</strong> can be used to square cut the <strong>worktop</strong> using the central<br />
slot.<br />
Engraved lines on the <strong>jig</strong> correspond to the edge of the <strong>worktop</strong>.<br />
Up to 650mm wide <strong>worktop</strong>s can be square cut using the central<br />
slot as a router guide.<br />
Follow the cutting <strong>instructions</strong> on previous pages to cut the<br />
<strong>worktop</strong>.<br />
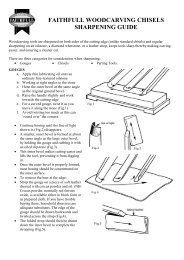
CUTTING CABINET DOOR HINGE RECESSES<br />
100<br />
100mm<br />
5.5mm<br />
1. Mark the position of the hinge on the door. The<br />
centre of the holes should be roughly 100mm from<br />
the top of the door to give the required support,<br />
ensure this measurement is as accurate as possible.<br />
2. Position 2 pins in the holes marked in the diagram<br />
left.<br />
3. Position the <strong>jig</strong> as shown in the diagram with the 2<br />
pins pushed up against the edge of the door.<br />
4. Secure the <strong>jig</strong> with G-clamps.<br />
5. Set the depth <strong>for</strong> 10mm.<br />
6. Commence cutting of the recess making sure to<br />
clean out the material in the centre of the hole as<br />
well as round the edge.<br />
7. Repeat step 5, increasing the cut by 2mm, there<strong>for</strong>e<br />
setting the total depth <strong>for</strong> 12mm. (This should be<br />
enough clearance <strong>for</strong> most hinges. Adjust this value<br />
if you require holes <strong>for</strong> thicker hinge heads).