BBT100 - Baby Food Maker - Bellini Cooking Appliances
BBT100 - Baby Food Maker - Bellini Cooking Appliances
BBT100 - Baby Food Maker - Bellini Cooking Appliances

You also want an ePaper? Increase the reach of your titles
YUMPU automatically turns print PDFs into web optimized ePapers that Google loves.
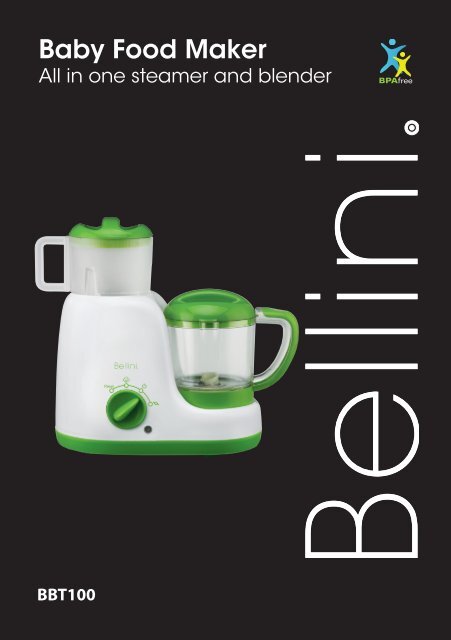
<strong>Baby</strong> <strong>Food</strong> <strong>Maker</strong><br />
All in one steamer and blender<br />
<strong>BBT100</strong>
Important Safeguards<br />
When using electrical appliances, in<br />
order to reduce the risk of fire, electric<br />
shock, and/or injury, these basic<br />
safety precautions should always be<br />
followed:<br />
For Your Safety<br />
Read all instructions carefully, even if you are<br />
familiar with the appliance.<br />
• To protect against the risk of electric<br />
shock, DO NOT IMMERSE main body of this<br />
appliance in water or any other liquid.<br />
• This appliance is not intended for use by<br />
persons (including children) with reduced<br />
physical, sensory and mental capabilities,<br />
or lack of experience and knowledge,<br />
unless they have been given supervision or<br />
instruction concerning use of the appliance<br />
by a person responsible for their safety.<br />
• Children should be supervised to ensure that<br />
they do not play with the appliance.<br />
• Switch off the power outlet and remove the<br />
plug before cleaning or when not in use.<br />
To unplug, grasp the plug and pull from the<br />
power outlet. Never pull the cord. Never carry<br />
the appliance by the cord.<br />
• Do not operate any appliance with a<br />
damaged cord or plug; if the appliance<br />
malfunctions; or if it is dropped or damaged<br />
in any manner.<br />
• Do not allow the cord to hang over the edge<br />
of a table or counter, or touch hot surfaces.<br />
• Do not operate or place any part of the<br />
appliance on or near any hot surfaces (such<br />
as a hot gas or electric burner, or in a heated<br />
oven).<br />
• Do not use this appliance for anything other<br />
than its intended use. This product is intended<br />
for household use only.<br />
• This appliance is intended to be plugged in a<br />
standard domestic power outlet only.<br />
• Do not attempt to repair, disassemble or<br />
modify the appliance. There are no userserviceable<br />
parts.<br />
• Do not use outdoors.<br />
• Operate on a dry level surface. Sinks,<br />
drainboards or uneven surfaces must be<br />
avoided.<br />
• The use of attachments or accessories not<br />
recommended or sold by the manufacturer<br />
can cause fire, electric shock or injury.<br />
• Never insert utensils into the appliance.<br />
• Allow to cool before cleaning.<br />
• Do not use with an extension cord.<br />
• Store the unit indoors in a dry location.<br />
• Do not operate under or near flammable<br />
materials, such as curtains, drapes or any<br />
other combustible materials.<br />
• Caution should be taken when handling<br />
this appliance as some surfaces may be hot<br />
during and immediately after boiling. Severe<br />
burns may result from misuse.<br />
• Avoid contact with steam from the lid when<br />
water is boiling, or just after the steamer has<br />
switched off. Take care when opening the<br />
lid when the steamer has recently boiled, as<br />
steam can burn.<br />
• Extreme caution is necessary when moving<br />
any appliance containing hot water.<br />
Wait until the appliance has switched off<br />
automatically, or switch it off manually before<br />
moving it.<br />
• Do not move the appliance containing hot<br />
liquids or food.<br />
• Do not directly touch food inside the steamer.<br />
• Do not touch the appliance when it is<br />
producing steam. Use a cloth to remove the<br />
lid and steam compartment.<br />
• To disconnect, remove plug from wall outlet.<br />
• CAUTION: This appliance generates heat<br />
and escaping steam during use. Proper<br />
precautions must be taken to prevent the risk<br />
of burns, fires or other damage to persons or<br />
property.<br />
• Do not touch any moving parts.<br />
• Keep hands and utensils away from cutting<br />
blade while chopping food to reduce the<br />
risk of injury to persons or damage to the<br />
appliance. A plastic or wooden scraper may<br />
be used but only when the blender is not<br />
running.
• Never attach the chopping blade without<br />
the bowl in place.<br />
• This appliance is intended for processing<br />
small quantities of food for immediate<br />
consumption. It is not intended to process<br />
large quantities of food at one time.<br />
• Avoid running the motor continuously for<br />
periods over 0 seconds.<br />
• Do not operate the appliance when empty.<br />
• Do not operate any appliance with a<br />
damaged cord or plug after the appliance<br />
malfunctions, or is dropped or damaged in<br />
any manner.<br />
• Ensure the bowl and lid are fitted correctly<br />
before starting appliance.<br />
• Motor and blender attachment must stop<br />
completely before removing lid.<br />
• Do not touch the blades when removing food<br />
from the bowl or when removing the blades<br />
for cleaning as they are sharp.<br />
• Do not attempt to override the cover lock<br />
mechanism.<br />
• Do not touch the blades, especially when the<br />
appliance is plugged in. The blades are very<br />
sharp.<br />
• If the blades get stuck, unplug the appliance<br />
before you remove the ingredients blocking<br />
the blades.<br />
• The appliance becomes very hot during<br />
steaming and may cause burns when<br />
touched. Only lift the bowl by its handle.<br />
• Always unplug the appliance and let it cool<br />
down before you clean it.<br />
• Never use the bowl or any other part of the<br />
appliance in a microwave, as they are not<br />
suitable for this use.<br />
• Never sterilise the bowl or any other part of<br />
the appliance in a steriliser or in a microwave,<br />
as they are not suitable for this use.<br />
• This appliance is intended for household use<br />
only.<br />
• Do not use the appliance if it has fallen or is<br />
damaged in any way.<br />
• Never use the steaming function without<br />
water.<br />
• Do not exceed the maximum level indicated<br />
on the tank.<br />
• When you steam ingredients, make sure that<br />
you do not overfill the steam basket.<br />
• When you blend liquids, do not exceed the<br />
maximum level indicated on the bowl.<br />
• Always make sure that the lid has cooled<br />
down after steaming before you open it<br />
to add more ingredients for blending if<br />
necessary.<br />
• Never connect this appliance to a timer<br />
switch or remote control system in order to<br />
avoid a hazardous situation.<br />
• Always check the temperature of the baby<br />
food before you feed your baby.<br />
• Always check the consistency of the baby<br />
food. Make sure there are no chunks in the<br />
food.<br />
• When the steaming process has finished<br />
(maximum 0 minutes) wait for the appliance<br />
to cool down for a few minutes, turn the dial<br />
to the Reset position before starting a new<br />
steaming process.<br />
• Regular descaling prevents damage to the<br />
appliance.<br />
Compulsory Warning<br />
If the supply cord is damaged, the cord must be<br />
replaced by the manufacturer, its service agent<br />
or similarly qualified persons in order to avoid a<br />
hazard.<br />
This product has not been designed for any uses<br />
other than those specified in this booklet.<br />
Save These Instructions
Features of Your <strong>Baby</strong> <strong>Food</strong> <strong>Maker</strong><br />
Handle<br />
Water Tank<br />
(Under The Basket)<br />
Control Dial<br />
Steam Basket Lid<br />
Indicator<br />
Steam Basket<br />
Setting Function<br />
Reset<br />
OFF<br />
Steamer<br />
Blender<br />
Reset<br />
Blender Lid<br />
Base<br />
Handle<br />
Blender Bowl<br />
Blade
Getting to Know Your<br />
<strong>Baby</strong> <strong>Food</strong> <strong>Maker</strong><br />
Congratulations on the purchase of your new<br />
BPA Free <strong>Bellini</strong> <strong>Baby</strong> <strong>Food</strong> <strong>Maker</strong>.<br />
Before first using your new <strong>Baby</strong> <strong>Food</strong> <strong>Maker</strong>,<br />
it is most important that you read and follow<br />
the instructions in this Use and Care booklet,<br />
even if you feel you are quite familiar with this<br />
type of appliance. Find a place and keep this<br />
booklet handy for future reference. Attention is<br />
particularly drawn to the section dealing with<br />
“IMPORTANT SAFEGUARDS”.<br />
This appliance has been designed to operate<br />
from a standard domestic power outlet. It is not<br />
intended for industrial or commercial use.<br />
Before First Use<br />
Carefully unpack the unit and remove all<br />
packaging materials. Remove the power plug<br />
cover from pins. Clean all parts except the main<br />
unit (see Cleaning and Maintenance),rinse and<br />
dry them thoroughly, taking care to handle the<br />
blending blades carefully.<br />
Caution: Do not immerse the base, cord or<br />
plug in water or any other liquid. Do not use<br />
harsh detergents or abrasive cleaners on any<br />
part of the blender.<br />
How to Assemble Your<br />
<strong>Baby</strong> <strong>Food</strong> <strong>Maker</strong><br />
IMPORTANT: Be sure the <strong>Baby</strong> <strong>Food</strong> <strong>Maker</strong> is<br />
off and unplugged before removing or replacing<br />
parts.<br />
Steamer Basket Handle<br />
Place the handle in the upward position and<br />
slide it upwards to secure to the steamer basket.<br />
Remove the handle from the steam basket in the<br />
inverse direction.<br />
Steamer Basket<br />
Place the steamer basket onto the water tank.<br />
Make sure the triangle icon on the basket is<br />
aligned to the “unlock” position on the base.<br />
Turn the handle clockwise to the “lock” position.<br />
Remove the steamer basket in the inverse<br />
direction.<br />
Blades<br />
Place the searing ring on the bottom of the<br />
blade.<br />
Using your hand, hold the top of the blade and<br />
place it through the hole on the bottom of the<br />
bowl.<br />
Turn the bowl over with its opening downward,<br />
place the blade retention nut on the blade’s<br />
other end and twist it anti-clockwise until it locks<br />
into position.<br />
Remove the blade in the inverse direction.
Blender Bowl<br />
Place the blending bowl over the centre post<br />
in the base. Make sure the triangle icon on the<br />
blending bowl is aligned to the “unlock” position<br />
on the base. Turn the handle anti-clockwise to<br />
the “lock” position.<br />
Remove the blender bowl in the inverse<br />
direction.<br />
Blender Lid<br />
Place the lid on the bowl as the below drawing,<br />
turn it anticlockwise until it locks into position.<br />
Remove the blender lid in the inverse direction.<br />
Warning: This unit has an interlocking system.<br />
The unit will not operate unless the lid has been<br />
fitted correctly. Do not attempt to start the<br />
unit without the lid being correctly placed and<br />
locked into position.<br />
Operation<br />
Always check the temperature of the baby food<br />
before you feed your baby.<br />
Always make sure that the lid has cooled down<br />
after steaming before you open it to add more<br />
ingredients for blending.<br />
Empty the water tank before you refill it to start a<br />
new steaming process.<br />
Do not exceed the maximum level indicated on<br />
the blender bowl when blending food.<br />
Do not exceed the maximum level indicated on<br />
the blender bowl when blending liquids.<br />
This appliance is intended for steaming fresh solid<br />
ingredients and then blending them to obtain<br />
baby food. Normally you would first steam the<br />
ingredients and then blend them. However,<br />
you can also use the appliance for steaming<br />
or blending only. When you use the appliance<br />
for blending only, skip the sections ‘Filling the<br />
water tank’and “Steaming’ and only follow the<br />
instructions in section “Blending’. After blending,<br />
never steam already blended food. Never steam<br />
the same batch of ingredients for longer than 0<br />
minutes or more than once.<br />
This appliance is NOT intended for:<br />
• Defrosting food<br />
• Steaming frozen food<br />
• Steaming already blended food<br />
• Steaming the same ingredients for more than<br />
0 minutes<br />
• <strong>Cooking</strong> rice and pasta<br />
• Blending ingredients first and then steaming<br />
them<br />
• Heating up fluids, e.g. soup or water<br />
• Keeping food warm for several hours<br />
• Reheating food<br />
Filling Water to The Tank<br />
Remove the steamer basket from the tank. Fill<br />
with water, ensuring the maximum level is not<br />
exceeded.<br />
Note: It is advisable not to use mineral<br />
water, as the minerals contained in this<br />
type of water cause scale to build up<br />
inside the tank.<br />
Note: Do not place anything other than<br />
water in the water tank.<br />
Steaming<br />
If certain vegetables and fruits are steamed<br />
gently, they are perfect for babies who start to<br />
eat solid food. Steaming is the healthiest way<br />
of preparing food, as the food retains lots of<br />
vitamins and other healthy nutrients.<br />
1. Position the unit on a flat surface.<br />
. Insert the power cord into a standard<br />
domestic power outlet and switch on.<br />
. Fill water tank with water.<br />
. Place the steamer basket onto the water tank<br />
and turn to the “lock” position.<br />
. Cut solid ingredients into small pieces (cubes<br />
not bigger than - cm).<br />
. Place the ingredients in the steamer basket.
. Place the lid on the steamer basket.<br />
8. Turn the control dial to the steaming position.<br />
The steaming indicator will light up to indicate<br />
that the appliance is steaming.<br />
9. When the food has steamed, turn the control<br />
dial to the “off” position. Wait minutes<br />
before removing lid to ensure no more steam<br />
releases from the steam outlet.<br />
10. If you want to serve the steamed baby food<br />
without blending it, test the food to make sure<br />
it is at a safe temperature for your baby.<br />
11. If you would like to blend the steamed food,<br />
please follow the Blending instructions.<br />
Note: You can find recipes and the<br />
cooking times required within this<br />
manual.<br />
Note: Do not steam frozen ingredients<br />
because the appliance cannot heat up<br />
frozen food to the temperature required<br />
for steaming. Always defrost frozen solid<br />
ingredients before you steam them in<br />
this appliance. Shake off any excess<br />
water from the defrosted ingredients<br />
before you place them in the steamer<br />
basket.<br />
Note: Do not process a large quantity<br />
of solid ingredients at the same time.<br />
Process these ingredients in a series of<br />
small batches instead.<br />
Warning: Hot steam or hot water could burn<br />
your fingers. Do not touch and never let children<br />
touch hot parts and steam, as this may cause<br />
scalds.<br />
Note: The steaming time depends on<br />
the amount of water you have put in the<br />
water tank.<br />
Note: If you want to steam another batch<br />
of ingredients, let the appliance cool<br />
down for 10 minutes, turn the control<br />
dial to Reset position before you start<br />
steaming again.<br />
Auto Cut-Out Reset<br />
This appliance is equipped with an overheat<br />
protection. It will cut off the power automatically<br />
if the water is heating dry. The steam indicator<br />
will go out at the same time.<br />
To start your next steaming process, wait for the<br />
appliance to cool down and turn the control dial<br />
to the reset position.<br />
Blending After Steaming<br />
1. Place the blender bowl with the blades on<br />
the base and turn to the “lock” position.<br />
. Place steamed food into the bowl. If<br />
necessary, add additional ingredients for<br />
blending (e.g. water or oil).<br />
. Place the lid on the blending bowl and turn<br />
to the “lock” position.<br />
. Turn the control dial to the blending position.<br />
Hold the knob in this position until the food is<br />
properly blended.<br />
5. When you have finished blending,<br />
simply release the control dial. The dial<br />
automatically returns to the off position.<br />
. Remove the blended food from the bowl. If<br />
necessary, use a spatula. Make sure that the<br />
baby food is at a safe temperature for your<br />
baby.<br />
. Unplug the appliance.<br />
Warning: This appliance is equipped with a<br />
built-in safety lock. This appliance only functions if<br />
you have correctly assembled the lid.<br />
Warning: Do not let the appliance blend for<br />
more than 0 seconds at a time. If you have not<br />
finished blending after 30 seconds, switch off the<br />
appliance and wait minutes before continuing.<br />
If the appliance becomes hot, let it cool down<br />
for a few minutes before before continuing.<br />
Note: If the ingredients stick to the wall<br />
of the bowl, switch off the appliance and<br />
loosen them with a spatula or add liquid.<br />
Note: Make sure that the blended baby<br />
food is at the right consistency (e.g. no<br />
lumps) before serving.<br />
Note: If the baby food is still too solid<br />
add liquid (e.g. water) until the baby<br />
food is soft and smooth.
Blending Without Steaming<br />
This appliance is intended for:<br />
• Pureeing steamed and cooked ingredients<br />
for baby food.<br />
• Blending fluids and fruits for baby drinks.<br />
This appliance is not intended for chopping hard<br />
ingredients such as ice or sugar cubes.<br />
1. Place the blender bowl with the blade onto<br />
the base and turn to the “lock” position.<br />
. Place the steamed food into the bowl. If<br />
necessary, add additional ingredients for<br />
blending (e.g. water or oil).<br />
. Place the lid on the blending bowl and turn<br />
to the “lock” position.<br />
. Turn the control dial to the blending position.<br />
Hold the dial in this position until the food is<br />
blended to the correct consistency.<br />
5. When you have finished blending, simply<br />
release the control dial. The control dial<br />
automatically returns to the off position.<br />
. Remove the blended food from the bowl. If<br />
necessary, use a spatula. Make sure that the<br />
baby food is at a safe temperature for your<br />
baby.<br />
. Unplug the appliance.<br />
Warning: This appliance is equipped with a<br />
built-in safety lock. This appliance only functions<br />
if you have correctly assembled the lid.<br />
Warning: Do not let the appliance blend for<br />
more than 0 seconds at a time. If you have not<br />
finished blending after 30 seconds, switch off the<br />
appliance and wait minutes before continuing.<br />
If the appliance becomes hot, let it cool down<br />
for a few minutes before continuing.<br />
8<br />
Note: When blending fluids, ensure you<br />
do not exceed the maximum level<br />
indicated on the bowl.<br />
Note: If the ingredients stick to the wall<br />
of the bowl, switch off the appliance and<br />
loosen them with a spatula or add liquid.<br />
Note: Make sure the blended food is at<br />
the right consistency before feeding to<br />
your baby.<br />
Note: If the baby food is still too solid<br />
add some fluid (e.g. water) until the<br />
baby food is soft and smooth.
Ingredients and Steaming Times<br />
Type of <strong>Food</strong> Ingredients Approximate Steaming<br />
Time<br />
Fruit Apple 10min<br />
Orange 10 min<br />
Peach 10 min<br />
Pear 10min<br />
Pineapple 1 min<br />
Plum 10 min<br />
Vegetables Asparagus 10 min<br />
Broccoli 0 min<br />
Carrot 1 min<br />
Cauliflower 1 min<br />
Celery 1 min<br />
Zucchini 1 min<br />
Fennel 1 min<br />
French Beans 0 min<br />
Leek 1 min<br />
Onion 1 min<br />
Peas 0 min<br />
Capsicum/Pepper 1 min<br />
Potato 0 min<br />
Pumpkin 1 min<br />
Spinach 1 min<br />
Swede 1 min<br />
Sweet Potato 1 min<br />
Tomato 1 min<br />
Meat Chicken, Beef, Lamb, Pork etc. 0 min<br />
Fish Salmon, Sole, Cod, Trout etc. 1 min<br />
All food has to be cut in small cubes, no bigger than - cm.<br />
Steaming Time:<br />
Refer to below table for water guidelines for steaming.<br />
Water Capacity Steam Time (Approx.)<br />
ml minutes<br />
0 ml minutes<br />
ml 10 minutes<br />
100 ml 1 minutes<br />
1 ml 1 minutes<br />
1 0 ml 0 minutes<br />
9
Cleaning and<br />
Maintenance<br />
Clean the appliance after every use.<br />
Never immerse the main unit in water.<br />
Never use bleach or chemical sterilising solutions/<br />
tablets in the appliance.<br />
Never use scouring pads, abrasive cleaning<br />
agents to clean the appliance.<br />
1. Unplug the appliance and remove the lid<br />
from the steamer basket and blender bowl.<br />
. Remove the steamer basket and blender<br />
bowl from the main unit.<br />
. Remove the blade from the blender bowl.<br />
. Clean the blade under the tap thoroughly,<br />
immediately after use. Make sure you also<br />
rinse the searing rubber ring.<br />
. Handle the blade very carefully. The cutting<br />
edges are very sharp.<br />
. Clean the other parts that have come into<br />
contact with food in hot water with some<br />
washing-up liquid immediately after use.<br />
7. To clean the water tank, fill it with warm,<br />
soapy water, then rinse thoroughly. Wipe dry<br />
with a soft cloth.<br />
8. If necessary, clean the main unit with a moist<br />
cloth.<br />
Warning: Never immerse the main unit , cord<br />
and plug into any liquids.<br />
Descaling The Water tank<br />
Mineral deposits (usually white in color) may form<br />
on the inner surfaces of the tank and can cause<br />
damage to the unit.<br />
Descaling is recommended every four weeks<br />
to ensure the appliance works effectively. To<br />
reduce scale build-up, it is helpful to use preboiled<br />
or filtered water in the appliance. To<br />
descale the appliance, follow the descaling<br />
instructions below.<br />
1. Make sure the appliance is switched off.<br />
. Add one sachet of citric acid (10g) to 1 0ml<br />
of warm water.<br />
. Fill the tank with the solution of citric acid (or<br />
vinegar) and water.<br />
10<br />
. Turn the control dial to steaming position. The<br />
indicator light will turn orange to indicate that<br />
the appliance is steaming.<br />
. Switch off the appliance after - min of<br />
steaming and unplug it.<br />
. Pour the used solution of citric acid (or<br />
vinegar) and water out of the tank.<br />
. Rinse the water tank and the bowl thoroughly<br />
with fresh water several times.<br />
8. Fill the tank with 1 0ml water and let the<br />
appliance complete a steaming process of<br />
0 minutes with the empty bowl before you<br />
use the appliance with food again.<br />
Note: You can also use a solution of<br />
100ml water and 50ml white vinegar (8%<br />
acetic acid).<br />
Storage<br />
1. Empty the water tank before you store the<br />
appliance.<br />
. Make sure all parts are clean and dry before<br />
you store the appliance.<br />
. Store the appliance with the blade unit in the<br />
bowl to prevent damage.
Troubleshooting<br />
Problem Possible Cause Solution<br />
The appliance does not heat. Thermostat has cut off the<br />
power.<br />
11<br />
Turn the control dial to Reset<br />
position.<br />
The appliance does not blend. Interlock switch not activated. Replace the blender bowl and<br />
lid to correct postion.<br />
The steaming light does not<br />
go on.<br />
The ingredients have not<br />
heated up completely.<br />
The appliance is not connected<br />
to the mains.<br />
Control dial not set at the<br />
Steam position.<br />
Thermostat has cut off the<br />
power.<br />
The pieces in the bowl are too<br />
big, there is too much food<br />
in the basket or you have not<br />
steamed the food long enough.<br />
The appliance does not steam. You have not put water in the<br />
appliance.<br />
Steaming takes too long or the<br />
steam function does not work<br />
at all.<br />
The blade unit or motor unit is<br />
blocked.<br />
The motor unit gives off an<br />
unpleasant smell during the first<br />
few times of use.<br />
Steam basket handle becomes<br />
loose when it is hot.<br />
The appliance continues to<br />
give off an unpleasant smell<br />
after I have used it a few times.<br />
The appliance makes a lot<br />
of noise, feels hot to touch or<br />
omits smoke etc.<br />
There is too much scale in the<br />
water tank.<br />
There is too much food in the<br />
bowl.<br />
Put the plug in the wall socket.<br />
Turn the control dial to Steam<br />
postion.<br />
Turn the control dial to Reset<br />
position.<br />
Cut the food into smaller pieces<br />
( - cm), decrease the amount<br />
of food in the basket or select a<br />
longer steaming time (max. 0<br />
minutes).<br />
Switch off the appliance and<br />
put the right amount of water in<br />
the tank.<br />
Descale the water tank.<br />
Switch off the appliance and<br />
process a smaller quantity. Do<br />
not fill the bowl beyond the<br />
Max. level.<br />
This is normal. If the appliance continues to<br />
give off this smell after you<br />
have used it a few times,<br />
check whether the processing<br />
quantities and times are<br />
correct.<br />
This is normal. Handle will tighten once<br />
appliance has cooled down.<br />
There is too much food in the<br />
blender bowl or you have let<br />
the appliance blend for too<br />
long.<br />
There is too much food in the<br />
bowl.<br />
The appliance has been<br />
blending too long.<br />
The lid of the bowl leaks. Lid has not been placed<br />
correctly on the bowl.<br />
There is too much food in the<br />
bowl.<br />
Process smaller quantities and<br />
do not let the appliance blend<br />
for more than 0 seconds at a<br />
time.<br />
Switch off the appliance and<br />
process a smaller quantity.<br />
Do not let the appliance blend<br />
for more than 0 seconds at a<br />
time.<br />
Assemble the lid on the bowl<br />
correctly.<br />
Switch off the appliance and<br />
process a smaller quantity.
Recipes<br />
Useful Hints & Guidelines<br />
All fruits and vegetables should be carefully<br />
washed before use.<br />
<strong>Baby</strong> food should be cooked thoroughly until<br />
piping hot and allowed to cool before serving.<br />
Never reheat your baby’s food more than once.<br />
Most freshly cooked foods can be stored in the<br />
refrigerator for up to 24 hours.<br />
Do not refreeze food after it has been thawed.<br />
Steaming times will vary according to the<br />
quantity of food in the jar. Check the instructions<br />
for use for the approximate steaming times for<br />
different foods.<br />
To reach the desired consistency, add baby milk<br />
or water to thin it down or add baby rice or drain<br />
some of the cooking water before blending to<br />
thicken it.<br />
All final quantities are indicative and can vary<br />
depending on the nature of the ingredients and<br />
cooking time.<br />
First Stage <strong>Food</strong>s<br />
Carrot & Potato Puree<br />
Ingredients:<br />
1 small carrot, peeled and sliced<br />
1 small potato, peeled and sliced<br />
¼ cup turnips, peeled and diced<br />
½ tsp olive oil<br />
Directions:<br />
Steam the vegetables for approx 15 minutes then<br />
drain the cooking liquid.<br />
Add olive oil and puree to desired consistency.<br />
Vegetable & Cheese Puree<br />
Ingredients:<br />
1 small carrot, peeled and diced<br />
1 small potato, peeled and diced<br />
1 small tomato, peeled and diced<br />
25gms edam cheese, grated<br />
Drizzle olive oil<br />
Directions:<br />
Steam the vegetables for approx 15 minutes.<br />
Once cooked, add the cheese and puree all<br />
together. To finish add a thin drizzle of olive oil.<br />
Note: Peel the tomato to avoid<br />
constipation in younger babies.<br />
12<br />
Cinnamon Applesauce<br />
Ingredients:<br />
1 small Granny Smith apple, peeled, cored and<br />
diced<br />
1 small Red Delicious apple, peeled, cored and<br />
diced<br />
Cinnamon to taste<br />
Maple syrup, optional<br />
Oatmeal<br />
Directions:<br />
Steam apples for 15 minutes then puree.<br />
Mix in syrup (optional), cinnamon and oatmeal<br />
until desired consistency and taste.<br />
Banana & Pear Puree<br />
Ingredients:<br />
1 medium banana, diced<br />
1 small pear peeled and diced<br />
1 tbs baby cereal<br />
Directions:<br />
Place the banana and pear in the steamer for<br />
approx 10 minutes. Once cooked, puree with<br />
baby cereal.<br />
New Textures & Flavours<br />
Butternut Squash & Carrots Puree<br />
Ingredients:<br />
1 small butternut squash, diced<br />
1 small carrot, sliced<br />
Olive Oil<br />
Directions:<br />
Steam the vegetables for approx 15 minutes.<br />
Drain excess liquid and reserve. Add olive oil<br />
and puree to desired consistency using the<br />
reserved liquid to achieve a thinner puree.<br />
Smashed Potatoes<br />
Ingredients:<br />
1 small potato, peeled and diced<br />
5 broccoli florets, chopped<br />
¼ cup shredded cheddar cheese<br />
1 tbs milk<br />
Directions:<br />
Steam the vegetables for approx 15 minutes.<br />
Discard leftover water from steaming.<br />
Add a tablespoon or so of milk and the cheese<br />
to taste. Mash together with a large fork.
Toddler Tastes<br />
Ricotta Gnocchi<br />
Ingredients:<br />
1 fresh egg<br />
1 cup ricotta cheese<br />
5 tablespoons flour<br />
1 teaspoon olive oil<br />
1 pinch ground nutmeg<br />
Directions:<br />
To make the gnocchi dough, cut the cheese into<br />
small pieces and place in the mixing bowl with the<br />
egg, flour, olive oil and nutmeg. Pulse 3 times.<br />
Dip a teaspoon in hot water and then use the<br />
spoon to shape the dough into several olive-sized<br />
gnocchi balls. (You will need to re-dip the spoon<br />
each time so the dough doesn’t stick).<br />
Heat a saucepan of water, when it boils, poach<br />
the gnocchi for 30 to 40 seconds and remove them<br />
with a slotted spoon. (Gnocchi is done when they<br />
start to float to the surface).<br />
Drizle with olive oil and eat immediately.<br />
Strawberry & Banana Yoghurt Shake<br />
Ingredients:<br />
½ ripe banana, sliced<br />
8 strawberries, washed, hulled and cut in ½<br />
1 tsp sugar (optional)<br />
½ cup plain yoghurt<br />
Directions:<br />
Place the fruit in the blending bowl and blend<br />
slightly. (One or two pulses). Add the yoghurt and<br />
sugar (optional).<br />
13
Notes<br />
1
Notes<br />
1
Warranty<br />
The benefits conferred by this warranty are in<br />
addition to the consumers guarantees and other<br />
rights and remedies in respect of the product<br />
which the consumer has under the Australian<br />
Consumer law.<br />
The original purchaser of this <strong>Bellini</strong> product is<br />
provided with the following warranty, subject to<br />
the following conditions.<br />
This product is warranted for a period of 1 year<br />
from the date of purchase for all parts defective<br />
in workmanship or materials. Should an instance<br />
occur where the product is deemed faulty, the<br />
product will need to be returned to the retailer<br />
where it was purchased to be replaced with the<br />
same product or a refund issued. In order to<br />
obtain an exchange or a refund, proof of<br />
purchase must be presented to the retailer.<br />
This warranty is in addition to all other rights and<br />
remedies available under the Australia Consumer<br />
Law and other laws and shall not be taken as<br />
applying to exclude, restrict or modify such rights<br />
or remedies in any other matter whatsoever.<br />
WARRANTY CONDITIONS<br />
1. This warranty is only valid for appliances used<br />
according to the manufacturer’s instructions.<br />
2. This appliance must not be modified or<br />
changed in any way.<br />
3. Connection must be to the voltage<br />
requirements as specified in the ratings label<br />
located on the product.<br />
4. The manufacturer does not accept liability for<br />
any direct or consequential damage, loss or<br />
other expense arising from misuse or incorrect<br />
installation and operation of the appliance.<br />
16<br />
5. Warranty will only be given where proof of<br />
purchase is provided, e.g. original invoice.<br />
6. Not designed or warranted for industrial or<br />
commercial use.<br />
DO NOT SEND IN THIS WARRANTY<br />
Fill out the following details and file with your<br />
purchase invoice.<br />
RETAIN & FILE WITH YOUR RECEIPT<br />
Your Purchase Receipt/Invoice is proof of date of<br />
purchase. You must be able to present it at the<br />
place of purchase to obtain a replacement or a<br />
refund.<br />
GSM International Ltd reserves the right to<br />
discontinue items, modify designs and change<br />
specifications without incurring obligation. Whilst<br />
every effort is made to ensure that descriptions,<br />
specifications and other information in this<br />
publication is correct, no warranty is given in<br />
respect thereof and the company shall not be<br />
liable for any errors therein.<br />
Purchased from:<br />
Co. Name:<br />
Address:<br />
Date of Purchase:<br />
NOTE: Consistent with our continuing<br />
product development policy,<br />
improvements may have been<br />
made which render the contents of<br />
this package slightly different to that<br />
shown.<br />
Cat. No. <strong>BBT100</strong><br />
June 2011