Basic Brick Construction - Quikrete
Basic Brick Construction - Quikrete
Basic Brick Construction - Quikrete

You also want an ePaper? Increase the reach of your titles
YUMPU automatically turns print PDFs into web optimized ePapers that Google loves.
<strong>Basic</strong> <strong>Brick</strong> <strong>Construction</strong> http://www.quikrete.com/diy/<strong>Basic</strong><strong>Brick</strong><strong>Construction</strong>.html<br />
The best way to learn the art of bricklaying is through hands-on<br />
experience, and there's no better place to start than with a basic<br />
freestanding brick wall. The wall described here is built in the<br />
common or American bond pattern, a pattern that is very and easy<br />
to lay. The wall is built in two wythes or tiers and can be safely<br />
built up to 3'; for a wall above 3', steel reinforcement is required.<br />
Reinforcing can be either rods inserted into the group after it has<br />
stiffened slightly or ties laid across two wythes to help hold them<br />
together. If you are panning to build a wall more than 3' high, it is<br />
best to consult your local building codes for exact specifications<br />
and techniques.<br />
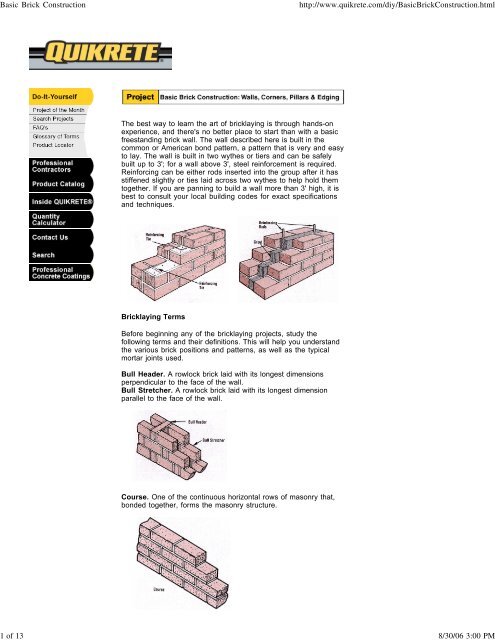
<strong>Brick</strong>laying Terms<br />
Before beginning any of the bricklaying projects, study the<br />
following terms and their definitions. This will help you understand<br />
the various brick positions and patterns, as well as the typical<br />
mortar joints used.<br />
Bull Header. A rowlock brick laid with its longest dimensions<br />
perpendicular to the face of the wall.<br />
Bull Stretcher. A rowlock brick laid with its longest dimension<br />
parallel to the face of the wall.<br />
Course. One of the continuous horizontal rows of masonry that,<br />
bonded together, forms the masonry structure.<br />
1 of 13 8/30/06 3:00 PM
<strong>Basic</strong> <strong>Brick</strong> <strong>Construction</strong> http://www.quikrete.com/diy/<strong>Basic</strong><strong>Brick</strong><strong>Construction</strong>.html<br />
Header. A masonry unit laid flat with its longest dimension<br />
perpendicular to the face of the wall. It is generally used to tie two<br />
wythes of masonry together.<br />
Rowlock. A brick laid on its face, or edge.<br />
Soldier. A brick laid on its end so that its longest dimension is<br />
parallel to the vertical axis of the face of the wall.<br />
Stretcher. A masonry unit laid flat with its longest dimension<br />
parallel to the face of the wall.<br />
Wythe. A continuous vertical section or thickness of masonry 4" or<br />
greater.<br />
<strong>Brick</strong> Walls<br />
QUIKRETE® Mortar Mix or Mason Mix <strong>Brick</strong>s<br />
Chalk line<br />
Mortarboard<br />
Hose<br />
Wheelbarrow<br />
Trowel<br />
Level<br />
Carpenter's square<br />
Tape measure<br />
2 of 13 8/30/06 3:00 PM
<strong>Basic</strong> <strong>Brick</strong> <strong>Construction</strong> http://www.quikrete.com/diy/<strong>Basic</strong><strong>Brick</strong><strong>Construction</strong>.html<br />
<strong>Brick</strong> set<br />
Mason's hammer<br />
Goggles<br />
Jointer<br />
Mason's line<br />
Line blocks<br />
Selecting a Site<br />
Take time to select a site for your wall; careful location can<br />
contribute greatly to the wall's longevity. Choose a spot where the<br />
soil is firm and drainage is good. Whenever possible, avoid<br />
locating the wall bear a large trees because the roots can expert<br />
great pressure on the wall and easily crack the foundation.<br />
Preparation<br />
The first step in building a brick wall is to lay a solid footer or<br />
foundation wall. For detailed instructions on pouring a concrete<br />
footer or foundation, see Footers for Walls or Concrete Walls. Be<br />
sure to allow the footer or foundation at least two full days to cure<br />
before beginning to lay the brick.<br />
Locate you r bricks in several stacks along the job site; this will<br />
save you time and effort later. To prevent the bricks from asorbing<br />
too much moisture from the mortar, hose them down a few hours<br />
before beginning to work. The hose will also come in handy for<br />
rinsing your tools occasionally as you work and for keeping the<br />
mortar sufficiently moist.<br />
To locate the outer edge of the wall, use a tape measure to<br />
measure in from the edge of the foundation at each end. Snap a<br />
chalk line between the two points to mark a guideline to keep the<br />
wall centered. You are now ready to begin building the wall using<br />
the following step-by-step procedure.<br />
Preparing the Mortar<br />
1. Mix the QUIKRETE® Mortar Mix or<br />
Mason Mix with water until you obtain<br />
a smooth, plastic-like consistency.<br />
2. Make a dry run by laying a course of stretcher bricks along the<br />
chalk line for the entire length of the wall. Leave ½" between each<br />
brick for the head joints and mark the position of the bricks on the<br />
foundation with a piece of chalk. Lay this course without cutting<br />
any of the bricks; if necessary, adjust the head joint width.<br />
3. Remove the dry course from the foundation, then throw a mortar<br />
line on the foundation. To do this, load the trowel with mortar and,<br />
as you bring your arm back toward your body, rotate the trowel<br />
deposit the mortar evenly. Mortar should be applied approximately<br />
1" thick, 1 brick wide, and 3 to 4 bricks long. (You might want to<br />
practice throwing lines on the mortar board until you become<br />
familiar with the technique.)<br />
3 of 13 8/30/06 3:00 PM
<strong>Basic</strong> <strong>Brick</strong> <strong>Construction</strong> http://www.quikrete.com/diy/<strong>Basic</strong><strong>Brick</strong><strong>Construction</strong>.html<br />
4. Furrow the mortar with the point of<br />
trowel. Divide the mortar cleanly with<br />
the trowel; do not scrape it. Good<br />
furrows not only ensure that the<br />
bricks not only ensure that the bricks<br />
are laid evenly, but they also help to<br />
squeeze out excess mortar on the<br />
sides as the bricks are set in place.<br />
Laying the <strong>Brick</strong>s<br />
1. Lay the first course of stretcher<br />
bricks in the mortar. Beginning with<br />
the second brick, apply mortar to<br />
the head joint end of each brick,<br />
then shove the bricks into place<br />
firmly so that the mortar is squeezed<br />
out of all side of the joints. Use a<br />
level to check the course for correct<br />
height, then place it on top to make<br />
sure that all the bricks are plumb<br />
and level.<br />
2. Make sure that the head joint<br />
thicknesses correspond with your<br />
chalk marks. When you have to<br />
move a brick, tap it gently with a<br />
trowel handle; never pool on it<br />
because this breaks the bond. Be<br />
sure to trim off any excess mortar<br />
for the sides of the bricks.<br />
3. Throw another mortar line alongside the first course, then begin<br />
laying the second, or backup, course. Use the level to make sure<br />
that the two courses are equal height, but do not mortar them<br />
together.<br />
4. Before beginning to lay the second, or header, course, cut two<br />
bricks to half length. To cut a brick, lay it on the ground and score<br />
it all the way around using a hammer and brick set. Break the brick<br />
in two with a sharp blow to the brick. Note: When cutting bricks,<br />
protect your eyes by wearing goggles.<br />
4 of 13 8/30/06 3:00 PM
<strong>Basic</strong> <strong>Brick</strong> <strong>Construction</strong> http://www.quikrete.com/diy/<strong>Basic</strong><strong>Brick</strong><strong>Construction</strong>.html<br />
5. Use the two half bricks to begin the second, or header, course.<br />
This will ensure that the first two courses are staggered for<br />
structural purposes.<br />
6. To finish the second course of the<br />
lead, lay three header bricks and make<br />
sure that they are plumb and level. As<br />
seen in the photo, the third and fifth<br />
courses consists of stretchers similar<br />
to the first course; the fourth course<br />
begins with single header, followed by<br />
stretchers. Use the level to make sure<br />
that the lead is true on each course.<br />
7. Build another lead on the other end<br />
of the foundation. As the mortar<br />
begins to set, it is best to stop laying<br />
bricks and use a concave jointer to finish the mortar joints. Work<br />
along the vertical joints first; this will help as improve the<br />
appearance of the wall.<br />
5 of 13 8/30/06 3:00 PM
<strong>Basic</strong> <strong>Brick</strong> <strong>Construction</strong> http://www.quikrete.com/diy/<strong>Basic</strong><strong>Brick</strong><strong>Construction</strong>.html<br />
Filling in the Leads<br />
1. Stretch a mason's line between the<br />
completed leads, then begin laying the<br />
outer course. The line should be<br />
approximately 1/16" away from the<br />
bricks and flush with their top edges<br />
as shown. Work from both ends of the<br />
wall toward the middle. When you<br />
reach the final brick, mortar both<br />
sides of it and push it straight down to<br />
squeeze the mortar out from the<br />
joints. |<br />
2. Move the mason's line to the back of the wall and begin laying<br />
the backup course. Remember to check your work with level for<br />
accuracy and finish the joints with the concave jointer when they<br />
are almost dry.<br />
3. The fifth, or top, course is laid exactly like the first. Move the<br />
mason's line up, throw a mortar line, and begin laying the bricks.<br />
Apply a generous amount of mortar on the face of each brick, then<br />
shove the brick firmly into place.<br />
4. To build a higher wall, simply build more five-course leads at<br />
each end of the wall. Keep in mind that some type of reinforcing<br />
6 of 13 8/30/06 3:00 PM
<strong>Basic</strong> <strong>Brick</strong> <strong>Construction</strong> http://www.quikrete.com/diy/<strong>Basic</strong><strong>Brick</strong><strong>Construction</strong>.html<br />
should be used for higher walls.<br />
5. Scoop mortar onto the trowel and use the concave jointer to fill<br />
in the joints on the top course. Keep a careful check on the joint<br />
thickness as you go. When you have laid the last brick, check the<br />
top course for assignment.<br />
Building Corners<br />
A wall with corners is not much harder to build that the basic<br />
freestanding wall. The following directions show how to build a<br />
corner in the common bond pattern, but they can be adapted to<br />
any of the other patterns as well.<br />
1. Snap chalk lines on both sides, then check to make sure that<br />
they are perfectly square using a carpenter's square or the 3-4-5<br />
method.<br />
2. Make a dry run to make the position of the bricks. Throw a<br />
mortar line, then place the first brick exactly at the corner, being<br />
careful to line it up with a chalk lines.<br />
7 of 13 8/30/06 3:00 PM
<strong>Basic</strong> <strong>Brick</strong> <strong>Construction</strong> http://www.quikrete.com/diy/<strong>Basic</strong><strong>Brick</strong><strong>Construction</strong>.html<br />
3. Lay the four remaining bricks in the first course of the lead.<br />
With the level and/or carpenter's square, check the alignment and<br />
make sure that the bricks are level and plumb.<br />
4. Throw mortar lines and lay the back-up course as shown. Both<br />
courses should be level with one another; there is no mortar joint<br />
between the two.<br />
5. To lay the second course, cut two bricks into quarter and<br />
three-quarter pieces. Begin by laying the three-quarter brick pieces<br />
perpendicular to one another to form the out edge of the corner.<br />
Continue by laying several header bricks out from the corner.<br />
Finally, complete the second course by inserting the two quarter<br />
closure bricks as shown.<br />
6. Lay courses 3 through 5 to finish the corner lead. Courses 3<br />
and 5 are similar to course 1; course 4 begins with a header<br />
positioned as shown.<br />
7. Construct a second lead at the opposite corner.<br />
Other Types of Bonds<br />
8 of 13 8/30/06 3:00 PM
<strong>Basic</strong> <strong>Brick</strong> <strong>Construction</strong> http://www.quikrete.com/diy/<strong>Basic</strong><strong>Brick</strong><strong>Construction</strong>.html<br />
In addition to the common bond pattern, there are a number of<br />
other patterns from which to choose. By using the previous<br />
directions for laying the common bond, you can use any of these<br />
patterns to give variety to your bricklaying work.<br />
Running Bond. This is the simplest pattern; it consists of only<br />
stretchers. Reinforcing ties are usually used with it because of the<br />
absence of headers. Running bond is common in brick veneer<br />
walls and wall cavity construction.<br />
Common or American Bond. As detailed in the step-by-step<br />
instruction, this is a variation of the running bond, with a course of<br />
full-length headers placed at regular intervals for structure<br />
bonding.<br />
Flemish Bond. This pattern uses alternate stretchers and headers,<br />
with the headers in alternate courses centered over the stretchers<br />
in the intervening courses.<br />
English Bond. This pattern also uses alternate stretchers and<br />
headers, but the headers are centered on the stretchers and the<br />
joints between the stretchers in all the courses in line up vertically.<br />
English Cross or Dutch Bond. This is a variation on the English,<br />
the only difference being that the vertical joints between the<br />
stretchers in alternate courses do not line up vertically.<br />
These joints center on the stretchers themselves.<br />
9 of 13 8/30/06 3:00 PM
<strong>Basic</strong> <strong>Brick</strong> <strong>Construction</strong> http://www.quikrete.com/diy/<strong>Basic</strong><strong>Brick</strong><strong>Construction</strong>.html<br />
Stack or Block Bond. This is a week bond, used normally for<br />
decorative effect on veneers. All vertical joints are aligned, and<br />
steel reinforcing ties must be installed if the pattern is being used<br />
structurally.<br />
Joints<br />
There are several commonly used methods of finishing method<br />
based on the type of construction. The best joints for strength and<br />
waterproofing are concave and V-joints. A weathered joint is also<br />
strong and the most watertight. Raked, struck, and extruded joints<br />
are perhaps the most dramatic looking; however, they are not very<br />
water-resistent. Care should be taken using them in rainy or<br />
freezing climates. A flush joint is the simplest joint-excess mortar<br />
is simply cut off with trowel. But this joint is not particular strong or<br />
water-resistant.<br />
Pillars and Posts<br />
The first step in making pillars and posts of masonry units is to<br />
construct adequate footings.<br />
10 of 13 8/30/06 3:00 PM
<strong>Basic</strong> <strong>Brick</strong> <strong>Construction</strong> http://www.quikrete.com/diy/<strong>Basic</strong><strong>Brick</strong><strong>Construction</strong>.html<br />
1. Make the forms. If the top surface of the footings will be level<br />
with or below the grade, cut the forms directly in the soil. If the<br />
surface of the footing will be above grade, use a shallow wood<br />
form in conjunction with a cavity cut in the soil.<br />
2. Mix QUIKRETE® Concrete Mix and pour it into the form<br />
3. When all standing water has evaporated, use a trowel to smooth<br />
11 of 13 8/30/06 3:00 PM
<strong>Basic</strong> <strong>Brick</strong> <strong>Construction</strong> http://www.quikrete.com/diy/<strong>Basic</strong><strong>Brick</strong><strong>Construction</strong>.html<br />
the surface of the footing.<br />
4. Moist-cure the concrete. Once the footings have set, continue<br />
pillar and posts construction as you would if you were building a<br />
full wall. Use a level frequently to check the horizontal plane of<br />
each course and the plumbness of each wall.<br />
Use a large carpenter's square to ensure that the corners are<br />
square. Cap the pillar or post with pre-cast concrete slabs,<br />
hand-formed mounds of QUIKRETE® Concrete or Mortar,<br />
removable wood caps, or pieces of flagstone.<br />
For Best Results<br />
Edging<br />
Be sure that dirt walls are vertical or that they slant out<br />
slightly at the base.<br />
Be sure that the base for the footing is firm and level.<br />
Check to see that the surface of the wood form is level<br />
Add vertical steel reinforcement rods or conduct for<br />
electrical cable.<br />
Add brackets, bolts, studs, hinges, light fixtures, and/or<br />
hangers before the concrete or masonry has set.<br />
Install the cap at a slight angle so that it sheds water.<br />
<strong>Brick</strong> edging is the perfect completion to concrete walkways and<br />
patios.<br />
1. Stake out the areas for the edging using measuring tape and<br />
twine. The width of the edging should be equal to the length of the<br />
brick being used-usually 8".<br />
2. Remove the sod and soil to a depth equal to the width of the<br />
brick -usually about 4".<br />
12 of 13 8/30/06 3:00 PM
<strong>Basic</strong> <strong>Brick</strong> <strong>Construction</strong> http://www.quikrete.com/diy/<strong>Basic</strong><strong>Brick</strong><strong>Construction</strong>.html<br />
3. Use one of the bricks to tamp down the excavation and make it<br />
as smooth as possible.<br />
4. Prepare the QUIKRETE® Mortar Mix or Mason Mix; then spread<br />
a layer in the excavation for the bricks.<br />
5. Set the bricks in place by applying mortar to one side and<br />
pressing each brick firmly against the preceding one.<br />
6. To adjust a brick, tap it with the trowel handle; never pull on it<br />
because this breaks the bond. Use the trowel to trim off any<br />
excess mortar from the topes of the bricks as you go.<br />
7. With this simple construction technique, you can even make<br />
curved edging. Just dig the excavation to the desired curve,<br />
taking care to keep the width the same at all times.<br />
13 of 13 8/30/06 3:00 PM