M1 Mag Trainer Instructions - JetBlack
M1 Mag Trainer Instructions - JetBlack
M1 Mag Trainer Instructions - JetBlack

Create successful ePaper yourself
Turn your PDF publications into a flip-book with our unique Google optimized e-Paper software.
www.jetblackcycling.com<br />
info@jetblackcycling.com<br />
Code: JBT-<strong>M1</strong><br />
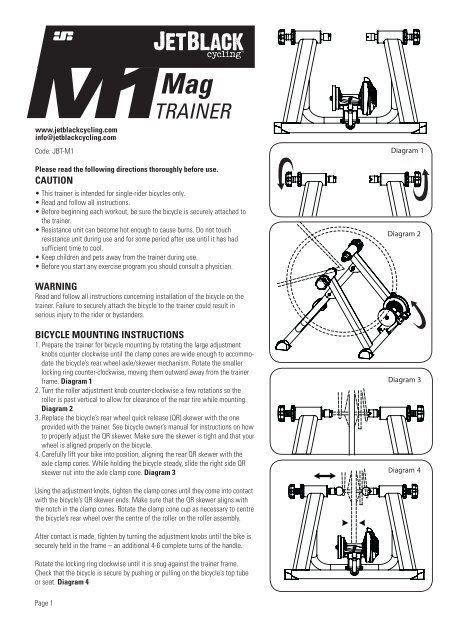
Please read the following directions thoroughly before use.<br />
CAUTION<br />
• This trainer is intended for single-rider bicycles only.<br />
• Read and follow all instructions.<br />
• Before beginning each workout, be sure the bicycle is securely attached to<br />
the trainer.<br />
• Resistance unit can become hot enough to cause burns. Do not touch<br />
resistance unit during use and for some period after use until it has had<br />
sufficient time to cool.<br />
• Keep children and pets away from the trainer during use.<br />
• Before you start any exercise program you should consult a physician.<br />
WARNING<br />
Read and follow all instructions concerning installation of the bicycle on the<br />
trainer. Failure to securely attach the bicycle to the trainer could result in<br />
serious injury to the rider or bystanders.<br />
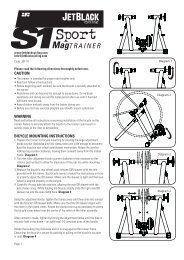
BICYCLE MOUNTING INSTRUCTIONS<br />
1. Prepare the trainer for bicycle mounting by rotating the large adjustment<br />
knobs counter clockwise until the clamp cones are wide enough to accommodate<br />
the bicycle’s rear wheel axle/skewer mechanism. Rotate the smaller<br />
locking ring counter-clockwise, moving them outward away from the trainer<br />
frame. Diagram 1<br />
2. Turn the roller adjustment knob counter-clockwise a few rotations so the<br />
roller is past vertical to allow for clearance of the rear tire while mounting.<br />
Diagram 2<br />
3. Replace the bicycle’s rear wheel quick release (QR) skewer with the one<br />
provided with the trainer. See bicycle owner’s manual for instructions on how<br />
to properly adjust the QR skewer. Make sure the skewer is tight and that your<br />
wheel is aligned properly on the bicycle.<br />
4. Carefully lift your bike into position, aligning the rear QR skewer with the<br />
axle clamp cones. While holding the bicycle steady, slide the right side QR<br />
skewer nut into the axle clamp cone. Diagram 3<br />
Using the adjustment knobs, tighten the clamp cones until they come into contact<br />
with the bicycle’s QR skewer ends. Make sure that the QR skewer aligns with<br />
the notch in the clamp cones. Rotate the clamp cone cup as necessary to centre<br />
the bicycle’s rear wheel over the centre of the roller on the roller assembly.<br />
After contact is made, tighten by turning the adjustment knobs until the bike is<br />
securely held in the frame – an additional 4-6 complete turns of the handle.<br />
Rotate the locking ring clockwise until it is snug against the trainer frame.<br />
Check that the bicycle is secure by pushing or pulling on the bicycle’s top tube<br />
or seat. Diagram 4<br />
Page 1<br />
<strong>Mag</strong><br />
TRAINER
USING YOUR TRAINER<br />
1. Tighten the roller adjustment knob by turning it clockwise until the<br />
resistance unit roller assembly contacts the rear tire. See Diagram 5. Then<br />
tighten the knob an additional 1½ to 2 full turns. The roller needs to provide<br />
only enough pressure to prevent the rear tire from slipping while in use. Over<br />
tightening the knob bolt may cause premature tire wear.<br />
2. Keep in mind that riding on an indoor trainer will cause your rear tire to<br />
wear more quickly than it would on the road. The tips below will help<br />
minimize tire wear.<br />
a) Allowing the tire to slip against the roller will accelerate tire wear. If you<br />
notice the tire slipping regularly during use, tighten the knob by additional ¼<br />
turn as necessary to reduce slipping.<br />
b) Try to apply power more evenly when accelerating and pedal with a<br />
smoother stroke.<br />
c) Use a smooth tread tire at least 23mm in width and maintain the maximum<br />
recommended inflation pressure for your tire.<br />
3. To make your indoor workout as quiet as possible, set the trainer on a<br />
<strong>JetBlack</strong> <strong>Trainer</strong> Mat and use a rear tire with a smooth tread pattern. Once<br />
attached, the bicycle slopes downward slightly. To level, use the optional<br />
<strong>JetBlack</strong> Riser Block under the front tire.<br />
4. This trainer has 5 levels of resistance to help keep variety in your workout<br />
program. To change the level, move the orange lever up or down as required.<br />
Level 1 is the least (easiest) level of resistance, and level 5 being the<br />
hardest. Changing gears on your bike will also have an effect on your<br />
exertion levels.<br />
BICYCLE REMOVAL<br />
1. Loosen the roller adjustment knob so the resistance unit is as close to the<br />
floor as possible.<br />
2. While supporting the bicycle, loosen the left side axle support cup by turning<br />
the adjustment knob counter-clockwise, until the rear wheel axle is free of<br />
the support cups.<br />
3. Note: The QR skewer provided with the trainer can be used when riding the<br />
bicycle of the trainer as well. If you choose to reinstall your bicycle’s original<br />
skewer, refer to your bicycle owner’s manual for instructions on properly<br />
adjusting the skewer. Before riding, ensure the quick release skewer is tight.<br />
4. To store or transport your trainer, grasp the trainer frame by the adjustment<br />
knobs and lift. Fold the legs together, and the trainer is ready for transport or<br />
storage. Be careful when folding the legs to avoid pinching your fingers.<br />
Page 2<br />
<strong>Mag</strong><br />
TRAINER