Corning® FloWell™ 2W Plates User Guide - Corning Incorporated
Corning® FloWell™ 2W Plates User Guide - Corning Incorporated
Corning® FloWell™ 2W Plates User Guide - Corning Incorporated

Create successful ePaper yourself
Turn your PDF publications into a flip-book with our unique Google optimized e-Paper software.
<strong>Corning</strong> ® FloWell <strong>2W</strong> <strong>Plates</strong> <strong>User</strong> <strong>Guide</strong><br />
Date Last Revised: 11/19/2012<br />
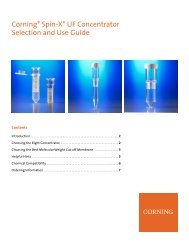
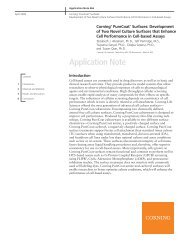
<strong>Corning</strong> FloWell <strong>2W</strong> plate is a multiple well cell culture<br />
plate that contains 2 sets of 3 wells connected through<br />
porous channels (Fig. 1A). This design allows continuous<br />
fluid perfusion between connected wells for up to 3 days.<br />
Flow direction and rate are driven primarily by hydrostatic<br />
pressure. The <strong>Corning</strong> FloWell <strong>2W</strong> plate is automation<br />
friendly, as the dimensions are the same as the standard<br />
6 well multiple well plate.<br />
<strong>Corning</strong> FloWell plates can be used as cell feeding devices<br />
for culturing cells that require frequent medium change,<br />
such as some stem cells, neuronal and primary cells and fastgrowing<br />
cancer cell lines. In this application, the middle well<br />
from each set of 3 connected wells serves as the cell culture<br />
well, respectively (Fig. 1B). The wells on either side of the<br />
cell culture well are used as the medium supplying well<br />
and waste well (Fig. 1B). With proper setup, medium flows<br />
continuously from the medium wells to cell wells for up to<br />
3 days. Concurrently, exhausted medium flows out of cell<br />
culture wells, which can be beneficial to cell viability and<br />
growth. This product is ideal for maintaining cell cultures<br />
that require daily medium exchange, through the weekend<br />
and holidays, saving both time and labor costs. By eliminating<br />
the need for manual medium exchange, the product can<br />
reduce the risk of contamination, cell loss and variability.<br />
<strong>Corning</strong> FloWell plates can also be used in co-culturing<br />
studies that investigate cell-to-cell communication with<br />
the ability to spatially separate cells of different types.<br />
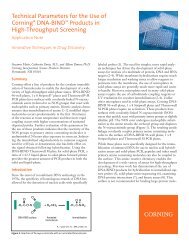
Medium well Cell well<br />
Flow direction Flow direction<br />
Waste well<br />
Porous materials<br />
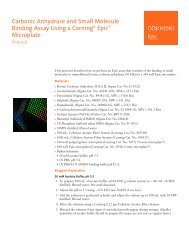
Figure 1A. <strong>Corning</strong> FloWell <strong>2W</strong> Plate. Multiple well cell culture<br />
plate with continuous fluid perfusion technology.<br />
Figure 1B. Side View<br />
Schematic Diagram of<br />
<strong>Corning</strong> FloWell <strong>2W</strong> Plate.<br />
Typical view of the plate at<br />
the beginning of the cell<br />
culture process.
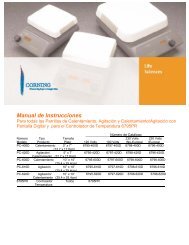
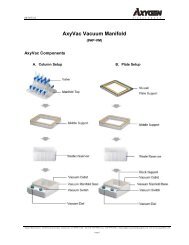
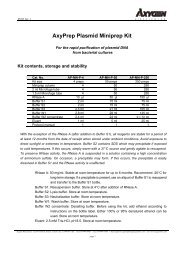
1 2 3<br />
4 5 6<br />
Figure 2. Well numbering<br />
scheme for <strong>Corning</strong> FloWell<br />
<strong>2W</strong> Plate.<br />
The procedure below describes how to set up the plates for continuous cell feeding.<br />
I. Coating Cell Culture Wells<br />
<strong>Corning</strong> ® FloWell <strong>Plates</strong> are tissue culture treated (TCT). If a special surface coating is<br />
required for cells to attach, the procedure outlined below provides general guidance. Only<br />
the two wells in the middle column need to be coated (Fig. 2, wells 2 and 5). All steps should<br />
be performed in a biological safety cabinet using aseptic techniques. This procedure may<br />
require optimization depending on the material used to coat the wells (i.e., collagen, fibronectin,<br />
Matrigel, gelatin, laminin or poly-ornithine).<br />
1. Prepare coating solutions using procedures recommended by the material supplier or<br />
procedures previously optimized for the cells to be cultured in 6 well plates.<br />
2. Transfer 1.5 mL DPBS buffer to each of the medium wells (Fig. 2, wells 1 and 4) and<br />
the waste wells (Fig. 2, wells 3 and 6).<br />
3. Transfer 1.5 mL coating solution to each of the cell wells (Fig. 2, wells 2 and 5). It is<br />
important to fill the cell wells with a volume equal to or slightly smaller than the volume<br />
used for medium and waste wells. This will ensure the coating material does not flow<br />
into the porous channels and reduces the risk of clogging the porous channels. This is<br />
especially important when using coating materials that could form irreversible gels.<br />
4. Incubate the plates for the required period of time and temperature (according to the<br />
manufacturer’s instructions or as previously optimized for 6 well plates). Some frequently<br />
used conditions identified from published literature include; 2 hours at room temperature,<br />
1 hour at 37°C incubator, or overnight at 4°C.<br />
5. For the best results, use the coated plates immediately. If plates are not used after the<br />
coating procedure, they should be sealed and stored at 4°C. The length of time the coated<br />
plates can be stored will depend on the coating materials used (follow manufacturer’s<br />
recommendations of optimize for the particular cell type used).<br />
II. Setting Up Cell Cultures<br />
Depending on the cell lines to be cultured, starting volumes for each set of 3 connected wells<br />
may vary. Therefore, determine the optimal conditions for each cell type to be cultured.<br />
For medium wells (Fig. 2, wells 1 and 4), a minimum volume of 6.5 mL medium is recommended<br />
in order to provide sufficient medium to cells cultured in the cell wells for up to 3 days.<br />
For some cells, a larger starting volume for the medium well is needed to sustain the cell<br />
growth. Do not fill the medium well with more than 9.5 mL per well to prevent overflow<br />
during handling.<br />
For cell wells (Fig. 2, wells 2 and 5), a minimal seeding volume of 2.5 mL medium per well.<br />
For waste wells (Fig. 2, wells 3 and 6), 0.5 mL medium is recommended. This is required<br />
to wet the waste wells and initiate fluid flow from the cell wells out into the waste wells.<br />
1. Prepare cells (either passaged or from frozen vials) so that they are in growth medium<br />
with desired cell seeding density.<br />
2. If the <strong>Corning</strong> FloWell plate was pre-coated and stored at 4°C, allow the plate to reach<br />
room temperature and remove the coating solutions or buffer from all wells.<br />
3. Transfer 2.5 mL of cell suspension prepared in step 1 to each of the cell culture wells<br />
(Fig. 2, wells 2 and 5).<br />
4. Gently rock and swirl plate to ensure uniform cell distribution.<br />
5. Aspirate 7 to10 mL pre-warmed growth medium with a 10 mL Stripette ® serological<br />
pipet.<br />
6. Dispense 3 mL growth medium to one waste well (Fig. 2, well 3). Then aspirate 2.5 mL<br />
of the medium back from the same waste well. This step is intended to wet the bottom of<br />
waste well, otherwise, a dry waste well may prevent medium flowing out of cell well. It is<br />
important to make sure that the waste wells are wet when setting up the cultures.
7. Dispense the remaining growth medium from the pipet to one medium well (Fig. 2,<br />
well 1). The total volume in the medium well should be in the range of 6.5 to 9.5 mL.<br />
8. Repeat step 5 to step 7 for the other set of waste and medium wells on the plate (Fig. 2,<br />
wells 6 and 4, respectively).<br />
9. Place the plate in cell culture incubator for 72 hours.<br />
10. Examine cell confluency and morphology daily to assess cell growth performance and<br />
determine if the cultures are ready for harvest.<br />
III. Medium Replenishment for Extended Cell Culture Growth<br />
If extended growth beyond 72 hours is needed for the cells, follow the procedure below to<br />
replenish the medium wells and discard exhausted medium.<br />
1. Warm up growth medium to 37°C.<br />
2. Remove <strong>Corning</strong> ® FloWell plate from the incubator and place into the biological<br />
safety cabinet.<br />
3. Aspirate and discard all the medium from the medium wells (Fig. 2, wells 1 and 4) and<br />
add the desired amount of pre-warmed fresh growth medium (6.5 to 9.5 mL).<br />
4. Aspirate and discard the exhausted medium in the waste wells (Fig. 2, wells 3 and 6).<br />
5. Optional: During the culturing period, dead cells can accumulate in the cell wells (Fig. 2,<br />
wells 2 and 5). If it is desired to remove the dead cells, a medium change step for the cell<br />
wells can be included. In this case, simply aspirate the medium in the cell wells and add<br />
2.5 mL pre-warmed fresh growth medium back into each cell well.<br />
6. Place plate back into incubator.<br />
IV. Cell Harvest<br />
1. Aspirate growth medium from all wells.<br />
2. Rinse cell wells with a minimum of 1.5 mL buffer.<br />
3. Detach cells from the cell well following the normal procedure for harvesting cells from<br />
a 6 well plate.<br />
4. Collect cell suspension from the cell wells and process.
Beginning-to-end<br />
Solutions for<br />
Cell Culture<br />
www.corning.com/lifesciences/solutions<br />
<strong>Corning</strong> <strong>Incorporated</strong><br />
Life Sciences<br />
836 North St.<br />
Building 300, Suite 3401<br />
Tewksbury, MA 01876<br />
t 800.492.1110<br />
t 978.442.2200<br />
f 978.442.2476<br />
www.corning.com/lifesciences<br />
At <strong>Corning</strong>, cells are in our culture. In our continuous efforts to improve efficiencies and develop<br />
new tools and technologies for life science researchers, we have scientists working in <strong>Corning</strong><br />
R&D labs across the globe, doing what you do every day. From seeding starter cultures to<br />
expanding cells for assays, our technical experts understand your challenges and your increased<br />
need for more reliable cells and cellular material.<br />
It is this expertise, plus a 160-year history of <strong>Corning</strong> innovation and manufacturing excellence,<br />
that puts us in a unique position to offer a beginning-to-end portfolio of high-quality, reliable cell<br />
culture consumables.<br />
For additional product or technical information, please visit<br />
www.corning.com/lifesciences or call 1.800.492.1110. Outside<br />
the United States, please call 978.442.2200.<br />
Worldwide<br />
Support Offices<br />
A S I A / P A C I F I C<br />
Australia/New Zealand<br />
t 0402-794-347<br />
China<br />
t 86 21 2215 2888<br />
f 86 21 6215 2988<br />
India<br />
t 91 124 4604000<br />
f 91 124 4604099<br />
Japan<br />
t 81 3-3586 1996<br />
f 81 3-3586 1291<br />
Korea<br />
t 82 2-796-9500<br />
f 82 2-796-9300<br />
Singapore<br />
t 65 6733-6511<br />
f 65 6861-2913<br />
Taiwan<br />
t 886 2-2716-0338<br />
f 886 2-2516-7500<br />
E U R O P E<br />
France<br />
t 0800 916 882<br />
f 0800 918 636<br />
Germany<br />
t 0800 101 1153<br />
f 0800 101 2427<br />
The Netherlands<br />
t 31 20 655 79 28<br />
f 31 20 659 76 73<br />
United Kingdom<br />
t 0800 376 8660<br />
f 0800 279 1117<br />
All Other European<br />
Countries<br />
t 31 (0) 20 659 60 51<br />
f 31 (0) 20 659 76 73<br />
L AT I N A M E R I C A<br />
Brasil<br />
t (55-11) 3089-7419<br />
f (55-11) 3167-0700<br />
Mexico<br />
t (52-81) 8158-8400<br />
f (52-81) 8313-8589<br />
For a listing of trademarks, visit us at www.corning.com/lifesciences/trademarks.<br />
All other trademarks in this document are the property of their respective owners.<br />
<strong>Corning</strong> <strong>Incorporated</strong>, One Riverfront Plaza, <strong>Corning</strong>, NY 14831-0001 © 2013 <strong>Corning</strong> <strong>Incorporated</strong> Printed<br />
® cellgro ®<br />
The <strong>Corning</strong> Family of Brands<br />
®<br />
®<br />
in U.S.A. 1/13 POD CLS-AN-215