

Colecovision Homebrew kit - Colecovision.eu
Colecovision Homebrew kit - Colecovision.eu
Colecovision Homebrew kit - Colecovision.eu

Create successful ePaper yourself
Turn your PDF publications into a flip-book with our unique Google optimized e-Paper software.
Introduction<br />
<strong>Colecovision</strong> <strong>Homebrew</strong> <strong>kit</strong><br />
Philipp Klaus Krause<br />
October 12, 2006<br />
The <strong>Homebrew</strong> <strong>kit</strong> CV allows homebrew developers to create their own cartridges. One<br />
<strong>kit</strong> contains the materials needed to create two cartridges. The homebrew <strong>kit</strong>s are<br />
available with red and black cartridge cases.<br />
Parts<br />
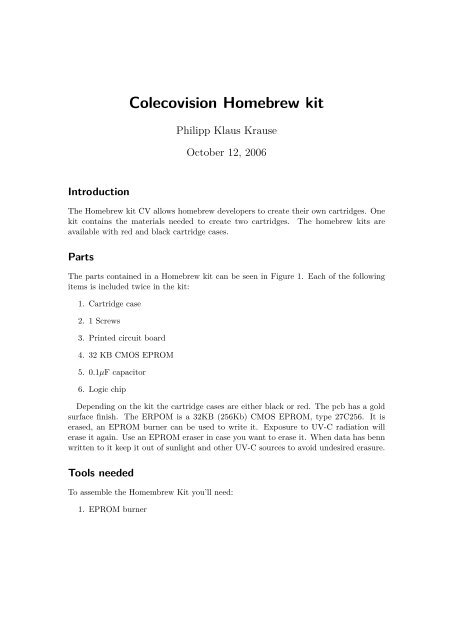
The parts contained in a <strong>Homebrew</strong> <strong>kit</strong> can be seen in Figure 1. Each of the following<br />
items is included twice in the <strong>kit</strong>:<br />
1. Cartridge case<br />
2. 1 Screws<br />
3. Printed circuit board<br />
4. 32 KB CMOS EPROM<br />
5. 0.1µF capacitor<br />
6. Logic chip<br />
Depending on the <strong>kit</strong> the cartridge cases are either black or red. The pcb has a gold<br />
surface finish. The ERPOM is a 32KB (256Kb) CMOS EPROM, type 27C256. It is<br />
erased, an EPROM burner can be used to write it. Exposure to UV-C radiation will<br />
erase it again. Use an EPROM eraser in case you want to erase it. When data has benn<br />
written to it keep it out of sunlight and other UV-C sources to avoid undesired erasure.<br />
Tools needed<br />
To assemble the Homembrew Kit you’ll need:<br />
1. EPROM burner
2. soldering iron and solder<br />
3. screwdriver<br />
Assembling<br />
Figure 1: Contents of a ColecoVision <strong>Homebrew</strong> <strong>kit</strong><br />
Configure your EPROM burner for 27C256 type EPROMS. Use the EPROM burner to<br />
burn a ROM image of your ColecoVision application into the EPROM.<br />
Then solder all the components to the pcb. Starting with the capacitor will make<br />
this a bit easier since it’s the smallest component. Make sure that the EPROM and<br />
logic chip are inserted correctly into the pcb: The correct orientation is printed on the<br />
pcb. Make sure that Markings on the end of the EPROM and logic chip align with the<br />
corresponding marking on the pcb (Figure 2). If the EPROM is not aligned correctly it<br />
will be destroyed when the ColecoVision is switched on (Figure 3).<br />
Separate the two case parts using a razorblade or sharp knive. Place the pcb in the<br />
back half of the case (Figure 4). Put the other half on top and use the screws to hold<br />
them together. Tighten the srews enough to keep the pcb in place when the cartridge is<br />
inserted into a ColecoVision. If you tighten the screws too much it will cause reversible<br />
deformation to the cartridge case; if that happens just untighten the screws a bit.
Figure 2: Correctly aligned EPROM and logic chip
Figure 3: Incorrectly aligned EPROM
Figure 4: Case part with pcb
