Instruction Sheet (PDF Format) - Round 2 Models
Instruction Sheet (PDF Format) - Round 2 Models
Instruction Sheet (PDF Format) - Round 2 Models

Create successful ePaper yourself
Turn your PDF publications into a flip-book with our unique Google optimized e-Paper software.
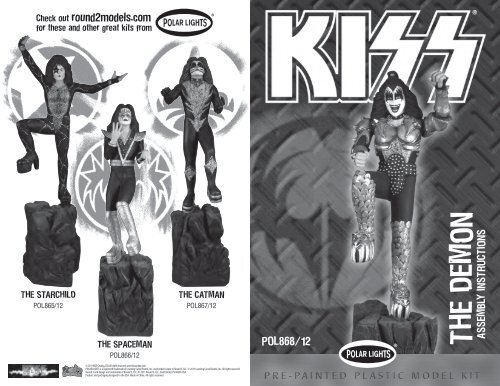
Check out round2models.com<br />
for these and other great kits from<br />
THE STARCHILD<br />
POL865/12<br />
THE SPACEMAN<br />
POL866/12<br />
THE CATMAN<br />
POL867/12<br />
© 2011 KISS Catalog, LTD. All rigths reserved. www kissonline.com<br />
POLAR LIGHTS is a registered trademark of Learning Curve Brands, Inc. used under license to <strong>Round</strong> 2, LLC. © 2011 Learning Curve Brands, Inc. All rights reserved.<br />
<strong>Round</strong> 2 and design are trademarks of <strong>Round</strong> 2, LLC. © 2011 <strong>Round</strong> 2, LLC, South Bend, IN 46628 USA.<br />
Product and packaging designed in the USA. Made in China. All rights reserved.<br />
POL868/12 THE DEMON<br />
ASSEMBLY INSTRUCTIONS
OUTER RIGHT<br />
ARM HALF<br />
RIGHT<br />
HAND<br />
CHESTPLATE<br />
ARMOR<br />
RIGHT ELBOW<br />
ARMOR<br />
RIGHT SIDE<br />
ARMOR<br />
OUTER RIGHT<br />
LEG HALF<br />
INNER RIGHT<br />
ARM HALF<br />
TORSO<br />
FRONT HALF<br />
RIGHT SHOE<br />
DEMONHEAD<br />
BELT/<br />
CODPIECE<br />
HEAD<br />
FRONT HALF<br />
INNER RIGHT<br />
LEG HALF<br />
LEFT SHOE<br />
DEMONHEAD<br />
INNER LEFT<br />
BOOT HALF<br />
LEFT SIDE<br />
ARMOR<br />
OUTER LEFT<br />
BOOT HALF<br />
TOP-KNOT<br />
PONYTAIL<br />
HEAD<br />
BACK HALF<br />
TORSO<br />
BACK HALF<br />
FRONT LEFT<br />
LEG HALF<br />
PRE-PAINTED MODEL KIT<br />
INNER LEFT<br />
ARM HALF<br />
REAR LEFT<br />
LEG HALF<br />
PLATFORM<br />
FRONT<br />
PLATFORM<br />
RIGHT SIDE<br />
LEFT<br />
HAND<br />
LEFT ELBOW<br />
ARMOR<br />
PLATFORM<br />
TOP<br />
OUTER LEFT<br />
ARM HALF<br />
THE DEMON<br />
Model Kit POL868/12<br />
INSTRUCTIONS FOR ASSEMBLING<br />
Before assembling model study sketch carefully<br />
Important–Apply cement to inside surfaces only.<br />
Avoid getting cement on outer surfaces of model<br />
sections Use cement very sparingly and avoid getting<br />
cement on hands so as not to mar or smear plastic<br />
surfaces Do not hurry Work carefully and patiently<br />
Important Note: Before proceeding to cement<br />
parts together it is advisable to fit parts together dry<br />
(without cement) so that you may familiarize yourself<br />
with the parts and how they go together also noting<br />
the points where cement is to be applied For best<br />
results assemble model exactly in the order<br />
indicated<br />
This kit is molded of styrene plastic use only<br />
styrene compatible glues or cements<br />
Assure yourself of a perfect model every time!<br />
PLATFORM BASE<br />
PLATFORM BACK<br />
PLATFORM<br />
LEFT SIDE<br />
ASSEMBLING THE UPPER TORSO<br />
1 Cement the R GHT ARM HALVES together Then<br />
cement R GHT HAND into assembled R GHT ARM<br />
Then cement R GHT ELBOW ARMOR into hole at<br />
elbow Set aside to dry<br />
2 Cement FACE into HA R FRONT HALF Then<br />
cement FACE/HA R FRONT HALF onto HA R<br />
BACK HALF Then cement TOP KNOT PONYTA L<br />
into slot on top of head Set aside to dry<br />
3 Cement LEFT ARM HALVES together<br />
Then cement LEFT HAND into assembled LEFT<br />
ARM Then cement LEFT ELBOW ARMOR into<br />
hole at elbow Set aside to dry<br />
4 Cement CHESTPLATE ARMOR to TORSO FRONT<br />
HALF Then cement TORSO BACK HALF to<br />
FRONT assembly Then cement R GHT S DE<br />
ARMOR and LEFT S DE ARMOR into the locator<br />
holes on the sides of assembled TORSO<br />
5 Cement assembled HEAD onto assembled TORSO<br />
Then cement assembled ARMS to the TORSO<br />
Set aside to dry<br />
ASSEMBLING THE LOWER BODY<br />
6 Cement the LEFT UPPER LEG HALVES together<br />
7 Cement R GHT LEG HALVES together Then<br />
cement R GHT SHOE DEMONHEAD on top of<br />
shoe Then cement LEFT LOWER LEG HALVES<br />
together Then cement LEFT SHOE DEMONHEAD<br />
on top of shoe Cement assembled LEFT LOWER<br />
LEG to assembled LEFT UPPER LEG<br />
Set aside to dry<br />
8 Cement the assembled R GHT LEG to the<br />
assembled LEFT LEG Use the square peg on the<br />
assembled R GHT LEG to achieve a good fit into<br />
the assembled LEFT LEG This will create a flat<br />
surface with a locator peg for the TORSO to be<br />
cemented on<br />
9 After assembling the LEGS and TORSO cement<br />
the BELT/CODP ECE over the LEGS at the waist<br />
The TORSO has a half circle cutout to allow<br />
snug placement of BELT Set aside to dry<br />
ASSEMBLING THE ROCK PLATFORM<br />
10 Cement the PLATFORM LEFT and R GHT S DE<br />
FRONT and to the PLATFORM BASE Each side<br />
has a bottom peg that easily slides between the<br />
twin triangular posts on the BASE<br />
11 Cement PLATFORM TOP onto assembled<br />
PLATFORM and BASE<br />
FINAL ASSEMBLY<br />
12 Cement assembled DEMON F GURE into the<br />
assembled ROCK PLATFORM base