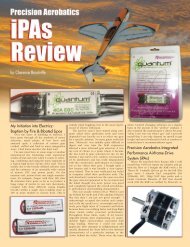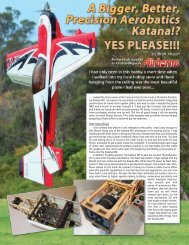
First Impressions - Precision Aerobatics
First Impressions - Precision Aerobatics
First Impressions - Precision Aerobatics

Create successful ePaper yourself
Turn your PDF publications into a flip-book with our unique Google optimized e-Paper software.
There is finally, a hardcore, no-holdsbarred,<br />
ultra light and robust 3D machine<br />
that is neither a foamie nor a profile, fully<br />
capable of precision flight all bundled in a<br />
neat mid-sized, sexy transparent coloured<br />
package and most importantly, capable of<br />
using my existing high capacity Lipo packs.<br />
The holy grail of 3D has finally arrived and<br />
it’s only a matter of deciding which colour<br />
to go first…..”Shrek” Green it shall be…this<br />
time and I shall name it my Hover Ogre!<br />
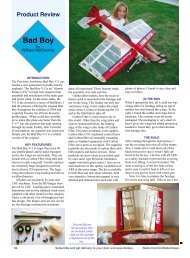
<strong>First</strong> <strong>Impressions</strong><br />
The parcel arrived intact and was quickly<br />
ripped opened to reveal the contents<br />
inside. What immediately caught my eyes<br />
was the beautifully sculptured airframe<br />
structure seen through the yummy transparent<br />
covering as well as the blinking carbon<br />
fibre parts inside the fuselage.<br />
Lifting the individual major components<br />
out of the box, I was totally blown away by<br />
how unbelievably light the airframe felt in<br />
proportion to its size and for a moment my<br />
brain could not comprehend the apparent<br />
disparity between the lightweight feel in my<br />
hands and what my eyes were telling me.<br />
Exceptionally light as it maybe, I was quick<br />
to note how stiff the airframe and wings<br />
were and upon closely peering through<br />
transparent covering revealed the extent<br />
carbon fibre is employed to achieve superior<br />
structural integrity. I thought to myself<br />
this is going to be one robust and survivable<br />
airplane with precision to boot; quite a<br />
rarity among lightweight 3D models which<br />
tend to be either light and fragile or strong<br />
and heavy.<br />
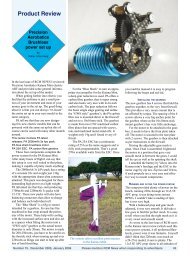
The fuselage features PA FiberFusion<br />
construction spotting CF (carbon fibre)<br />
stingers running the entire length of the<br />
fuselage as well as CF strips and rods
strengthening the cross members, reducing the<br />
likelihood of the fuselage breaking in the event<br />
of the many hard landings that I “plan” to make<br />
while perfecting my rolling harrier landings.<br />
Beneath the fuselage lies the recessed landing<br />
gear mount that is also robustly reinforced with<br />
CF to address another common problem of the<br />
LG ripping out. Many other light weight 3D<br />
models, either glow or electric powered, are<br />
frequently prone to weakness in this area. It<br />
became very apparent to me that the Addiction<br />
is indeed a very tough aeroplane and when it<br />
comes to learning hardcore 3D, especially at<br />
low level. Robustness is paramount to allow the<br />
safest (cost effective to some) way to learn challenging<br />
and risky manoeuvres.<br />
Putting the fuselage aside, the two piece<br />
removable wings were inspected next. The<br />
ailerons were already pre-hinged at the factory<br />
and appeared to be slightly twisted which is<br />
normal for lightweight ailerons of this nature<br />
and the manual specifically addresses how to<br />
untwist them. The ailerons are pre-hinged with<br />
clear transparent heat-shrink covering similar to<br />
the ones on the PA Electric Shock providing<br />
massive amounts of throw. I peered through the<br />
wing tips and saw the ends of three CF rods, i.e.<br />
one at the leading edge and two at where the<br />
spar would usually be, making the wings, inspite<br />
of its exceptionally light weight, very stiff<br />
and equally robust as well.<br />
The touch of quality even extended to the<br />
hardware package itself. All control surface horns<br />
were CNC produced CF making them light, stiff<br />
and slop free meaning crisp controls without sacrificing<br />
weight. The predominant use of CF is still<br />
relatively rare in most balsa models at the current<br />
time. Even some top dollar composite giant<br />
scales still use, at best metal or Phenolic control<br />
horns. The one piece fibreglass cowl was<br />
unpacked and inspected. It had all the major<br />
openings pre-cut saving more build time. This is<br />
certainly welcome especially considering the<br />
potential health risk associated with fibreglass<br />
dust and the only thing that is left to be done is<br />
to drill the four cowl mounting screw holes.<br />
The Build<br />
As most of the Addiction major components<br />
are pre-built at the factory (including the prehinged<br />
ailerons, motor cage with carbon fibre<br />
pre-drilled firewall, one piece canopy/hatch, prehinged<br />
elevator and cowl) there is really not<br />
much effort and time required in the build and<br />
most modellers working at a leisurely pace should<br />
be able to complete the model in two short<br />
evenings without the need for special tools or the<br />
much dreaded task of cleaning up after the build.<br />
Very little glue is required because essentially glue<br />
is only needed for the motor mount, horizontal<br />
stabs, rudder hinges and control horns.<br />
Prior to commencing the build, I religiously<br />
went thorough the manual and I found the pictorial<br />
manual to be very concise, clearly<br />
describing each phase of the build process.<br />
Next came making the required openings in the<br />
fuselage and wing covering using a soldering<br />
iron to facilitate the dry fitting process and some<br />
were already pre-made at the factory.<br />
I started the build in the usual way by first<br />
ironing down the covering to seal the areas where<br />
I need to make openings. The transparent covering<br />
makes it very easy to spot where the openings<br />
need to be easily made with a sharp X-acto blade.<br />
The CF landing gear, along with the lightweight<br />
wheels were then bolted on to the fuselage<br />
to double up as a stable work stand and to<br />
stage the next phase of the build; the alignment<br />
of the horizontal stab referencing the wings for<br />
better precision.<br />
The CF wing tube was inserted along with<br />
both wing halves and the ailerons were taped to<br />
remain in the neutral position and then untwisted<br />
as described in the manual. A slot was then<br />
cut at the rear of the fuselage and the horizontal<br />
stab was then inserted and eyeballed against the<br />
top of the wings. A little sanding was required to<br />
the horizontal stab slots to achieve precise alignment<br />
and the horizontal stab was removed to<br />
have the CA hinges installed. A quick eyeball on<br />
the stab alignment, a quick measurement to both<br />
wing tips to reconfirm the laser cut alignment<br />
holes and a little CA is applied to permanently<br />
bond the stab to the fuselage. Next the slot at the<br />
rear of the fuselage is filled with the supplied<br />
balsa block, trimmed down and then recovered<br />
with supplied transparent covering hiding the<br />
evidence of the minor surgery.<br />
The vertical stab and rudder is then assembled<br />
with CA hinges and the tail wheel installed.<br />
The motor mount is then glued in to the fuselage<br />
with glue, pinned with the supplied CF<br />
pins and clamped in place to allow the glue to<br />
cure over night. It is best to test fit the CF pins<br />
first prior to gluing. Additional wood glue is<br />
also brushed over all the joints of the motor<br />
mount to ensure maximum strength. The<br />
moulded air-scoops are then installed with CA.<br />
Next came preparing the HS65HB servos for<br />
installation. Both elevator and rudder servo<br />
cables were extended by soldering light weight<br />
servo cables and terminated with JR compatible<br />
connectors. The optional CF long servo arms<br />
were then installed on the servos to get the maximum<br />
throws on those huge control surfaces.<br />
The CF control horns were then attached to<br />
all the surfaces and with the servo arms and<br />
control surfaces positioned in neutral, the CF<br />
push rods were assembled to ensure precise<br />
mechanical geometry and to avoid introducing<br />
unwanted differential.<br />
The PA Thrust 20 was then bolted on without<br />
a fuss and followed by the PA Quantum 30<br />
and the cables connected. The JR 610M receiver<br />
was next installed and the antenna cable<br />
carefully routed to avoid any CF components to<br />
ensure maximum radio reliability.<br />
The servos were then centred with the subtrim<br />
and then deflection was checked and adjusted<br />
to ensure a bind free travel on all rates. I was<br />
happy to note the massive amounts of controls<br />
afforded by the linkage geometry promising<br />
excellent control authority especially in the post<br />
stall region of flight. Since the PA Quantum 30 is<br />
already pre-programmed to suit the Thrust 20,<br />
connection was merely a plug and play affair.<br />
As I anticipate that the Addiction will be<br />
flown very hard, I opted to install non-slip<br />
material on the battery Velcro strap and tray to<br />
avoid repeating the hairy experience of landing<br />
with the pack dangling on the side of the fuselage.<br />
A small strip of non-slip is CA’d onto the<br />
strap and CF battery tray in-lieu of attaching a<br />
Velcro strip on the battery.
Once the avionics was complete, the cowl<br />
and prop were installed last and ready for its<br />
maiden flight. The hard part was to wait for the<br />
weekend to arrive.<br />
The Check Ride<br />
Saturday arrived and I rushed to the field<br />
like a bat out of hell. It was gusty and threatening<br />
to rain but I was desperate to check this<br />
baby out, so whatever the weather maybe,<br />
falling short of getting struck by lightning, the<br />
Addiction must absolutely fly. I popped the<br />
Lipo pack in, quickly re-checked the controls<br />
and did a quick and short rolling take off<br />
straight into a hover. The first impression I got<br />
was that the Addiction was extremely easy to<br />
hover and in spite of the gusty conditions, it<br />
happily torque rolled and drifted downwind<br />
and required relatively little control corrections.<br />
The throttle was then advanced to climb out<br />
and check the trims; two clicks up elevator and<br />
two clicks left aileron and she was roughly<br />
trimmed out and I quickly put it into a quick<br />
inverted elevator and popping back into a<br />
hover. The massive aileron throws gave it ample<br />
authority to counteract the torque and adding<br />
more aileron allowed it to roll in reverse with<br />
ease. Despite the large control surface, the<br />
Addiction did not feel twitchy and immediately<br />
switched to rate 3 to get the maximum throws<br />
and 0% expo to maximize its agility and<br />
response. It handled so well even under these<br />
extreme throws that the expo was later<br />
removed out of rate 1 and 2 and all subsequent<br />
flights thereon were only rate 3.<br />
The Addiction was later put into quick set of<br />
rolling harriers and by the time it completed the<br />
second circuit, it started to rain requiring a very<br />
quick emergency landing to scurry off for cover.<br />
After about an hour, the rain stopped and the sun<br />
came out and flights resumed. It was still very<br />
gusty but the Addiction flew nevertheless, and I<br />
had loads of fun until it was too dark to fly.<br />
I made it a point to fly on Sunday morning<br />
to get more stick time on the Addiction and to<br />
put it through its paces for the review and this<br />
time I took notes! It was sunny and windless;<br />
perfect condition for 3D flying. The hovers this<br />
time were spot on and the torque rolls were<br />
almost hands free and very relaxing indeed. The<br />
Addiction felt very friendly and easy to fly. The<br />
vertical stability was exceptional, making this<br />
one of the easiest 3D airplane to hover, torque<br />
roll and hand catch. Despite it size, its predictability<br />
allowed it to be safely hand launched<br />
and caught on demand allowing this airplane to<br />
be flown without the need for a suitable runway<br />
or even a runway for that matter.<br />
Moving on from the “hoverbatics”,(is there<br />
such a word?) the Addiction was taken through<br />
a series of manoeuvres starting with the<br />
‘blender’ into an inverted flatspin. Entry was<br />
easy and it stopped dead when the aileron and<br />
rudder was released into a nice smooth inverted<br />
‘elevator’ continuing on to a slow and stable<br />
‘harrier’. With the lighter pack, climbing flat<br />
spins are easily accomplished and it’s really<br />
awesome to watch it flat spinning whilst stationary<br />
and with a bit more throttle starts to<br />
climb upwards and altitude is controlled by<br />
merely managing the throttle.<br />
Next, the Addiction was flown on full throt-<br />
tle and into an upright snap into an immediate<br />
hover and then smoothly transitioning into a<br />
slow knife edge. It does it effortlessly. The<br />
Addiction performs amazingly slow KE with<br />
very little roll coupling and can completely<br />
come to a dead stop in light winds by varying<br />
the AOA and carefully balancing the aileron<br />
inputs. Inverted snaps were then performed at<br />
high throttle followed by a series of walls. It<br />
performed all those without a hitch.<br />
Taking the Addiction vertical and then executing<br />
a ‘waterfall’ at the apex, it goes into a<br />
nice smooth inverted ‘elevator’. Consecutive<br />
sets of ‘waterfalls’ are performed by merely<br />
ramping up the throttle when the nose is pointing<br />
up and throttling down when it is pointing<br />
down and ample thrust from the motor allows<br />
consecutive ‘waterfalls’ to be safely performed<br />
as low as 3 meters off the deck. Both upright<br />
and inverted ‘elevators’ were stable and can be<br />
performed slowly with smooth transitions to<br />
‘harriers’ or even a spot landing if desired. The<br />
Addiction performs well in both upright and<br />
inverted ‘harriers’ and speed is controlled by<br />
adjusting the AOA and throttle. Steering is easily<br />
accomplished with little rudder input to fly<br />
slow and lazy tight circles without the risk of<br />
dropping the wing as low as you want and even<br />
land. This adds another avenue to the number<br />
of fancy ways to land this bird.<br />
When the lighter PA1800mAh 18-30C 3S<br />
packs were installed, the Addiction performed<br />
beautiful high AOA and smooth rolling harriers<br />
on the stock CG location. Smooth rolling ‘harriers’<br />
can also be replicated with the slightly<br />
heavier PA2200mAh pack located 1/3 its length
aft with the APC 11X4.7SF prop. The Addiction<br />
felt well balanced and the rolling harriers could<br />
be slowed down allowing ample time for any<br />
modeller to “think” the rolling harrier manoeuvre<br />
though as they attempt it for the first time.<br />
The knife edge spins are really out of this<br />
world; slow spins and descending at the speed<br />
slightly faster than a regular ‘elevator’ or ‘parachute’.<br />
All it is requires is just to kick the rudder<br />
at the apex to drop the Addiction sideways and<br />
immediately hold up elevator and a little aileron<br />
correction and apply æ throttle, it goes into a slow<br />
knife edge spin almost pivoting on the wing tips.<br />
With most of my pre-planed manoeuvres<br />
bagged, I spent the later part of the afternoon<br />
just having a little fun with the Addiction over a<br />
patch of tall grass. The excellent control authority<br />
allowed very close in flying to basically<br />
muck around by flying as low as possible to<br />
touch the grass without snagging. It was really<br />
fun and the manoeuvres got lower and lower to<br />
the ground pretty quick.<br />
Conclusion<br />
The Addiction is one of the easiest hardcore<br />
3D airplanes that I have ever flown. It has a rare<br />
mix of excellent attributes ranging from stable,<br />
predictable, reasonably precise to agile and<br />
aggressive, which is an excellent departure from<br />
the run of the mill 3D airplanes and provides versatility<br />
to varying levels of skill sets. It offers considerably<br />
more scope for advanced aerobatic<br />
pilots to mix a multitude of aerobatic manoeuvres<br />
into their existing repertoire while at the same<br />
time it’s stability and predictability provides beginners<br />
with an exceptionally gradual learning curve<br />
to get into the advanced stuff. This is one of the<br />
few airplanes where a modeller is able to quickly<br />
progress at any stage of his skills development.<br />
As for me, I have found the Addiction to be<br />
pure addictive fun and in just two weekends<br />
have already found it to be a valuable advanced<br />
learning tool by allowing me to bag three new<br />
tricks. I would certainly recommend the<br />
Addiction to any modeller, may it be plain vanilla<br />
aerobatics, freestyle, serious hardcore 3D or<br />
just out to have pure unadulterated fun with the<br />
sticks. Whatever it is, I don’t see myself getting<br />
bored with the Addiction and the more I fly the<br />
more addictive it gets. The Addiction ARF and<br />
its power components are available directly<br />
through <strong>Precision</strong> <strong>Aerobatics</strong> at 02-9558 0443 or<br />
<strong>Precision</strong><strong>Aerobatics</strong>.com and through all<br />
good hobby shops.