Cognos 8 Report Studio Creating Multi Query Reports
Cognos 8 Report Studio Creating Multi Query Reports
Cognos 8 Report Studio Creating Multi Query Reports

You also want an ePaper? Increase the reach of your titles
YUMPU automatically turns print PDFs into web optimized ePapers that Google loves.
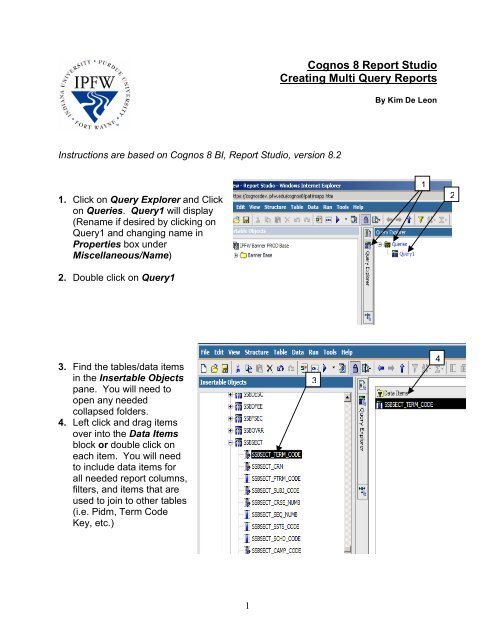
Instructions are based on <strong>Cognos</strong> 8 BI, <strong>Report</strong> <strong>Studio</strong>, version 8.2<br />
1. Click on <strong>Query</strong> Explorer and Click<br />
on Queries. <strong>Query</strong>1 will display<br />
(Rename if desired by clicking on<br />
<strong>Query</strong>1 and changing name in<br />
Properties box under<br />
Miscellaneous/Name)<br />
2. Double click on <strong>Query</strong>1<br />
3. Find the tables/data items<br />
in the Insertable Objects<br />
pane. You will need to<br />
open any needed<br />
collapsed folders.<br />
4. Left click and drag items<br />
over into the Data Items<br />
block or double click on<br />
each item. You will need<br />
to include data items for<br />
all needed report columns,<br />
filters, and items that are<br />
used to join to other tables<br />
(i.e. Pidm, Term Code<br />
Key, etc.)<br />
1<br />
<strong>Cognos</strong> 8 <strong>Report</strong> <strong>Studio</strong><br />
<strong>Creating</strong> <strong>Multi</strong> <strong>Query</strong> <strong>Report</strong>s<br />
3<br />
.<br />
By Kim De Leon<br />
1<br />
.<br />
4<br />
2<br />
.
5. Create filters as needed by<br />
dragging Data Items or<br />
Insertable Objects into<br />
the Detail Filters block.<br />
6. When complete, return to<br />
<strong>Query</strong> Explorer and click<br />
on Queries.<br />
7. Click on <strong>Query</strong> in the Insertable<br />
Objects pane and drag into work area.<br />
<strong>Query</strong>2 will appear. Double click on<br />
<strong>Query</strong>2.<br />
8. Find the tables/data items in<br />
the Insertable Objects pane.<br />
You will need to open any<br />
needed collapsed folders.<br />
9. Left click and drag items over<br />
into the Data Items block or<br />
double click on each item.<br />
You will need to include data<br />
items for all needed report<br />
columns, filters, and items<br />
that are used to join to other<br />
tables (i.e. Pidm, Term Code<br />
Key, etc.) Repeat Step 5<br />
above to create filters.<br />
10. When complete, return to<br />
<strong>Query</strong> Explorer and click on<br />
Queries<br />
2<br />
6<br />
7<br />
.<br />
8<br />
.<br />
5<br />
10<br />
.<br />
9<br />
9<br />
.
11. Click on Join in the Insertable<br />
Objects pane and drag into the<br />
work area. <strong>Query</strong>3 will appear<br />
with two empty boxes.<br />
12. Drag <strong>Query</strong>1 into the top empty<br />
box connected to the Join. This<br />
creates a shortcut replica of<br />
<strong>Query</strong>1.<br />
13. Drag <strong>Query</strong>2 into the bottom<br />
empty box connected to the Join.<br />
This creates a shortcut replica of<br />
<strong>Query</strong>2.<br />
14. Double Click on <strong>Query</strong>3.<br />
15. In the Insertable Objects pane,<br />
click on Join and drag list over to<br />
the Data Items block. This brings<br />
over data fields now combined in<br />
both <strong>Query</strong>1 and <strong>Query</strong>2.<br />
3<br />
11<br />
15<br />
12<br />
13<br />
14
16. Return to <strong>Query</strong> Explorer and<br />
double click on Queries.<br />
17. Double click on the yellow Join<br />
object next to <strong>Query</strong>3.<br />
18. In the new box that opens, click New<br />
Link to create joins between<br />
columns. Click matching data fields<br />
from each side. Click New Link for<br />
any additional joins needed.<br />
19. Check cardinality for each link<br />
created.<br />
4<br />
16<br />
17<br />
19<br />
5:<br />
00<br />
18
20. Repeat steps to add additional tables/views using<br />
this structure.<br />
21. Click on Page Explorer and Page 1 under<br />
<strong>Report</strong> Pages.<br />
22. Click on the report object to<br />
highlight (usually a list or<br />
crosstab report).<br />
23. Click the up arrow on the<br />
Properties pane and click on<br />
List.<br />
24. Under Data then <strong>Query</strong>, all<br />
created queries should be<br />
listed.<br />
5<br />
23<br />
5:<br />
00<br />
24<br />
5:<br />
00<br />
22<br />
5:<br />
00
25. Click on the column then click on the<br />
down arrow. Click on <strong>Query</strong>3 or the last<br />
joined query. (This will force the report<br />
to use the “joined” query data.)<br />
26. At the bottom of the Insertable Objects<br />
pane, click on the middle tab. Scroll<br />
down until <strong>Query</strong>3 data is viewable. The<br />
data columns will have red and yellow<br />
lightening bolts across the icons<br />
indicating they are joined data<br />
columns.<br />
27. Drag or double click the data<br />
column items from <strong>Query</strong>3 ONLY<br />
onto the report. Finish building<br />
report as needed.<br />
6<br />
26<br />
5:<br />
00<br />
27<br />
5:<br />
00<br />
25<br />
5:<br />
00
HINTS:<br />
• This document is structured with the standard <strong>Cognos</strong> query naming convention of<br />
<strong>Query</strong>1, <strong>Query</strong>2, etc. Renaming the queries is recommended! Using Banner<br />
table names is suggested for easy recognition.<br />
- Click on the <strong>Query</strong> in the <strong>Query</strong> Explorer and change the name in the<br />
Properties pane under Miscellaneous then Name.<br />
• <strong>Creating</strong> Filters – Filters should be built in the query where the data column<br />
originally resides. This will optimize the queries processing. However, joined data<br />
can be filtered as needed.<br />
• Changing Auto Group & Summarize - Changing this field to ‘No’ for each query<br />
and join query (except the final one) may need to be done. If it is set to ‘No’, detail<br />
rows will be rendered. Leaving it set to ‘Yes’ can cause inconsistent aggregations<br />
and incorrect data results.<br />
- Click on <strong>Query</strong> in the <strong>Query</strong> Explorer. In the Properties pane under<br />
Data and Auto Group & Summarize, click on the field with ’Yes’ then<br />
click on the drop down arrow and click “No’.<br />
• Check Aggregation Types on Insertable Objects – When bringing over<br />
Insertable Objects into the Data Items block, watch for aggregation icons on<br />
each column. With OLTP data this can be a problem with PIDM_Key and Age<br />
columns in the Object Access views.<br />
- Click on the Data Item and change the Aggregate Function in the<br />
Properties pane, usually to None or Automatic.<br />
-<br />
• Need for Data Items from Insertable Objects – When building queries and<br />
deciding which Data Items you’ll need, consider three things:<br />
- Is it a column needed on the final report?<br />
- Is it a column needed for future joins to other queries (like PIDM or Term)?<br />
- Is it needed for a filter?<br />
• Tabular Data Check – As you build the multi queries, check each query and each<br />
query join by running the report In View Tabular within <strong>Report</strong> <strong>Studio</strong>. (Data<br />
output will appear very much like the Results section in Brio). This will aid in<br />
finding data errors, filter problems, and join issues as you create the multi queries.<br />
• IPFW publishes a secured Banner instance for this method of query creation. It is<br />
not intended to be a replacement for FrameWork Manager modeling. This method<br />
is best used to join small numbers of tables or views together for ad-hoc reporting<br />
by advanced report authors. FrameWork Manager models have pre-defined<br />
relationships and need to be considered when multiple reports are needed for<br />
similar or repetitive reporting needs from OLTP.<br />
7