
You also want an ePaper? Increase the reach of your titles
YUMPU automatically turns print PDFs into web optimized ePapers that Google loves.
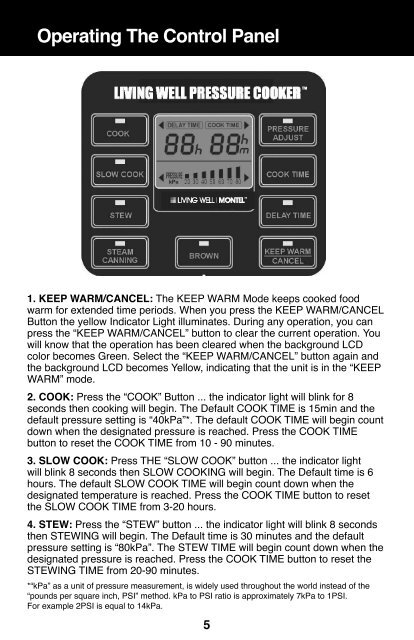
Operating the Control panel<br />
1. KEEp WarM/CanCEL: The KEEP WARM Mode keeps cooked food<br />
warm for extended time periods. When you press the KEEP WARM/CANCEL<br />
Button the yellow Indicator Light illuminates. During any operation, you can<br />
press the “KEEP WARM/CANCEL” button to clear the current operation. You<br />
will know that the operation has been cleared when the background LCD<br />
color becomes Green. Select the “KEEP WARM/CANCEL” button again and<br />
the background LCD becomes Yellow, indicating that the unit is in the “KEEP<br />
WARM” mode.<br />
2. COOK: Press the “COOK” Button ... the indicator light will blink for 8<br />
seconds then cooking will begin. The Default COOK TIME is 15min and the<br />
default pressure setting is “40kPa”*. The default COOK TIME will begin count<br />
down when the designated pressure is reached. Press the COOK TIME<br />
button to reset the COOK TIME from 10 - 90 minutes.<br />
3. SLOW COOK: Press THE “SLOW COOK” button ... the indicator light<br />
will blink 8 seconds then SLOW COOKING will begin. The Default time is 6<br />
hours. The default SLOW COOK TIME will begin count down when the<br />
designated temperature is reached. Press the COOK TIME button to reset<br />
the SLOW COOK TIME from 3-20 hours.<br />
4. StEW: Press the “STEW” button ... the indicator light will blink 8 seconds<br />
then STEWING will begin. The Default time is 30 minutes and the default<br />
pressure setting is “80kPa”. The STEW TIME will begin count down when the<br />
designated pressure is reached. Press the COOK TIME button to reset the<br />
STEWING TIME from 20-90 minutes.<br />
*“kPa” as a unit of pressure measurement, is widely used throughout the world instead of the<br />
“pounds per square inch, PSI” method. kPa to PSI ratio is approximately 7kPa to 1PSI.<br />
For example 2PSI is equal to 14kPa.<br />
5<br />
Operating the Control panel (continued)<br />
5. StEaM /CannInG: Press the “STEAM/CANING” button, the indicator<br />
light will blink 8 seconds then the process will begin. The Default time<br />
is 30min. The cooker will count down when proper temperature is reached.<br />
Press the COOK TIME button to reset the STEAM TIME from 10-90min.<br />
6. BrOWn: Press the “BROWN” button, the indicator light will blink 8<br />
seconds then “BROWNING” will begin. The Default time is 30min. The cooker<br />
will count down when proper temperature is reached. Press the COOK TIME<br />
button to reset the BROWN TIME from 10-90min.<br />
7. prESSUrE aDJUSt: When the “PRESSURE ADJUST” button is selected,<br />
the indicator light will blink 8 seconds then pressure will begin to build.<br />
The Default time and pressure setting is 15 minutes at 40kPa. To increase or<br />
decrease pressure, reselect the Pressure Adjust Button until the desired setting<br />
appears on the Control Panel readout. - from 20kPa-80kPa.<br />
8. COOK tIME: Press “COOK TIME” button to set the desired cooking time.<br />
9. DELaY tIME: This feature can only be activated when selected within 8<br />
seconds after another cooking process has been programmed. Selecting the<br />
“DELAY TIME” button gives you the option of delaying the cooking process<br />
by 4-12 hours.<br />
Built In Safety Features<br />
1. Lid Safety Device: Prevents pressure build-up if lid is not closed<br />
properly and prevents lid from opening until all pressure is released.<br />
2. pressure and temperature Sensor Controls: Maintain even heat<br />
and pressure by automatically activating or deactivating the power<br />
supply.<br />
3. “Back-up” Safety release Valve: Should the Temperature/Pressure<br />
Sensor device malfunction, causing pressure to build beyond<br />
maximum setting, the “Back-Up” will automatically “kick in” and<br />
release the built up pressure.<br />
4. “Clog resistant” Feature: Prevents food from blocking the steam<br />
release port.<br />
5. “Spring Loaded” Safety pressure release: Should all safety<br />
features listed above fail, this “spring-loaded” device located beneath<br />
the heating element will automatically lower the inner pot, causing it to<br />
separate automatically from the Rubber Gasket (fig. 3, page 8). This<br />
will enable the steam and pressure to automatically escape around<br />
the pot lid, avoiding a dangerous situation.<br />
6. temperature “Cut-Off” Device: Should the unit malfunction and<br />
cause the internal temperature to rise beyond the “Safe” limit, this<br />
device will cut-off the power supply and will not automatically reset.<br />
6