Rickard's Stillwater Nymph
Rickard's Stillwater Nymph
Rickard's Stillwater Nymph

You also want an ePaper? Increase the reach of your titles
YUMPU automatically turns print PDFs into web optimized ePapers that Google loves.
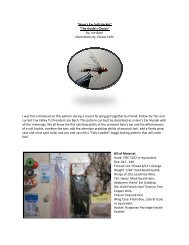
“Rickard’s <strong>Stillwater</strong> <strong>Nymph</strong>”<br />
By: Duane Velie<br />
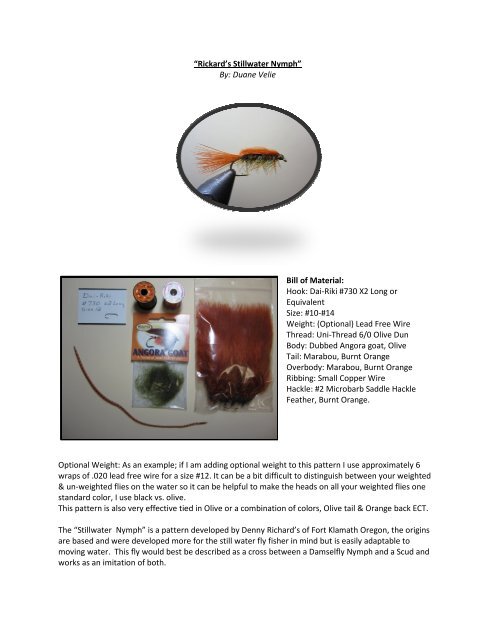
Bill of Material:<br />
Hook: Dai-Riki Riki #730 X2 Long or<br />
Equivalent<br />
Size: #10-#14<br />
Weight: (Optional) Lead Free Wire<br />
Thread: Uni-Thread Thread 6/0 Olive Dun<br />
Body: Dubbed Angora goat, goat Olive<br />
Tail: Marabou, Burnt Orange<br />
Overbody: Marabou, Burnt Orange<br />
Ribbing: Small Copper Wire<br />
Hackle: #2 Microbarb Saddle Hackle<br />
Feather, Burnt Orange.<br />
Optional Weight: As an example; if I am adding optional weight to this pattern I use approximately 6<br />
wraps of .020 lead free wire for a size # #12. 2. It can be a bit difficult to distinguish between your weighted<br />
& un-weighted weighted flies on the water so it can be helpful to make the heads on all your weighted flies one<br />
standard color, I use black vs. olive.<br />
This pattern is also very effective tied in Ol Olive ive or a combination of colors, Olive tail & Orange back ECT.<br />
The “<strong>Stillwater</strong> <strong>Nymph</strong>” is a pattern developed by Denny Richard’s of Fort Klamath Oregon, the origins<br />
are based and were developed more for the still water fly fisher in mind but is easily adap adaptable adap to<br />
moving water. This fly would best be described as a cross between a Damselfly <strong>Nymph</strong> and a Scud and<br />
works as an imitation of both.
Step 1: Start thread on hook shank and run to<br />
starting point above hook barb.<br />
Step 2: Tie in a length of Marabou to form the tail,<br />
secure with wraps of thread.<br />
Step 3: Fold forward section of marabou back over<br />
the tail and again secure with a few tight wraps of<br />
thread. This will be used to form the back or over<br />
body a few steps from now.
Step 4: Tie in a length of copper wire and secure,<br />
next tie in saddle hackle feather tip first and secure<br />
with thread, trim tags. (You don’t want to tie in the<br />
hackle feather Palmered Style as this will cause the<br />
fly to want to spin when retrieved)<br />
Step 5: Form a Dubbing Loop then run thread to<br />
slightly behind hook eye leaving room for over<br />
body tie in and a small thread head, secure thread<br />
with a half hitch. Insert the Angora goat hair and<br />
spin to shape.<br />
Step 6: Wrap formed dubbing loop forward to form<br />
the body and secure with a few tight wraps of<br />
thread.<br />
*A rotary vise makes quick work of this step*
Step 7: Trim dubbing loop tag. Wrap copper wire<br />
forward to form the ribbing, secure with a few tight<br />
wraps of thread. *After the ribbing is complete is a<br />
perfect time to use your bodkin to pick out some<br />
additional Angora goat fibers to fill in the body a bit<br />
if needed*.<br />
Step 8: Trim wire tag. Wrap hackle feather forward<br />
3 to 4 turns and secure with a few tight wraps of<br />
thread.<br />
Step 9: Trim hackle feather tag. Pull marabou that<br />
was tied over tail in step #3 over the top of the<br />
body and secure with a few tight wraps of thread.
Step 10: Trim marabou/over body tag. Form a neat<br />
thread head and whip finish.<br />
Step 11: Trim hackle barbules and the long Angora<br />
goat dubbing fibers from the sides of the fly. Trim<br />
any overly long dubbing fibers from underside of<br />
the fly for appearance if desired.<br />
Step 12: Apply Head cement.<br />
(Completed Fly!)