

Your Free Paper Plate Airplane - Hobbies R 4 U
Your Free Paper Plate Airplane - Hobbies R 4 U
Your Free Paper Plate Airplane - Hobbies R 4 U

You also want an ePaper? Increase the reach of your titles
YUMPU automatically turns print PDFs into web optimized ePapers that Google loves.
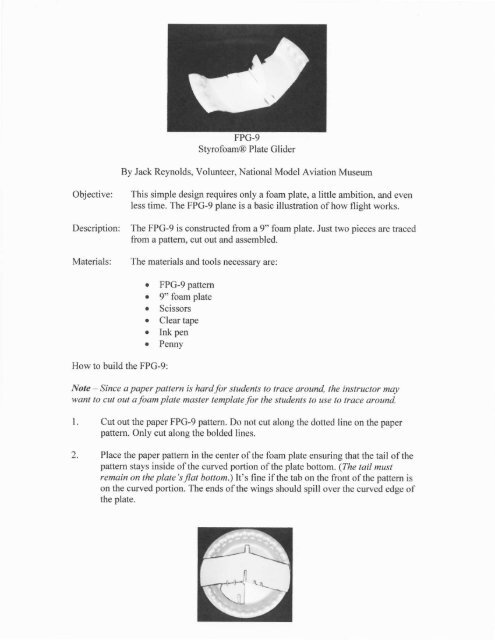
FPG-9<br />
Styrofoam@ <strong>Plate</strong> Glider<br />
By Jack Reynolds, Volunteer, National Model Aviation Museum<br />
Objective: This simple design requires only a foam plate, a little ambition, and even<br />
less time. The FPG-9 plane is a basic illustration of how flight works.<br />
Description: The FPG-9 is constructed from a 9" foam plate. Just two pieces are traced<br />
from a pattem, cut out and assembled.<br />
Materials: The materials and tools necessary are:<br />
How to build the FPG-9:<br />
o FPG-9 pattem<br />
o 9" foam plate<br />
r Scissors<br />
r Clear tape<br />
o Ink pen<br />
. penny<br />
Note - Since a paper pattern is hard for students to trace around, the instructor may<br />
want to cut out afoam plate master template for the students to use to trace around-<br />
l. Cut out the paper FPG-9 pattem. Do not cut along the dotted line on the paper<br />
pattem. Only cut along the bolded lines.<br />
2. Place the paper pattem in the center ofthe foam plate ensuring that the tail ofthe<br />
pattem stays inside ofthe curved portion ofthe plate bottom. (The tail must<br />
remain on the plate'sflat bottom.)lt's fine if the tab on the front of the pattem is<br />
on the curved portion. The ends ofthe wings should spill over the curved edge of<br />
the plate.<br />
7_\<br />
: -)L<br />
-./--"
3. Trace around the pattem with an ink pen. Don't forget to mark the scissor slits A<br />
and B.<br />
5.<br />
7.<br />
9.<br />
10.<br />
11.<br />
12.<br />
13.<br />
Cut the foam template out by following the pen lines you just drew.<br />
Once the instructor has completed the master foam template, the students may use<br />
the template to create their FPG-9 planes.<br />
Have the students place the foam template in the center ofthe plate and trace<br />
around the template making sure to mark all of the lines.<br />
When tracing slits A and B the students only need to make one line. These lines<br />
will create the elevons and nrdder.<br />
Have the students cut out the FPG-9 they just traced by following the pen lines.<br />
Important Note - At this time cut along the dotted line to sepqrate the tail from<br />
the wing of the FPG-9. It worl
Scisrrlr<br />
slirs<br />
(A)<br />
\_<br />
scllisor -/-<br />
il- . r.<br />
Slits tB) \=<br />
,<br />
-l -<br />
a<br />
t<br />
-j-<br />
:<br />
-/l<br />
_--<br />
FPG-9 Pattern<br />
By Jack Reynolds<br />
\\ irl lh rr l rlll<br />
is tle ttt'ruinrd<br />
lrr thirktrt.rr<br />
rll lo'tttt Pl'tlc'